FORD THUNDERBIRD 2002 11.G Workshop Manual
Manufacturer: FORD, Model Year: 2002, Model line: THUNDERBIRD, Model: FORD THUNDERBIRD 2002 11.GPages: 248, PDF Size: 2.1 MB
Page 51 of 248
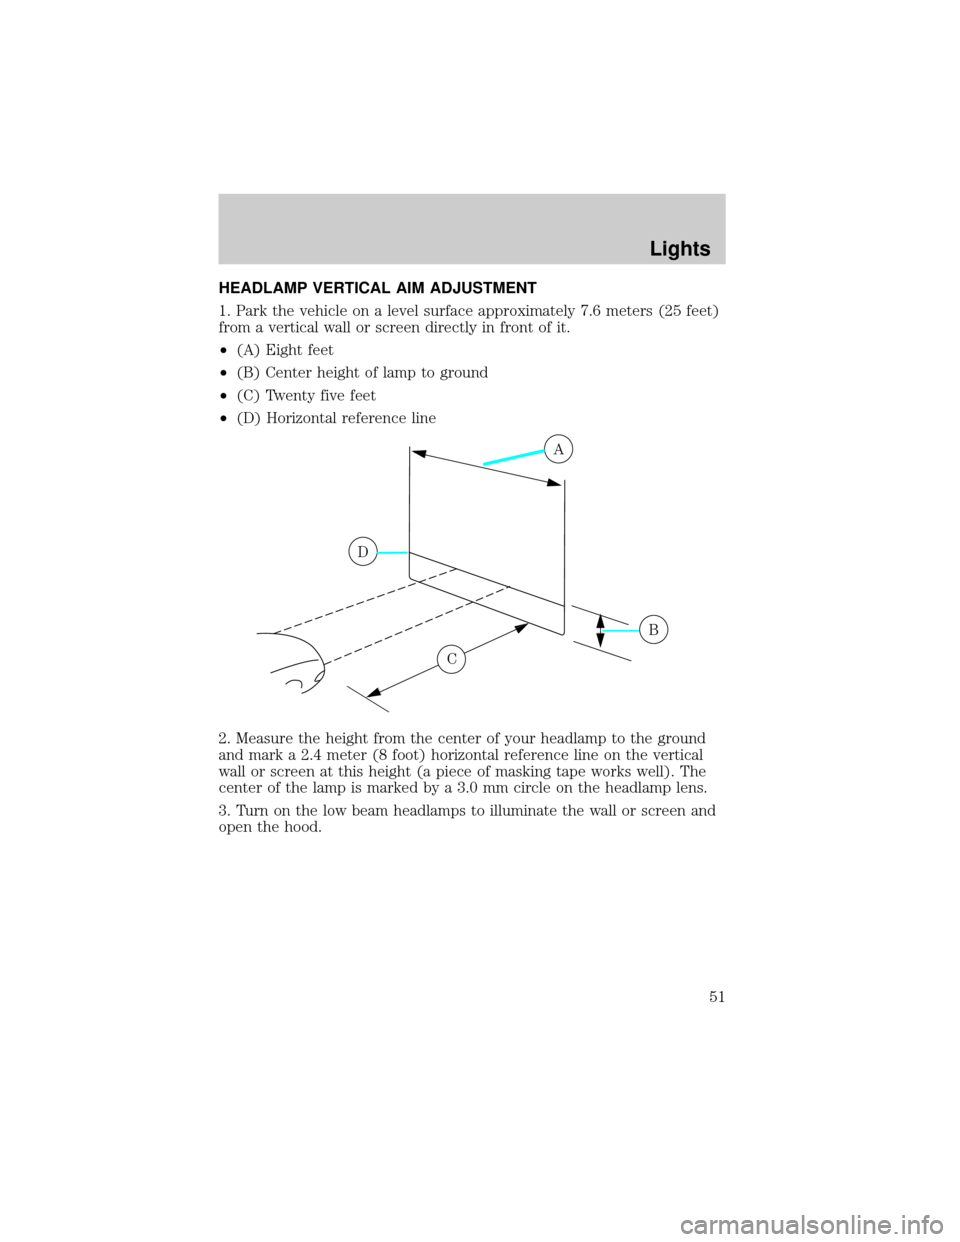
HEADLAMP VERTICAL AIM ADJUSTMENT
1. Park the vehicle on a level surface approximately 7.6 meters (25 feet)
from a vertical wall or screen directly in front of it.
²(A) Eight feet
²(B) Center height of lamp to ground
²(C) Twenty five feet
²(D) Horizontal reference line
2. Measure the height from the center of your headlamp to the ground
and mark a 2.4 meter (8 foot) horizontal reference line on the vertical
wall or screen at this height (a piece of masking tape works well). The
center of the lamp is marked by a 3.0 mm circle on the headlamp lens.
3. Turn on the low beam headlamps to illuminate the wall or screen and
open the hood.
A
D
B
C
Lights
51
Page 52 of 248
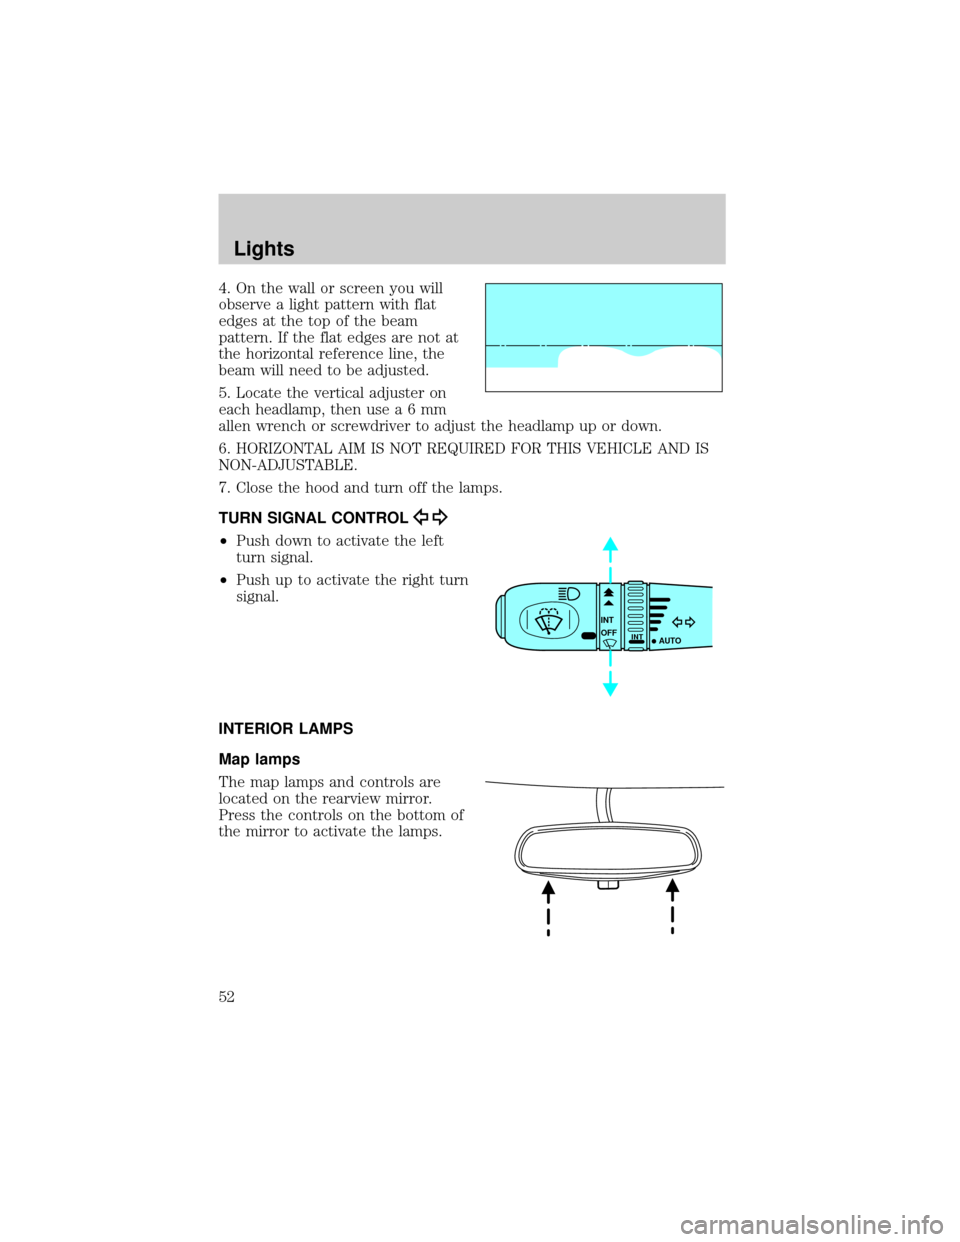
4. On the wall or screen you will
observe a light pattern with flat
edges at the top of the beam
pattern. If the flat edges are not at
the horizontal reference line, the
beam will need to be adjusted.
5. Locate the vertical adjuster on
each headlamp, then usea6mm
allen wrench or screwdriver to adjust the headlamp up or down.
6. HORIZONTAL AIM IS NOT REQUIRED FOR THIS VEHICLE AND IS
NON-ADJUSTABLE.
7. Close the hood and turn off the lamps.
TURN SIGNAL CONTROL
²Push down to activate the left
turn signal.
²Push up to activate the right turn
signal.
INTERIOR LAMPS
Map lamps
The map lamps and controls are
located on the rearview mirror.
Press the controls on the bottom of
the mirror to activate the lamps.
INT
INTOFF
AUTO
Lights
52
Page 53 of 248
BULBS
Replacing exterior bulbs
Check the operation of the following lamps frequently:
²Headlamps
²Tail lamps
²Brakelamps
²High-mount brakelamp
²Turn signals
²Supplemental parking lamps
²Front/rear side marker lamps
²Backup lamps
²License plate lamp
Do not remove lamp bulbs unless they will be replaced immediately. If a
bulb is removed for an extended period of time, contaminants may enter
the lamp housings and affect performance.
Using the right bulbs
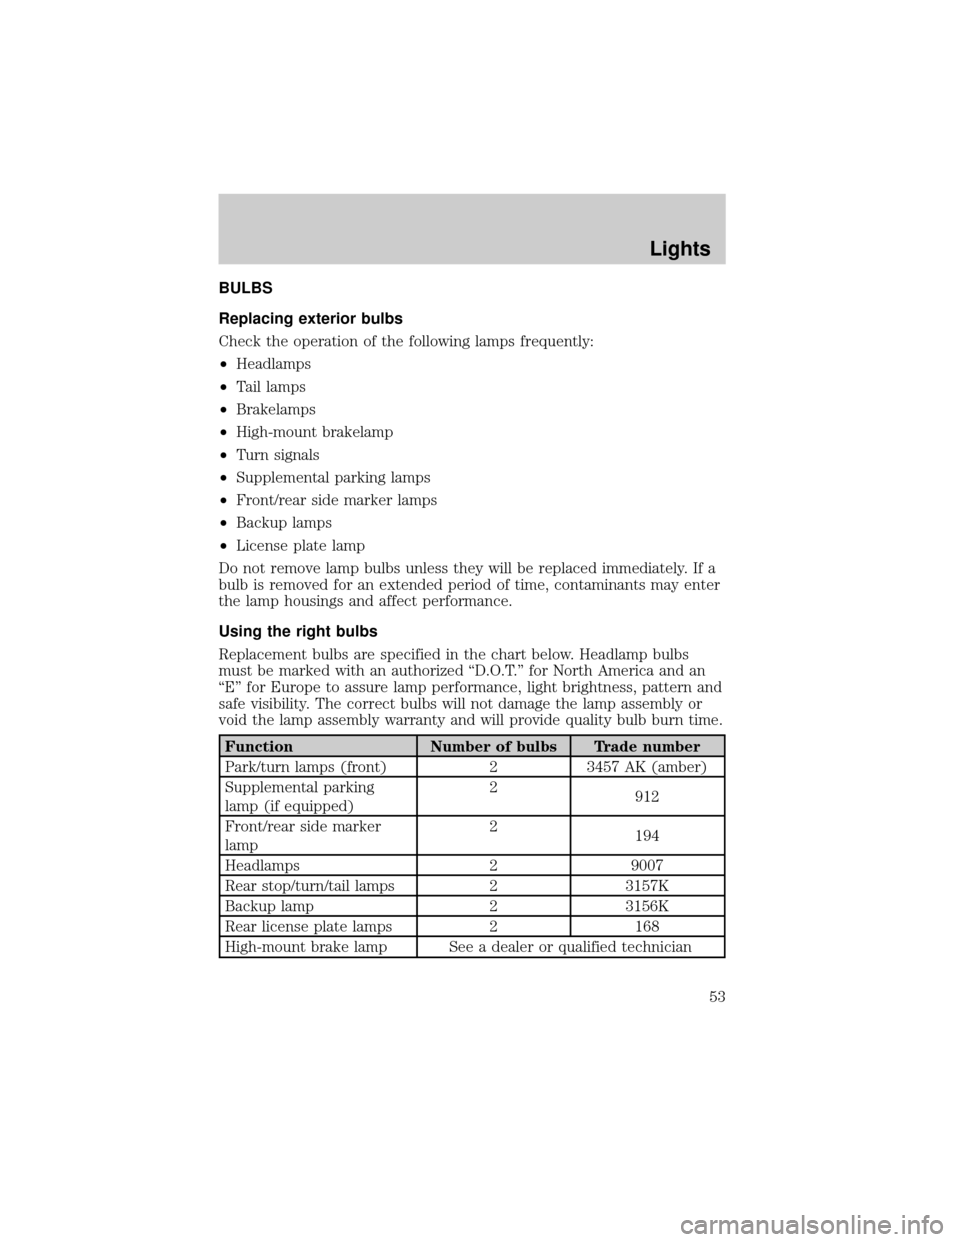
Replacement bulbs are specified in the chart below. Headlamp bulbs
must be marked with an authorized ªD.O.T.º for North America and an
ªEº for Europe to assure lamp performance, light brightness, pattern and
safe visibility. The correct bulbs will not damage the lamp assembly or
void the lamp assembly warranty and will provide quality bulb burn time.
Function Number of bulbs Trade number
Park/turn lamps (front) 2 3457 AK (amber)
Supplemental parking
lamp (if equipped)2
912
Front/rear side marker
lamp2
194
Headlamps 2 9007
Rear stop/turn/tail lamps 2 3157K
Backup lamp 2 3156K
Rear license plate lamps 2 168
High-mount brake lamp See a dealer or qualified technician
Lights
53
Page 54 of 248
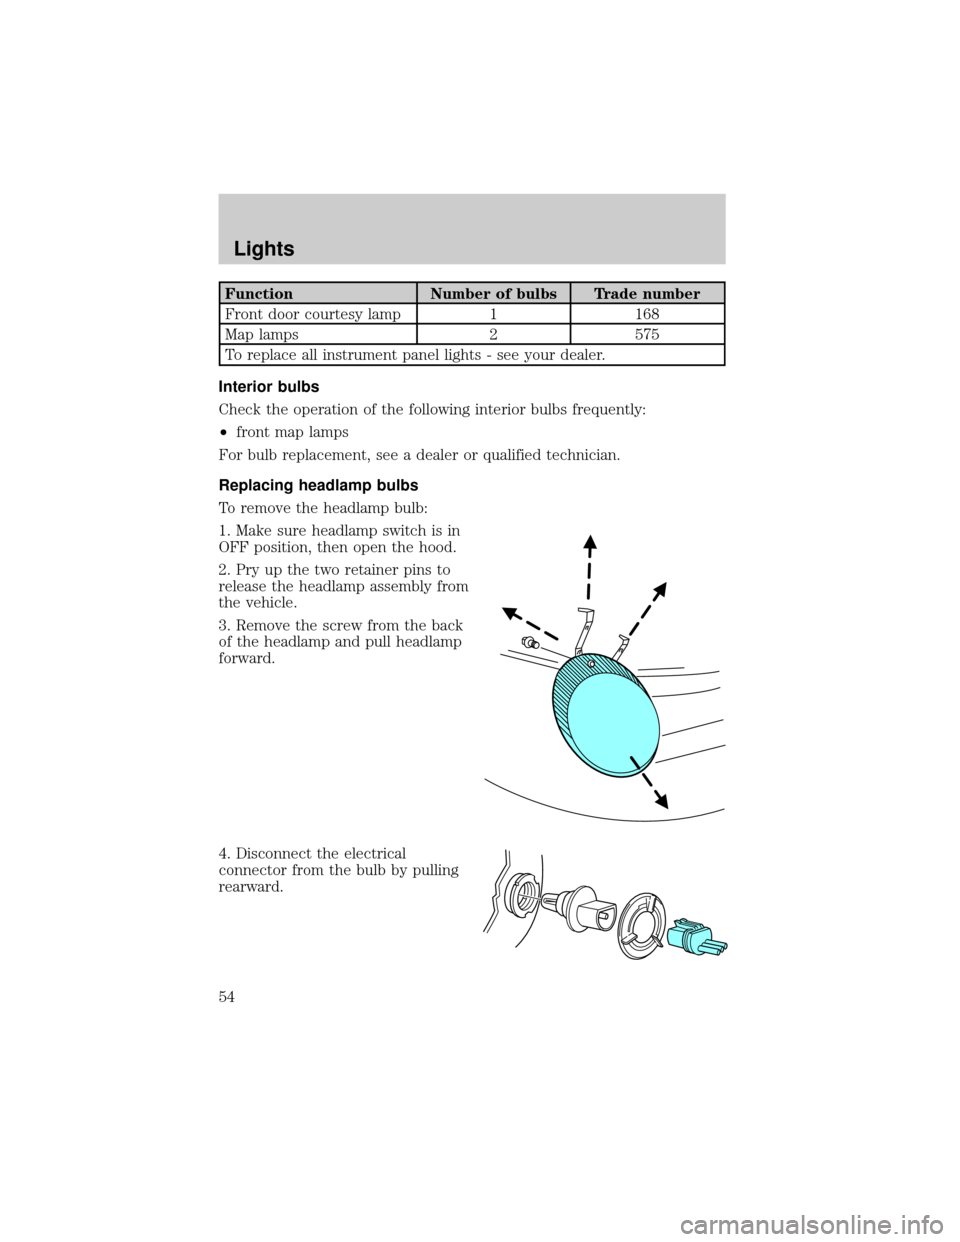
Function Number of bulbs Trade number
Front door courtesy lamp 1 168
Map lamps 2 575
To replace all instrument panel lights - see your dealer.
Interior bulbs
Check the operation of the following interior bulbs frequently:
²front map lamps
For bulb replacement, see a dealer or qualified technician.
Replacing headlamp bulbs
To remove the headlamp bulb:
1. Make sure headlamp switch is in
OFF position, then open the hood.
2. Pry up the two retainer pins to
release the headlamp assembly from
the vehicle.
3. Remove the screw from the back
of the headlamp and pull headlamp
forward.
4. Disconnect the electrical
connector from the bulb by pulling
rearward.
Lights
54
Page 55 of 248
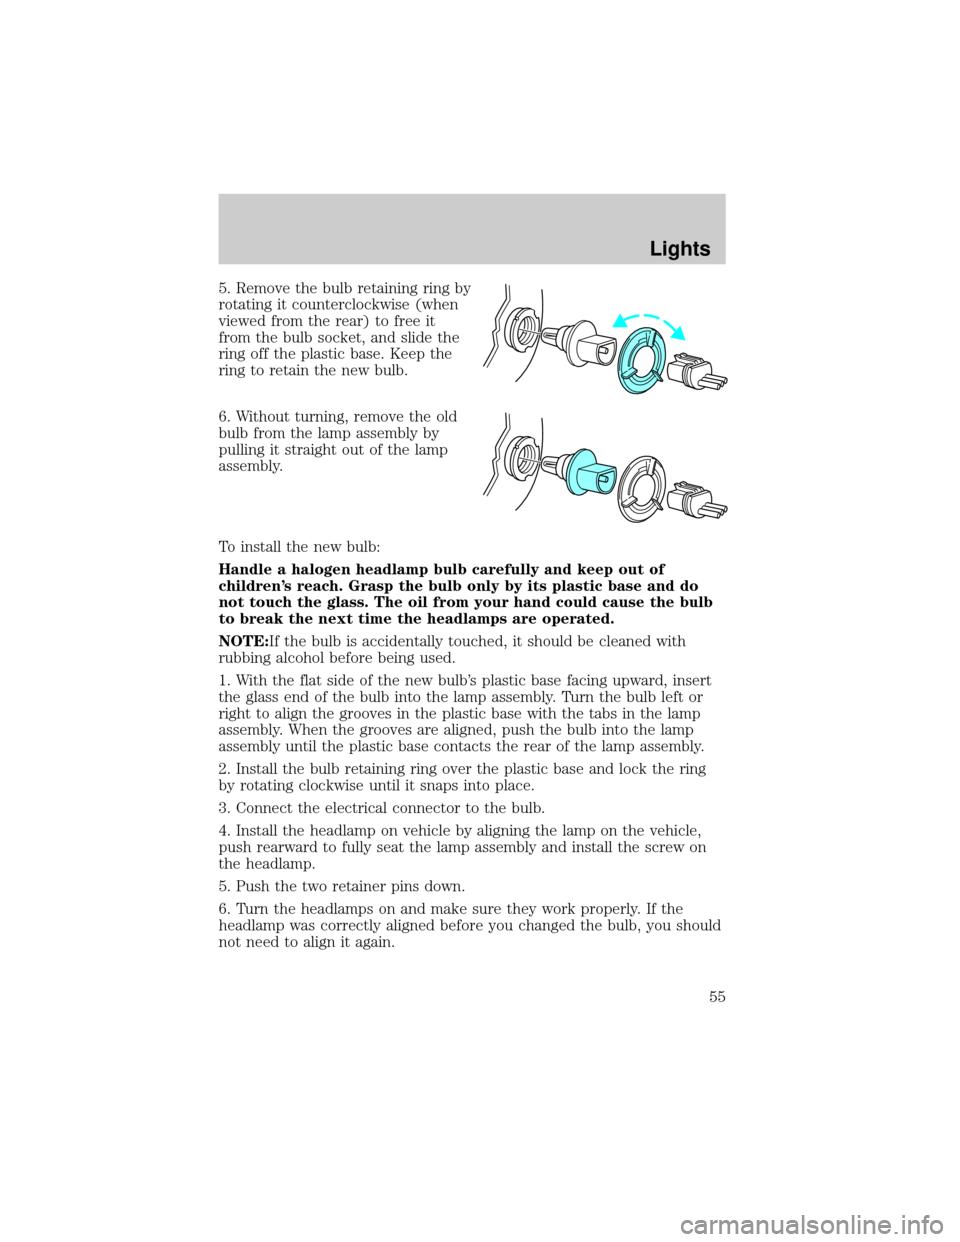
5. Remove the bulb retaining ring by
rotating it counterclockwise (when
viewed from the rear) to free it
from the bulb socket, and slide the
ring off the plastic base. Keep the
ring to retain the new bulb.
6. Without turning, remove the old
bulb from the lamp assembly by
pulling it straight out of the lamp
assembly.
To install the new bulb:
Handle a halogen headlamp bulb carefully and keep out of
children's reach. Grasp the bulb only by its plastic base and do
not touch the glass. The oil from your hand could cause the bulb
to break the next time the headlamps are operated.
NOTE:If the bulb is accidentally touched, it should be cleaned with
rubbing alcohol before being used.
1. With the flat side of the new bulb's plastic base facing upward, insert
the glass end of the bulb into the lamp assembly. Turn the bulb left or
right to align the grooves in the plastic base with the tabs in the lamp
assembly. When the grooves are aligned, push the bulb into the lamp
assembly until the plastic base contacts the rear of the lamp assembly.
2. Install the bulb retaining ring over the plastic base and lock the ring
by rotating clockwise until it snaps into place.
3. Connect the electrical connector to the bulb.
4. Install the headlamp on vehicle by aligning the lamp on the vehicle,
push rearward to fully seat the lamp assembly and install the screw on
the headlamp.
5. Push the two retainer pins down.
6. Turn the headlamps on and make sure they work properly. If the
headlamp was correctly aligned before you changed the bulb, you should
not need to align it again.
Lights
55
Page 56 of 248
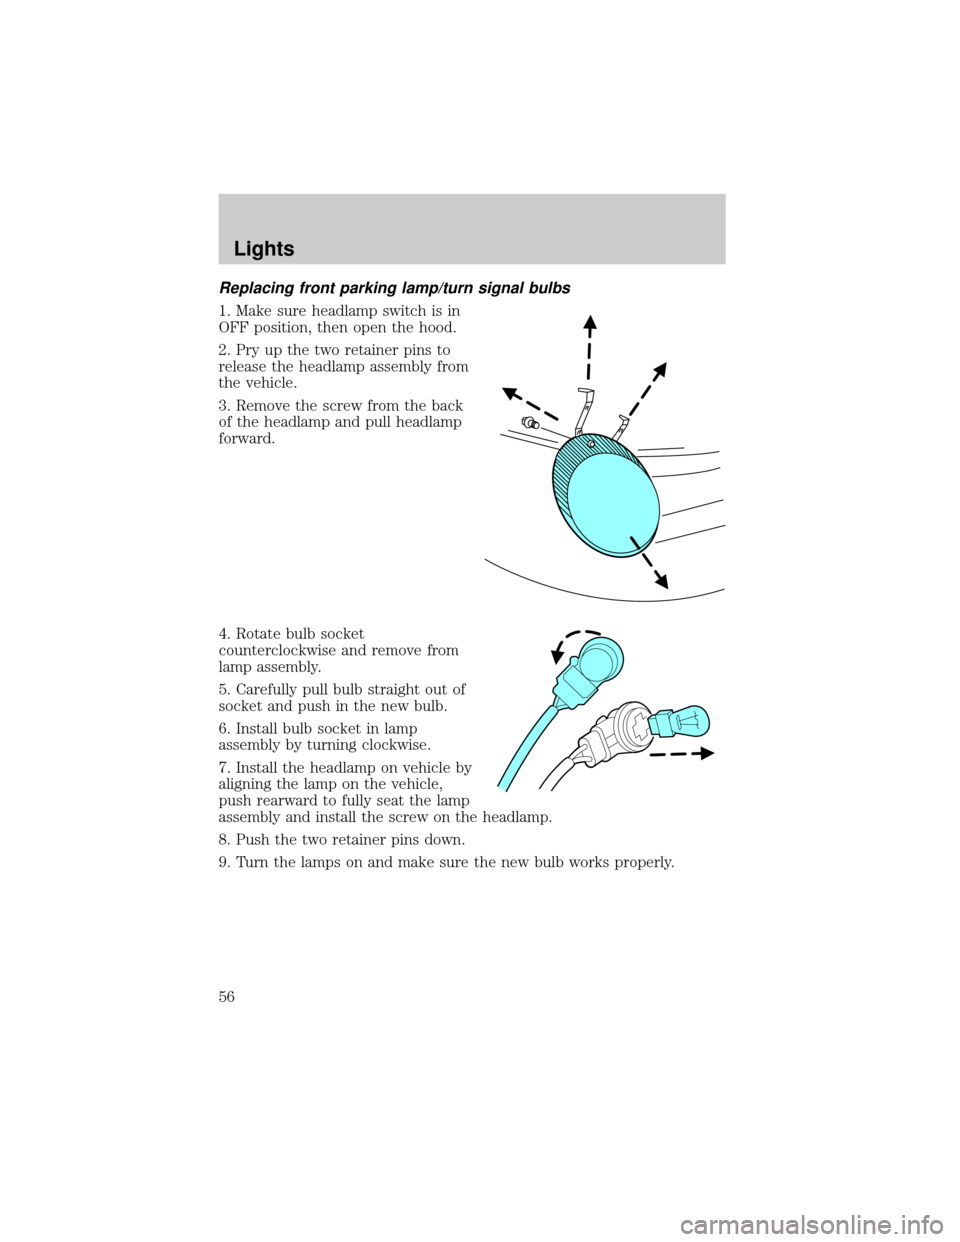
Replacing front parking lamp/turn signal bulbs
1. Make sure headlamp switch is in
OFF position, then open the hood.
2. Pry up the two retainer pins to
release the headlamp assembly from
the vehicle.
3. Remove the screw from the back
of the headlamp and pull headlamp
forward.
4. Rotate bulb socket
counterclockwise and remove from
lamp assembly.
5. Carefully pull bulb straight out of
socket and push in the new bulb.
6. Install bulb socket in lamp
assembly by turning clockwise.
7. Install the headlamp on vehicle by
aligning the lamp on the vehicle,
push rearward to fully seat the lamp
assembly and install the screw on the headlamp.
8. Push the two retainer pins down.
9. Turn the lamps on and make sure the new bulb works properly.
Lights
56
Page 57 of 248
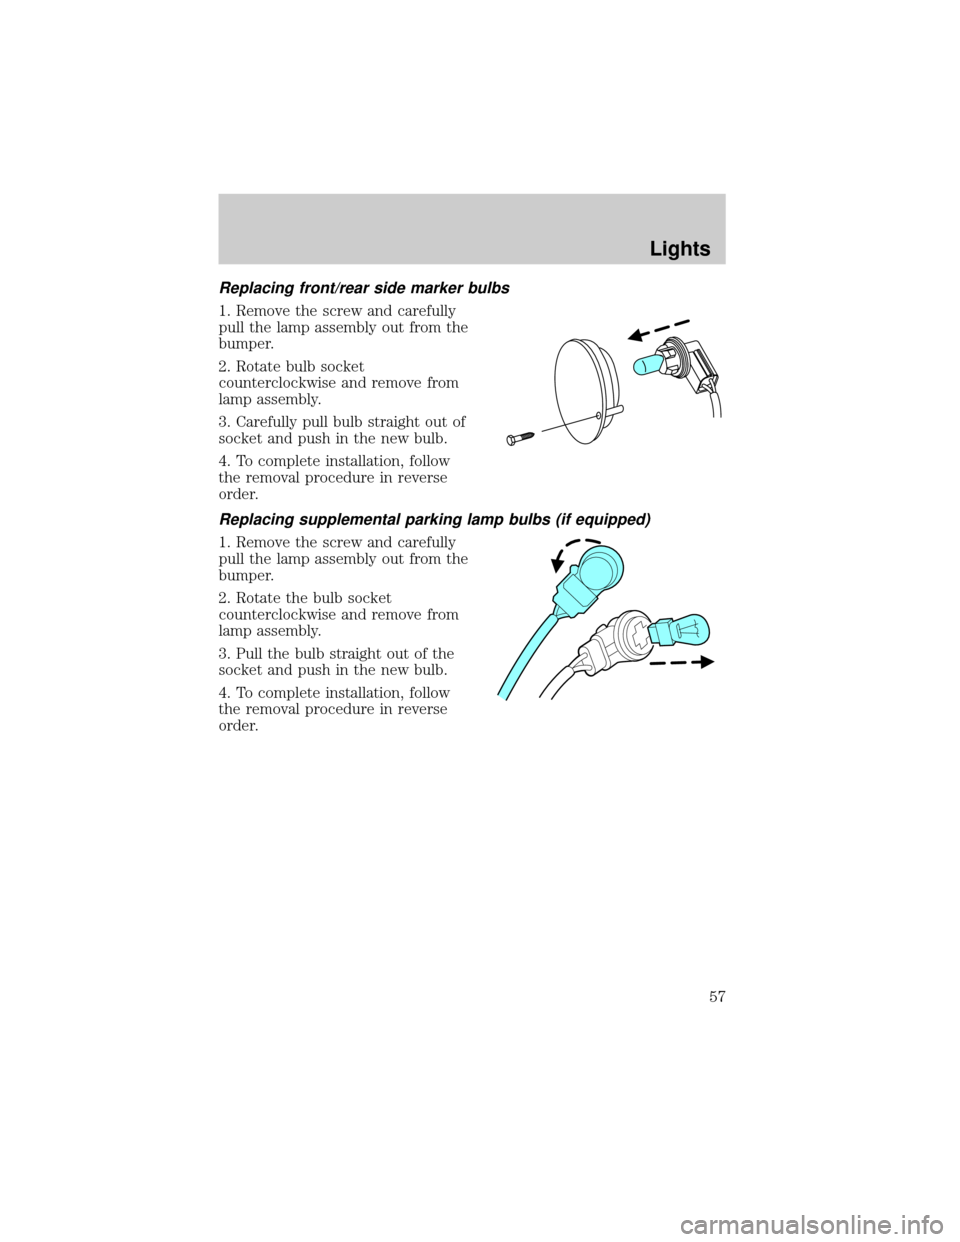
Replacing front/rear side marker bulbs
1. Remove the screw and carefully
pull the lamp assembly out from the
bumper.
2. Rotate bulb socket
counterclockwise and remove from
lamp assembly.
3. Carefully pull bulb straight out of
socket and push in the new bulb.
4. To complete installation, follow
the removal procedure in reverse
order.
Replacing supplemental parking lamp bulbs (if equipped)
1. Remove the screw and carefully
pull the lamp assembly out from the
bumper.
2. Rotate the bulb socket
counterclockwise and remove from
lamp assembly.
3. Pull the bulb straight out of the
socket and push in the new bulb.
4. To complete installation, follow
the removal procedure in reverse
order.
Lights
57
Page 58 of 248
Replacing tail/brake/turn/backup lamp bulbs
The tail/brake//turn/backup bulbs are located in the tail lamp assembly,
one just below the other. Follow the same steps to replace either bulb:
Prior to pulling the carpet away, in
step 1, the trunk trim scuff plate
must be removed. This can be
accomplished by pulling gently on
the component until the 6 push pins
along the rear of the trunk release.
The part can be placed aside and
the carpet pulled away. To replace
the piece, re-align the pins and push
into place.
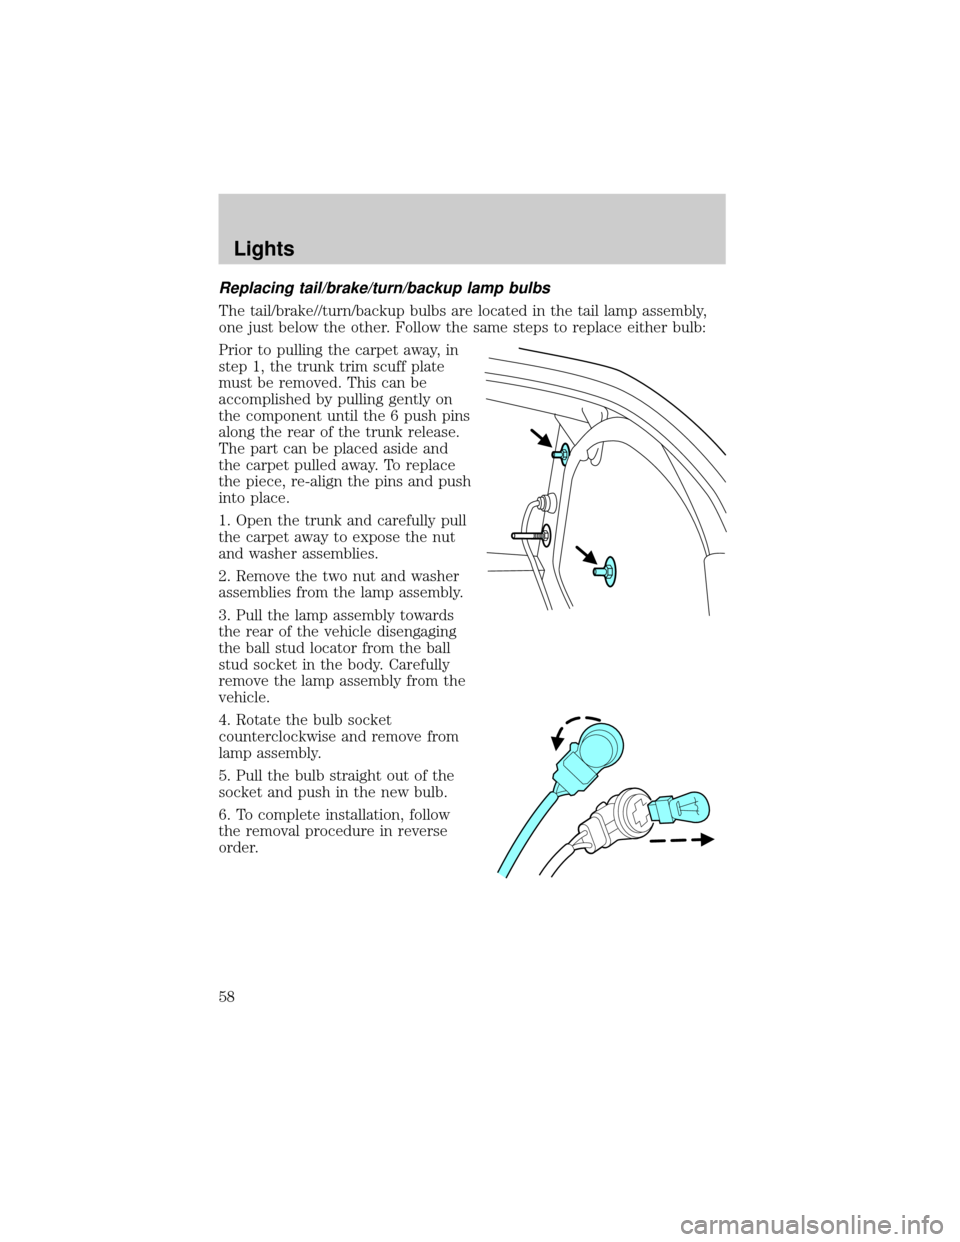
1. Open the trunk and carefully pull
the carpet away to expose the nut
and washer assemblies.
2. Remove the two nut and washer
assemblies from the lamp assembly.
3. Pull the lamp assembly towards
the rear of the vehicle disengaging
the ball stud locator from the ball
stud socket in the body. Carefully
remove the lamp assembly from the
vehicle.
4. Rotate the bulb socket
counterclockwise and remove from
lamp assembly.
5. Pull the bulb straight out of the
socket and push in the new bulb.
6. To complete installation, follow
the removal procedure in reverse
order.
Lights
58
Page 59 of 248
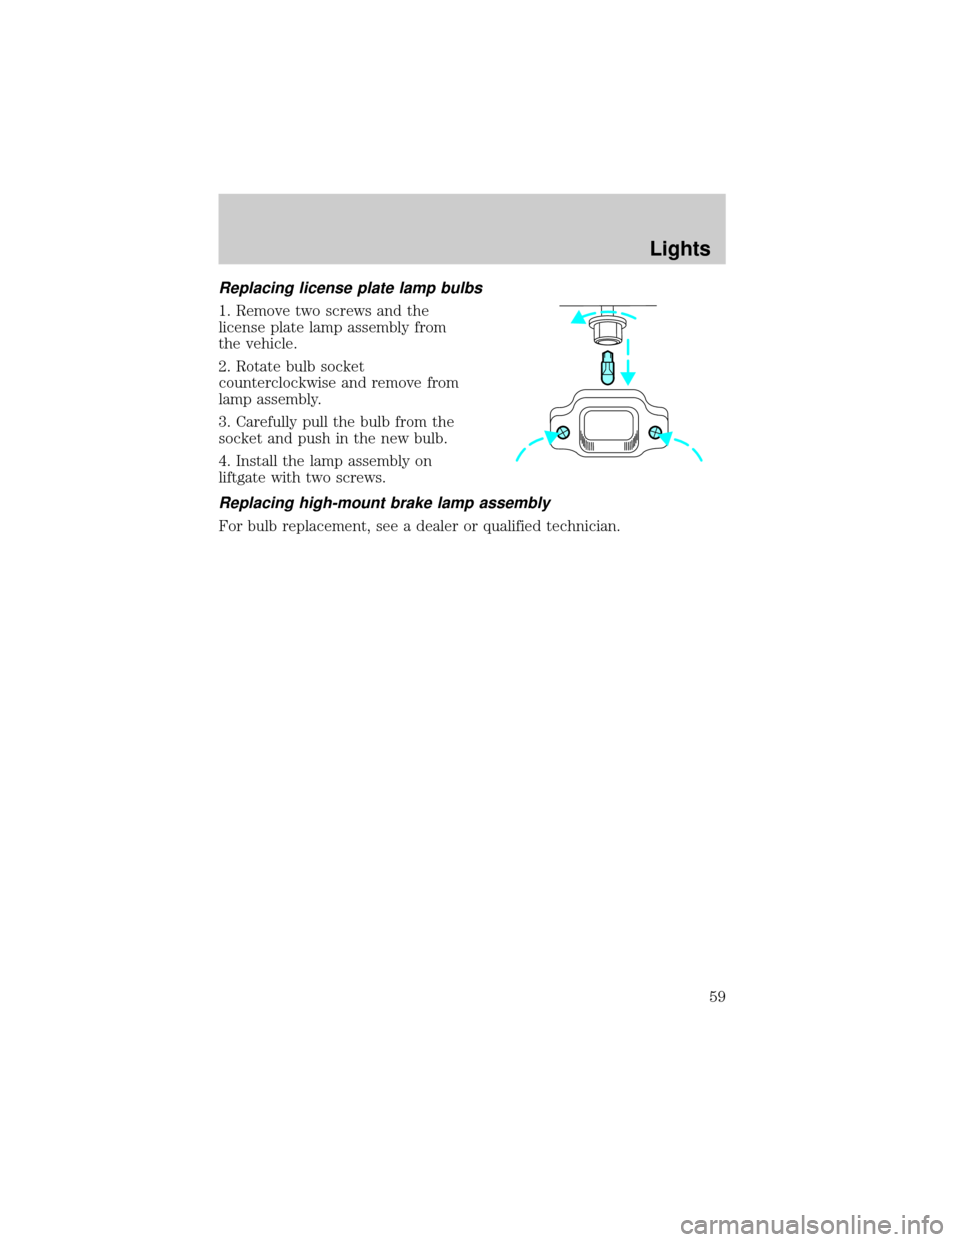
Replacing license plate lamp bulbs
1. Remove two screws and the
license plate lamp assembly from
the vehicle.
2. Rotate bulb socket
counterclockwise and remove from
lamp assembly.
3. Carefully pull the bulb from the
socket and push in the new bulb.
4. Install the lamp assembly on
liftgate with two screws.
Replacing high-mount brake lamp assembly
For bulb replacement, see a dealer or qualified technician.
Lights
59
Page 60 of 248
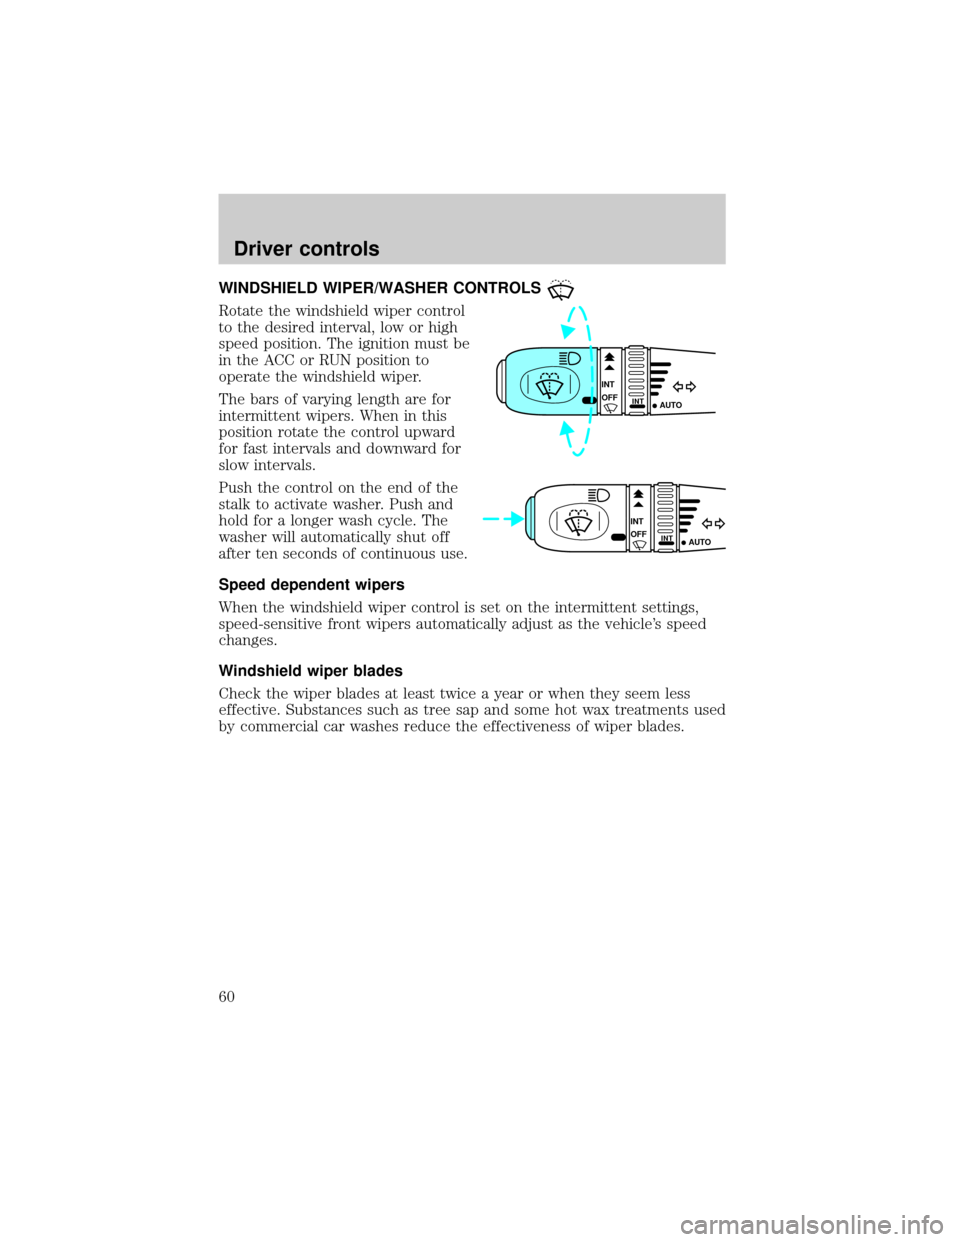
WINDSHIELD WIPER/WASHER CONTROLS
Rotate the windshield wiper control
to the desired interval, low or high
speed position. The ignition must be
in the ACC or RUN position to
operate the windshield wiper.
The bars of varying length are for
intermittent wipers. When in this
position rotate the control upward
for fast intervals and downward for
slow intervals.
Push the control on the end of the
stalk to activate washer. Push and
hold for a longer wash cycle. The
washer will automatically shut off
after ten seconds of continuous use.
Speed dependent wipers
When the windshield wiper control is set on the intermittent settings,
speed-sensitive front wipers automatically adjust as the vehicle's speed
changes.
Windshield wiper blades
Check the wiper blades at least twice a year or when they seem less
effective. Substances such as tree sap and some hot wax treatments used
by commercial car washes reduce the effectiveness of wiper blades.
INT
INTOFF
AUTO
INT
INTOFF
AUTO
Driver controls
60