trailer FORD TRANSIT 2015 5.G Owners Manual
[x] Cancel search | Manufacturer: FORD, Model Year: 2015, Model line: TRANSIT, Model: FORD TRANSIT 2015 5.GPages: 461, PDF Size: 5.82 MB
Page 6 of 461
Hints on Driving With Anti-Lock
Brakes............................................................137
Parking Brake.................................................138
Traction Control
Principle of Operation.................................139
Using Traction Control................................139
Stability Control
Principle of Operation..................................141
Using Stability Control................................142
Parking Aids
Principle of Operation.................................143
P
arking Aid......................................................143
Rear View Camera.......................................144
Cruise Control
Principle of Operation.................................147
Using C
ruise Control....................................147
Driving Aids
Speed Limiter
................................................149
Driver Alert
......................................................149
Lane Keeping System
.................................150
Load Carrying
Load Retaining Fixtures..............................153
Load Limit........................................................153
Towing
Towing a Trailer..............................................161
Trailer Sway Control....................................162
Recommended Towing Weights............162
Essential Towing Checks...........................164
Transporting the Vehicle............................170
T
owing the Vehicle on Four Wheels........171
Driving Hints
Br
eaking-In......................................................173 R
educed Engine Performance.................173
Ec
onomical Driving.......................................173
Cold Weather Precautions........................174
Driving Through Water................................174
Fl
oor Mats........................................................174
R
oadside Emergencies
Roadside Assistance
...................................176
Hazard Warning Flashers...........................177
Fuel Shutoff.....................................................177
Jump Starting the Vehicle.........................178
P
ost-Crash Alert System...........................180
C
ustomer Assistance
Getting the Services You Need.................181
In California (U.S. Only).............................182
The Better Business Bureau (BBB) Auto Line Program (U.S. Only)......................183
Utilizing the Mediation/Arbitration Program (Canada Only)........................183
Getting Assistance Outside the U.S. and Canada.........................................................184
Ordering Additional Owner's Literature.....................................................185
Reporting Safety Defects (U.S. Only).............................................................185
Reporting Safety Defects (Canada Only).............................................................186
Fuses
Fus
e Box Locations......................................187
Fuse Specification Chart...........................188
Changing a Fuse
...........................................198
Maintenance
General Information..................................200
Opening and Closing the Hood.............200
Under Hood Overview - 3.5L....................201
Under Hood Ov
erview - 3.7L...................202
Under Hood Overview - 3.2L Power Stroke Diesel.............................................203
3 Transit (TTH) Canada/United States of America, enUSA, Edition date: 03/2014 Table of Contents
Page 77 of 461
If the needle enters the red section, the
engine is overheating. Stop your vehicle as
soon as it is safe to do so and switch the
engine off. Determine the cause once the
engine has cooled down. See Engine
Coolant Check (page 206).
Note: Do not restart the engine until the
cause of overheating has been determined
and resolved.
Tripmeter Reset and Distance to
Empty
(If Equipped)
Press the button to change between the
tripmeter and distance to empty
information. Press and hold the button to
reset the tripmeter.
Fuel Gauge
Note: The fuel gauge may vary slightly
when your vehicle is moving or on a gradient.
Switch the ignition on. The fuel gauge will
indicate approximately how much fuel is
in the fuel tank. The arrow adjacent to the
fuel pump symbol indicates on which side
of your vehicle the fuel filler door is located. The needle should move toward F when
you refuel your vehicle. If the needle points
to E after adding fuel, this indicates your
vehicle needs service soon.
After refueling some variability in needle
position is normal:
•
It may take a short time for the needle
to reach F after leaving the gas station.
This is normal and depends upon the
slope of pavement at the gas station.
• The fuel amount dispensed into the
tank is a little less or more than the
gauge indicated. This is normal and
depends upon the slope of pavement
at the gas station.
• If the gas station nozzle shuts off
before the tank is full, try a different
gas pump nozzle.
Low Fuel Reminder
A low fuel reminder triggers when the fuel
gauge needle is at 1/16th.
Variations: Distance-to-empty
Fuel gauge position
Driving type (fuel economy
conditions)
35 miles to 80 miles (56 kmto 129 km)
1/16th
Highway driving
35 miles (56km)
1/16th
Severe duty driving (trailer
towing, extended idle)
74Transit (TTH) Canada/United States of America, enUSA, Edition date: 03/2014 Instrument Cluster
Page 83 of 461
Message
Average Fuel
All values
1 See Trip Computer (page 82). See Gauges (page 73).
Information Message
Driver Alert
DEF level
Engine Hours
Idle:
Engine Hours
Running:
Trailer Brake
Gain:
System check
Settings Action
Message
Off
Driver Alert
Driver Assist
Electric
Trailer Brake
Elec.-Hydraulic
Sensitivity
Lane Keeping
Intensity
Manual or xx Seconds
Hdlamp Delay
Lighting
Choose your applicable
setting
Rain Light
Choose your applicable
setting
Language
Display
80Transit (TTH) Canada/United States of America, enUSA, Edition date: 03/2014 Information Displays
Page 115 of 461
FUEL QUALITY - GASOLINE
Note:
Use of any fuel other than
recommended fuel can cause powertrain
damage, impair the emission control system
or cause loss of vehicle performance. Any
damage to vehicle that is caused by use of
fuel not recommended will not be covered
under warranty.
Choosing the Right Fuel Without
a Flex Fuel Vehicle (If Equipped)
Use only UNLEADED gasoline or
UNLEADED gasoline blended with a
maximum of 85% ethanol (E-85) in your
Flex Fuel Vehicle (FFV). If your vehicle is
flex fuel capable, the fuel fill inlet will have
a yellow housing.
Do not use:
• Fuel containing more than 15% ethanol
or E-85 fuel.
• Fuel with methanol.
• Fuels containing metallic based
additives, including manganese-based
compounds.
• Fuels containing the octane booster
additive, methylcyclopentadienyl
manganese tricarbonyl (MMT)
• Leaded fuel (The use of leaded fuel is
prohibited by law).
Choosing the Right Fuel With a
Flex Fuel Vehicle (If Equipped)
Use only UNLEADED gasoline or
UNLEADED gasoline blended with a
maximum of 85% ethanol (E-85) in your
Flex Fuel Vehicle (FFV). If your vehicle is
flex fuel capable, it will have a yellow bezel
placed over the fuel fill inlet.
Do not use:
• Fuels containing more than 85%
ethanol or E-100 fuel.
• Fuel with methanol. •
Fuels containing metallic based
additives, including manganese-based
compounds.
• Fuels containing the octane booster
additive, methylcyclopentadienyl
manganese tricarbonyl (MMT)
• Leaded fuel (The use of leaded fuel is
prohibited by law).
Octane Recommendations Do not be concerned if your engine
sometimes knocks lightly. However, if it
knocks heavily under most driving
conditions while you are using fuel with the
recommended octane rating, see your
authorized dealer to prevent any engine
damage.
3.5L V6 EcoBoost
We recommend regular unleaded gasoline
with a pump (R+M)/2 octane rating of 87.
Some stations offer fuels posted as regular
with an octane rating below 87, particularly
in high altitude areas. We do not
recommend fuels with an octane rating
below 87. To provide improved
performance, we recommend premium
fuel for severe duty usage, such as trailer
tow.
112 Transit (TTH) Canada/United States of America, enUSA, Edition date: 03/2014 Fuel and RefuelingE161513
Page 122 of 461
6. Remove the spout from the diesel
exhaust fluid container and replace the
cap.
Note: If there is diesel exhaust fluid left in
the container retain it for later use. The
spout is re-useable. Wash the spout with
clean water prior to storage. Do not use the
diesel exhaust fluid spout with any other
fluid.
Filling the Diesel Exhaust Fluid Tank in
Cold Climates
Diesel exhaust fluid may freeze if the
ambient temperature is below 12°F (-11°C).
Your vehicle has a preheating system
which allows diesel exhaust fluid to
operate below 12°F (-11°C). If you do not
use your vehicle for an extended period
when the ambient temperature is below
12°F (-11°C)
, the fluid in the tank may
freeze. If the tank is overfilled and the fluid
freezes it may damage the tank. This is not
covered by the vehicle warranty.
Contaminated Diesel Exhaust
Fluid or Inoperative Selective
Catalytic Reduction System If the system becomes
contaminated or inoperative, the
diesel exhaust fluid warning
lamp will illuminate and a message will
appear in the information display.
Continued driving without replacing the
fluid or not having the system repaired will
result in:
• Vehicle speed being limited. Prior to
this occurring a message will appear in
the information display.
• Further vehicle operation without
replacing contaminated diesel exhaust
fluid will cause the engine to run at idle
speed. Note:
If the vehicle speed becomes limited
or the engine will only run at idle speed,
normal vehicle operation will not resume
until you have the system repaired. To
service a contaminated or inoperative
system, see an authorized dealer.
Note: You must add a minimum of 3.2 qt
(3 L) for your vehicle to exit the run at idle
speed mode.
Diesel Exhaust Fluid Guidelines
• Do not put diesel exhaust fluid in the
vehicle fuel tank.
• Do not overfill the diesel exhaust fluid
tank.
• Do not dilute diesel exhaust fluid with
water or any other liquid.
• Do not re-use a diesel exhaust fluid
container.
• Do not store in direct sunlight.
• Store at temperatures between 23°F
(-5°C) and 68°F (20°C).
• Do not store a diesel exhaust fluid
container in your vehicle.
• Diesel exhaust fluid is non-flammable,
non-toxic, colorless and water-soluble.
Approximate Diesel Exhaust Fluid
Usage
The chart below illustrates the
approximate diesel exhaust fluid usage for
the given distances traveled under various
driving conditions. Usage may vary
depending on:
• Driving style.
• Towing a trailer.
• Vehicle load.
• Engine idling time.
119 Transit (TTH) Canada/United States of America, enUSA, Edition date: 03/2014 Fuel and RefuelingE163176
Page 123 of 461

Approximate diesel exhaust fluid usage per
tank mi (km)
Driving conditions
1100–4100 (1,770–6,600)
Primary trailer tow, aggressive driving
4100–6500 (6,600–10,460)
City drive
6500–10500 (10,460– 16,900)
Steady highway drive
REFUELING WARNINGS
When refueling always shut the
engine off and never allow sparks or
open flames near the filler neck.
Never smoke or use a cell phone while
refueling. Fuel vapor is extremely
hazardous under certain conditions. Avoid
inhaling excess fumes. Do not attempt to refuel using a fuel
pump nozzle that does not fit
through both closing flaps of the
capless fuel filler neck. Wait at least 10 seconds before
removing the fuel pump nozzle to
allow any residual fuel to drain into
the fuel tank. Stop refueling after the fuel pump
nozzle automatically shuts off for the
second time. Failure to follow this
will fill the expansion space in the fuel tank
and could lead to fuel overflowing. Do not remove the fuel pump nozzle
from its fully inserted position when
refueling.
Do not overfill the fuel tank. The
pressure in an overfilled tank may
cause leakage and lead to fuel spray
and fire. Do not attempt to start the engine if you
have refueled the fuel tank with the
incorrect fuel. This can cause damage not
covered by the vehicle warranty. Have your
vehicle checked by an authorized dealer
immediately.
If you use a high pressure spray to wash
your vehicle, only spray the fuel tank filler
door briefly from a distance not less than
8 in (200 mm).
Note:
The front door must be open before
you can open and close the fuel tank filler
door.
Note: Capless fuel systems do not have a
fuel tank filler cap.
1. Fully open the fuel tank filler door until
it engages.
120 Transit (TTH) Canada/United States of America, enUSA, Edition date: 03/2014 Fuel and RefuelingE162791
Page 136 of 461
AUTOMATIC TRANSMISSION
WARNINGS
Always set the parking brake fully
and make sure you shift the gearshift
lever to park (P). Switch the ignition
off and remove the key whenever you leave
your vehicle. Do not apply the brake pedal and
accelerator pedal simultaneously.
Applying both pedals simultaneously
for more than three seconds will limit
engine rpm, which may result in difficulty
maintaining speed in traffic and could lead
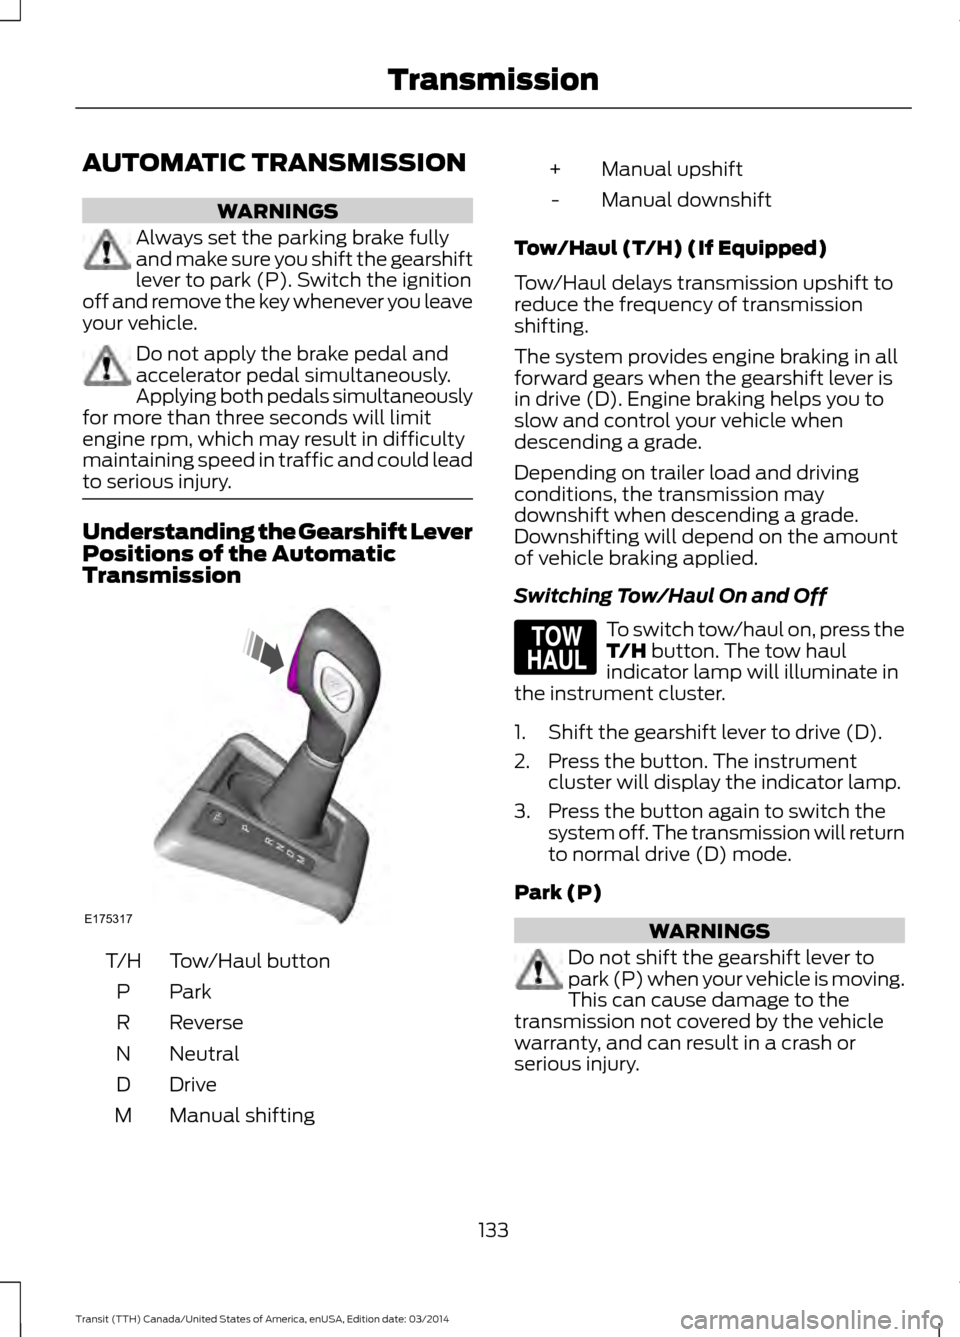
to serious injury. Understanding the Gearshift Lever
Positions of the Automatic
Transmission
Tow/Haul button
T/H
ParkP
Reverse
R
Neutral
N
Drive
D
Manual shifting
M Manual upshift
+
Manual downshift
-
Tow/Haul (T/H) (If Equipped)
Tow/Haul delays transmission upshift to
reduce the frequency of transmission
shifting.
The system provides engine braking in all
forward gears when the gearshift lever is
in drive (D). Engine braking helps you to
slow and control your vehicle when
descending a grade.
Depending on trailer load and driving
conditions, the transmission may
downshift when descending a grade.
Downshifting will depend on the amount
of vehicle braking applied.
Switching Tow/Haul On and Off To switch tow/haul on, press the
T/H button. The tow haul
indicator lamp will illuminate in
the instrument cluster.
1. Shift the gearshift lever to drive (D).
2. Press the button. The instrument cluster will display the indicator lamp.
3. Press the button again to switch the system off. The transmission will return
to normal drive (D) mode.
Park (P) WARNINGS
Do not shift the gearshift lever to
park (P) when your vehicle is moving.
This can cause damage to the
transmission not covered by the vehicle
warranty, and can result in a crash or
serious injury.
133 Transit (TTH) Canada/United States of America, enUSA, Edition date: 03/2014 TransmissionE175317 E161509
Page 146 of 461
PRINCIPLE OF OPERATION
WARNINGS
The system does not relieve you of
your responsibility to drive with due
care and attention.
If your vehicles has a non-Ford
approved trailer tow module the
system may not correctly detect
objects. The sensors may not detect objects
in heavy rain or other conditions that
cause disruptive reflections.
The sensors may not detect objects
with surfaces that absorb ultrasonic
waves.
The system does not detect objects
that are moving away from your
vehicle. They will only be detected
shortly after they start to move toward
your vehicle. Take particular care when reversing
with a tow ball arm or a rear fitted
accessory. For example, a bicycle
carrier. The rear parking aid will only
indicate the approximate distance from
the rear bumper to an object. If you use a high pressure spray to
wash your vehicle, only spray the
sensors briefly from a distance not
less than eight inches (20 centimeters). Note:
If your vehicle has a tow ball arm,
switch the system off when you connect
trailer lamps (or lighting boards) to the
13-pin socket through a Ford approved
trailer tow module.
Note: Keep the sensors free from dirt, ice
or snow. Do not clean with sharp objects.
Note: The system may emit false alerts if
it detects a signal using the same frequency
as the sensors or if your vehicle is fully
loaded. Note:
The outer sensors may detect the
side walls of a garage. If the distance
between the outer sensors and the side wall
remains constant for three seconds, the
alert will turn off. As you continue the inner
sensors will detect objects directly behind
your vehicle.
PARKING AID WARNINGS
The parking aid system can only
assist you to detect objects when
your vehicle is moving at parking
speeds. To help avoid personal injury you
must take care when using the parking aid
system. Traffic control systems, inclement
weather, air brakes, external motors
and fans may affect the correct
operation of the sensing system.This may
cause reduced performance or false alerts. The system may not detect small or
moving objects, particularly those
close to the ground.
The system warns you of objects that are
within the detection zone of the bumper
areas. When you switch the ignition on,
the system automatically turns on. The
system becomes active when you shift into
reverse (R) and the speed of your vehicle
is 10 mph (16 km/h) or less.
143 Transit (TTH) Canada/United States of America, enUSA, Edition date: 03/2014 Parking Aids
Page 149 of 461
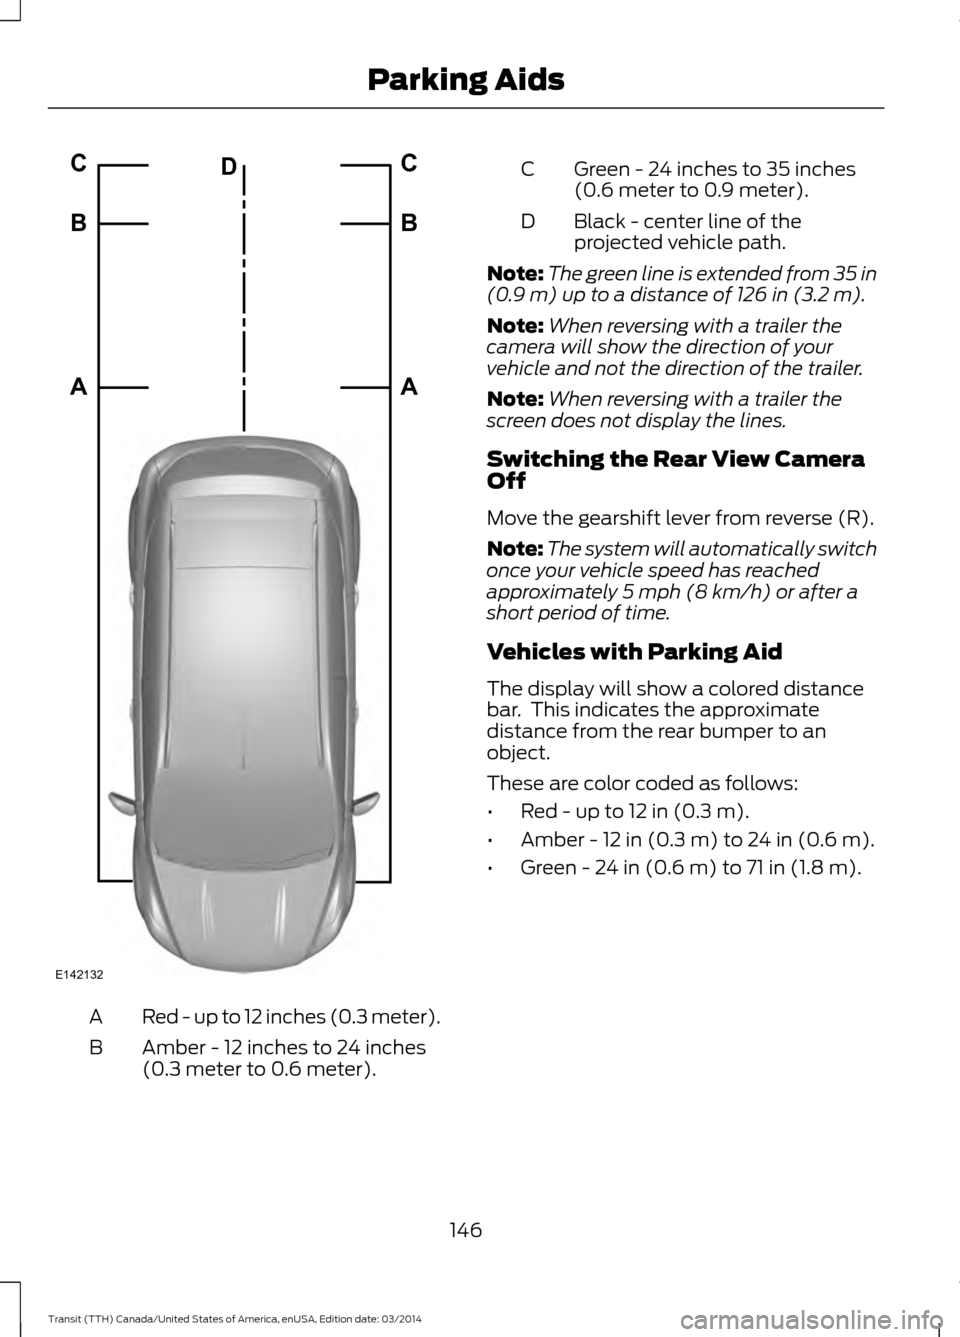
Red - up to 12 inches (0.3 meter).
A
Amber - 12 inches to 24 inches
(0.3 meter to 0.6 meter).
B Green - 24 inches to 35 inches
(0.6 meter to 0.9 meter).
C
Black - center line of the
projected vehicle path.
D
Note: The green line is extended from 35 in
(0.9 m) up to a distance of 126 in (3.2 m).
Note: When reversing with a trailer the
camera will show the direction of your
vehicle and not the direction of the trailer.
Note: When reversing with a trailer the
screen does not display the lines.
Switching the Rear View Camera
Off
Move the gearshift lever from reverse (R).
Note: The system will automatically switch
once your vehicle speed has reached
approximately
5 mph (8 km/h) or after a
short period of time.
Vehicles with Parking Aid
The display will show a colored distance
bar. This indicates the approximate
distance from the rear bumper to an
object.
These are color coded as follows:
• Red - up to 12 in (0.3 m).
• Amber - 12 in (0.3 m) to
24 in (0.6 m).
• Green -
24 in (0.6 m) to 71 in (1.8 m).
146 Transit (TTH) Canada/United States of America, enUSA, Edition date: 03/2014 Parking AidsE142132A B C
A B C
D
Page 156 of 461
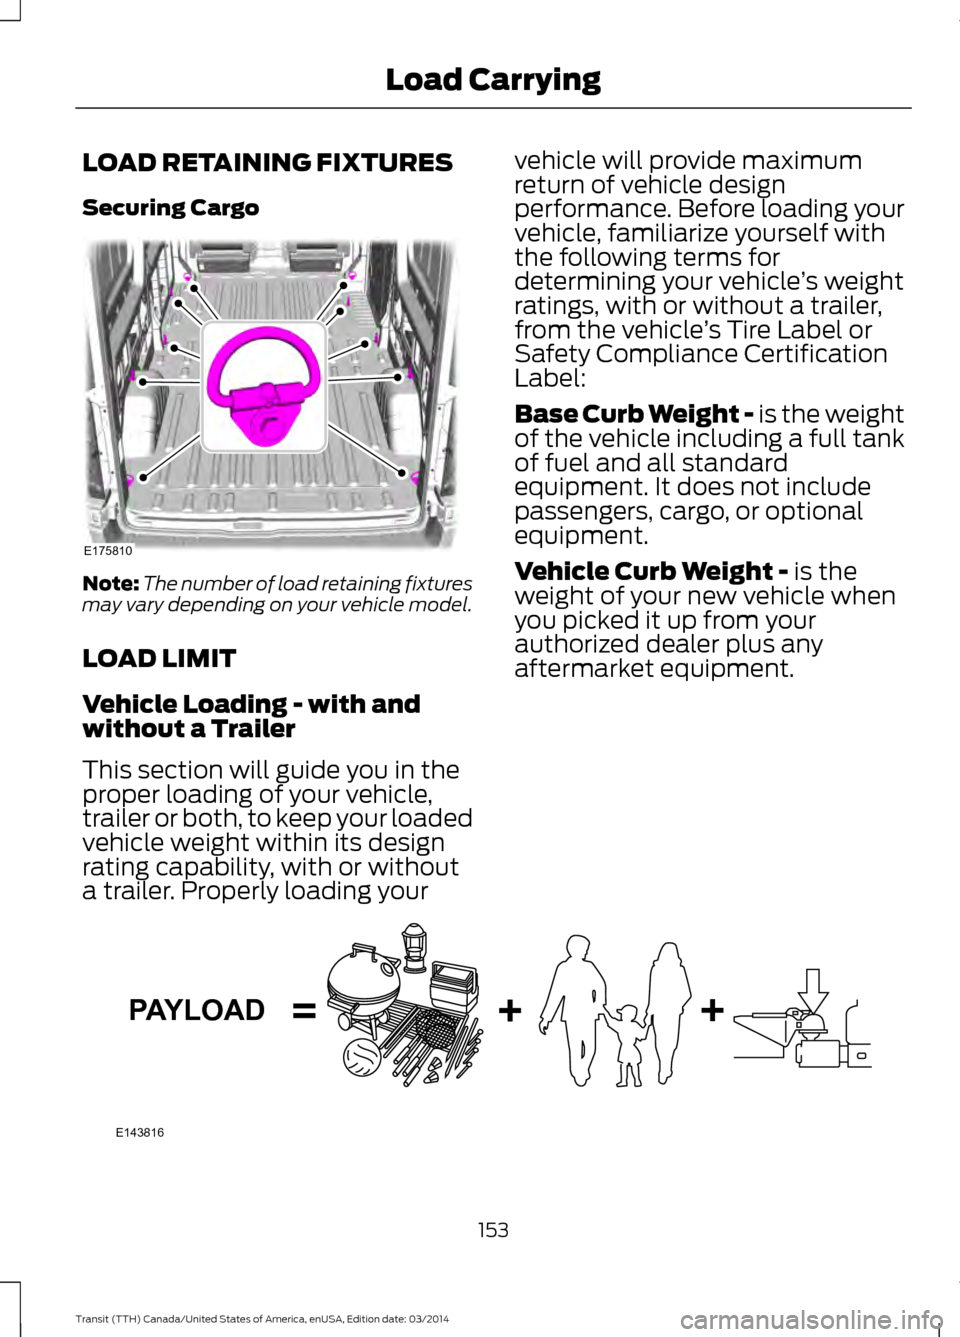
LOAD RETAINING FIXTURES
Securing Cargo
Note:
The number of load retaining fixtures
may vary depending on your vehicle model.
LOAD LIMIT
Vehicle Loading - with and
without a Trailer
This section will guide you in the
proper loading of your vehicle,
trailer or both, to keep your loaded
vehicle weight within its design
rating capability, with or without
a trailer. Properly loading your vehicle will provide maximum
return of vehicle design
performance. Before loading your
vehicle, familiarize yourself with
the following terms for
determining your vehicle
’s weight
ratings, with or without a trailer,
from the vehicle ’s Tire Label or
Safety Compliance Certification
Label:
Base Curb Weight - is the weight
of the vehicle including a full tank
of fuel and all standard
equipment. It does not include
passengers, cargo, or optional
equipment.
Vehicle Curb Weight -
is the
weight of your new vehicle when
you picked it up from your
authorized dealer plus any
aftermarket equipment. 153
Transit (TTH) Canada/United States of America, enUSA, Edition date: 03/2014 Load CarryingE175810 E143816PAYLOAD