ignition FORD TRANSIT 2019 Manual PDF
[x] Cancel search | Manufacturer: FORD, Model Year: 2019, Model line: TRANSIT, Model: FORD TRANSIT 2019Pages: 529, PDF Size: 8.57 MB
Page 227 of 529
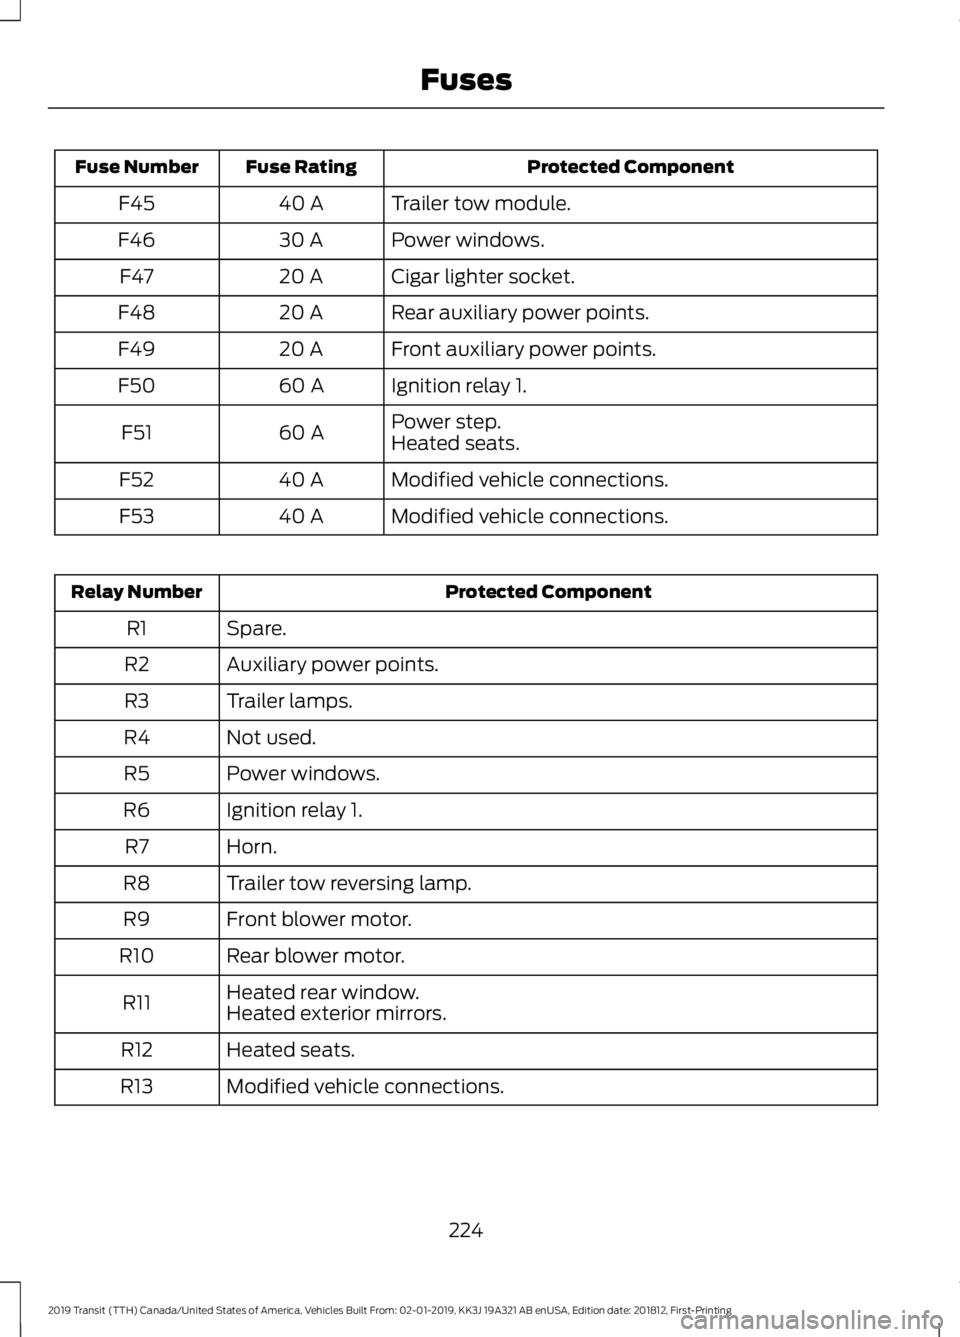
Protected Component
Fuse Rating
Fuse Number
Trailer tow module.
40 A
F45
Power windows.
30 A
F46
Cigar lighter socket.
20 A
F47
Rear auxiliary power points.
20 A
F48
Front auxiliary power points.
20 A
F49
Ignition relay 1.
60 A
F50
Power step.
60 A
F51
Heated seats.
Modified vehicle connections.
40 A
F52
Modified vehicle connections.
40 A
F53 Protected Component
Relay Number
Spare.
R1
Auxiliary power points.
R2
Trailer lamps.
R3
Not used.
R4
Power windows.
R5
Ignition relay 1.
R6
Horn.
R7
Trailer tow reversing lamp.
R8
Front blower motor.
R9
Rear blower motor.
R10
Heated rear window.
R11 Heated exterior mirrors.
Heated seats.
R12
Modified vehicle connections.
R13
224
2019 Transit (TTH) Canada/United States of America, Vehicles Built From: 02-01-2019, KK3J 19A321 AB enUSA, Edition date: 201812, First-Printing Fuses
Page 228 of 529
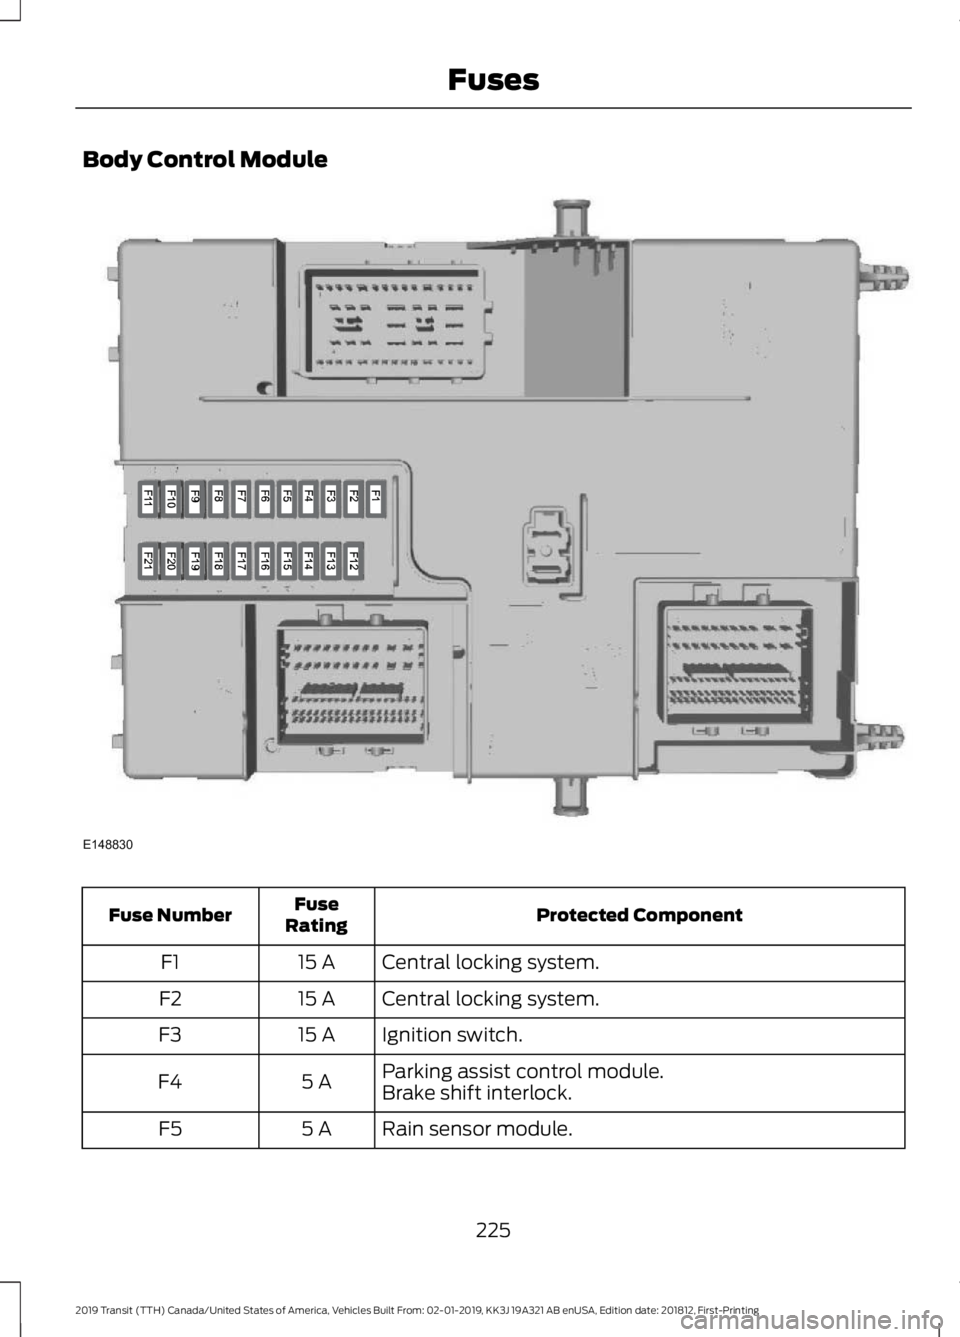
Body Control Module
Protected Component
Fuse
Rating
Fuse Number
Central locking system.
15 A
F1
Central locking system.
15 A
F2
Ignition switch.
15 A
F3
Parking assist control module.
5 A
F4
Brake shift interlock.
Rain sensor module.
5 A
F5
225
2019 Transit (TTH) Canada/United States of America, Vehicles Built From: 02-01-2019, KK3J 19A321 AB enUSA, Edition date: 201812, First-Printing FusesE148830
Page 229 of 529
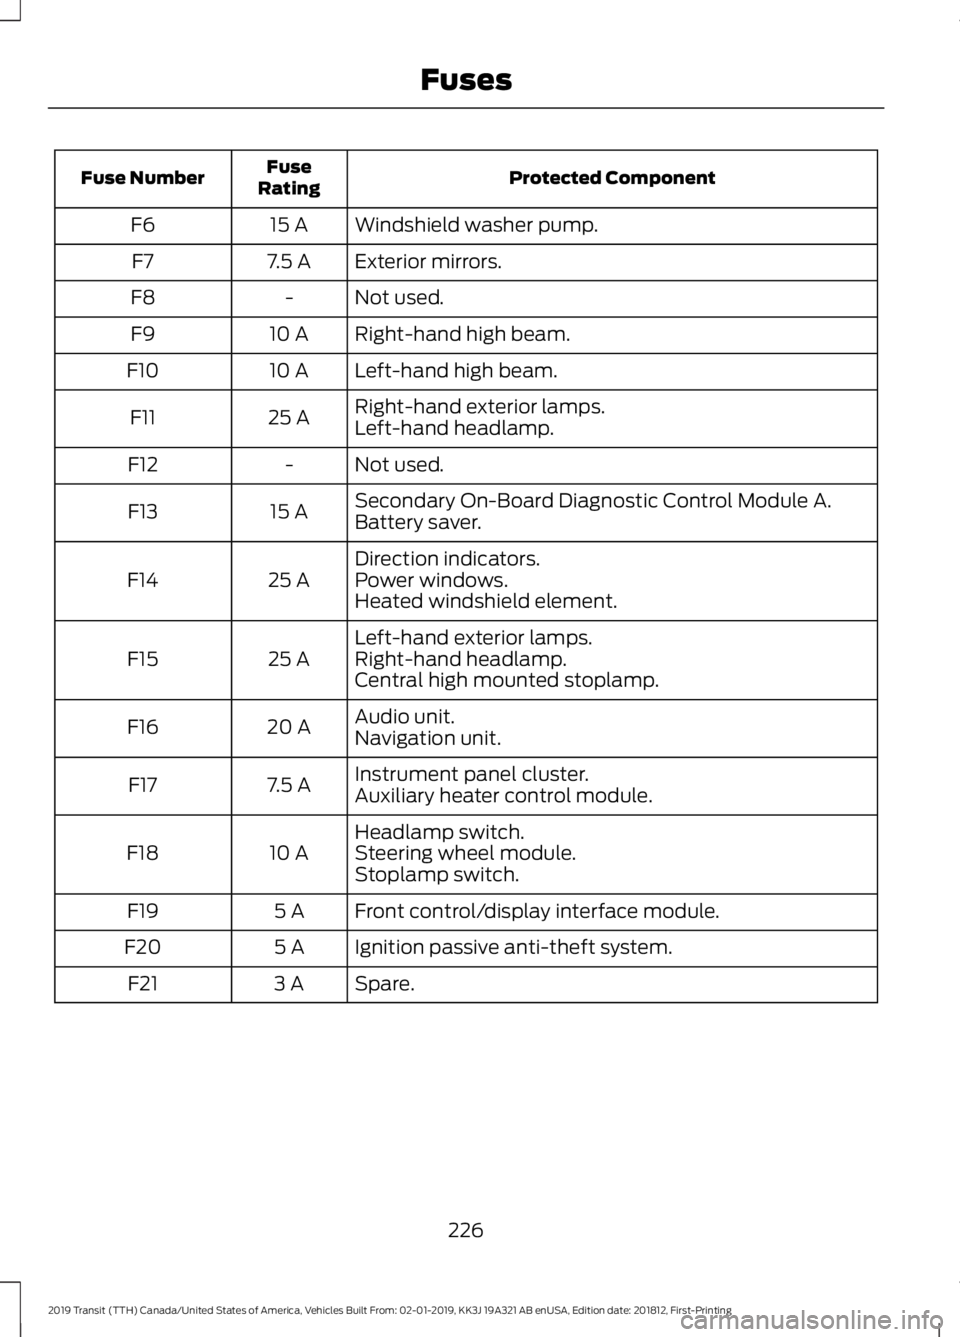
Protected Component
Fuse
Rating
Fuse Number
Windshield washer pump.
15 A
F6
Exterior mirrors.
7.5 A
F7
Not used.
-
F8
Right-hand high beam.
10 A
F9
Left-hand high beam.
10 A
F10
Right-hand exterior lamps.
25 A
F11
Left-hand headlamp.
Not used.
-
F12
Secondary On-Board Diagnostic Control Module A.
15 A
F13
Battery saver.
Direction indicators.
25 A
F14 Power windows.
Heated windshield element.
Left-hand exterior lamps.
25 A
F15 Right-hand headlamp.
Central high mounted stoplamp.
Audio unit.
20 A
F16
Navigation unit.
Instrument panel cluster.
7.5 A
F17
Auxiliary heater control module.
Headlamp switch.
10 A
F18 Steering wheel module.
Stoplamp switch.
Front control/display interface module.
5 A
F19
Ignition passive anti-theft system.
5 A
F20
Spare.
3 A
F21
226
2019 Transit (TTH) Canada/United States of America, Vehicles Built From: 02-01-2019, KK3J 19A321 AB enUSA, Edition date: 201812, First-Printing Fuses
Page 239 of 529
•
Sustained towing operation above
1,000 mi (1,600 km).
• Sustained high-speed driving at Gross
Vehicle Weight Rating (maximum
loaded weight for vehicle operation).
• Sustained use of diesel fuel other than
ultra-low sulfur diesel (ULSD).
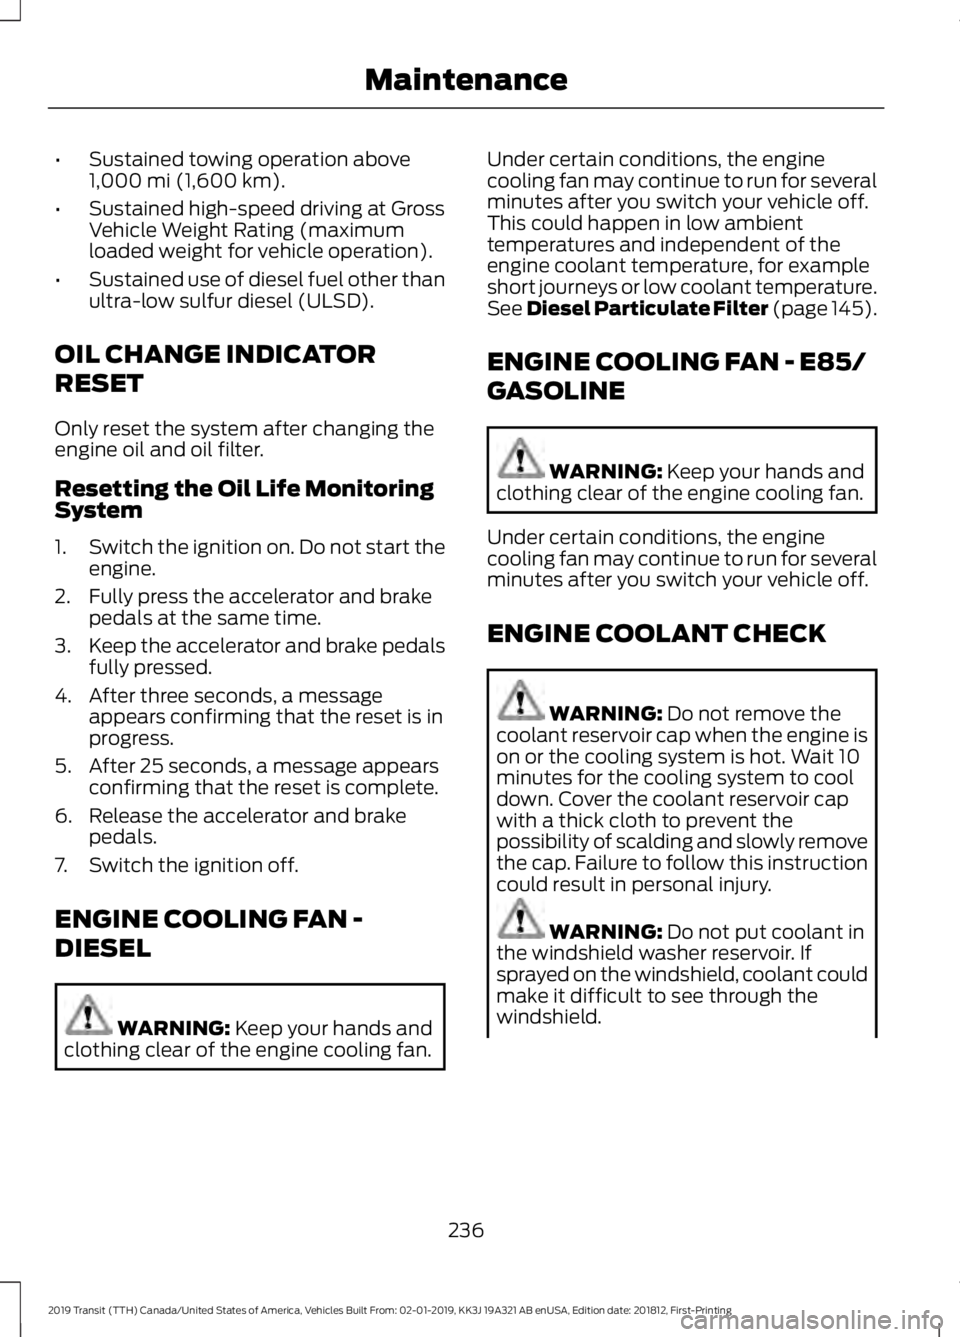
OIL CHANGE INDICATOR
RESET
Only reset the system after changing the
engine oil and oil filter.
Resetting the Oil Life Monitoring
System
1. Switch the ignition on. Do not start the
engine.
2. Fully press the accelerator and brake pedals at the same time.
3. Keep the accelerator and brake pedals
fully pressed.
4. After three seconds, a message appears confirming that the reset is in
progress.
5. After 25 seconds, a message appears confirming that the reset is complete.
6. Release the accelerator and brake pedals.
7. Switch the ignition off.
ENGINE COOLING FAN -
DIESEL WARNING:
Keep your hands and
clothing clear of the engine cooling fan. Under certain conditions, the engine
cooling fan may continue to run for several
minutes after you switch your vehicle off.
This could happen in low ambient
temperatures and independent of the
engine coolant temperature, for example
short journeys or low coolant temperature.
See Diesel Particulate Filter (page 145).
ENGINE COOLING FAN - E85/
GASOLINE
WARNING:
Keep your hands and
clothing clear of the engine cooling fan.
Under certain conditions, the engine
cooling fan may continue to run for several
minutes after you switch your vehicle off.
ENGINE COOLANT CHECK WARNING:
Do not remove the
coolant reservoir cap when the engine is
on or the cooling system is hot. Wait 10
minutes for the cooling system to cool
down. Cover the coolant reservoir cap
with a thick cloth to prevent the
possibility of scalding and slowly remove
the cap. Failure to follow this instruction
could result in personal injury. WARNING:
Do not put coolant in
the windshield washer reservoir. If
sprayed on the windshield, coolant could
make it difficult to see through the
windshield.
236
2019 Transit (TTH) Canada/United States of America, Vehicles Built From: 02-01-2019, KK3J 19A321 AB enUSA, Edition date: 201812, First-Printing Maintenance
Page 246 of 529
When you start the engine the water in fuel
indicator lamp turns off after a short period
of time.
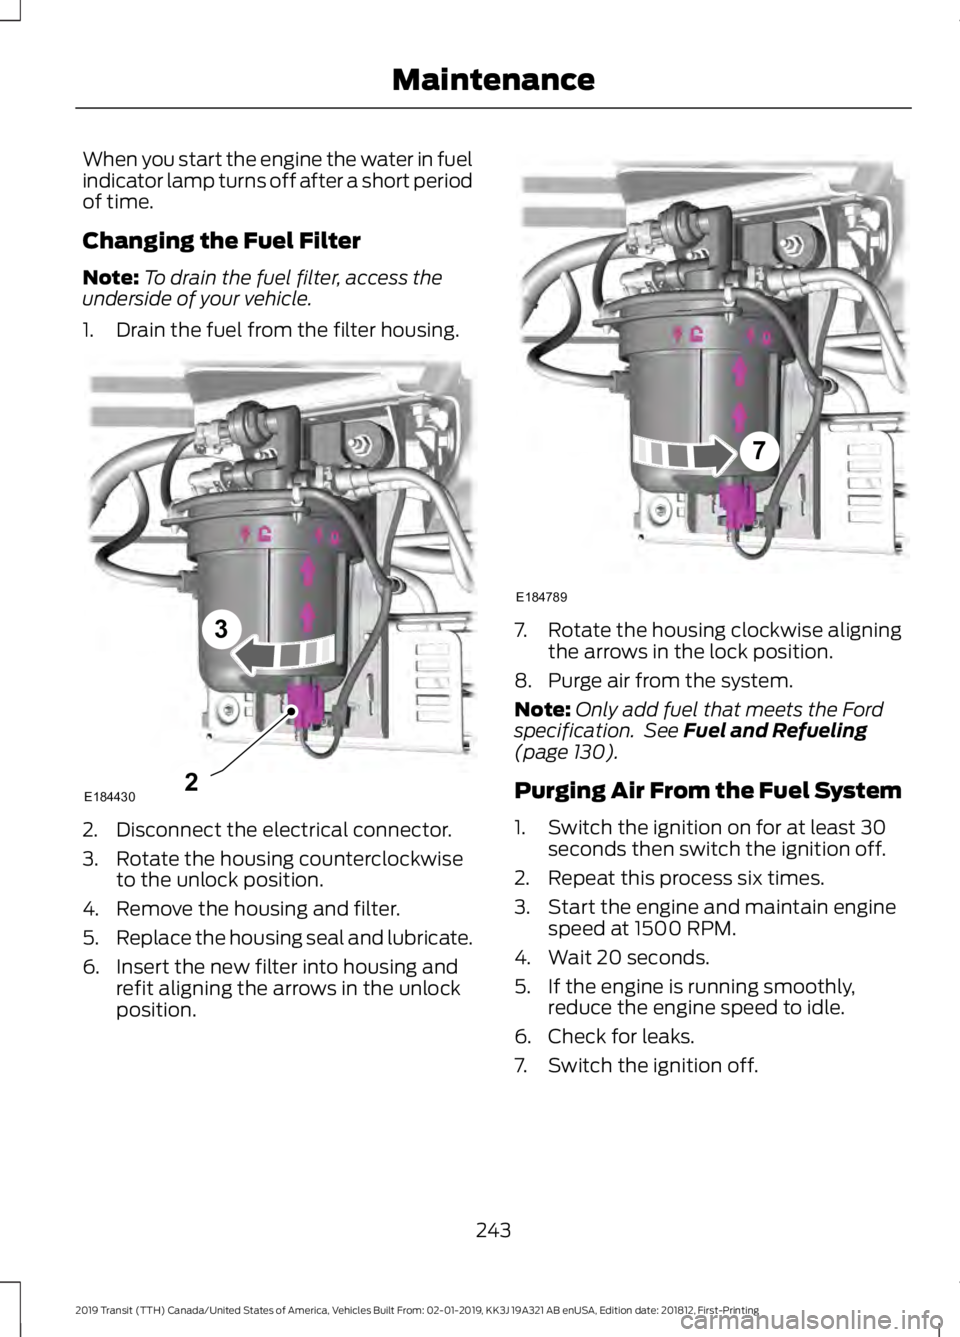
Changing the Fuel Filter
Note:
To drain the fuel filter, access the
underside of your vehicle.
1. Drain the fuel from the filter housing. 2. Disconnect the electrical connector.
3. Rotate the housing counterclockwise
to the unlock position.
4. Remove the housing and filter.
5. Replace the housing seal and lubricate.
6. Insert the new filter into housing and refit aligning the arrows in the unlock
position. 7. Rotate the housing clockwise aligning
the arrows in the lock position.
8. Purge air from the system.
Note: Only add fuel that meets the Ford
specification. See Fuel and Refueling
(page 130).
Purging Air From the Fuel System
1. Switch the ignition on for at least 30 seconds then switch the ignition off.
2. Repeat this process six times.
3. Start the engine and maintain engine speed at 1500 RPM.
4. Wait 20 seconds.
5. If the engine is running smoothly, reduce the engine speed to idle.
6. Check for leaks.
7. Switch the ignition off.
243
2019 Transit (TTH) Canada/United States of America, Vehicles Built From: 02-01-2019, KK3J 19A321 AB enUSA, Edition date: 201812, First-Printing MaintenanceE1844302
3 E184789
7
Page 247 of 529
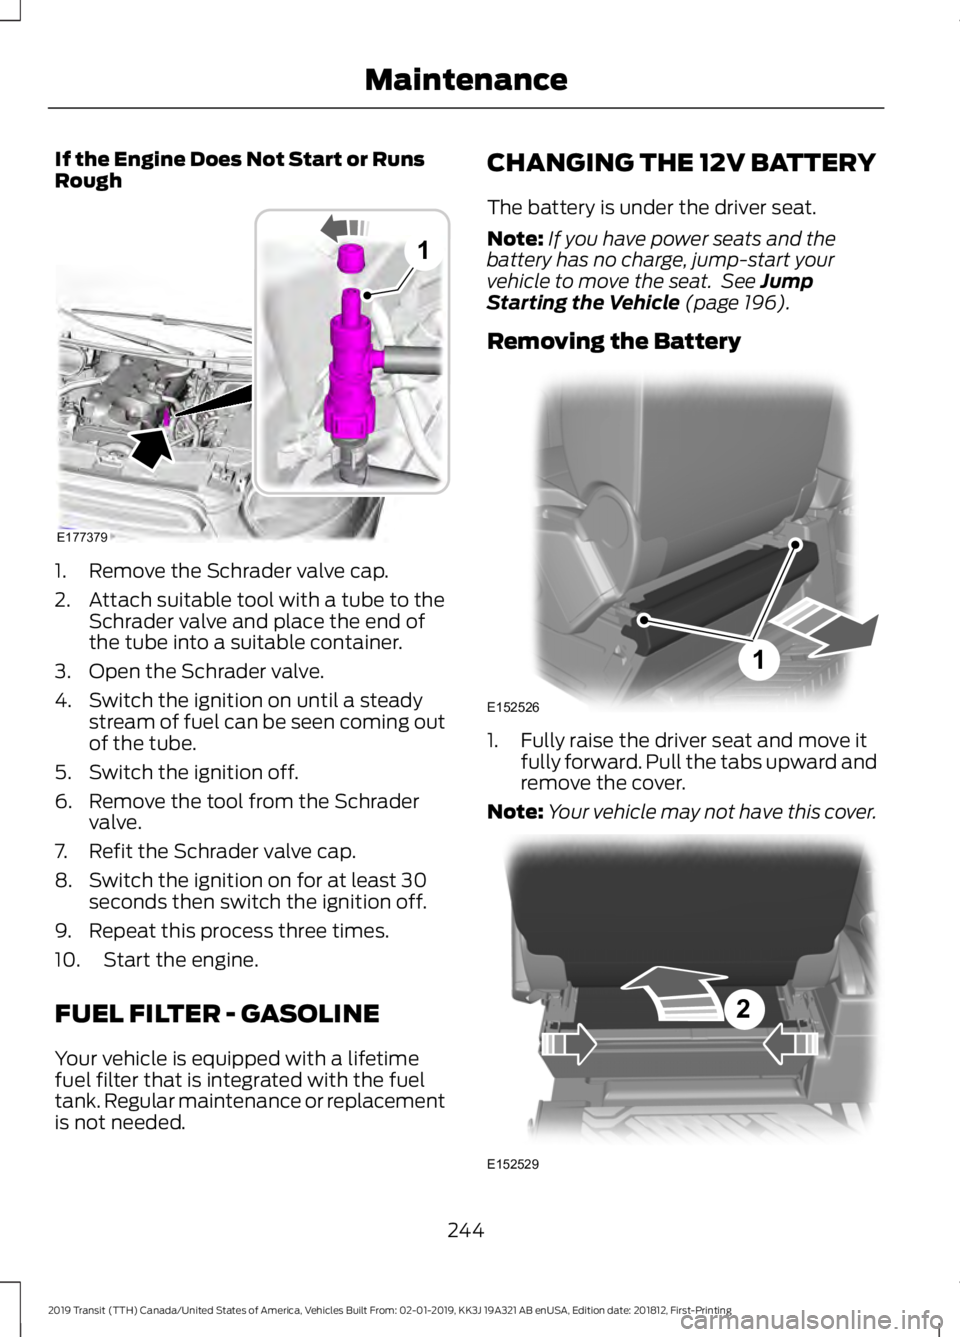
If the Engine Does Not Start or Runs
Rough
1. Remove the Schrader valve cap.
2. Attach suitable tool with a tube to the
Schrader valve and place the end of
the tube into a suitable container.
3. Open the Schrader valve.
4. Switch the ignition on until a steady stream of fuel can be seen coming out
of the tube.
5. Switch the ignition off.
6. Remove the tool from the Schrader valve.
7. Refit the Schrader valve cap.
8. Switch the ignition on for at least 30 seconds then switch the ignition off.
9. Repeat this process three times.
10. Start the engine.
FUEL FILTER - GASOLINE
Your vehicle is equipped with a lifetime
fuel filter that is integrated with the fuel
tank. Regular maintenance or replacement
is not needed. CHANGING THE 12V BATTERY
The battery is under the driver seat.
Note:
If you have power seats and the
battery has no charge, jump-start your
vehicle to move the seat. See Jump
Starting the Vehicle (page 196).
Removing the Battery 1. Fully raise the driver seat and move it
fully forward. Pull the tabs upward and
remove the cover.
Note: Your vehicle may not have this cover. 244
2019 Transit (TTH) Canada/United States of America, Vehicles Built From: 02-01-2019, KK3J 19A321 AB enUSA, Edition date: 201812, First-Printing MaintenanceE177379
1 E152526
1 2
E152529
Page 251 of 529
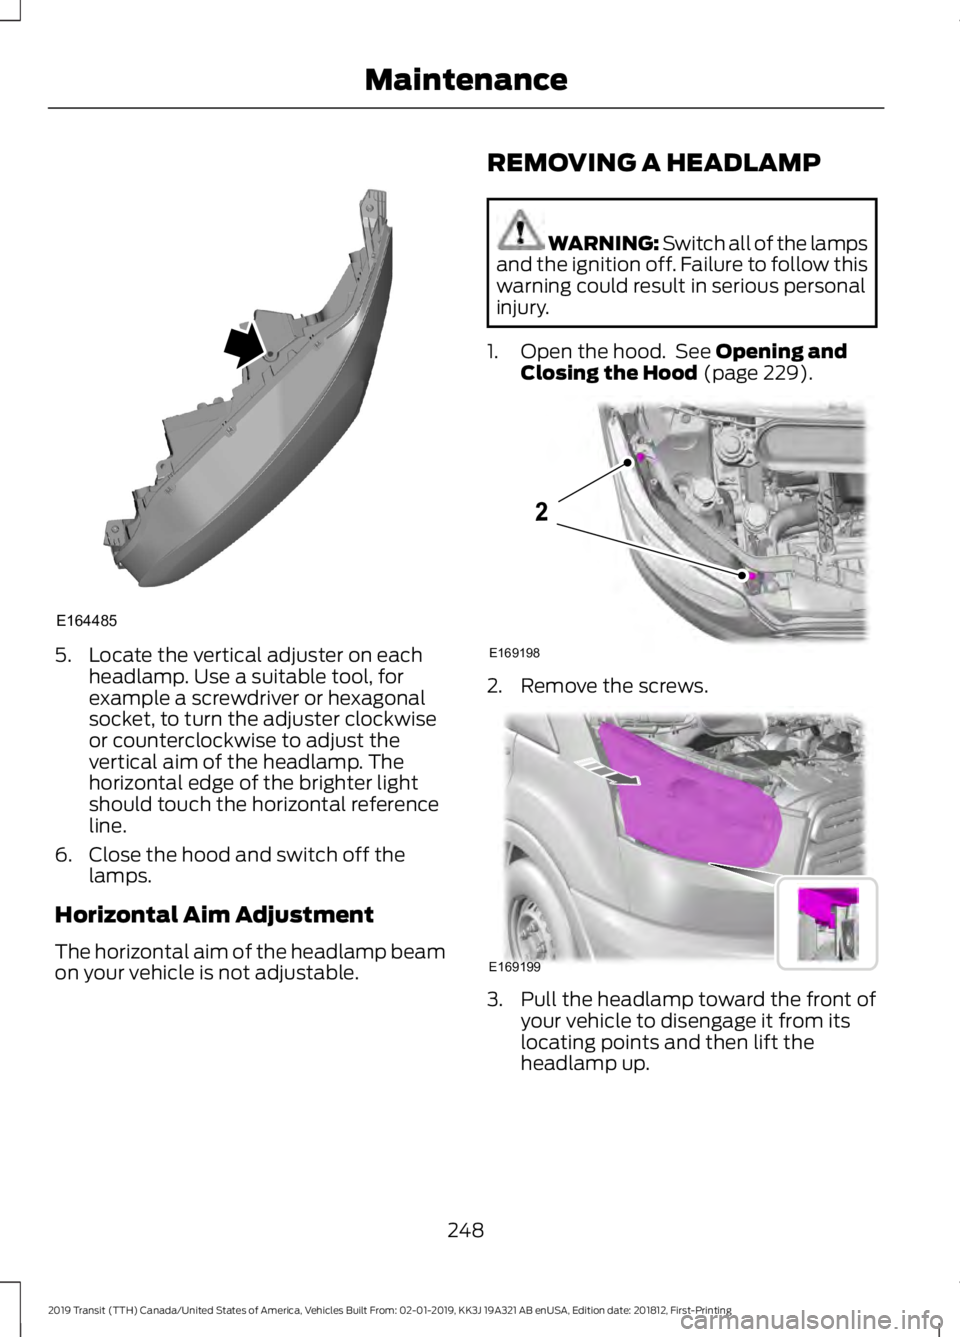
5. Locate the vertical adjuster on each
headlamp. Use a suitable tool, for
example a screwdriver or hexagonal
socket, to turn the adjuster clockwise
or counterclockwise to adjust the
vertical aim of the headlamp. The
horizontal edge of the brighter light
should touch the horizontal reference
line.
6. Close the hood and switch off the lamps.
Horizontal Aim Adjustment
The horizontal aim of the headlamp beam
on your vehicle is not adjustable. REMOVING A HEADLAMP WARNING: Switch all of the lamps
and the ignition off. Failure to follow this
warning could result in serious personal
injury.
1. Open the hood. See Opening and
Closing the Hood (page 229). 2. Remove the screws.
3. Pull the headlamp toward the front of
your vehicle to disengage it from its
locating points and then lift the
headlamp up.
248
2019 Transit (TTH) Canada/United States of America, Vehicles Built From: 02-01-2019, KK3J 19A321 AB enUSA, Edition date: 201812, First-Printing MaintenanceE164485 E169198
2 E169199
Page 252 of 529
4. Disconnect the electrical connectors.
Note:
When you install the headlamp, make
sure that you correctly attach the electrical
connector.
Note: When you install the headlamp, make
sure that you correctly engage its locating
points.
CHANGING A BULB WARNING: Switch all of the lamps
and the ignition off. Failure to follow this
warning could result in serious personal
injury. WARNING: Bulbs become hot
when in use. Let them cool down before
you remove them.
Use the correct specification bulb. See
Bulb Specification Chart
(page 254).
The following instructions describe how to
remove the bulbs. Install in the reverse
order unless otherwise stated.
Note: LED lamps are not serviceable. See
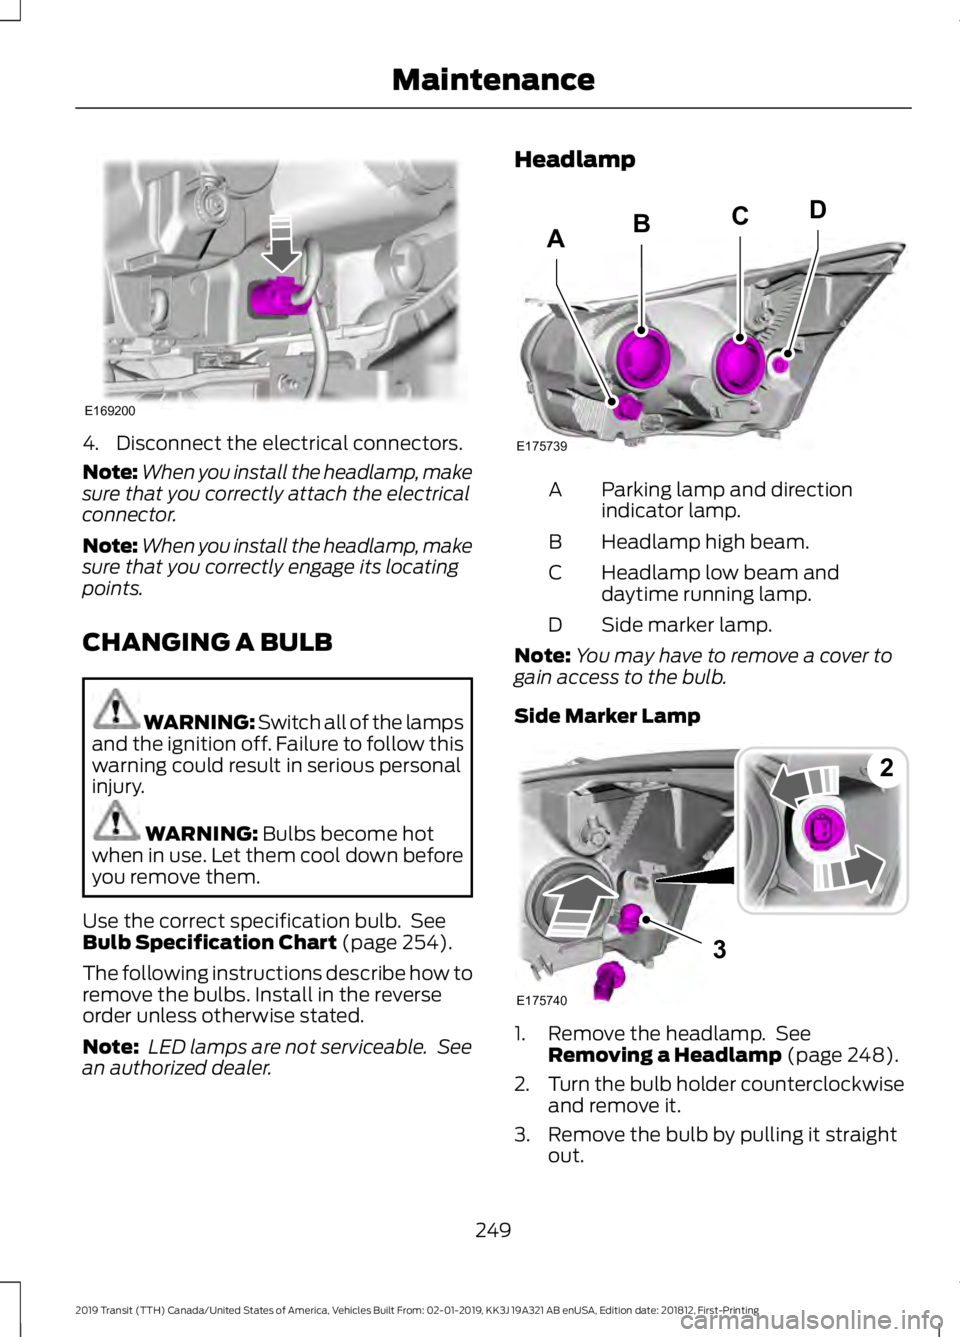
an authorized dealer. Headlamp
Parking lamp and direction
indicator lamp.
A
Headlamp high beam.
B
Headlamp low beam and
daytime running lamp.
C
Side marker lamp.
D
Note: You may have to remove a cover to
gain access to the bulb.
Side Marker Lamp 1. Remove the headlamp. See
Removing a Headlamp
(page 248).
2. Turn the bulb holder counterclockwise
and remove it.
3. Remove the bulb by pulling it straight out.
249
2019 Transit (TTH) Canada/United States of America, Vehicles Built From: 02-01-2019, KK3J 19A321 AB enUSA, Edition date: 201812, First-Printing MaintenanceE169200 E175739
BCD
A 3
E175740
2
Page 266 of 529
When washing:
•
Take care when using a power washer
to clean the engine. The high-pressure
fluid could penetrate the sealed parts
and cause damage.
• Do not spray a hot engine with cold
water to avoid cracking the engine
block or other engine components.
• Spray Motorcraft Engine Shampoo and
Degreaser on all parts that require
cleaning and pressure rinse clean. In
Canada, use Motorcraft Engine
Shampoo.
Note: If your vehicle has an engine cover
remove the cover before application of
Motorcraft Engine Shampoo and Degreaser.
Immediately rinse away any over spray.
• Never wash or rinse the engine while it
is hot or running; water in the running
engine may cause internal damage.
• Never wash or rinse any ignition coil,
spark plug wire or spark plug well, or
the area in and around these locations.
• Cover the battery, power distribution
box, and air filter assembly to prevent
water damage when cleaning the
engine.
CLEANING THE WINDOWS AND
WIPER BLADES
Car wash chemicals and environmental
fallout can result in windshield and wiper
blade contamination. Dirty windshield and
wipers will result in poor windshield wiper
operation. Keep the windshield and wiper
blades clean to maintain windshield wiper
performance. To clean the windshield and wiper blades:
•
Clean the windshield with a
non-abrasive glass cleaner. When
cleaning the interior of the windshield,
avoid getting any glass cleaner on the
instrument panel or door panels. Wipe
any glass cleaner off these surfaces
immediately.
• For windshields contaminated with
tree sap, chemicals, wax or bugs, clean
the entire windshield using steel wool
(no greater than 0000 grade) in a
circular motion and rinse with water.
• Clean the wiper blades with isopropyl
rubbing alcohol or windshield washer
concentrate.
Note: Do not use razor blades or other
sharp objects to clean or remove decals
from the inside of the heated rear window.
The vehicle warranty does not cover
damage caused to the heated rear window
grid lines.
CLEANING THE INTERIOR
Note: Do not allow air fresheners and hand
sanitizers to spill on interior surfaces. If a
spill occurs, wipe off immediately. Damage
may not be covered by the vehicle Warranty.
Note: Do not use household cleaning
products or glass cleaners, which can stain
and discolor the fabric and affect the flame
retardant abilities of the seat materials.
Note: We recommend distilled water when
cleaning.
Fabric, Carpets, Cloth Seats,
Headliners and Floor Mats
Note: Avoid soaking any surface. Do not
use excessive amounts of water to clean
the vehicle interior.
Note: To avoid spots or discoloration, clean
the entire surface.
263
2019 Transit (TTH) Canada/United States of America, Vehicles Built From: 02-01-2019, KK3J 19A321 AB enUSA, Edition date: 201812, First-Printing Vehicle Care
Page 296 of 529
1. Drive your vehicle above 20 mph
(32 km/h) for at least two minutes and
then park in a safe location where you
can easily get to all four tires and have
access to a tire inflation pump.
2. Switch the ignition off.
3. Switch the ignition on with the engine off.
4. Turn the hazard flashers on then off three times, this must be completed
within 10 seconds. If the reset mode
has been entered successfully, the horn
will chirp once and the system indicator
will flash. If this does not occur, repeat
the procedure from step 2. If after
repeated attempts to enter the reset
mode, the horn does not chirp and the
system indicator does not flash, have
your vehicle checked by an authorized
dealer as soon as possible.
5. Train the system sensors in the tires using the following reset sequence
starting with the left front tire and
following a clockwise order: Left front,
right front, right rear, left rear.
6. Remove the valve cap from the valve stem on the left front tire. Decrease the
air pressure until the horn chirps.
Note: The single horn chirp confirms that
the sensor identification code has been
learned by your vehicle for this position. If a
double horn chirp is heard, the reset
procedure was unsuccessful and must be
repeated.
7. Remove the valve cap from the valve stem on the right front tire. Decrease
the air pressure until the horn chirps.
8. Remove the valve cap from the valve stem on the right rear tire. Decrease the
air pressure until the horn chirps. 9. Remove the valve cap from the valve
stem on the left rear tire. Decrease the
air pressure until the horn chirps.
Training is complete when the horn
chirps after the last system sensor (left
rear) has been trained and the system
indicator stops flashing.
10. Switch the ignition off. If two short horn chirps are heard, the reset
procedure was unsuccessful and
must be repeated.
Note: If after repeating the procedure two
short horn chirps are heard again, have your
vehicle checked by an authorized dealer as
soon as possible.
11. Set all four tires to the correct pressure
See Maintenance (page
229). or the tire inflation pressure label
(located on the edge of driver door or
the B-Pillar).
CHANGING A ROAD WHEEL WARNING:
Do not use tire
sealants as they may damage the tire
pressure monitoring system. WARNING:
If the tire pressure
monitor sensor becomes damaged it
may not function.
Note: The tire pressure monitoring system
indicator light will illuminate when the spare
tire is in use. To restore the full function of
the monitoring system, all road wheels
equipped with tire pressure monitoring
sensors must be mounted on this vehicle.
If you get a flat tire while driving, do not
apply the brake heavily. Instead, gradually
decrease your speed. Hold the steering
wheel firmly and slowly move to a safe
place on the side of the road.
293
2019 Transit (TTH) Canada/United States of America, Vehicles Built From: 02-01-2019, KK3J 19A321 AB enUSA, Edition date: 201812, First-Printing Wheels and Tires