FORD TRANSIT 2020 Owners Manual
Manufacturer: FORD, Model Year: 2020, Model line: TRANSIT, Model: FORD TRANSIT 2020Pages: 529, PDF Size: 8.3 MB
Page 351 of 529
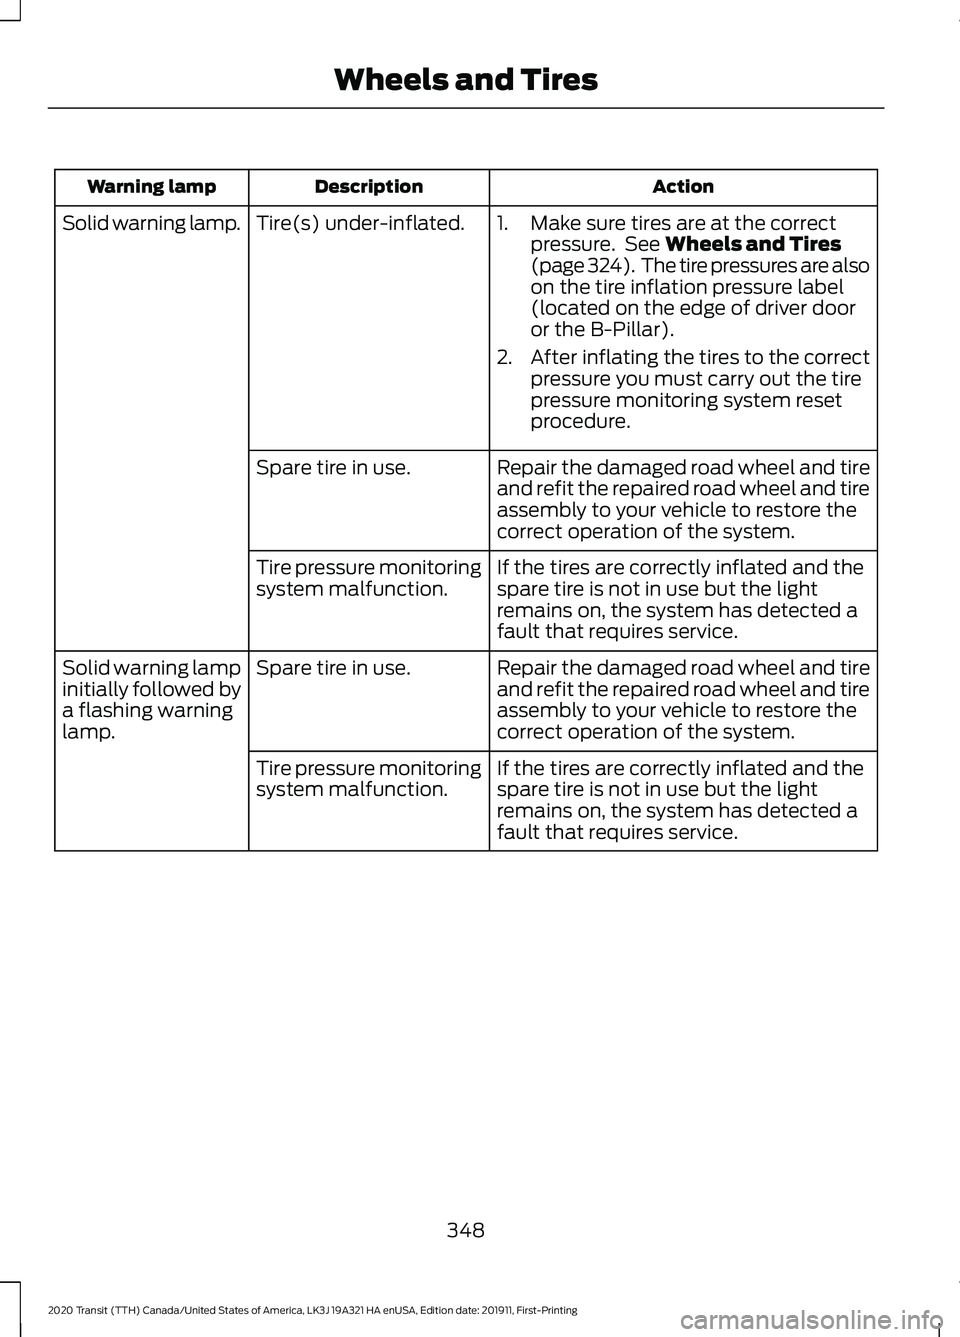
Action
Description
Warning lamp
1. Make sure tires are at the correctpressure. See Wheels and Tires
(page 324). The tire pressures are also
on the tire inflation pressure label
(located on the edge of driver door
or the B-Pillar).
2. After inflating the tires to the correct
pressure you must carry out the tire
pressure monitoring system reset
procedure.
Tire(s) under-inflated.
Solid warning lamp.
Repair the damaged road wheel and tire
and refit the repaired road wheel and tire
assembly to your vehicle to restore the
correct operation of the system.
Spare tire in use.
If the tires are correctly inflated and the
spare tire is not in use but the light
remains on, the system has detected a
fault that requires service.
Tire pressure monitoring
system malfunction.
Repair the damaged road wheel and tire
and refit the repaired road wheel and tire
assembly to your vehicle to restore the
correct operation of the system.
Spare tire in use.
Solid warning lamp
initially followed by
a flashing warning
lamp.
If the tires are correctly inflated and the
spare tire is not in use but the light
remains on, the system has detected a
fault that requires service.
Tire pressure monitoring
system malfunction.
348
2020 Transit (TTH) Canada/United States of America, LK3J 19A321 HA enUSA, Edition date: 201911, First-Printing Wheels and Tires
Page 352 of 529
Tire Pressure Monitoring System
Reset Procedure
Overview
WARNING: To determine the
required pressure(s) for your vehicle, see
the Safety Compliance Certification
Label (on the door hinge pillar,
door-latch post or the door edge that
meets the door-latch post, next to the
driver seat) or the Tire Label on the
B-Pillar or the edge of the driver door.
You must carry out the system reset
procedure after each tire replacement or
adjustment of the tire pressures. To maintain your vehicle load carrying
capability, your vehicle requires different
tire pressures in the front tires compared
to the rear tires.
The system illuminates the warning lamp
at different pressures for the front and rear
tires.
If the tires are rotated, the Tire Pressure
Monitoring System needs to be reset to
relearn the new tire pressures. It does not
know which sensor is where and assumes
you have set the pressures correctly.
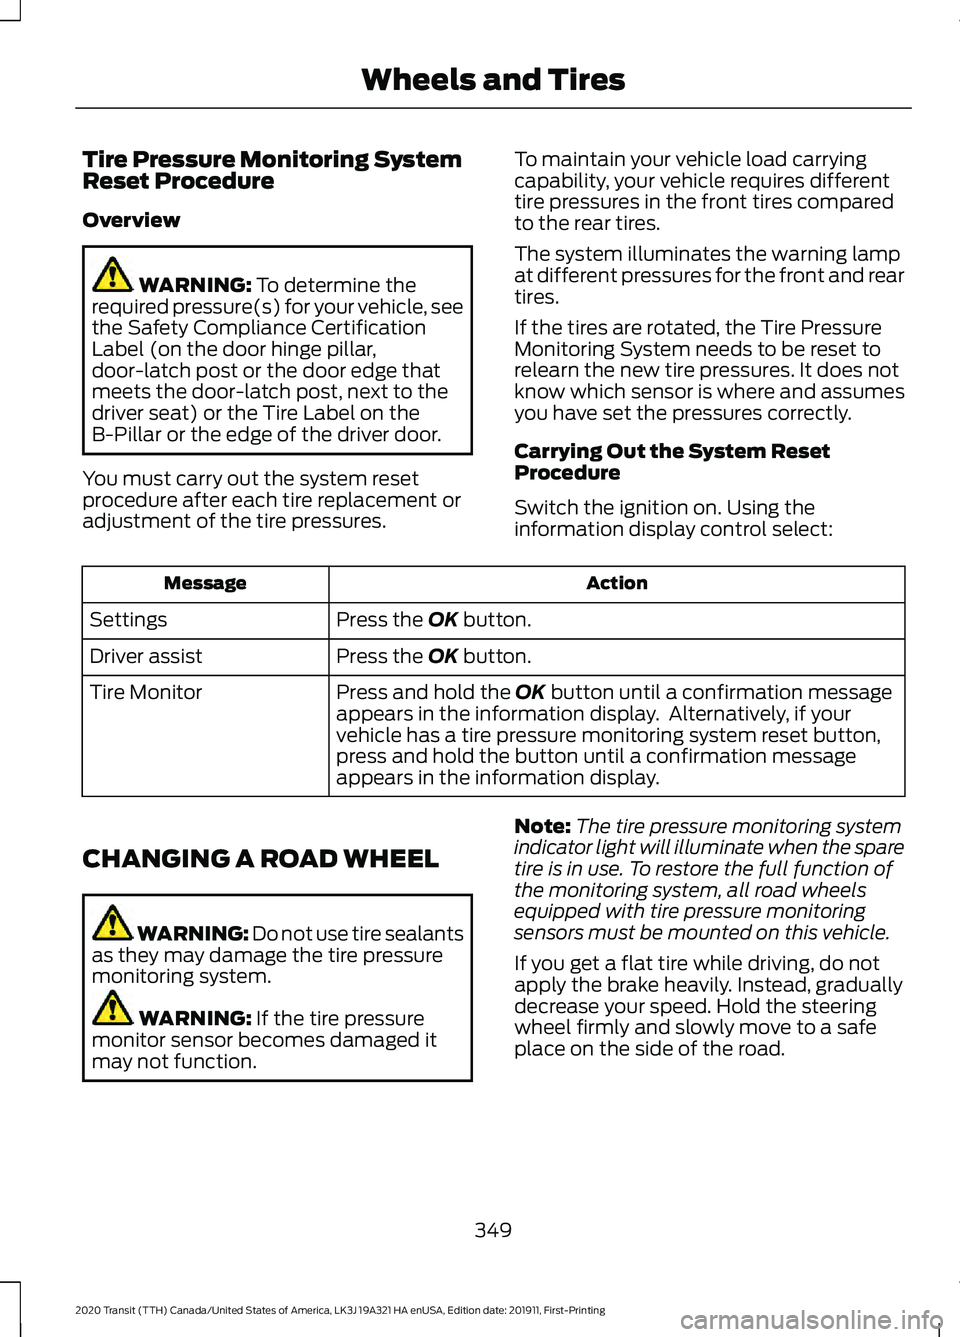
Carrying Out the System Reset
Procedure
Switch the ignition on. Using the
information display control select: Action
Message
Press the
OK button.
Settings
Press the
OK button.
Driver assist
Press and hold the
OK button until a confirmation message
appears in the information display. Alternatively, if your
vehicle has a tire pressure monitoring system reset button,
press and hold the button until a confirmation message
appears in the information display.
Tire Monitor
CHANGING A ROAD WHEEL WARNING: Do not use tire sealants
as they may damage the tire pressure
monitoring system. WARNING:
If the tire pressure
monitor sensor becomes damaged it
may not function. Note:
The tire pressure monitoring system
indicator light will illuminate when the spare
tire is in use. To restore the full function of
the monitoring system, all road wheels
equipped with tire pressure monitoring
sensors must be mounted on this vehicle.
If you get a flat tire while driving, do not
apply the brake heavily. Instead, gradually
decrease your speed. Hold the steering
wheel firmly and slowly move to a safe
place on the side of the road.
349
2020 Transit (TTH) Canada/United States of America, LK3J 19A321 HA enUSA, Edition date: 201911, First-Printing Wheels and Tires
Page 353 of 529
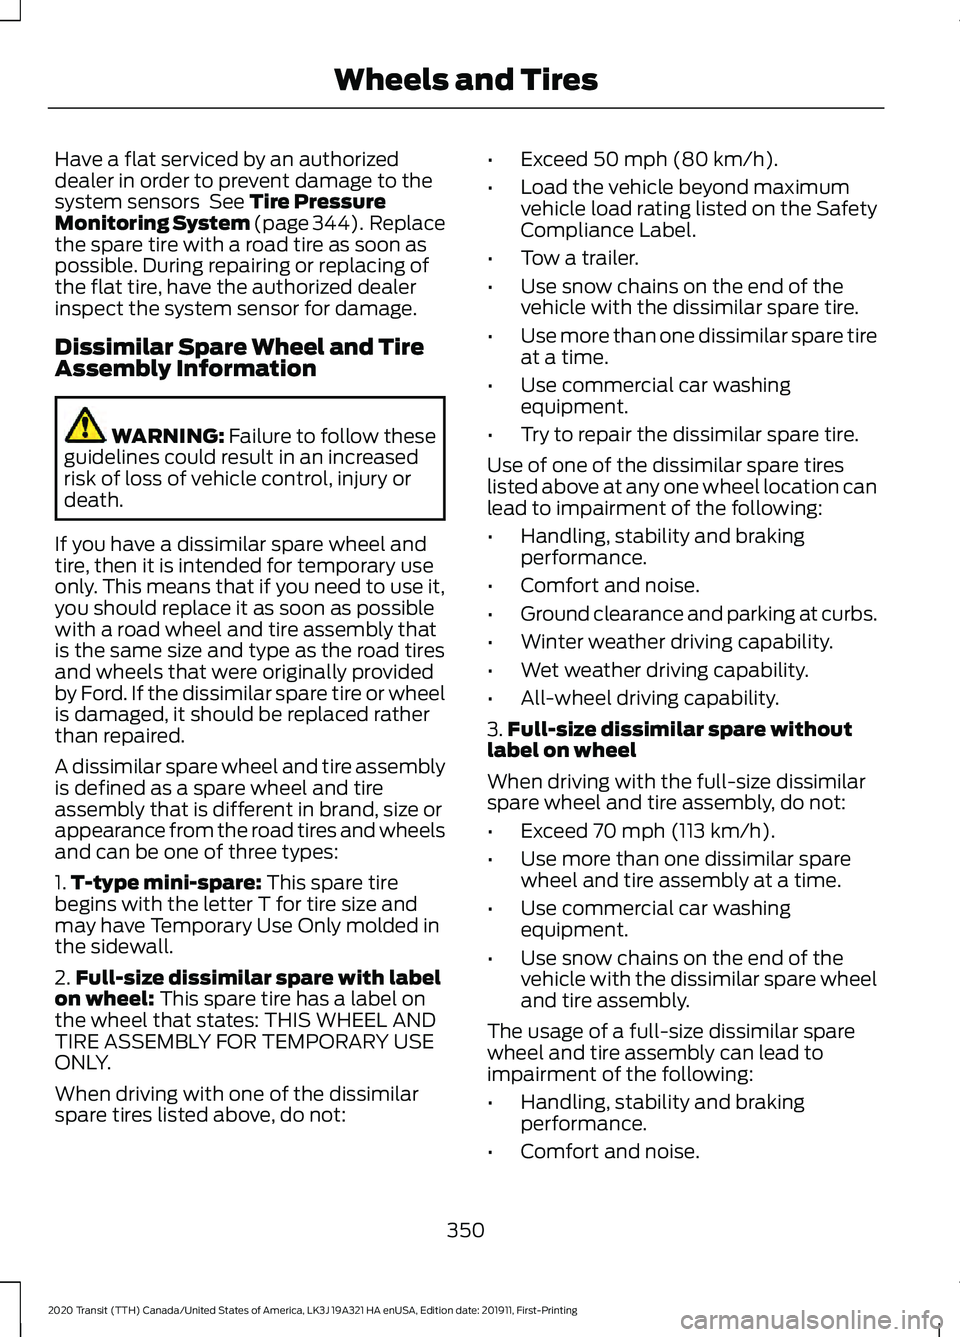
Have a flat serviced by an authorized
dealer in order to prevent damage to the
system sensors See Tire Pressure
Monitoring System (page 344). Replace
the spare tire with a road tire as soon as
possible. During repairing or replacing of
the flat tire, have the authorized dealer
inspect the system sensor for damage.
Dissimilar Spare Wheel and Tire
Assembly Information WARNING:
Failure to follow these
guidelines could result in an increased
risk of loss of vehicle control, injury or
death.
If you have a dissimilar spare wheel and
tire, then it is intended for temporary use
only. This means that if you need to use it,
you should replace it as soon as possible
with a road wheel and tire assembly that
is the same size and type as the road tires
and wheels that were originally provided
by Ford. If the dissimilar spare tire or wheel
is damaged, it should be replaced rather
than repaired.
A dissimilar spare wheel and tire assembly
is defined as a spare wheel and tire
assembly that is different in brand, size or
appearance from the road tires and wheels
and can be one of three types:
1. T-type mini-spare:
This spare tire
begins with the letter T for tire size and
may have Temporary Use Only molded in
the sidewall.
2. Full-size dissimilar spare with label
on wheel:
This spare tire has a label on
the wheel that states: THIS WHEEL AND
TIRE ASSEMBLY FOR TEMPORARY USE
ONLY.
When driving with one of the dissimilar
spare tires listed above, do not: •
Exceed
50 mph (80 km/h).
• Load the vehicle beyond maximum
vehicle load rating listed on the Safety
Compliance Label.
• Tow a trailer.
• Use snow chains on the end of the
vehicle with the dissimilar spare tire.
• Use more than one dissimilar spare tire
at a time.
• Use commercial car washing
equipment.
• Try to repair the dissimilar spare tire.
Use of one of the dissimilar spare tires
listed above at any one wheel location can
lead to impairment of the following:
• Handling, stability and braking
performance.
• Comfort and noise.
• Ground clearance and parking at curbs.
• Winter weather driving capability.
• Wet weather driving capability.
• All-wheel driving capability.
3. Full-size dissimilar spare without
label on wheel
When driving with the full-size dissimilar
spare wheel and tire assembly, do not:
• Exceed
70 mph (113 km/h).
• Use more than one dissimilar spare
wheel and tire assembly at a time.
• Use commercial car washing
equipment.
• Use snow chains on the end of the
vehicle with the dissimilar spare wheel
and tire assembly.
The usage of a full-size dissimilar spare
wheel and tire assembly can lead to
impairment of the following:
• Handling, stability and braking
performance.
• Comfort and noise.
350
2020 Transit (TTH) Canada/United States of America, LK3J 19A321 HA enUSA, Edition date: 201911, First-Printing Wheels and Tires
Page 354 of 529
•
Ground clearance and parking at curbs.
• Winter weather driving capability.
• Wet weather driving capability.
• All-wheel driving capability.
When driving with the full-size dissimilar
spare wheel and tire assembly additional
caution should be given to:
• Towing a trailer.
• Driving vehicles equipped with a
camper body.
• Driving vehicles with a load on the
cargo rack.
Drive cautiously when using a full-size
dissimilar spare wheel and tire assembly
and seek service as soon as possible.
Locking Lug Nuts (If Equipped)
You can obtain replacement locking lug
nuts or a locking lug nut key using the
reference number certificate.
The locking lug nut key is located in the
glove box or in the storage compartment
in the front right-hand side stepwell.
Vehicles With a Spare Wheel
The spare wheel is under the rear of your
vehicle.
If the spare wheel is the same type and
size as your vehicle road wheel, you can fit
the spare wheel and continue to drive in
the normal manner.
If the spare wheel is not the same type and
size as your vehicle road wheel, it has a
label showing the maximum driving speed
limit. Note:
If your vehicle is fitted with a tire
pressure monitoring system, the warning
indicator will flash if you fit the spare wheel
to your vehicle. To restore the correct
operation of the tire pressure monitoring
system, you must have the repaired road
wheel and tire assembly refitted to your
vehicle. See
Tire Pressure Monitoring
System (page 344). To prevent damage
occurring to the tire pressure monitoring
system sensors, make sure you have a
damage tire repaired or replaced by a tire
professional.
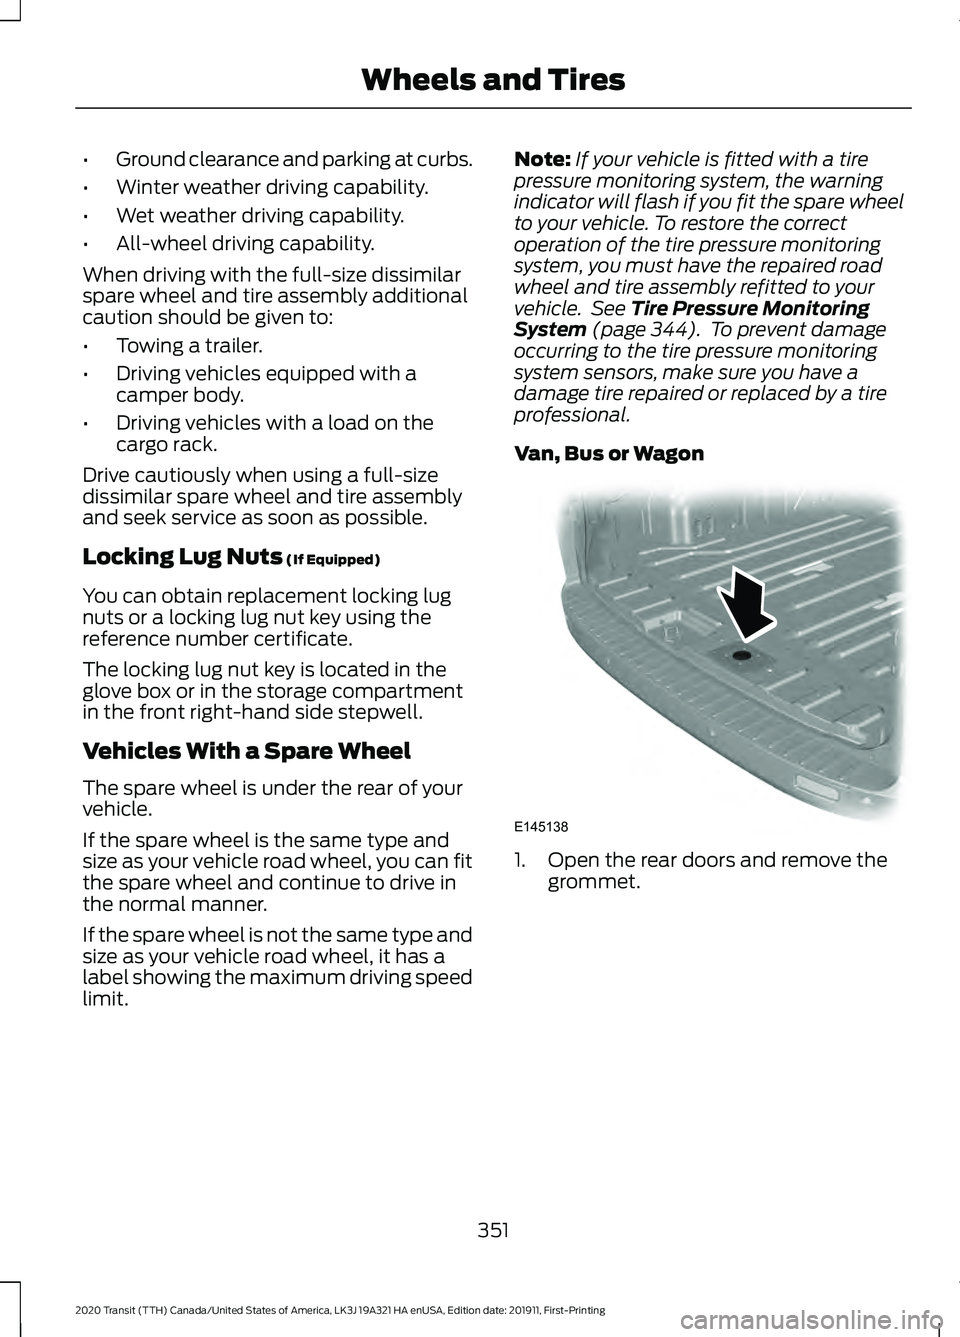
Van, Bus or Wagon 1. Open the rear doors and remove the
grommet.
351
2020 Transit (TTH) Canada/United States of America, LK3J 19A321 HA enUSA, Edition date: 201911, First-Printing Wheels and TiresE145138
Page 355 of 529
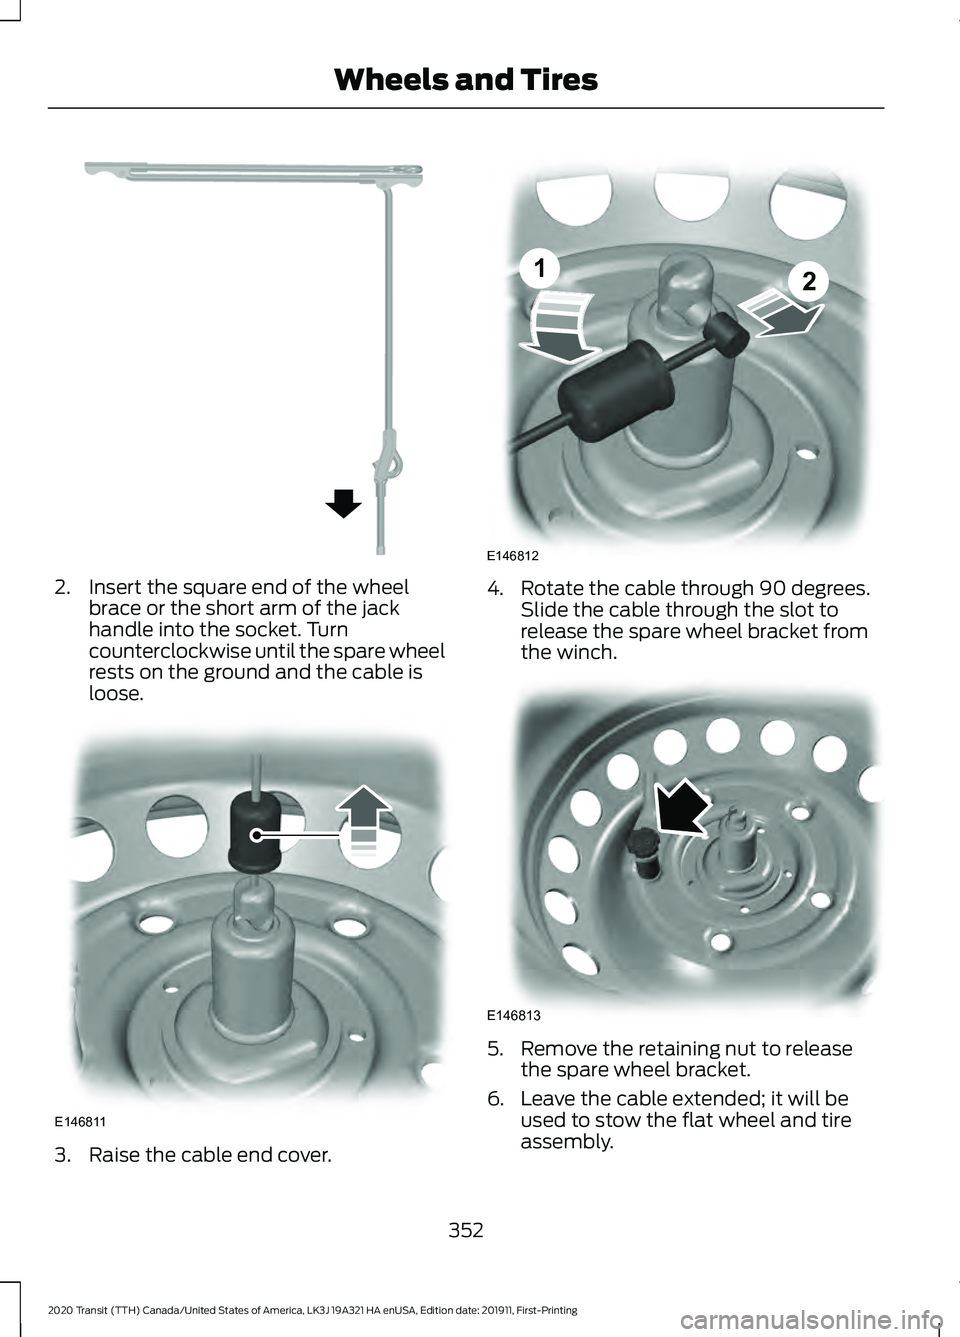
2. Insert the square end of the wheel
brace or the short arm of the jack
handle into the socket. Turn
counterclockwise until the spare wheel
rests on the ground and the cable is
loose. 3. Raise the cable end cover. 4. Rotate the cable through 90 degrees.
Slide the cable through the slot to
release the spare wheel bracket from
the winch. 5. Remove the retaining nut to release
the spare wheel bracket.
6. Leave the cable extended; it will be used to stow the flat wheel and tire
assembly.
352
2020 Transit (TTH) Canada/United States of America, LK3J 19A321 HA enUSA, Edition date: 201911, First-Printing Wheels and TiresE298323 E146811 E146812
12 E146813
Page 356 of 529
Note:
Do not raise the spare wheel bracket
without a wheel attached. Damage to the
winch mechanism could occur.
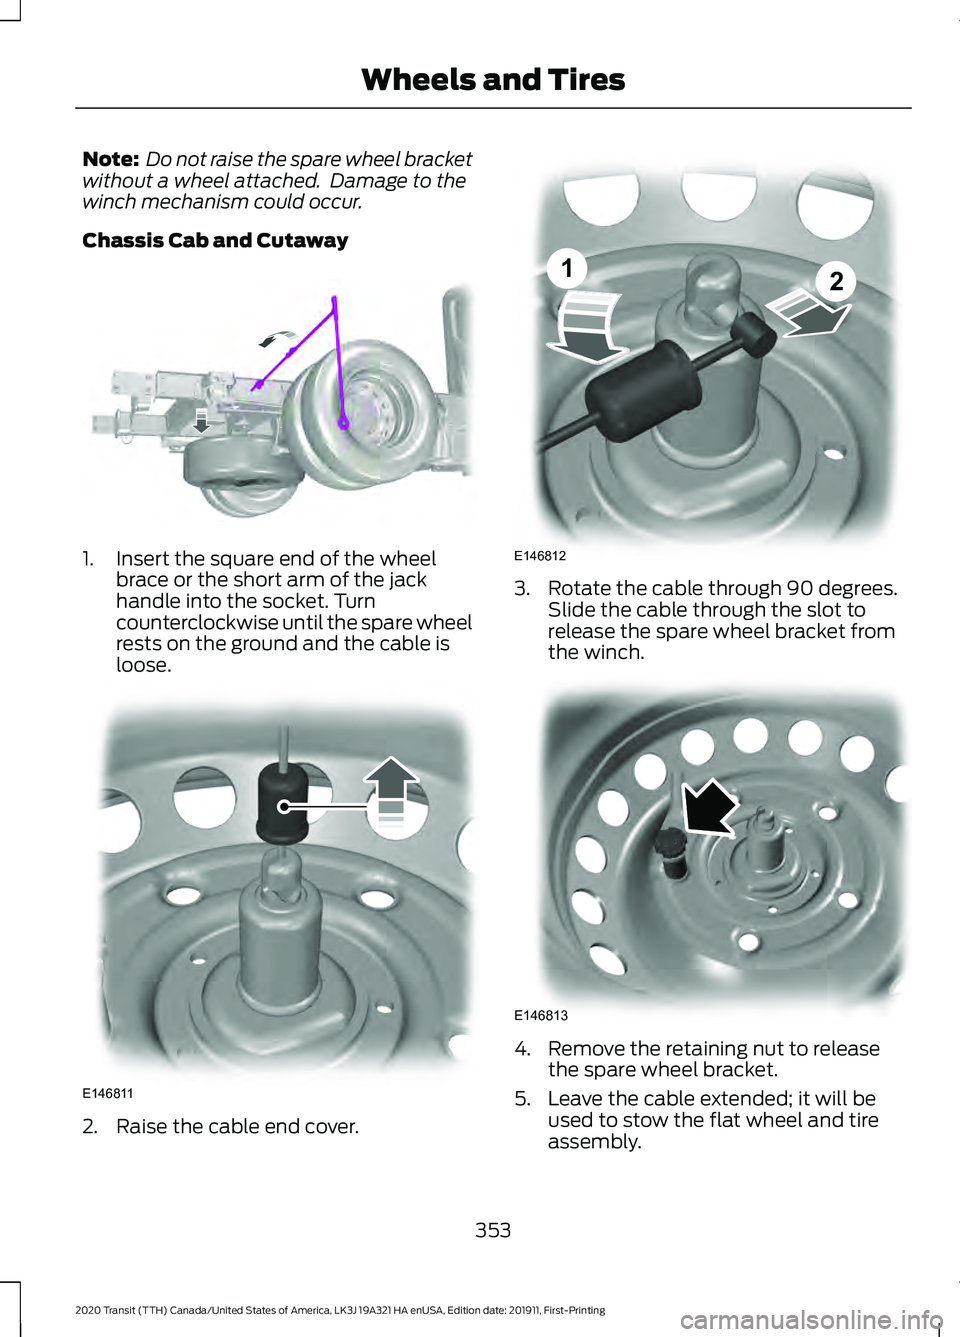
Chassis Cab and Cutaway 1. Insert the square end of the wheel
brace or the short arm of the jack
handle into the socket. Turn
counterclockwise until the spare wheel
rests on the ground and the cable is
loose. 2. Raise the cable end cover. 3. Rotate the cable through 90 degrees.
Slide the cable through the slot to
release the spare wheel bracket from
the winch. 4. Remove the retaining nut to release
the spare wheel bracket.
5. Leave the cable extended; it will be used to stow the flat wheel and tire
assembly.
353
2020 Transit (TTH) Canada/United States of America, LK3J 19A321 HA enUSA, Edition date: 201911, First-Printing Wheels and TiresE310689 E146811 E146812
12 E146813
Page 357 of 529
Note:
Do not raise the spare wheel bracket
without a wheel attached. Damage to the
winch mechanism could occur.
Vehicle Jack WARNING: Do not work on your
vehicle when the jack is the only support
as your vehicle could slip off the jack.
Failure to follow this instruction could
result in personal injury or death. WARNING:
To help prevent your
vehicle from moving when changing a
wheel, shift the transmission into park
(P), set the parking brake and use an
appropriate block or wheel chock to
secure the wheel diagonally opposite to
the wheel being changed. For example,
when changing the front left wheel,
place an appropriate block or wheel
chock on the right rear wheel. WARNING:
Do not attempt to
change a tire on the side of the vehicle
close to moving traffic. Pull far enough
off the road to avoid the danger of being
hit when operating the jack or changing
the wheel. WARNING:
Always use the jack
provided as original equipment with your
vehicle. If using a jack other than the one
provided, make sure the jack capacity is
adequate for the vehicle weight,
including any vehicle cargo or
modifications. If you are unsure if the jack
capacity is adequate, contact the
authorized dealer. WARNING:
Switch off the running
boards before jacking or placing any
object under your vehicle. Never place
your hand between the extended running
board and your vehicle. A moving running
board may cause injury. Note:
Passengers should not remain in the
vehicle when the vehicle is being jacked.
Note: Vehicles with a Temporary Mobility
Kit do not have a vehicle jack or a lug
wrench.
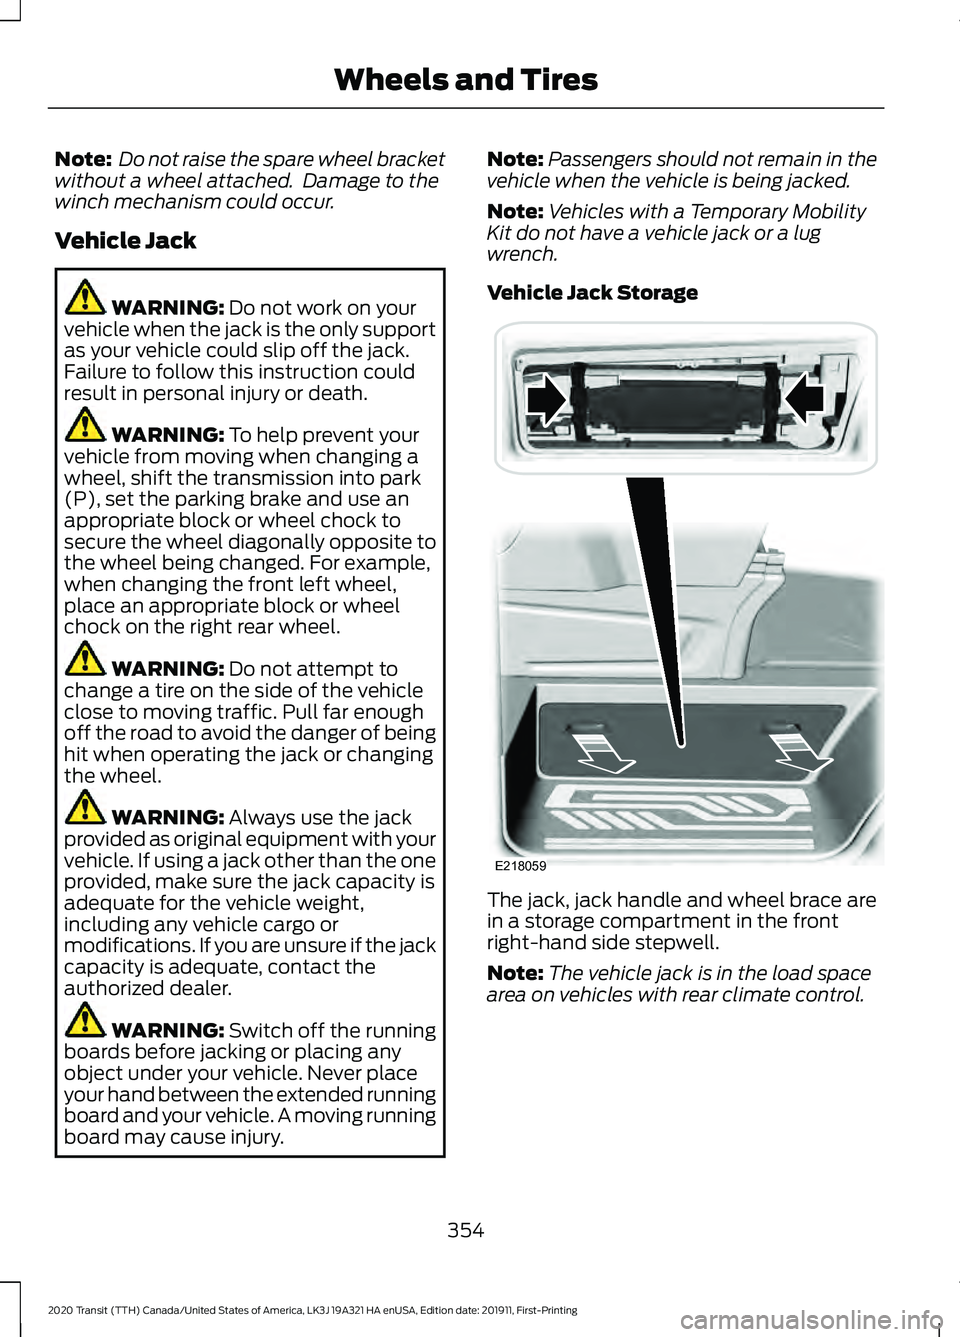
Vehicle Jack Storage The jack, jack handle and wheel brace are
in a storage compartment in the front
right-hand side stepwell.
Note:
The vehicle jack is in the load space
area on vehicles with rear climate control.
354
2020 Transit (TTH) Canada/United States of America, LK3J 19A321 HA enUSA, Edition date: 201911, First-Printing Wheels and TiresE218059
Page 358 of 529
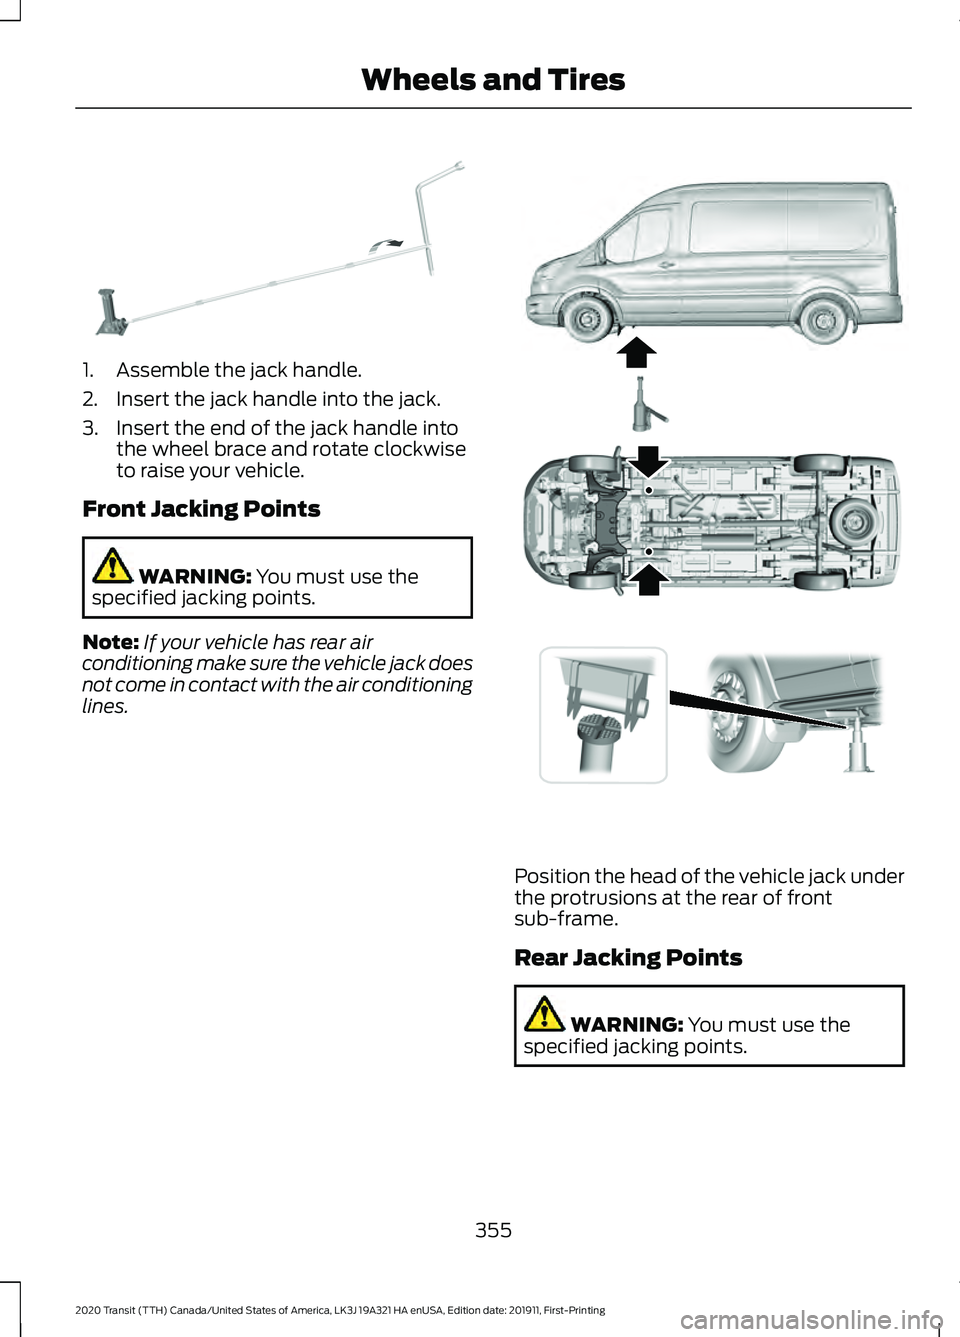
1. Assemble the jack handle.
2. Insert the jack handle into the jack.
3. Insert the end of the jack handle into
the wheel brace and rotate clockwise
to raise your vehicle.
Front Jacking Points WARNING: You must use the
specified jacking points.
Note: If your vehicle has rear air
conditioning make sure the vehicle jack does
not come in contact with the air conditioning
lines. Position the head of the vehicle jack under
the protrusions at the rear of front
sub-frame.
Rear Jacking Points
WARNING:
You must use the
specified jacking points.
355
2020 Transit (TTH) Canada/United States of America, LK3J 19A321 HA enUSA, Edition date: 201911, First-Printing Wheels and TiresE297495 E171405
Page 359 of 529
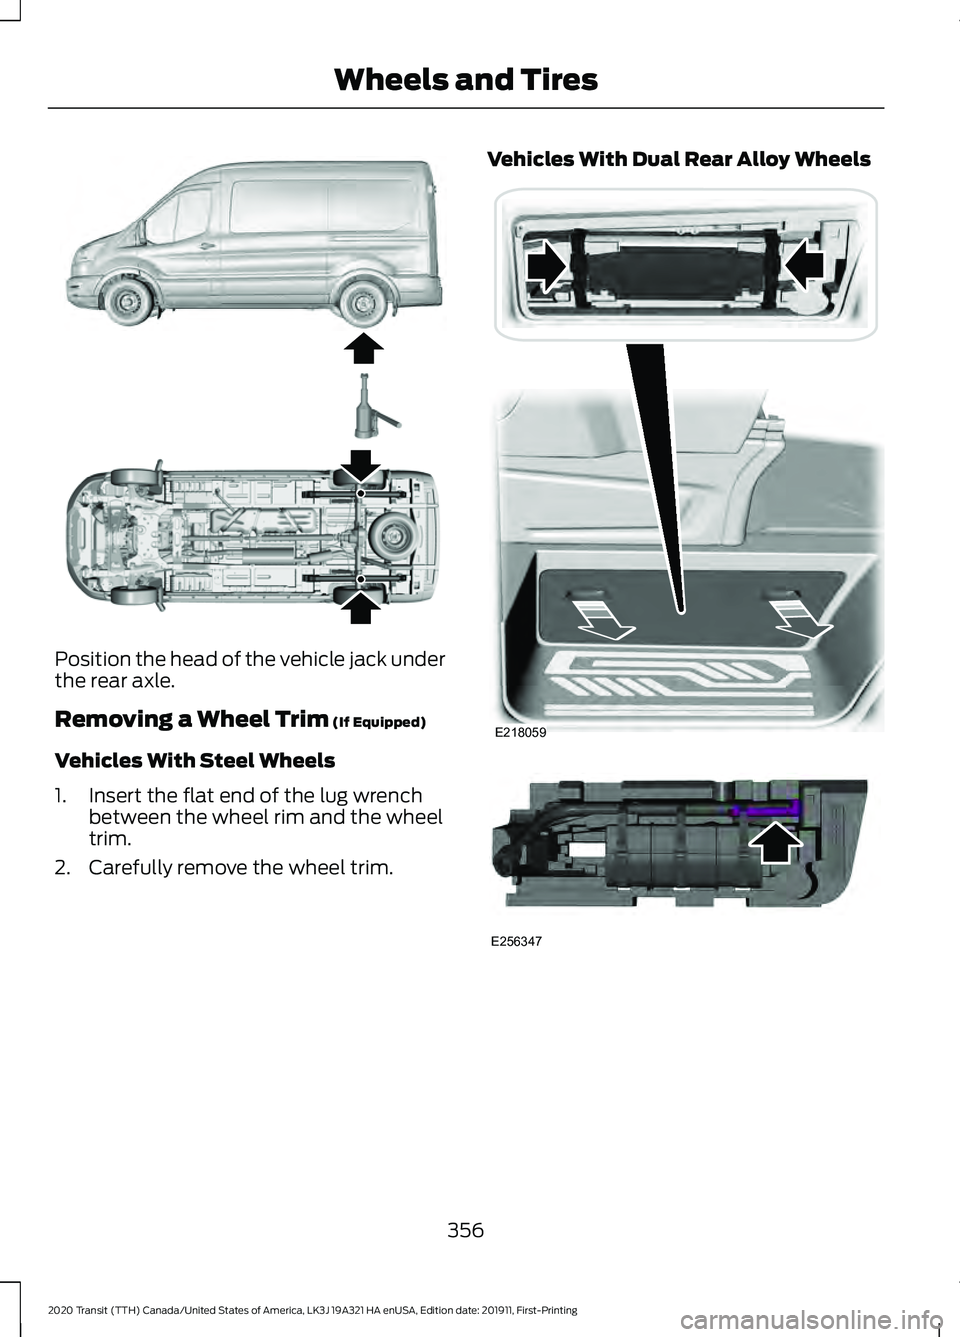
Position the head of the vehicle jack under
the rear axle.
Removing a Wheel Trim (If Equipped)
Vehicles With Steel Wheels
1. Insert the flat end of the lug wrench between the wheel rim and the wheel
trim.
2. Carefully remove the wheel trim. Vehicles With Dual Rear Alloy Wheels
356
2020 Transit (TTH) Canada/United States of America, LK3J 19A321 HA enUSA, Edition date: 201911, First-Printing Wheels and TiresE171406 E218059 E256347
Page 360 of 529
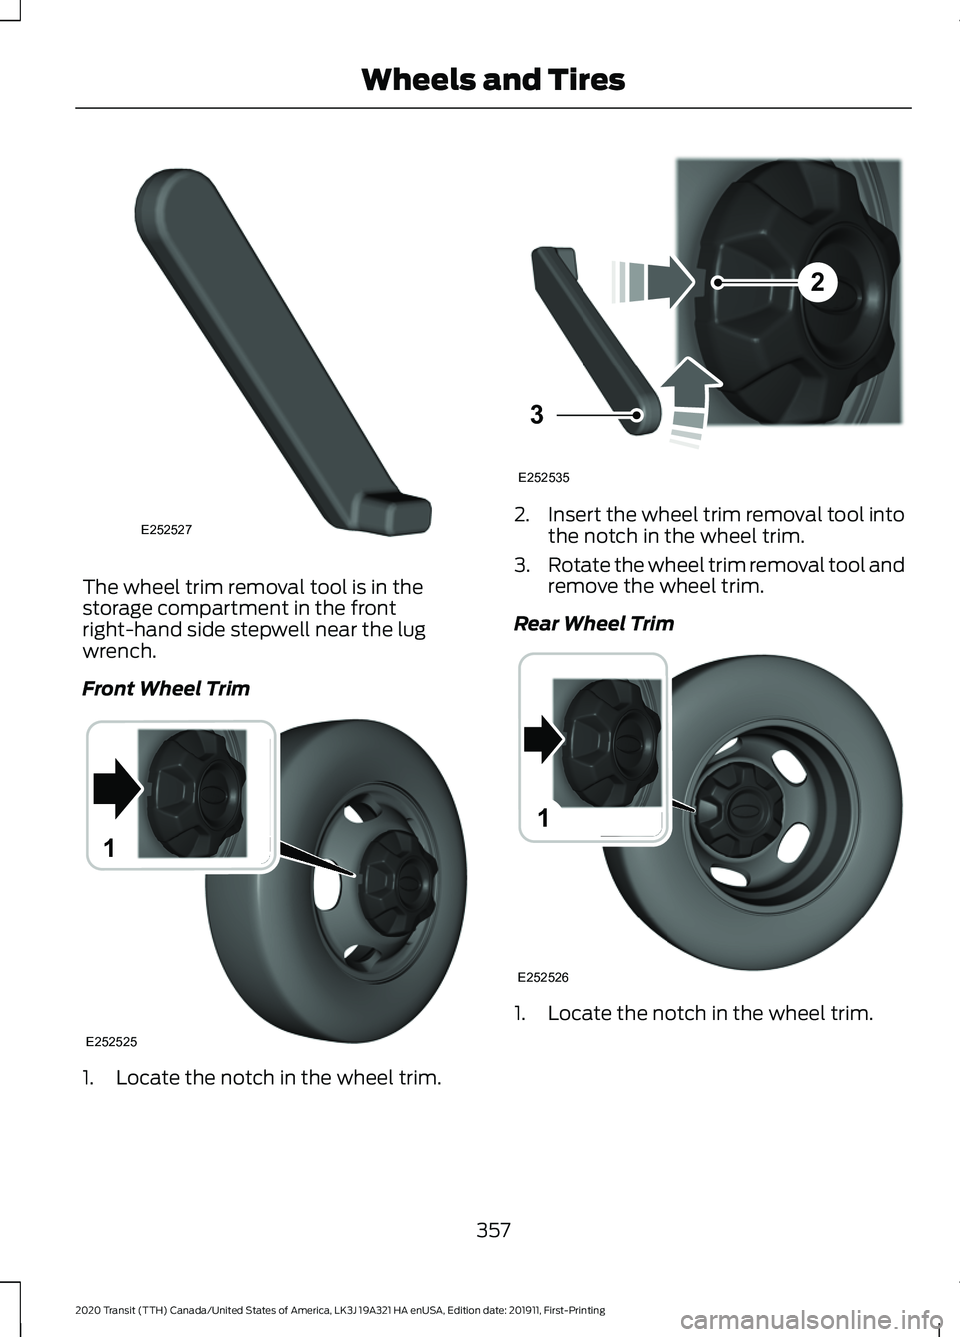
The wheel trim removal tool is in the
storage compartment in the front
right-hand side stepwell near the lug
wrench.
Front Wheel Trim
1. Locate the notch in the wheel trim. 2.
Insert the wheel trim removal tool into
the notch in the wheel trim.
3. Rotate the wheel trim removal tool and
remove the wheel trim.
Rear Wheel Trim 1. Locate the notch in the wheel trim.
357
2020 Transit (TTH) Canada/United States of America, LK3J 19A321 HA enUSA, Edition date: 201911, First-Printing Wheels and TiresE252527 E252525
1 2
3
E252535 1
E252526