warning light FORD TRANSIT 2020 Service Manual
[x] Cancel search | Manufacturer: FORD, Model Year: 2020, Model line: TRANSIT, Model: FORD TRANSIT 2020Pages: 529, PDF Size: 8.3 MB
Page 233 of 529
PRE-COLLISION ASSIST
WARNING: You are responsible for
controlling your vehicle at all times. The
system is designed to be an aid and does
not relieve you of your responsibility to
drive with due care and attention. Failure
to follow this instruction could result in
the loss of control of your vehicle,
personal injury or death. WARNING: The system does not
operate during hard acceleration or
steering. Failure to take care may lead
to a crash or personal injury. WARNING: The system may fail or
operate with reduced function during
cold and severe weather conditions.
Snow, ice, rain, spray and fog can
adversely affect the system. Keep the
front camera and radar free of snow and
ice. Failure to take care may result in the
loss of control of your vehicle, serious
personal injury or death. WARNING:
The system may not
operate properly if your vehicle has a
non-Ford windshield. Do not carry out
windshield repairs in the area around the
sensor. WARNING:
Some situations and
objects prevent hazard detection. For
example low or direct sunlight, inclement
weather, unconventional vehicle types,
and pedestrians. Apply the brakes when
necessary. Failure to follow this
instruction could result in the loss of
control of your vehicle, personal injury or
death. WARNING: The Pre-Collision Assist
system with brake support cannot help
prevent all collisions. Do not rely on this
system to replace your judgment and the
need to maintain correct distance and
speed.
The pre-collision assist system is active
when your vehicle reaches a speed greater
than approximately
6 mph (10 km/h).
Pedestrian detection is active at speeds
up to
50 mph (80 km/h).
Note: The system is not designed to detect
animals.
Note: The system is not designed to detect
vehicles or cyclists that are traveling in a
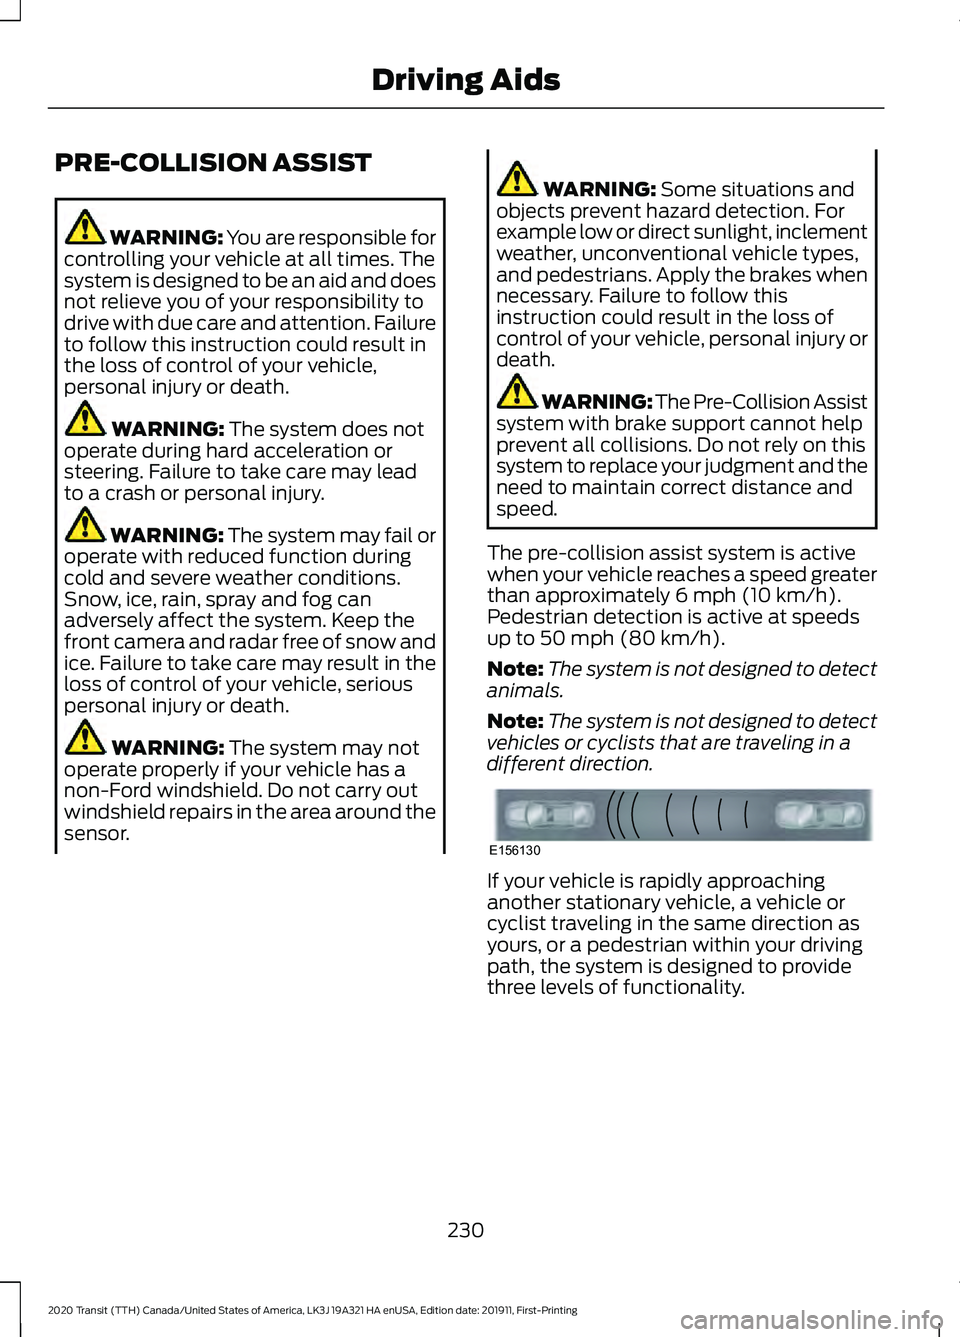
different direction. If your vehicle is rapidly approaching
another stationary vehicle, a vehicle or
cyclist traveling in the same direction as
yours, or a pedestrian within your driving
path, the system is designed to provide
three levels of functionality.
230
2020 Transit (TTH) Canada/United States of America, LK3J 19A321 HA enUSA, Edition date: 201911, First-Printing Driving AidsE156130
Page 234 of 529
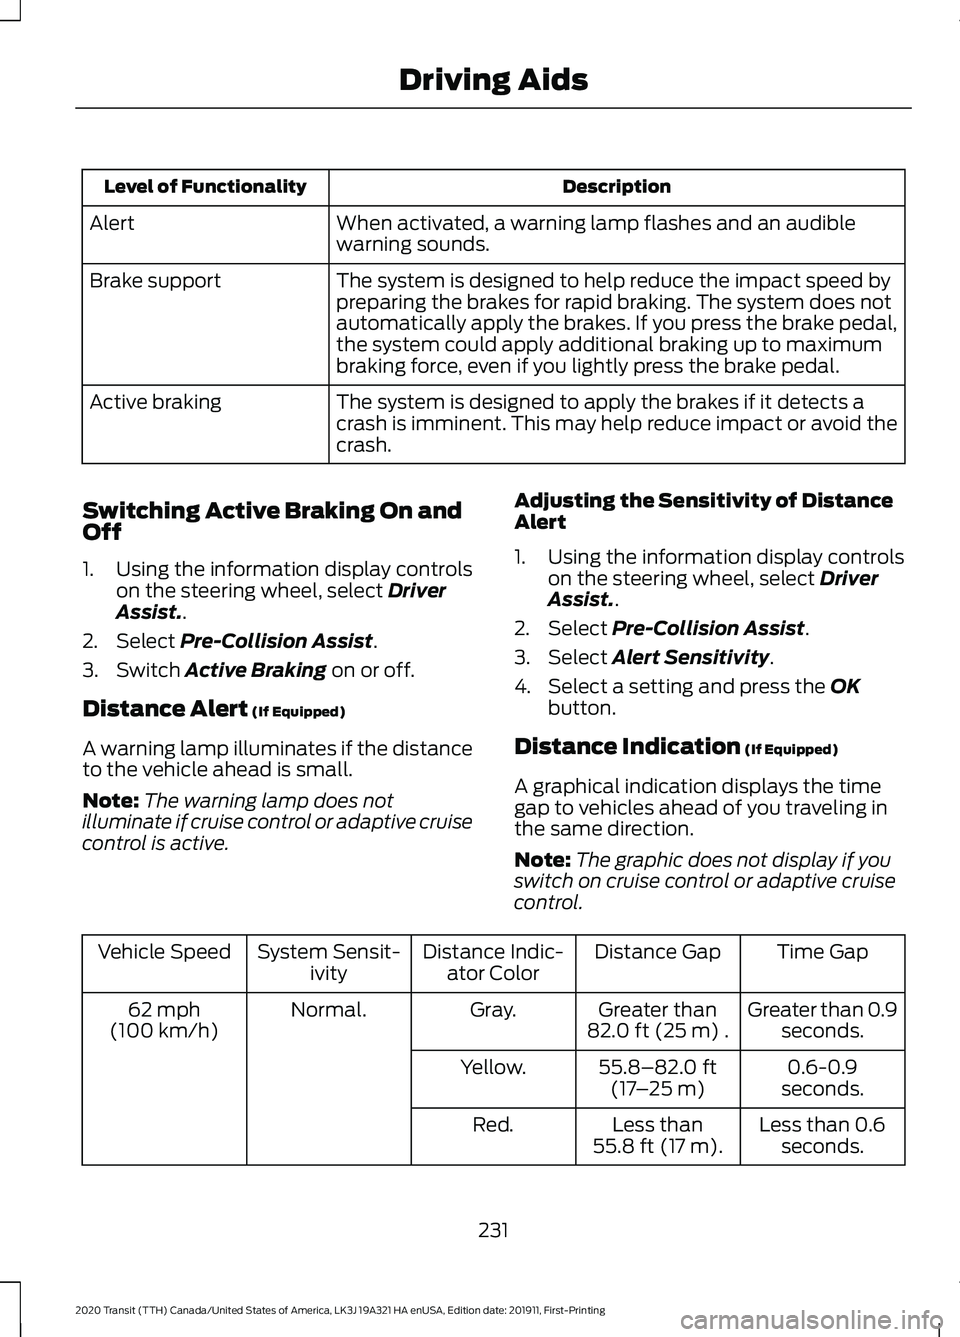
Description
Level of Functionality
When activated, a warning lamp flashes and an audible
warning sounds.
Alert
The system is designed to help reduce the impact speed by
preparing the brakes for rapid braking. The system does not
automatically apply the brakes. If you press the brake pedal,
the system could apply additional braking up to maximum
braking force, even if you lightly press the brake pedal.
Brake support
The system is designed to apply the brakes if it detects a
crash is imminent. This may help reduce impact or avoid the
crash.
Active braking
Switching Active Braking On and
Off
1. Using the information display controls on the steering wheel, select Driver
Assist..
2. Select
Pre-Collision Assist.
3. Switch
Active Braking on or off.
Distance Alert
(If Equipped)
A warning lamp illuminates if the distance
to the vehicle ahead is small.
Note: The warning lamp does not
illuminate if cruise control or adaptive cruise
control is active. Adjusting the Sensitivity of Distance
Alert
1. Using the information display controls
on the steering wheel, select
Driver
Assist..
2. Select
Pre-Collision Assist.
3. Select
Alert Sensitivity.
4. Select a setting and press the
OK
button.
Distance Indication
(If Equipped)
A graphical indication displays the time
gap to vehicles ahead of you traveling in
the same direction.
Note: The graphic does not display if you
switch on cruise control or adaptive cruise
control. Time Gap
Distance Gap
Distance Indic-
ator Color
System Sensit-
ivity
Vehicle Speed
Greater than 0.9seconds.
Greater than
82.0 ft (25 m)
.
Gray.
Normal.
62 mph
(100 km/h)
0.6-0.9
seconds.
55.8–82.0 ft
(17 –25 m)
Yellow.
Less than 0.6seconds.
Less than
55.8 ft (17 m)
.
Red.
231
2020 Transit (TTH) Canada/United States of America, LK3J 19A321 HA enUSA, Edition date: 201911, First-Printing Driving Aids
Page 245 of 529
TOWING A TRAILER
WARNING: Towing trailers
beyond the maximum
recommended gross trailer
weight exceeds the limit of your
vehicle and could result in engine
damage, transmission damage,
structural damage, loss of
vehicle control, vehicle rollover
and personal injury. WARNING:
Do not exceed
the GVWR or the GAWR
specified on the certification
label.
Note: See
Recommended
Towing Weights (page 243).
Your vehicle may have electrical
items, such as fuses or relays,
related to towing. See
Fuses
(page 273).
Your vehicle's load capacity
designation is by weight, not by
volume, so you cannot necessarily
use all available space when
loading a vehicle or trailer.
Towing a trailer places an extra
load on your vehicle's engine,
transmission, axle, brakes, tires
and suspension. Inspect these
components periodically during,
and after, any towing operation. Load Placement
To help minimize how trailer
movement affects your vehicle
when driving:
•
Load the heaviest items closest
to the trailer floor.
• Load the heaviest items
centered between the left and
right side trailer tires.
• Load the heaviest items above
the trailer axles or just slightly
forward toward the trailer
tongue. Do not allow the final
trailer tongue weight to go
above or below 10-15% of the
loaded trailer weight.
• Select a ball mount with the
correct rise or drop and load
capacity. When both the
loaded vehicle and trailer are
connected, the trailer frame
should be level, or slightly
angled down toward your
vehicle, when viewed from the
side.
When driving with a trailer or
payload, a slight takeoff vibration
or shudder may be present due to
the increased payload weight.
Additional information regarding
proper trailer loading and setting
your vehicle up for towing is
located in another chapter of this
manual. See
Load Limit (page
237).
You can also find information in
the
RV & Trailer Towing Guide
available at your authorized
dealer, or online.
242
2020 Transit (TTH) Canada/United States of America, LK3J 19A321 HA enUSA, Edition date: 201911, First-Printing Towing
Page 258 of 529
BREAKING-IN
You need to break in new tires for
approximately 300 mi (480 km). During
this time, your vehicle may exhibit some
unusual driving characteristics. The engine
also needs to break in. Avoid hard
accelerations and driving too fast for the
first 1,000 mi (1,600 km). If possible, avoid
carrying heavy loads up steep grades
during the break-in period.
DRIVING THROUGH WATER WARNING:
Do not drive through
flowing or deep water as you may lose
control of your vehicle.
Note: Driving through standing water can
cause vehicle damage.
Note: Engine damage can occur if water
enters the air filter.
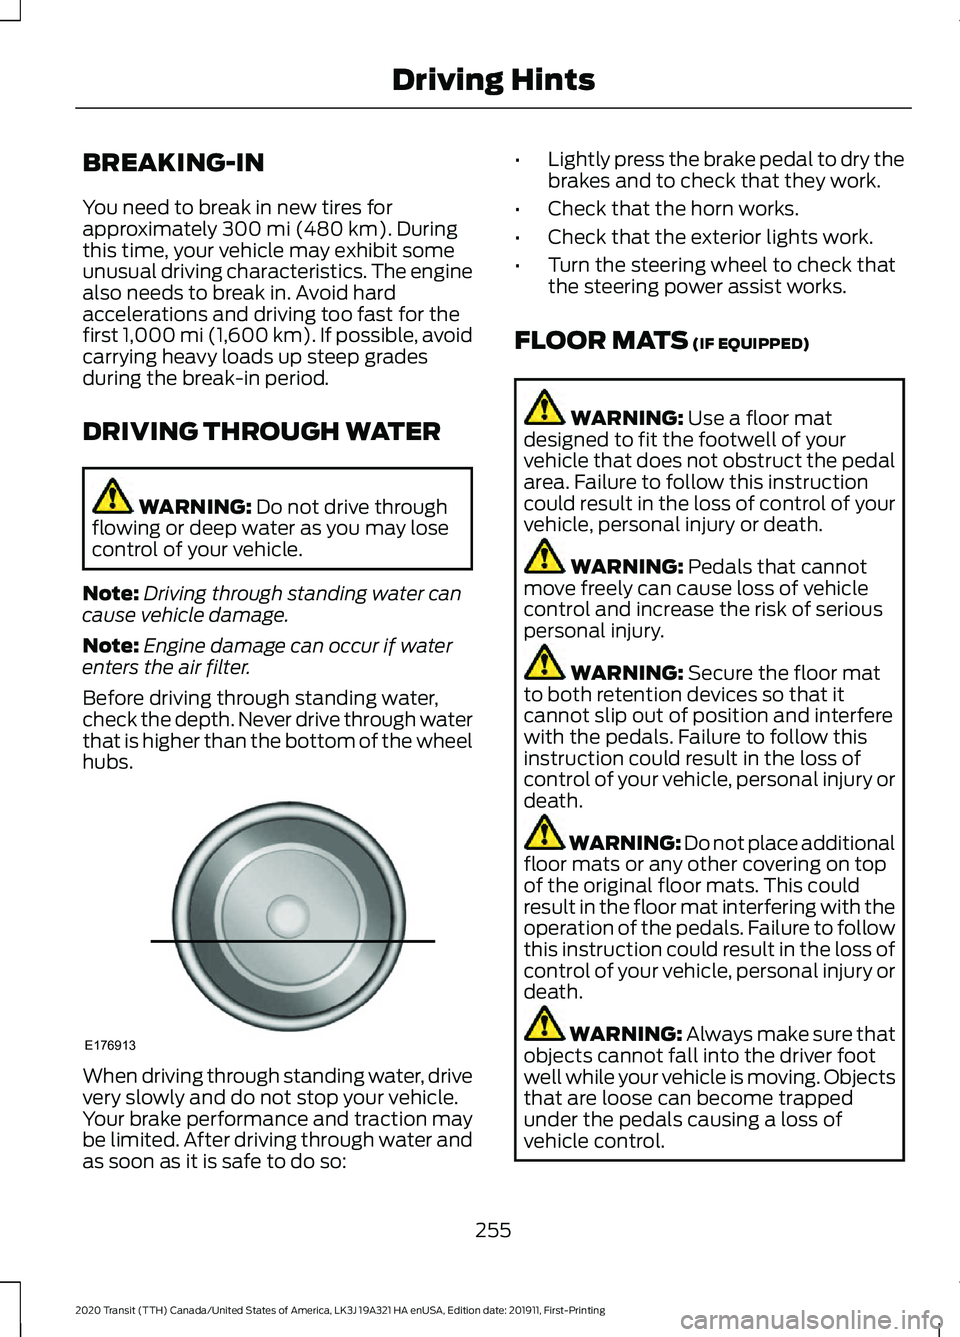
Before driving through standing water,
check the depth. Never drive through water
that is higher than the bottom of the wheel
hubs. When driving through standing water, drive
very slowly and do not stop your vehicle.
Your brake performance and traction may
be limited. After driving through water and
as soon as it is safe to do so: •
Lightly press the brake pedal to dry the
brakes and to check that they work.
• Check that the horn works.
• Check that the exterior lights work.
• Turn the steering wheel to check that
the steering power assist works.
FLOOR MATS
(IF EQUIPPED) WARNING:
Use a floor mat
designed to fit the footwell of your
vehicle that does not obstruct the pedal
area. Failure to follow this instruction
could result in the loss of control of your
vehicle, personal injury or death. WARNING:
Pedals that cannot
move freely can cause loss of vehicle
control and increase the risk of serious
personal injury. WARNING:
Secure the floor mat
to both retention devices so that it
cannot slip out of position and interfere
with the pedals. Failure to follow this
instruction could result in the loss of
control of your vehicle, personal injury or
death. WARNING: Do not place additional
floor mats or any other covering on top
of the original floor mats. This could
result in the floor mat interfering with the
operation of the pedals. Failure to follow
this instruction could result in the loss of
control of your vehicle, personal injury or
death. WARNING:
Always make sure that
objects cannot fall into the driver foot
well while your vehicle is moving. Objects
that are loose can become trapped
under the pedals causing a loss of
vehicle control.
255
2020 Transit (TTH) Canada/United States of America, LK3J 19A321 HA enUSA, Edition date: 201911, First-Printing Driving HintsE176913
Page 300 of 529
4.
Carefully lift the air filter housing cover.
Remove the air filter element from the
air filter housing.
5. Install a new air filter element.
6. Replace the air filter housing cover. Engage the clamps that secure the air
filter housing cover to the air filter
housing. Be careful not to crimp the
filter element edges between the air
filter housing and cover. Make sure
that the tabs on the edge are correctly
aligned into the slots.
7. Slip the air tube onto the air filter cover
and snugly tighten the bolt on the air
tube clamp, but do not overtighten.
8. Reconnect the intake air temperature sensor electrical connector to the
outlet tube. Make sure the locking tab
on the connector is in the locked
position.
DRAINING THE FUEL FILTER
WATER TRAP - DIESEL WARNING: Do not dispose of fuel
in the household refuse or the public
sewage system. Use an authorized waste
disposal facility. You should drain water from the
fuel filter water trap whenever
the warning light illuminates or
a message appears in the information
display.
This occurs when approximately
7 fl oz
(200 ml) of water accumulates in the fuel
filter water trap. If you ignore the warning
lamp, water may pass through to the
system and may cause damage not
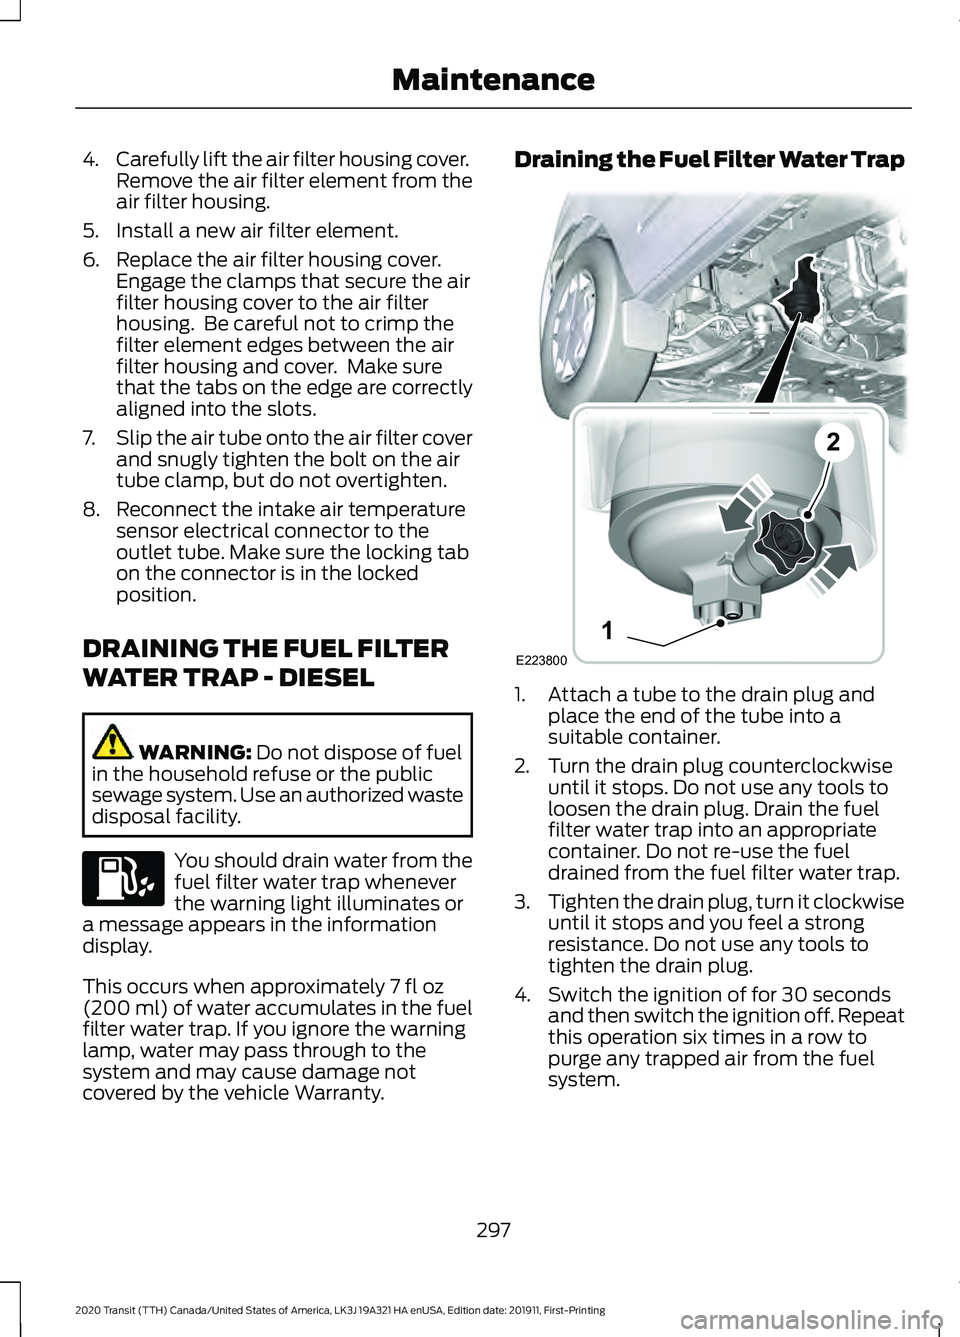
covered by the vehicle Warranty. Draining the Fuel Filter Water Trap
1. Attach a tube to the drain plug and
place the end of the tube into a
suitable container.
2. Turn the drain plug counterclockwise until it stops. Do not use any tools to
loosen the drain plug. Drain the fuel
filter water trap into an appropriate
container. Do not re-use the fuel
drained from the fuel filter water trap.
3. Tighten the drain plug, turn it clockwise
until it stops and you feel a strong
resistance. Do not use any tools to
tighten the drain plug.
4. Switch the ignition of for 30 seconds and then switch the ignition off. Repeat
this operation six times in a row to
purge any trapped air from the fuel
system.
297
2020 Transit (TTH) Canada/United States of America, LK3J 19A321 HA enUSA, Edition date: 201911, First-Printing Maintenance E223800
1
2
Page 301 of 529
ENGINE COOLING FAN -
DIESEL
WARNING: Keep your hands and
clothing clear of the engine cooling fan.
Under certain conditions, the engine
cooling fan may continue to run for several
minutes after you switch your vehicle off.
This could happen in low ambient
temperatures and independent of the
engine coolant temperature, for example
short journeys or low coolant temperature.
See
Diesel Particulate Filter (page 167).
ENGINE COOLING FAN -
GASOLINE WARNING:
Keep your hands and
clothing clear of the engine cooling fan.
Under certain conditions, the engine
cooling fan may continue to run for several
minutes after you switch your vehicle off.
ENGINE COOLANT CHECK WARNING:
Do not remove the
coolant reservoir cap when the engine is
on or the cooling system is hot. Wait 10
minutes for the cooling system to cool
down. Cover the coolant reservoir cap
with a thick cloth to prevent the
possibility of scalding and slowly remove
the cap. Failure to follow this instruction
could result in personal injury. WARNING:
Do not put coolant in
the windshield washer reservoir. If
sprayed on the windshield, coolant could
make it difficult to see through the
windshield. WARNING:
To reduce the risk of
personal injury, make sure the engine is
cool before unscrewing the coolant
pressure relief cap. The cooling system
is under pressure. Steam and hot liquid
can come out forcefully when you loosen
the cap slightly. WARNING:
Do not add coolant
further than the MAX mark.
When the engine is cold, check the
concentration and level of the coolant at
the intervals listed in the scheduled
maintenance information. See Scheduled
Maintenance
(page 462).
Note: Make sure that the coolant level is
between the
MIN and MAX marks on the
coolant reservoir.
Note: Coolant expands when it is hot. The
level may extend beyond the
MAX mark.
Maintain coolant concentration within
48% to 50%, which equates to a freeze
point between
-29°F (-34°C) and -35°F
(-37°C). Coolant concentration should be
checked using a refractometer. We do not
recommend the use of hydrometers or
coolant test strips for measuring coolant
concentration.
Adding Coolant WARNING:
Do not add engine
coolant when the engine is on or the
cooling system is hot. Failure to follow
this instruction could result in personal
injury.
298
2020 Transit (TTH) Canada/United States of America, LK3J 19A321 HA enUSA, Edition date: 201911, First-Printing Maintenance
Page 309 of 529
Note:
There may be an identifying mark on
the lens to help you locate the center of the
bulb.
Note: To see a clearer light pattern while
adjusting one headlamp, you may want to
block the light from the other headlamp.
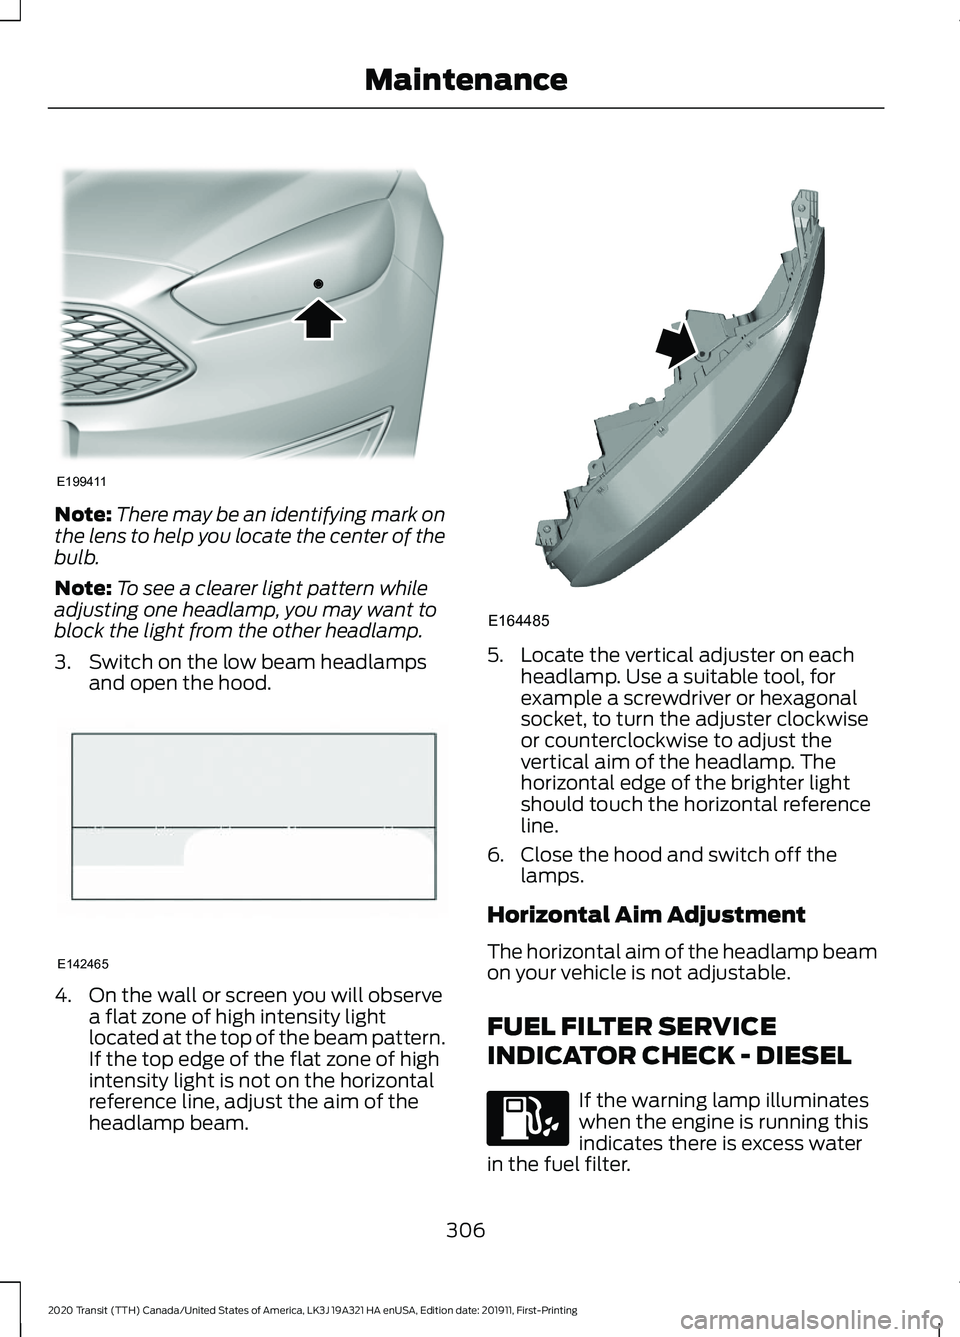
3. Switch on the low beam headlamps and open the hood. 4. On the wall or screen you will observe
a flat zone of high intensity light
located at the top of the beam pattern.
If the top edge of the flat zone of high
intensity light is not on the horizontal
reference line, adjust the aim of the
headlamp beam. 5. Locate the vertical adjuster on each
headlamp. Use a suitable tool, for
example a screwdriver or hexagonal
socket, to turn the adjuster clockwise
or counterclockwise to adjust the
vertical aim of the headlamp. The
horizontal edge of the brighter light
should touch the horizontal reference
line.
6. Close the hood and switch off the lamps.
Horizontal Aim Adjustment
The horizontal aim of the headlamp beam
on your vehicle is not adjustable.
FUEL FILTER SERVICE
INDICATOR CHECK - DIESEL If the warning lamp illuminates
when the engine is running this
indicates there is excess water
in the fuel filter.
306
2020 Transit (TTH) Canada/United States of America, LK3J 19A321 HA enUSA, Edition date: 201911, First-Printing MaintenanceE199411 E142465 E164485
Page 320 of 529
Note:
Do not apply cleaning product to hot
surfaces and do not leave cleaning product
on chrome surfaces for a period of time
exceeding that which is recommended.
Note: Industrial-strength (heavy-duty)
cleaners, or cleaning chemicals, may cause
damage over a period of time.
Body Paintwork Preservation
Frequently remove particles such as bird
droppings, tree sap, insect deposits, tar
spots, road salt and industrial fallout to
avoid paint surface damage.
Frequently wash the underbody of your
vehicle if salt is applied on the road.
We recommend that you wax the
paintwork once or twice a year.
Note: Do not apply polish in strong sunlight
as this dries the polish too quickly.
Note: Do not allow polish to come in
contact with unpainted plastic surfaces as
it can be difficult to remove.
Note: Do not apply polish to the windshield
or rear window. A contaminated windshield
or contaminated wiper blades may lead to
increased wiper noise, reduced wipe quality
or reduced rain sensor performance.
Sliding Door Tracks WARNING: Do not open or close
the sliding doors when your hands are
near the tracks or rollers.
To clean the sliding door tracks, wipe the
surface using a clean, cotton cloth with a
mild soap and water solution.
Do not use a commercial or high-pressure
washer. WAXING
Regular waxing is necessary to protect your
car's paint from the elements. We
recommend that you wash and wax the
painted surface once or twice a year.
When washing and waxing, park your
vehicle in a shaded area out of direct
sunlight. Always wash your vehicle before
applying wax.
•
Use a quality wax that does not contain
abrasives.
• Follow the manufacturer ’s instructions
to apply and remove the wax.
• Apply a small amount of wax in a
back-and-forth motion, not in circles.
• Do not allow wax to come in contact
with any non-body (low-gloss black)
colored trim. The wax will discolor or
stain the parts over time.
•Roof racks.
• Bumpers.
• Grained door handles.
• Side moldings.
• Mirror housings.
• Windshield cowl area.
• Do not apply wax to glass areas.
• After waxing, your car's paint should
feel smooth, and be free of streaks and
smudges.
CLEANING THE ENGINE
Engines are more efficient when they are
clean because grease and dirt buildup keep
the engine warmer than normal.
317
2020 Transit (TTH) Canada/United States of America, LK3J 19A321 HA enUSA, Edition date: 201911, First-Printing Vehicle Care
Page 351 of 529
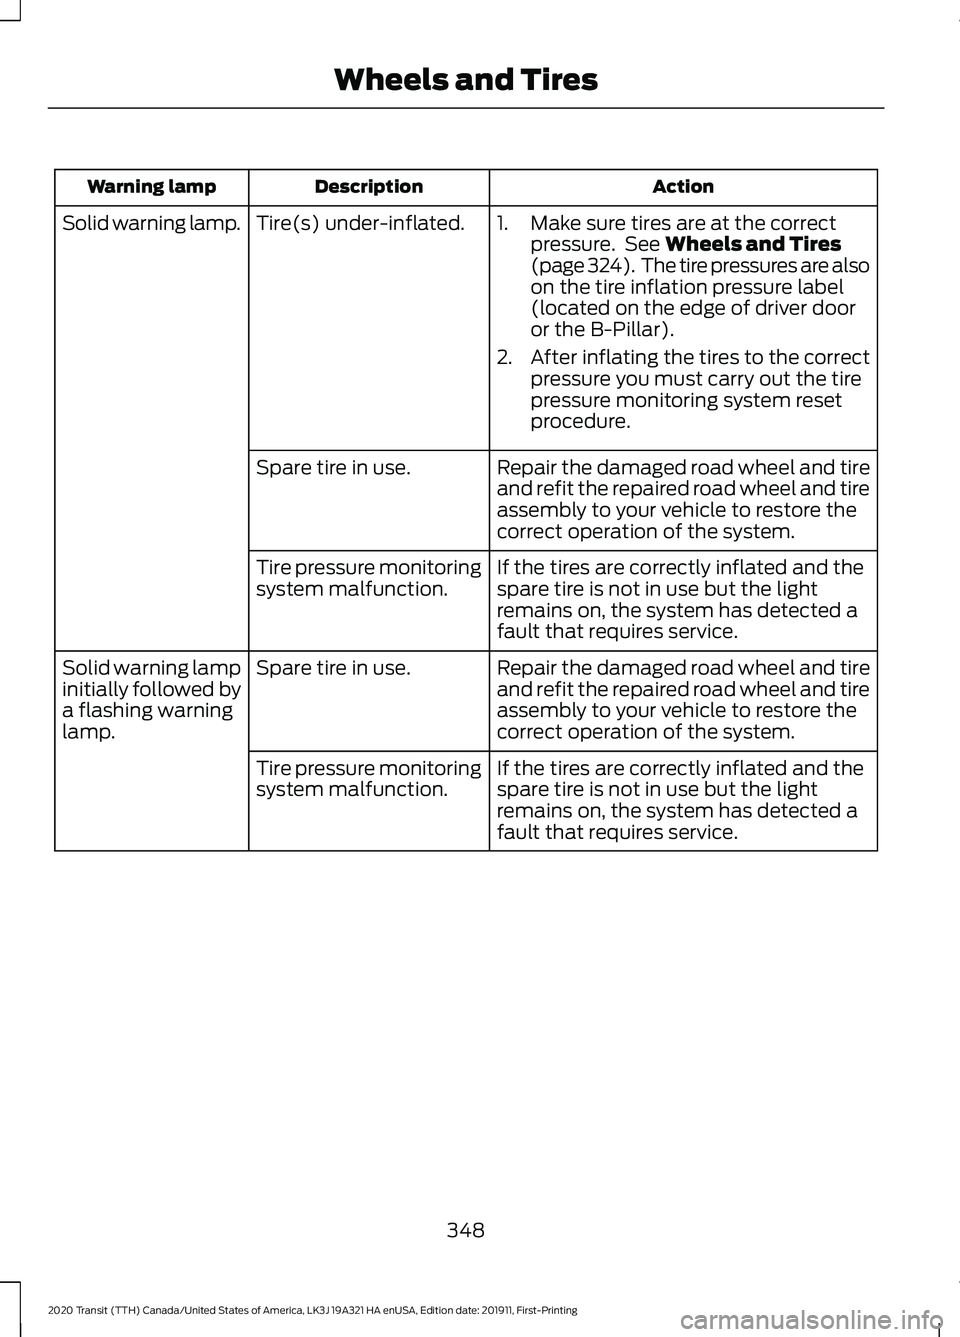
Action
Description
Warning lamp
1. Make sure tires are at the correctpressure. See Wheels and Tires
(page 324). The tire pressures are also
on the tire inflation pressure label
(located on the edge of driver door
or the B-Pillar).
2. After inflating the tires to the correct
pressure you must carry out the tire
pressure monitoring system reset
procedure.
Tire(s) under-inflated.
Solid warning lamp.
Repair the damaged road wheel and tire
and refit the repaired road wheel and tire
assembly to your vehicle to restore the
correct operation of the system.
Spare tire in use.
If the tires are correctly inflated and the
spare tire is not in use but the light
remains on, the system has detected a
fault that requires service.
Tire pressure monitoring
system malfunction.
Repair the damaged road wheel and tire
and refit the repaired road wheel and tire
assembly to your vehicle to restore the
correct operation of the system.
Spare tire in use.
Solid warning lamp
initially followed by
a flashing warning
lamp.
If the tires are correctly inflated and the
spare tire is not in use but the light
remains on, the system has detected a
fault that requires service.
Tire pressure monitoring
system malfunction.
348
2020 Transit (TTH) Canada/United States of America, LK3J 19A321 HA enUSA, Edition date: 201911, First-Printing Wheels and Tires
Page 352 of 529
Tire Pressure Monitoring System
Reset Procedure
Overview
WARNING: To determine the
required pressure(s) for your vehicle, see
the Safety Compliance Certification
Label (on the door hinge pillar,
door-latch post or the door edge that
meets the door-latch post, next to the
driver seat) or the Tire Label on the
B-Pillar or the edge of the driver door.
You must carry out the system reset
procedure after each tire replacement or
adjustment of the tire pressures. To maintain your vehicle load carrying
capability, your vehicle requires different
tire pressures in the front tires compared
to the rear tires.
The system illuminates the warning lamp
at different pressures for the front and rear
tires.
If the tires are rotated, the Tire Pressure
Monitoring System needs to be reset to
relearn the new tire pressures. It does not
know which sensor is where and assumes
you have set the pressures correctly.
Carrying Out the System Reset
Procedure
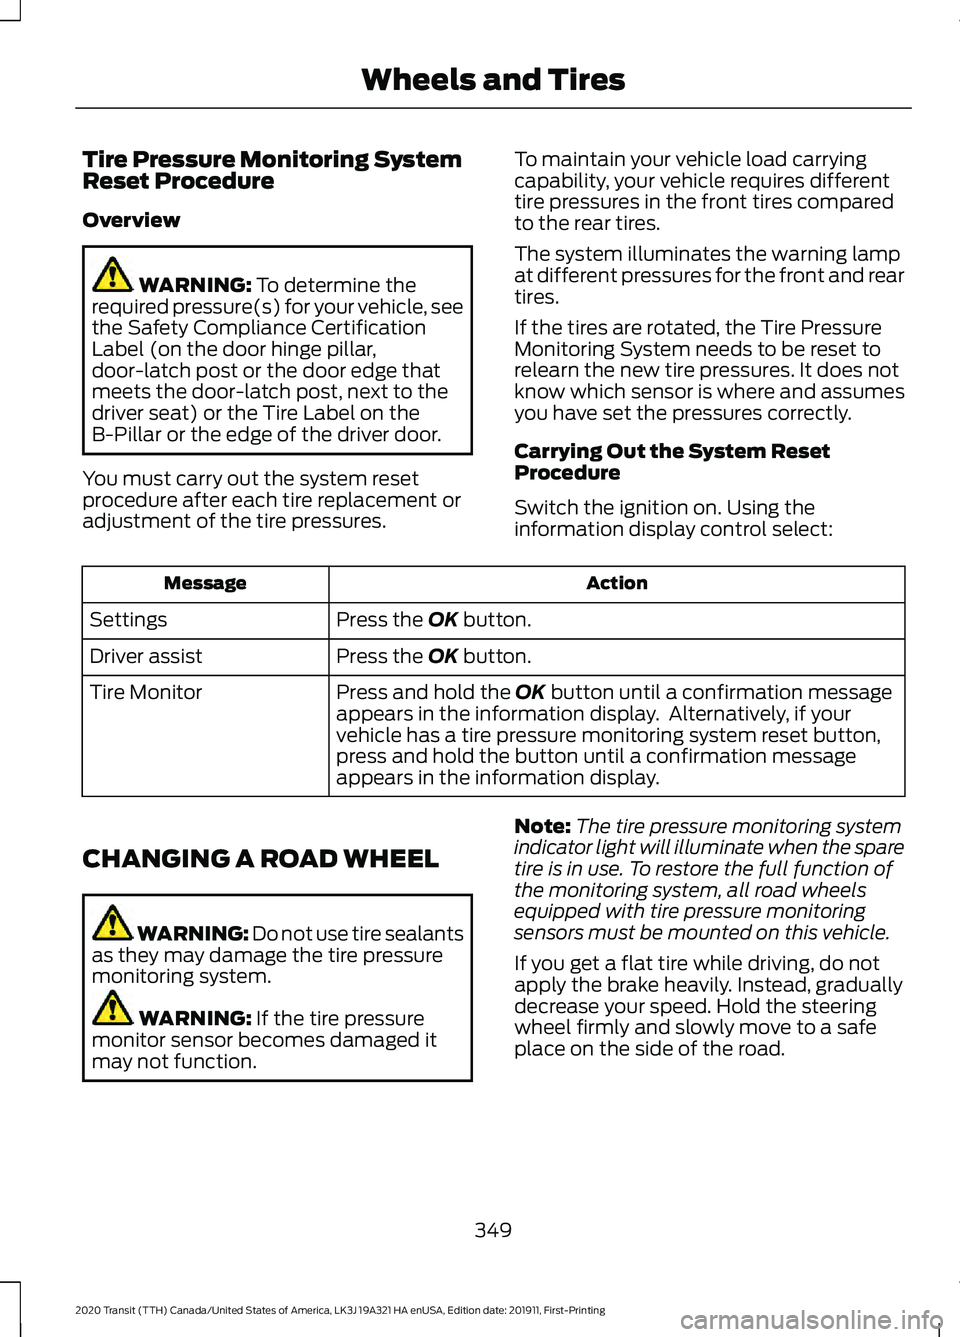
Switch the ignition on. Using the
information display control select: Action
Message
Press the
OK button.
Settings
Press the
OK button.
Driver assist
Press and hold the
OK button until a confirmation message
appears in the information display. Alternatively, if your
vehicle has a tire pressure monitoring system reset button,
press and hold the button until a confirmation message
appears in the information display.
Tire Monitor
CHANGING A ROAD WHEEL WARNING: Do not use tire sealants
as they may damage the tire pressure
monitoring system. WARNING:
If the tire pressure
monitor sensor becomes damaged it
may not function. Note:
The tire pressure monitoring system
indicator light will illuminate when the spare
tire is in use. To restore the full function of
the monitoring system, all road wheels
equipped with tire pressure monitoring
sensors must be mounted on this vehicle.
If you get a flat tire while driving, do not
apply the brake heavily. Instead, gradually
decrease your speed. Hold the steering
wheel firmly and slowly move to a safe
place on the side of the road.
349
2020 Transit (TTH) Canada/United States of America, LK3J 19A321 HA enUSA, Edition date: 201911, First-Printing Wheels and Tires