steering FORD TRANSIT 2020 Repair Manual
[x] Cancel search | Manufacturer: FORD, Model Year: 2020, Model line: TRANSIT, Model: FORD TRANSIT 2020Pages: 529, PDF Size: 8.3 MB
Page 237 of 529
Using the Front View Camera
The front view camera provides a video
image of the area in front of your vehicle.
To use the front view camera system,
place the transmission in any gear except
reverse (R). An image of the front of your
vehicle appears once you press the camera
enable button and your vehicle speed is
below 6 mph (10 km/h).
Note: The area displayed on the screen may
vary according to your vehicle's orientation
or road condition.
Note: The front view camera will switch off
if your vehicle speed exceeds
6 mph
(10 km/h). You will have to switch the
system back on by using the enable button
once below the speed threshold.
Note: The camera system may not operate
correctly if mud, water or debris obstructs
the camera's view. You can clean the lens
with a soft, lint-free cloth and non-abrasive
cleaner or by using your front washer. See
Wipers and Washers
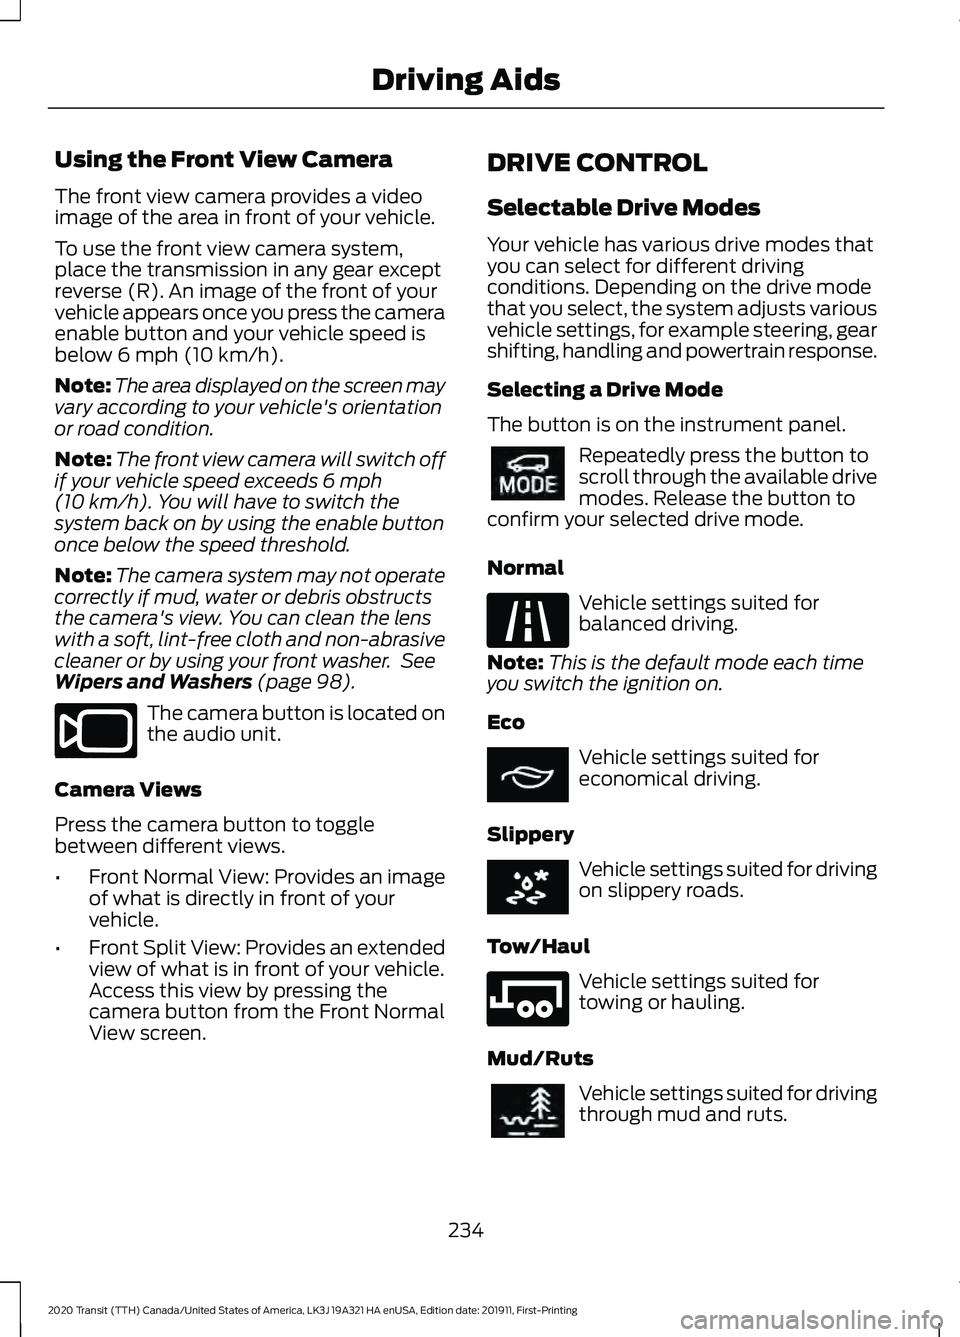
(page 98). The camera button is located on
the audio unit.
Camera Views
Press the camera button to toggle
between different views.
• Front Normal View: Provides an image
of what is directly in front of your
vehicle.
• Front Split View: Provides an extended
view of what is in front of your vehicle.
Access this view by pressing the
camera button from the Front Normal
View screen. DRIVE CONTROL
Selectable Drive Modes
Your vehicle has various drive modes that
you can select for different driving
conditions. Depending on the drive mode
that you select, the system adjusts various
vehicle settings, for example steering, gear
shifting, handling and powertrain response.
Selecting a Drive Mode
The button is on the instrument panel.
Repeatedly press the button to
scroll through the available drive
modes. Release the button to
confirm your selected drive mode.
Normal Vehicle settings suited for
balanced driving.
Note: This is the default mode each time
you switch the ignition on.
Eco Vehicle settings suited for
economical driving.
Slippery Vehicle settings suited for driving
on slippery roads.
Tow/Haul Vehicle settings suited for
towing or hauling.
Mud/Ruts Vehicle settings suited for driving
through mud and ruts.
234
2020 Transit (TTH) Canada/United States of America, LK3J 19A321 HA enUSA, Edition date: 201911, First-Printing Driving AidsE188847 E298514 E225310 E267164 E269320 E246592 E296606
Page 256 of 529
•
If your vehicle is fitted with
AdvanceTrac with roll stability control
(RSC), this system may turn on during
typical cornering maneuvers with a
heavily loaded trailer. This is normal.
Turning the corner at a slower speed
while towing may reduce this tendency.
• If you are towing a trailer frequently in
hot weather, hilly conditions, at the
gross combined weight rating (or any
combination of these factors), consider
refilling your vehicle's rear axle with
synthetic gear lubricant (if the axle is
not already filled with it). See
Capacities and Specifications (page
362).
• Allow more distance for stopping with
a trailer attached. Anticipate stops and
brake gradually.
• Avoid parking on a grade. However, if
you must park on a grade:
•Turn the steering wheel to point
your vehicle tires away from traffic
flow.
• Set your vehicle parking brake.
• Place the automatic transmission
in position park (
P).
• Place wheel chocks in front of and
at the back of the trailer wheels.
(Trailer wheel chocks are not
included with your vehicle.)
Launching or Retrieving a Boat or
Personal Water Craft (PWC)
When backing down a ramp during boat
launching or retrieval:
• Do not allow the static water level to
rise above the bottom edge of the rear
bumper.
• Do not allow waves to break higher
than
6 in (15 cm) above the bottom
edge of the rear bumper.
Note: Disconnect the wiring to the trailer
before backing the trailer into the water. Note:
Reconnect the wiring to the trailer
after the trailer is removed from the water.
Exceeding these limits may allow water to
enter vehicle components:
• Causing internal damage to the
components.
• Affecting driveability, emissions, and
reliability.
Replace the rear axle lubricant anytime
the rear axle has been submerged in water.
Water may have contaminated the rear
axle lubricant, which is not normally
checked or changed unless a leak is
suspected or other axle repair is required.
TOWING THE VEHICLE ON
FOUR WHEELS
If you need to tow your vehicle, contact a
professional towing service or, if you are a
member of a roadside assistance program,
your roadside assistance service provider.
253
2020 Transit (TTH) Canada/United States of America, LK3J 19A321 HA enUSA, Edition date: 201911, First-Printing Towing
Page 258 of 529
BREAKING-IN
You need to break in new tires for
approximately 300 mi (480 km). During
this time, your vehicle may exhibit some
unusual driving characteristics. The engine
also needs to break in. Avoid hard
accelerations and driving too fast for the
first 1,000 mi (1,600 km). If possible, avoid
carrying heavy loads up steep grades
during the break-in period.
DRIVING THROUGH WATER WARNING:
Do not drive through
flowing or deep water as you may lose
control of your vehicle.
Note: Driving through standing water can
cause vehicle damage.
Note: Engine damage can occur if water
enters the air filter.
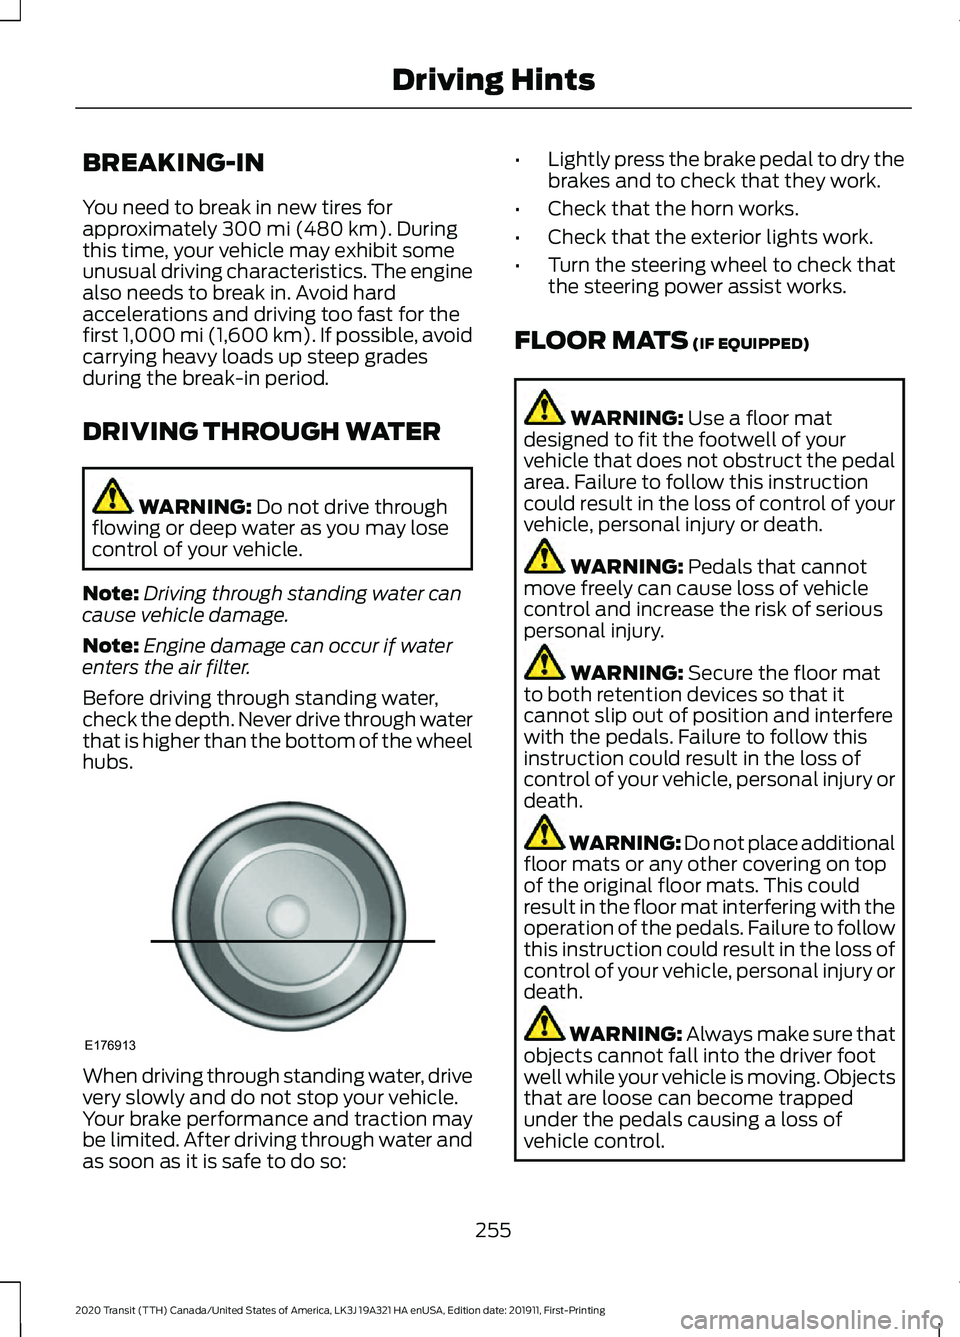
Before driving through standing water,
check the depth. Never drive through water
that is higher than the bottom of the wheel
hubs. When driving through standing water, drive
very slowly and do not stop your vehicle.
Your brake performance and traction may
be limited. After driving through water and
as soon as it is safe to do so: •
Lightly press the brake pedal to dry the
brakes and to check that they work.
• Check that the horn works.
• Check that the exterior lights work.
• Turn the steering wheel to check that
the steering power assist works.
FLOOR MATS
(IF EQUIPPED) WARNING:
Use a floor mat
designed to fit the footwell of your
vehicle that does not obstruct the pedal
area. Failure to follow this instruction
could result in the loss of control of your
vehicle, personal injury or death. WARNING:
Pedals that cannot
move freely can cause loss of vehicle
control and increase the risk of serious
personal injury. WARNING:
Secure the floor mat
to both retention devices so that it
cannot slip out of position and interfere
with the pedals. Failure to follow this
instruction could result in the loss of
control of your vehicle, personal injury or
death. WARNING: Do not place additional
floor mats or any other covering on top
of the original floor mats. This could
result in the floor mat interfering with the
operation of the pedals. Failure to follow
this instruction could result in the loss of
control of your vehicle, personal injury or
death. WARNING:
Always make sure that
objects cannot fall into the driver foot
well while your vehicle is moving. Objects
that are loose can become trapped
under the pedals causing a loss of
vehicle control.
255
2020 Transit (TTH) Canada/United States of America, LK3J 19A321 HA enUSA, Edition date: 201911, First-Printing Driving HintsE176913
Page 283 of 529
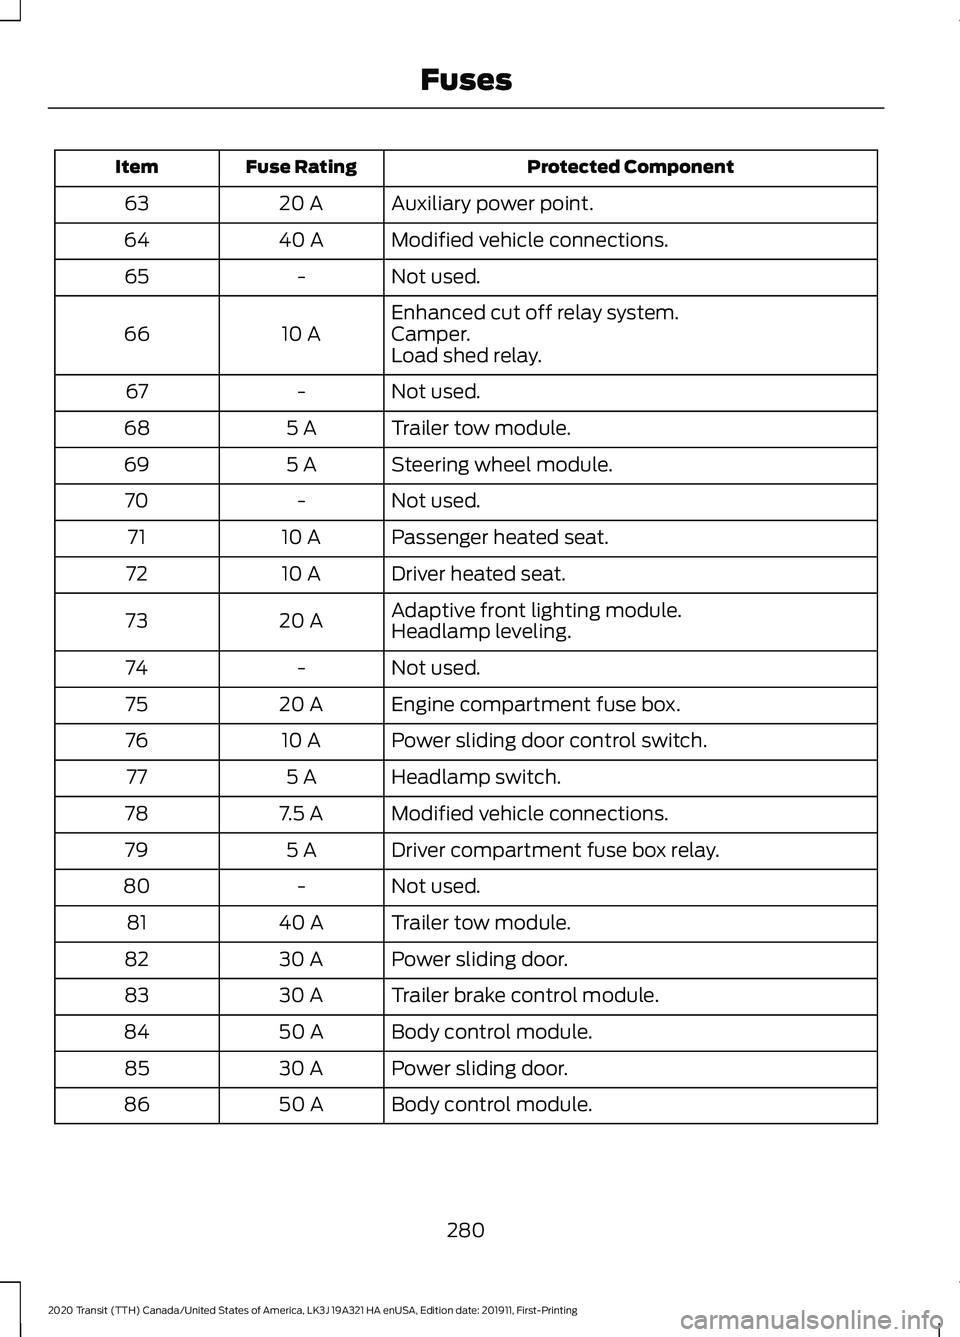
Protected Component
Fuse Rating
Item
Auxiliary power point.
20 A
63
Modified vehicle connections.
40 A
64
Not used.
-
65
Enhanced cut off relay system.
10 A
66 Camper.
Load shed relay.
Not used.
-
67
Trailer tow module.
5 A
68
Steering wheel module.
5 A
69
Not used.
-
70
Passenger heated seat.
10 A
71
Driver heated seat.
10 A
72
Adaptive front lighting module.
20 A
73
Headlamp leveling.
Not used.
-
74
Engine compartment fuse box.
20 A
75
Power sliding door control switch.
10 A
76
Headlamp switch.
5 A
77
Modified vehicle connections.
7.5 A
78
Driver compartment fuse box relay.
5 A
79
Not used.
-
80
Trailer tow module.
40 A
81
Power sliding door.
30 A
82
Trailer brake control module.
30 A
83
Body control module.
50 A
84
Power sliding door.
30 A
85
Body control module.
50 A
86
280
2020 Transit (TTH) Canada/United States of America, LK3J 19A321 HA enUSA, Edition date: 201911, First-Printing Fuses
Page 285 of 529
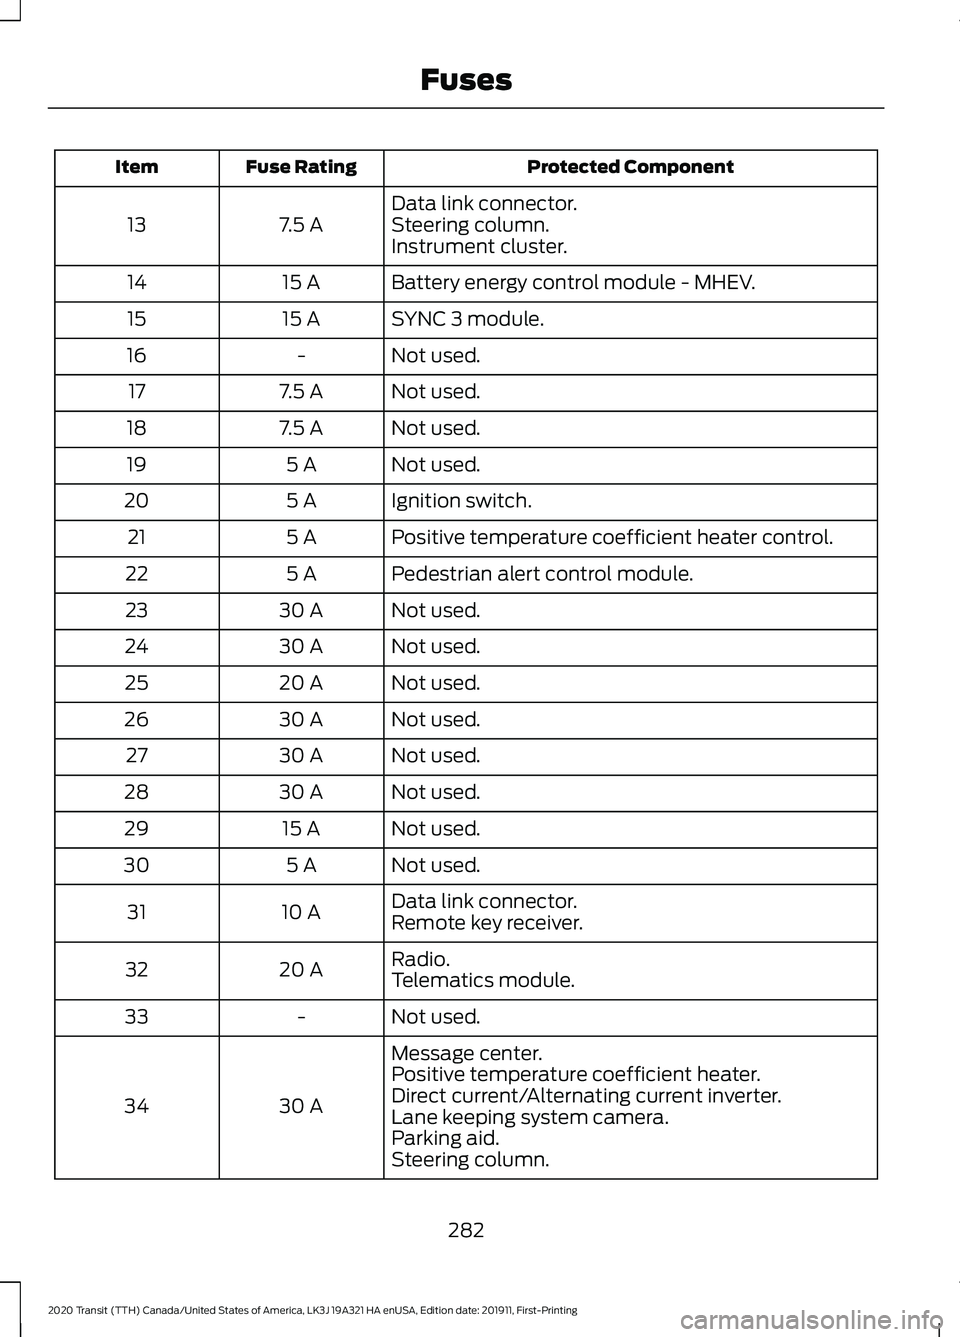
Protected Component
Fuse Rating
Item
Data link connector.
7.5 A
13 Steering column.
Instrument cluster.
Battery energy control module - MHEV.
15 A
14
SYNC 3 module.
15 A
15
Not used.
-
16
Not used.
7.5 A
17
Not used.
7.5 A
18
Not used.
5 A
19
Ignition switch.
5 A
20
Positive temperature coefficient heater control.
5 A
21
Pedestrian alert control module.
5 A
22
Not used.
30 A
23
Not used.
30 A
24
Not used.
20 A
25
Not used.
30 A
26
Not used.
30 A
27
Not used.
30 A
28
Not used.
15 A
29
Not used.
5 A
30
Data link connector.
10 A
31
Remote key receiver.
Radio.
20 A
32
Telematics module.
Not used.
-
33
Message center.
30 A
34 Positive temperature coefficient heater.
Direct current/Alternating current inverter.
Lane keeping system camera.
Parking aid.
Steering column.
282
2020 Transit (TTH) Canada/United States of America, LK3J 19A321 HA enUSA, Edition date: 201911, First-Printing Fuses
Page 286 of 529
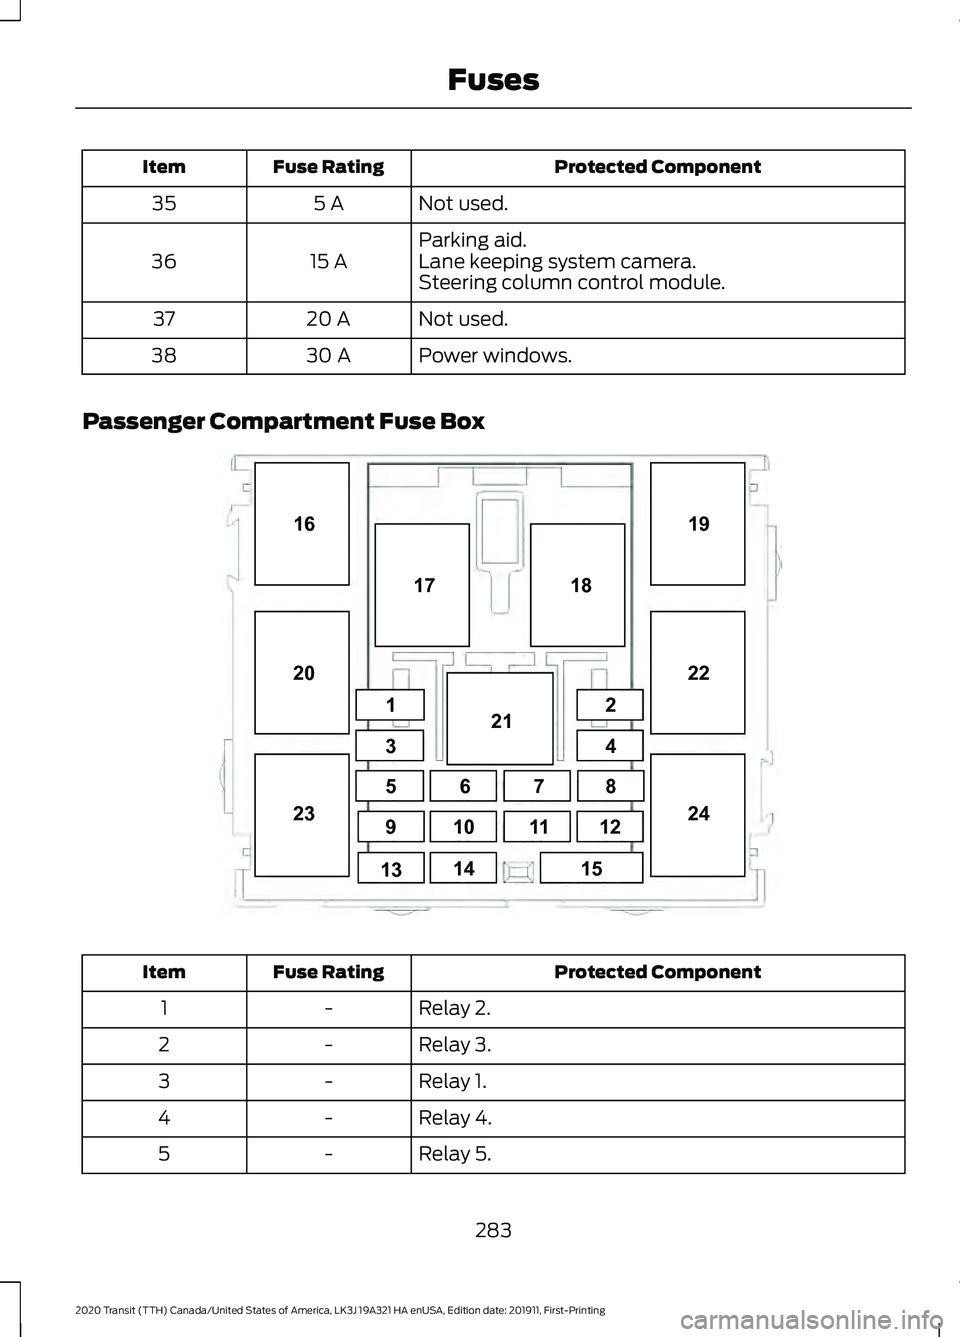
Protected Component
Fuse Rating
Item
Not used.
5 A
35
Parking aid.
15 A
36 Lane keeping system camera.
Steering column control module.
Not used.
20 A
37
Power windows.
30 A
38
Passenger Compartment Fuse Box Protected Component
Fuse Rating
Item
Relay 2.
-
1
Relay 3.
-
2
Relay 1.
-
3
Relay 4.
-
4
Relay 5.
-
5
283
2020 Transit (TTH) Canada/United States of America, LK3J 19A321 HA enUSA, Edition date: 201911, First-Printing Fuses1
34
5 8
9 12
10
14 18
19
20 2122
23 24
15
16
67
11
13 17
2E296792
Page 288 of 529
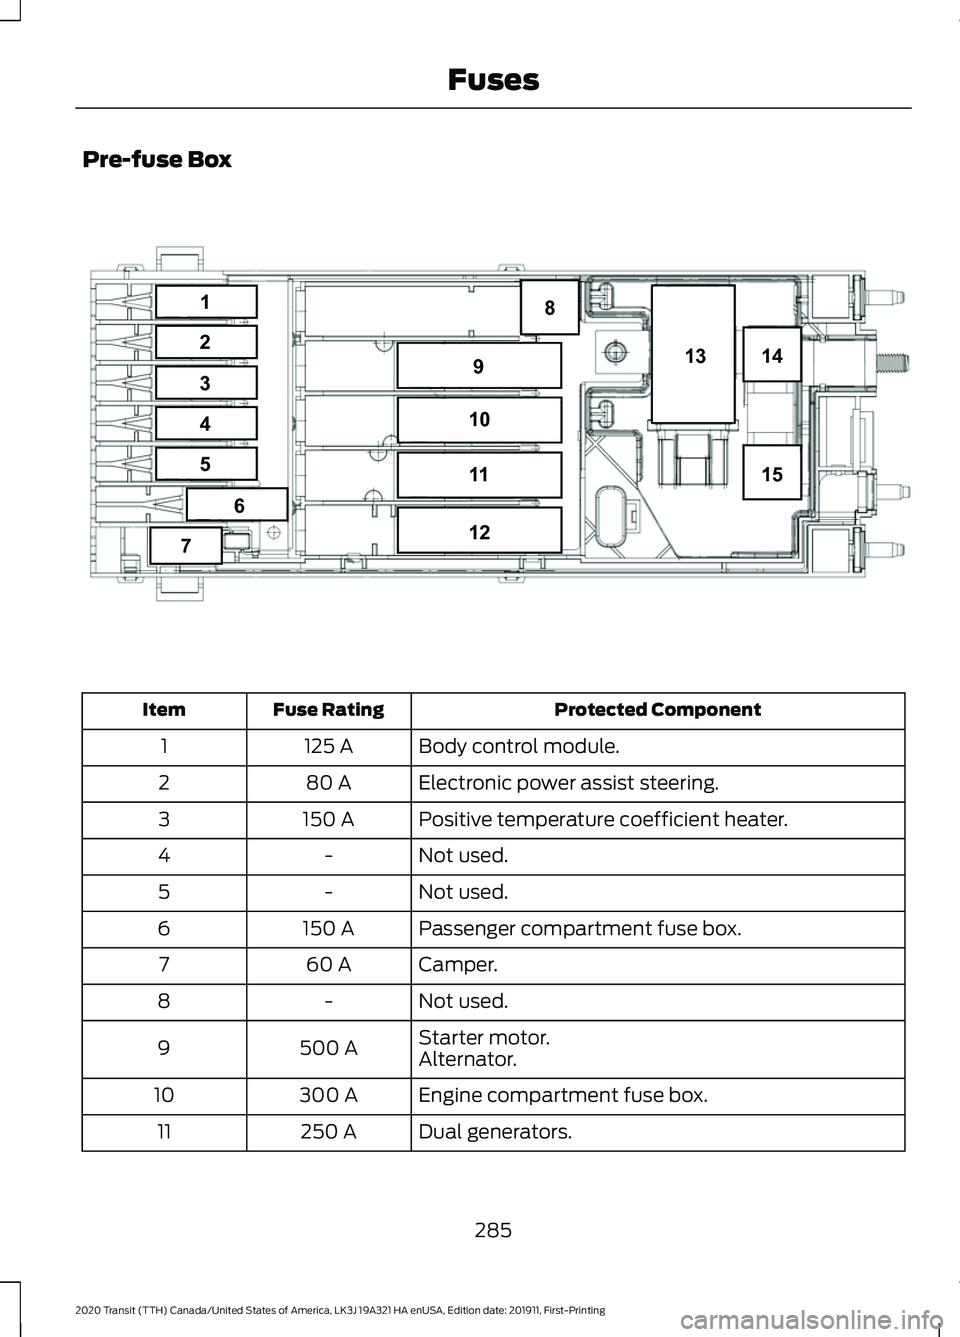
Pre-fuse Box
Protected Component
Fuse Rating
Item
Body control module.
125 A
1
Electronic power assist steering.
80 A
2
Positive temperature coefficient heater.
150 A
3
Not used.
-
4
Not used.
-
5
Passenger compartment fuse box.
150 A
6
Camper.
60 A
7
Not used.
-
8
Starter motor.
500 A
9
Alternator.
Engine compartment fuse box.
300 A
10
Dual generators.
250 A
11
285
2020 Transit (TTH) Canada/United States of America, LK3J 19A321 HA enUSA, Edition date: 201911, First-Printing Fuses8
14
15
13
9
10
11
12
1
2
3
4
5
6
7E296043
Page 298 of 529
Note:
Do not add oil further than the
maximum mark. Oil levels above the
maximum mark may cause engine damage.
Note: Soak up any spillage with an
absorbent cloth immediately.
5. Reset the Intelligent Oil Life Monitor. See Oil Change Indicator Reset
(page 296).
Engine Lubrication for Severe
Service Operation
The following conditions define severe
service operation. The Intelligent Oil Life
Monitor will determine engine oil and oil
filter change intervals.
• Frequent or extended idling.
• Frequent low-speed operation at
25 mph (40 km/h)
or less.
• Frequent severe dust condition
operation. •
Frequent off-road operation.
• Sustained ambient temperatures of
-9°F (-23°C)
or below.
• Sustained ambient temperatures of
100°F (38°C)
or above.
• Sustained towing operation above
1,000 mi (1,600 km)
.
• Sustained high-speed driving at Gross
Vehicle Weight Rating (maximum
loaded weight for vehicle operation).
• Sustained use of diesel fuel other than
ultra-low sulfur diesel (ULSD).
OIL CHANGE INDICATOR
RESET - DIESEL
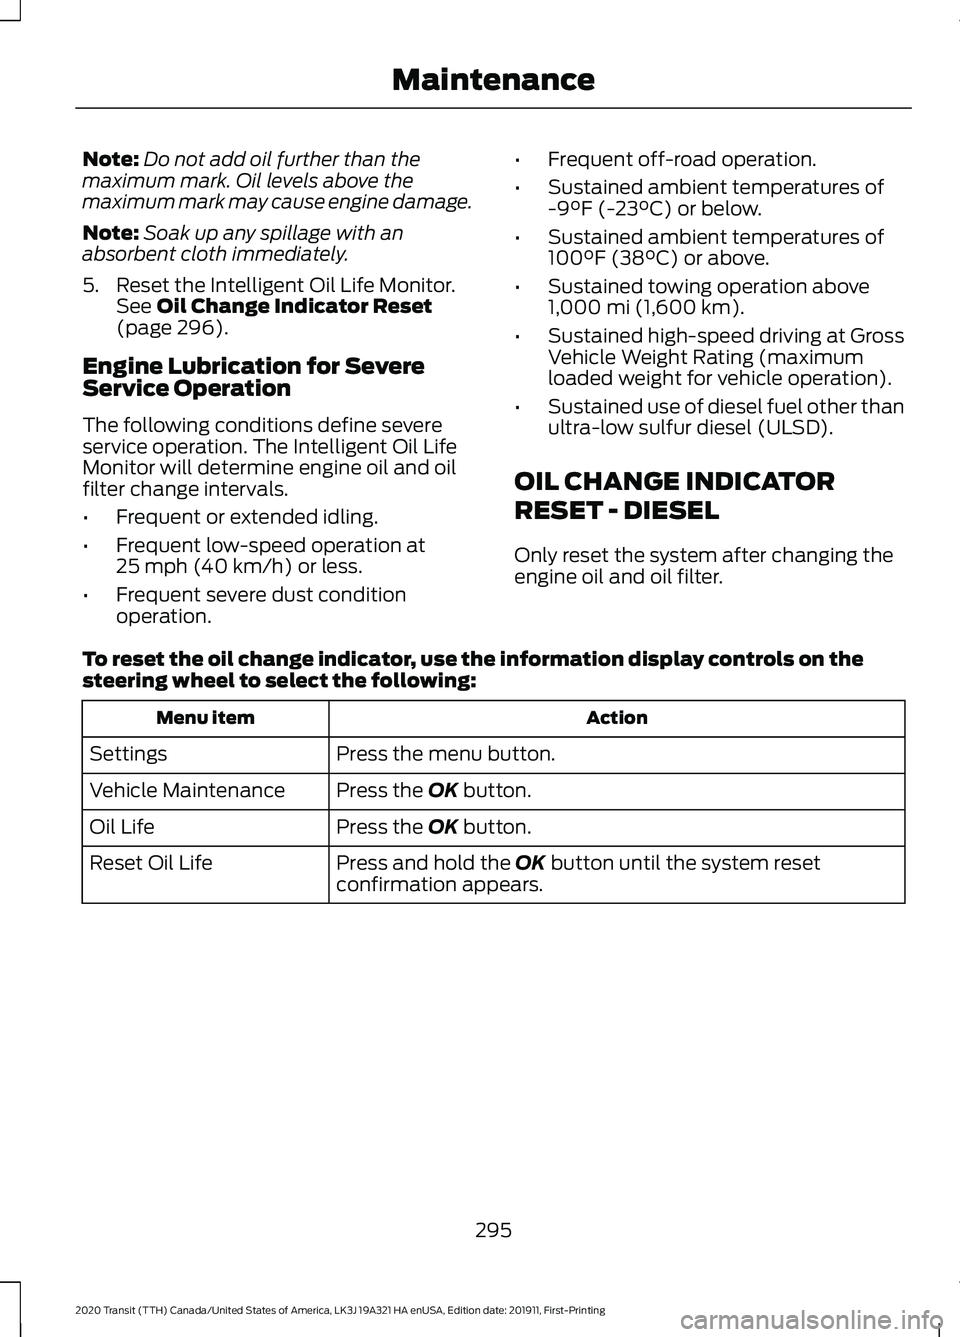
Only reset the system after changing the
engine oil and oil filter.
To reset the oil change indicator, use the information display controls on the
steering wheel to select the following: Action
Menu item
Press the menu button.
Settings
Press the
OK button.
Vehicle Maintenance
Press the
OK button.
Oil Life
Press and hold the
OK button until the system reset
confirmation appears.
Reset Oil Life
295
2020 Transit (TTH) Canada/United States of America, LK3J 19A321 HA enUSA, Edition date: 201911, First-Printing Maintenance
Page 304 of 529

Continued operation increases the engine
temperature, causing the engine to
completely shut down. Your steering and
braking effort increases in this situation.
When the engine temperature cools, you
can re-start the engine. Have your vehicle
checked as soon as possible to minimize
engine damage.
When Fail-Safe Mode Is Activated
WARNING: Fail-safe mode is for
use during emergencies only. Operate
your vehicle in fail-safe mode only as
long as necessary to bring your vehicle
to rest in a safe location and seek
immediate repairs. When in fail-safe
mode, your vehicle will have limited
power, will not be able to maintain
high-speed operation, and may
completely shut down without warning,
potentially losing engine power, power
steering assist, and power brake assist,
which may increase the possibility of a
crash resulting in serious injury. WARNING:
Do not remove the
coolant reservoir cap when the engine is
on or the cooling system is hot. Wait 10
minutes for the cooling system to cool
down. Cover the coolant reservoir cap
with a thick cloth to prevent the
possibility of scalding and slowly remove
the cap. Failure to follow this instruction
could result in personal injury.
Your vehicle has limited engine power
when in the fail-safe mode, drive your
vehicle with caution. Your vehicle does not
maintain high-speed operation and the
engine may operate poorly.
Remember that the engine is capable of
automatically shutting down to prevent
engine damage. In this situation:
1. Pull off the road as soon as safely possible and switch the engine off. 2. If you are a member of a roadside
assistance program, we recommend
that you contact your roadside
assistance service provider.
3. If this is not possible, wait for a short period of time for the engine to cool.
4. Check the coolant level. If the coolant level is at or below the minimum mark,
add prediluted coolant immediately.
5. When the engine temperature cools, you can re-start the engine. Have your
vehicle checked as soon as possible to
minimize engine damage.
Note: Driving your vehicle without repair
increases the chance of engine damage.
Engine Coolant Temperature
Management
(If Equipped) WARNING:
To reduce the risk of
crash and injury, be prepared that the
vehicle speed may reduce and the
vehicle may not be able to accelerate
with full power until the coolant
temperature reduces.
If you tow a trailer with your vehicle, the
engine may temporarily reach a higher
temperature during severe operating
conditions, for example ascending a long
or steep grade in high ambient
temperatures.
At this time, you may notice the coolant
temperature gauge moves toward the red
zone and a message may appear in the
information display.
301
2020 Transit (TTH) Canada/United States of America, LK3J 19A321 HA enUSA, Edition date: 201911, First-Printing Maintenance
Page 323 of 529
Instrument Cluster Screens, LCD
Screens and Radio Screens
Note:
Do not use abrasives, alcoholic
solvents or chemical solvents to clean the
instrument cluster screens, LCD screens or
radio screens. These cleaning products can
damage the screens.
Clean the instrument panel and cluster
lens with a clean, damp and soft cloth,
then use a clean, dry and soft cloth to dry
these areas.
Do not spray any liquid directly onto the
screens.
Do not use a microfiber cloth to clean the
bezel around the display screens as it could
damage the surface.
Rear Windows
Note: Do not use any abrasive materials to
clean the interior of the rear windows.
Note: Do not install stickers or labels to the
interior of the rear windows.
Mirrors
Do not clean the housing or glass of any
mirror with harsh abrasives, fuel or other
petroleum or ammonia-based cleaning
products.
Storage Compartments, Cup
Holders and Ashtrays
To clean:
• Take out any removable inserts.
• Wipe the surface with a soft, damp
cloth and a mild soap and water
solution. Dry the area with a clean, soft
cloth. CLEANING THE INSTRUMENT
PANEL AND INSTRUMENT
CLUSTER LENS WARNING: Do not use chemical
solvents or strong detergents when
cleaning the steering wheel or
instrument panel to avoid contamination
of the airbag system.
Note: Follow the same procedure as
cleaning leather seats for cleaning leather
instrument panels and leather interior trim
surfaces.
Clean the instrument panel and cluster
lens with a clean, damp and soft cloth,
then use a clean, dry and soft cloth to dry
these areas.
• Avoid cleaners or polishes that increase
the gloss of the upper portion of the
instrument panel. The dull finish in this
area helps protect you from
undesirable windshield reflection.
• Do not use any household cleaning
products or glass cleaners as these
may damage the finish of the
instrument panel, interior trim and
cluster lens.
• Wash or wipe your hands clean if you
have been in contact with certain
products such as insect repellent and
suntan lotion to avoid possible damage
to the interior painted surfaces.
• Do not allow air fresheners and hand
sanitizers to spill onto interior surfaces.
If a spill occurs, wipe off immediately.
Your warranty may not cover these
damages.
If a staining liquid like coffee or juice has
been spilled on the instrument panel or on
interior trim surfaces:
1. Wipe up spilled liquid using a clean, soft cloth as quickly as possible.
320
2020 Transit (TTH) Canada/United States of America, LK3J 19A321 HA enUSA, Edition date: 201911, First-Printing Vehicle Care