torque FORD TRANSIT 2020 Owners Manual
[x] Cancel search | Manufacturer: FORD, Model Year: 2020, Model line: TRANSIT, Model: FORD TRANSIT 2020Pages: 529, PDF Size: 8.3 MB
Page 116 of 529
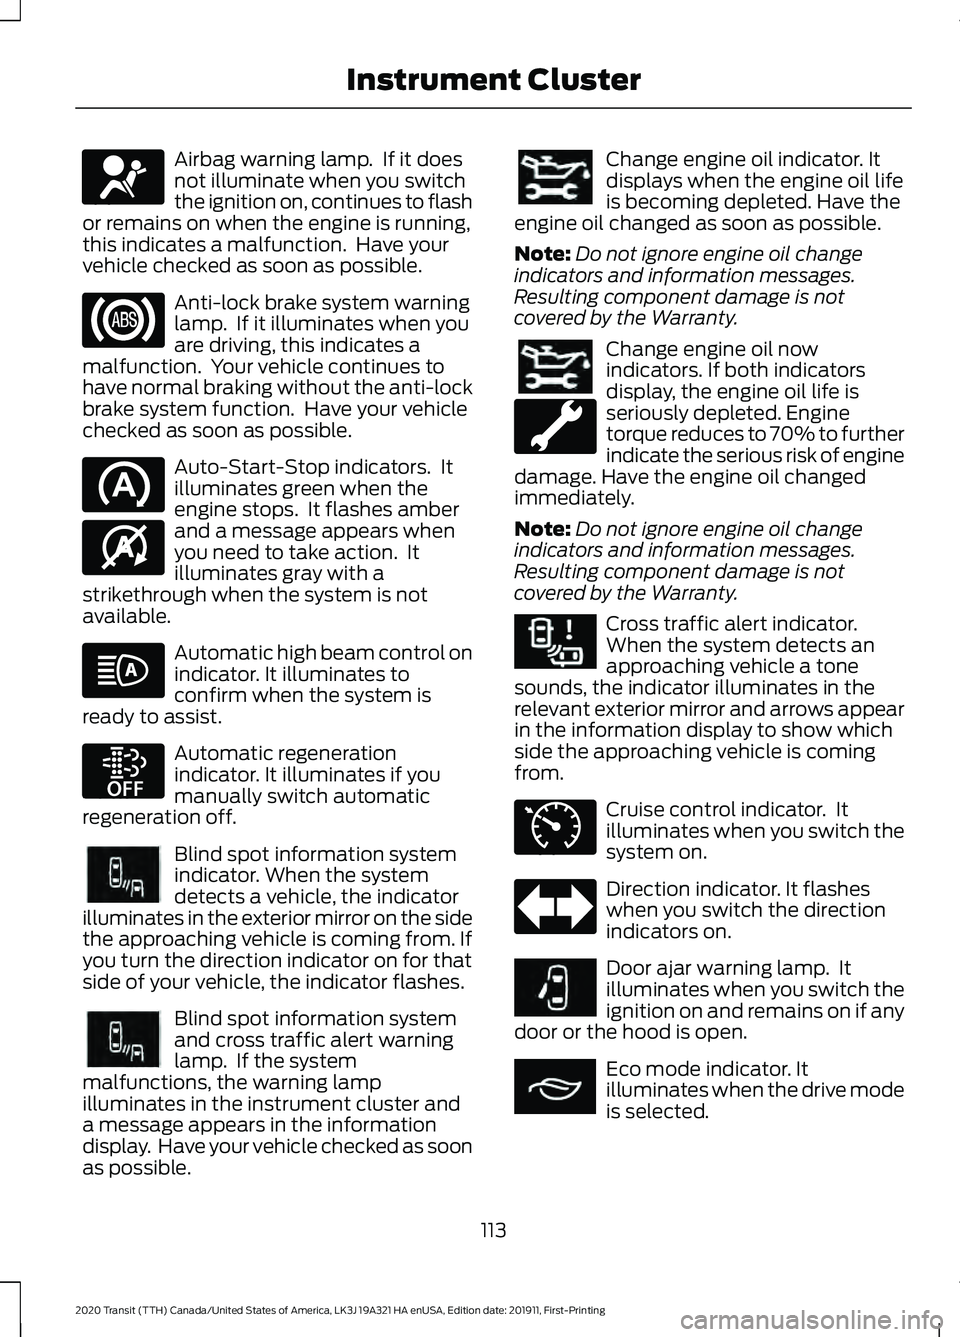
Airbag warning lamp. If it does
not illuminate when you switch
the ignition on, continues to flash
or remains on when the engine is running,
this indicates a malfunction. Have your
vehicle checked as soon as possible. Anti-lock brake system warning
lamp. If it illuminates when you
are driving, this indicates a
malfunction. Your vehicle continues to
have normal braking without the anti-lock
brake system function. Have your vehicle
checked as soon as possible. Auto-Start-Stop indicators. It
illuminates green when the
engine stops. It flashes amber
and a message appears when
you need to take action. It
illuminates gray with a
strikethrough when the system is not
available. Automatic high beam control on
indicator. It illuminates to
confirm when the system is
ready to assist. Automatic regeneration
indicator. It illuminates if you
manually switch automatic
regeneration off. Blind spot information system
indicator. When the system
detects a vehicle, the indicator
illuminates in the exterior mirror on the side
the approaching vehicle is coming from. If
you turn the direction indicator on for that
side of your vehicle, the indicator flashes. Blind spot information system
and cross traffic alert warning
lamp. If the system
malfunctions, the warning lamp
illuminates in the instrument cluster and
a message appears in the information
display. Have your vehicle checked as soon
as possible. Change engine oil indicator. It
displays when the engine oil life
is becoming depleted. Have the
engine oil changed as soon as possible.
Note: Do not ignore engine oil change
indicators and information messages.
Resulting component damage is not
covered by the Warranty. Change engine oil now
indicators. If both indicators
display, the engine oil life is
seriously depleted. Engine
torque reduces to 70% to further
indicate the serious risk of engine
damage. Have the engine oil changed
immediately.
Note: Do not ignore engine oil change
indicators and information messages.
Resulting component damage is not
covered by the Warranty. Cross traffic alert indicator.
When the system detects an
approaching vehicle a tone
sounds, the indicator illuminates in the
relevant exterior mirror and arrows appear
in the information display to show which
side the approaching vehicle is coming
from. Cruise control indicator. It
illuminates when you switch the
system on.
Direction indicator. It flashes
when you switch the direction
indicators on.
Door ajar warning lamp. It
illuminates when you switch the
ignition on and remains on if any
door or the hood is open. Eco mode indicator. It
illuminates when the drive mode
is selected.
113
2020 Transit (TTH) Canada/United States of America, LK3J 19A321 HA enUSA, Edition date: 201911, First-Printing Instrument ClusterE67017 E146361 E252868 E249861E249861 E249861E249861 E268294 E71340 E249859 E267164
Page 186 of 529
WARNING: You must remain in
your vehicle when the system turns on.
At all times, you are responsible for
controlling your vehicle, supervising the
system and intervening, if required.
Failure to take care may result in the loss
of control of your vehicle, serious
personal injury or death. WARNING:
The system turns off if
there is a malfunction or if you
excessively rev the engine.
The system makes it easier for you to pull
away when your vehicle is on a slope
without using the parking brake. When the system activates, your vehicle
remains stationary for a few seconds after
you release the brake pedal. This gives you
time to move your foot from the brake
pedal to the accelerator pedal. The brakes
release when the engine has developed
sufficient torque to prevent your vehicle
from rolling down the slope.
Using Hill Start Assist
1. Bring your vehicle to a complete
standstill. Keep the brake pedal
pressed.
2. Select a gear.
Note: The system activates if the sensors
detect that your vehicle is on a slope.
3. Pull away in the normal manner.
Note: When you remove your foot from the
brake pedal, your vehicle remains on the
slope without rolling away for a few
seconds. This hold time increases if you are
in the process of driving off.
Switching Hill Start Assist On or Off
Vehicles with Manual Transmission
To switch hill start assist on or off, use the information display controls on the
steering wheel to select the following: Action
Menu Item
Press the menu button.
Driver Assist.
Press the
OK button.
Hill Start Assist
The system remembers the last setting
when you start your vehicle.
Note: There is no indicator to indicate
whether the system is on or off. Vehicles with Automatic Transmission
The system turns on when you switch the
ignition on and you cannot switch the
system off.
183
2020 Transit (TTH) Canada/United States of America, LK3J 19A321 HA enUSA, Edition date: 201911, First-Printing Brakes
Page 363 of 529
Note:
Check the lug nuts for correct
tightness and check the tire pressure as
soon as possible. Note:
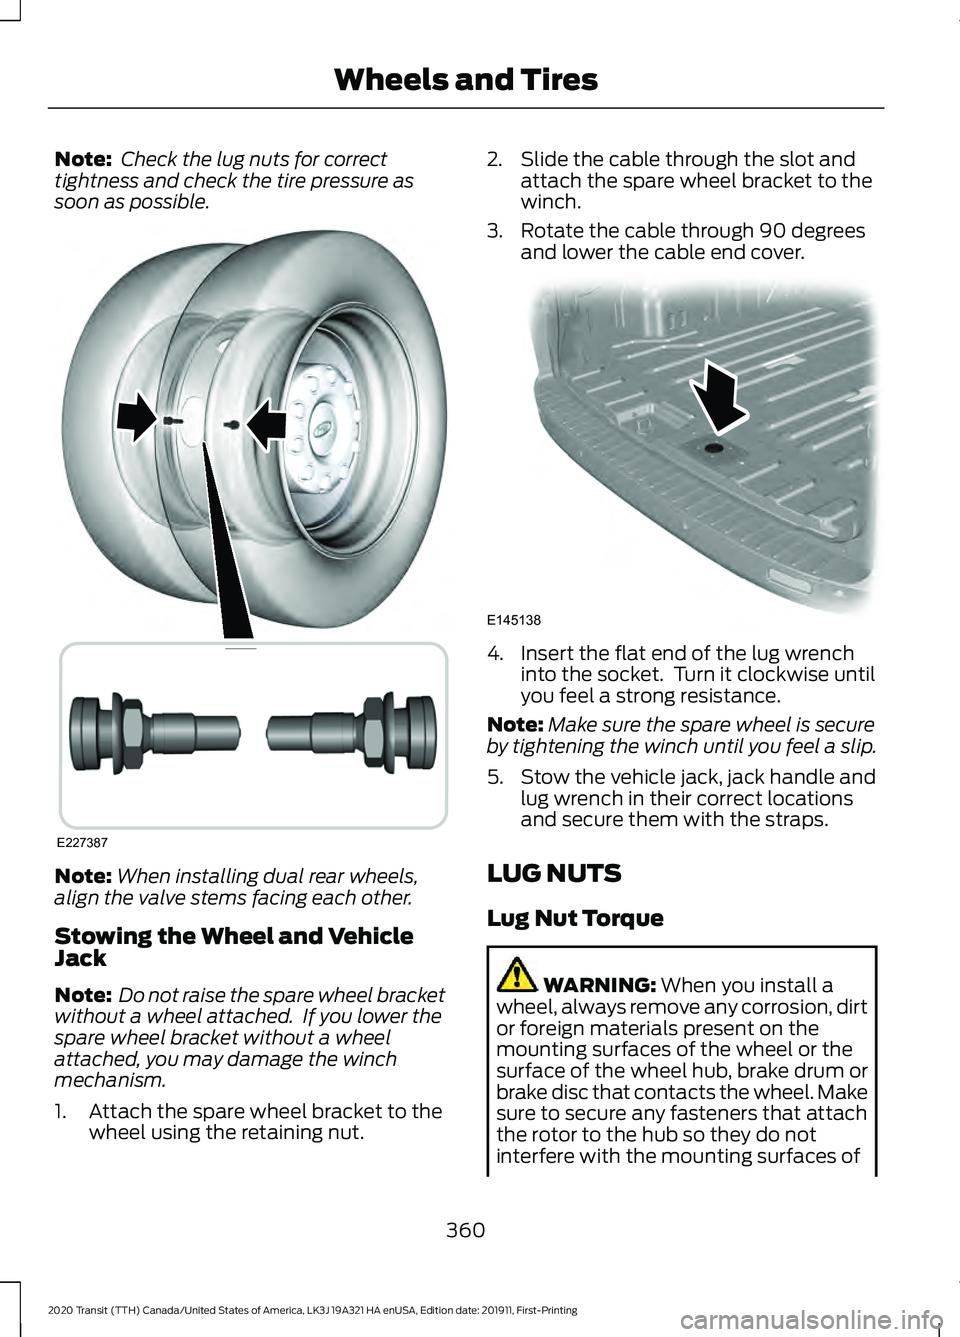
When installing dual rear wheels,
align the valve stems facing each other.
Stowing the Wheel and Vehicle
Jack
Note: Do not raise the spare wheel bracket
without a wheel attached. If you lower the
spare wheel bracket without a wheel
attached, you may damage the winch
mechanism.
1. Attach the spare wheel bracket to the wheel using the retaining nut. 2. Slide the cable through the slot and
attach the spare wheel bracket to the
winch.
3. Rotate the cable through 90 degrees and lower the cable end cover. 4. Insert the flat end of the lug wrench
into the socket. Turn it clockwise until
you feel a strong resistance.
Note: Make sure the spare wheel is secure
by tightening the winch until you feel a slip.
5. Stow the vehicle jack, jack handle and lug wrench in their correct locations
and secure them with the straps.
LUG NUTS
Lug Nut Torque WARNING: When you install a
wheel, always remove any corrosion, dirt
or foreign materials present on the
mounting surfaces of the wheel or the
surface of the wheel hub, brake drum or
brake disc that contacts the wheel. Make
sure to secure any fasteners that attach
the rotor to the hub so they do not
interfere with the mounting surfaces of
360
2020 Transit (TTH) Canada/United States of America, LK3J 19A321 HA enUSA, Edition date: 201911, First-Printing Wheels and TiresE227387 E145138
Page 469 of 529
At every oil change interval as indicated by the information display
*
Inspect the engine cooling system strength and hoses.
Inspect the exhaust system and heat shields.
Inspect front axle and U-joints. Lubricate if equipped with grease fittings.
Inspect the steering linkage, ball joints, suspension, tire-rod ends, driveshaft and U-
joints. Lubricate any areas with grease fittings.
Diesel engine fill diesel exhaust fluid.
Inspect the wheels and related components for abnormal noise, wear, looseness or
drag.
* Do not exceed one year or 10000 miles (16000 kilometers) between service intervals.
** Reset the Intelligent Oil-Life Monitor after engine oil and filter changes. Brake Fluid Maintenance
1
Change the brake fluid. 2
Every 3 Years
1 Perform this maintenance item every 3 years. Do not exceed the designated time for
the interval.
2 Brake fluid servicing requires special equipment available at your authorized dealer. Other maintenance items
1
Replace cabin air filter.
Every 20000 miles (32000
km)
Torque rear axle U-bolts to specification.
Every 30000 miles (48000
km) Diesel engine replace fuel filter. 2
Replace engine air filter.
Change diesel foam air filter.
Every 45000 miles (70000
km)
Change engine coolant.3
At 200000 miles (320000
km)
Replace spark plugs.
Every 100000 miles
(160000 km)
466
2020 Transit (TTH) Canada/United States of America, LK3J 19A321 HA enUSA, Edition date: 201911, First-Printing Scheduled Maintenance
Page 519 of 529
J
Jump Starting the Vehicle - 2.0L
EcoBlue........................................................259
Connecting the Jumper Cables.................... 259
Starting the Engine............................................ 261
Jump Starting the Vehicle - 3.5L Duratec/3.5L Ecoboost™
......................261
Connecting the Jumper Cables.................... 262
Jump Starting...................................................... 263
Preparing Your Vehicle...................................... 261
Removing the Jumper Cables....................... 263
K
Keyless Entry
...................................................88
Keyless Entry Settings....................................... 88
Keyless Entry – Troubleshooting................... 89
Locking and Unlocking the Doors Using Keyless Entry.................................................... 88
Master Access Code........................................... 88
Keyless Entry Settings.................................88 Clearing All Personal Access Codes.............88
Creating Personal Access Codes................... 88
Reprogramming the Unlocking Function............................................................. 88
Keyless Entry – Troubleshooting.............89 Keyless Entry – Frequently Asked
Questions........................................................... 89
Keys and Remote Controls........................64 Principle of Operation........................................ 64
L
Lane Keeping System..................................217 Lane Keeping System Display....................... 219
Lane Keeping System Messages.................220
Lane Keeping System Settings..................... 218
Lane Keeping System Warning Lamps and Indicators.......................................................... 219
Switching Lane Keeping System On or Off........................................................................\
218
Lighting Control
.............................................101
Exterior Lamps On Audible Warning...........102
Flashing High Beam Headlamps.................. 102
High Beam Headlamp Indicator................... 102
Lamps On Indicator........................................... 102
Lighting Control Positions................................ 101Switching High Beam Headlamps On and
Off....................................................................... 102
Switching the Parking Lamps On.................. 101
Lighting
..............................................................101
General Information........................................... 101
Load Carriers See: Roof Racks and Load Carriers -
Bus...................................................................... 236
See: Roof Racks and Load Carriers - Van..................................................................... 236
Load Carrying................................................236
Load Limit
.......................................................237
Special Loading Instructions for Owners of
Pick-up Trucks and Utility-type
Vehicles............................................................. 241
Vehicle Loading - with and without a Trailer................................................................. 237
Load Retaining Fixtures.............................236 Securing Cargo................................................... 236
Locating the Cabin Air Filter......................127
Locating the Keyless Entry Keypad.........88
Locking and Unlocking..................................77 Autolock................................................................... 79
Autounlock.............................................................. 79
Configurable Unlocking..................................... 80
Locking...................................................................... 77
Locking and Unlocking the Doors From Inside..................................................................... 77
One-Stage Unlocking........................................ 80
Opening the Double Rear Doors..................... 77
Rear Emergency Exit........................................... 79
Two-Stage Unlocking........................................ 80
Unlocking................................................................. 77
Zone Re-Locking.................................................. 80
Locking and Unlocking the Doors Using Keyless Entry
................................................88
Locking the Doors................................................ 89
Unlocking the Doors........................................... 88
Locking the Steering Wheel.......................97 Unlocking the Steering Wheel......................... 97
Lug Nuts See: Changing a Road Wheel....................... 349
Lug Nuts
.........................................................360
Locking Lug Nuts................................................ 361
Lug Nut Torque.................................................. 360
516
2020 Transit (TTH) Canada/United States of America, LK3J 19A321 HA enUSA, Edition date: 201911, First-Printing Index