buttons FORD TRANSIT 2021 Owners Manual
[x] Cancel search | Manufacturer: FORD, Model Year: 2021, Model line: TRANSIT, Model: FORD TRANSIT 2021Pages: 509, PDF Size: 8.21 MB
Page 70 of 509
Note:
If locking was not successful, any
door is open, or if the hood is open on
vehicles with an alarm or remote start then
the horn sounds but the direction indicators
do not flash.
Switching the Panic Alarm On and
Off Press the button on the remote
control to switch the panic alarm
on. Press the button again or
switch the ignition on to switch the panic
alarm off.
We recommend you do not use this
method to locate your vehicle.
Note: The panic alarm only operates when
the ignition is off.
REMOTE CONTROL - VEHICLES
WITH: POWER SLIDING DOOR
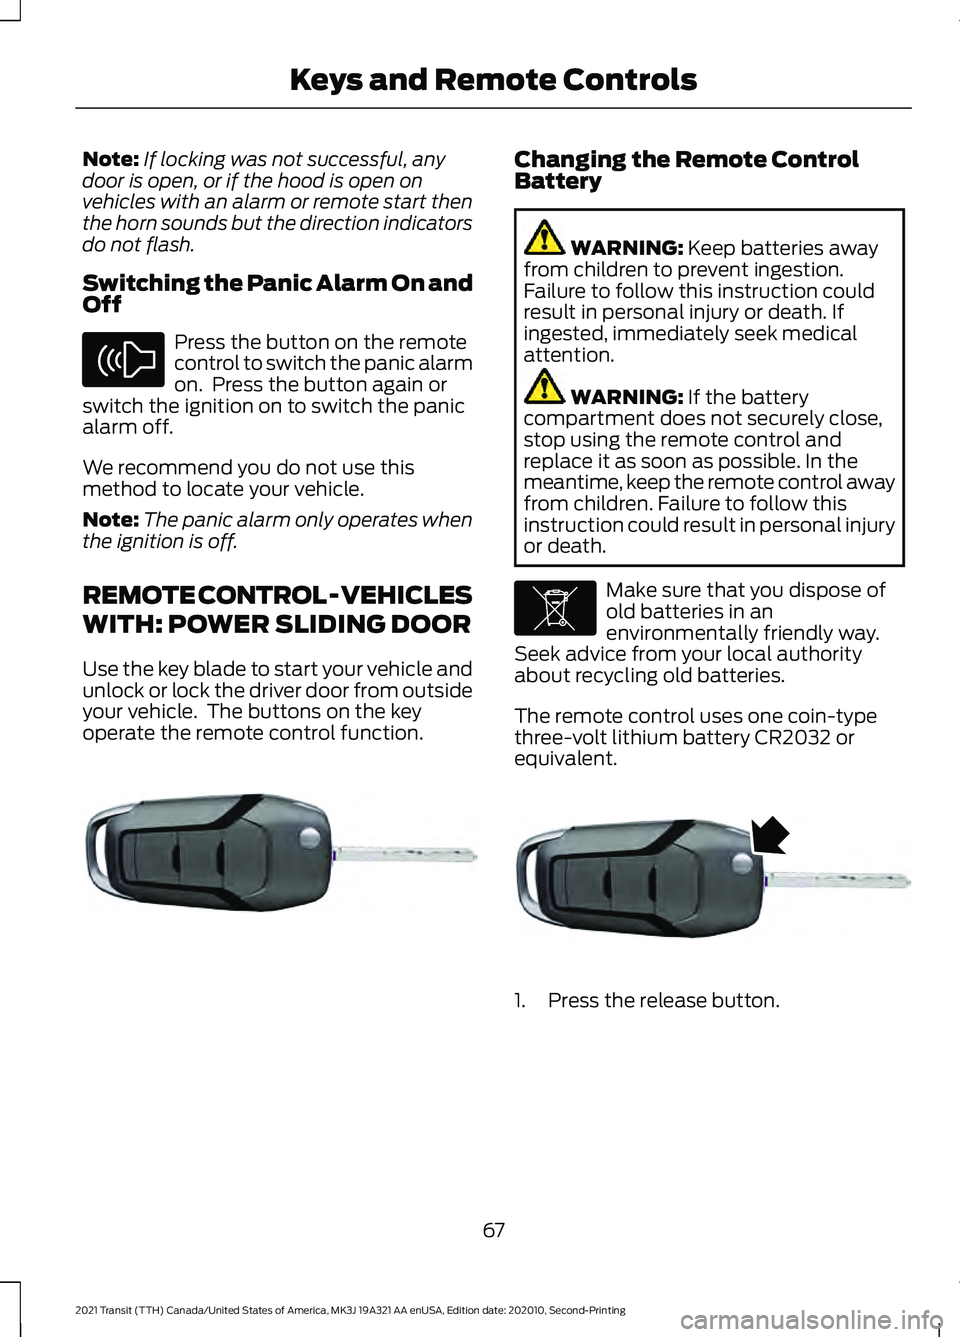
Use the key blade to start your vehicle and
unlock or lock the driver door from outside
your vehicle. The buttons on the key
operate the remote control function. Changing the Remote Control
Battery
WARNING: Keep batteries away
from children to prevent ingestion.
Failure to follow this instruction could
result in personal injury or death. If
ingested, immediately seek medical
attention. WARNING:
If the battery
compartment does not securely close,
stop using the remote control and
replace it as soon as possible. In the
meantime, keep the remote control away
from children. Failure to follow this
instruction could result in personal injury
or death. Make sure that you dispose of
old batteries in an
environmentally friendly way.
Seek advice from your local authority
about recycling old batteries.
The remote control uses one coin-type
three-volt lithium battery CR2032 or
equivalent. 1. Press the release button.
67
2021 Transit (TTH) Canada/United States of America, MK3J 19A321 AA enUSA, Edition date: 202010, Second-Printing Keys and Remote ControlsE138624 E302820 E107998 E302821
Page 90 of 509
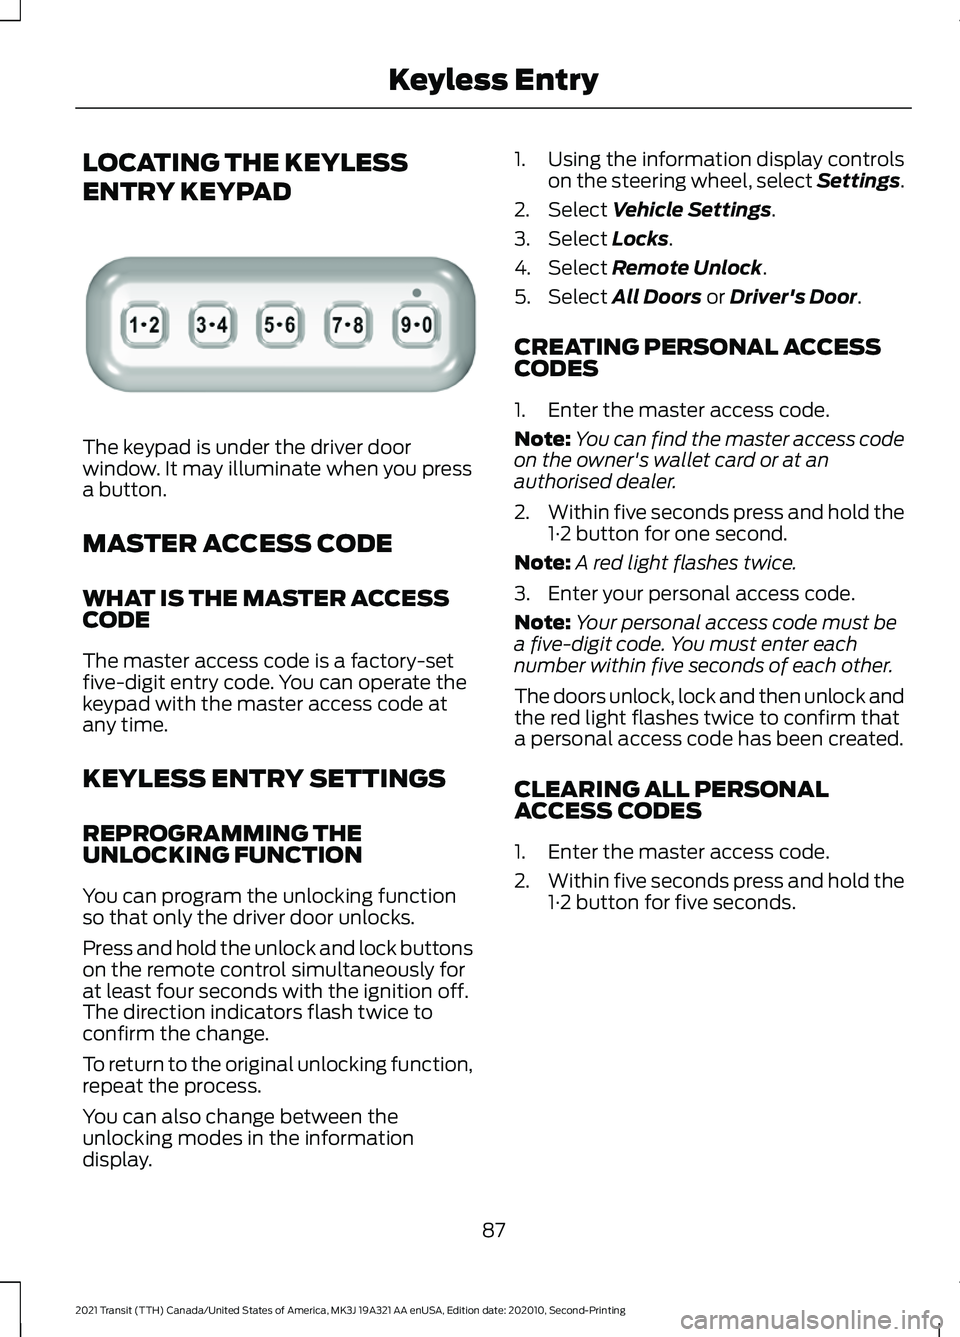
LOCATING THE KEYLESS
ENTRY KEYPAD
The keypad is under the driver door
window. It may illuminate when you press
a button.
MASTER ACCESS CODE
WHAT IS THE MASTER ACCESS
CODE
The master access code is a factory-set
five-digit entry code. You can operate the
keypad with the master access code at
any time.
KEYLESS ENTRY SETTINGS
REPROGRAMMING THE
UNLOCKING FUNCTION
You can program the unlocking function
so that only the driver door unlocks.
Press and hold the unlock and lock buttons
on the remote control simultaneously for
at least four seconds with the ignition off.
The direction indicators flash twice to
confirm the change.
To return to the original unlocking function,
repeat the process.
You can also change between the
unlocking modes in the information
display. 1. Using the information display controls
on the steering wheel, select Settings.
2. Select Vehicle Settings.
3. Select
Locks.
4. Select
Remote Unlock.
5. Select
All Doors or Driver's Door.
CREATING PERSONAL ACCESS
CODES
1. Enter the master access code.
Note: You can find the master access code
on the owner's wallet card or at an
authorised dealer.
2. Within five seconds press and hold the
1·2 button for one second.
Note: A red light flashes twice.
3. Enter your personal access code.
Note: Your personal access code must be
a five-digit code. You must enter each
number within five seconds of each other.
The doors unlock, lock and then unlock and
the red light flashes twice to confirm that
a personal access code has been created.
CLEARING ALL PERSONAL
ACCESS CODES
1. Enter the master access code.
2. Within five seconds press and hold the
1·2 button for five seconds.
87
2021 Transit (TTH) Canada/United States of America, MK3J 19A321 AA enUSA, Edition date: 202010, Second-Printing Keyless EntryE307685
Page 91 of 509
LOCKING AND UNLOCKING
THE DOORS USING KEYLESS
ENTRY
UNLOCKING THE DOORS
Enter the master access code or your
personal access code to unlock the driver's
door, then press the 3·4 button within five
seconds to unlock all doors.
Note:
If you program the unlocking function
so that all doors unlock, you do not have to
press the 3·4 button. See Reprogramming
the Unlocking Function (page 87).
The interior lamps illuminate to confirm
that the doors have been unlocked.
Unlocking the Rear Cargo Doors
Enter the master access code or your
personal access code, then press the 5·6
button within five seconds.
LOCKING THE DOORS
Press and hold the 7·8 and 9·0 buttons at
the same time with the driver door closed.
KEYLESS ENTRY –
TROUBLESHOOTING
KEYLESS ENTRY – FREQUENTLY
ASKED QUESTIONS
Why does the keypad not read the
access code? If you enter the access code too fast
on the keypad, the unlock function
may not work. Slowly re-enter the
access code. You must only press a
button once to enter the second digit
on that button. Why does the keypad not function?
The keypad goes into an anti-scan
mode if you enter a wrong code seven
times. The anti-scan mode disables
the keypad for one minute and the red
light flashes.
88
2021 Transit (TTH) Canada/United States of America, MK3J 19A321 AA enUSA, Edition date: 202010, Second-Printing Keyless Entry
Page 105 of 509
The headlamps remain on for a period of
time after you switch the ignition off. Use
the information display controls to adjust
the period of time that the headlamps
remain on.
Adjusting the Period of Time That
the Headlamps Remain On
1. Using the information display controls
on the steering wheel, select Settings.
2. Select Vehicle Settings.
3. Select
Lighting.
4. Select
Autolamp Delay.
5. Select a setting.
6. Press the
OK button.
INSTRUMENT LIGHTING
DIMMER
The instrument lighting dimmer buttons
are on the lighting control. Repeatedly press one of the
buttons to adjust the brightness.
DAYTIME RUNNING LAMPS
(IF
EQUIPPED) WARNING:
The daytime running
lamps system does not activate the rear
lamps and may not provide adequate
lighting during low visibility driving
conditions. Also, the autolamps switch
position may not activate the headlamps in all low visibility conditions, such as
daytime fog. Make sure the headlamps
are switched to auto or on, as
appropriate, during all low visibility
conditions. Failure to do so may result in
a crash.
Type 1 - Conventional (Non-
Configurable)
The daytime running lamps turn on when:
1. The ignition is switched to the on position.
2. The lighting control is in the off, parking
lamp or autolamps positions.
3. The headlamps are off.
Type 2 - Configurable
Switch the daytime running lamps on or
off using the information display controls.
See
Information Displays (page 115).
The daytime running lamps turn on when:
1. They are switched on in the information
display. See
Information Displays
(page 115).
2. The ignition is switched to the on position.
3. The lighting control is in the autolamps
position.
4. The headlamps are off.
The other lighting control switch positions
do not activate the daytime running lamps,
and you can use them to temporarily
override autolamp control.
When switched off in the information
display, the daytime running lamps are off
in all lighting control switch positions.
102
2021 Transit (TTH) Canada/United States of America, MK3J 19A321 AA enUSA, Edition date: 202010, Second-Printing LightingE291299 E291298
Page 130 of 509

The head restraint consists of:
Energy absorbing head restraint.
A
Guide sleeve adjust and unlock
button.
B
Guide sleeve unlock and remove
button.
C
Steel stems.
D
Adjusting the Head Restraint WARNING: Adjust the head
restraints for all passengers before you
drive your vehicle. This will help minimize
the risk of neck injury in the event of a
crash. Do not adjust the head restraints
when your vehicle is moving.
Note: Adjust the seat backrest to an upright
driving position before adjusting the head
restraint. Adjust the head restraint so that
the top of it is level with the top of your head
and as far forward as possible.
Raising the Head Restraint
Lift the head restraint up.
Lowering the Head Restraint
1. Press and hold button B.
2. Push the head restraint down. Removing the Head Restraint WARNING:
Do not remove the
head restraint from an occupied seat.
1. Lift the head restraint up until it reaches its highest position.
2. Press and hold buttons B and C.
3. Remove the head restraint.
Installing the Head Restraint WARNING:
Install head restraints
correctly to help minimize the risk of neck
injury in the event of a crash.
1. Align the steel stems into the guide sleeves.
2. Press and hold buttons B and C.
3. Push the head restraint down.
MANUAL SEATS - VEHICLES
WITH: 2-WAY MANUAL SEAT WARNING: Do not adjust the driver
seat when your vehicle is moving. WARNING:
Do not place cargo or
any objects behind the seatback before
returning it to the original position.
Moving the Seat Backward and
Forward WARNING: Make sure the seat fully
locks into place by rocking it backward
and forward. Not securing the seat into
the locked position can be dangerous in
a crash and could cause serious personal
injury or death.
127
2021 Transit (TTH) Canada/United States of America, MK3J 19A321 AA enUSA, Edition date: 202010, Second-Printing SeatsE215998
Page 164 of 509
AUTOMATIC TRANSMISSION
WARNING: Do not apply the brake
pedal and accelerator pedal
simultaneously. Applying both pedals
simultaneously for more than a few
seconds will limit engine performance,
which may result in difficulty maintaining
speed in traffic and could lead to serious
injury. WARNING:
When your vehicle is
stationary, keep the brake pedal fully
pressed when shifting gears. Failure to
follow this instruction could result in
personal injury, death or property
damage. WARNING:
Apply the parking
brake, shift into park (P), switch the
ignition off and remove the key before
you leave your vehicle. Failure to follow
this instruction could result in personal
injury or death.
Selector Lever Positions
The instrument cluster displays the current
position.
Park (P)
In park (P), power is not transmitted to the
driven wheels and the transmission is
locked. You can start the engine with the
transmission in this position.
Shift into park (P) only when your vehicle
is stationary.
Reverse (R)
Shift into reverse (R) only when your
vehicle is stationary and the engine is at
idle speed. Neutral (N) WARNING:
In neutral (N) your
vehicle has the ability to roll freely. If you
intend to leave your vehicle, make sure
you apply the parking brake.
In neutral (N), power is not transmitted to
the driven wheels but the transmission is
not locked. You can start the engine with
the transmission in this position.
Drive (D)
Drive (D) is the normal position for driving.
Manual (M)
In manual (M), you can upshift or
downshift using the buttons on the
selector lever.
SelectShift™
Use this feature to upshift or downshift
using the buttons on the selector lever.
Shift into manual (M) to switch the feature
on.
• Press the
+ button to upshift.
• Press the
– button to downshift.
Shift into another gear to switch the
feature off.
Progressive Range Selection
Use this feature to lock out gears using the
buttons on the selector lever. This may
provide you with an improved driving
experience, for example, on slippery roads
or steep slopes.
With the transmission in drive (D), press
the
– button to switch the feature on.
Note: The instrument cluster displays the
available and selected gears.
161
2021 Transit (TTH) Canada/United States of America, MK3J 19A321 AA enUSA, Edition date: 202010, Second-Printing Transmission
Page 200 of 509
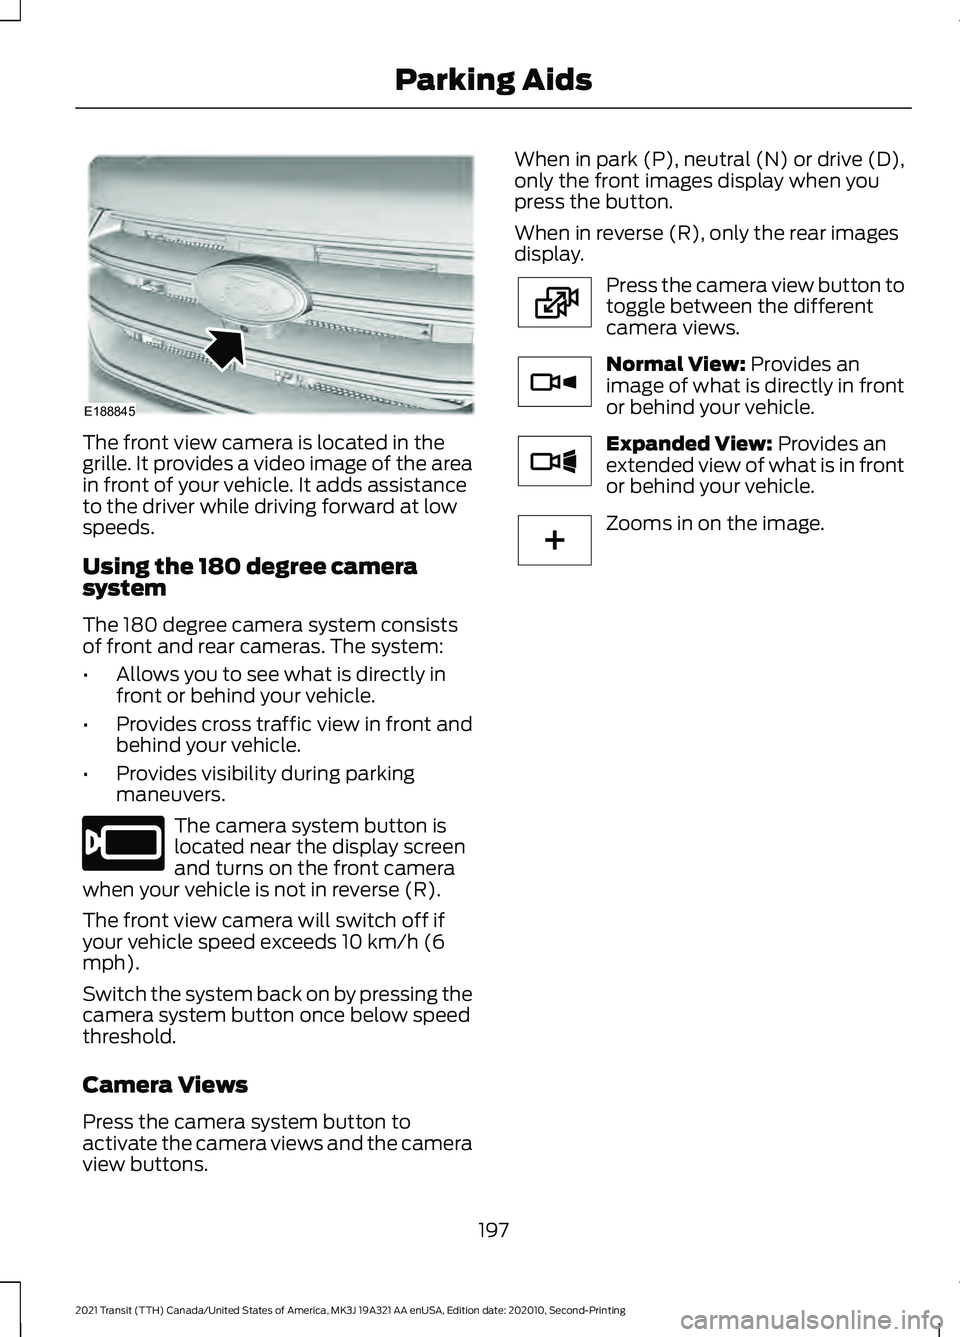
The front view camera is located in the
grille. It provides a video image of the area
in front of your vehicle. It adds assistance
to the driver while driving forward at low
speeds.
Using the 180 degree camera
system
The 180 degree camera system consists
of front and rear cameras. The system:
•
Allows you to see what is directly in
front or behind your vehicle.
• Provides cross traffic view in front and
behind your vehicle.
• Provides visibility during parking
maneuvers. The camera system button is
located near the display screen
and turns on the front camera
when your vehicle is not in reverse (R).
The front view camera will switch off if
your vehicle speed exceeds 10 km/h (6
mph).
Switch the system back on by pressing the
camera system button once below speed
threshold.
Camera Views
Press the camera system button to
activate the camera views and the camera
view buttons. When in park (P), neutral (N) or drive (D),
only the front images display when you
press the button.
When in reverse (R), only the rear images
display.
Press the camera view button to
toggle between the different
camera views.
Normal View: Provides an
image of what is directly in front
or behind your vehicle. Expanded View:
Provides an
extended view of what is in front
or behind your vehicle. Zooms in on the image.
197
2021 Transit (TTH) Canada/United States of America, MK3J 19A321 AA enUSA, Edition date: 202010, Second-Printing Parking AidsE188845 E205884 E224483 E224784 E224785 E224485
Page 244 of 509
Integrated Trailer Brake Controller
WARNING: Use the integrated
trailer brake controller to properly adjust
the trailer brakes and check all
connections before towing a trailer.
Failure to follow this instruction could
result in the loss of control of your
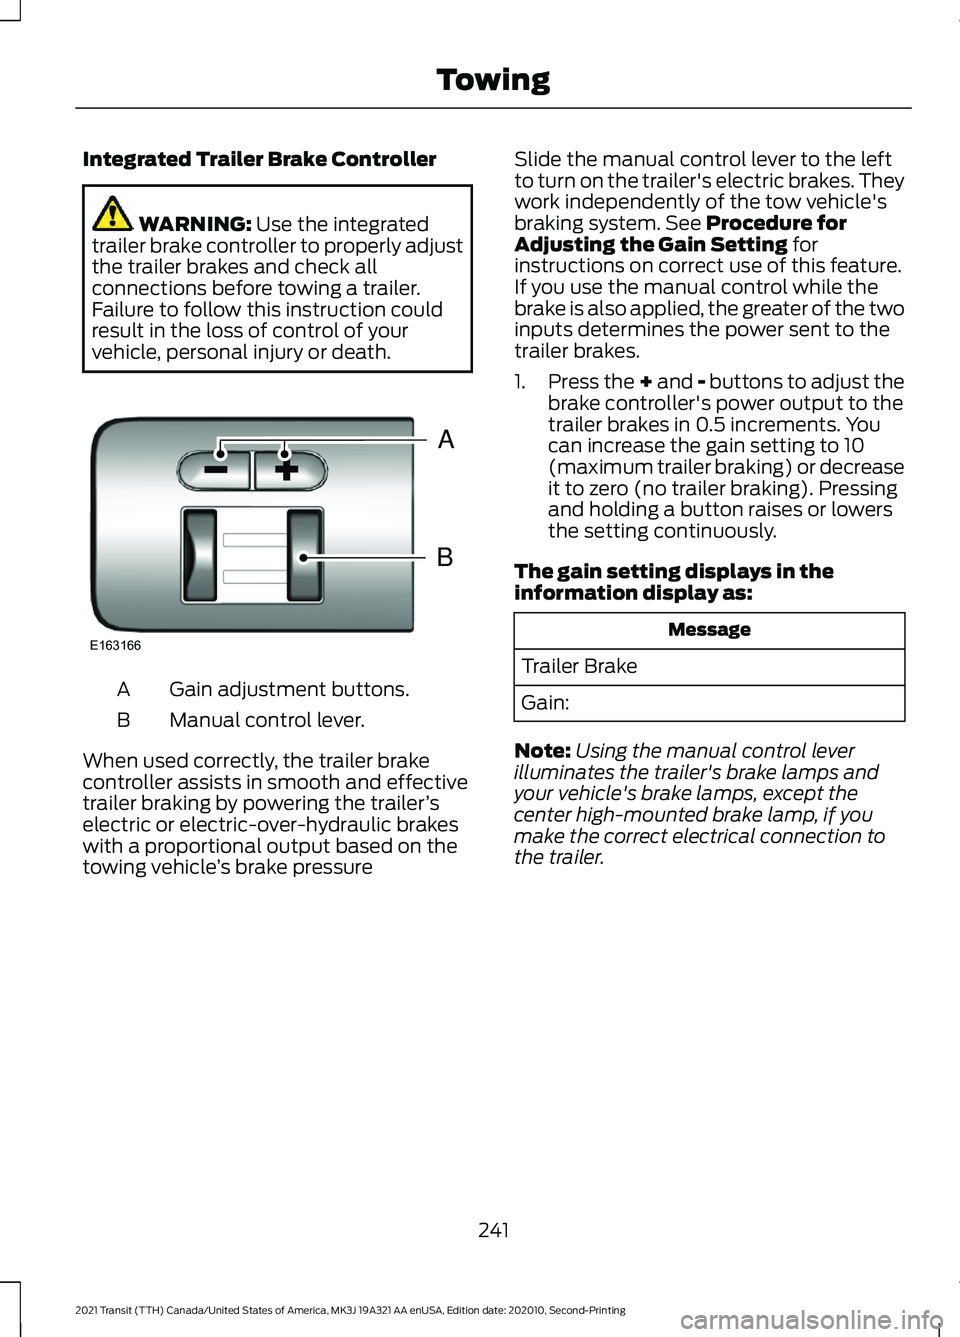
vehicle, personal injury or death. Gain adjustment buttons.
A
Manual control lever.
B
When used correctly, the trailer brake
controller assists in smooth and effective
trailer braking by powering the trailer ’s
electric or electric-over-hydraulic brakes
with a proportional output based on the
towing vehicle ’s brake pressure Slide the manual control lever to the left
to turn on the trailer's electric brakes. They
work independently of the tow vehicle's
braking system. See Procedure for
Adjusting the Gain Setting for
instructions on correct use of this feature.
If you use the manual control while the
brake is also applied, the greater of the two
inputs determines the power sent to the
trailer brakes.
1. Press the + and - buttons to adjust the
brake controller's power output to the
trailer brakes in 0.5 increments. You
can increase the gain setting to 10
(maximum trailer braking) or decrease
it to zero (no trailer braking). Pressing
and holding a button raises or lowers
the setting continuously.
The gain setting displays in the
information display as: Message
Trailer Brake
Gain:
Note: Using the manual control lever
illuminates the trailer's brake lamps and
your vehicle's brake lamps, except the
center high-mounted brake lamp, if you
make the correct electrical connection to
the trailer.
241
2021 Transit (TTH) Canada/United States of America, MK3J 19A321 AA enUSA, Edition date: 202010, Second-Printing TowingB
A
E163166
Page 245 of 509
The controller shows gain setting, output bar graph and the trailer connectivity
status in the information display as follows:
Action and Description
Message
Displays the current gain setting during a given ignition cycle
and when adjusting the gain setting. This also displays if you
use the manual control lever or make gain adjustments with
no trailer connected.
Trailer Brake
Gain:
No Trailer
Displays when you press your vehicle's brake pedal, or upon
use of the manual control lever. Bar indicators illuminate in
the information display to indicate the amount of power going
to the trailer brakes relative to the brake pedal or manual
control input. One bar indicates the least amount of output;
six bars indicate maximum output.
Trailer Brake
Gain:
Output:
Displays when the system senses a correct trailer wiring
connection during a given ignition cycle. For example a trailer
with electric trailer brakes.
Trailer Connected
Displays when the system senses a trailer connection and
then a disconnection, either intentional or unintentional,
during a given ignition cycle, this is accompanied by a single
audible tone. It also displays if a vehicle or trailer-wiring fault
occurs causing the trailer to appear disconnected. This
message can also display if you use the manual control lever
without a trailer connected.
Trailer Disconnected
Procedure for Adjusting the Gain Setting
The gain setting sets the trailer brake
controller for the specific towing condition.
You should change the setting as towing
conditions change. Changes to towing
conditions include trailer load, vehicle load,
road conditions and weather.
The gain should be set to provide the
maximum trailer braking assistance while
making sure the trailer wheels do not lock
when using the brakes. Locked trailer
wheels may lead to trailer instability.
Note: Only carry out this procedure in a
traffic-free environment at speeds of
approximately 20-25 mph (30-40 km/h). 1.
Make sure the trailer brakes are in good
working condition, functioning normally
and correctly adjusted. See a trailer
dealer if necessary.
2. Hook up the trailer and make the electrical connections according to the
trailer manufacturer's instructions.
3. Use the gain adjustment + and -
buttons to increase or decrease the
gain setting to the desired starting
point. A gain setting of six is a good
starting point for heavier loads.
4. In a traffic-free environment, tow the trailer on a dry, level surface at a speed
of 20-25 mph (30-40 km/h) and slide
the manual control lever completely.
242
2021 Transit (TTH) Canada/United States of America, MK3J 19A321 AA enUSA, Edition date: 202010, Second-Printing Towing
Page 380 of 509
Selecting the Radio
Press the button to select radio
mode.
Press the button again to display
the available radio sources. Repeatedly
press the button to scroll through the
available radio sources.
Changing Radio Stations Rotate the control to change radio
stations.
Note:
You can change the radio frequency
by using the seek buttons.
Note: You can recall radio stations using
the numeric preset buttons.
Selecting Media Press the button to select media
mode.
Press the button again to display
the available media sources. Repeatedly
press the button to scroll through the
available media sources. Scrolling Through the Menu
Options
Selecting a Menu Option
Returning to the Previous Screen
Seek Up and Next Track Button
Select to skip to the next track.
Press and hold the button to fast
forward through the track.
377
2021 Transit (TTH) Canada/United States of America, MK3J 19A321 AA enUSA, Edition date: 202010, Second-Printing Audio System E248947 E100027 E248947 E248946