clock FORD TRANSIT CONNECT 2013 1.G User Guide
[x] Cancel search | Manufacturer: FORD, Model Year: 2013, Model line: TRANSIT CONNECT, Model: FORD TRANSIT CONNECT 2013 1.GPages: 321, PDF Size: 4.5 MB
Page 195 of 321
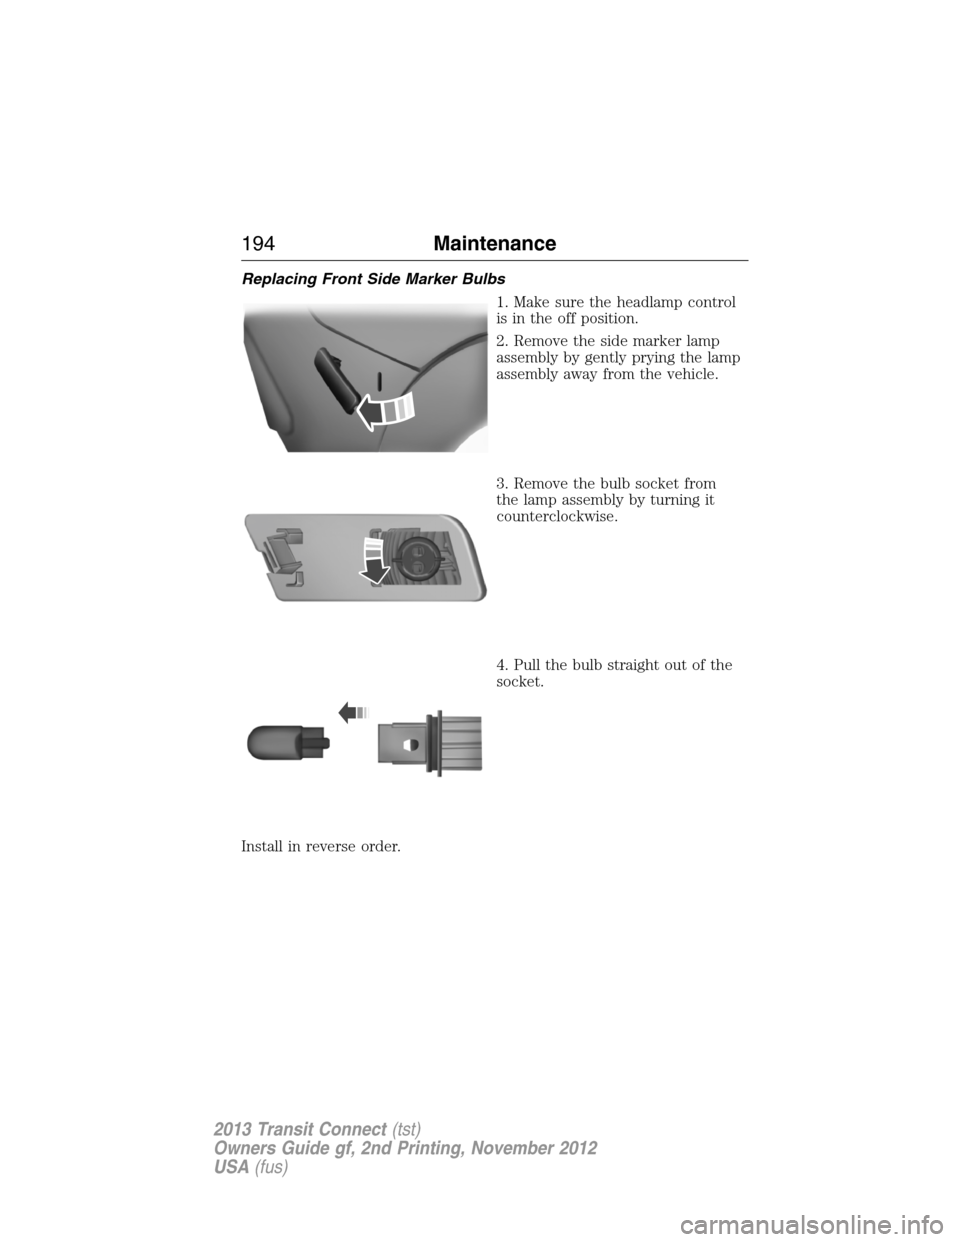
Replacing Front Side Marker Bulbs
1. Make sure the headlamp control
is in the off position.
2. Remove the side marker lamp
assembly by gently prying the lamp
assembly away from the vehicle.
3. Remove the bulb socket from
the lamp assembly by turning it
counterclockwise.
4. Pull the bulb straight out of the
socket.
Install in reverse order.
194Maintenance
2013 Transit Connect(tst)
Owners Guide gf, 2nd Printing, November 2012
USA(fus)
Page 196 of 321
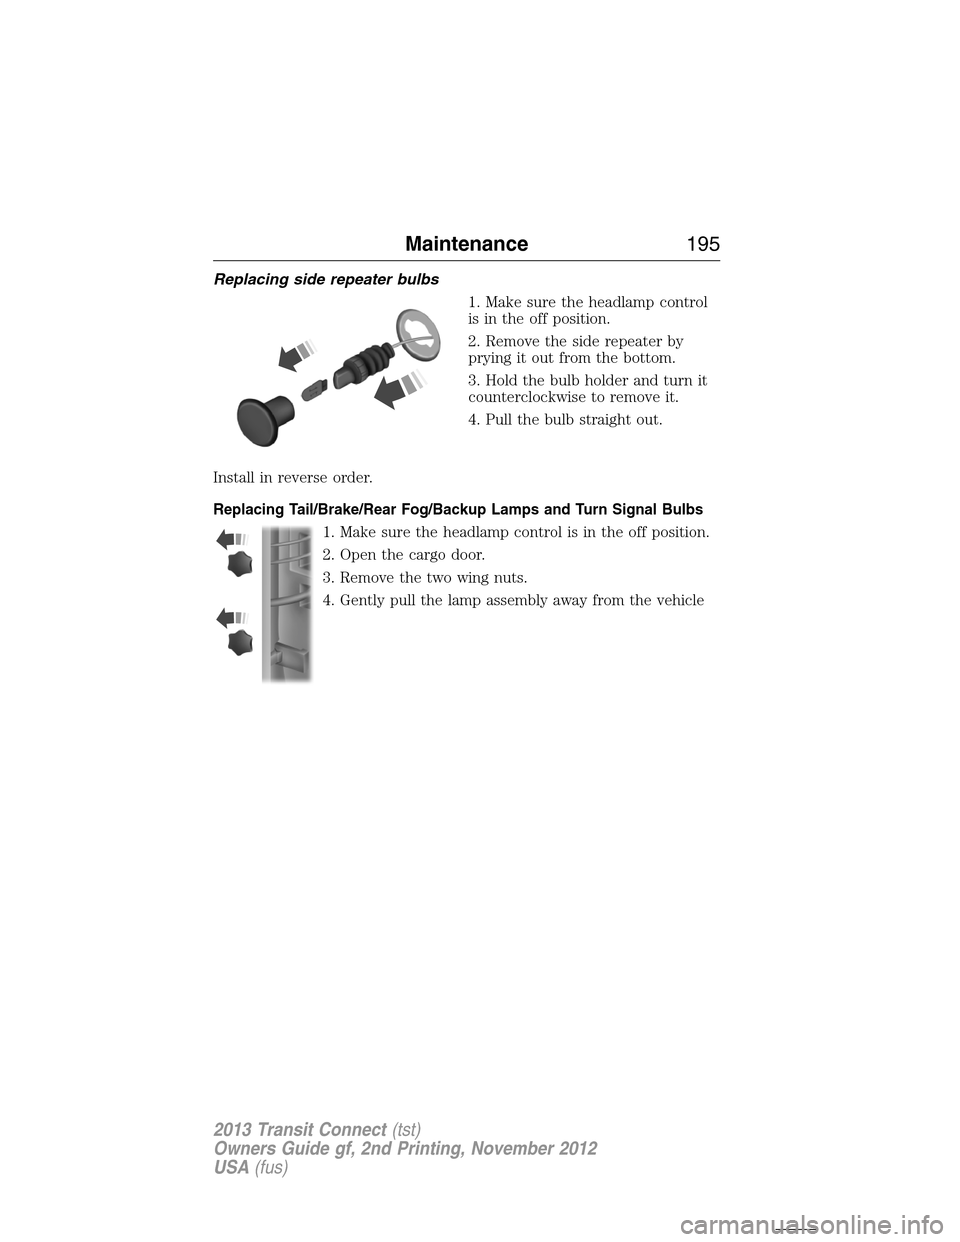
Replacing side repeater bulbs
1. Make sure the headlamp control
is in the off position.
2. Remove the side repeater by
prying it out from the bottom.
3. Hold the bulb holder and turn it
counterclockwise to remove it.
4. Pull the bulb straight out.
Install in reverse order.
Replacing Tail/Brake/Rear Fog/Backup Lamps and Turn Signal Bulbs
1. Make sure the headlamp control is in the off position.
2. Open the cargo door.
3. Remove the two wing nuts.
4. Gently pull the lamp assembly away from the vehicle
Maintenance195
2013 Transit Connect(tst)
Owners Guide gf, 2nd Printing, November 2012
USA(fus)
Page 197 of 321
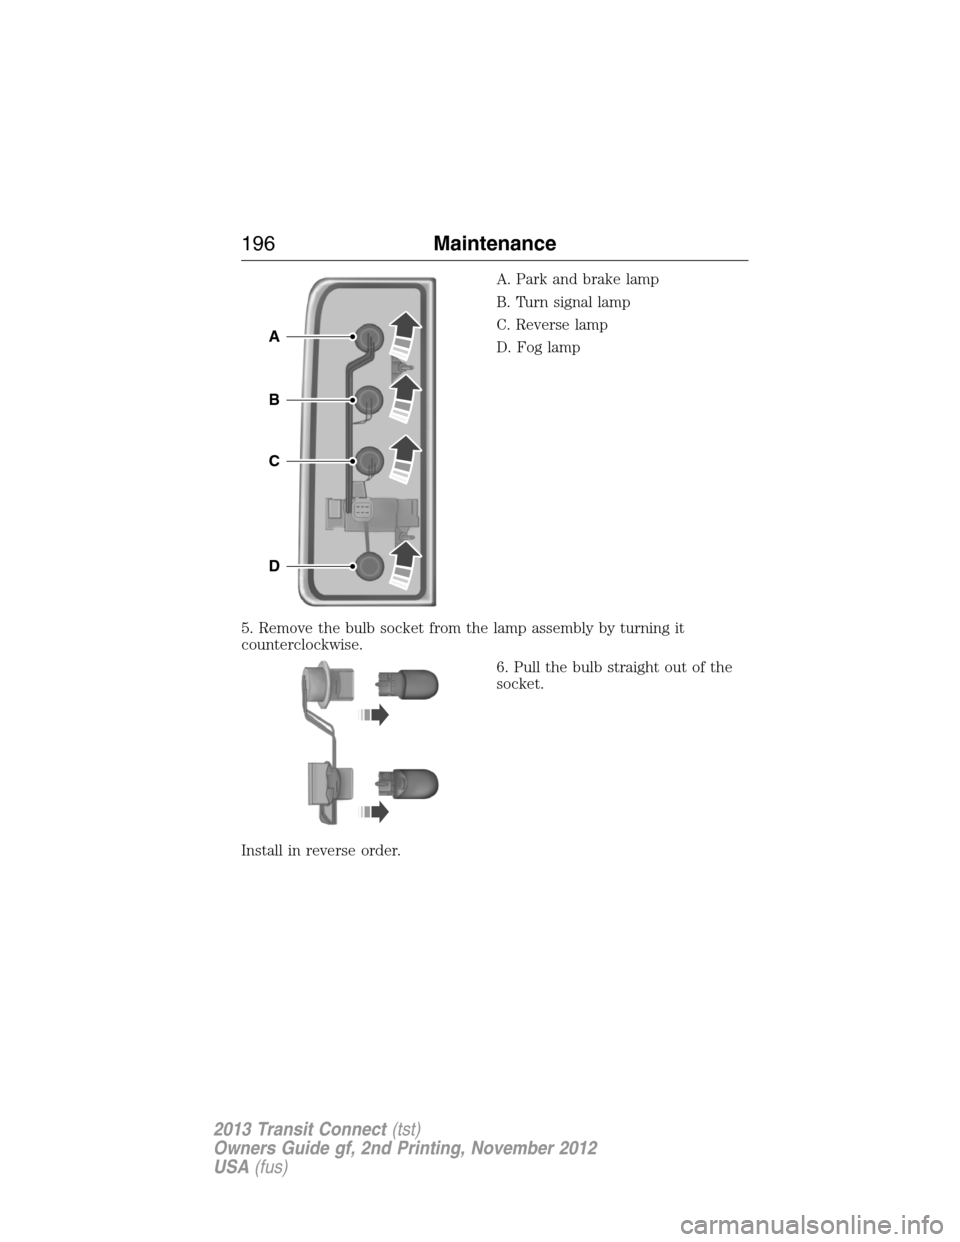
A. Park and brake lamp
B. Turn signal lamp
C. Reverse lamp
D. Fog lamp
5. Remove the bulb socket from the lamp assembly by turning it
counterclockwise.
6. Pull the bulb straight out of the
socket.
Install in reverse order.
A
B
C
D
196Maintenance
2013 Transit Connect(tst)
Owners Guide gf, 2nd Printing, November 2012
USA(fus)
Page 198 of 321
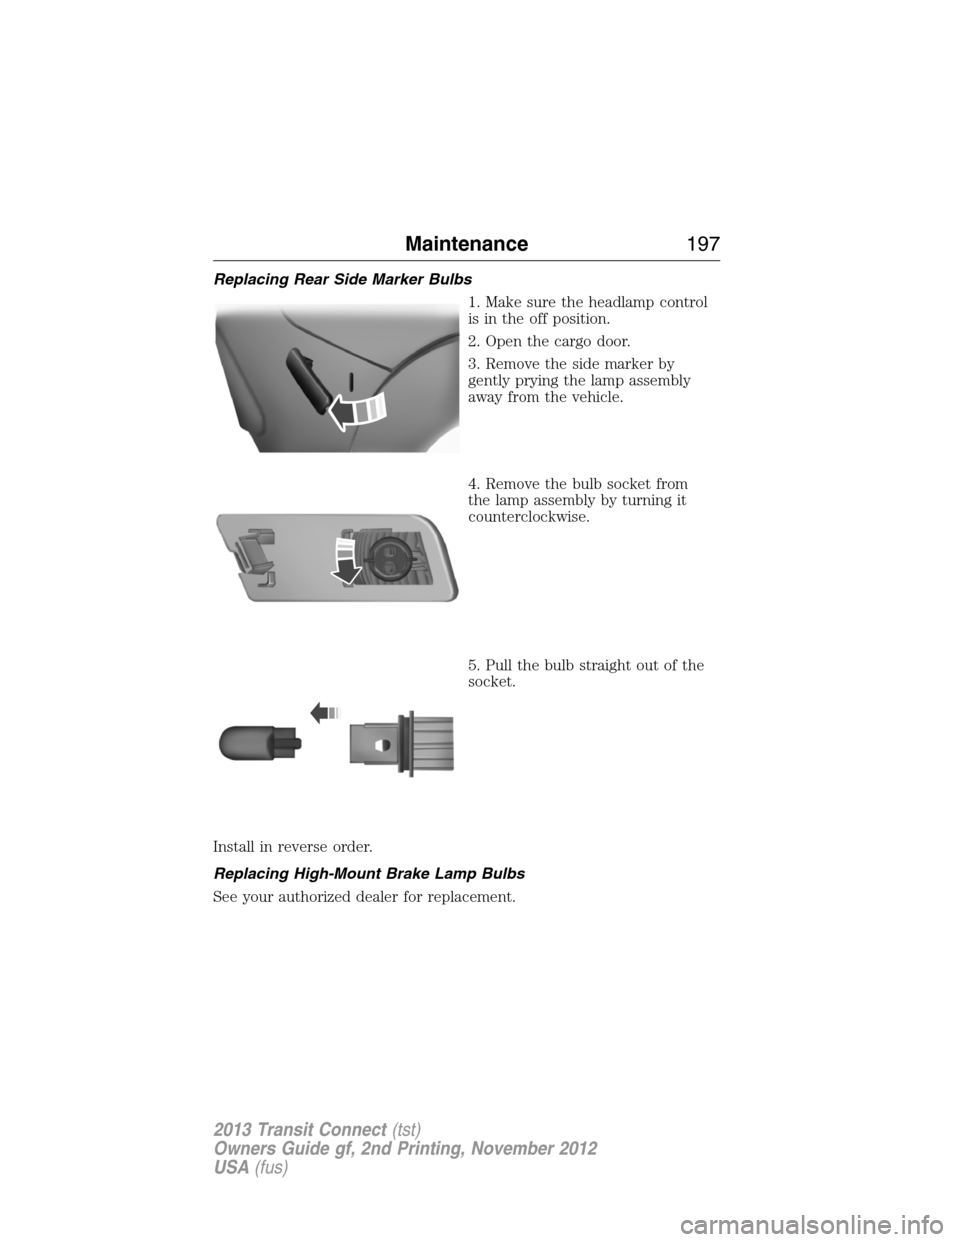
Replacing Rear Side Marker Bulbs
1. Make sure the headlamp control
is in the off position.
2. Open the cargo door.
3. Remove the side marker by
gently prying the lamp assembly
away from the vehicle.
4. Remove the bulb socket from
the lamp assembly by turning it
counterclockwise.
5. Pull the bulb straight out of the
socket.
Install in reverse order.
Replacing High-Mount Brake Lamp Bulbs
See your authorized dealer for replacement.
Maintenance197
2013 Transit Connect(tst)
Owners Guide gf, 2nd Printing, November 2012
USA(fus)
Page 235 of 321
If the reset mode has been entered successfully, the horn will sound
once and the system indicator will flash. If this does not occur, please try
again starting at step 2.
If after repeated attempts to enter the reset mode, the horn does not
sound and the system indicator does not flash, seek service from your
authorized dealer.
5.Note:Train the system sensors in the tires using the following system
reset sequence starting with the left front tire in the following clockwise
order:
•Left front (Driver’s side front tire)
•Right front (Passenger’s side front tire)
•Right rear (Passenger’s side rear tire)
•Left rear (Driver’s side rear tire)
6. Remove the valve cap from the valve stem on the left front tire;
decrease the air pressure until the horn sounds.
Note:The single horn chirp confirms that the sensor identification code
has been learned by the module for this position. If a double horn is
heard, the reset procedure was unsuccessful, and must be repeated.
7. Remove the valve cap from the valve stem on the right front tire;
decrease the air pressure until the horn sounds.
8. Remove the valve cap from the valve stem on the right rear tire;
decrease the air pressure until the horn sounds.
9. Remove the valve cap from the valve stem on the left rear tire;
decrease the air pressure until the horn sounds.
Training is complete after the horn sounds for the last tire trained
(driver’s side rear tire) and the system indicator stops flashing.
10. Turn the ignition off. If two short horn beeps are heard, the reset
procedure was unsuccessful and must be repeated.
If after repeating the procedure and two short beeps are heard when the
ignition is turned to off, seek assistance from your authorized dealer.
11. Set all four tires to the recommended air pressure as indicated on
the Safety Compliance Certification Label or Tire Label located on the
B-Pillar or the edge of the driver’s door.
234Wheels and Tires
2013 Transit Connect(tst)
Owners Guide gf, 2nd Printing, November 2012
USA(fus)
Page 239 of 321
WARNING:Always use the jack provided as original equipment
with your vehicle. If using a jack other than the one provided as
original equipment with your vehicle, make sure the jack capacity is
adequate for the vehicle weight, including any vehicle cargo or
modifications.
Note:Passengers should not remain in the vehicle when the vehicle is
being jacked.
Park on a level surface, set the parking brake and activate the hazard
flashers. Then, place the transmission selector lever in positionPand
turn the engine off.
The jack and tools are located behind a cover in the sidewall at the left
rear of the cargo area. The retention straps and wing nut need to be
removed before removing the jack.
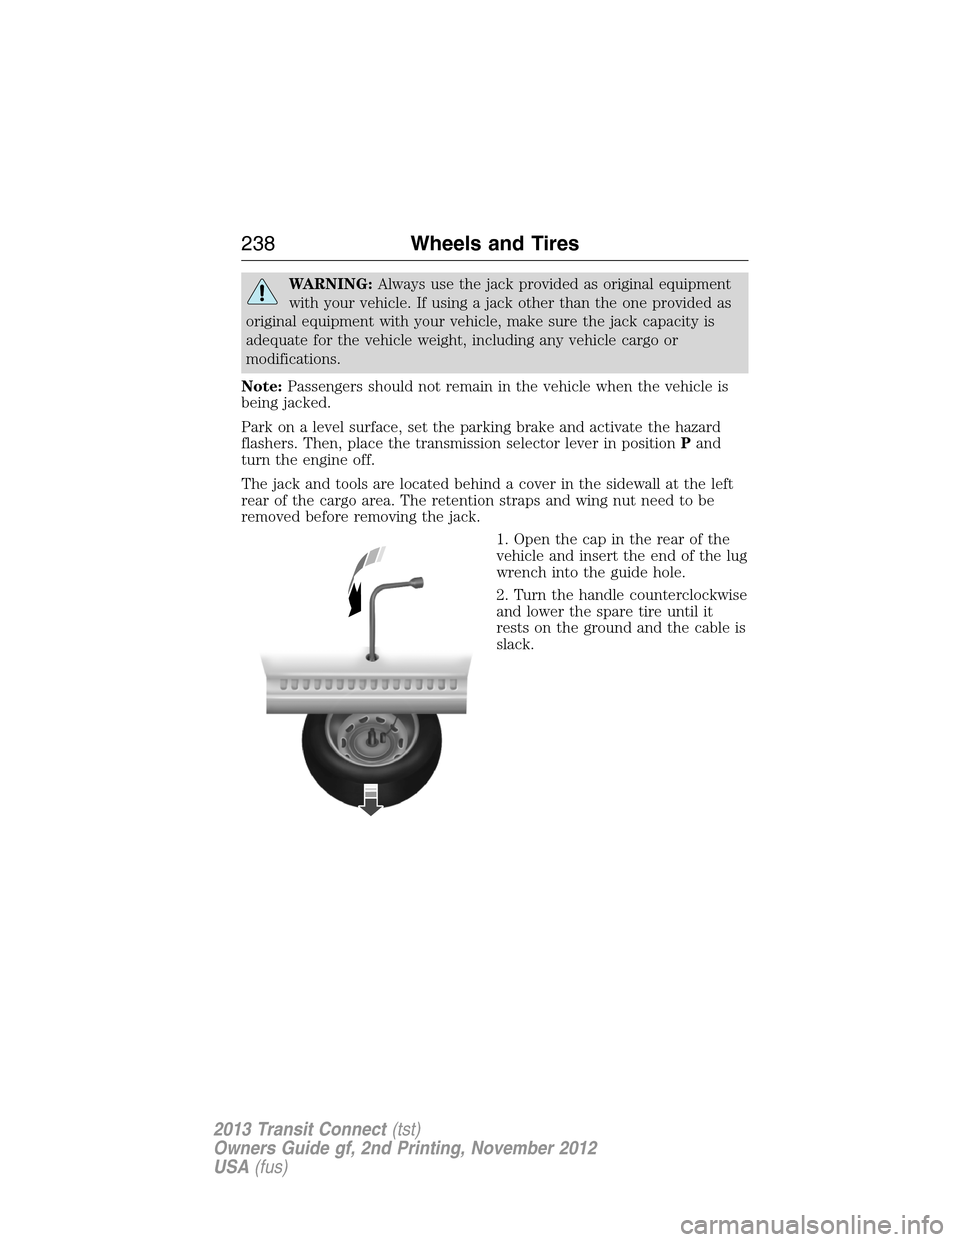
1. Open the cap in the rear of the
vehicle and insert the end of the lug
wrench into the guide hole.
2. Turn the handle counterclockwise
and lower the spare tire until it
rests on the ground and the cable is
slack.
238Wheels and Tires
2013 Transit Connect(tst)
Owners Guide gf, 2nd Printing, November 2012
USA(fus)
Page 240 of 321
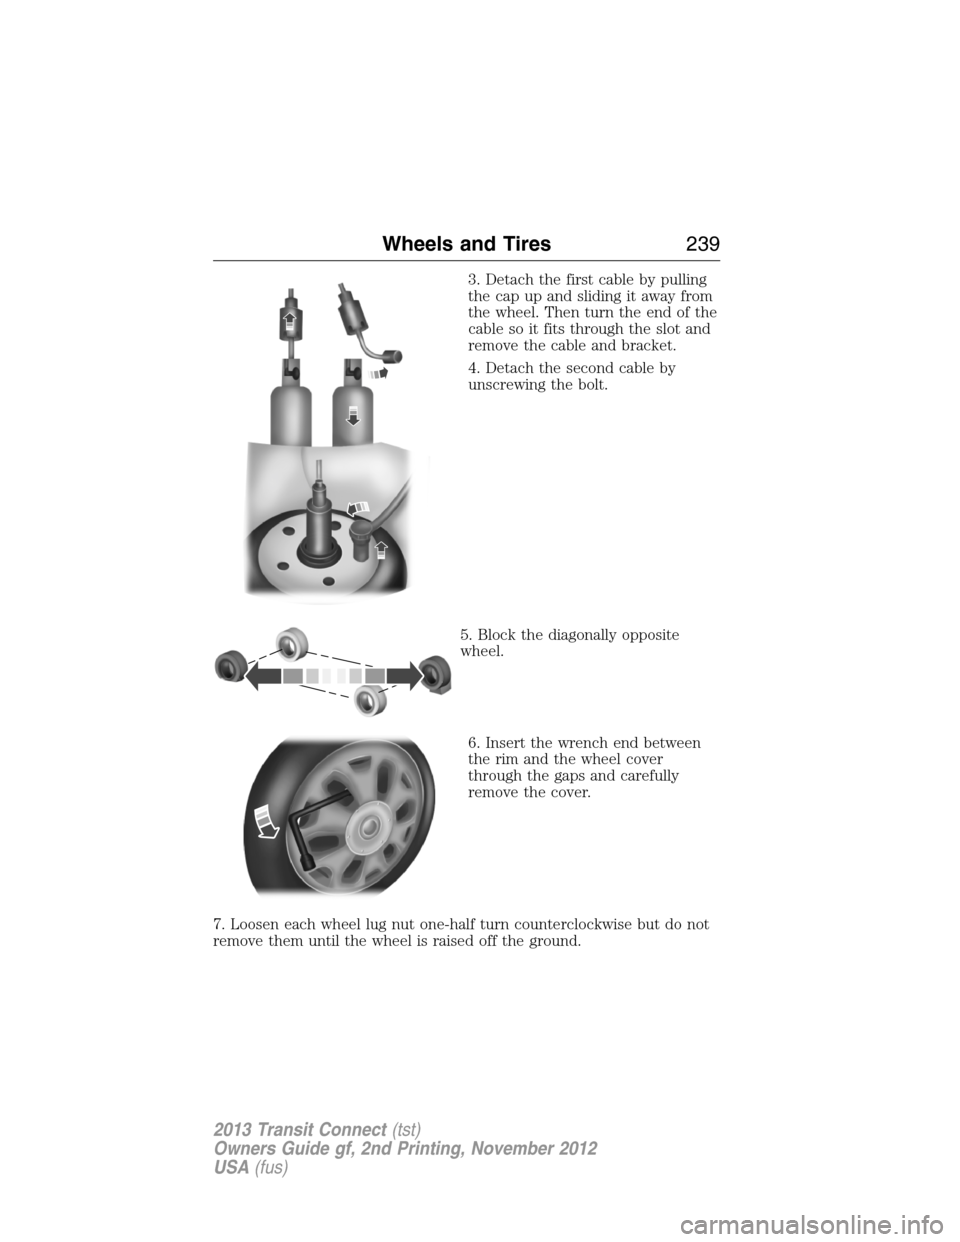
3. Detach the first cable by pulling
the cap up and sliding it away from
the wheel. Then turn the end of the
cable so it fits through the slot and
remove the cable and bracket.
4. Detach the second cable by
unscrewing the bolt.
5. Block the diagonally opposite
wheel.
6. Insert the wrench end between
the rim and the wheel cover
through the gaps and carefully
remove the cover.
7. Loosen each wheel lug nut one-half turn counterclockwise but do not
remove them until the wheel is raised off the ground.
Wheels and Tires239
2013 Transit Connect(tst)
Owners Guide gf, 2nd Printing, November 2012
USA(fus)
Page 241 of 321
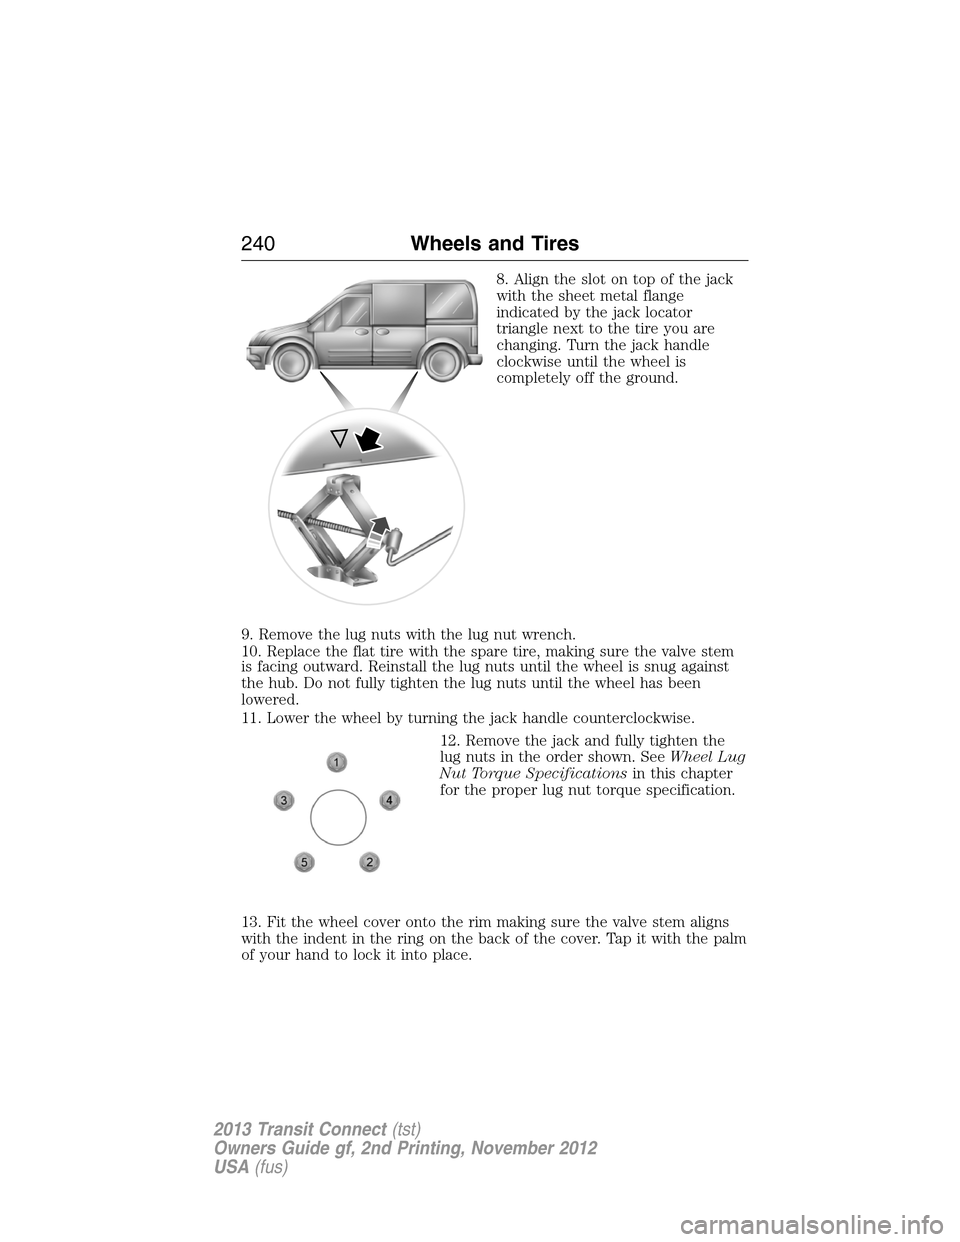
8. Align the slot on top of the jack
with the sheet metal flange
indicated by the jack locator
triangle next to the tire you are
changing. Turn the jack handle
clockwise until the wheel is
completely off the ground.
9. Remove the lug nuts with the lug nut wrench.
10. Replace the flat tire with the spare tire, making sure the valve stem
is facing outward. Reinstall the lug nuts until the wheel is snug against
the hub. Do not fully tighten the lug nuts until the wheel has been
lowered.
11. Lower the wheel by turning the jack handle counterclockwise.
12. Remove the jack and fully tighten the
lug nuts in the order shown. SeeWheel Lug
Nut Torque Specificationsin this chapter
for the proper lug nut torque specification.
13. Fit the wheel cover onto the rim making sure the valve stem aligns
with the indent in the ring on the back of the cover. Tap it with the palm
of your hand to lock it into place.
240Wheels and Tires
2013 Transit Connect(tst)
Owners Guide gf, 2nd Printing, November 2012
USA(fus)
Page 242 of 321
Stowing the flat/spare tire
Note:Failure to follow spare tire stowage instructions may result in
failure of cable or loss of spare tire.
1. Lay the tire on the ground with the valve stem facing up toward the
vehicle.
2. Slide the wheel partially under the vehicle and install the retainer
through the wheel center. Pull on the cables to align the components at
the end of the cables.
3. Attach the second cable by screwing the bolt into one of the holes in
the wheel.
4. Turn the end of the first cable so it fits through the slot and install the
cable. Then slide the cap over the retainer.
5. Turn the lug wrench clockwise until the tire is raised to its stowed
position underneath the vehicle. The effort to turn the jack handle
increases significantly and the spare tire carrier ratchets or slips when
the tire is raised to the maximum tightness. Tighten to the best of your
ability, to the point where the ratchet/slip occurs, if possible. The spare
tire carrier will not allow you to overtighten. If the spare tire carrier
ratchets or slips with little effort, take the vehicle to your authorized
dealer for assistance at your earliest convenience.
6. Check that the tire lies flat against the frame and is properly
tightened. Try to push or pull, then turn the tire to be sure it will not
move. Loosen and retighten, if necessary. Failure to properly stow the
spare tire may result in failure of the winch cable and loss of the tire.
7. Repeat this tightness check procedure when servicing the spare tire
pressure (every six months, perscheduled maintenance information),
or at any time that the spare tire is disturbed through service of other
components.
Return the jack and tools to the storage position in the cargo area.
Electric vehicles
For specific information on the Transit Connect Electric, refer to the
Azure Dynamics TC-E Owner’s GuideSupplement.
Wheels and Tires241
2013 Transit Connect(tst)
Owners Guide gf, 2nd Printing, November 2012
USA(fus)
Page 317 of 321
C
Capacities for refilling fluids ....244
CD ..........................................88–89
CD player ....................................86
Cell phone use ............................15
Changing a tire .........................235
Changing the air filter ..............188
Child safety seats
attaching with tether straps ....28
automatic locking mode
(retractor) .................................36
LATCH .......................................26
Child safety seats - booster
seats .............................................21
Cleaning your vehicle ...............201
engine compartment ..............203
instrument panel ....................205
interior .....................................204
plastic parts ............................202
washing ....................................201
waxing .....................................203
wheels ......................................206
wiper blades ............................204
Climate control (see Air
conditioning or Heating) ............94
Clock ......................................88–89
Console ......................................107
overhead ..................................107
Coolant ......................................177
checking and adding ..............177
refill capacities ........................244
specifications ..........................244
Customer Assistance ................149
Ford Extended Service
Plan ..................................251, 253
Getting roadside assistance ...149Getting the service
you need .................................155
Ordering additional owner’s
literature .................................161
Utilizing the
Mediation/Arbitration
Program ...................................159
D
Defrost .........................................94
rear window ..............................98
Dipstick
automatic transaxle fluid .......181
automatic transmission
fluid ..........................................181
engine oil .................................176
Doors
central unlocking ......................58
lubricant specifications ..........244
Driving under special
conditions ..................................124
through water .........................146
E
Electronic stability control ......129
Emergencies, roadside
jump-starting ..........................151
running out of fuel .................114
Emission control system ..........117
End user license agreement ....307
Engine ........................................243
cleaning ...................................203
coolant .....................................177
fail-safe cooling .......................180
lubrication specifications .......244
refill capacities ........................244
service points ..........................176
Engine block heater .................110
316Index
2013 Transit Connect(tst)
Owners Guide gf, 2nd Printing, November 2012
USA(fus)