warning light FORD TRANSIT CONNECT 2014 2.G Service Manual
[x] Cancel search | Manufacturer: FORD, Model Year: 2014, Model line: TRANSIT CONNECT, Model: FORD TRANSIT CONNECT 2014 2.GPages: 411, PDF Size: 6.62 MB
Page 230 of 411
The tire pressure monitoring system
complies with part 15 of the FCC rules and
with RSS-210 of Industry Canada.
Operation is subject to the following two
conditions: (1) This device may not cause
harmful interference, and (2) This device
must accept any interference received,
including interference that may cause
undesired operation.
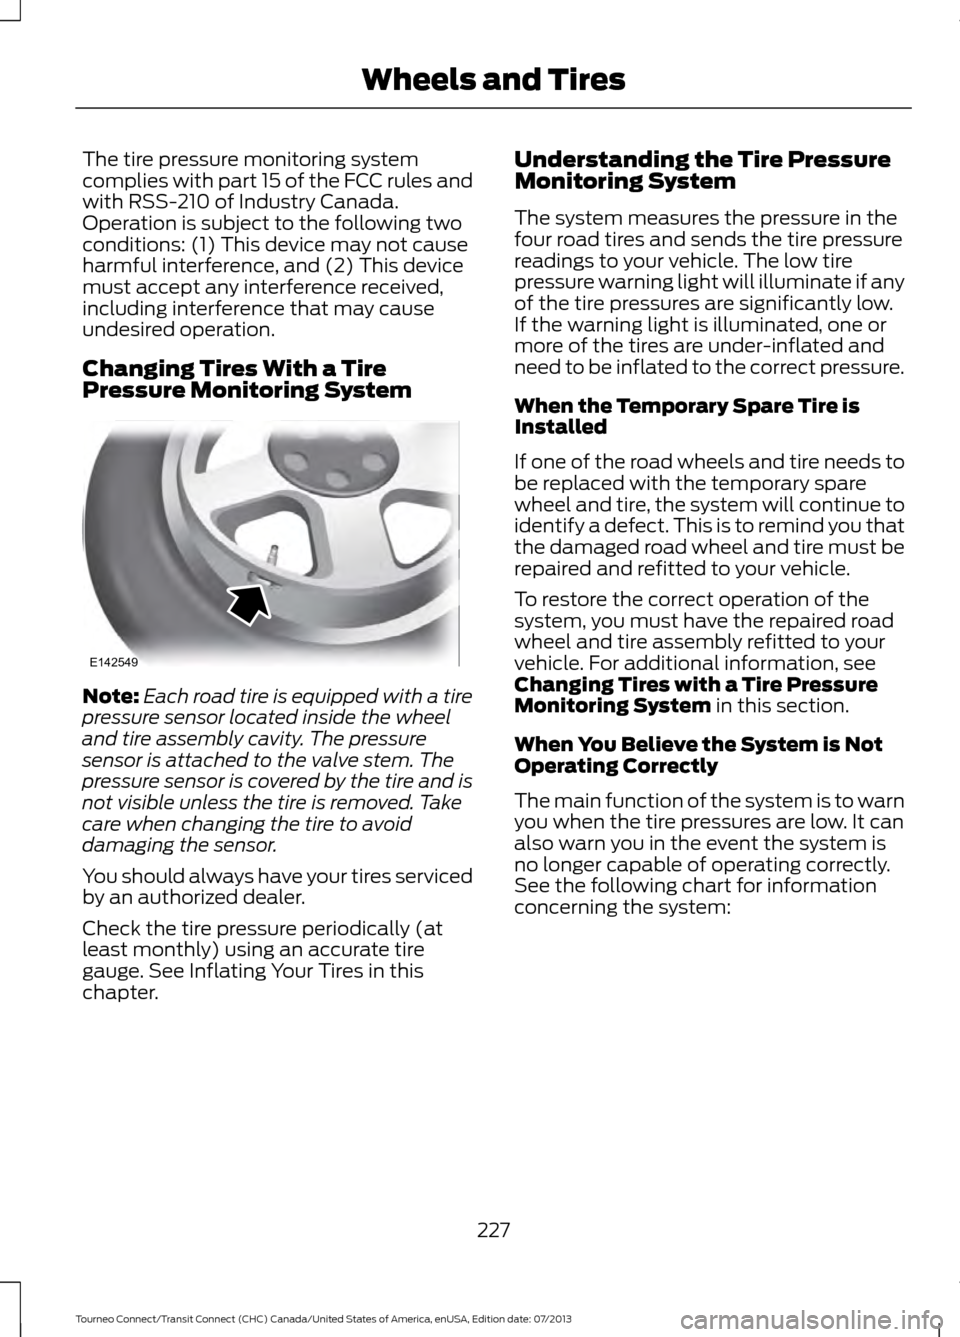
Changing Tires With a Tire
Pressure Monitoring System
Note:
Each road tire is equipped with a tire
pressure sensor located inside the wheel
and tire assembly cavity. The pressure
sensor is attached to the valve stem. The
pressure sensor is covered by the tire and is
not visible unless the tire is removed. Take
care when changing the tire to avoid
damaging the sensor.
You should always have your tires serviced
by an authorized dealer.
Check the tire pressure periodically (at
least monthly) using an accurate tire
gauge. See Inflating Your Tires in this
chapter. Understanding the Tire Pressure
Monitoring System
The system measures the pressure in the
four road tires and sends the tire pressure
readings to your vehicle. The low tire
pressure warning light will illuminate if any
of the tire pressures are significantly low.
If the warning light is illuminated, one or
more of the tires are under-inflated and
need to be inflated to the correct pressure.
When the Temporary Spare Tire is
Installed
If one of the road wheels and tire needs to
be replaced with the temporary spare
wheel and tire, the system will continue to
identify a defect. This is to remind you that
the damaged road wheel and tire must be
repaired and refitted to your vehicle.
To restore the correct operation of the
system, you must have the repaired road
wheel and tire assembly refitted to your
vehicle. For additional information, see
Changing Tires with a Tire Pressure
Monitoring System in this section.
When You Believe the System is Not
Operating Correctly
The main function of the system is to warn
you when the tire pressures are low. It can
also warn you in the event the system is
no longer capable of operating correctly.
See the following chart for information
concerning the system:
227
Tourneo Connect/Transit Connect (CHC) Canada/United States of America, enUSA, Edition date: 07/2013 Wheels and TiresE142549
Page 231 of 411
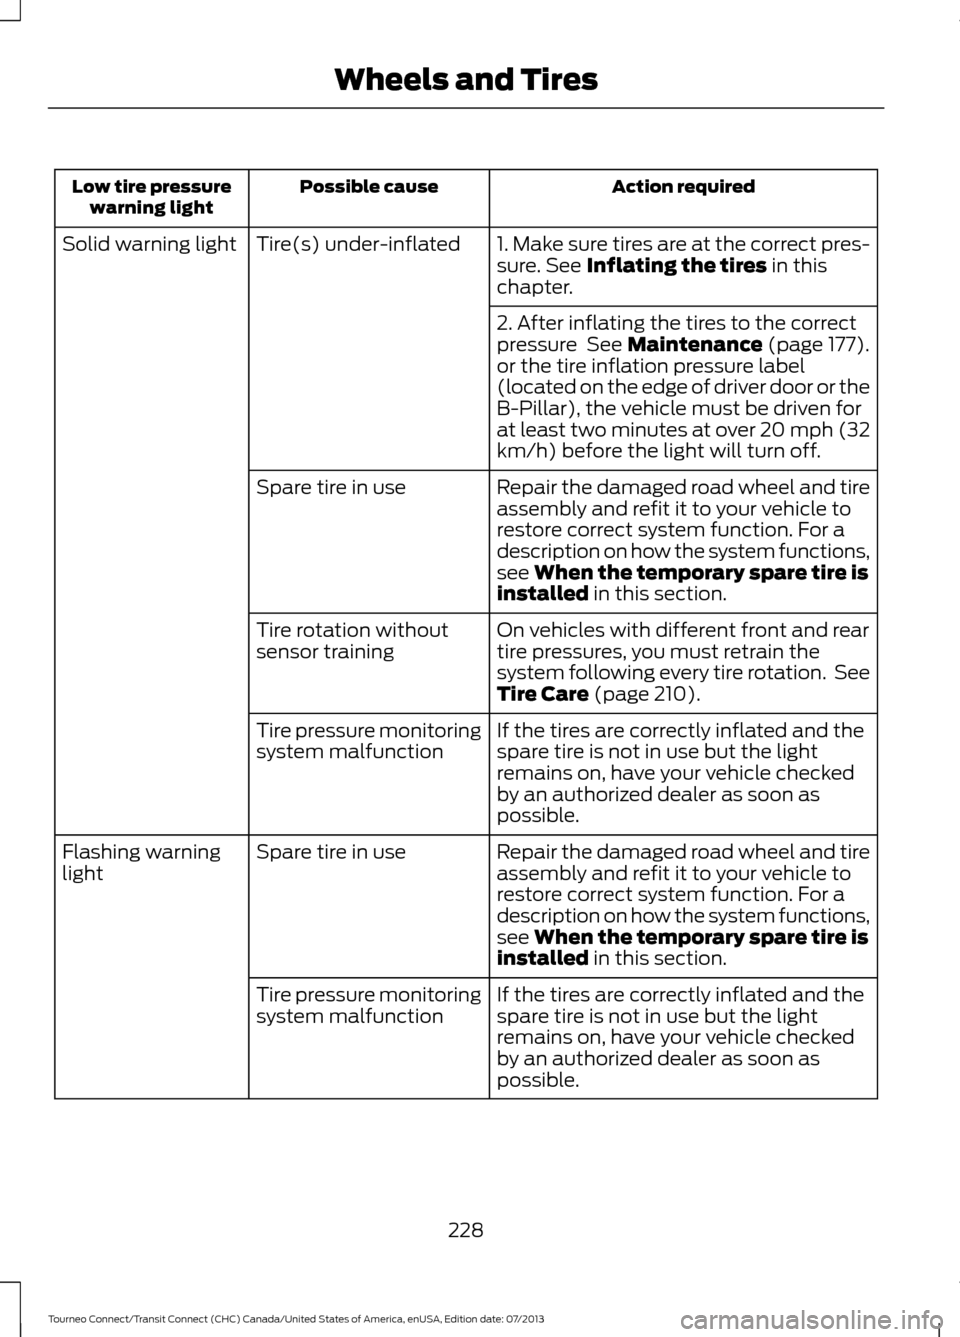
Action required
Possible cause
Low tire pressure
warning light
1. Make sure tires are at the correct pres-
sure. See Inflating the tires in this
chapter.
Tire(s) under-inflated
Solid warning light
2. After inflating the tires to the correct
pressure
See Maintenance (page 177).
or the tire inflation pressure label
(located on the edge of driver door or the
B-Pillar), the vehicle must be driven for
at least two minutes at over 20 mph (32
km/h) before the light will turn off.
Repair the damaged road wheel and tire
assembly and refit it to your vehicle to
restore correct system function. For a
description on how the system functions,
see
When the temporary spare tire is
installed in this section.
Spare tire in use
On vehicles with different front and rear
tire pressures, you must retrain the
system following every tire rotation. See
Tire Care
(page 210).
Tire rotation without
sensor training
If the tires are correctly inflated and the
spare tire is not in use but the light
remains on, have your vehicle checked
by an authorized dealer as soon as
possible.
Tire pressure monitoring
system malfunction
Repair the damaged road wheel and tire
assembly and refit it to your vehicle to
restore correct system function. For a
description on how the system functions,
see
When the temporary spare tire is
installed in this section.
Spare tire in use
Flashing warning
light
If the tires are correctly inflated and the
spare tire is not in use but the light
remains on, have your vehicle checked
by an authorized dealer as soon as
possible.
Tire pressure monitoring
system malfunction
228
Tourneo Connect/Transit Connect (CHC) Canada/United States of America, enUSA, Edition date: 07/2013 Wheels and Tires
Page 232 of 411
When Inflating the Tires
When inflating the tires (for example; at a
gas station), the system may not respond
immediately to the air added to the tires.
It may take up to two minutes of driving
over 20 mph (32 km/h) for the light to turn
off after you have filled your tires to the
recommended inflation pressure.
How Temperature Affects the Tire
Pressures
While driving in a normal manner, tire
pressures may increase up to 4 psi (0.3
bar) from a cold start situation. If the
vehicle is stationary overnight and the
temperature significantly lower than the
daytime temperature, tire pressures may
decrease up to 3 psi (0.2 bar) for a drop of
30°F (17°C) in ambient temperature. This
lower pressure value will be detected by
the system as being significantly lower
than the correct inflation pressure and the
warning light will illuminate.
If the warning light is on:
•
Check each tire to verify that none are
flat.
• If one or more tires are flat, repair as
necessary.
• Check the tire pressures and Inflate all
the tires to the correct pressure.
Tire Pressure Monitoring System
Reset Procedure
Note: The system reset procedure needs
to be carried out after each tire replacement. Overview WARNING
To determine the required
pressure(s) for your vehicle, see the
Safety Compliance Certification
Label (affixed to either the door hinge
pillar, door-latch post, or the door edge
that meets the door-latch post, next to the
driver seating position), or Tire Label
located on the B-Pillar or the edge of the
driver door. To maintain your vehicle
’s load carrying
capability, this vehicle requires different
tire pressures in the front tires compared
to the rear tires. The system on your vehicle
is designed to illuminate the warning light
at different pressures for the front and rear
tires.
The tires need to be periodically rotated
to provide consistent performance and
maximum tire life, the system needs to
know when the tires have been rotated to
determine which set of tires are on the
front and rear axles. With this information,
the system can detect and correctly warn
of low tire pressures.
System Reset Tips:
• To reduce the chance of interference
from another vehicle, the system reset
procedure should be carried out at
least three feet (one meter) away from
another Ford vehicle undergoing the
system reset procedure.
• Do not wait more than two minutes
between resetting each tire sensor or
the system will time-out and the entire
procedure will have to be repeated on
all four wheels. A double horn chirp
indicates the need to repeat the
procedure.
229
Tourneo Connect/Transit Connect (CHC) Canada/United States of America, enUSA, Edition date: 07/2013 Wheels and Tires
Page 233 of 411
Carrying Out the System Reset
Procedure
Read the entire procedure before carrying
out a system reset.
1. Drive your vehicle above 20 mph (32
km/h) for at least two minutes and
then park in a safe location where you
can easily get to all four tires and have
access to a tire inflation pump.
2. Switch the ignition off.
3. Switch the ignition on with the engine off.
4. Turn the hazard flashers on then off three times, this must be completed
within 10 seconds. If the reset mode
has been entered successfully, the horn
will chirp once and the system indicator
will flash. If this does not occur, repeat
the procedure from step 2. If after
repeated attempts to enter the reset
mode, the horn does not chirp and the
system indicator does not flash, have
your vehicle checked by an authorized
dealer as soon as possible.
5. Train the system sensors in the tires using the following reset sequence
starting with the left front tire and
following a clockwise order: Left front,
right front, right rear, left rear.
6. Remove the valve cap from the valve stem on the left front tire. Decrease the
air pressure until the horn chirps.
Note: The single horn chirp confirms that
the sensor identification code has been
learned by your vehicle for this position. If a
double horn chirp is heard, the reset
procedure was unsuccessful and must be
repeated.
7. Remove the valve cap from the valve stem on the right front tire. Decrease
the air pressure until the horn chirps.
8. Remove the valve cap from the valve stem on the right rear tire. Decrease the
air pressure until the horn chirps. 9. Remove the valve cap from the valve
stem on the left rear tire. Decrease the
air pressure until the horn chirps.
Training is complete when the horn
chirps after the last system sensor (left
rear) has been trained and the system
indicator stops flashing.
10. Switch the ignition off. If two short horn chirps are heard, the reset
procedure was unsuccessful and
must be repeated.
Note: If after repeating the procedure two
short horn chirps are heard again, have your
vehicle checked by an authorized dealer as
soon as possible.
11. Set all four tires to the correct pressure See Maintenance (page
177). or the tire inflation pressure label
(located on the edge of driver door or
the B-Pillar).
CHANGING A ROAD WHEEL WARNINGS
The use of tire sealants may damage
your tire pressure monitoring system
and should only be used in roadside
emergencies. If you must use a sealant, the
Ford Tire Mobility Kit sealant should be
used. The tire pressure monitoring system
sensor and valve stem on the wheel must
be replaced by an authorized dealer after
use of the sealant. If the tire pressure monitor sensor
becomes damaged, it will no longer
function.
See Tire Pressure
Monitoring System (page 226). Note:
The tire pressure monitoring system
indicator light will illuminate when the spare
tire is in use. To restore the full function of
the monitoring system, all road wheels
equipped with tire pressure monitoring
sensors must be mounted on the vehicle.
230
Tourneo Connect/Transit Connect (CHC) Canada/United States of America, enUSA, Edition date: 07/2013 Wheels and Tires
Page 389 of 411
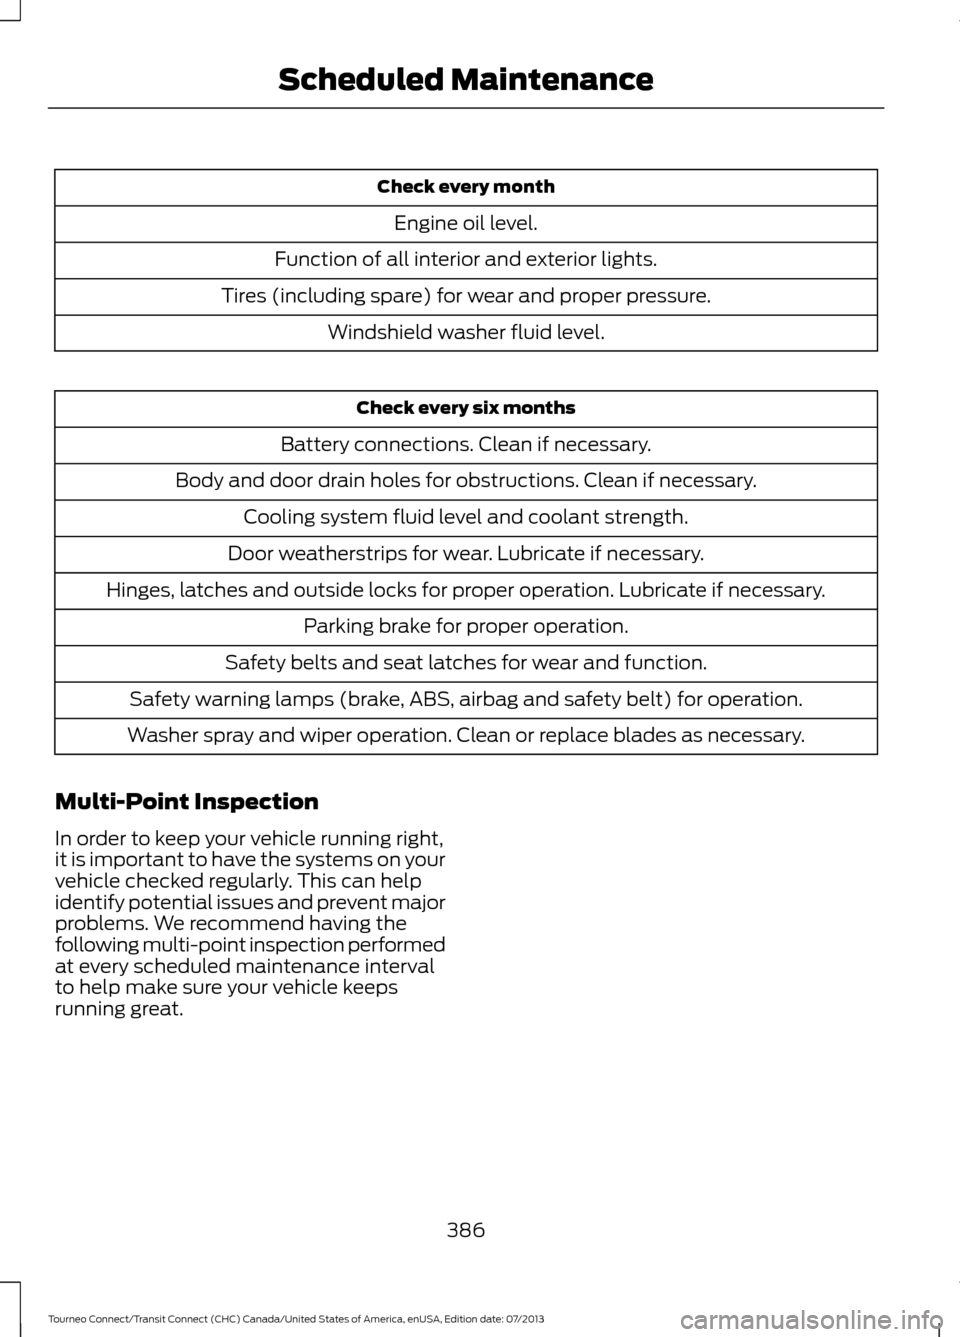
Check every month
Engine oil level.
Function of all interior and exterior lights.
Tires (including spare) for wear and proper pressure. Windshield washer fluid level. Check every six months
Battery connections. Clean if necessary.
Body and door drain holes for obstructions. Clean if necessary. Cooling system fluid level and coolant strength.
Door weatherstrips for wear. Lubricate if necessary.
Hinges, latches and outside locks for proper operation. Lubricate if necessary. Parking brake for proper operation.
Safety belts and seat latches for wear and function.
Safety warning lamps (brake, ABS, airbag and safety belt) for operation.
Washer spray and wiper operation. Clean or replace blades as necessary.
Multi-Point Inspection
In order to keep your vehicle running right,
it is important to have the systems on your
vehicle checked regularly. This can help
identify potential issues and prevent major
problems. We recommend having the
following multi-point inspection performed
at every scheduled maintenance interval
to help make sure your vehicle keeps
running great.
386
Tourneo Connect/Transit Connect (CHC) Canada/United States of America, enUSA, Edition date: 07/2013 Scheduled Maintenance
Page 405 of 411
Fuse Specification Chart............................167
Engine Compartment Fuse Box.................... 167
Load Compartment Fuse Box........................ 173
Passenger Compartment Fuse Box..............171
G
Gauges................................................................72 Engine Coolant Temperature Gauge.............72
Fuel Gauge.............................................................. 73
Information Display.............................................. 72
General Information on Radio Frequencies....................................................41
General Maintenance Information.......384
Multi-Point Inspection..................................... 386
Owner Checks and Services.......................... 385
Protecting Your Investment.......................... 384
Why Maintain Your Vehicle?......................... 384
Why Maintain Your Vehicle at Your Dealership?..................................................... 384
Getting Assistance Outside the U.S. and Canada..........................................................163
Getting the Services You Need...............160 Away From Home.............................................. 160
Global Opening and Closing
......................69
Closing the Windows.......................................... 69
Opening the Windows....................................... 69
H
Handbrake See: Parking Brake.............................................. 122
Hazard Warning Flashers..........................156
Headlamp Exit Delay....................................63
Head Restraints..............................................96 Adjusting the Head Restraint........................... 97
Heated Seats
.................................................104
Heated Windows and Mirrors...................94 Heated Exterior Mirrors...................................... 95
Heated Rear Window......................................... 95
Heated Windshield.............................................. 95
Heating See: Climate Control.......................................... 88
Hill Start Assist..............................................123 Using Hill Start Assist........................................ 123Hints on Controlling the Interior
Climate............................................................92
Cooling the Interior Quickly.............................. 93
General Hints......................................................... 92
Heating the Interior Quickly.............................. 93
Maximum Cooling Performance in Instrument Panel or Instrument Panel
and Footwell Positions................................. 93
Recommended Settings for Cooling ...........93
Recommended Settings for Heating............93
Side Window Defogging in Cold Weather.............................................................. 93
Vehicle Stationary for Extended Periods During Extreme High Ambient
Temperatures................................................... 93
Hints on Driving With Anti-Lock Brakes.............................................................122
Hood Lock See: Opening and Closing the Hood............177
I
Ignition Switch
..............................................109
In California (U.S. Only)..............................161
Information Display Control.......................57
Information Displays
......................................77
General Information............................................. 77
Information....................................................346 911 Assist............................................................... 353
Alerts...................................................................... 352
Calendar................................................................ 352
Sirius Travel Link................................................ 350
SYNC Services (If Equipped, United States Only).................................................................. 347
Vehicle Health Report...................................... 355
Information Messages
..................................82
Installing Child Seats.....................................14 Child Seats............................................................... 14
Using Lap and Shoulder Belts.......................... 15
Using Lower Anchors and Tethers for Children (LATCH).............................................. 17
Using Tether Straps.............................................. 19
Instrument Cluster
.........................................72
Instrument Lighting Dimmer.....................63
402
Tourneo Connect/Transit Connect (CHC) Canada/United States of America, enUSA, Edition date: 07/2013 Index
Page 410 of 411
Using Cruise Control....................................132
Switching Cruise Control Off.......................... 132
Switching Cruise Control On........................... 132
Using MyKey With Remote Start Systems...........................................................47
Using Snow Chains.....................................225
Using Stability Control................................126
AdvanceTrac® with Roll Stability Control ™
(RSC®).............................................................. 126
Using SYNC™ With Your Media Player............................................................285
Accessing Your Play Menu.............................. 291
Connecting Your Digital Media Player to the USB Port.......................................................... 286
Media Menu Features...................................... 290
Media Voice Commands................................ 288
System Settings................................................. 293
What's Playing?................................................. 287
Using SYNC™ With Your Phone............263 Accessing Features Through the Phone
Menu.................................................................. 270
Accessing Your Phone Settings.................... 274
Making a Call...................................................... 268
Pairing a Cell Phone for the First Time................................................................... 263
Pairing Subsequent Cell Phones.................265
Phone Options during an Active Call.........269
Receiving Calls................................................... 269
System Settings................................................. 276
Text Messaging.................................................... 272
Using Traction Control
................................124
Switching the System Off Using a
Switch................................................................ 124
Switching the System Off Using the Information Display Controls.................... 124
System Indicator Lights and Messages.......................................................... 124
Using Voice Recognition
...........................260
Initiating a Voice Session............................... 260
System Interaction and Feedback...............261
Using Winter Tires
.......................................225
Utilizing the Mediation/Arbitration Program (Canada Only).........................162
V
Vehicle Care...................................................202
Vehicle Certification Label.......................240 Vehicle Identification Number
................239
Vehicle Storage............................................206
Battery.................................................................... 207
Body....................................................................... 206
Brakes..................................................................... 207
Cooling system................................................... 207
Engine..................................................................... 207
Fuel system.......................................................... 207
General.................................................................. 206
Miscellaneous..................................................... 207
Removing Vehicle From Storage.................. 207
Tires........................................................................\
. 207
Ventilation See: Climate Control.......................................... 88
Vents See: Air Vents........................................................ 88
VIN See: Vehicle Identification Number............239
Voice Control
...................................................56
W
Warning Lamps and Indicators.................73 Airbag - Front......................................................... 73
Anti-Lock Braking System................................. 73
Battery...................................................................... 73
Blind Spot Monitor............................................... 73
Brake System......................................................... 73
Cruise Control........................................................ 74
Direction Indicator................................................ 74
Engine Oil................................................................. 74
Fasten Safety Belt................................................ 74
Fog Lamps - Front................................................ 74
High Beam............................................................... 74
Information............................................................. 74
Low Fuel Level....................................................... 74
Low Tire Pressure Warning............................... 74
Parking Lamps....................................................... 75
Service Engine Soon............................................ 75
Traction and Stability Control.......................... 75
Traction and Stability Control Off.................. 75
Washer Fluid Check.....................................184
Washers See: Cleaning the Exterior.............................. 202
See: Wipers and Washers................................. 58
Waxing.............................................................203
Wheel Nuts See: Changing a Road Wheel....................... 230
407
Tourneo Connect/Transit Connect (CHC) Canada/United States of America, enUSA, Edition date: 07/2013 Index