sensor FORD TRANSIT CONNECT 2014 2.G Quick Reference Guide
[x] Cancel search | Manufacturer: FORD, Model Year: 2014, Model line: TRANSIT CONNECT, Model: FORD TRANSIT CONNECT 2014 2.GPages: 10, PDF Size: 9.45 MB
Page 3 of 10

54
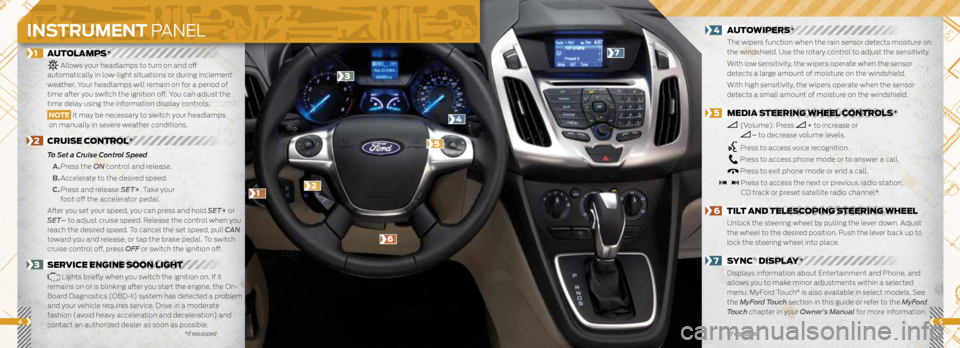
1 AUTOLAMPS*
Allows your headlamps to turn on and off
automatically in low-light situations or during inclement
weather. Your headlamps will remain on for a period of
time after you switch the ignition off. You can adjust the
time delay using the information display controls.
NOTE It may be necessary to switch your headlamps
on manually in severe weather conditions.
2 CRUISE CONTROL*
To Set a Cruise Control Speed
A. Press the ON control and release.
B. Accelerate to the desired speed.
C. Press and release SET+. Take your
foot off the accelerator pedal.
After you set your speed, you can press and hold SET+ or
SET– to adjust cruise speed. Release the control when you
reach the desired speed. To cancel the set speed, pull CAN
toward you and release, or tap the brake pedal. To switch
cruise control off, press OFF or switch the ignition off.
3 SERVICE ENGINE SOON LIGHT
Lights briefly when you switch the ignition on. If it
remains on or is blinking after you start the engine, the On-
Board Diagnostics (OBD-II) system has detected a problem
and your vehicle requires service. Drive in a moderate
fashion (avoid heavy acceleration and deceleration) and
contact an authorized dealer as soon as possible.
4 AUTOWIPERS*
The wipers function when the rain sensor detects moisture on
the windshield. Use the rotary control to adjust the sensitivity.
With low sensitivity, the wipers operate when the sensor
detects a large amount of moisture on the windshield.
With high sensitivity, the wipers operate when the sensor
detects a small amount of moisture on the windshield.
5 MEDIA STEERING WHEEL CONTROLS*
(Volume): Press + to increase or
– to decrease volume levels.
Press to access voice recognition.
Press to access phone mode or to answer a call.
Press to exit phone mode or end a call.
Press to access the next or previous radio station,
CD track or preset satellite radio channel*.
6 TILT AND TELESCOPING STEERING WHEEL
Unlock the steering wheel by pulling the lever down. Adjust
the wheel to the desired position. Push the lever back up to
lock the steering wheel into place.
7 SYNC® DISPLAY*
Displays information about Entertainment and Phone, and
allows you to make minor adjustments within a selected
menu. MyFord Touch
® is also available in select models. See
the MyFord Touch section in this guide or refer to the MyFord
Touch chapter in your Owner’s Manual for more information.
*if equipped
*if equipped
21
5
6
3
4
7
INSTRUMENT PANEL
Page 7 of 10

*if equipped
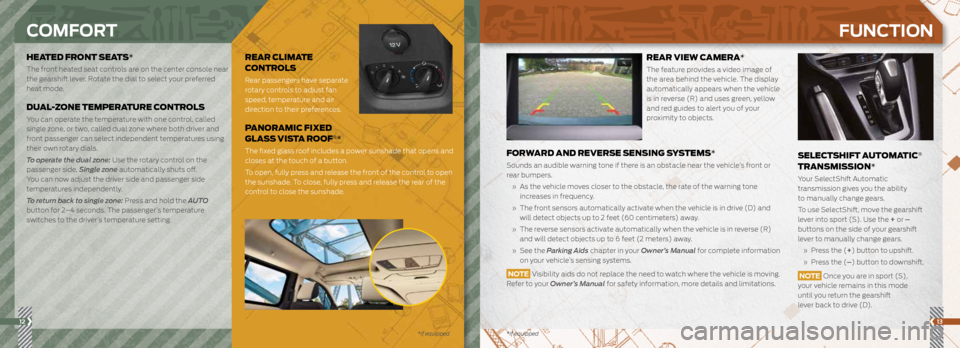
HEATED FRONT SEATS*
The front heated seat controls are on the center console near
the gearshift lever. Rotate the dial to select your preferred
heat mode.
DUAL-ZONE TEMPERATURE CONTROLS
You can operate the temperature with one control, called
single zone, or two, called dual zone where both driver and
front passenger can select independent temperatures using
their own rotary dials.
To operate the dual zone: Use the rotary control on the
passenger side. Single zone automatically shuts off.
You can now adjust the driver side and passenger side
temperatures independently.
To return back to single zone: Press and hold the AUTO
button for 2–4 seconds. The passenger’s temperature
switches to the driver’s temperature setting.
12
COMFORT
SELECTSHIFT AUTOMATIC®
TRANSMISSION*
Your SelectShift Automatic
transmission gives you the ability
to manually change gears.
To use SelectShift, move the gearshift
lever into sport (S). Use the + or –
buttons on the side of your gearshift
lever to manually change gears.
» Press the (+ ) button to upshift.
» Press the (– ) button to downshift.
NOTE Once you are in sport (S),
your vehicle remains in this mode
until you return the gearshift
lever back to drive (D).
FUNCTION
13
REAR CLIMATE
CONTROLS
Rear passengers have separate
rotary controls to adjust fan
speed, temperature and air
direction to their preferences.
PANORAMIC FIXED
GLASS VISTA ROOF®*
The fixed glass roof includes a power sunshade that opens and
closes at the touch of a button.
To open, fully press and release the front of the control to open
the sunshade. To close, fully press and release the rear of the
control to close the sunshade.
*if equipped
REAR VIEW CAMERA*
The feature provides a video image of
the area behind the vehicle. The display
automatically appears when the vehicle
is in reverse (R) and uses green, yellow
and red guides to alert you of your
proximity to objects.
FORWARD AND REVERSE SENSING SYSTEMS*
Sounds an audible warning tone if there is an obstacle near the vehicle’s front or
rear bumpers.
» As the vehicle moves closer to the obstacle, the rate of the warning tone
increases in frequency.
» The front sensors automatically activate when the vehicle is in drive (D) and
will detect objects up to 2 feet (60 centimeters) away.
» The reverse sensors activate automatically when the vehicle is in reverse (R)
and will detect objects up to 6 feet (2 meters) away.
» See the Parking Aids chapter in your Owner’s Manual for complete information
on your vehicle’s sensing systems.
NOTE Visibility aids do not replace the need to watch where the vehicle is moving.
Refer to your Owner’s Manual for safety information, more details and limitations.