hood open FORD TRANSIT CONNECT 2015 2.G Owners Manual
[x] Cancel search | Manufacturer: FORD, Model Year: 2015, Model line: TRANSIT CONNECT, Model: FORD TRANSIT CONNECT 2015 2.GPages: 428, PDF Size: 6.27 MB
Page 7 of 428
Ordering Additional Owner's
Literature......................................................172
Reporting Safety Defects (U.S. Only)..............................................................172
Reporting Safety Defects (Canada Only)..............................................................173
Fuses
Fuse Box Locations......................................174
Fuse Specification Chart............................175
Changing a Fuse
...........................................184
Maintenance
General Information
....................................185
Opening and Closing the Hood...............185
Under Hood Overview - 1.6L.....................187
Under Hood Overview - 2.5L...................188
Engine Oil Dipstick -
1.6L
EcoBoost™................................................189
Engine Oil Dipstick - 2.5L..........................189
Engine Oil Check..........................................189
Oil Change Indicator Reset.......................190
Engine Coolant Check................................190
Automatic Transmission Fluid Check............................................................192
Brake Fluid Check.........................................192
Power Steering Fluid Check......................192
Washer Fluid Check
.....................................192
Changing the 12V Battery..........................193
Checking the Wiper Blades......................194
Changing the Wiper Blades......................194
Adjusting the Headlamps.........................196
Changing a Bulb............................................197
Bulb Specification Chart...........................202
Changing the Engine Air Filter................204
Technical Specifications -
1.6L
EcoBoost™...............................................205
Technical Specifications - 2.5L..............207
Vehicle Care
Cleaning Products
.........................................211 Cleaning the Exterior....................................211
Waxing..............................................................212
Cleaning the Engine
.....................................212
Cleaning the Windows and Wiper Blades...........................................................213
Cleaning the Interior....................................213
Cleaning the Instrument Panel and Instrument Cluster Lens.........................213
Cleaning Leather Seats..............................214
Repairing Minor Paint Damage................215
Cleaning the Alloy Wheels
........................215
Vehicle Storage
..............................................215
Wheels and Tires
General Information
....................................218
Tire Care
...........................................................219
Using Winter Tires.......................................234
Using Snow Chains.....................................234
Tire Pressure Monitoring System...........235
Changing a Road Wheel...........................239
Technical Specifications...........................244
Capacities and Specific- ations
Engine Specifications -
1.6L
EcoBoost™...............................................246
Engine Specifications - 2.5L....................246
Motorcraft Parts - 1.6L EcoBoost™......247
Motorcraft Parts - 2.5L..............................248
Vehicle Identification Number................248
Vehicle Certification Label.......................249
Transmission Code Designation
............250
Audio System
General Information -
United States of
America........................................................251
Audio Unit - Vehicles With: AM/FM......252
Audio Unit - Vehicles With: Premium AM/ FM/CD.........................................................255
Audio Unit - Vehicles With: AM/FM/CD/ SYNC............................................................256
4
Transit Connect (CHC) Canada/United States of America, enUSA, First Printing Table of Contents
Page 18 of 428
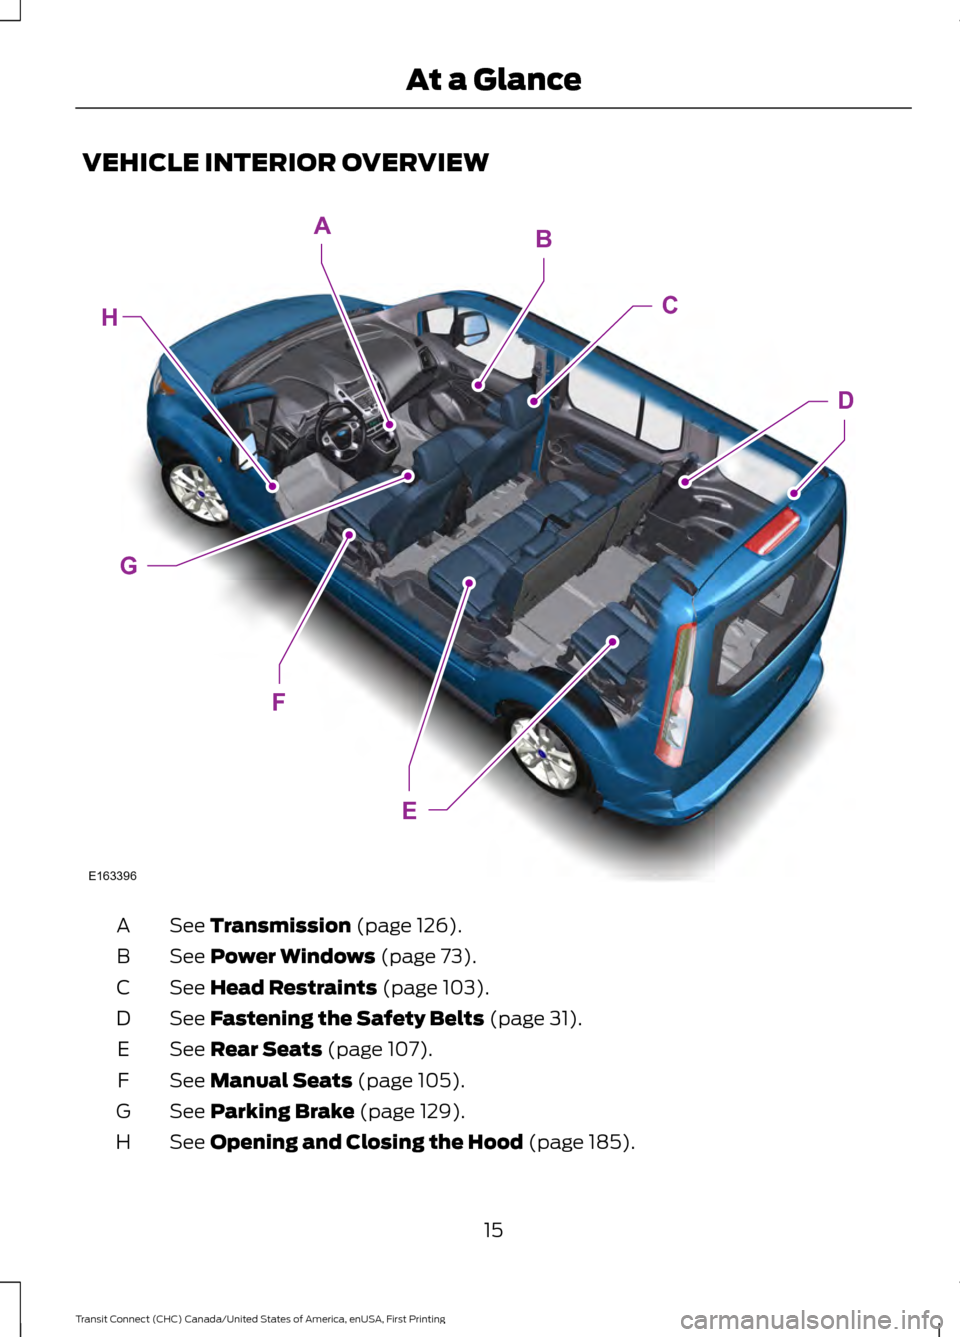
VEHICLE INTERIOR OVERVIEW
See Transmission (page 126).
A
See
Power Windows (page 73).
B
See
Head Restraints (page 103).
C
See
Fastening the Safety Belts (page 31).
D
See
Rear Seats (page 107).
E
See
Manual Seats (page 105).
F
See
Parking Brake (page 129).
G
See
Opening and Closing the Hood (page 185).
H
15
Transit Connect (CHC) Canada/United States of America, enUSA, First Printing At a GlanceE163396
E
H
F
G
AB
C
D
Page 47 of 428
SAFETY CANOPY™
WARNINGS
Do not place objects or mount
equipment on or near the headliner
at the siderail that may come into
contact with a deploying curtain airbag.
Failure to follow these instructions may
increase the risk of personal injury in the
event of a crash. Do not lean your head on the door.
The curtain airbag could injure you
as it deploys from the headliner.
Do not attempt to service, repair, or
modify the curtain airbags, its fuses,
the A, B, C, or D pillar trim, or the
headliner on a vehicle containing curtain
airbags as you could be seriously injured
or killed. Contact your authorized dealer
as soon as possible. All occupants of your vehicle
including the driver should always
wear their safety belts even when an
airbag supplemental restraint system and
curtain airbag is provided. Failure to
properly wear your safety belt could
seriously increase the risk of injury or death. To reduce risk of injury, do not
obstruct or place objects in the
deployment path of the curtain
airbag. If the curtain airbags have deployed,
the curtain airbags will not function
again. The curtain airbags (including
the A, B, C and D pillar trim and headliner)
must be inspected and serviced by an
authorized dealer. If the curtain airbag is
not replaced, the unrepaired area will
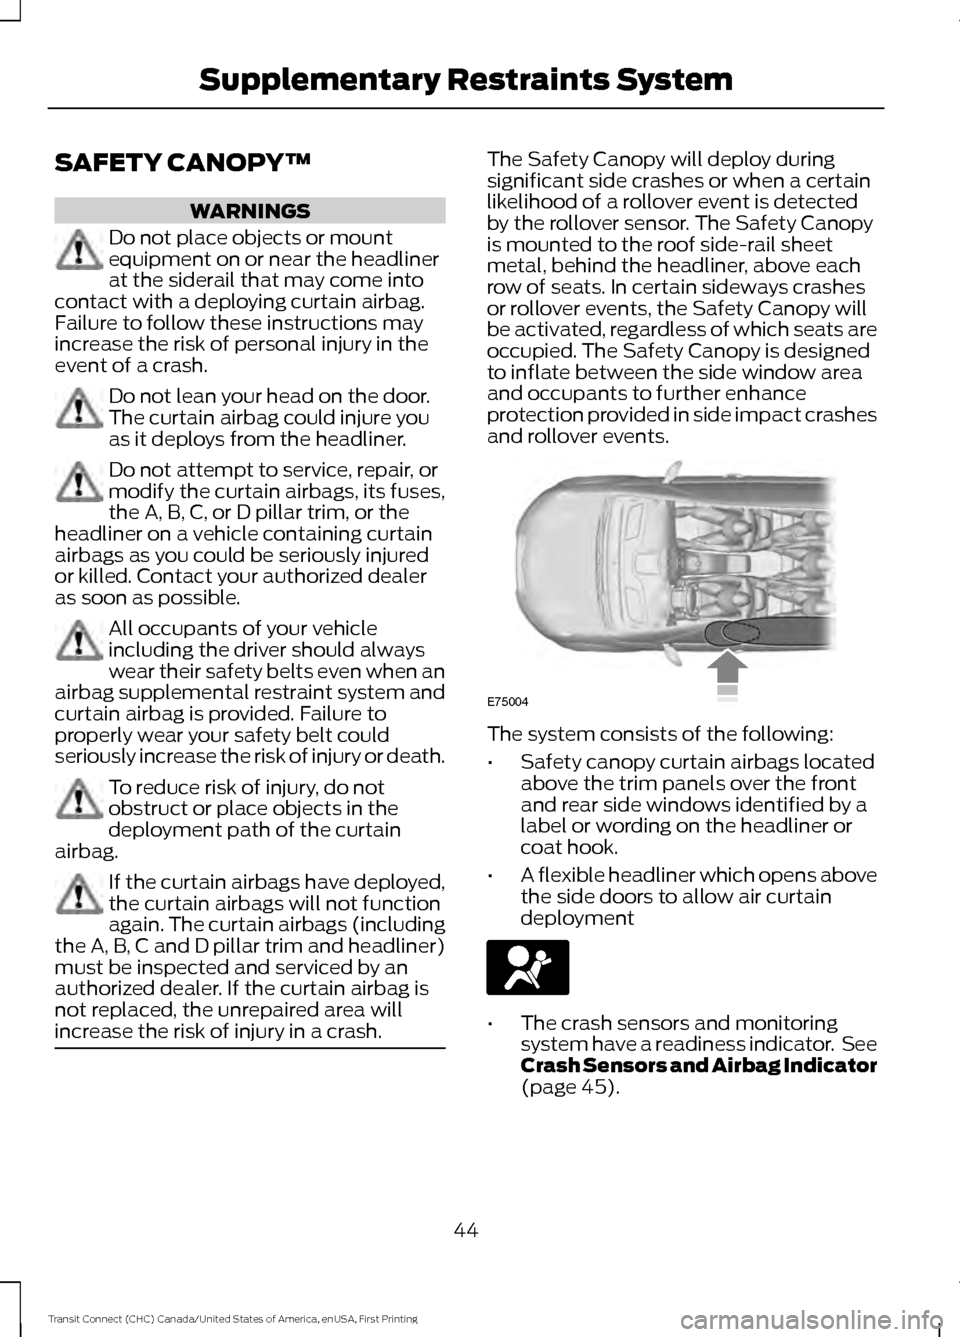
increase the risk of injury in a crash. The Safety Canopy will deploy during
significant side crashes or when a certain
likelihood of a rollover event is detected
by the rollover sensor. The Safety Canopy
is mounted to the roof side-rail sheet
metal, behind the headliner, above each
row of seats. In certain sideways crashes
or rollover events, the Safety Canopy will
be activated, regardless of which seats are
occupied. The Safety Canopy is designed
to inflate between the side window area
and occupants to further enhance
protection provided in side impact crashes
and rollover events.
The system consists of the following:
•
Safety canopy curtain airbags located
above the trim panels over the front
and rear side windows identified by a
label or wording on the headliner or
coat hook.
• A flexible headliner which opens above
the side doors to allow air curtain
deployment •
The crash sensors and monitoring
system have a readiness indicator. See
Crash Sensors and Airbag Indicator
(page 45).
44
Transit Connect (CHC) Canada/United States of America, enUSA, First Printing Supplementary Restraints SystemE75004
Page 48 of 428
Children 12 years old and under should
always be properly restrained in the rear
seats. The Safety Canopy will not interfere
with children restrained using a properly
installed child or booster seat because it
is designed to inflate downward from the
headliner above the doors along the side
window opening.
The design and development of the Safety
Canopy included recommended testing
procedures that were developed by a
group of automotive safety experts known
as the Side Airbag Technical Working
Group. These recommended testing
procedures help reduce the risk of injuries
related to the deployment of side airbags
(including the Safety Canopy).
CRASH SENSORS AND
AIRBAG INDICATOR
WARNING
Modifying or adding equipment to
the front end of your vehicle
(including frame, bumper, front end
body structure and tow hooks) may affect
the performance of the airbag system,
increasing the risk of injury. Do not modify
the front end of your vehicle. Your vehicle has a collection of crash and
occupant sensors which provide
information to the restraints control
module which deploys (activates) the
front safety belt pretensioners, driver
airbag, passenger airbag, seat mounted
side airbags, and the Safety Canopy. Based
on the type of accident (frontal impact,
side impact or rollover) the restraints
control module will deploy the appropriate
safety devices. The restraints control module also
monitors the readiness of the above safety
devices plus the crash and occupant
sensors. A warning indicator light in the
instrument cluster indicates the readiness
of the safety system. If this warning
indicator light is not functioning and there
is another fault within the system, the
message cluster may display an airbag
failure warning. See Information
Displays (page 84). You will hear five
tones that repeat periodically until you
repair the problem, the warning indicator
light or both. Routine maintenance of the
airbag is not required.
A difficulty with the system is indicated by
one or more of the following: •
The readiness light will not illuminate
immediately after the ignition is turned
on.
• The readiness light will either flash or
stay lit.
• A series of five beeps will be heard. The
tone pattern will repeat periodically
until the problem, the light or both are
repaired.
If any of these things happen, even
intermittently, have the supplemental
restraint system serviced at an authorized
dealer immediately. Unless serviced, the
system may not function properly in the
event of a crash.
The safety belt pretensioners and the
airbag supplemental restraint system is
designed to activate when your vehicle
sustains frontal or sideways deceleration
sufficient to cause the restraints control
module to deploy a safety device or when
a certain likelihood of a rollover event is
detected by the rollover sensor.
45
Transit Connect (CHC) Canada/United States of America, enUSA, First Printing Supplementary Restraints System
Page 51 of 428
Reprogramming the Unlocking
Function
Note:
When you press the unlock button
only the driver and passenger doors are
unlocked. Pressing the unlock button again
unlocks all the doors. This is the default
setting. See Locking and Unlocking (page
54).
Press and hold the unlock and lock buttons
on the remote control simultaneously for
at least four seconds with the ignition off.
The direction indicators will flash twice to
confirm the change.
To return to the original unlocking function,
repeat the process.
Replacing the Battery
The remote control uses one coin type
three volt lithium battery CR2032 or
equivalent.
Note: Refer to local regulations when
disposing of transmitter batteries.
Note: Do not wipe off any grease on the
battery terminals or on the back surface of
the circuit board.
Note: Replacing the battery will not delete
the transmitter from the vehicle. The
transmitter should operate normally.
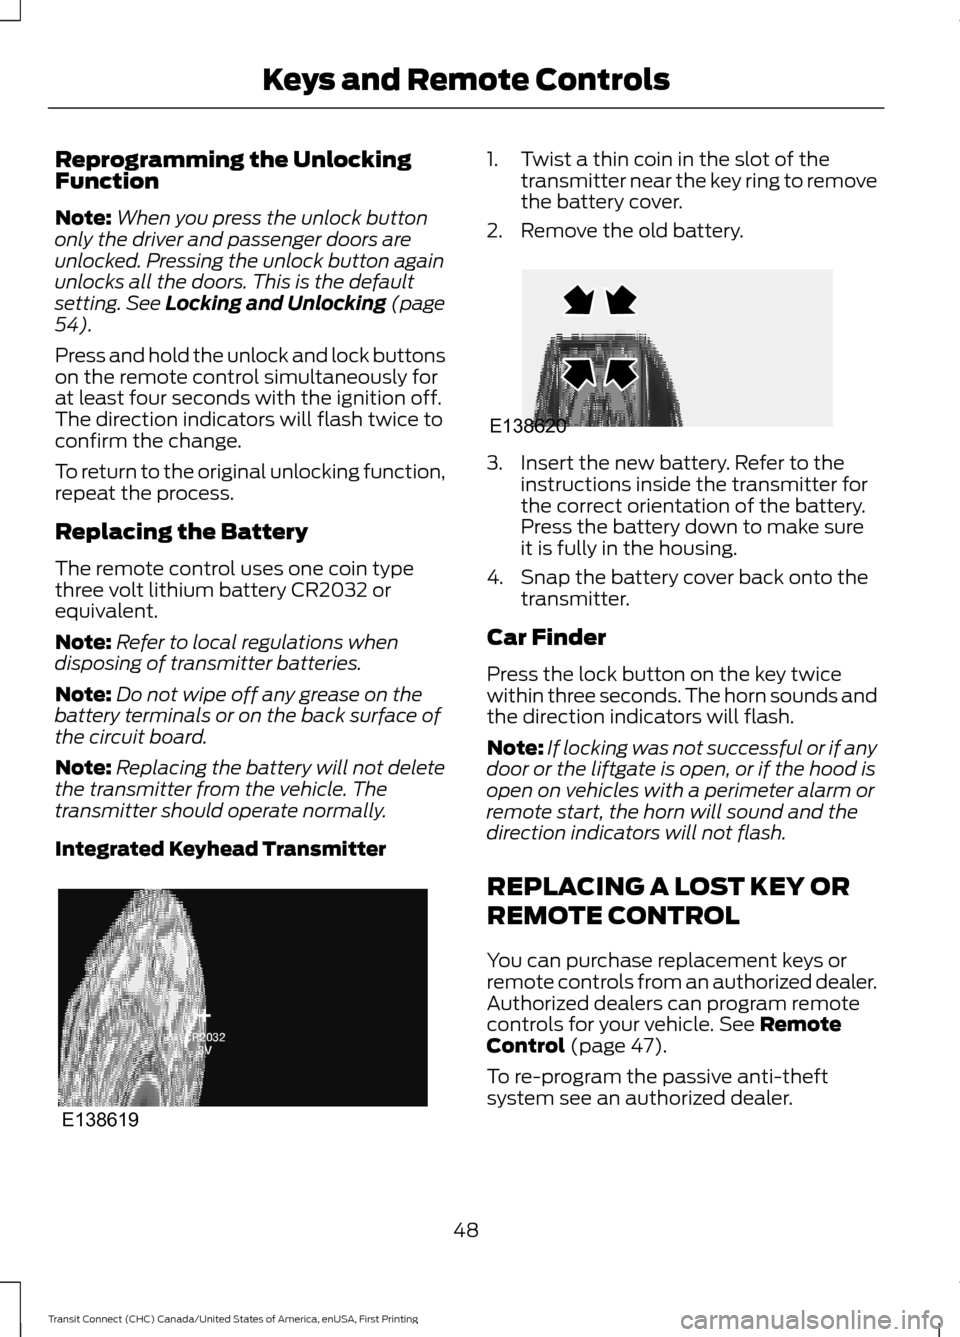
Integrated Keyhead Transmitter 1. Twist a thin coin in the slot of the
transmitter near the key ring to remove
the battery cover.
2. Remove the old battery. 3. Insert the new battery. Refer to the
instructions inside the transmitter for
the correct orientation of the battery.
Press the battery down to make sure
it is fully in the housing.
4. Snap the battery cover back onto the transmitter.
Car Finder
Press the lock button on the key twice
within three seconds. The horn sounds and
the direction indicators will flash.
Note: If locking was not successful or if any
door or the liftgate is open, or if the hood is
open on vehicles with a perimeter alarm or
remote start, the horn will sound and the
direction indicators will not flash.
REPLACING A LOST KEY OR
REMOTE CONTROL
You can purchase replacement keys or
remote controls from an authorized dealer.
Authorized dealers can program remote
controls for your vehicle.
See Remote
Control (page 47).
To re-program the passive anti-theft
system see an authorized dealer.
48
Transit Connect (CHC) Canada/United States of America, enUSA, First Printing Keys and Remote ControlsE138619 E138620
Page 57 of 428
LOCKING AND UNLOCKING
Remote Control
The remote control can be used any time
your vehicle is not running.
Unlocking the Doors
The positions lamps illuminate when you
unlock the doors. They automatically turn
off when you switch the ignition on.
Note:
You can unlock the driver door with
the key. Use the key when the remote
control is not functioning.
Note: When you lock your vehicle for
several weeks, the remote control will be
switched off. Your vehicle must be unlocked
and the engine started using the key.
Unlocking and starting your vehicle once will
enable the remote control.
One-Stage Unlocking Press the button to unlock all
doors.
The direction indicators will flash.
Two-Stage Unlocking Press the button twice within
three seconds to unlock all
doors.
The direction indicators flash twice.
Reprogramming the Unlocking
Function
You can reprogram the unlocking function
using the remote control to change
between one-stage and two-stage
unlocking. See Remote Control (page
47). Locking the Doors Press the button to lock all the
doors.
Press the button twice within
three seconds to double lock the doors.
The horn will chirp twice if all the doors
and the luggage compartment are closed.
Note: If any door or the luggage
compartment is not closed, or if the hood is
not closed on vehicles that have an
anti-theft alarm or remote start, the horn
will not chirp.
Automatic Re-locking
The doors will relock automatically if you
do not open a door within 45 seconds of
unlocking the doors with the remote
control. The door locks and the alarm will
return to their previous state.
Locking and Unlocking the Doors
From Inside
The power door lock control is located on
the driver and passenger doors. Press the button to lock or
unlock all the doors. The lamp
illuminates with the doors
locked.
Opening the Double Rear Doors WARNING
If there is a ladder fitted to the rear
cargo door, do not open the door
fully if the side-loading door is open.
54
Transit Connect (CHC) Canada/United States of America, enUSA, First Printing Locks E102566
Page 93 of 428
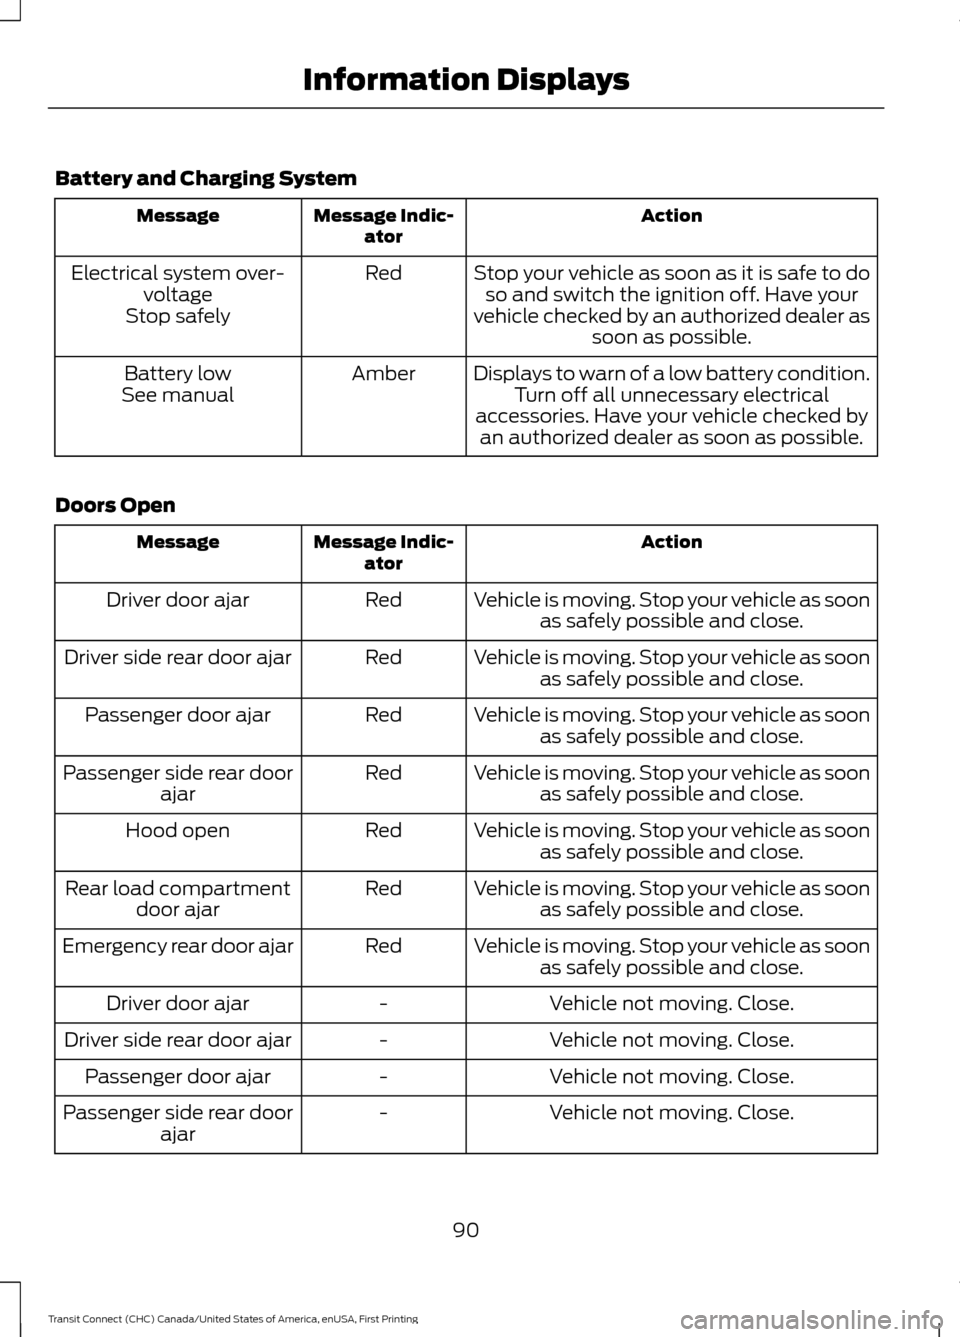
Battery and Charging System
Action
Message Indic-
ator
Message
Stop your vehicle as soon as it is safe to doso and switch the ignition off. Have your
vehicle checked by an authorized dealer as soon as possible.
Red
Electrical system over-
voltage
Stop safely
Displays to warn of a low battery condition.Turn off all unnecessary electrical
accessories. Have your vehicle checked by an authorized dealer as soon as possible.
Amber
Battery low
See manual
Doors Open Action
Message Indic-
ator
Message
Vehicle is moving. Stop your vehicle as soonas safely possible and close.
Red
Driver door ajar
Vehicle is moving. Stop your vehicle as soonas safely possible and close.
Red
Driver side rear door ajar
Vehicle is moving. Stop your vehicle as soonas safely possible and close.
Red
Passenger door ajar
Vehicle is moving. Stop your vehicle as soonas safely possible and close.
Red
Passenger side rear door
ajar
Vehicle is moving. Stop your vehicle as soonas safely possible and close.
Red
Hood open
Vehicle is moving. Stop your vehicle as soonas safely possible and close.
Red
Rear load compartment
door ajar
Vehicle is moving. Stop your vehicle as soonas safely possible and close.
Red
Emergency rear door ajar
Vehicle not moving. Close.
-
Driver door ajar
Vehicle not moving. Close.
-
Driver side rear door ajar
Vehicle not moving. Close.
-
Passenger door ajar
Vehicle not moving. Close.
-
Passenger side rear door
ajar
90
Transit Connect (CHC) Canada/United States of America, enUSA, First Printing Information Displays
Page 94 of 428
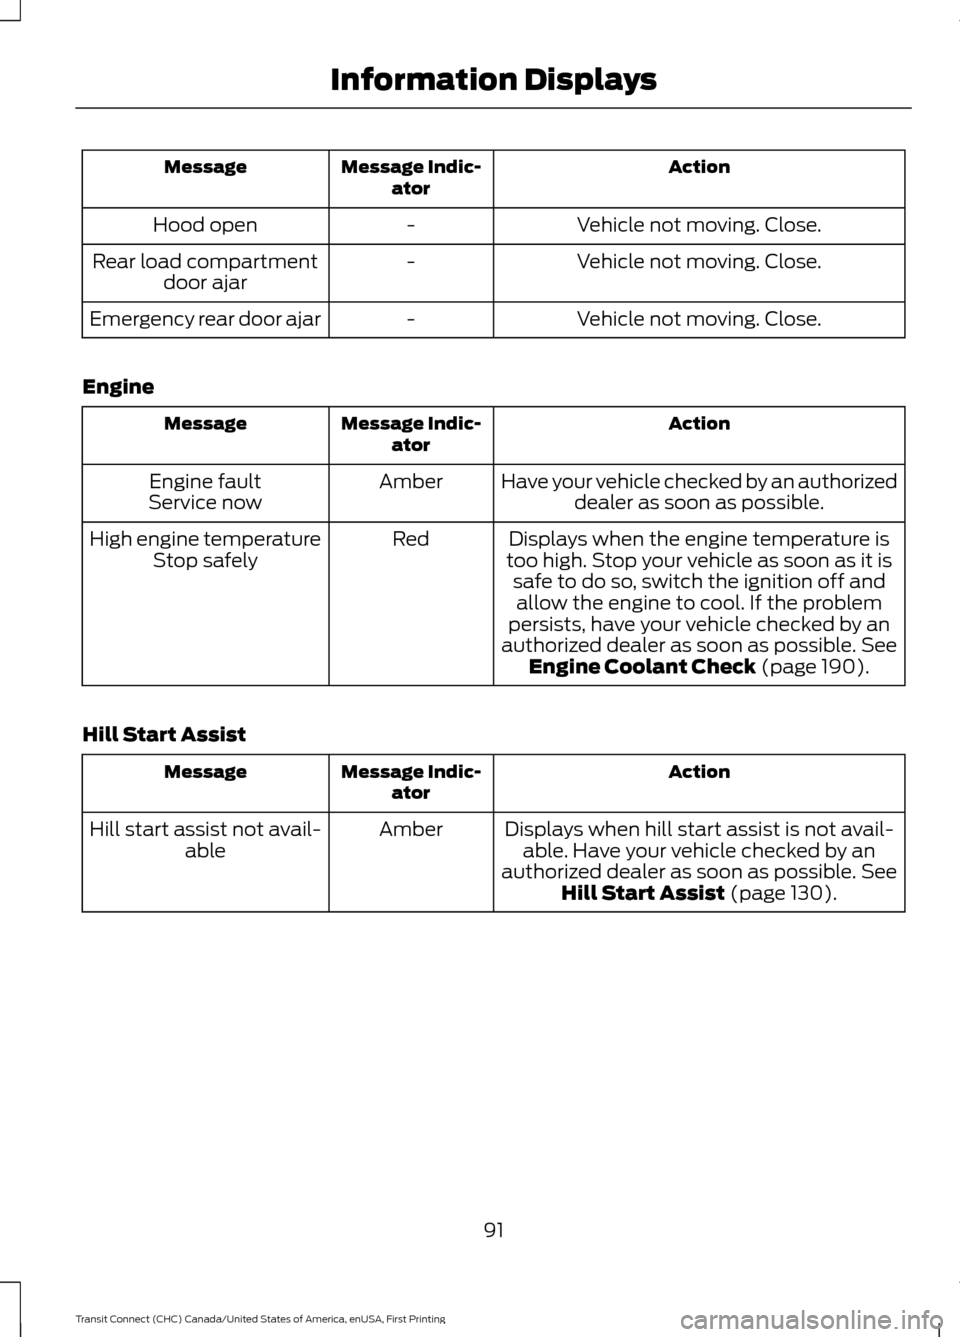
Action
Message Indic-
ator
Message
Vehicle not moving. Close.
-
Hood open
Vehicle not moving. Close.
-
Rear load compartment
door ajar
Vehicle not moving. Close.
-
Emergency rear door ajar
Engine Action
Message Indic-
ator
Message
Have your vehicle checked by an authorizeddealer as soon as possible.
Amber
Engine fault
Service now
Displays when the engine temperature is
too high. Stop your vehicle as soon as it is safe to do so, switch the ignition off andallow the engine to cool. If the problem
persists, have your vehicle checked by an
authorized dealer as soon as possible. See
Engine Coolant Check (page 190).
Red
High engine temperature
Stop safely
Hill Start Assist Action
Message Indic-
ator
Message
Displays when hill start assist is not avail-able. Have your vehicle checked by an
authorized dealer as soon as possible.
See
Hill Start Assist (page 130).
Amber
Hill start assist not avail-
able
91
Transit Connect (CHC) Canada/United States of America, enUSA, First Printing Information Displays
Page 188 of 428
GENERAL INFORMATION
Have your vehicle serviced regularly to help
maintain its roadworthiness and resale
value. There is a large network of
authorized dealers that are there to help
you with their professional servicing
expertise. We believe that their specially
trained technicians are best qualified to
service your vehicle properly and expertly.
They are supported by a wide range of
highly specialized tools developed
specifically for servicing your vehicle.
To help you service your vehicle, we
provide scheduled maintenance
information which makes tracking routine
service easy. See Scheduled
Maintenance (page 399).
If your vehicle requires professional service,
an authorized dealer can provide the
necessary parts and service. Check your
warranty information to find out which
parts and services are covered.
Use only recommended fuels, lubricants,
fluids and service parts conforming to
specifications. Motorcraft® parts are
designed and built to provide the best
performance in your vehicle.
Precautions
• Do not work on a hot engine.
• Make sure that nothing gets caught in
moving parts.
• Do not work on a vehicle with the
engine running in an enclosed space,
unless you are sure you have enough
ventilation.
• Keep all open flames and other burning
material (such as cigarettes) away
from the battery and all fuel related
parts. Working with the Engine Off
1.
Set the parking brake and shift to park
(P).
2. Switch off the engine.
3. Block the wheels.
Working with the Engine On WARNING
To reduce the risk of vehicle damage
and/or personal burn injuries, do not
start your engine with the air cleaner
removed and do not remove it while the
engine is running. 1.
Set the parking brake and shift to park
(P).
2. Block the wheels
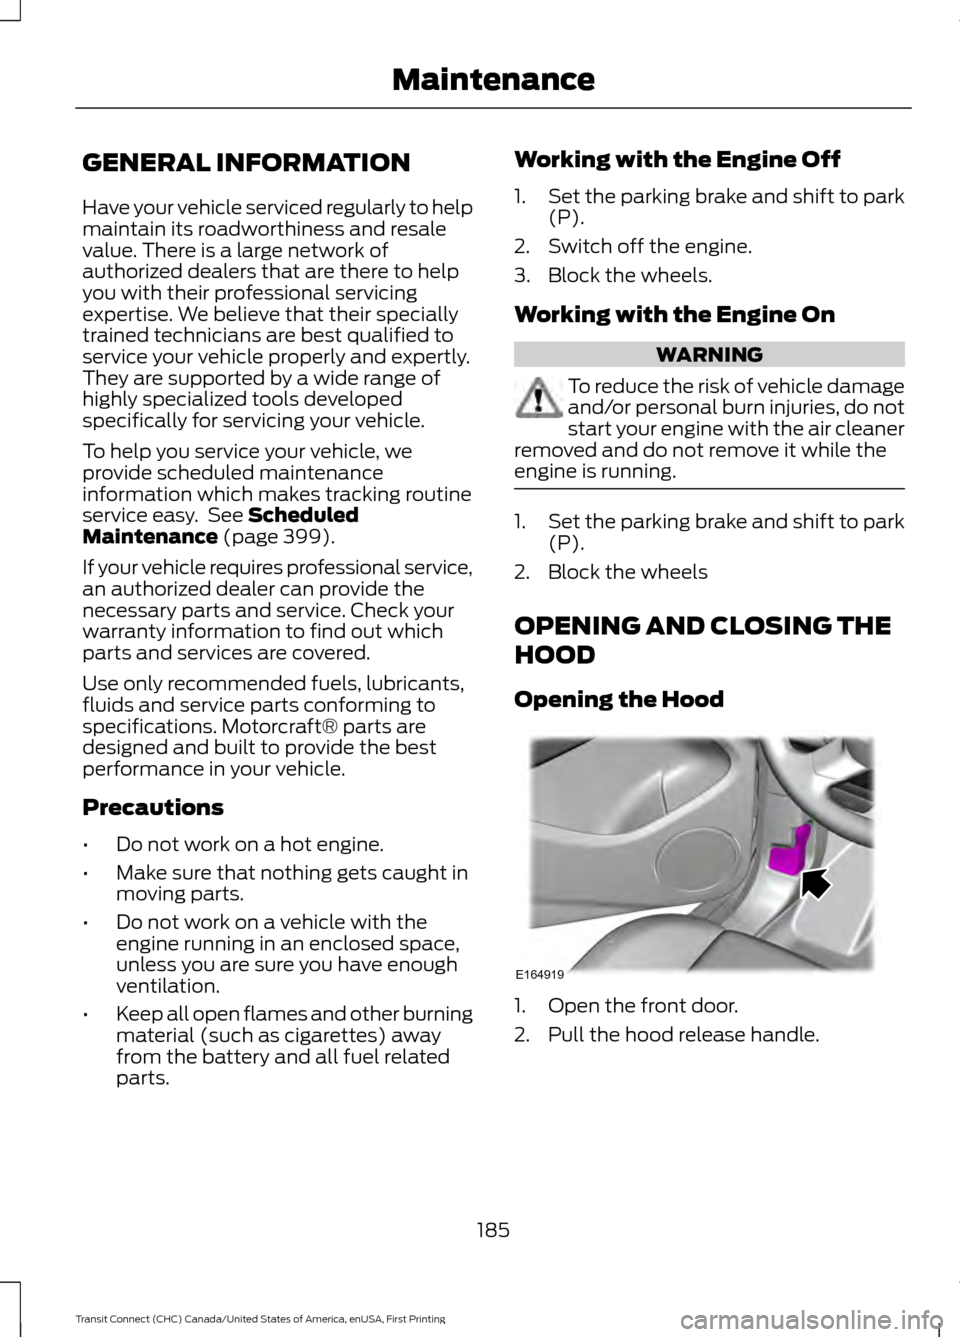
OPENING AND CLOSING THE
HOOD
Opening the Hood 1. Open the front door.
2. Pull the hood release handle.
185
Transit Connect (CHC) Canada/United States of America, enUSA, First Printing MaintenanceE164919
Page 189 of 428
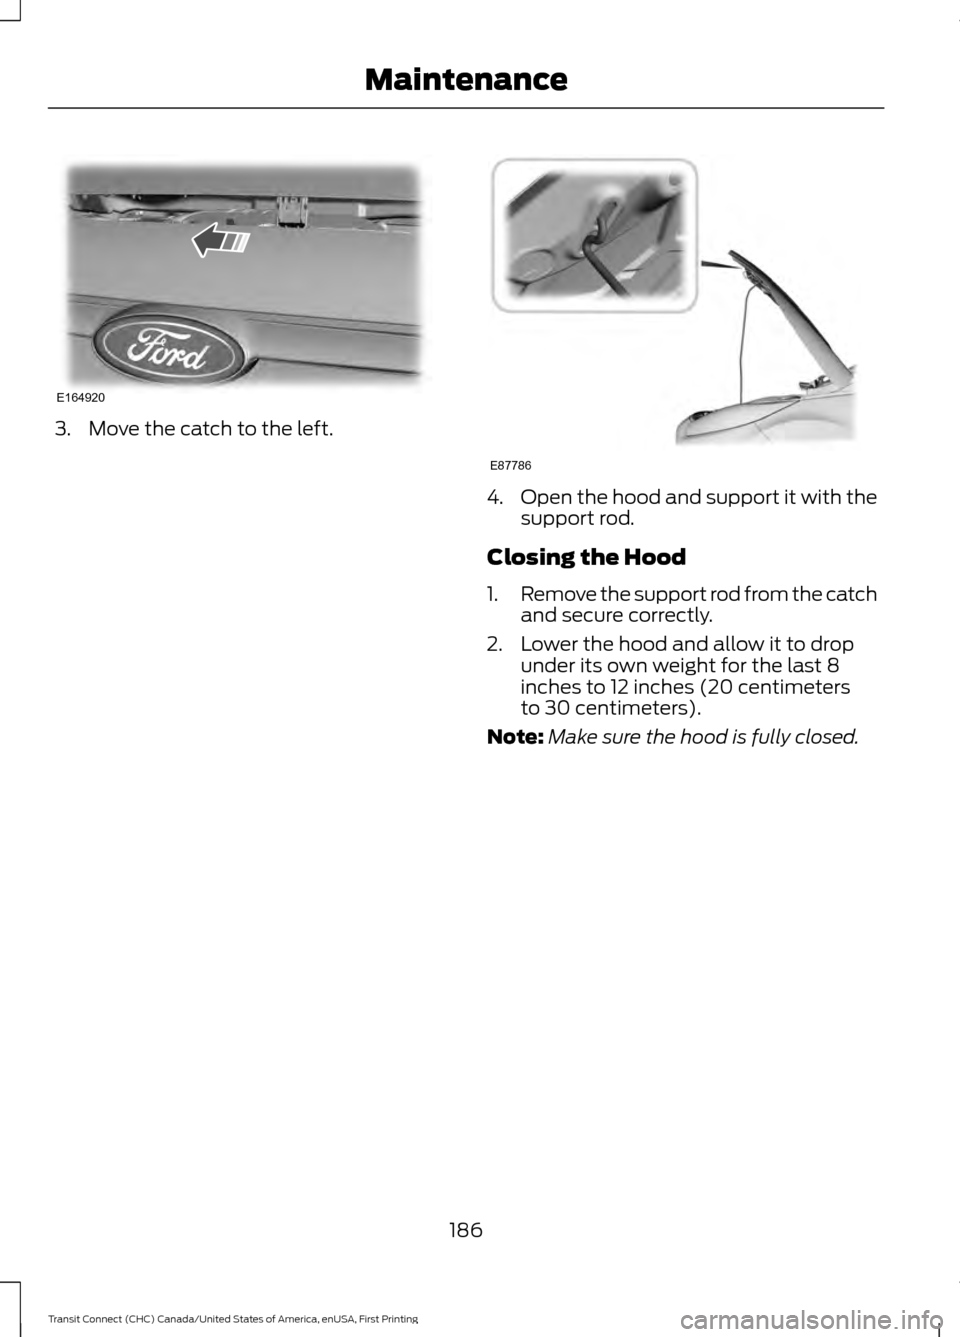
3. Move the catch to the left.
4.
Open the hood and support it with the
support rod.
Closing the Hood
1. Remove the support rod from the catch
and secure correctly.
2. Lower the hood and allow it to drop under its own weight for the last 8
inches to 12 inches (20 centimeters
to 30 centimeters).
Note: Make sure the hood is fully closed.
186
Transit Connect (CHC) Canada/United States of America, enUSA, First Printing MaintenanceE164920 E87786