transmission FORD TRANSIT CONNECT 2015 2.G Owners Manual
[x] Cancel search | Manufacturer: FORD, Model Year: 2015, Model line: TRANSIT CONNECT, Model: FORD TRANSIT CONNECT 2015 2.GPages: 428, PDF Size: 6.27 MB
Page 6 of 428
Engine Block Heater......................................117
Fuel and Refueling
Safety Precautions.......................................119
Fuel Quality
....................................................120
Running Out of Fuel....................................120
Refueling...........................................................121
Fuel Consumption
........................................123
Emission Control System...........................123
Transmission
Automatic Transmission
............................126
Brakes
General Information....................................129
Hints on Driving With Anti-Lock Brakes...........................................................129
Parking Brake
.................................................129
Hill Start Assist..............................................130
Traction Control
Principle of Operation..................................131
Using Traction Control.................................131
Stability Control
Principle of Operation.................................132
Using Stability Control
................................133
Parking Aids
Principle of Operation.................................134
Parking Aid
......................................................134
Rear View Camera........................................137
Cruise Control
Principle of Operation.................................139
Using Cruise Control
....................................139
Driving Aids
Steering............................................................140 Load Carrying
Luggage Anchor Points...............................141
Rear Under Floor Storage...........................141
Cargo Nets
.......................................................142
Roof Racks and Load Carriers.................143
Load Limit
.......................................................144
Towing
Towing a Trailer..............................................152
Trailer Sway Control....................................153
Recommended Towing Weights
............153
Essential Towing Checks
...........................155
Towing Points.................................................157
Transporting the Vehicle
...........................158
Towing the Vehicle on Four Wheels......159
Driving Hints
Breaking-In.....................................................160
Reduced Engine Performance................160
Economical Driving
.....................................160
Cold Weather Precautions
.........................161
Driving Through Water.................................161
Floor Mats........................................................161
Roadside Emergencies
Roadside Assistance
...................................163
Hazard Warning Flashers
..........................164
Fuel Shutoff
...................................................164
Jump Starting the Vehicle
.........................164
Post-Crash Alert System...........................167
Customer Assistance
Getting the Services You Need...............168
In California (U.S. Only).............................169
The Better Business Bureau (BBB) Auto Line Program (U.S. Only).......................170
Utilizing the Mediation/Arbitration Program (Canada Only)........................170
Getting Assistance Outside the U.S. and Canada..........................................................171
3
Transit Connect (CHC) Canada/United States of America, enUSA, First Printing Table of Contents
Page 7 of 428
Ordering Additional Owner's
Literature......................................................172
Reporting Safety Defects (U.S. Only)..............................................................172
Reporting Safety Defects (Canada Only)..............................................................173
Fuses
Fuse Box Locations......................................174
Fuse Specification Chart............................175
Changing a Fuse
...........................................184
Maintenance
General Information
....................................185
Opening and Closing the Hood...............185
Under Hood Overview - 1.6L.....................187
Under Hood Overview - 2.5L...................188
Engine Oil Dipstick -
1.6L
EcoBoost™................................................189
Engine Oil Dipstick - 2.5L..........................189
Engine Oil Check..........................................189
Oil Change Indicator Reset.......................190
Engine Coolant Check................................190
Automatic Transmission Fluid Check............................................................192
Brake Fluid Check.........................................192
Power Steering Fluid Check......................192
Washer Fluid Check
.....................................192
Changing the 12V Battery..........................193
Checking the Wiper Blades......................194
Changing the Wiper Blades......................194
Adjusting the Headlamps.........................196
Changing a Bulb............................................197
Bulb Specification Chart...........................202
Changing the Engine Air Filter................204
Technical Specifications -
1.6L
EcoBoost™...............................................205
Technical Specifications - 2.5L..............207
Vehicle Care
Cleaning Products
.........................................211 Cleaning the Exterior....................................211
Waxing..............................................................212
Cleaning the Engine
.....................................212
Cleaning the Windows and Wiper Blades...........................................................213
Cleaning the Interior....................................213
Cleaning the Instrument Panel and Instrument Cluster Lens.........................213
Cleaning Leather Seats..............................214
Repairing Minor Paint Damage................215
Cleaning the Alloy Wheels
........................215
Vehicle Storage
..............................................215
Wheels and Tires
General Information
....................................218
Tire Care
...........................................................219
Using Winter Tires.......................................234
Using Snow Chains.....................................234
Tire Pressure Monitoring System...........235
Changing a Road Wheel...........................239
Technical Specifications...........................244
Capacities and Specific- ations
Engine Specifications -
1.6L
EcoBoost™...............................................246
Engine Specifications - 2.5L....................246
Motorcraft Parts - 1.6L EcoBoost™......247
Motorcraft Parts - 2.5L..............................248
Vehicle Identification Number................248
Vehicle Certification Label.......................249
Transmission Code Designation
............250
Audio System
General Information -
United States of
America........................................................251
Audio Unit - Vehicles With: AM/FM......252
Audio Unit - Vehicles With: Premium AM/ FM/CD.........................................................255
Audio Unit - Vehicles With: AM/FM/CD/ SYNC............................................................256
4
Transit Connect (CHC) Canada/United States of America, enUSA, First Printing Table of Contents
Page 18 of 428
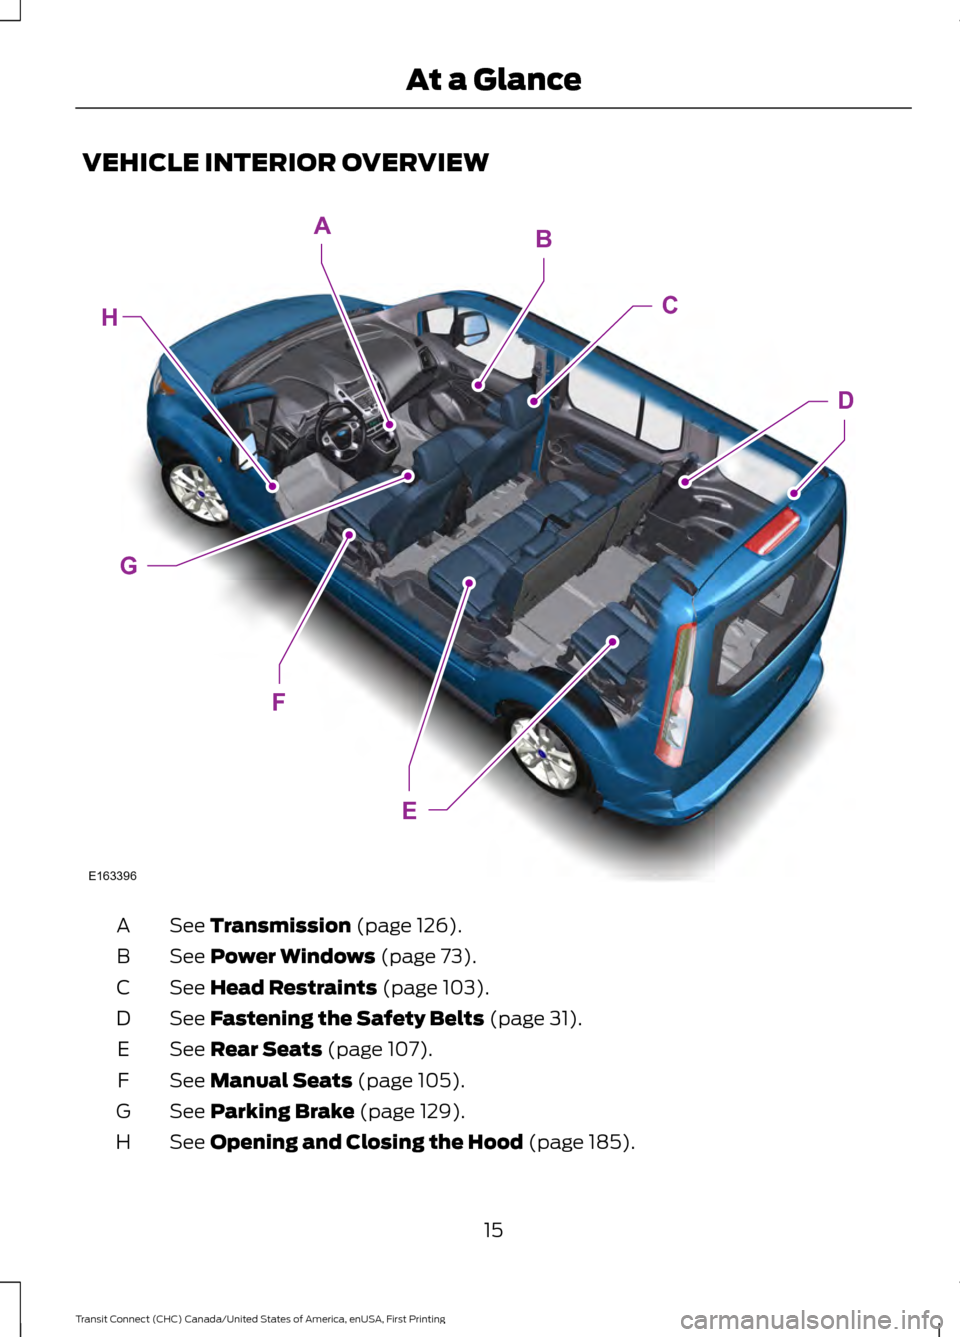
VEHICLE INTERIOR OVERVIEW
See Transmission (page 126).
A
See
Power Windows (page 73).
B
See
Head Restraints (page 103).
C
See
Fastening the Safety Belts (page 31).
D
See
Rear Seats (page 107).
E
See
Manual Seats (page 105).
F
See
Parking Brake (page 129).
G
See
Opening and Closing the Hood (page 185).
H
15
Transit Connect (CHC) Canada/United States of America, enUSA, First Printing At a GlanceE163396
E
H
F
G
AB
C
D
Page 38 of 428
Then...
If...
The Belt-Minder feature will not activate.
You and the front seat passenger buckle
your safety belts before you switch the
ignition on or less than 1– 2 minutes elapse
after you switch the ignition on...
The Belt-Minder feature activates, the
safety belt warning light illuminates and a
warning tone sounds for 6 seconds every
25 seconds, repeating for about 5 minutes
or until you and the front seat passenger
buckle your safety belts.
You or the front seat passenger do not
buckle your safety belts before your vehicle
reaches at least 6 mph (9.7 km/h) and 1–
2
minutes elapse after you switch the ignition
on...
The Belt-Minder feature activates, the
safety belt warning light illuminates and a
warning tone sounds for 6 seconds every
25 seconds, repeating for about 5 minutes
or until you and the front seat passenger
buckle your safety belts.
The safety belt for the driver or front
passenger is unbuckled for about 1 minute
while the vehicle is traveling at least 6 mph
(9.7 km/h) and more than 1–
2 minutes
elapse after you switch the ignition on...
Deactivating and Activating the
Belt-Minder Feature WARNING
While the system allows you to
switch this feature off, the intent of
the system is to remind you to wear
your safety belt to improve your chance to
survive an accident. We recommend you
leave the system switched on for yourself
and others who may use the vehicle. Note:
The driver and front passenger
warnings switch on and off independently.
When you perform this procedure for one
seating position, do not buckle the other
position as this will terminate the process.
Read Steps 1–4 thoroughly before
proceeding with the programming
procedure. Before following the procedure, make sure
that:
•
The parking brake is set.
• The transmission is in park (P) or
neutral (N).
• The ignition is off.
• The driver and front passenger safety
belts are unbuckled.
1. Switch the ignition on. Do not start the
vehicle.
2. Wait until the safety belt warning light turns off (about 1 minute). After Step
2, wait an additional 5 seconds before
proceeding with Step 3. Once you start
Step 3, you must complete the
procedure within 30 seconds.
3. For the seating position you are switching off, buckle then unbuckle the
safety belt three times at a moderate
speed, ending in the unbuckled state.
After Step 3, the safety belt warning
light turns on.
35
Transit Connect (CHC) Canada/United States of America, enUSA, First Printing Safety Belts
Page 50 of 428
GENERAL INFORMATION ON
RADIO FREQUENCIES
This device complies with Part 15 of the
FCC Rules and with Industry Canada
license-exempt RSS standard(s).
Operation is subject to the following two
conditions: (1) This device may not cause
harmful interference, and (2) This device
must accept any interference received,
including interference that may cause
undesired operation.
Note:
Changes or modifications not
expressively approved by the party
responsible for compliance could void the
user's authority to operate the equipment.
The term IC before the radio certification
number only signifies that Industry Canada
technical specifications were met.
The typical operating range for your
transmitter is approximately 33 feet (10
meters). Vehicles with the remote start
feature will have a greater range. One of
the following could cause a decrease in
operating range:
• weather conditions
• nearby radio towers
• structures around the vehicle
• other vehicles parked next to your
vehicle
The radio frequency used by your remote
control can also be used by other short
distance radio transmissions, for example
amateur radios, medical equipment,
wireless headphones, remote controls and
alarm systems. If the frequencies are
jammed, you will not be able to use your
remote control. You can lock and unlock
the doors with the key.
Note: Make sure to lock your vehicle before
leaving it unattended.
Note: If you are in range, the remote control
will operate if you press any button
unintentionally. Note:
The remote control contains sensitive
electrical components. Exposure to moisture
or impact may cause permanent damage.
REMOTE CONTROL
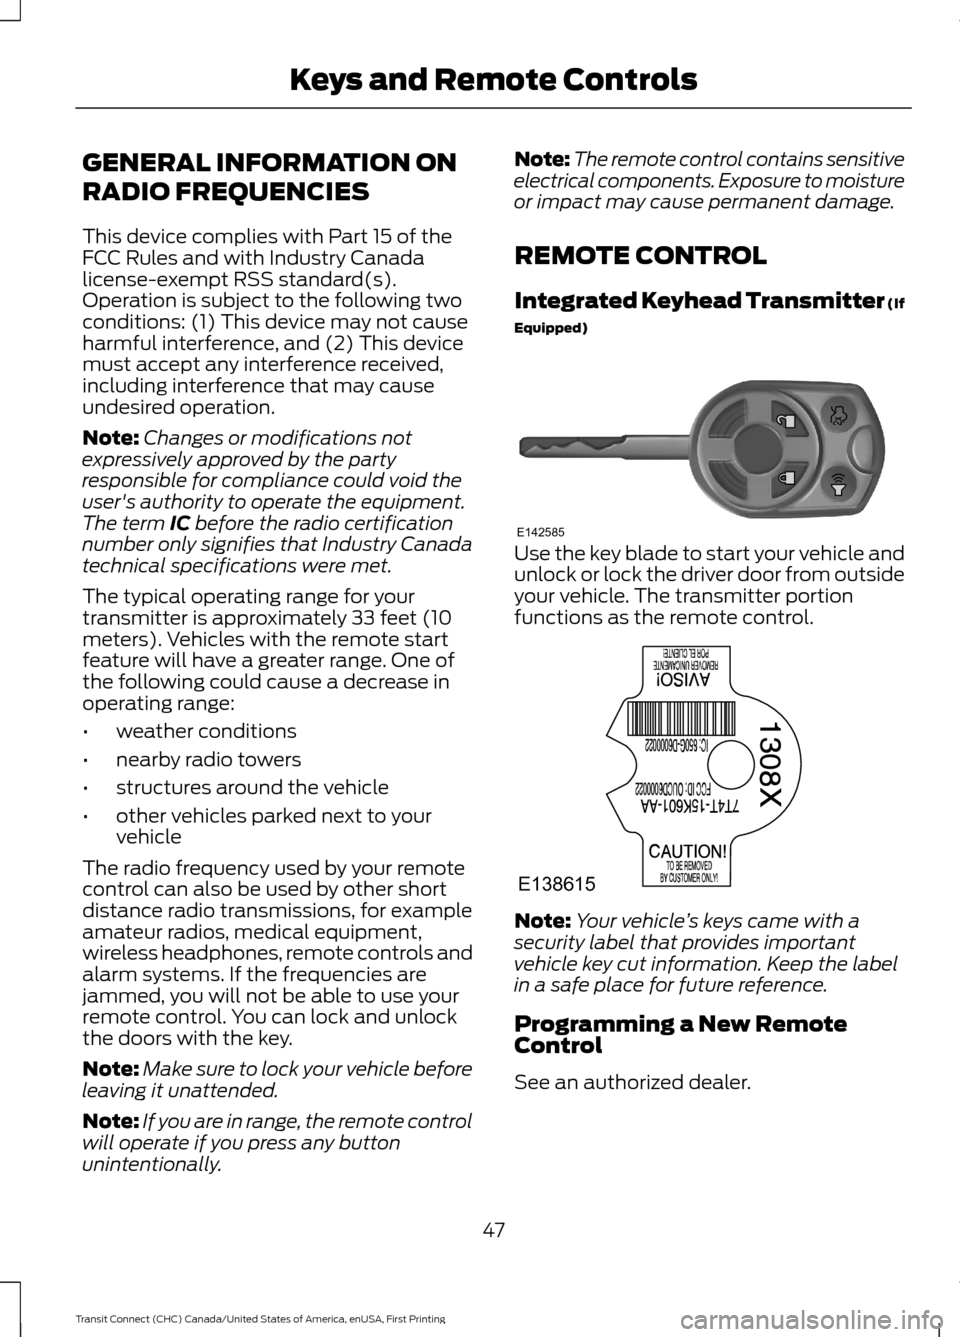
Integrated Keyhead Transmitter (If
Equipped) Use the key blade to start your vehicle and
unlock or lock the driver door from outside
your vehicle. The transmitter portion
functions as the remote control.
Note:
Your vehicle ’s keys came with a
security label that provides important
vehicle key cut information. Keep the label
in a safe place for future reference.
Programming a New Remote
Control
See an authorized dealer.
47
Transit Connect (CHC) Canada/United States of America, enUSA, First Printing Keys and Remote ControlsE142585 E138615
Page 86 of 428
Automatic Transmission Warning
Chime
Sounds when you have not moved the
transmission selector lever to park. A
message will be shown in the display.
83
Transit Connect (CHC) Canada/United States of America, enUSA, First Printing Instrument Cluster
Page 103 of 428
Recommended Settings for
Cooling
•
Adjust the fan speed to the second
speed setting.
• Adjust the temperature control to the
midway point of the cold settings.
• Adjust the air distribution control to the
instrument panel air vents position.
Vehicle Stationary for Extended
Periods During Extreme High
Ambient Temperatures
• Apply the parking brake.
• Move the transmission selector lever
to position P or neutral.
• Adjust the temperature control to the
MAX A/C
position.
• Adjust the fan speed to the lowest
speed setting. Side Window Defogging in Cold
Weather
•
Adjust the air distribution control to the
instrument panel and windshield air
vents positions.
• Press the
A/C button.
• Adjust the temperature control to the
desired setting.
• Adjust the fan speed to the highest
setting.
• Direct the instrument panel side air
vents toward the side windows.
• Close the instrument panel vents.
Maximum Cooling Performance in
Instrument Panel or Instrument
Panel and Footwell Positions
• Adjust the temperature control to the
lowest setting.
• Press the
A/C and recirculated air
buttons.
• Adjust the fan speed to the highest
setting initially and then adjust it to suit
the desired comfort level.
100
Transit Connect (CHC) Canada/United States of America, enUSA, First Printing Climate Control
Page 118 of 428
GENERAL INFORMATION
WARNINGS
Extended idling at high engine
speeds can produce very high
temperatures in the engine and
exhaust system, creating the risk of fire or
other damage. Do not park, idle or drive your vehicle
on dry grass or other dry ground
cover. The emission system heats up
the engine compartment and exhaust
system, creating the risk of fire. Do not start the engine in a closed
garage or in other enclosed areas.
Exhaust fumes can be toxic. Always
open the garage door before you start the
engine. If you smell exhaust fumes inside
your vehicle, have your vehicle
checked by an authorized dealer
immediately. Do not drive your vehicle if
you smell exhaust fumes. If you disconnect the battery, your vehicle
may exhibit some unusual driving
characteristics for approximately 5 miles
(8 kilometers) after you reconnect it. This
is because the engine management system
must realign itself with the engine. You can
disregard any unusual driving
characteristics during this period.
The powertrain control system meets all
Canadian interference-causing equipment
standard requirements regulating the
impulse electrical field or radio noise.
When you start the engine, avoid pressing
the accelerator pedal before and during
operation. Only use the accelerator pedal
when you have difficulty starting the
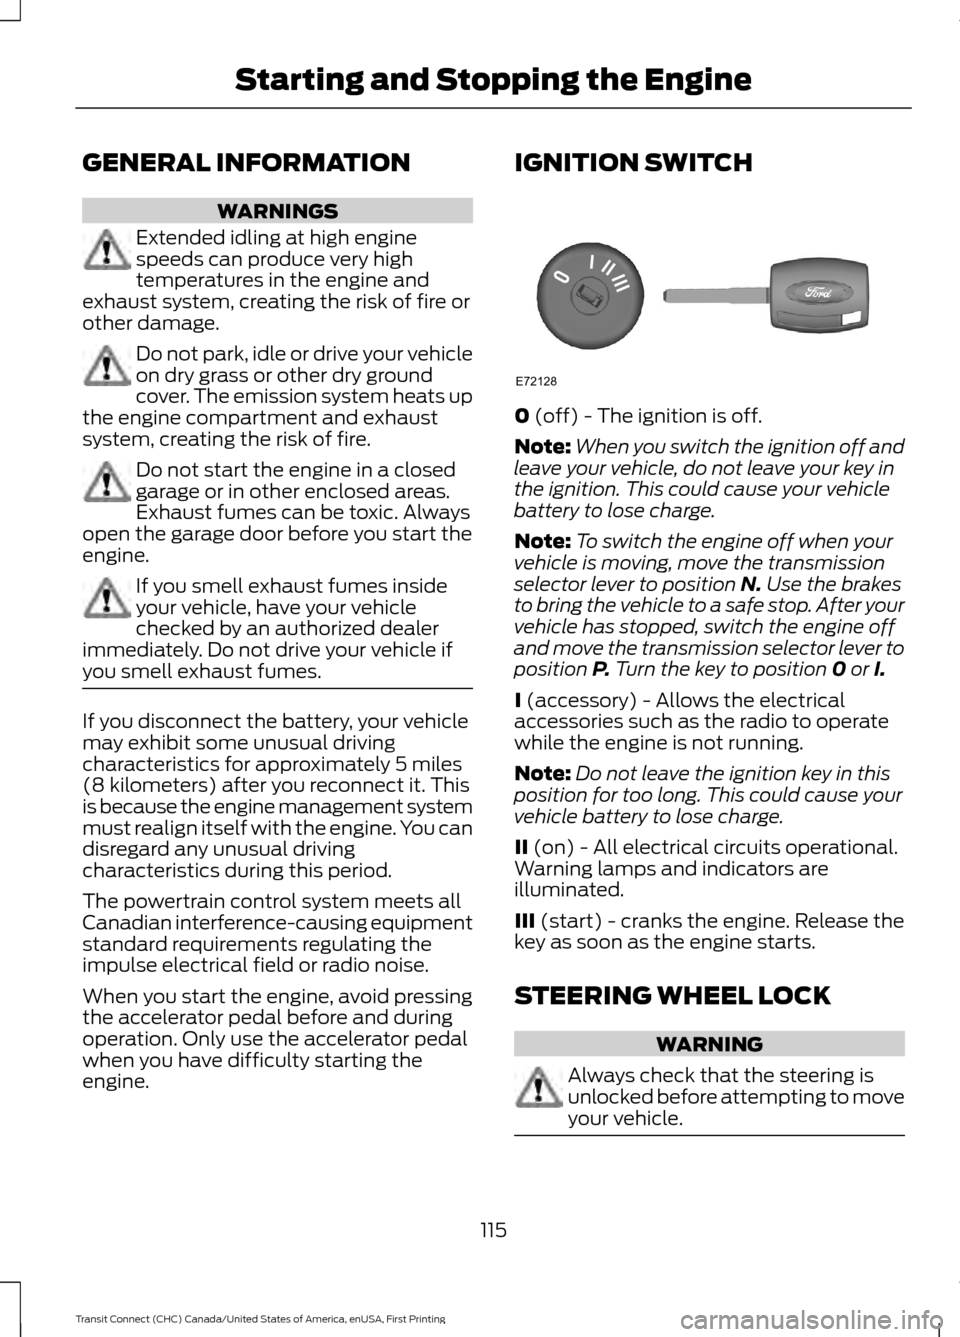
engine. IGNITION SWITCH
0 (off) - The ignition is off.
Note: When you switch the ignition off and
leave your vehicle, do not leave your key in
the ignition. This could cause your vehicle
battery to lose charge.
Note: To switch the engine off when your
vehicle is moving, move the transmission
selector lever to position
N. Use the brakes
to bring the vehicle to a safe stop. After your
vehicle has stopped, switch the engine off
and move the transmission selector lever to
position
P. Turn the key to position 0 or I.
I
(accessory) - Allows the electrical
accessories such as the radio to operate
while the engine is not running.
Note: Do not leave the ignition key in this
position for too long. This could cause your
vehicle battery to lose charge.
II
(on) - All electrical circuits operational.
Warning lamps and indicators are
illuminated.
III
(start) - cranks the engine. Release the
key as soon as the engine starts.
STEERING WHEEL LOCK WARNING
Always check that the steering is
unlocked before attempting to move
your vehicle.
115
Transit Connect (CHC) Canada/United States of America, enUSA, First Printing Starting and Stopping the EngineE72128
Page 119 of 428
To lock the steering wheel:
1. Remove the key from the ignition
switch.
2. Rotate the steering wheel slightly to engage the lock.
To unlock the steering wheel:
1. Insert the key in the ignition switch.
2. Turn the key to position I.
Note: You may need to rotate the steering
wheel slightly to assist unlocking if there is
a steering wheel load applied.
STARTING A GASOLINE
ENGINE
Before starting the engine check
the following:
• Make sure all occupants have fastened
their safety belts.
• Make sure the headlamps and
electrical accessories are off.
• Make sure the parking brake is on.
• Make sure the transmission is in park
(P).
When you start the engine, the idle speed
increases, this helps to warm up the
engine. If the engine idle speed does not
slow down automatically, have your
vehicle checked by an authorized dealer.
Note: Do not touch the accelerator pedal.
1. Fully press the brake pedal.
2. Turn the ignition key to position
II to
switch the ignition on.
3. Turn the ignition key to position
III to
start your vehicle. Release the key
when the engine starts. Note:
You can only operate the starter for
a limited period of time, for example 10
seconds. The number of start attempts is
limited to approximately six. If you exceed
this limit, the system will not allow you to
try again until a period of time has elapsed,
for example 30 minutes.
Engine Idle Speed after Starting
The speed at which the engine idles
immediately after starting will adjust
automatically to minimize vehicle
emissions and maximize cabin comfort
and fuel economy.
The idle speed will vary depending on
certain factors. These include vehicle
component and ambient temperatures as
well as electrical and climate system
demands.
Cold or Hot Engine
If the engine does not start within 10
seconds, wait for a short period and try
again.
If the engine does not start after three
attempts, wait 10 seconds and follow the
flooded engine procedure.
If you have difficulty starting the engine
when the temperature is below -13°F
(-25°C), press the accelerator pedal to the
mid-way point of its travel and try again.
Flooded Engine
1. Move the transmission selector lever to position
P.
2. Fully depress the accelerator pedal and
hold it there.
3. Start the engine.
Note: If the engine does not start, repeat
the cold or hot engine procedure.
116
Transit Connect (CHC) Canada/United States of America, enUSA, First Printing Starting and Stopping the Engine
Page 128 of 428
present, the service engine soon indicator
should stay off the next time you start the
engine. A driving cycle consists of a cold
engine startup followed by mixed
city/highway driving. No additional vehicle
service is required.
If the service engine soon indicator remains
on, have your vehicle serviced at the first
available opportunity. Although some
malfunctions detected by the OBD-II may
not have symptoms that are apparent,
continued driving with the service engine
soon indicator on can result in increased
emissions, lower fuel economy, reduced
engine and transmission smoothness, and
lead to more costly repairs.
Readiness for
Inspection/Maintenance (I/M)
Testing
Some state/provincial and local
governments may have
Inspection/Maintenance (I/M) programs
to inspect the emission control equipment
on your vehicle. Failure to pass this
inspection could prevent you from getting
a vehicle registration.
If the service engine soon
indicator is on or the bulb does
not work, you may need to have
the vehicle serviced. See On-Board
Diagnostics (OBD-II).
Your vehicle may not pass the I/M test if
the service engine soon indicator is on or
not working properly (bulb is burned out),
or if the OBD-II system has determined
that some of the emission control systems
have not been properly checked. In this
case, your vehicle is not ready for I/M
testing. If the vehicle
’s engine or transmission has
just been serviced, or the battery has
recently run down or been replaced, the
OBD-II system may indicate that the
vehicle is not ready for I/M testing. To
determine if the vehicle is ready for I/M
testing, turn the ignition key to the on
position for 15 seconds without cranking
the engine. If the service engine soon
indicator blinks eight times, it means that
the vehicle is not ready for I/M testing; if
the service engine soon indicator stays on
solid, it means that the vehicle is ready for
I/M testing.
The OBD-II system monitors the emission
control system during normal driving. A
complete check may take several days. If
the vehicle is not ready for I/M testing, you
may need to perform the following driving
cycle consisting of mixed city and highway
driving:
Drive on an expressway or highway for a
steady 15 minutes, followed by 20 minutes
of stop-and-go driving with at least four
30-second idle periods.
Allow the vehicle to sit for at least eight
hours without starting the engine. Then,
start the engine and complete the above
driving cycle. The engine must warm up to
its normal operating temperature. Once
started, do not turn off the engine until the
above driving cycle is complete. If the
vehicle is still not ready for I/M testing, you
will have to repeat the above driving cycle.
125
Transit Connect (CHC) Canada/United States of America, enUSA, First Printing Fuel and Refueling