Seat FORD TRANSIT CONNECT 2016 2.G Workshop Manual
[x] Cancel search | Manufacturer: FORD, Model Year: 2016, Model line: TRANSIT CONNECT, Model: FORD TRANSIT CONNECT 2016 2.GPages: 439, PDF Size: 6.96 MB
Page 136 of 439
PRINCIPLE OF OPERATION
WARNINGS
Vehicle modifications involving
braking system, aftermarket roof
racks, suspension, steering system,
tire construction and wheel and tire size
may change the handling characteristics
of your vehicle and may adversely affect
the performance of the electronic stability
control system. In addition, installing any
stereo loudspeakers may interfere with
and adversely affect the electronic stability
control system. Install any aftermarket
stereo loudspeaker as far as possible from
the front center console, the tunnel, and
the front seats in order to minimize the risk
of interfering with the electronic stability
control sensors. Reducing the
effectiveness of the electronic stability
control system could lead to an increased
risk of loss of vehicle control, vehicle
rollover, personal injury and death. Remember that even advanced
technology cannot defy the laws of
physics. It’
s always possible to lose
control of a vehicle due to inappropriate
driver input for the conditions. Aggressive
driving on any road condition can cause
you to lose control of your vehicle
increasing the risk of personal injury or
property damage. Activation of the
electronic stability control system is an
indication that at least some of the tires
have exceeded their ability to grip the road;
this could reduce the operator ’s ability to
control the vehicle potentially resulting in
a loss of vehicle control, vehicle rollover,
personal injury and death. If your electronic
stability control system activates, SLOW
DOWN. The system automatically turns on each
time you switch the ignition on. If a driving condition activates either the
stability control or the traction control
system you may experience the following
conditions:
•
The stability and traction control light
flashes.
• Your vehicle slows down.
• Reduced engine power.
• A vibration in the brake pedal.
• The brake pedal is stiffer than usual.
• If the driving condition is severe and
your foot is not on the brake, the brake
pedal may move as the systems
applies higher brake forces.
The stability control system has several
features built into it to help you maintain
control of your vehicle:
Electronic Stability Control
The system enhances your vehicle ’s ability
to prevent skids or lateral slides by
applying brakes to one or more of the
wheels individually and, if necessary,
reducing engine power.
Roll Stability Control
The system enhances your vehicle ’s ability
to prevent rollovers by detecting your
vehicle ’s roll motion and the rate at which
it changes by applying the brakes to one
or more wheels individually.
Traction Control
The system enhances your vehicle ’s ability
to maintain traction of the wheels by
detecting and controlling wheel spin. See
Using Traction Control (page 132).
133
Tourneo Connect/Transit Connect (CHC) Canada/United States of America, enUSA, First Printing Stability Control
Page 151 of 439
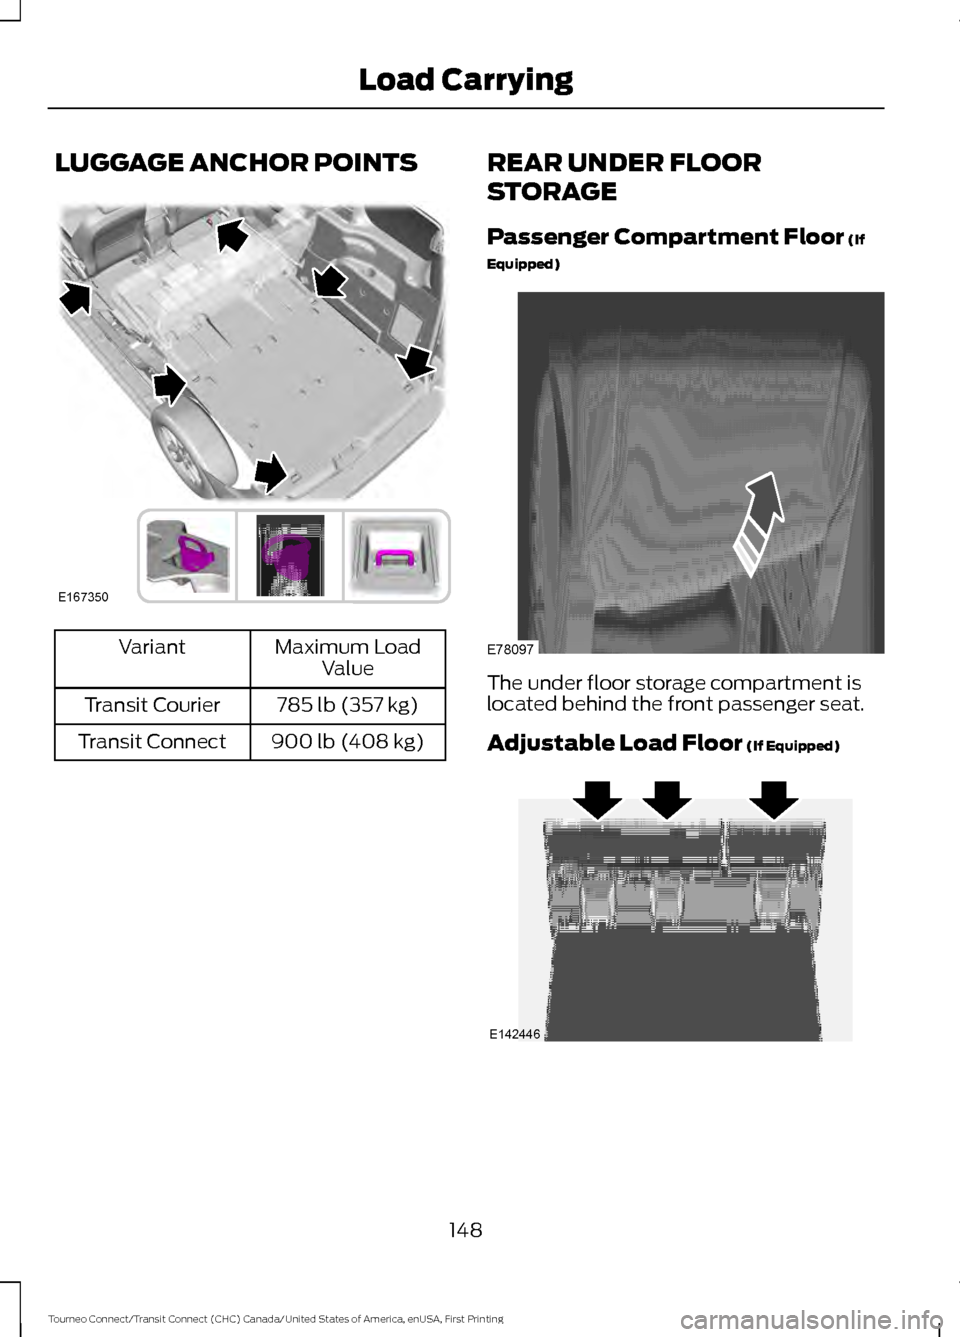
LUGGAGE ANCHOR POINTS
Maximum Load
Value
Variant
785 lb (357 kg)
Transit Courier
900 lb (408 kg)
Transit Connect REAR UNDER FLOOR
STORAGE
Passenger Compartment Floor (If
Equipped) The under floor storage compartment is
located behind the front passenger seat.
Adjustable Load Floor
(If Equipped)
148
Tourneo Connect/Transit Connect (CHC) Canada/United States of America, enUSA, First Printing Load CarryingE167350 E78097 E142446
Page 152 of 439
Vehicles with the standard size spare tire
can adjust the load floor to two positions.
The front of the load floor can be placed
either on (for high position) or below (for
low position) the ledges behind the rear
seats. The rear of the load floor always sits
on the two small shelves located on the
liftgate trim.
CARGO NETS
Installing the Net (If Equipped)
WARNINGS
Always attach and tighten the net to
the luggage anchor points and do not
put more than
22 lb (10 kg) of cargo
behind the net and above the seat back.
Otherwise, the net could fail and cargo
could become a projectile, which could
cause serious injury. Do not allow people to ride in the
third row seating positions when the
cargo net is installed behind the
second row. Failure to do so may limit
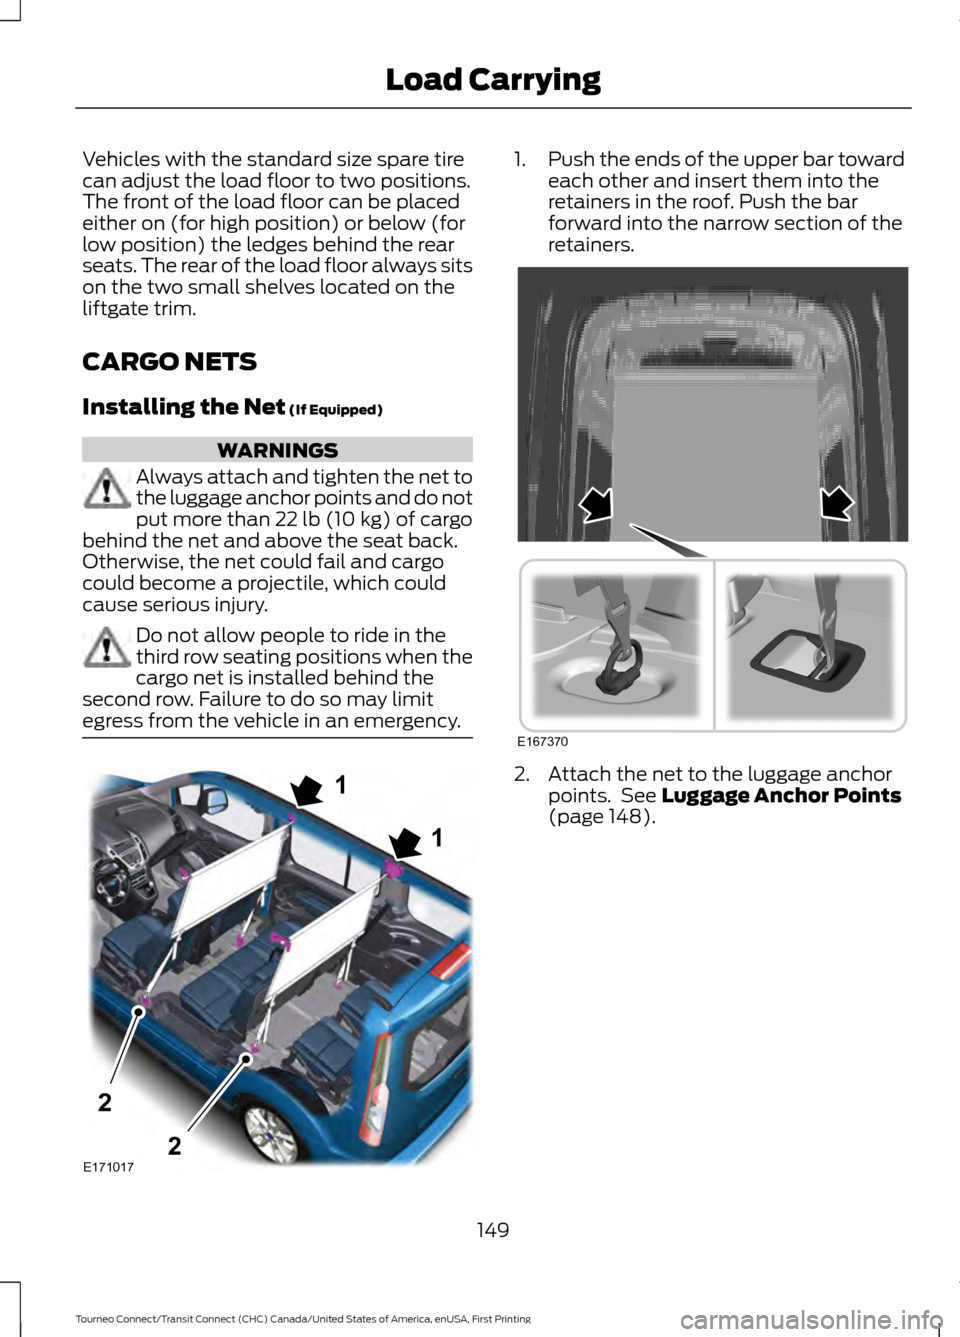
egress from the vehicle in an emergency. 1.
Push the ends of the upper bar toward
each other and insert them into the
retainers in the roof. Push the bar
forward into the narrow section of the
retainers. 2. Attach the net to the luggage anchor
points. See
Luggage Anchor Points
(page 148).
149
Tourneo Connect/Transit Connect (CHC) Canada/United States of America, enUSA, First Printing Load CarryingE1710171
12
2 E167370
Page 156 of 439
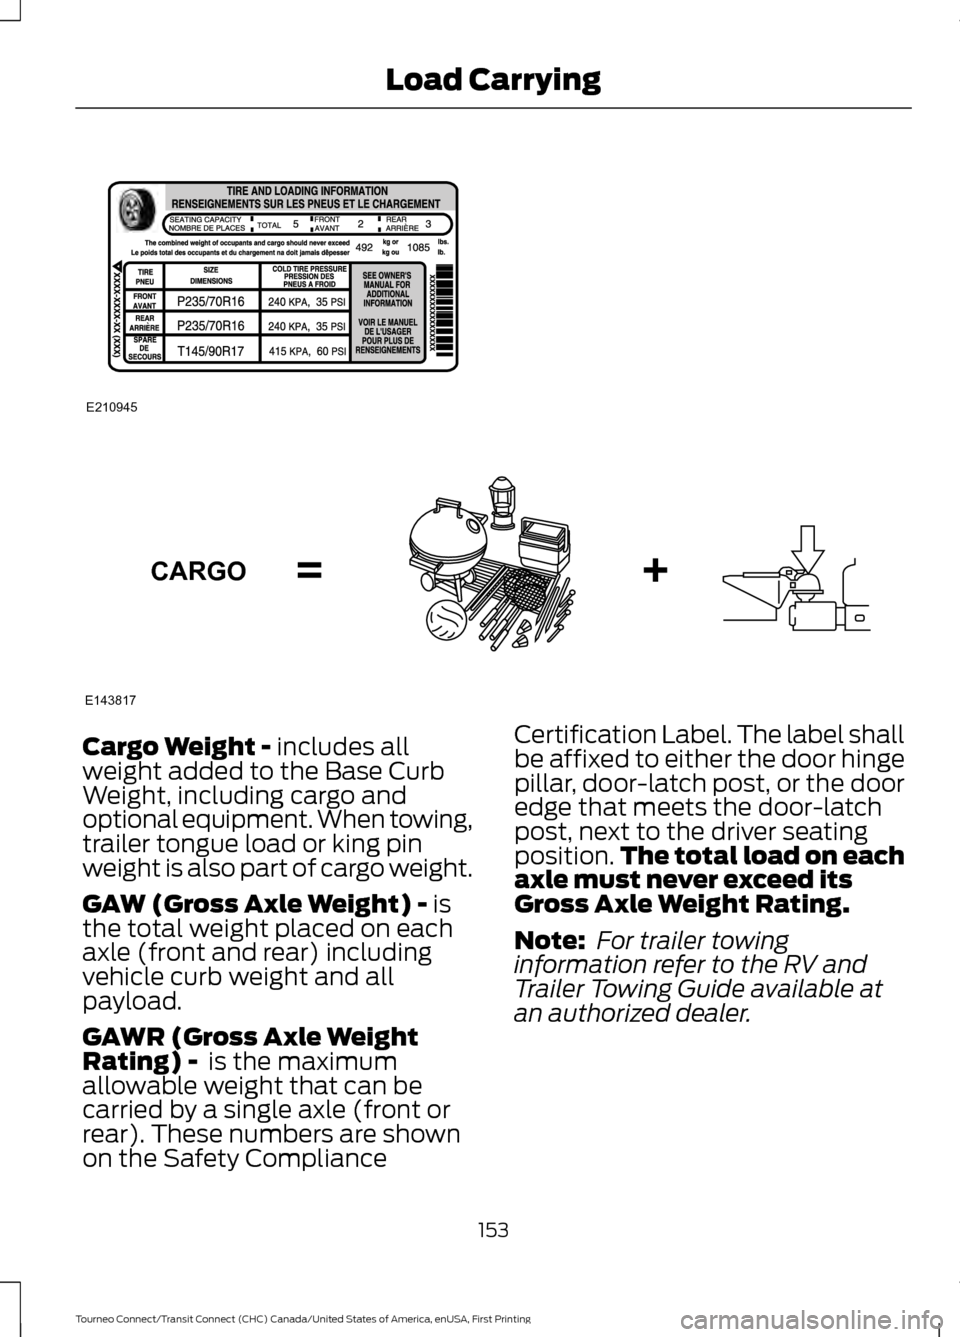
Cargo Weight - includes all
weight added to the Base Curb
Weight, including cargo and
optional equipment. When towing,
trailer tongue load or king pin
weight is also part of cargo weight.
GAW (Gross Axle Weight) -
is
the total weight placed on each
axle (front and rear) including
vehicle curb weight and all
payload.
GAWR (Gross Axle Weight
Rating) -
is the maximum
allowable weight that can be
carried by a single axle (front or
rear). These numbers are shown
on the Safety Compliance Certification Label. The label shall
be affixed to either the door hinge
pillar, door-latch post, or the door
edge that meets the door-latch
post, next to the driver seating
position.
The total load on each
axle must never exceed its
Gross Axle Weight Rating.
Note: For trailer towing
information refer to the RV and
Trailer Towing Guide available at
an authorized dealer.
153
Tourneo Connect/Transit Connect (CHC) Canada/United States of America, enUSA, First Printing Load CarryingE210945 E143817CARGO
Page 157 of 439
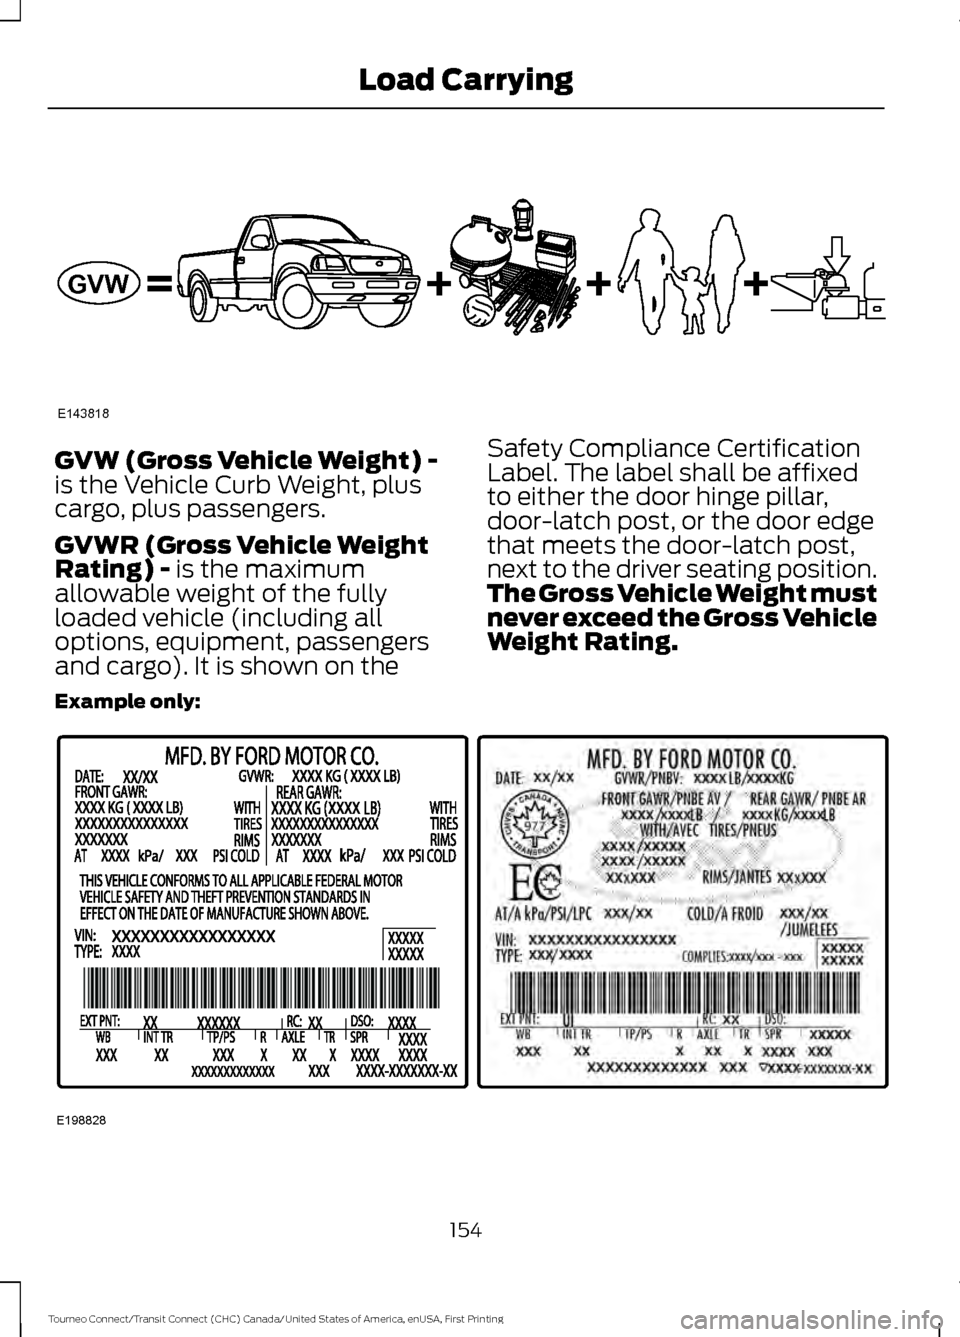
GVW (Gross Vehicle Weight) -
is the Vehicle Curb Weight, plus
cargo, plus passengers.
GVWR (Gross Vehicle Weight
Rating) - is the maximum
allowable weight of the fully
loaded vehicle (including all
options, equipment, passengers
and cargo). It is shown on the Safety Compliance Certification
Label. The label shall be affixed
to either the door hinge pillar,
door-latch post, or the door edge
that meets the door-latch post,
next to the driver seating position.
The Gross Vehicle Weight must
never exceed the Gross Vehicle
Weight Rating.
Example only: 154
Tourneo Connect/Transit Connect (CHC) Canada/United States of America, enUSA, First Printing Load CarryingE143818GVW E198828
Page 160 of 439
*Suppose your vehicle has a
1400-pound (635-kilogram) cargo
and luggage capacity. You decide
to go golfing. Is there enough load
capacity to carry you, four of your
friends and all the golf bags? You
and four friends average 220
pounds (99 kilograms) each and
the golf bags weigh approximately
30 pounds (13.5 kilograms) each.
The calculation would be: 1400 -
(5 x 220) - (5 x 30) = 1400 - 1100
- 150 = 150 pounds. Yes, you have
enough load capacity in your
vehicle to transport four friends
and your golf bags. In metric units,
the calculation would be: 635
kilograms - (5 x 99 kilograms) -
(5 x 13.5 kilograms) = 635 - 495 -
67.5 = 72.5 kilograms.
*Suppose your vehicle has a
1400-pound (635-kilogram) cargo
and luggage capacity. You and
one of your friends decide to pick
up cement from the local home
improvement store to finish that
patio you have been planning for
the past two years. Measuring the
inside of the vehicle with the rear
seat folded down, you have room
for twelve 100-pound
(45-kilogram) bags of cement. Do
you have enough load capacity to
transport the cement to your
home? If you and your friend each
weigh 220 pounds (99 kilograms),
the calculation would be: 1400 -
(2 x 220) - (12 x 100) = 1400 - 440
- 1200 = - 240 pounds. No, you do
not have enough cargo capacity
to carry that much weight. In
metric units, the calculation would
be: 635 kilograms - (2 x 99
kilograms) - (12 x 45 kilograms) =
635 - 198 - 540 = -103 kilograms.
You will need to reduce the load
weight by at least 240 pounds
(104 kilograms). If you remove
three 100-pound (45-kilogram)
cement bags, then the load
calculation would be: 1400 - (2 x
220) - (9 x 100) = 1400 - 440 -
900 = 60 pounds. Now you have
the load capacity to transport the
cement and your friend home. In
metric units, the calculation would
be: 635 kilograms - (2 x 99
kilograms) - (9 x 45 kilograms) =
635 - 198 - 405 = 32 kilograms.
The above calculations also
assume that the loads are
positioned in your vehicle in a
manner that does not overload
the Front or the Rear Gross Axle
Weight Rating specified for your
vehicle on the Safety Compliance
Certification Label. The label shall
be affixed to either the door hinge
pillar, door-latch post, or the door
edge that meets the door-latch
post, next to the driver seating
position.
157
Tourneo Connect/Transit Connect (CHC) Canada/United States of America, enUSA, First Printing Load Carrying
Page 187 of 439
Circuits protected
Fuse rating
Fuse
Front power window.
25A *
F29
Ignition switch position II output (van only).
5A *
F30
Taxi roof lamp switch.
15A *
F31
Engine control module.
15A *
F32
Engine control module.
10A *
F33
Fuel injectors.
10A *
F34
Vehicle power 4.
15A *
F35
Active grill shutter - 1.6 GTDI and 2.5L engine only.
5A *
F36
Battery saver relay.
5A *
F37
Engine control module.
15A *
F38
Transmission control module.
Taxi block connector.
10A *
F39
Electronic power assist steering.
5A *
F40
Body control module.
20A *
F41
Rear window wiper.
15A *
F42
Heated front seat - Van.
15A *
F43
Accessories - Van.
20A *
Headlamp control module.
15A *
F44
Air conditioning switch - Taxi.
5A *
Power exterior mirror - without door control unit.
10A *
F45
Windshield wiper.
40A **
F46
184
Tourneo Connect/Transit Connect (CHC) Canada/United States of America, enUSA, First Printing Fuses
Page 192 of 439
Circuits protected
Fuse Rating
Fuse
Rear heating, ventilation and air conditioning.
10A *
F1
Driver seat adjuster.
25A *
F2
Driver door module.
25A *
F3
Passenger door module.
25A *
F4
Not used.
-
F5
Door control unit rear left.
25A *
F6
Door control unit rear right.
25A *
F7
Not used.
-
F8
Not used.
-
F9
Not used.
-
F10
Not used.
-
F11
Not used.
-
F12
Not used.
-
F13
Not used.
-
F14
Not used.
-
F15
Not used.
-
F16
Not used.
-
F17
Not used.
-
F18
Not used.
-
F19
Not used.
-
F20
Not used.
-
F21
Not used.
-
F22
Not used.
-
F23
Not used.
-
F24
Rear blower motor.
40A **
F25
189
Tourneo Connect/Transit Connect (CHC) Canada/United States of America, enUSA, First Printing Fuses
Page 193 of 439
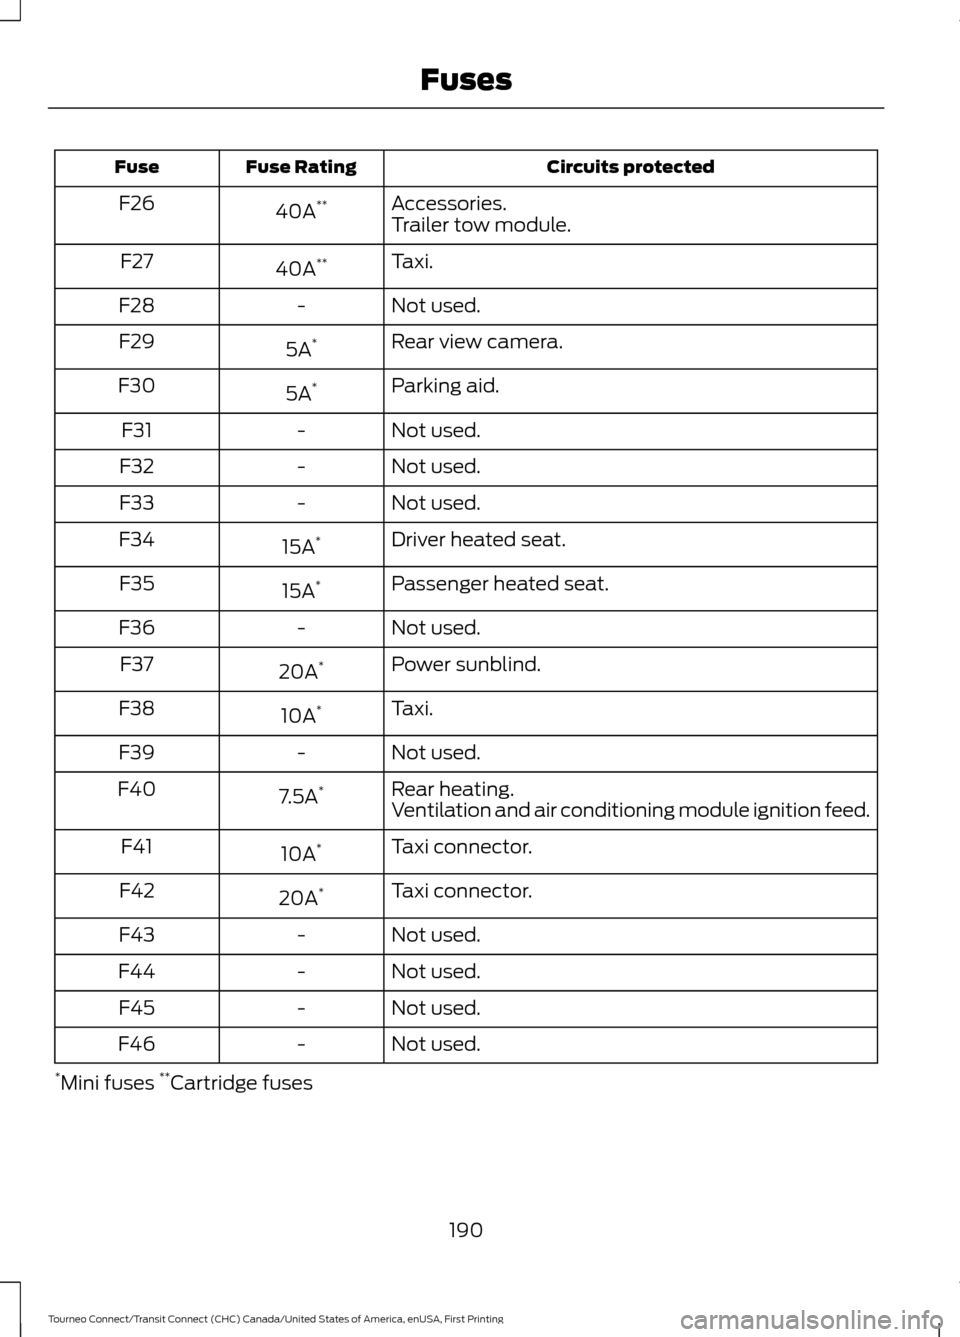
Circuits protected
Fuse Rating
Fuse
Accessories.
40A **
F26
Trailer tow module.
Taxi.
40A **
F27
Not used.
-
F28
Rear view camera.
5A *
F29
Parking aid.
5A *
F30
Not used.
-
F31
Not used.
-
F32
Not used.
-
F33
Driver heated seat.
15A *
F34
Passenger heated seat.
15A *
F35
Not used.
-
F36
Power sunblind.
20A *
F37
Taxi.
10A *
F38
Not used.
-
F39
Rear heating.
7.5A *
F40
Ventilation and air conditioning module ignition feed.
Taxi connector.
10A *
F41
Taxi connector.
20A *
F42
Not used.
-
F43
Not used.
-
F44
Not used.
-
F45
Not used.
-
F46
* Mini fuses **
Cartridge fuses
190
Tourneo Connect/Transit Connect (CHC) Canada/United States of America, enUSA, First Printing Fuses
Page 215 of 439
CHANGING THE ENGINE AIR
FILTER
WARNING
To reduce the risk of vehicle damage
and/or personal burn injuries do not
start your engine with the air cleaner
removed and do not remove it while the
engine is running. When changing the air filter element, use
only the air filter element listed. See
Capacities and Specifications (page
249).
For EcoBoost equipped vehicles: When
servicing the air cleaner, it is important that
no foreign material enter the air induction
system. The engine and turbocharger are
susceptible to damage from even small
particles.
Change the air filter element at the proper
interval. See
Maintenance (page 193).
Note: Failure to use the correct air filter
element may result in severe engine
damage. The customer warranty may be
void for any damage to the engine if the
correct air filter element is not used. EcoBoost Engines
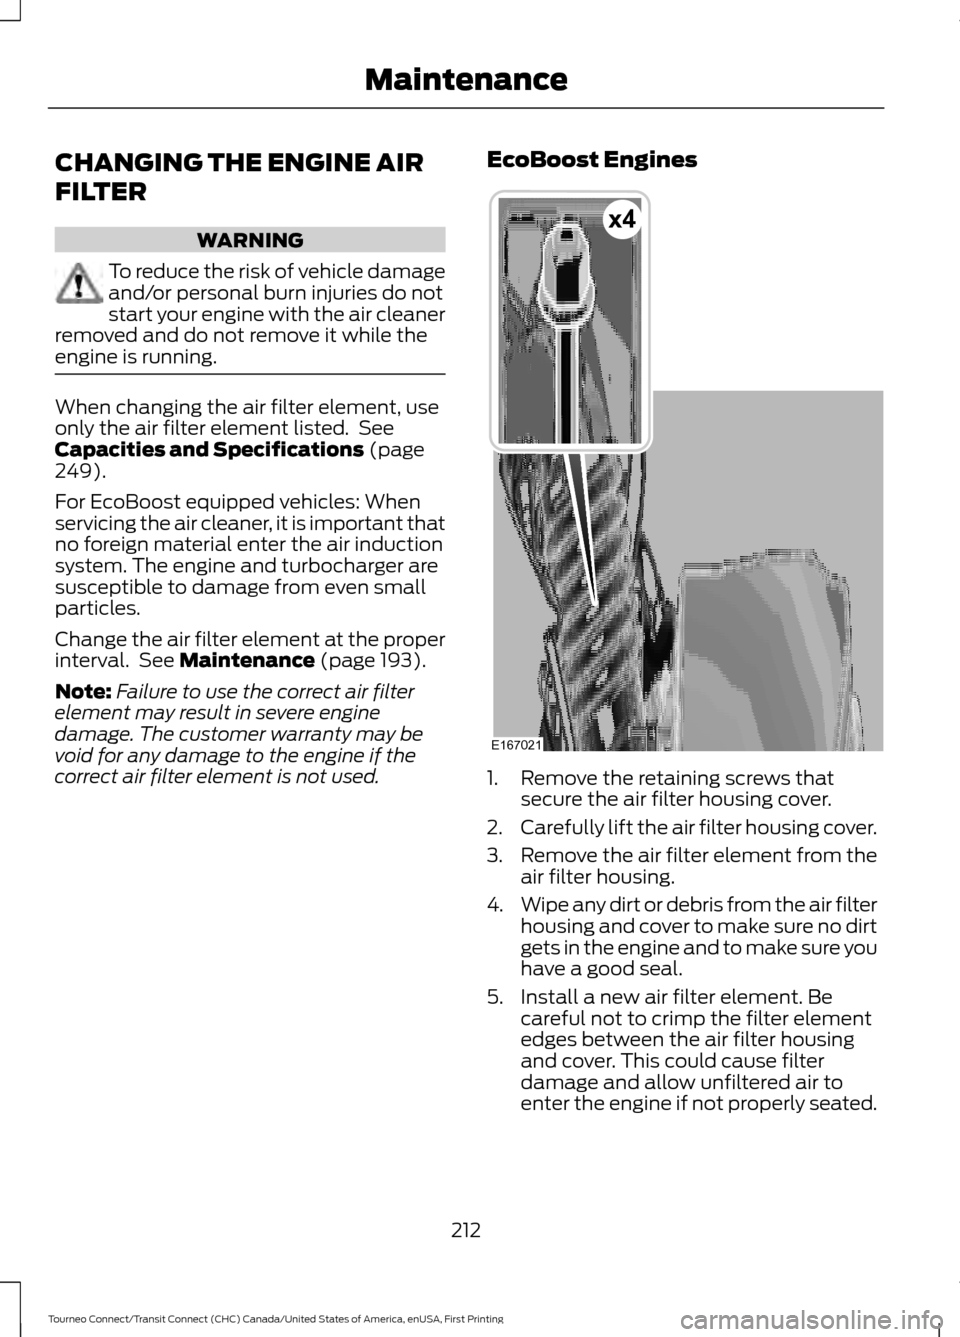
1. Remove the retaining screws that
secure the air filter housing cover.
2. Carefully lift the air filter housing cover.
3. Remove the air filter element from the
air filter housing.
4. Wipe any dirt or debris from the air filter
housing and cover to make sure no dirt
gets in the engine and to make sure you
have a good seal.
5. Install a new air filter element. Be careful not to crimp the filter element
edges between the air filter housing
and cover. This could cause filter
damage and allow unfiltered air to
enter the engine if not properly seated.
212
Tourneo Connect/Transit Connect (CHC) Canada/United States of America, enUSA, First Printing MaintenanceE167021
x4