reset FORD TRANSIT CONNECT 2016 2.G Owners Manual
[x] Cancel search | Manufacturer: FORD, Model Year: 2016, Model line: TRANSIT CONNECT, Model: FORD TRANSIT CONNECT 2016 2.GPages: 439, PDF Size: 6.96 MB
Page 7 of 439
Ordering Additional Owner's
Literature......................................................179
Reporting Safety Defects (U.S. Only)..............................................................179
Reporting Safety Defects (Canada Only).............................................................180
Fuses
Fuse Box Locations.......................................181
Fuse Specification Chart...........................182
Changing a Fuse............................................191
Maintenance
General Information
....................................193
Opening and Closing the Hood...............193
Under Hood Overview - 1.6L
....................195
Under Hood Overview - 2.5L...................196
Engine Oil Dipstick - 1.6L EcoBoost™
.................................................197
Engine Oil Dipstick - 2.5L
...........................197
Engine Oil Check...........................................197
Oil Change Indicator Reset.......................198
Engine Coolant Check................................198
Automatic Transmission Fluid Check...........................................................200
Brake Fluid Check.......................................200
Power Steering Fluid Check....................200
Washer Fluid Check...................................200
Changing the 12V Battery
..........................201
Checking the Wiper Blades.....................202
Changing the Wiper Blades.....................202
Adjusting the Headlamps........................205
Changing a Bulb..........................................206
Bulb Specification Chart
.............................211
Changing the Engine Air Filter..................212
Vehicle Care
Cleaning Products
........................................214
Cleaning the Exterior...................................214
Waxing..............................................................215 Cleaning the Engine
.....................................215
Cleaning the Windows and Wiper Blades...........................................................216
Cleaning the Interior....................................216
Cleaning the Instrument Panel and Instrument Cluster Lens.........................217
Cleaning Leather Seats
...............................217
Repairing Minor Paint Damage...............218
Cleaning the Alloy Wheels........................218
Vehicle Storage
.............................................218
Wheels and Tires
General Information.....................................221
Tire Care
..........................................................222
Using Winter Tires
........................................237
Using Snow Chains
......................................237
Tire Pressure Monitoring System...........238
Changing a Road Wheel...........................242
Technical Specifications
...........................247
Capacities and Specific- ations
Engine Specifications - 1.6L EcoBoost™...............................................249
Engine Specifications - 2.5L....................249
Motorcraft Parts - 1.6L EcoBoost™
......250
Motorcraft Parts - 2.5L
...............................251
Vehicle Identification Number.................251
Vehicle Certification Label.......................252
Transmission Code Designation
............253
Capacities and Specifications - 1.6L EcoBoost™
................................................253
Capacities and Specifications - 2.5L
.....255
Audio System
General Information
...................................258
Audio Unit - Vehicles With: AM/FM......259
Audio Unit - Vehicles With: Premium AM/ FM/CD..........................................................262
Audio Unit - Vehicles With: AM/FM/CD/ SYNC............................................................263
4
Tourneo Connect/Transit Connect (CHC) Canada/United States of America, enUSA, First Printing Table of Contents
Page 11 of 439
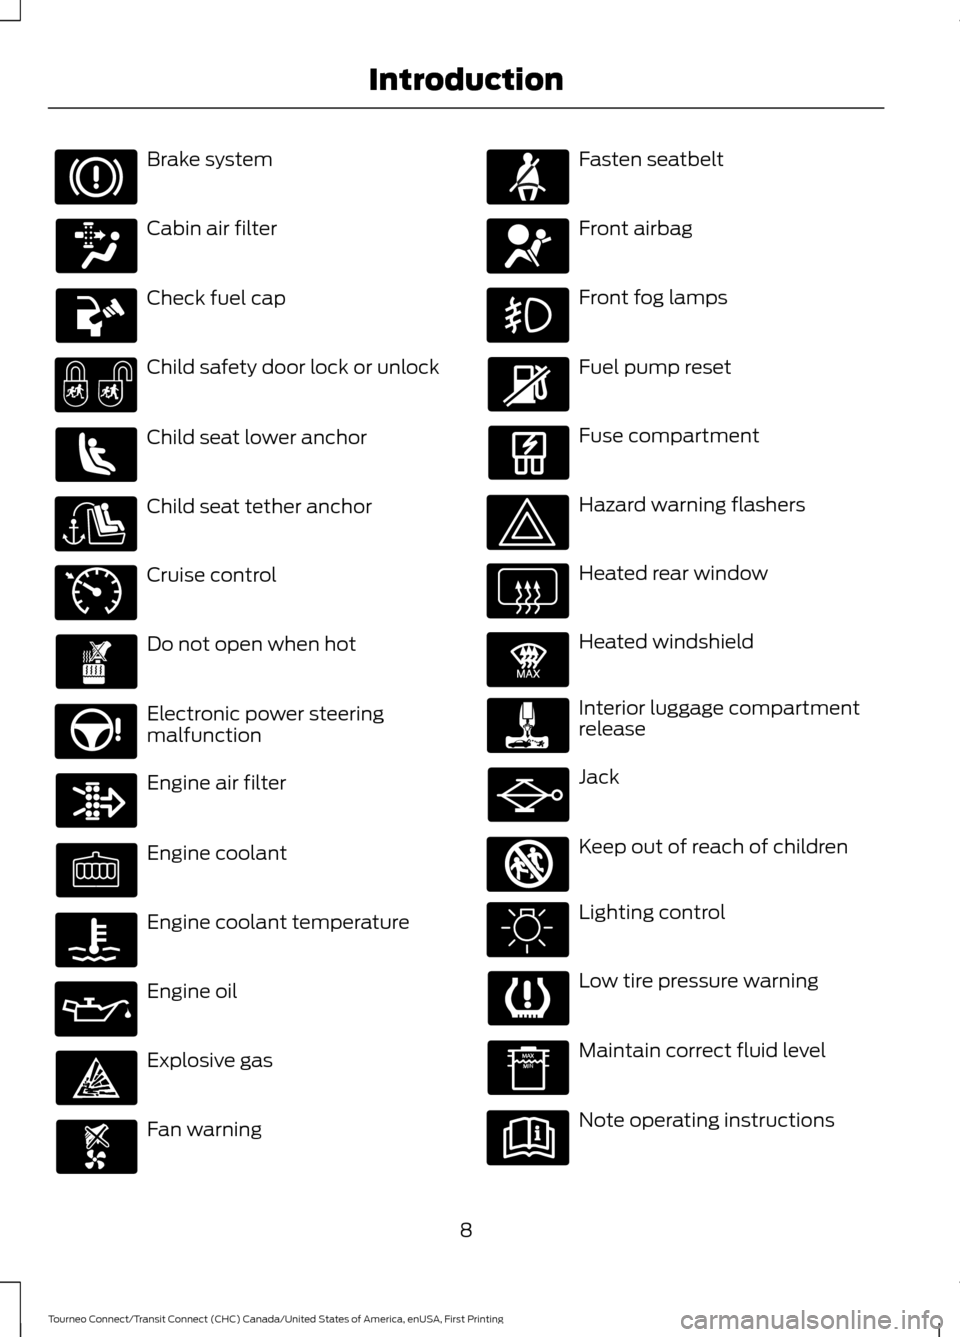
Brake system
Cabin air filter
Check fuel cap
Child safety door lock or unlock
Child seat lower anchor
Child seat tether anchor
Cruise control
Do not open when hot
Electronic power steering
malfunction
Engine air filter
Engine coolant
Engine coolant temperature
Engine oil
Explosive gas
Fan warning Fasten seatbelt
Front airbag
Front fog lamps
Fuel pump reset
Fuse compartment
Hazard warning flashers
Heated rear window
Heated windshield
Interior luggage compartment
release
Jack
Keep out of reach of children
Lighting control
Low tire pressure warning
Maintain correct fluid level
Note operating instructions
8
Tourneo Connect/Transit Connect (CHC) Canada/United States of America, enUSA, First Printing Introduction E71340 E91392 E161353
Page 55 of 439
USING MYKEY WITH REMOTE
START SYSTEMS
MyKey is not compatible with non
Ford-approved, aftermarket remote start
systems. If you choose to install a remote
start system, see an authorized dealer for
a Ford-approved remote start system.
MYKEY TROUBLESHOOTING Potential Causes
Condition
· The key used to start your vehicle does
not have admin privileges.
I cannot program a MyKey.
·
The key used to start your vehicle is the
only admin key (there always has to be at
least one admin key).
·
SecuriLock passive anti-theft system is
disabled or in unlimited mode.
·
The key used to start your vehicle does
not have admin privileges.
I cannot program the configurable settings.
· No keys are programmed to the vehicle.
See
Creating a MyKey (page 49).
·
The key used to start your vehicle does
not have admin privileges.
I cannot clear the MyKeys.
·
No MyKeys are programmed to the
vehicle. See Creating a MyKey (page
49).
Purchase a new key from your authorized
dealer.
I lost the only admin key.
Program a spare key. See
Passive Anti-
Theft System (page 58).
I lost a key.
·
The MyKey user is not using the MyKey.
MyKey distance does not accumulate.
· An admin key holder cleared the MyKeys
and created new MyKeys.
·
The key system has been reset.
52
Tourneo Connect/Transit Connect (CHC) Canada/United States of America, enUSA, First Printing MyKey
™
Page 64 of 439
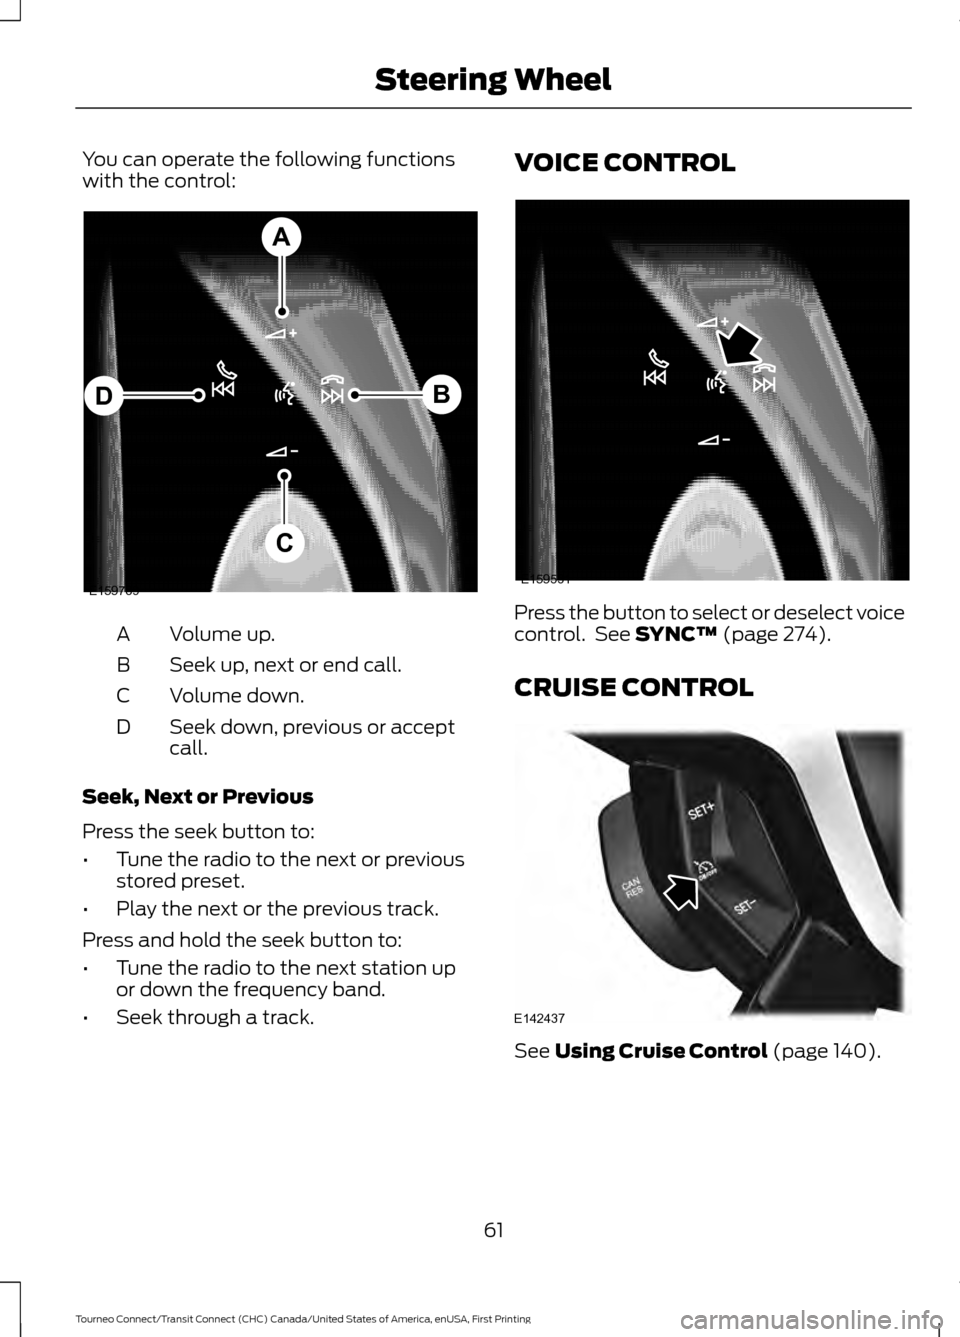
You can operate the following functions
with the control:
Volume up.
A
Seek up, next or end call.
B
Volume down.
C
Seek down, previous or accept
call.
D
Seek, Next or Previous
Press the seek button to:
• Tune the radio to the next or previous
stored preset.
• Play the next or the previous track.
Press and hold the seek button to:
• Tune the radio to the next station up
or down the frequency band.
• Seek through a track. VOICE CONTROL
Press the button to select or deselect voice
control. See SYNC™ (page 274).
CRUISE CONTROL See
Using Cruise Control (page 140).
61
Tourneo Connect/Transit Connect (CHC) Canada/United States of America, enUSA, First Printing Steering WheelE159789
A
B
C
D E159531 E142437
Page 78 of 439
Note:
You may hear a pulsing noise when
just one of the windows is open. Lower the
opposite window slightly to reduce this
noise.
One-Touch Down (If Equipped)
Press the control fully and release it. Press
again or lift it to stop the window.
One-Touch Up
(If Equipped)
Lift the control fully and release it. Press
or lift it again to stop the window.
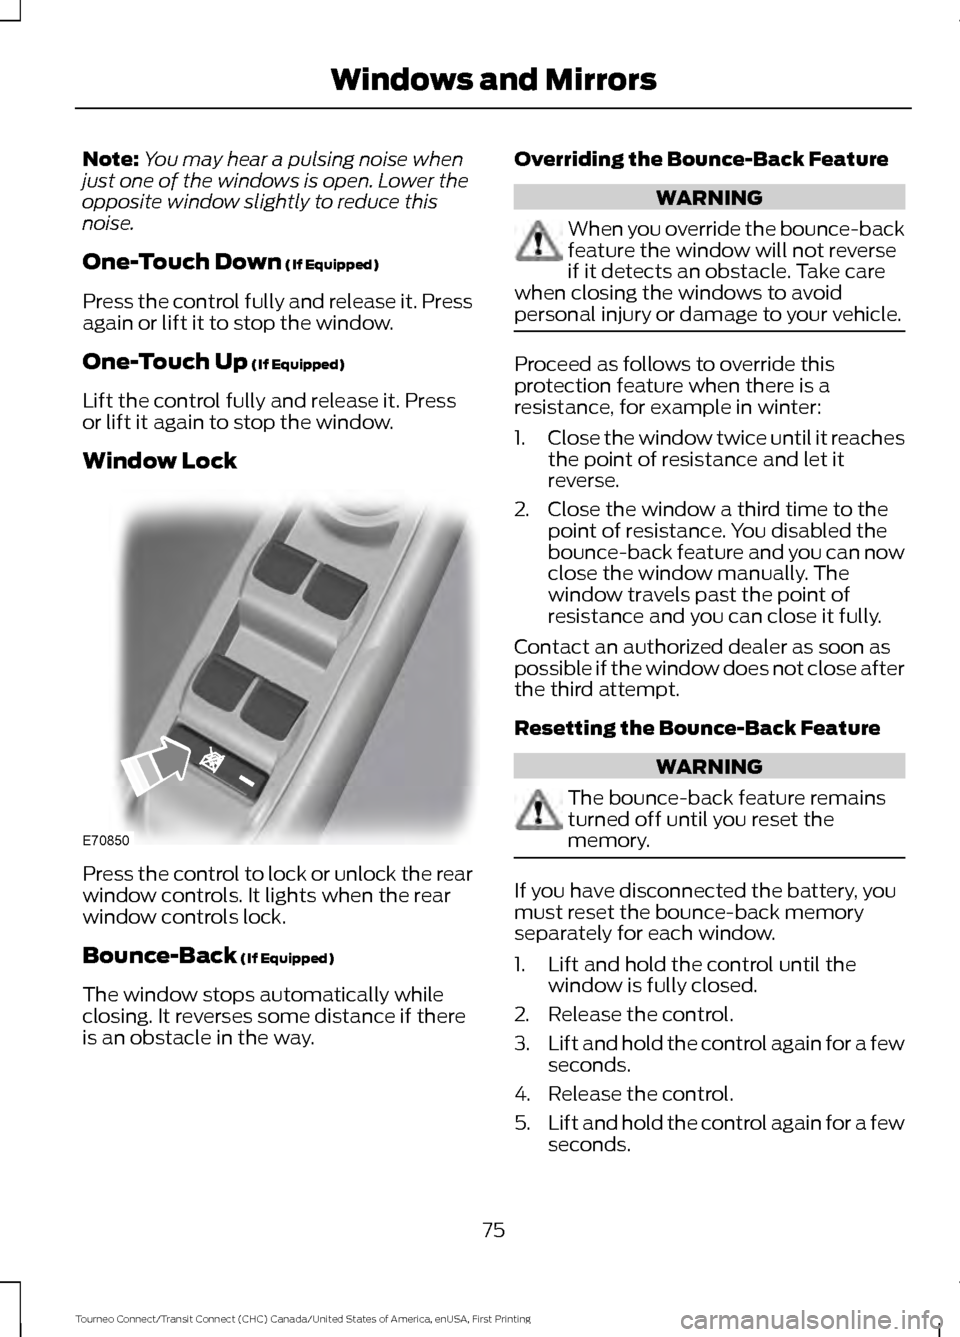
Window Lock Press the control to lock or unlock the rear
window controls. It lights when the rear
window controls lock.
Bounce-Back
(If Equipped)
The window stops automatically while
closing. It reverses some distance if there
is an obstacle in the way. Overriding the Bounce-Back Feature WARNING
When you override the bounce-back
feature the window will not reverse
if it detects an obstacle. Take care
when closing the windows to avoid
personal injury or damage to your vehicle. Proceed as follows to override this
protection feature when there is a
resistance, for example in winter:
1.
Close the window twice until it reaches
the point of resistance and let it
reverse.
2. Close the window a third time to the point of resistance. You disabled the
bounce-back feature and you can now
close the window manually. The
window travels past the point of
resistance and you can close it fully.
Contact an authorized dealer as soon as
possible if the window does not close after
the third attempt.
Resetting the Bounce-Back Feature WARNING
The bounce-back feature remains
turned off until you reset the
memory.
If you have disconnected the battery, you
must reset the bounce-back memory
separately for each window.
1. Lift and hold the control until the
window is fully closed.
2. Release the control.
3. Lift and hold the control again for a few
seconds.
4. Release the control.
5. Lift and hold the control again for a few
seconds.
75
Tourneo Connect/Transit Connect (CHC) Canada/United States of America, enUSA, First Printing Windows and MirrorsE70850
Page 90 of 439
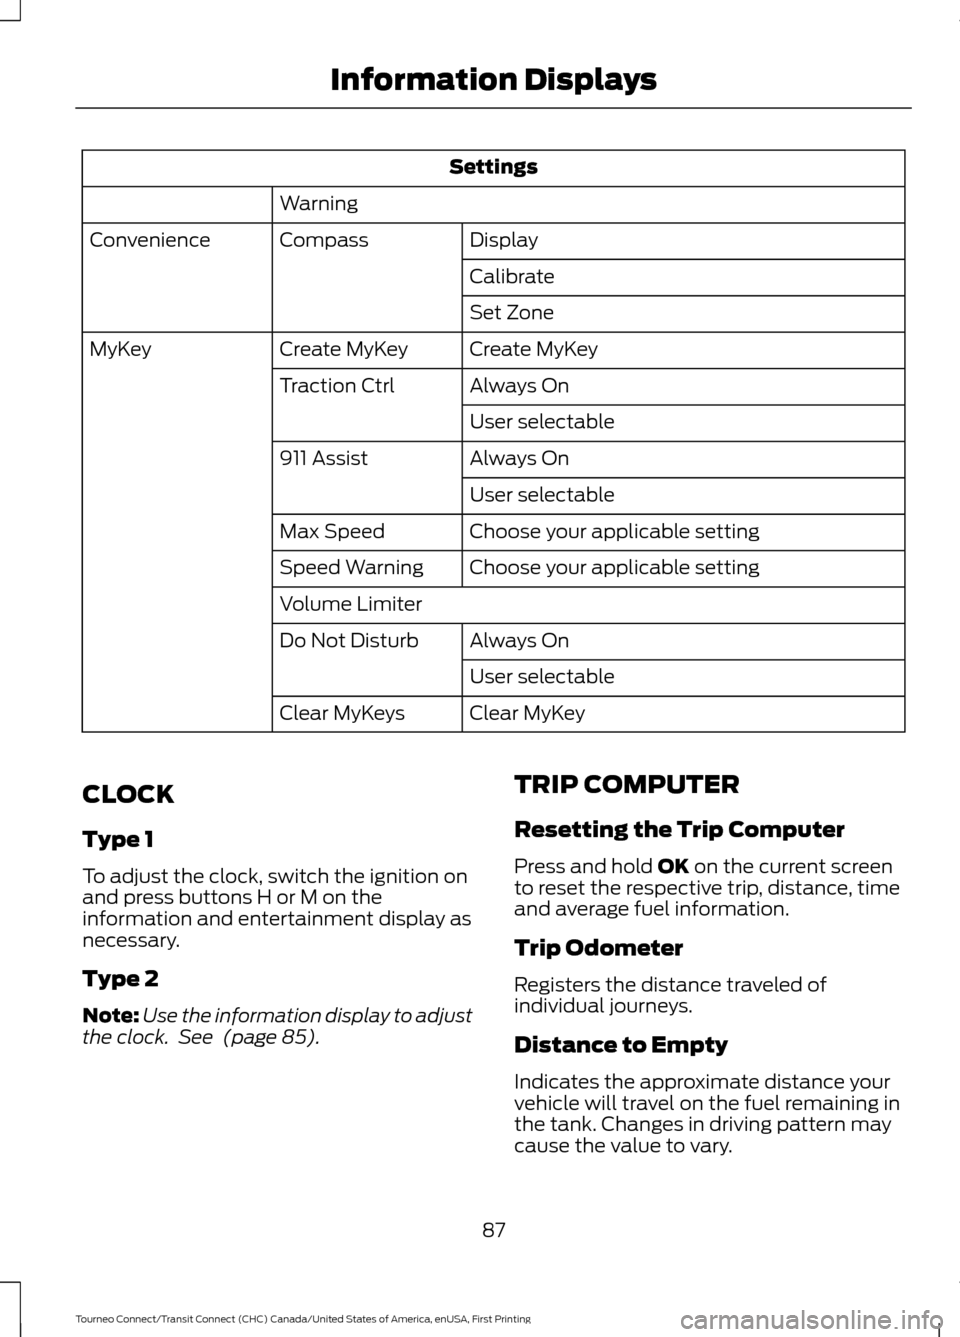
Settings
Warning Display
Compass
Convenience
Calibrate
Set Zone
Create MyKey
Create MyKey
MyKey
Always On
Traction Ctrl
User selectable
Always On
911 Assist
User selectable
Choose your applicable setting
Max Speed
Choose your applicable setting
Speed Warning
Volume Limiter
Always On
Do Not Disturb
User selectable
Clear MyKey
Clear MyKeys
CLOCK
Type 1
To adjust the clock, switch the ignition on
and press buttons H or M on the
information and entertainment display as
necessary.
Type 2
Note: Use the information display to adjust
the clock. See (page 85). TRIP COMPUTER
Resetting the Trip Computer
Press and hold
OK on the current screen
to reset the respective trip, distance, time
and average fuel information.
Trip Odometer
Registers the distance traveled of
individual journeys.
Distance to Empty
Indicates the approximate distance your
vehicle will travel on the fuel remaining in
the tank. Changes in driving pattern may
cause the value to vary.
87
Tourneo Connect/Transit Connect (CHC) Canada/United States of America, enUSA, First Printing Information Displays
Page 91 of 439
Average Fuel
Indicates the average fuel consumption
since the function was last reset.
Digital Speedometer
The speed your vehicle is traveling at will
display as a digital number.
PERSONALIZED SETTINGS
Measure Units
To swap between imperial and metric
units, scroll to this display and press the
OK button.
Swapping between imperial and metric
units will affect the following displays:
• Distance to empty.
• Average fuel consumption.
• Instantaneous fuel consumption.
• Average speed.
Switching Chimes Off
The following chimes can be switched off:
• Warning messages.
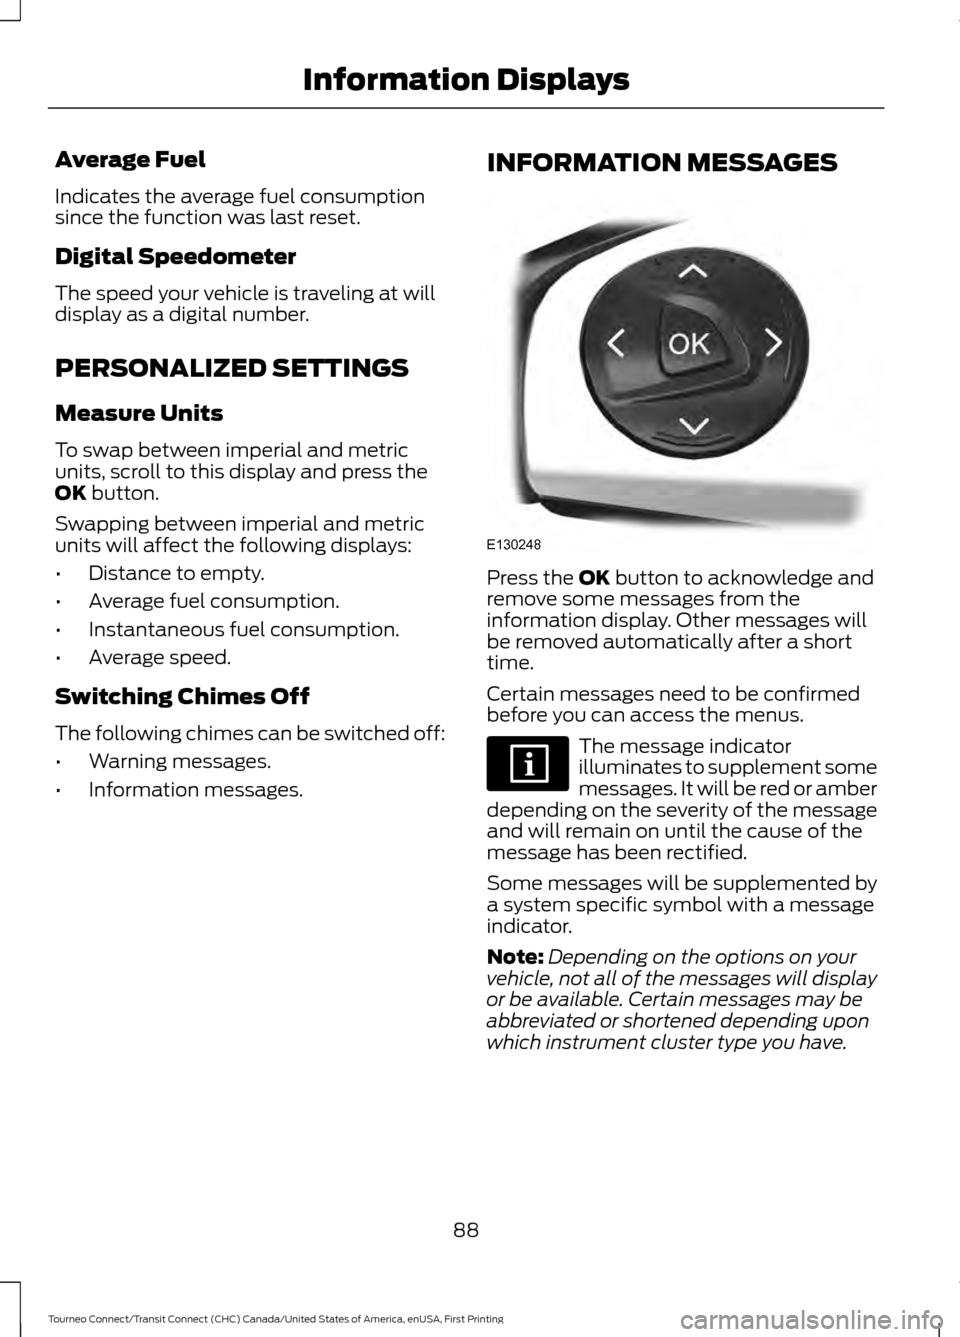
• Information messages. INFORMATION MESSAGES Press the
OK button to acknowledge and
remove some messages from the
information display. Other messages will
be removed automatically after a short
time.
Certain messages need to be confirmed
before you can access the menus. The message indicator
illuminates to supplement some
messages. It will be red or amber
depending on the severity of the message
and will remain on until the cause of the
message has been rectified.
Some messages will be supplemented by
a system specific symbol with a message
indicator.
Note: Depending on the options on your
vehicle, not all of the messages will display
or be available. Certain messages may be
abbreviated or shortened depending upon
which instrument cluster type you have.
88
Tourneo Connect/Transit Connect (CHC) Canada/United States of America, enUSA, First Printing Information DisplaysE130248
Page 125 of 439
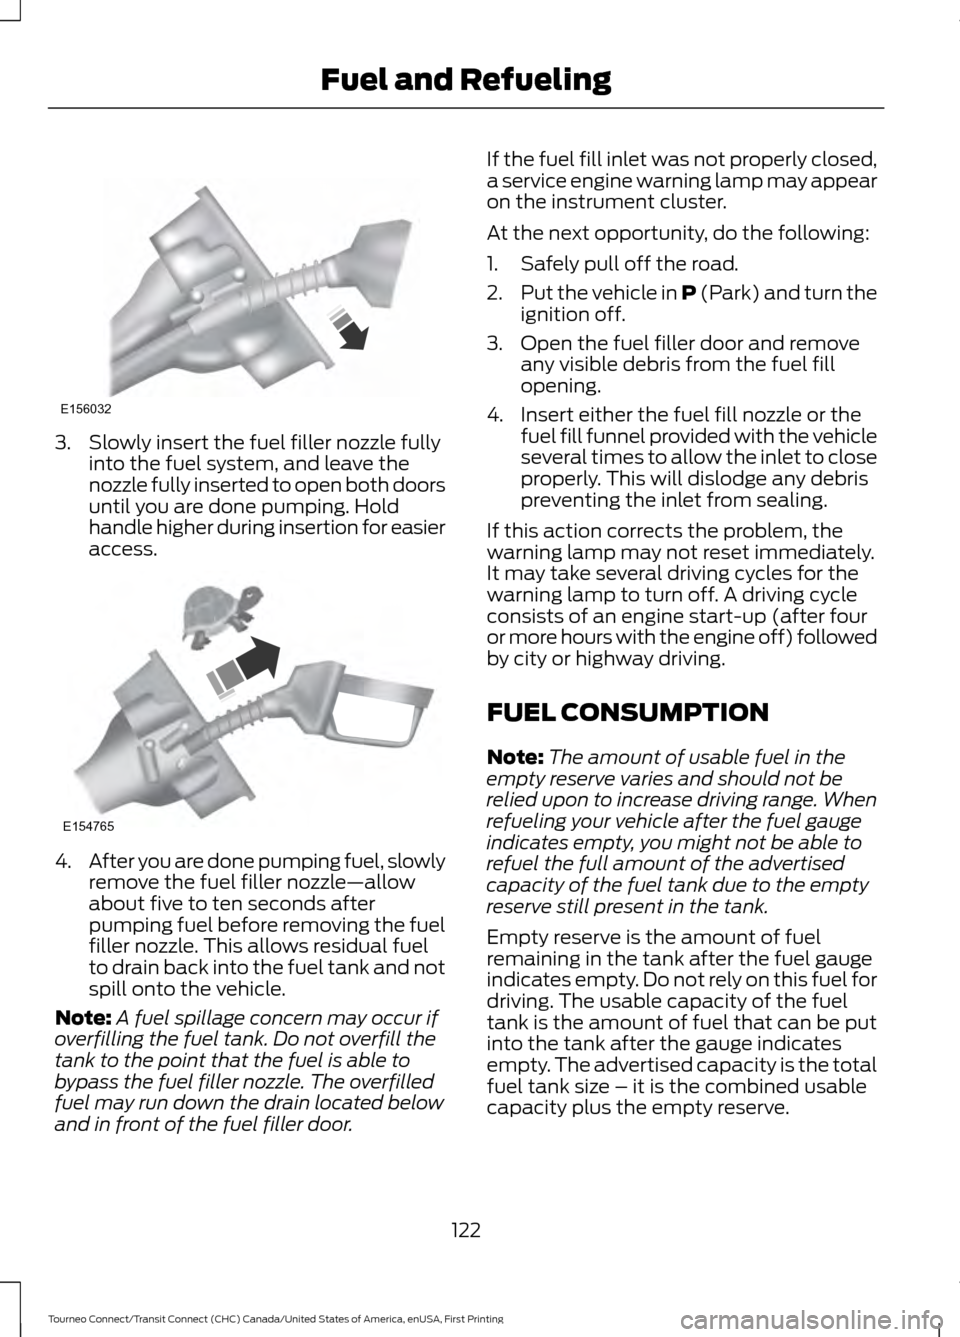
3. Slowly insert the fuel filler nozzle fully
into the fuel system, and leave the
nozzle fully inserted to open both doors
until you are done pumping. Hold
handle higher during insertion for easier
access. 4.
After you are done pumping fuel, slowly
remove the fuel filler nozzle—allow
about five to ten seconds after
pumping fuel before removing the fuel
filler nozzle. This allows residual fuel
to drain back into the fuel tank and not
spill onto the vehicle.
Note: A fuel spillage concern may occur if
overfilling the fuel tank. Do not overfill the
tank to the point that the fuel is able to
bypass the fuel filler nozzle. The overfilled
fuel may run down the drain located below
and in front of the fuel filler door. If the fuel fill inlet was not properly closed,
a service engine warning lamp may appear
on the instrument cluster.
At the next opportunity, do the following:
1. Safely pull off the road.
2.
Put the vehicle in P (Park) and turn the
ignition off.
3. Open the fuel filler door and remove any visible debris from the fuel fill
opening.
4. Insert either the fuel fill nozzle or the fuel fill funnel provided with the vehicle
several times to allow the inlet to close
properly. This will dislodge any debris
preventing the inlet from sealing.
If this action corrects the problem, the
warning lamp may not reset immediately.
It may take several driving cycles for the
warning lamp to turn off. A driving cycle
consists of an engine start-up (after four
or more hours with the engine off) followed
by city or highway driving.
FUEL CONSUMPTION
Note: The amount of usable fuel in the
empty reserve varies and should not be
relied upon to increase driving range. When
refueling your vehicle after the fuel gauge
indicates empty, you might not be able to
refuel the full amount of the advertised
capacity of the fuel tank due to the empty
reserve still present in the tank.
Empty reserve is the amount of fuel
remaining in the tank after the fuel gauge
indicates empty. Do not rely on this fuel for
driving. The usable capacity of the fuel
tank is the amount of fuel that can be put
into the tank after the gauge indicates
empty. The advertised capacity is the total
fuel tank size – it is the combined usable
capacity plus the empty reserve.
122
Tourneo Connect/Transit Connect (CHC) Canada/United States of America, enUSA, First Printing Fuel and RefuelingE156032 E154765
Page 201 of 439
WARNINGS
Only add oil when the engine is cold.
If the engine is hot, wait 10 minutes
for the engine to cool down.
Do not remove the filler cap when
the engine is running.
1. Remove the engine oil filler cap.
2. Add engine oil that meets Ford
specifications. See Capacities and
Specifications (page 249).
3. Wipe off any spilled oil.
4. Replace the engine oil filler cap. Turn it clockwise until you feel a strong
resistance.
Note: Do not add oil further than the
maximum mark. Oil levels above the
maximum mark may cause engine damage.
Note: Soak up any spillage with an
absorbent cloth immediately.
OIL CHANGE INDICATOR
RESET
Resetting the Oil Life Monitoring
System
Only reset the oil life monitoring system
after changing the engine oil and oil filter.
1. Switch the ignition on. Do not start the
engine. For vehicles with push-button
start, press and hold the start button
for two seconds without pressing the
brake pedal. Do not start the engine.
2. Press the accelerator and brake pedals
at the same time.
3. Keep the accelerator and brake pedals
fully pressed.
4. After three seconds, a message confirming that the reset is in progress
will be displayed. 5. After 25 seconds, a message
confirming that the reset is complete
will be displayed.
6. Release the accelerator and brake pedals.
7. The message confirming that the reset
is complete will no longer be displayed.
8. Switch the ignition off. For vehicles with
push-button start, press the start
button to switch the ignition off.
ENGINE COOLANT CHECK
Checking the Engine Coolant
When the engine is cold, check the
concentration and level of the engine
coolant at the intervals listed in the
scheduled maintenance information. See
Scheduled Maintenance
(page 386).
Note: Make sure that the level is between
the MIN and MAX marks on the coolant
reservoir.
Note: Coolant expands when it is hot. The
level may extend beyond the MAX mark.
Note: If the level is at the MIN mark, below
the MIN mark, or empty, add coolant
immediately. See
Adding Engine Coolant
in this chapter.
Maintain coolant concentration within
48% to 50%, which equates to a freeze
point between -30°F (-34°C) and -34°F
(-37°C).
Note: For best results, coolant
concentration should be tested with a
refractometer, for example Robinair®
Coolant and Battery Refractometer 75240.
We do not recommend the use of
hydrometers or coolant test strips for
measuring coolant concentrations.
Note: Automotive fluids are not
interchangeable. Do not use engine coolant,
antifreeze or windshield washer fluid outside
of its specified function and vehicle location.
198
Tourneo Connect/Transit Connect (CHC) Canada/United States of America, enUSA, First Printing Maintenance
Page 205 of 439
presets, are also maintained in memory by
power from the low voltage battery. When
a technician disconnects and connects the
low voltage battery, these settings are
erased. Complete the following procedure
in order to restore the settings:
1. With the vehicle at a complete stop,
set the parking brake.
2. Shift into park (P).
3. Switch off all accessories.
4. Fully press the brake pedal and start the vehicle.
5. Run the engine until it reaches normal operating temperature. While the
engine is warming up, complete the
following: Reset the clock. See Audio
System (page 258). Reset the power
windows bounce-back feature. See
Windows and Mirrors
(page 74).
Reset the radio station presets. See
Audio System
(page 258).
6. Allow the engine to idle for at least one
minute. If the engine turns off, press
the accelerator pedal to start the
engine.
7. While the engine is running, press the brake pedal and shift into neutral (N).
8. Allow the engine to run for at least one
minute by pressing on the accelerator
pedal.
9. Drive the vehicle at least 12 mi (20 km)
to completely relearn the idle and fuel
trim strategy.
Note: If you do not allow the engine to
relearn the idle and fuel trim strategy, the
idle quality of your vehicle may be adversely
affected until the engine computer
eventually relearns the idle trim and fuel
trim strategy.
Make sure that you dispose of old batteries
in an environmentally friendly way. Seek
advice from your local authority about
recycling old batteries. CHECKING THE WIPER
BLADES
Run the tip of your fingers over the edge of
the blade to check for roughness.
Clean the wiper blades with washer fluid
or water applied with a soft sponge or
cloth.
CHANGING THE WIPER
BLADES
Replace the wiper blades at least annually
for optimum performance.
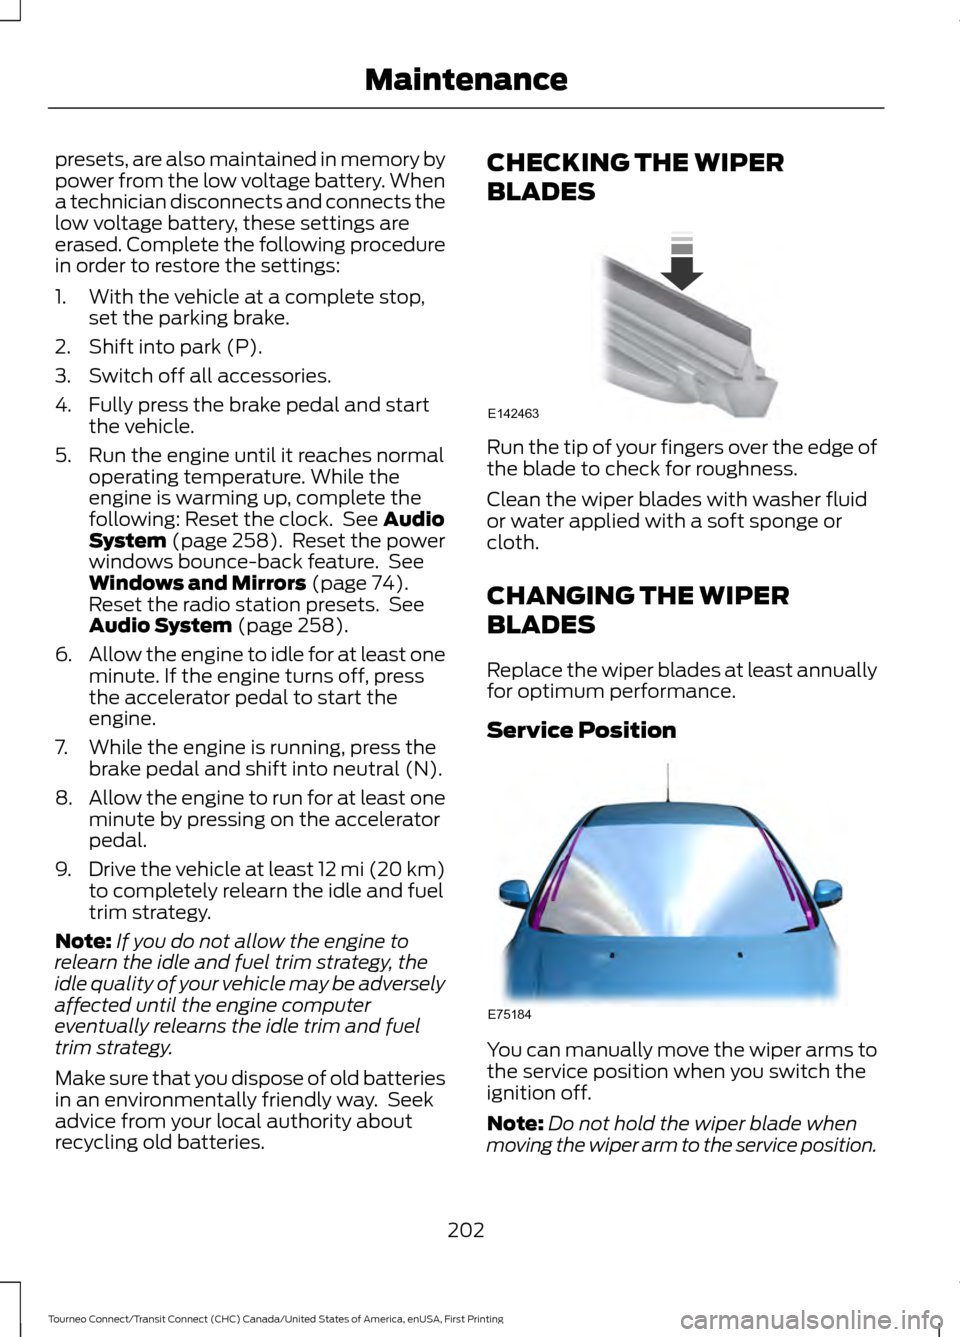
Service Position
You can manually move the wiper arms to
the service position when you switch the
ignition off.
Note:
Do not hold the wiper blade when
moving the wiper arm to the service position.
202
Tourneo Connect/Transit Connect (CHC) Canada/United States of America, enUSA, First Printing MaintenanceE142463 E75184