display FORD TRANSIT CONNECT 2018 Workshop Manual
[x] Cancel search | Manufacturer: FORD, Model Year: 2018, Model line: TRANSIT CONNECT, Model: FORD TRANSIT CONNECT 2018Pages: 449, PDF Size: 6.73 MB
Page 267 of 449
FM: Press the button to select the FM frequency band.
J
AM:
Press the button to select the AM frequency band.
K
Cursor up
or down: Press the cursor up or down arrow buttons to adjust the
settings within the menus or to move to the next radio station while listening
to the radio on the
FM or AM frequency band.
L
Sound:
Press the button to adjust the sound settings for bass, treble, balance
or fade.
M
Sound Button
This will allow you to adjust the sound
settings for bass, treble, balance or fade.
1. Press the sound button until the required setting is displayed.
2. Use the cursor up or down arrow buttons to select the required level.
Note: Fade settings are only adjustable if
there are speakers in the rear of your vehicle.
Frequency Band Buttons
Press the
FM or AM button to select
frequency band.
You can use the buttons to return to radio
reception when you have been listening to
an
AUX source.
Station Tuning Buttons
Seek Tuning
Select a frequency band and briefly press
one of the seek buttons. The unit will stop
at the first station it finds in the direction
you have chosen.
Manual Tuning
Use the cursor up or down arrow buttons
to tune up or down the frequency band in
small increments, or press and hold to
increment quickly until you find a station
you want to listen to. Station Preset Buttons
This feature allows you to store your
favorite stations. They can be recalled by
selecting the appropriate frequency band
and pressing one of the preset buttons.
1. Select a frequency band.
2. Tune to the station required.
3. Press and hold one of the preset
buttons. The audio unit will also mute
momentarily as confirmation.
You can repeat this on each frequency
band and for each preset button.
Clock Button
This will allow you to adjust the clock
settings.
1. Press the clock button until Set Hour
is displayed.
2. Use the cursor up or down arrow buttons to set the correct hour.
3. Press the clock button again until
Set
Minutes is displayed.
4. Use the cursor up or down arrow buttons to set the correct minutes.
Setting 24 Hour or 12 Hour Display
1. Press the
MENU button until 24 Hour
is displayed.
2. Use the cursor up or down arrow buttons to toggle between 24 hour or
12 hour display.
264
2018 Transit Connect (CHC) Canada/United States of America, CG3709en enUSA, Edition date: 201704, First Printing Audio System
Page 268 of 449
Menu Button
This will allow you to adjust all of the audio
system settings. Press the button
repeatedly until the required setting is
displayed. Use the cursor up or down arrow
buttons to adjust the following settings:
•
Clock hour
• Clock minutes
• 24 hour, 12 hour
• Bass
• Treble
• Balance
• Fade
• RDS
AUX Button
Connect your media device to the audio
unit. See Media Hub (page 276).
Select your media device as the audio
source by pressing the
AUX button. After
connecting your media device, the first
track will start to play automatically. AUDIO UNIT - VEHICLES WITH:
AM/FM/CD/SYNC WARNING
Driving while distracted can result in
loss of vehicle control, crash and
injury. We strongly recommend that
you use extreme caution when using any
device that may take your focus off the
road. Your primary responsibility is the safe
operation of your vehicle. We recommend
against the use of any hand-held device
while driving and encourage the use of
voice-operated systems when possible.
Make sure you are aware of all applicable
local laws that may affect the use of
electronic devices while driving. Note:
You can operate your audio system
for up to one hour after you switch the
ignition off. Press the on and off control to
operate the system with the ignition turned
off. The system automatically turns off after
one hour.
265
2018 Transit Connect (CHC) Canada/United States of America, CG3709en enUSA, Edition date: 201704, First Printing Audio System
Page 273 of 449
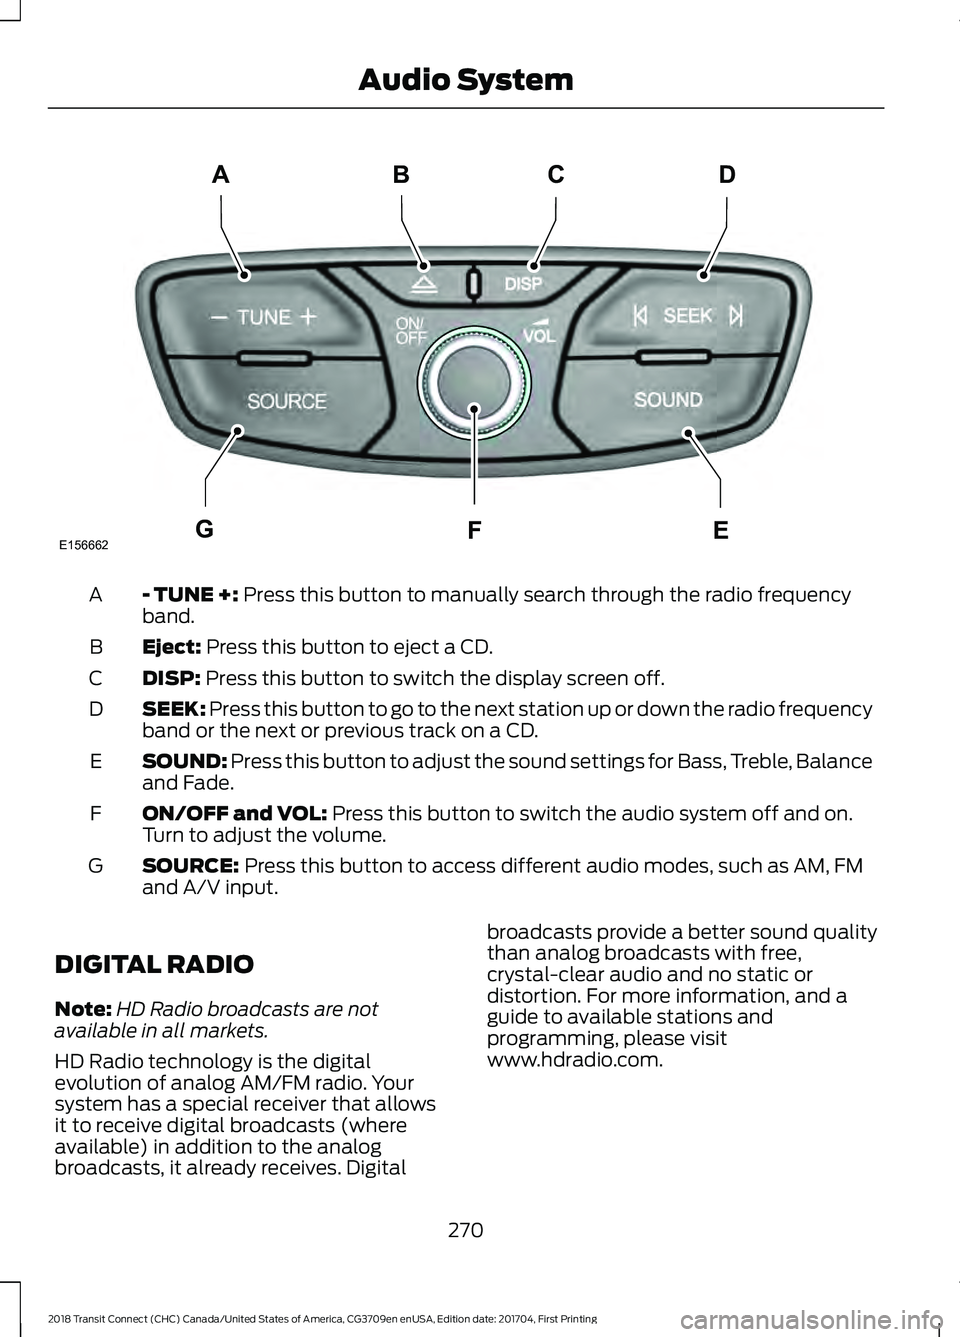
- TUNE +: Press this button to manually search through the radio frequency
band.
A
Eject:
Press this button to eject a CD.
B
DISP:
Press this button to switch the display screen off.
C
SEEK:
Press this button to go to the next station up or down the radio frequency
band or the next or previous track on a CD.
D
SOUND:
Press this button to adjust the sound settings for Bass, Treble, Balance
and Fade.
E
ON/OFF and VOL:
Press this button to switch the audio system off and on.
Turn to adjust the volume.
F
SOURCE:
Press this button to access different audio modes, such as AM, FM
and A/V input.
G
DIGITAL RADIO
Note: HD Radio broadcasts are not
available in all markets.
HD Radio technology is the digital
evolution of analog AM/FM radio. Your
system has a special receiver that allows
it to receive digital broadcasts (where
available) in addition to the analog
broadcasts, it already receives. Digital broadcasts provide a better sound quality
than analog broadcasts with free,
crystal-clear audio and no static or
distortion. For more information, and a
guide to available stations and
programming, please visit
www.hdradio.com.
270
2018 Transit Connect (CHC) Canada/United States of America, CG3709en enUSA, Edition date: 201704, First Printing Audio SystemE156662
CD
GEF
B
A
Page 276 of 449
HD Radio Technology manufactured under
license from iBiquity Digital Corp. U.S. and
foreign patents. HD Radio and the HD and
HD Radio logos are proprietary trademarks
of iBiquity Digital Corp. Ford Motor
Company and iBiquity Digital Corp. are not
responsible for the content sent using HD
Radio technology. Content may be
changed, added or deleted at any time at
the station owner's discretion.
SATELLITE RADIO
SIRIUS® broadcasts a variety of music,
news, sports, weather, traffic and
entertainment satellite radio channels. For
more information and a complete list of
SIRIUS satellite radio channels, visit
www.siriusxm.com in the United States,
www.siriusxm.ca in Canada, or call SIRIUS
at 1-888-539-7474.
Note:
This receiver includes the eCos
real-time operating system. eCos is
published under the eCos License.
Satellite Radio Reception Factors Potential satellite radio reception issues
For optimal reception performance, keep the antenna
clear of snow and ice build-up and keep luggage and other
material as far away from the antenna as possible.
Antenna obstructions
Hills, mountains, tall buildings, bridges, tunnels, freeway
overpasses, parking garages, dense tree foliage and
thunderstorms can interfere with your reception.
Terrain
When you pass a ground-based broadcast-repeating
tower, a stronger signal may overtake a weaker one and
the audio system may mute.
Station overload
Your display may show ACQUIRING . . . to indicate the
interference and the audio system may mute.
Satellite radio signal interfer-
ence
SIRIUS® Satellite Radio Service
Note: SIRIUS reserves the unrestricted right
to change, rearrange, add or delete
programming including canceling, moving
or adding particular channels, and its prices,
at any time, with or without notice to you.
Ford Motor Company shall not be
responsible for any such programming
changes. 273
2018 Transit Connect (CHC) Canada/United States of America, CG3709en enUSA, Edition date: 201704, First Printing Audio SystemE208625
Page 278 of 449
Action
Condition
Message
Contact SIRIUS at 1-888-
539-7474 to resolve
subscription issues.
Your satellite service is no
longer available.
Questions? Call
1-888-539-7474
Use the channel guide to
turn off the Lock or Skip
function on that station.
All the channels in the
selected category are either
skipped or locked.
None found
Check Channel Guide
No action required.
SIRIUS has updated the
channels available for your
vehicle.
Subscription Updated
AUDIO INPUT JACK WARNINGS
Driving while distracted can result in
loss of vehicle control, accident and
injury. We strongly recommend that
you use extreme caution when using any
device or feature that may take your focus
off the road. Your primary responsibility is
the safe operation of your vehicle. We
recommend against the use of any
handheld device while driving and
encourage the use of voice-operated
systems when possible. Make sure you are
aware of all applicable local laws that may
affect the use of electronic devices while
driving. For safety reasons, do not connect
or adjust the settings on your
portable music player while your
vehicle is moving. Store the portable music player in a
secure location, such as the center
console or the glove box, when your
vehicle is in moving. Hard objects may
become projectiles in a collision or sudden
stop, which may increase the risk of serious
injury. The audio extension cable must be
long enough to allow the portable music
player to be safely stored while your
vehicle is moving. The auxiliary input jack allows you to
connect and play music from your portable
music player through your vehicle speakers.
You can use any portable music player
designed for use with headphones. Your
audio extension cable must have male
one-eighth inch (three and one-half
millimeter) connectors at each end.
1. Make sure your vehicle is stationary
with the radio and portable music
players turned off.
2. Plug the extension cable from the portable music player into the auxiliary
input jack.
3. Switch the radio on. Select either a tuned FM station or a CD.
4. Adjust the volume as desired.
5. Switch the portable music player on and adjust its volume to half its
maximum level.
6. Press AUX until LINE or LINE IN
appears in the display. You should hear
music from your device even if it is low.
7. Adjust the volume on your portable music player until it reaches the volume
level of the FM station or CD. Do this
by switching back and forth between
the AUX and FM or CD controls.
275
2018 Transit Connect (CHC) Canada/United States of America, CG3709en enUSA, Edition date: 201704, First Printing Audio System
Page 279 of 449
USB PORT (If Equipped)
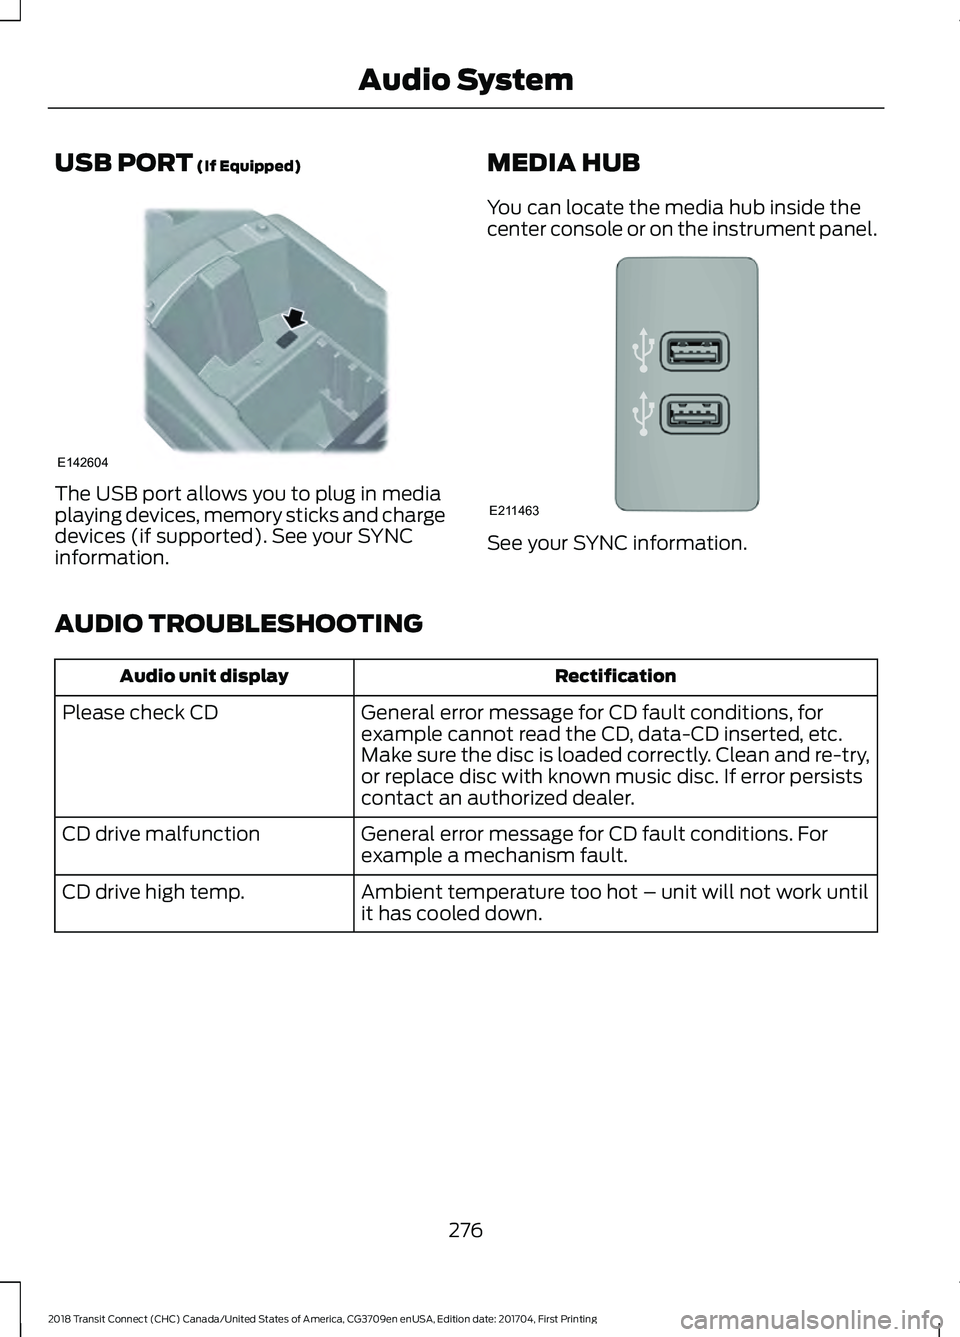
The USB port allows you to plug in media
playing devices, memory sticks and charge
devices (if supported). See your SYNC
information.
MEDIA HUB
You can locate the media hub inside the
center console or on the instrument panel. See your SYNC information.
AUDIO TROUBLESHOOTING Rectification
Audio unit display
General error message for CD fault conditions, for
example cannot read the CD, data-CD inserted, etc.
Make sure the disc is loaded correctly. Clean and re-try,
or replace disc with known music disc. If error persists
contact an authorized dealer.
Please check CD
General error message for CD fault conditions. For
example a mechanism fault.
CD drive malfunction
Ambient temperature too hot – unit will not work until
it has cooled down.
CD drive high temp.
276
2018 Transit Connect (CHC) Canada/United States of America, CG3709en enUSA, Edition date: 201704, First Printing Audio SystemE142604 E211463
Page 282 of 449
System data cannot be accessed without
special equipment and access to the
vehicle's SYNC module. Ford Motor
Company and Ford of Canada will not
access the system data for any purpose
other than as described absent consent, a
court order, or where required by law
enforcement, other government
authorities, or other third parties acting
with lawful authority. Other parties may
seek to access the information
independently of Ford Motor Company and
Ford of Canada. For further privacy
information, see the section on 911 Assist.
See SYNC™ Applications and Services
(page 293). USING VOICE RECOGNITION
This system helps you control many
features using voice commands. This
allows you to keep your hands on the
wheel and focus on what is around you.
Initiating a Voice Session Press the voice button. A list of
available voice commands
appears in the display.
Global Voice Commands
These voice commands are always
available. You can say them at any time. Global voice commands
This command ends the voice session. You
can also cancel a session by holding the
voice button for two or more seconds.
(cancel | exit)
This command provides you with hints,
examples and instructions.
help
This command restarts the voice session
from the initial starting point.
(main menu | start again)
You can say any of the voice commands that appear within open and close brackets that
are separated by |. For example, where; (cancel | exit) appears you say; cancel or exit.
Helpful Hints
• Make sure the interior of your vehicle is
as quiet as possible. Wind noise from
open windows and road vibrations may
prevent the system from correctly
recognizing spoken commands.
• Before giving a voice command, wait
for the system announcement to finish,
followed by a single tone. Any
command spoken before this does not
register with the system. •
Speak naturally, without long pauses
between words.
• You can interrupt the system at any
time while it is speaking by pressing the
voice button. You can cancel a voice
session by pressing and holding the
voice button.
279
2018 Transit Connect (CHC) Canada/United States of America, CG3709en enUSA, Edition date: 201704, First Printing SYNC™E142599
Page 284 of 449
To adjust this setting press the voice button, when prompted say:
Action and Description
Voice Command
voice settings
Then any of the following: When enabled, this feature will prompt you
to confirm any voice initiated call command
prior to the call being placed.
phone confirmation on
The system will make a best guess; you
may still occasionally be asked to confirm
settings.
phone confirmation off
Changing the Voice Settings
In addition to using voice commands to
change the voice settings, you can also use
the menu in the audio display.
To change the voice settings press the
Menu button then select: Menu Item
SYNC-Settings
Voice settings
Note: Depending on the current climate
control settings, the fan speed may
automatically go down while issuing voice
commands or while making and receiving
phone calls via SYNC to reduce the amount
of background noise in the vehicle. The fan
speed will automatically return to normal
operation once the voice session ends. Fan
speed can also be adjusted normally during
a voice session, simply press fan buttons (or
turn fan knob) to increase or decrease fan
speed to desired setting. To disable this automatic fan speed
reduction feature during voice sessions,
press and hold the climate control AC and
Recirculated air buttons simultaneously,
release and then increase fan speed within
2 seconds. To re-enable this feature, repeat
the above sequence.
USING SYNC™ WITH YOUR
PHONE
Hands-free calling is one of the main
features of SYNC. While the system
supports a variety of features, many are
dependent on your cellular phone's
functionality. At a minimum, most cellular
phones with Bluetooth wireless technology
support the following functions:
•
Answering an incoming call.
• Ending a call.
• Using privacy mode.
• Dialing a number.
• Redialing.
• Call waiting notification.
• Caller ID.
281
2018 Transit Connect (CHC) Canada/United States of America, CG3709en enUSA, Edition date: 201704, First Printing SYNC™
Page 285 of 449
Other features, such as text messaging
using Bluetooth and automatic phonebook
download, are phone-dependent features.
To check your phone's compatibility, see
your phone's manual and visit
www.SYNCMyRide.com,
www.SYNCMyRide.ca or
www.syncmaroute.ca.
Pairing a Phone for the First Time
Wirelessly pairing your phone with SYNC
allows you to make and receive hands-free
calls.
Note:
SYNC can support downloading up
to approximately 4000 entries per
Bluetooth-enabled cellular phone.
Note: Make sure to switch on the ignition
and the radio. Shift the transmission into
park (P) for automatic transmission or first
gear for manual transmission.
Using the Audio System
Note: To scroll through the menus, press
the up and down arrows on your audio
system.
1. Make sure to switch on your phone's Bluetooth feature before starting the
search. See your device's manual if
necessary.
2. Press the PHONE button. When the
audio display indicates there is no
paired phone, select the option to add.
3. When a message to begin pairing appears in the audio display, search for
SYNC on your phone to start the pairing
process. 4. When prompted on your cell phone
’s
display, confirm that the PIN provided
by SYNC matches the PIN displayed
on your cell phone. Your phone is now
paired and the display indicates that
the pairing was successful. If you are
prompted to enter a PIN on your device,
enter the PIN displayed on the screen.
The display indicates when the pairing
is successful.
Depending on your phone's capability and
your market, the system may prompt you
with questions, such as setting the current
phone as the primary phone (the phone
SYNC automatically tries to connect with
first upon vehicle start-up) and
downloading your phonebook.
Using Voice Commands Make sure to switch on your
phone's Bluetooth feature
before starting the search. See
your device's manual if necessary.
Press the voice and when prompted
say: Action and Descrip-
tion
Voice Command
Follow the instruc-
tions on the audio
display.
(pair ([Bluetooth]
device | phone |
Bluetooth audio) |
add phone)
You can say any of the voice commands
that appear within open and close brackets
that are separated by |. For example,
where; (what's | what is) appears you say;
what's or what is.
The commands that have [ ] around the
word means that the word is optional.
282
2018 Transit Connect (CHC) Canada/United States of America, CG3709en enUSA, Edition date: 201704, First Printing SYNC™E142599
Page 286 of 449
Depending on your phone's capability and
your market, the system may prompt you
with questions, such as setting the current
phone as the primary phone (the phone
SYNC automatically tries to connect with
first upon vehicle start-up) and
downloading your phonebook.
Pairing Subsequent Phones
Note:
Make sure to switch on the ignition
and the radio. Shift the transmission into
park (P) for automatic transmission or first
gear for manual transmission.
Note: To scroll through the menus, press
the up and down arrows on your audio
system.
1. Make sure to switch on your phone's Bluetooth feature before starting the
search. See your device's manual if
necessary.
2. Press the PHONE button.
3. Select the option for Bluetooth Devices.
4. Press the
OK button.
5. Select the option to add. This starts the pairing process.
6. When a message to begin pairing appears in the audio display, search for
SYNC on your device.
7. When prompted on your cell phone ’s
display, confirm that the PIN provided
by SYNC matches the PIN displayed
on your cell phone. Your phone is now
paired and the display indicates that
the pairing was successful. If you are
prompted to enter a PIN on your device,
enter the PIN displayed on the screen.
The display indicates when the pairing
is successful. SYNC may prompt you with more cell
phone options. Your cell phone may also
prompt you to give SYNC permission to
access information. For more information
on your cell phone
’s capability, see your
cell phone ’s manual and visit the website.
Phone Voice Commands Press the voice button. When
prompted, say any of the
following:
Voice Command
(phone | Blackberry | iPhone)
Then say any of the following:
call (___)
call ___ at home
call ___ ((in|at) [the] office | at work)
call ___ on (cell | mobile)
call ___ on other 1
dial [[a] number]
2
([go to] privacy | transfer to phone
| privacy on)
2
(hold call [on] | place call on hold)
2
join (calls | call)
2
mute call [on]
2
(mute call off | un-mute call)
(turn ringer on | silent mode off)
(turn ringer off | silent mode [on])
283
2018 Transit Connect (CHC) Canada/United States of America, CG3709en enUSA, Edition date: 201704, First Printing SYNC™E142599