reset FORD TRANSIT CONNECT 2019 User Guide
[x] Cancel search | Manufacturer: FORD, Model Year: 2019, Model line: TRANSIT CONNECT, Model: FORD TRANSIT CONNECT 2019Pages: 493, PDF Size: 7.43 MB
Page 145 of 493
Vehicles with Keyless Start
See Push Button Ignition Switch (page
135).
Failure to Start
Vehicles with an Ignition Key
If the engine does not crank when the
ignition key is turned to position III:
1. Fully press the brake pedal.
2. Turn the key to position III until the engine has started.
Note: The total cranking time without
engine start is limited to prevent the starter
motor overheating. That limit is a function
of number of crank attempts and duration.
Once the limit is exceded, further cranking
is inhibited until after a period of time, for
example 15 to 30 minutes.
Vehicles with Keyless Start
See
Push Button Ignition Switch (page
135).
Automatic Shutdown
This feature automatically shuts down
your vehicle if it has been idling for an
extended period. The ignition also turns
off in order to save battery power. Before
your vehicle shuts down, a message
appears in the information display showing
a timer counting down from 30 seconds.
If you do not intervene within 30 seconds,
your vehicle shuts down. Another message
appears in the information display to
inform you that your vehicle has shut down
in order to save fuel. Start your vehicle as
you normally do.
Automatic Shutdown Override
Note: You cannot permanently switch off
the automatic shutdown feature. If you
switch it off, it turns on each time you switch
the ignition on. You can stop the shutdown, or reset the
timer, at any point before the 30-second
countdown has expired by doing any of the
following:
•
You can reset the timer by interacting
with your vehicle (such as pressing the
brake pedal or accelerator pedal).
• You can temporarily switch off the
shutdown feature any time the ignition
is on (for the current ignition cycle
only). Use the information display to
do so. See
Information Displays
(page 92).
• During the countdown before
shutdown, you are prompted to press
OK or RESET (depending on your type
of information display) to temporarily
switch the feature off (for the current
ignition cycle only).
Stopping the Engine When Your
Vehicle is Stationary
Vehicles with an Ignition Key
1. Shift into park (P).
2. Turn the key to position
0.
3. Apply the parking brake.
Vehicles with Keyless Start
See
Push Button Ignition Switch (page
135).
Stopping the Engine When Your
Vehicle is Moving WARNING:
Switching off the engine
when your vehicle is still moving results in
a significant decrease in braking
assistance. Higher effort is required to
apply the brakes and to stop your vehicle.
A significant decrease in steering
assistance could also occur. The steering
does not lock, but higher effort could be
141
2019 Transit Connect (CHC) Canada/United States of America, CG3739en enUSA, Edition date: 201804, First-Printing Starting and Stopping the Engine
Page 161 of 493
3. Apply the parking brake.
4. Fully open the fuel filler door.
5. Check the fuel tank filler valve for any
debris that may be restricting its
movement.
6. Remove any debris from the fuel tank filler valve.
7. Fully insert a fuel pump nozzle or the fuel filler funnel provided with your
vehicle into the fuel filler pipe. See
Fuel Filler Funnel Location (page
153). This action should dislodge any
debris that may be preventing the fuel
tank filler valve from fully closing.
8. Remove the fuel pump nozzle or fuel filler funnel from the fuel filler pipe.
9. Fully close the fuel filler door.
Note: The message may not immediately
reset. If the message continues to appear
and a warning lamp illuminates, have your
vehicle checked as soon as possible.
FUEL CONSUMPTION
Advertised Capacity
The advertised capacity is the maximum
amount of fuel that you can add to the fuel
tank after running out of fuel. Included in
the advertised capacity is an empty
reserve. The empty reserve is an
unspecified amount of fuel that remains
in the fuel tank when the fuel gauge
indicates empty.
Note: The amount of fuel in the empty
reserve varies and should not be relied upon
to increase driving range.
Fuel Economy
Your vehicle calculates fuel economy
figures through the trip computer average
fuel function. See
General Information
(page 92). The first
1,000 mi (1,500 km) of driving is
the break-in period of the engine. A more
accurate measurement is obtained after
2,000 mi (3,000 km)
.
Impacting Fuel Economy
• Incorrect tire inflation pressures.
• Fully loading your vehicle.
• Carrying unnecessary weight.
• Adding certain accessories to your
vehicle such as bug deflectors, rollbars
or light bars, running boards and ski
racks.
• Using fuel blended with alcohol. See
Fuel Quality
(page 151).
• Fuel economy may decrease with lower
temperatures.
• Fuel economy may decrease when
driving short distances.
• You may get better fuel economy when
driving on flat terrain than when driving
on hilly terrain.
157
2019 Transit Connect (CHC) Canada/United States of America, CG3739en enUSA, Edition date: 201804, First-Printing Fuel and Refueling
Page 201 of 493
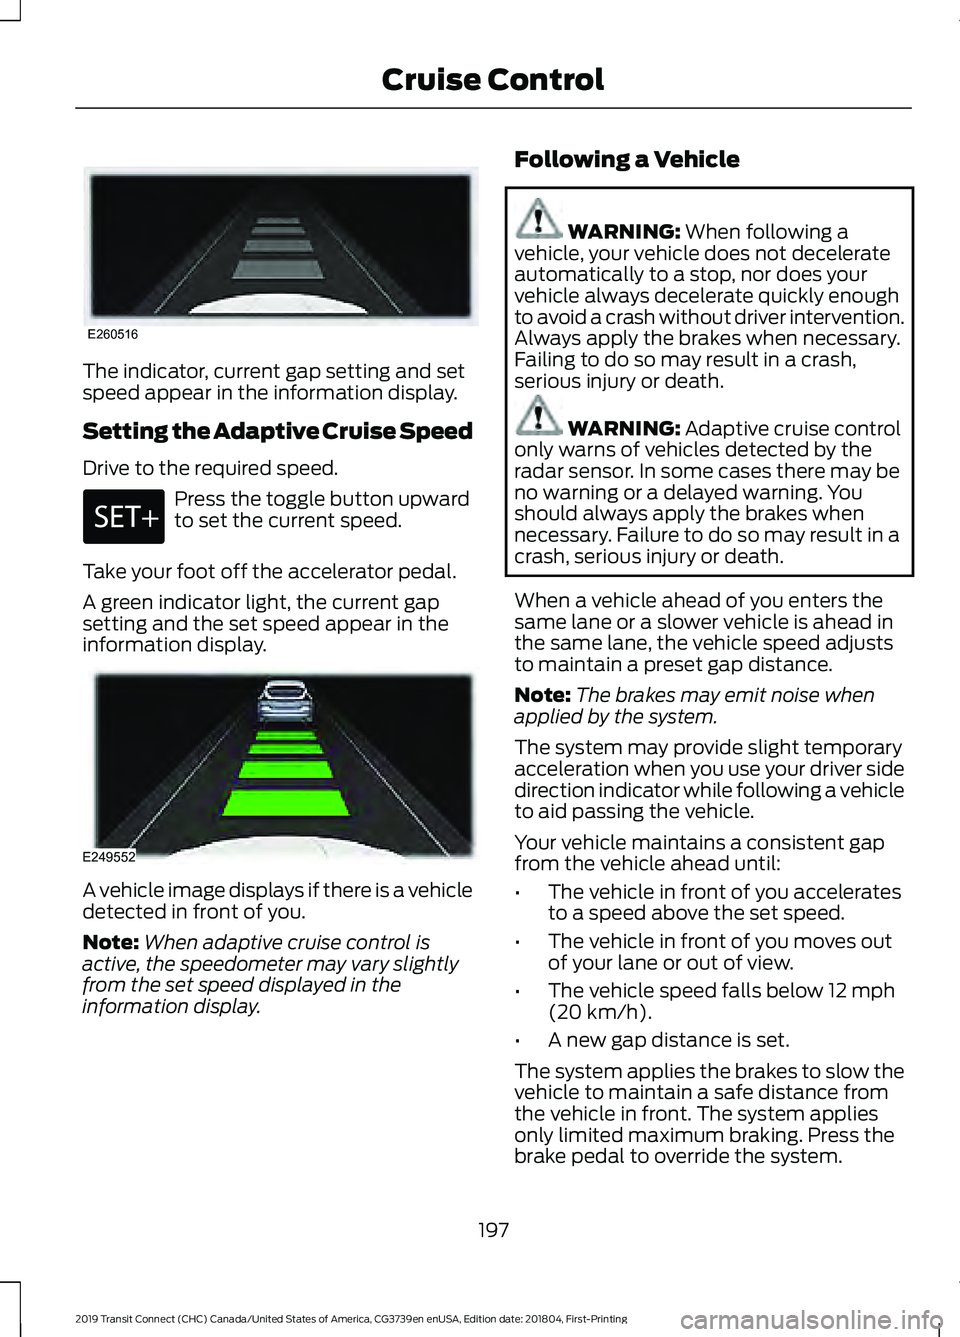
The indicator, current gap setting and set
speed appear in the information display.
Setting the Adaptive Cruise Speed
Drive to the required speed.
Press the toggle button upward
to set the current speed.
Take your foot off the accelerator pedal.
A green indicator light, the current gap
setting and the set speed appear in the
information display. A vehicle image displays if there is a vehicle
detected in front of you.
Note:
When adaptive cruise control is
active, the speedometer may vary slightly
from the set speed displayed in the
information display. Following a Vehicle WARNING: When following a
vehicle, your vehicle does not decelerate
automatically to a stop, nor does your
vehicle always decelerate quickly enough
to avoid a crash without driver intervention.
Always apply the brakes when necessary.
Failing to do so may result in a crash,
serious injury or death. WARNING:
Adaptive cruise control
only warns of vehicles detected by the
radar sensor. In some cases there may be
no warning or a delayed warning. You
should always apply the brakes when
necessary. Failure to do so may result in a
crash, serious injury or death.
When a vehicle ahead of you enters the
same lane or a slower vehicle is ahead in
the same lane, the vehicle speed adjusts
to maintain a preset gap distance.
Note: The brakes may emit noise when
applied by the system.
The system may provide slight temporary
acceleration when you use your driver side
direction indicator while following a vehicle
to aid passing the vehicle.
Your vehicle maintains a consistent gap
from the vehicle ahead until:
• The vehicle in front of you accelerates
to a speed above the set speed.
• The vehicle in front of you moves out
of your lane or out of view.
• The vehicle speed falls below
12 mph
(20 km/h).
• A new gap distance is set.
The system applies the brakes to slow the
vehicle to maintain a safe distance from
the vehicle in front. The system applies
only limited maximum braking. Press the
brake pedal to override the system.
197
2019 Transit Connect (CHC) Canada/United States of America, CG3739en enUSA, Edition date: 201804, First-Printing Cruise ControlE260516 E249552
Page 209 of 493
Resetting Driver Alert
You can reset the system by:
•
Switching the ignition off and on when
your vehicle is stationary.
• Opening and closing the driver door
when your vehicle is stationary.
Driver Alert System Messages Action
Message
Displays when we recommend that you take a break due to
low alertness levels.
Driver Alert Warning Rest
Suggested
Displays when you must take a break due to low alertness
levels.
Driver Alert Warning Rest
Now
LANE KEEPING SYSTEM WARNING: The system is designed
to aid the driver. It is not intended to
replace your attention and judgment. You
are still responsible to drive with due care
and attention. WARNING:
At all times, you are
responsible for controlling your vehicle,
supervising the system and intervening, if
required. Failure to take care may result in
the loss of control of your vehicle, serious
personal injury or death. WARNING:
The system may not
function if the sensor is blocked. WARNING:
The sensor may
incorrectly track lane markings as other
structures or objects. This can result in a
false or missed warning. WARNING:
In cold and severe
weather conditions the system may not
function. Rain, snow and spray can all limit
sensor performance. WARNING:
Large contrasts in
outside lighting can limit sensor
performance. WARNING:
The system will not
operate if the sensor cannot track the road
lane markings. WARNING:
If damage occurs in the
immediate area surrounding the sensor,
have your vehicle checked as soon as
possible. WARNING:
The system may not
correctly operate if your vehicle is fitted
with a suspension kit not approved by us.
The system is designed to alert you by
providing a temporary steering torque input
or steering wheel vibration when it detects
an unintended lane departure. The system
detects and tracks the road lane markings
using a camera mounted behind the
interior mirror. The system only operates
when the vehicle speed is greater than
approximately
40 mph (65 km/h). You
can view the system status in the
instrument cluster.
Note: The system works when the camera
can detect at least one lane marking.
205
2019 Transit Connect (CHC) Canada/United States of America, CG3739en enUSA, Edition date: 201804, First-Printing Driving Aids
Page 218 of 493
Note:
The system only indicates the
efficiency level for the current trip. The
system resets each time you switch the
ignition on.
Eco Mode System Display
You can view the instantaneous efficiency
level or the trip summary in the information
display. Instantaneous Efficiency Level
The display ring increases as the
instantaneous efficiency level increases
and illuminates when it reaches maximum
efficiency. The level continuously updates
to indicate the efficiency level for the
current trip.
To view the instantaneous efficiency level, use the information display controls
on the steering wheel to select the following: Action
Menu Item
Press the menu button.
MyView
Press the OK button.
Eco Coach
Trip Summary
The calculated trip summary is shown as
three colored bars. The bars travel from
left to right as the calculated efficiency
levels increase. The bars indicate the
average efficiency level for acceleration,
deceleration and speed during the total
distance traveled by your vehicle for the
current trip.
To view the trip summary, use the information display controls on the steering
wheel to select the following: Action
Menu Item
Press the menu button.
MyView
Press the OK button. Press it again to view the trip summary.
Eco Coach
214
2019 Transit Connect (CHC) Canada/United States of America, CG3739en enUSA, Edition date: 201804, First-Printing Driving Aids
Page 271 of 493
Only use oils certified for gasoline engines
by the American Petroleum Institute (API).
An oil with this trademark symbol
conforms to the current engine and
emission system protection standards and
fuel economy requirements of the
International Lubricants Specification
Advisory Committee (ILSAC).
To top up the engine oil level do the
following:
1. Clean the area surrounding the engine
oil filler cap before you remove it.
2. Remove the engine oil filler cap. See Under Hood Overview (page 262).
Turn it counterclockwise and remove
it.
3. Add engine oil that meets Ford specifications. See
Capacities and
Specifications (page 340). You may
have to use a funnel to pour the engine
oil into the opening.
4. Recheck the oil level.
5. If the oil level is correct, replace the dipstick and make sure it is fully seated.
6. Replace the engine oil filler cap. Turn it clockwise until you feel a strong
resistance.
Note: Do not add oil further than the
maximum mark. Oil levels above the
maximum mark may cause engine damage. Note:
Make sure you install the oil filler cap
correctly.
Note: Soak up any spillage with an
absorbent cloth immediately.
OIL CHANGE INDICATOR
RESET
Only reset the system after changing the
engine oil and oil filter.
Resetting the Oil Life Monitoring
System
1. Switch the ignition on. Do not start the
engine.
2. Fully press the accelerator and brake pedals at the same time.
3. Keep the accelerator and brake pedals
fully pressed.
4. After three seconds, a message appears confirming that the reset is in
progress.
5. After 25 seconds, a message appears confirming that the reset is complete.
6. Release the accelerator and brake pedals.
7. Switch the ignition off.
ENGINE COOLING FAN -
GASOLINE WARNING:
Keep your hands and
clothing clear of the engine cooling fan.
Under certain conditions, the engine
cooling fan may continue to run for several
minutes after you switch your vehicle off.
267
2019 Transit Connect (CHC) Canada/United States of America, CG3739en enUSA, Edition date: 201804, First-Printing MaintenanceE142732
Page 274 of 493
Do not add extra inhibitors or additives to
the coolant. These can be harmful and
compromise the corrosion protection of
the coolant.
Recycled Coolant
We do not recommend the use of recycled
coolant as an approved recycling process
is not yet available.
Dispose of used engine coolant in an
appropriate manner. Follow your
community's regulations and standards
for recycling and disposing of automotive
fluids.
Severe Climates
If you drive in extremely cold climates:
•
It may be necessary to increase the
coolant concentration above 50%.
• A coolant concentration of 60%
provides improved freeze point
protection. Coolant concentrations
above 60% decrease the overheat
protection characteristics of the
coolant and may cause engine
damage.
If you drive in extremely hot climates:
• You can decrease the coolant
concentration to 40%.
• Coolant concentrations below 40%
decrease the freeze and corrosion
protection characteristics of the
coolant and may cause engine
damage.
Vehicles driven year-round in non-extreme
climates should use prediluted coolant for
optimum cooling system and engine
protection. Coolant Change
At specific mileage intervals, as listed in
the scheduled maintenance information,
the coolant should be changed. Add
prediluted coolant approved to the correct
specification.
Fail-Safe Cooling
Fail-safe cooling allows you to temporarily
drive your vehicle before any incremental
component damage occurs. The fail-safe
distance depends on ambient
temperature, vehicle load and terrain.
How Fail-Safe Cooling Works
If the engine begins to overheat,
the coolant temperature gauge
moves toward the red zone:
A warning lamp illuminates and
a message may appear in the
information display.
If the engine reaches a preset
over-temperature condition, the engine
automatically switches to alternating
cylinder operation. Each disabled cylinder
acts as an air pump and cools the engine.
When this occurs, your vehicle still
operates, however:
• Engine power is limited.
• The air conditioning system turns off.
Continued operation increases the engine
temperature, causing the engine to
completely shut down. Your steering and
braking effort increases in this situation.
When the engine temperature cools, you
can re-start the engine. Have your vehicle
checked as soon as possible to minimize
engine damage.
270
2019 Transit Connect (CHC) Canada/United States of America, CG3739en enUSA, Edition date: 201804, First-Printing Maintenance
Page 278 of 493
Note:
See an authorized dealer for low
voltage battery access, testing, or
replacement.
When a low voltage battery replacement
is necessary, see an authorized dealer to
replace the low voltage battery with a Ford
recommended replacement low voltage
battery that matches the electrical
requirements of the vehicle.
To ensure proper operation of the battery
management system (BMS), do not allow
a technician to connect any electrical
device ground connection directly to the
low voltage battery negative post. A
connection at the low voltage battery
negative post can cause inaccurate
measurements of the battery condition
and potential incorrect system operation.
Note: If a person adds electrical or
electronic accessories or components to the
vehicle, the accessories or components may
adversely affect the low voltage battery
performance and durability and may also
affect the performance of other electrical
systems in the vehicle.
For longer, trouble-free operation, keep the
top of the battery clean and dry. Also,
make certain the battery cables are always
tightly fastened to the battery terminals.
If you see any corrosion on the battery or
terminals, remove the cables from the
terminals and clean with a wire brush. You
can neutralize the acid with a solution of
baking soda and water.
When a battery replacement is required,
the battery should only be replaced with
a Ford recommended replacement battery
that matches the electrical requirements
of the vehicle.
Because your vehicle ’s engine is
electronically-controlled by a computer,
some engine control settings are
maintained by power from the low voltage
battery. Some engine computer settings,
like the idle trim and fuel trim strategy, optimize the driveability and performance
of the engine. Some other computer
settings, like the clock and radio station
presets, are also maintained in memory by
power from the low voltage battery. When
a technician disconnects and connects the
low voltage battery, these settings are
erased. Complete the following procedure
in order to restore the settings:
1. With the vehicle at a complete stop,
set the parking brake.
2. Shift the transmission into park (P).
3. Switch off all accessories.
4. Fully press the brake pedal and start the vehicle.
5. Run the engine until it reaches normal operating temperature. While the
engine is warming up, complete the
following: Reset the clock. See Audio
System (page 352). Reset the power
windows bounce-back feature. See
Windows and Mirrors
(page 83).
Reset the radio station presets. See
Audio System
(page 352).
6. Allow the engine to idle for at least one
minute. If the engine turns off, press
the accelerator pedal to start the
engine.
7. While the engine is running, press the brake pedal and shift into neutral (N).
8. Allow the engine to run for at least one
minute by pressing on the accelerator
pedal.
9. Drive the vehicle at least 12 mi (20 km)
to completely relearn the idle and fuel
trim strategy.
Note: If you do not allow the engine to
relearn the idle and fuel trim strategy, the
idle quality of your vehicle may be adversely
affected until the engine computer
eventually relearns the idle trim and fuel
trim strategy.
274
2019 Transit Connect (CHC) Canada/United States of America, CG3739en enUSA, Edition date: 201804, First-Printing Maintenance
Page 297 of 493
Engine
•
Change the engine oil and filter prior to
storage because used engine oil
contains contaminates which may
cause engine damage.
• Start the engine every 15 days for a
minimum of 15 minutes. Run at fast idle
with the climate controls set to defrost
until the engine reaches normal
operating temperature.
• With your foot on the brake, shift
through all the gears while the engine
is running.
• We recommend that you change the
engine oil before you use your vehicle
again.
Fuel system
• Fill the fuel tank with high-quality fuel
until the first automatic shutoff of the
fuel pump nozzle.
Cooling system
• Protect against freezing temperatures.
• When removing your vehicle from
storage, check coolant fluid level.
Confirm that there are no cooling
system leaks and that fluid is at the
recommended level.
Battery
• Check and recharge as necessary. Keep
connections clean.
• If storing your vehicle for more than 30
days without recharging the battery,
we recommend that you disconnect
the battery cables to maintain battery
charge for quick starting.
Note: It is necessary to reset memory
features if battery cables are disconnected. Brakes
•
Make sure the brakes and parking brake
release fully.
Tires
• Maintain recommended air pressure.
Miscellaneous
• Make sure all linkages, cables, levers
and pins under your vehicle are covered
with grease to prevent rust.
• Move vehicles at least 25 ft (7.5 m)
every 15 days to lubricate working parts
and prevent corrosion.
Removing Vehicle From Storage
When your vehicle is ready to come out of
storage, do the following:
• Wash your vehicle to remove any dirt
or grease film build-up on window
surfaces.
• Check windshield wipers for any
deterioration.
• Check under the hood for any foreign
material that may have collected
during storage such as mice or squirrel
nests.
• Check the exhaust for any foreign
material that may have collected
during storage.
• Check tire pressures and set tire
inflation per the Tire Label.
• Check brake pedal operation. Drive
your vehicle
15 ft (4.5 m) back and
forth to remove rust build-up.
• Check fluid levels (including coolant,
oil and gas) to make sure there are no
leaks, and fluids are at recommended
levels.
• If you remove the battery, clean the
battery cable ends and check for
damage.
293
2019 Transit Connect (CHC) Canada/United States of America, CG3739en enUSA, Edition date: 201804, First-Printing Vehicle Care
Page 318 of 493
Highway Hazards
No matter how carefully you drive
there is always the possibility that
you may eventually have a flat tire
on the highway. Drive slowly to the
closest safe area out of traffic.
This may further damage the flat
tire, but your safety is more
important.
If you feel a sudden vibration or
ride disturbance while driving, or
you suspect your tire or vehicle
has been damaged, immediately
reduce your speed. Drive with
caution until you can safely pull
off the road. Stop and inspect the
tires for damage. If a tire is
under-inflated or damaged,
deflate it, remove wheel and
replace it with your spare tire and
wheel. If you cannot detect a
cause, have the vehicle towed to
the nearest repair facility or tire
dealer to have the vehicle
inspected.
Tire and Wheel Alignment
A bad jolt from hitting a curb or
pothole can cause the front end
of your vehicle to become
misaligned or cause damage to
your tires. If your vehicle seems to
pull to one side when you are
driving, the wheels may be out of
alignment. Have an authorized
dealer check the wheel alignment
periodically.
Wheel misalignment in the front
or the rear can cause uneven and
rapid treadwear of your tires and
should be corrected by an
authorized dealer. Front-wheel
drive vehicles and those with an
independent rear suspension (if
equipped) may require alignment
of all four wheels.
The tires should also be balanced
periodically. An unbalanced tire
and wheel assembly may result in
irregular tire wear.
Tire Rotation
WARNING: If the tire label
shows different tire pressures for
the front and rear tires and the
vehicle is equipped with a tire
pressure monitoring system, then
the settings for the system
sensors need to be updated.
Always perform the system reset
procedure after tire rotation. If the
system is not reset, it may not
provide a low tire pressure
warning when necessary. See Tire
Pressure Monitoring System
(page
316).
Note: If your tires show uneven
wear ask an authorized dealer to
check for and correct any wheel
misalignment, tire imbalance or
mechanical problem involved
before tire rotation.
314
2019 Transit Connect (CHC) Canada/United States of America, CG3739en enUSA, Edition date: 201804, First-Printing Wheels and Tires