tow FORD TRANSIT CONNECT 2020 User Guide
[x] Cancel search | Manufacturer: FORD, Model Year: 2020, Model line: TRANSIT CONNECT, Model: FORD TRANSIT CONNECT 2020Pages: 509, PDF Size: 7.73 MB
Page 58 of 509
GENERAL INFORMATION ON
RADIO FREQUENCIES
This device complies with Part 15 of the
FCC Rules and with Licence exempt RSS
Standards of Industry Canada. Operation
is subject to the following two conditions:
•
This device may not cause harmful
interference, and
• This device must accept any
interference received, including
interference that may cause undesired
operation. WARNING: Changes or
modifications not expressively approved
by the party responsible for compliance
could void the user's authority to operate
the equipment. The term "IC:" before the
radio certification number only signifies
that Industry Canada technical
specifications were met.
The typical operating range for your
transmitter is approximately
33 ft (10 m).
Vehicles with the remote start feature will
have a greater range. One of the following
could cause a decrease in operating range:
• Weather conditions.
• Nearby radio towers.
• Structures around the vehicle.
• Other vehicles parked next to your
vehicle.
Other short distance radio transmissions,
for example amateur radios, medical
equipment, wireless headphones, remote
controls and alarm systems can also use
the radio frequency used by your remote
control. If the frequencies are jammed, you
will not be able to use your remote control.
You can lock and unlock the doors with the
key. Note:
Make sure to lock your vehicle before
leaving it unattended.
Note: If you are in range, the remote control
will operate if you press any button
unintentionally.
Note: The remote control contains sensitive
electrical components. Exposure to moisture
or impact may cause permanent damage.
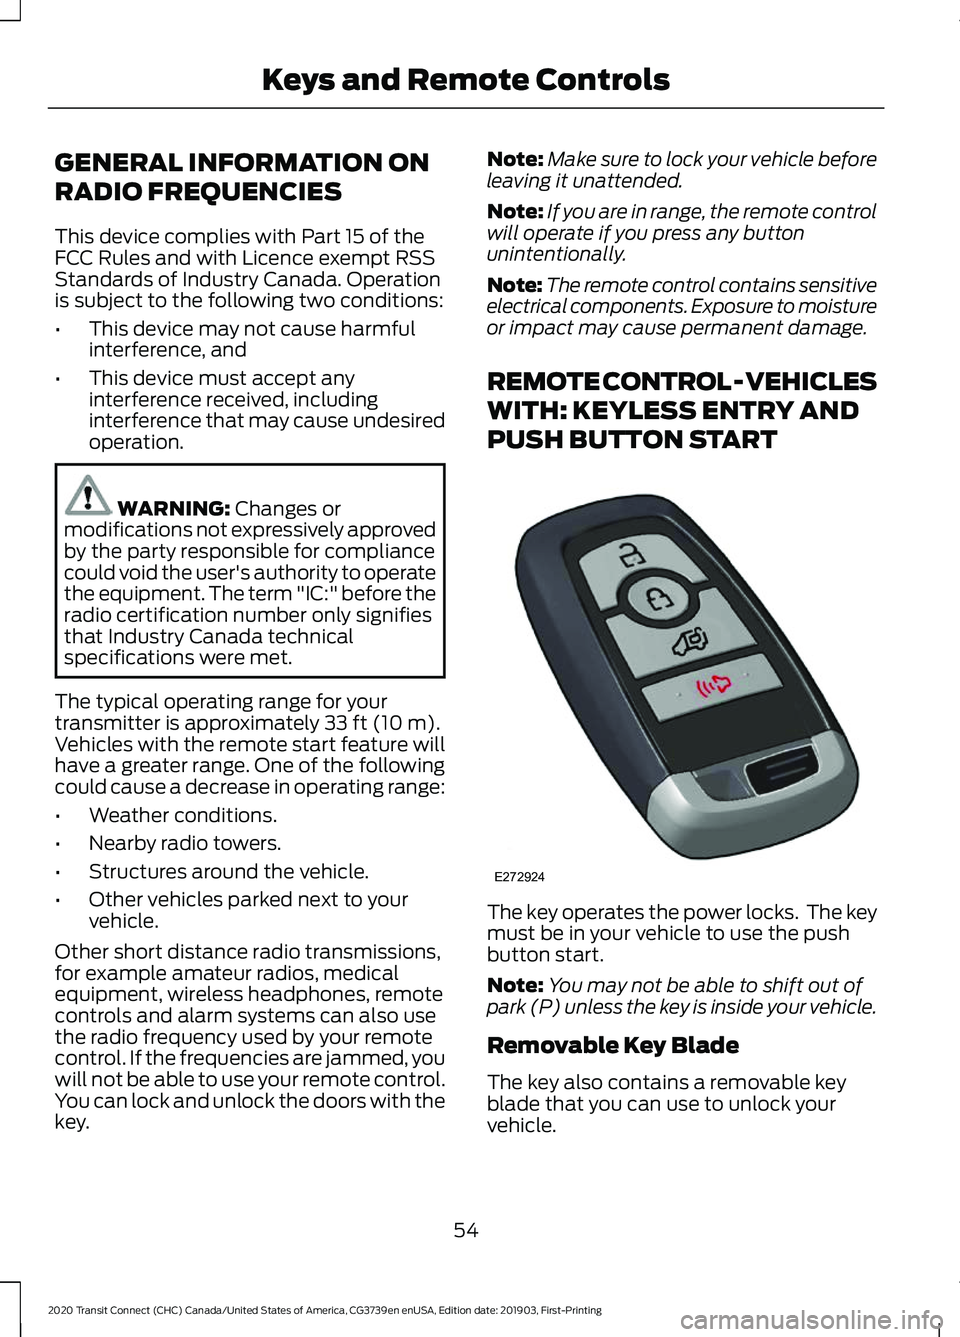
REMOTE CONTROL - VEHICLES
WITH: KEYLESS ENTRY AND
PUSH BUTTON START The key operates the power locks. The key
must be in your vehicle to use the push
button start.
Note:
You may not be able to shift out of
park (P) unless the key is inside your vehicle.
Removable Key Blade
The key also contains a removable key
blade that you can use to unlock your
vehicle.
54
2020 Transit Connect (CHC) Canada/United States of America, CG3739en enUSA, Edition date: 201903, First-Printing Keys and Remote ControlsE272924
Page 71 of 509
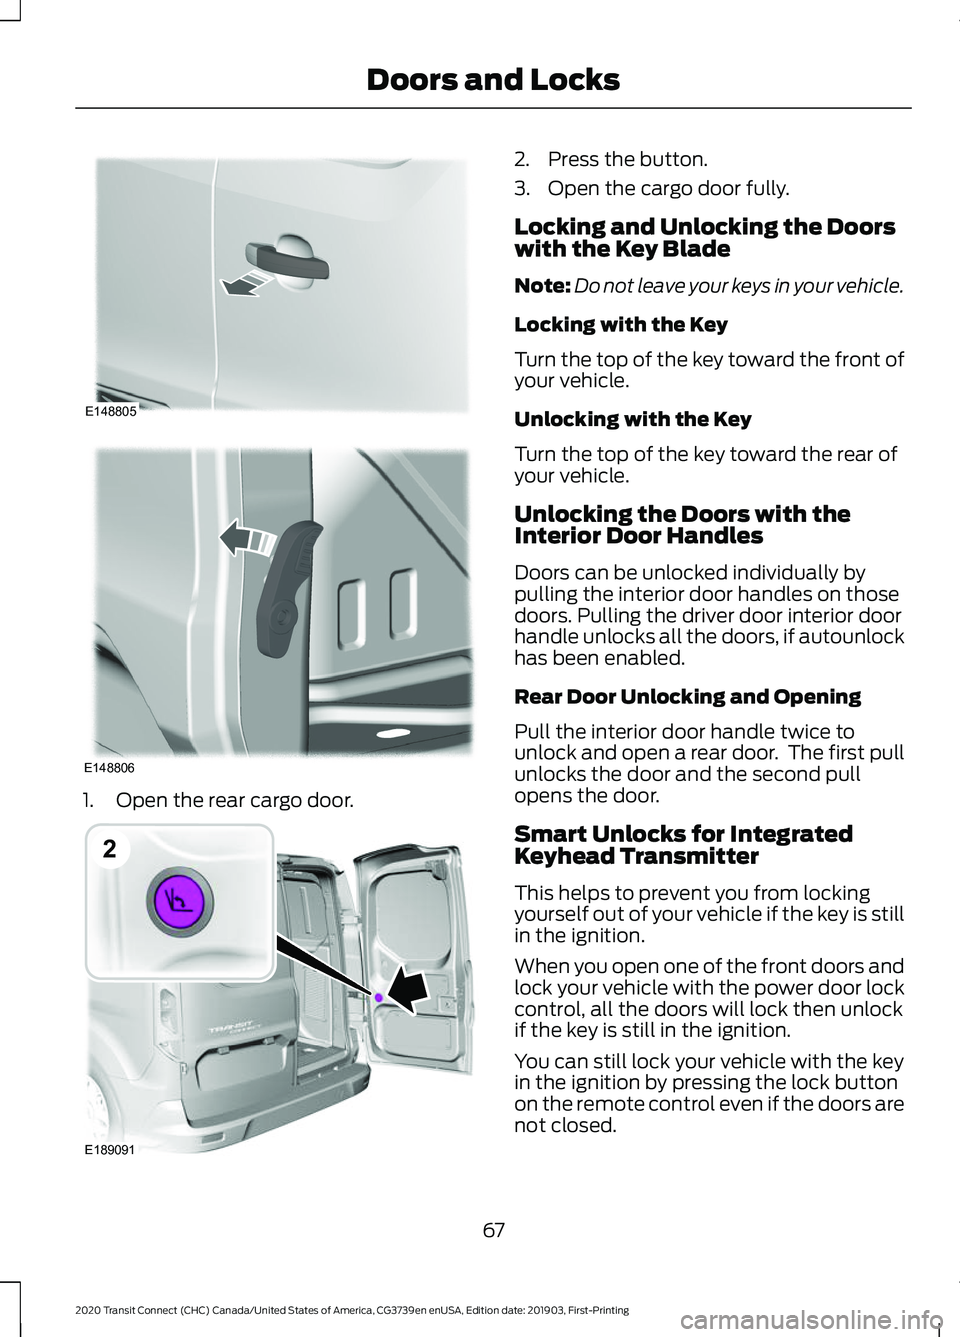
1. Open the rear cargo door. 2. Press the button.
3. Open the cargo door fully.
Locking and Unlocking the Doors
with the Key Blade
Note:
Do not leave your keys in your vehicle.
Locking with the Key
Turn the top of the key toward the front of
your vehicle.
Unlocking with the Key
Turn the top of the key toward the rear of
your vehicle.
Unlocking the Doors with the
Interior Door Handles
Doors can be unlocked individually by
pulling the interior door handles on those
doors. Pulling the driver door interior door
handle unlocks all the doors, if autounlock
has been enabled.
Rear Door Unlocking and Opening
Pull the interior door handle twice to
unlock and open a rear door. The first pull
unlocks the door and the second pull
opens the door.
Smart Unlocks for Integrated
Keyhead Transmitter
This helps to prevent you from locking
yourself out of your vehicle if the key is still
in the ignition.
When you open one of the front doors and
lock your vehicle with the power door lock
control, all the doors will lock then unlock
if the key is still in the ignition.
You can still lock your vehicle with the key
in the ignition by pressing the lock button
on the remote control even if the doors are
not closed.
67
2020 Transit Connect (CHC) Canada/United States of America, CG3739en enUSA, Edition date: 201903, First-Printing Doors and LocksE148805 E148806 E189091
2
Page 78 of 509
PASSIVE ANTI-THEFT
SYSTEM
Note:
The system is not compatible with
non-Ford aftermarket remote start systems.
Use of these systems may result in vehicle
starting problems and a loss of security
protection.
Note: Metallic objects, electronic devices
or a second programmed key on the same
key chain may cause vehicle starting
problems if they are too close to the key
when starting the engine. Prevent these
objects from touching the programmed key
while starting the engine. Switch the ignition
off, move all objects on the key chain away
from the programmed key and restart the
engine if a problem occurs.
Note: Do not leave a duplicate
programmed key in your vehicle. Always
take your keys and lock all doors when
leaving your vehicle.
SecuriLock®
The system is an engine immobilization
system. It is designed to help prevent the
engine from being started unless a
programmed key for your vehicle is used.
Using an incorrectly programmed key may
prevent the engine from starting. A
message may appear in the information
display.
If you are unable to start the engine with a
programmed key, a malfunction has
happened and a message may appear in
the information display.
Automatic Arming
The engine immobilization system arms
immediately after you switch the ignition
off. Automatic Disarming
Switching the ignition on with a
programmed key disarms the engine
immobilization system.
Replacement Keys
If your keys are lost or stolen and you do
not have a spare programmed key, you will
need to have your vehicle towed to an
authorized dealer. You need to erase the
programmed keys from your vehicle and
program new keys.
Store an extra programmed key away from
your vehicle in a safe place to help prevent
any inconveniences. We recommend that
you contact an authorized dealer to
purchase additional spare or replacement
keys.
Note:
Your vehicle comes with two keys.
Programming a Remote Flip Key
The procedure programs both the vehicle
immobilizer keycode and the remote entry
portion of the remote control to your
vehicle.
To program a new key, you require two
programmed keys and one unprogrammed
key with you in your vehicle.
We recommend that you contact an
authorized dealer to have the key
programmed if you do not have two
programmed keys.
Make sure that you complete the
procedure within 30 seconds.
Stop and wait for at least one minute
before you start again if you miss a step.
Note: You can program a maximum of six
keys to your vehicle.
Read the entire procedure before you
begin.
1. Close all the doors.
74
2020 Transit Connect (CHC) Canada/United States of America, CG3739en enUSA, Edition date: 201903, First-Printing Security
Page 80 of 509

6. Press the push button ignition switch.
7. Wait five seconds.
8. Press the push button ignition switch.
9. Remove the key.
10. Within 10 seconds, place the second
programmed key in the backup
position.
11. Press the push button ignition switch.
12. Wait five seconds.
13. Press the push button ignition switch.
14. Remove the key.
15. Within 10 seconds, place the unprogrammed key in the backup
position.
16. Press the push button ignition switch.
Check that the remote control function
operate with the new key.
Note: Wait 10 seconds and repeat the
procedure if the key functions do not
operate.
Wait 20 seconds and repeat the procedure
to program an additional key.
ANTI-THEFT ALARM
Alarm System (If Equipped)
Your vehicle may have one of the following
alarm systems:
• Perimeter Alarm.
• Anti-Theft Alarm with Interior and
Inclination Sensors.
Perimeter Alarm
The perimeter alarm is a deterrent against
unauthorized access to your vehicle
through the doors, luggage compartment
and the hood. Interior Sensors
The interior sensors are in the overhead
console.
When you lock your vehicle and arm the
alarm, the sensors are designed to detect
any movement inside your vehicle.
Note:
Do not cover the interior sensors.
Inclination Sensors
When you lock your vehicle and arm the
alarm, the sensors are designed to detect
an attempt to raise your vehicle, for
example to remove a wheel or to tow it
away.
Triggering the Alarm
Once armed, the alarm is triggered in any
of the following ways:
• If someone opens a door, the liftgate
or the hood without a valid key or
remote control.
• If you switch the ignition on without a
valid key.
• If the interior sensors detect movement
within your vehicle.
If the alarm is triggered, the alarm horn will
sound for 30 seconds and the hazard
warning flashers will flash for five minutes.
Any further attempts to carry out one of
the above will trigger the alarm again.
Full Guard and Reduced Guard
Full Guard
Full guard is the standard setting.
In full guard, the interior sensors are on
when you arm the alarm.
Note: Do not arm the alarm with full guard
if passengers, animals or other moving
objects are inside your vehicle.
76
2020 Transit Connect (CHC) Canada/United States of America, CG3739en enUSA, Edition date: 201903, First-Printing Security
Page 83 of 509
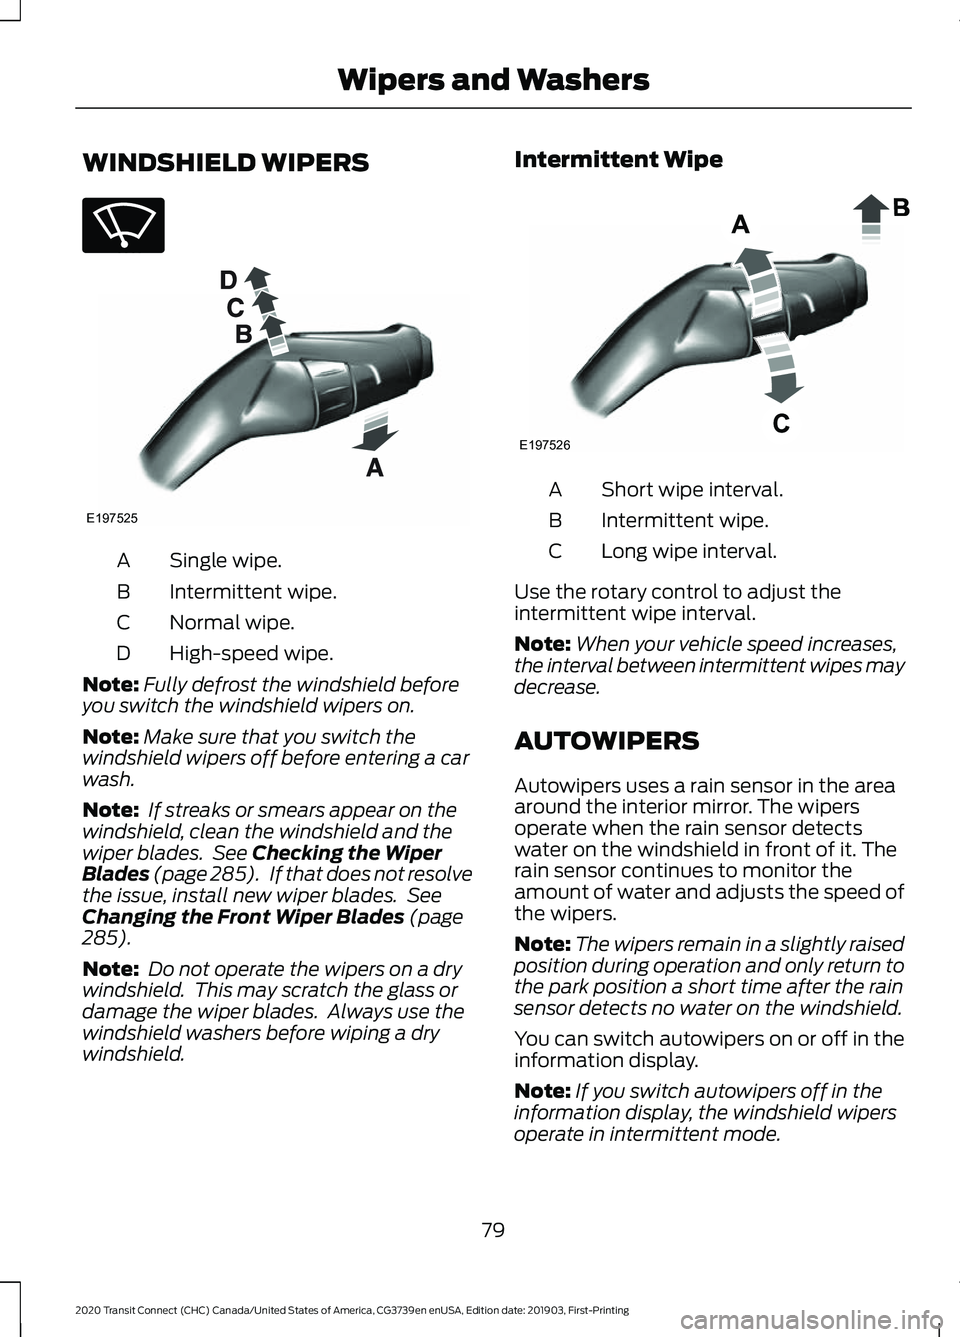
WINDSHIELD WIPERS
Single wipe.
A
Intermittent wipe.
B
Normal wipe.
C
High-speed wipe.
D
Note: Fully defrost the windshield before
you switch the windshield wipers on.
Note: Make sure that you switch the
windshield wipers off before entering a car
wash.
Note: If streaks or smears appear on the
windshield, clean the windshield and the
wiper blades. See Checking the Wiper
Blades (page 285). If that does not resolve
the issue, install new wiper blades. See
Changing the Front Wiper Blades
(page
285).
Note: Do not operate the wipers on a dry
windshield. This may scratch the glass or
damage the wiper blades. Always use the
windshield washers before wiping a dry
windshield. Intermittent Wipe
Short wipe interval.
A
Intermittent wipe.
B
Long wipe interval.
C
Use the rotary control to adjust the
intermittent wipe interval.
Note: When your vehicle speed increases,
the interval between intermittent wipes may
decrease.
AUTOWIPERS
Autowipers uses a rain sensor in the area
around the interior mirror. The wipers
operate when the rain sensor detects
water on the windshield in front of it. The
rain sensor continues to monitor the
amount of water and adjusts the speed of
the wipers.
Note: The wipers remain in a slightly raised
position during operation and only return to
the park position a short time after the rain
sensor detects no water on the windshield.
You can switch autowipers on or off in the
information display.
Note: If you switch autowipers off in the
information display, the windshield wipers
operate in intermittent mode.
79
2020 Transit Connect (CHC) Canada/United States of America, CG3739en enUSA, Edition date: 201903, First-Printing Wipers and WashersE270969 E197525 E197526
Page 84 of 509
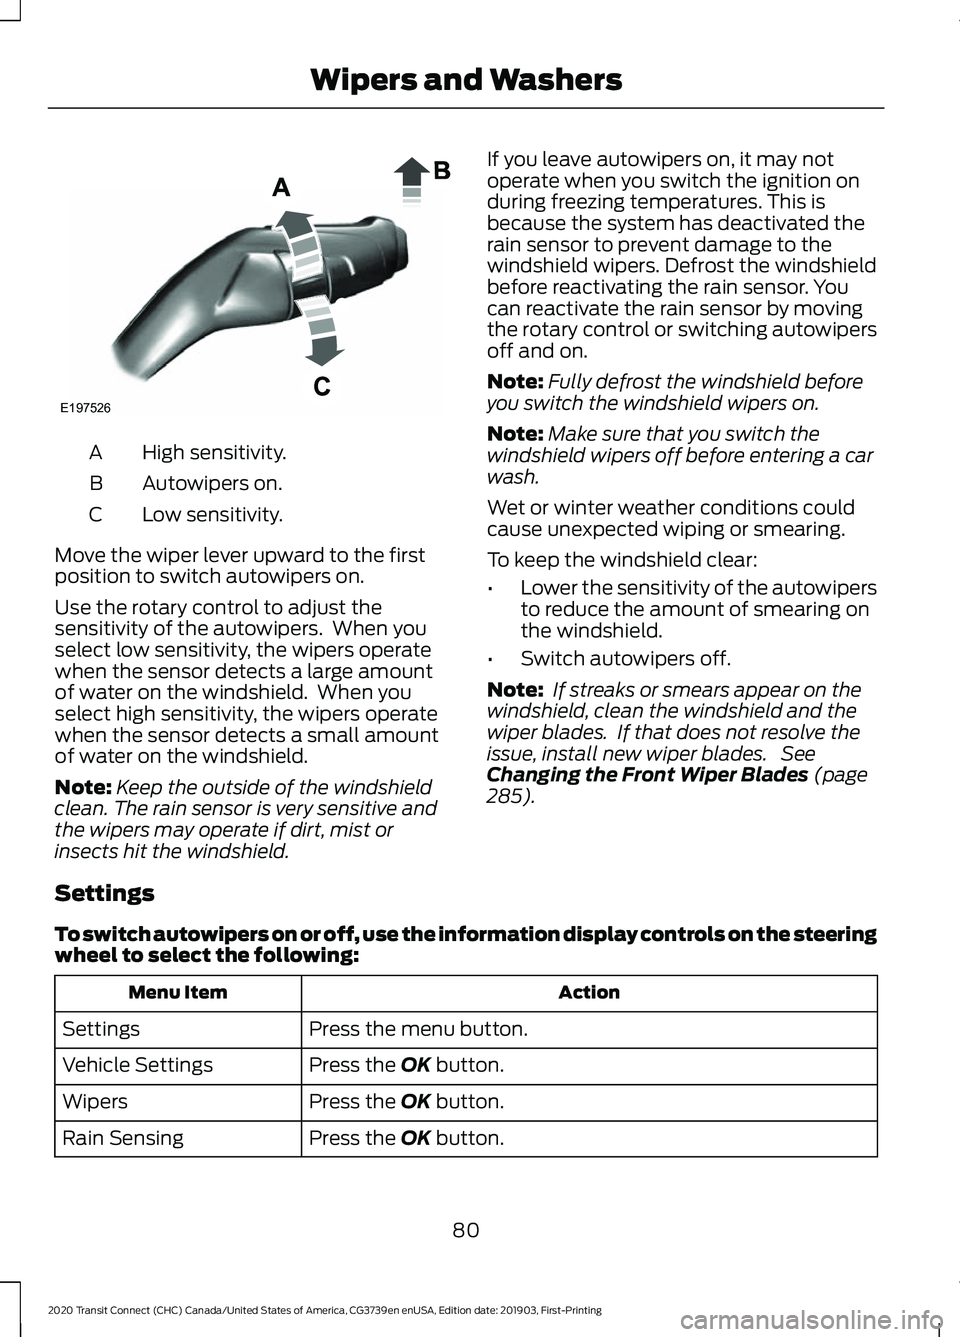
High sensitivity.
A
Autowipers on.
B
Low sensitivity.
C
Move the wiper lever upward to the first
position to switch autowipers on.
Use the rotary control to adjust the
sensitivity of the autowipers. When you
select low sensitivity, the wipers operate
when the sensor detects a large amount
of water on the windshield. When you
select high sensitivity, the wipers operate
when the sensor detects a small amount
of water on the windshield.
Note: Keep the outside of the windshield
clean. The rain sensor is very sensitive and
the wipers may operate if dirt, mist or
insects hit the windshield. If you leave autowipers on, it may not
operate when you switch the ignition on
during freezing temperatures. This is
because the system has deactivated the
rain sensor to prevent damage to the
windshield wipers. Defrost the windshield
before reactivating the rain sensor. You
can reactivate the rain sensor by moving
the rotary control or switching autowipers
off and on.
Note:
Fully defrost the windshield before
you switch the windshield wipers on.
Note: Make sure that you switch the
windshield wipers off before entering a car
wash.
Wet or winter weather conditions could
cause unexpected wiping or smearing.
To keep the windshield clear:
• Lower the sensitivity of the autowipers
to reduce the amount of smearing on
the windshield.
• Switch autowipers off.
Note: If streaks or smears appear on the
windshield, clean the windshield and the
wiper blades. If that does not resolve the
issue, install new wiper blades. See
Changing the Front Wiper Blades (page
285).
Settings
To switch autowipers on or off, use the information display controls on the steering
wheel to select the following: Action
Menu Item
Press the menu button.
Settings
Press the
OK button.
Vehicle Settings
Press the
OK button.
Wipers
Press the
OK button.
Rain Sensing
80
2020 Transit Connect (CHC) Canada/United States of America, CG3739en enUSA, Edition date: 201903, First-Printing Wipers and WashersE197526
Page 85 of 509
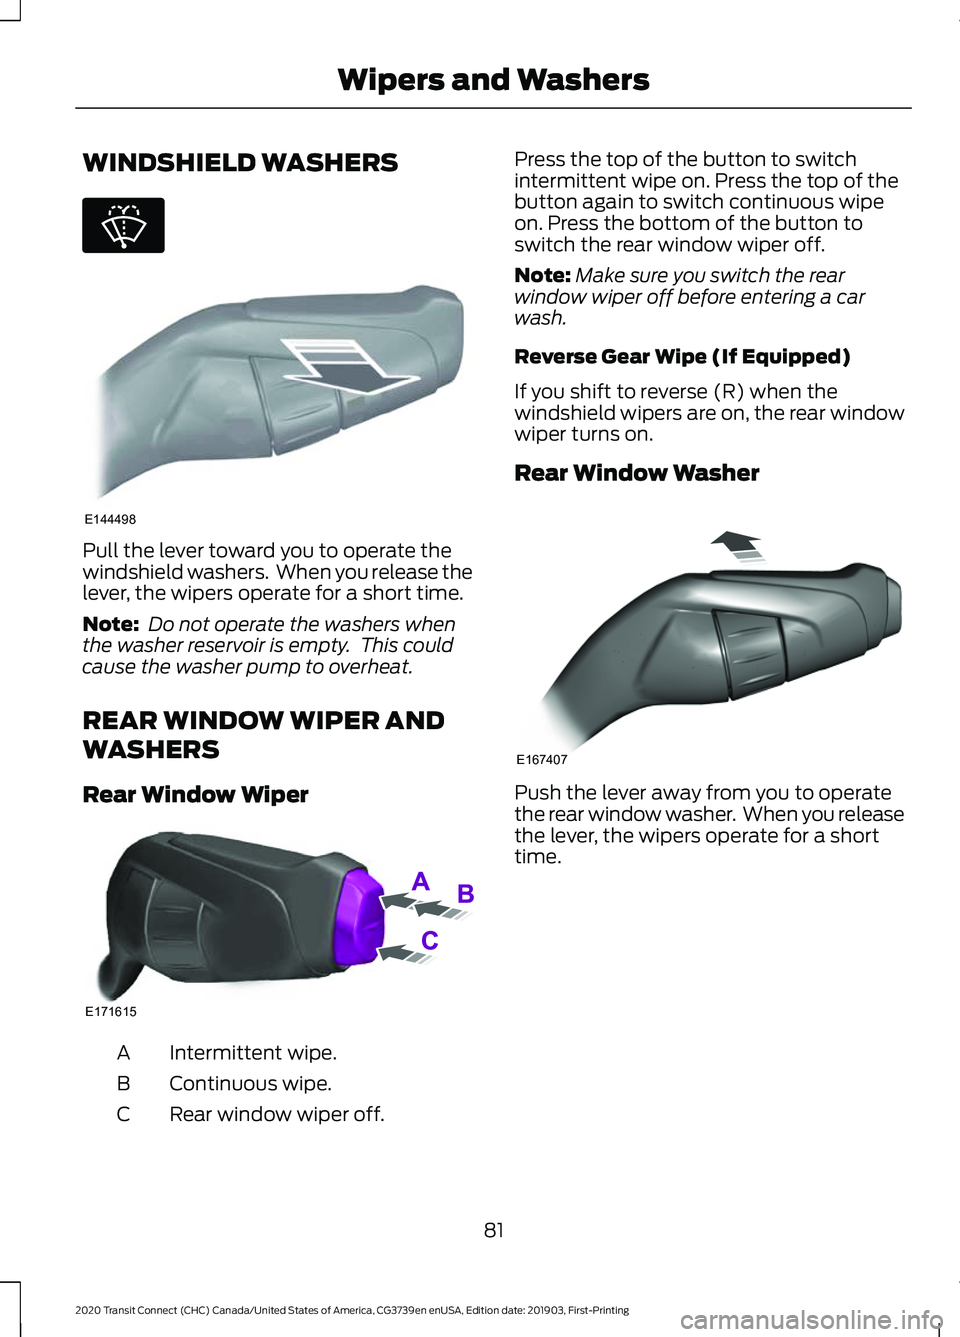
WINDSHIELD WASHERS
Pull the lever toward you to operate the
windshield washers. When you release the
lever, the wipers operate for a short time.
Note:
Do not operate the washers when
the washer reservoir is empty. This could
cause the washer pump to overheat.
REAR WINDOW WIPER AND
WASHERS
Rear Window Wiper Intermittent wipe.
A
Continuous wipe.
B
Rear window wiper off.
C Press the top of the button to switch
intermittent wipe on. Press the top of the
button again to switch continuous wipe
on. Press the bottom of the button to
switch the rear window wiper off.
Note:
Make sure you switch the rear
window wiper off before entering a car
wash.
Reverse Gear Wipe (If Equipped)
If you shift to reverse (R) when the
windshield wipers are on, the rear window
wiper turns on.
Rear Window Washer Push the lever away from you to operate
the rear window washer. When you release
the lever, the wipers operate for a short
time.
81
2020 Transit Connect (CHC) Canada/United States of America, CG3739en enUSA, Edition date: 201903, First-Printing Wipers and WashersE270967 E144498 E171615 E167407
Page 87 of 509
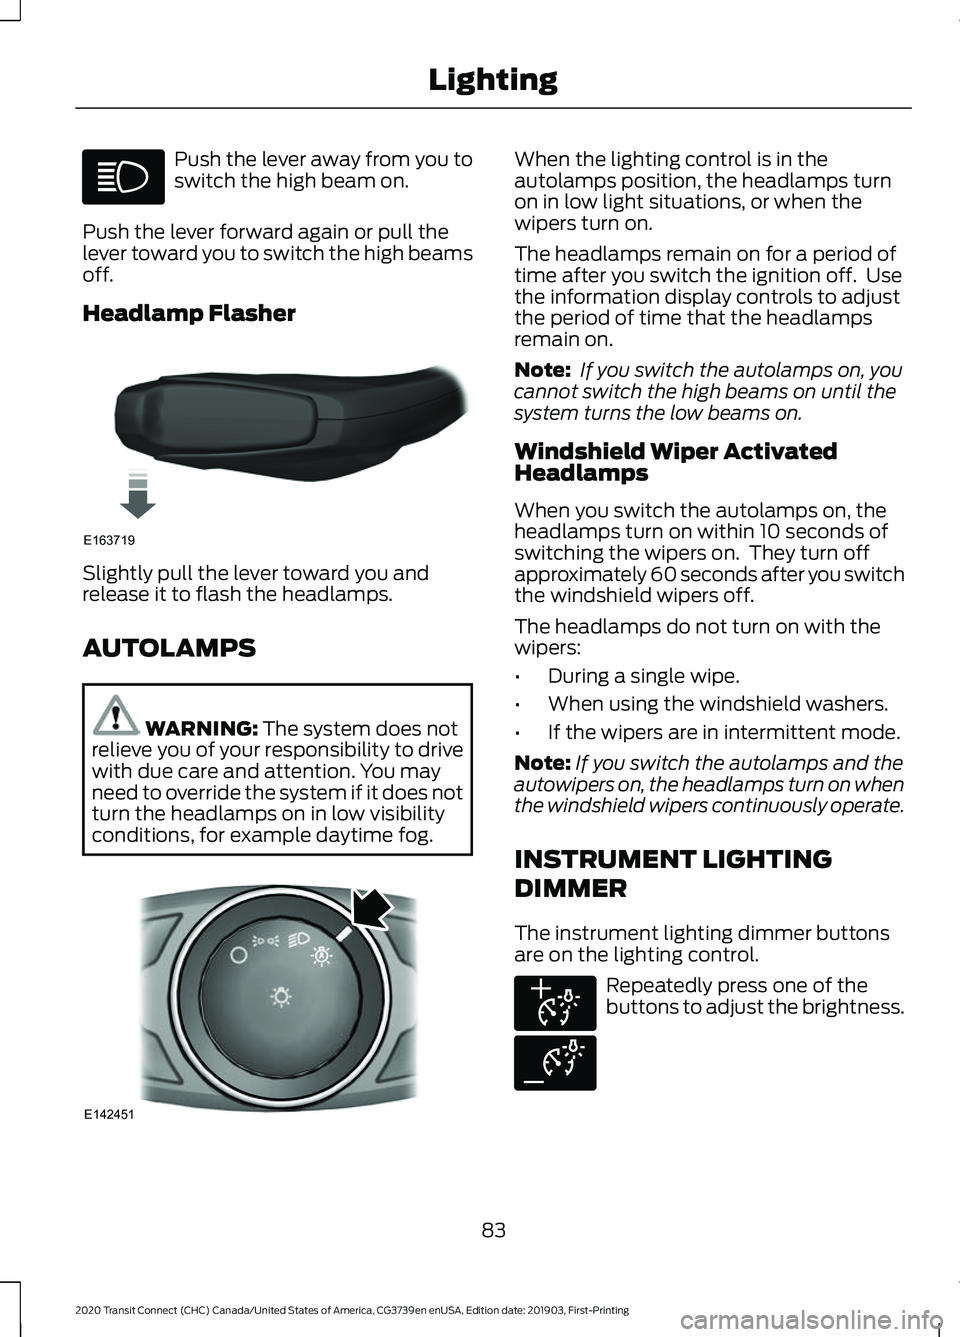
Push the lever away from you to
switch the high beam on.
Push the lever forward again or pull the
lever toward you to switch the high beams
off.
Headlamp Flasher Slightly pull the lever toward you and
release it to flash the headlamps.
AUTOLAMPS
WARNING: The system does not
relieve you of your responsibility to drive
with due care and attention. You may
need to override the system if it does not
turn the headlamps on in low visibility
conditions, for example daytime fog. When the lighting control is in the
autolamps position, the headlamps turn
on in low light situations, or when the
wipers turn on.
The headlamps remain on for a period of
time after you switch the ignition off. Use
the information display controls to adjust
the period of time that the headlamps
remain on.
Note:
If you switch the autolamps on, you
cannot switch the high beams on until the
system turns the low beams on.
Windshield Wiper Activated
Headlamps
When you switch the autolamps on, the
headlamps turn on within 10 seconds of
switching the wipers on. They turn off
approximately 60 seconds after you switch
the windshield wipers off.
The headlamps do not turn on with the
wipers:
• During a single wipe.
• When using the windshield washers.
• If the wipers are in intermittent mode.
Note: If you switch the autolamps and the
autowipers on, the headlamps turn on when
the windshield wipers continuously operate.
INSTRUMENT LIGHTING
DIMMER
The instrument lighting dimmer buttons
are on the lighting control. Repeatedly press one of the
buttons to adjust the brightness.
83
2020 Transit Connect (CHC) Canada/United States of America, CG3739en enUSA, Edition date: 201903, First-Printing Lighting E163719 E142451 E291299 E291298
Page 88 of 509
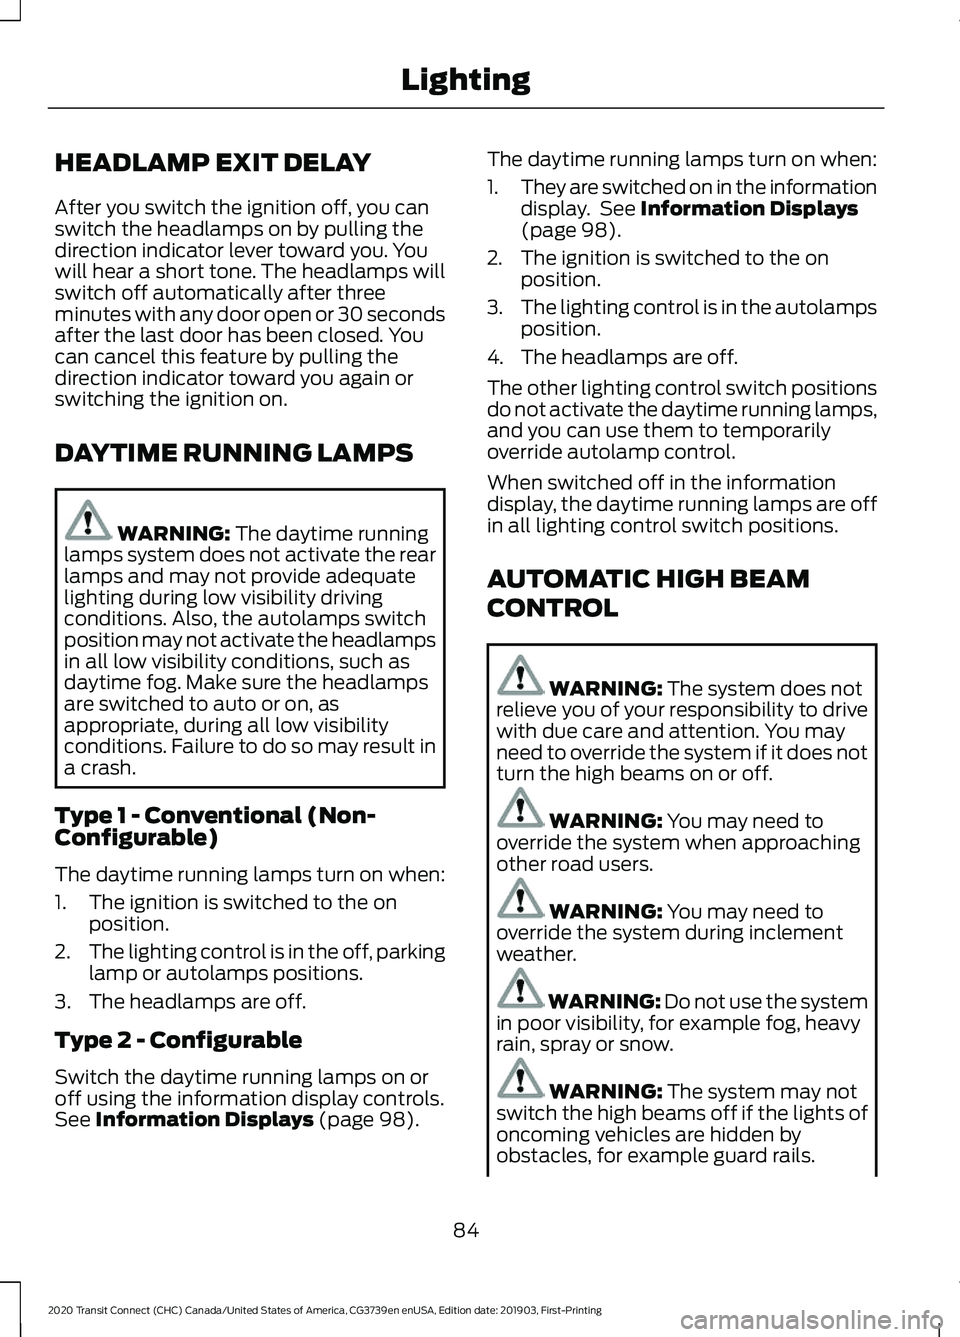
HEADLAMP EXIT DELAY
After you switch the ignition off, you can
switch the headlamps on by pulling the
direction indicator lever toward you. You
will hear a short tone. The headlamps will
switch off automatically after three
minutes with any door open or 30 seconds
after the last door has been closed. You
can cancel this feature by pulling the
direction indicator toward you again or
switching the ignition on.
DAYTIME RUNNING LAMPS
WARNING: The daytime running
lamps system does not activate the rear
lamps and may not provide adequate
lighting during low visibility driving
conditions. Also, the autolamps switch
position may not activate the headlamps
in all low visibility conditions, such as
daytime fog. Make sure the headlamps
are switched to auto or on, as
appropriate, during all low visibility
conditions. Failure to do so may result in
a crash.
Type 1 - Conventional (Non-
Configurable)
The daytime running lamps turn on when:
1. The ignition is switched to the on position.
2. The lighting control is in the off, parking
lamp or autolamps positions.
3. The headlamps are off.
Type 2 - Configurable
Switch the daytime running lamps on or
off using the information display controls.
See
Information Displays (page 98). The daytime running lamps turn on when:
1.
They are switched on in the information
display. See
Information Displays
(page 98).
2. The ignition is switched to the on position.
3. The lighting control is in the autolamps
position.
4. The headlamps are off.
The other lighting control switch positions
do not activate the daytime running lamps,
and you can use them to temporarily
override autolamp control.
When switched off in the information
display, the daytime running lamps are off
in all lighting control switch positions.
AUTOMATIC HIGH BEAM
CONTROL WARNING:
The system does not
relieve you of your responsibility to drive
with due care and attention. You may
need to override the system if it does not
turn the high beams on or off. WARNING:
You may need to
override the system when approaching
other road users. WARNING:
You may need to
override the system during inclement
weather. WARNING:
Do not use the system
in poor visibility, for example fog, heavy
rain, spray or snow. WARNING:
The system may not
switch the high beams off if the lights of
oncoming vehicles are hidden by
obstacles, for example guard rails.
84
2020 Transit Connect (CHC) Canada/United States of America, CG3739en enUSA, Edition date: 201903, First-Printing Lighting
Page 95 of 509
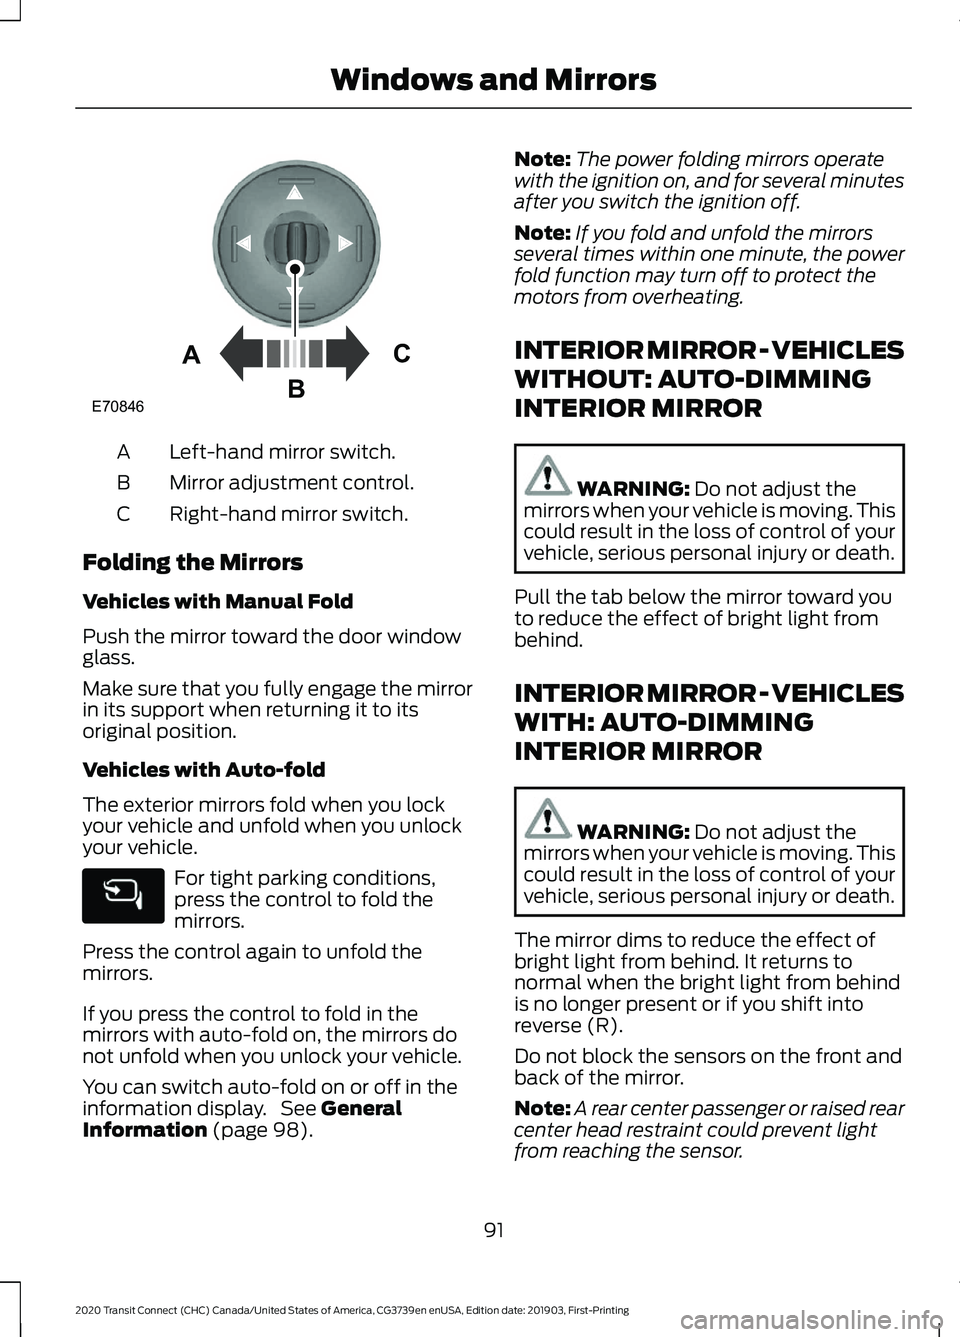
Left-hand mirror switch.
A
Mirror adjustment control.
B
Right-hand mirror switch.
C
Folding the Mirrors
Vehicles with Manual Fold
Push the mirror toward the door window
glass.
Make sure that you fully engage the mirror
in its support when returning it to its
original position.
Vehicles with Auto-fold
The exterior mirrors fold when you lock
your vehicle and unfold when you unlock
your vehicle. For tight parking conditions,
press the control to fold the
mirrors.
Press the control again to unfold the
mirrors.
If you press the control to fold in the
mirrors with auto-fold on, the mirrors do
not unfold when you unlock your vehicle.
You can switch auto-fold on or off in the
information display. See General
Information (page 98). Note:
The power folding mirrors operate
with the ignition on, and for several minutes
after you switch the ignition off.
Note: If you fold and unfold the mirrors
several times within one minute, the power
fold function may turn off to protect the
motors from overheating.
INTERIOR MIRROR - VEHICLES
WITHOUT: AUTO-DIMMING
INTERIOR MIRROR WARNING:
Do not adjust the
mirrors when your vehicle is moving. This
could result in the loss of control of your
vehicle, serious personal injury or death.
Pull the tab below the mirror toward you
to reduce the effect of bright light from
behind.
INTERIOR MIRROR - VEHICLES
WITH: AUTO-DIMMING
INTERIOR MIRROR WARNING:
Do not adjust the
mirrors when your vehicle is moving. This
could result in the loss of control of your
vehicle, serious personal injury or death.
The mirror dims to reduce the effect of
bright light from behind. It returns to
normal when the bright light from behind
is no longer present or if you shift into
reverse (R).
Do not block the sensors on the front and
back of the mirror.
Note: A rear center passenger or raised rear
center head restraint could prevent light
from reaching the sensor.
91
2020 Transit Connect (CHC) Canada/United States of America, CG3739en enUSA, Edition date: 201903, First-Printing Windows and MirrorsE70846A
C
B