stop start FORD TRANSIT CONNECT 2020 Owner's Guide
[x] Cancel search | Manufacturer: FORD, Model Year: 2020, Model line: TRANSIT CONNECT, Model: FORD TRANSIT CONNECT 2020Pages: 509, PDF Size: 7.73 MB
Page 171 of 509
Continuing to drive your vehicle may cause
reduced power or the engine to stop.
Failure to respond to a warning lamp may
cause component damage not covered by
the vehicle Warranty. Have your vehicle
checked as soon as possible.
See Warning Lamps and Indicators
(page 94).
SELECTIVE CATALYTIC
REDUCTANT SYSTEM
Your vehicle has a selective catalytic
reductant system to help reduce exhaust
emission levels by injecting diesel exhaust
fluid into the exhaust system. The engine
may not start if you tamper with or disable
the selective catalytic reductant system.
For the system to correctly operate, you
must maintain the fluid level. The
minimum fluid refill quantity required to
restart the engine is
1.3 gal (5 L).
Note: If your vehicle is on a gradient, the
minimum fluid refill quantity required to
restart the engine may be greater than
1.3 gal (5 L)
.
Diesel Exhaust Fluid Guidelines
• Do not put in the vehicle fuel tank. This
can cause engine damage not covered
by the vehicle Warranty.
• Do not overfill the tank.
• Do not dilute with water or any other
liquid.
• Do not re-use an empty fluid container. •
Do not store in direct sunlight.
• Store at temperatures between
23°F
(-5°C) and 68°F (20°C).
• Do not store fluid containers in your
vehicle.
• The fluid is non-flammable, non-toxic,
colorless and water-soluble.
Filling the Diesel Exhaust Fluid
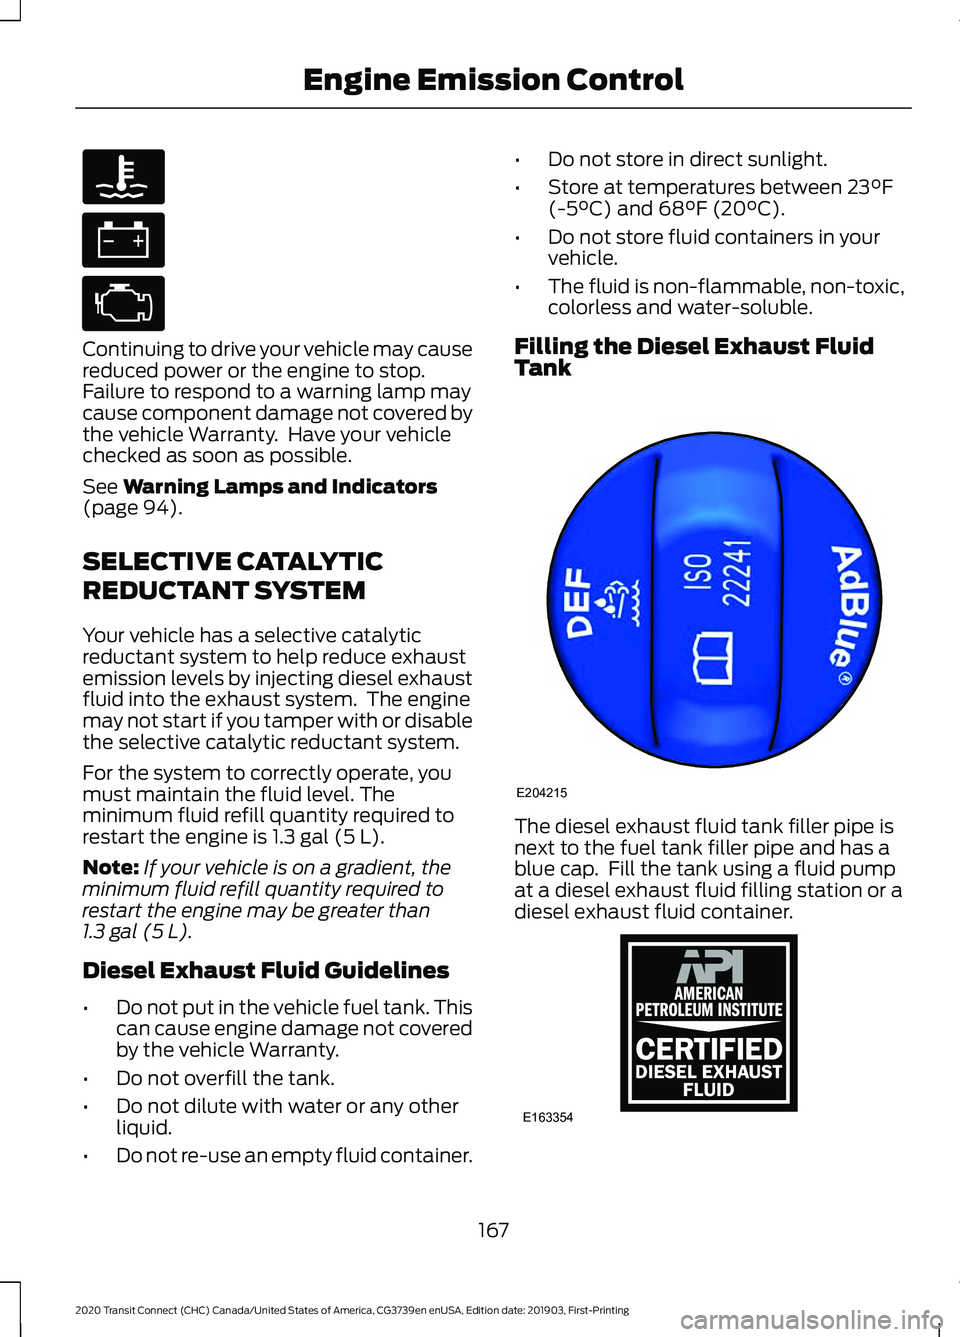
Tank The diesel exhaust fluid tank filler pipe is
next to the fuel tank filler pipe and has a
blue cap. Fill the tank using a fluid pump
at a diesel exhaust fluid filling station or a
diesel exhaust fluid container.
167
2020 Transit Connect (CHC) Canada/United States of America, CG3739en enUSA, Edition date: 201903, First-Printing Engine Emission Control E204215 E163354)E163354
Page 173 of 509
6. Replace the diesel exhaust fluid tank
filler cap. Turn it clockwise until you
feel a strong resistance.
Do not attempt to start the engine if you
have filled the diesel exhaust fluid tank
with incorrect fluid. Incorrect diesel
exhaust fluid use could cause damage not
covered by the vehicle Warranty. Have your
vehicle immediately checked.
Filling the Diesel Exhaust Fluid
Tank Using a Container WARNING: Keep diesel exhaust
fluid out of reach of children. Avoid
contact with skin, eyes or clothing. In
case of contact with your eyes, flush
immediately with water and get prompt
medical attention. In case of contact
with your skin, clean immediately with
soap and water. If you swallow any
diesel exhaust fluid, drink plenty of
water, call a physician immediately. WARNING:
Only refill the diesel
exhaust fluid tank in a well ventilated
area. When you remove the diesel
exhaust fluid tank filler cap or a diesel
exhaust fluid container cap, ammonia
vapors may escape. Ammonia vapors
can be irritating to skin, eyes and mucous
membranes. Inhaling ammonia vapors
can cause burning to the eyes, throat and
nose and cause coughing and watery
eyes.
Always follow the manufacturer's
instructions.
1. Remove the fluid container cap.
2. Place the spout on to the container and
tighten it until you feel a strong
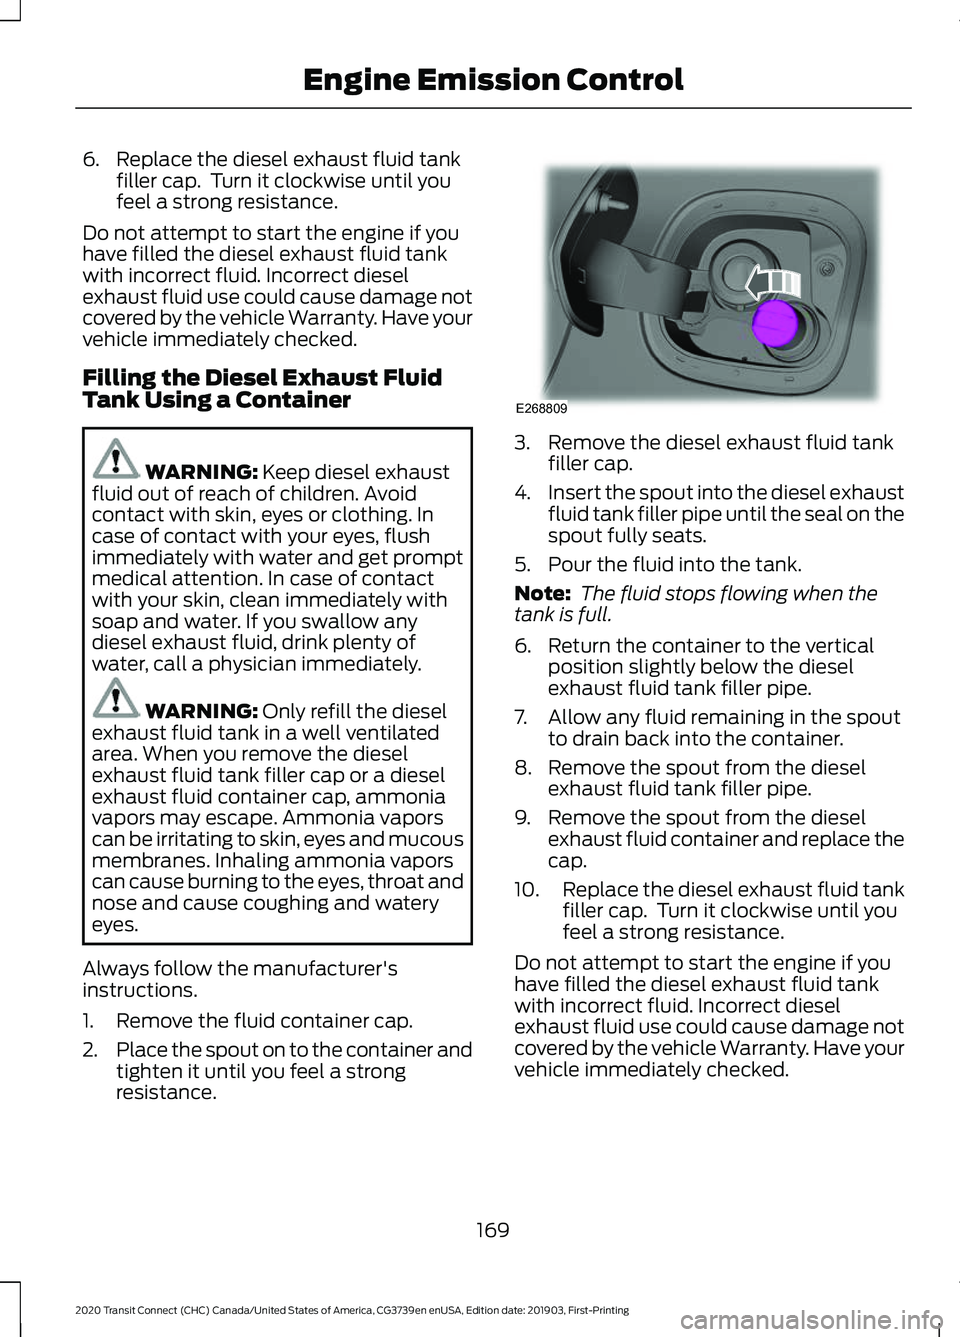
resistance. 3. Remove the diesel exhaust fluid tank
filler cap.
4. Insert the spout into the diesel exhaust
fluid tank filler pipe until the seal on the
spout fully seats.
5. Pour the fluid into the tank.
Note: The fluid stops flowing when the
tank is full.
6. Return the container to the vertical position slightly below the diesel
exhaust fluid tank filler pipe.
7. Allow any fluid remaining in the spout to drain back into the container.
8. Remove the spout from the diesel exhaust fluid tank filler pipe.
9. Remove the spout from the diesel exhaust fluid container and replace the
cap.
10. Replace the diesel exhaust fluid tank
filler cap. Turn it clockwise until you
feel a strong resistance.
Do not attempt to start the engine if you
have filled the diesel exhaust fluid tank
with incorrect fluid. Incorrect diesel
exhaust fluid use could cause damage not
covered by the vehicle Warranty. Have your
vehicle immediately checked.
169
2020 Transit Connect (CHC) Canada/United States of America, CG3739en enUSA, Edition date: 201903, First-Printing Engine Emission ControlE268809
Page 180 of 509
AUTOMATIC TRANSMISSION
- 6-SPEED AUTOMATIC
TRANSMISSION
WARNING: Do not apply the brake
pedal and accelerator pedal
simultaneously. Applying both pedals
simultaneously for more than a few
seconds will limit engine performance,
which may result in difficulty maintaining
speed in traffic and could lead to serious
injury. WARNING:
When your vehicle is
stationary, keep the brake pedal fully
pressed when shifting gears. Failure to
follow this instruction could result in
personal injury, death or property
damage.
Selector Lever Positions
The instrument cluster displays the current
gear.
Park (P)
In park (P), power is not transmitted to the
driven wheels and the transmission is
locked. You can start the engine with the
transmission in this position.
Shift into park (P) only when your vehicle
is stationary.
Reverse (R)
Shift into reverse (R) only when your
vehicle is stationary and the engine is at
idle speed.
Neutral (N)
In neutral (N), power is not transmitted to
the driven wheels but the transmission is
not locked. You can start the engine with
the transmission in this position. Drive (D)
Drive (D) is the normal position for driving.
Sport (S)
In sport (S), the transmission selects the
optimum gear for best performance.
SelectShift™
(If Equipped)
About SelectShift™
Use this feature to upshift or downshift
using the buttons on the selector lever.
Using SelectShift™
Shift into sport (S). Press the
+ button to
switch the feature on.
• Press the
+ button to upshift.
• Press the
– button to downshift.
Shift into another gear to switch the
feature off.
Brake Shift Interlock
About Brake Shift Interlock
Brake shift interlock prevents you from
shifting out of park (P) when you have
switched the ignition on and not pressed
the brake pedal.
Shifting Out of Park (P) WARNING:
Do not drive your
vehicle until you verify that the
stoplamps are working. WARNING:
If the parking brake is
fully released, but the brake warning
lamp remains illuminated, the brakes
may not be working properly. Have your
vehicle checked as soon as possible.
176
2020 Transit Connect (CHC) Canada/United States of America, CG3739en enUSA, Edition date: 201903, First-Printing Transmission
Page 181 of 509
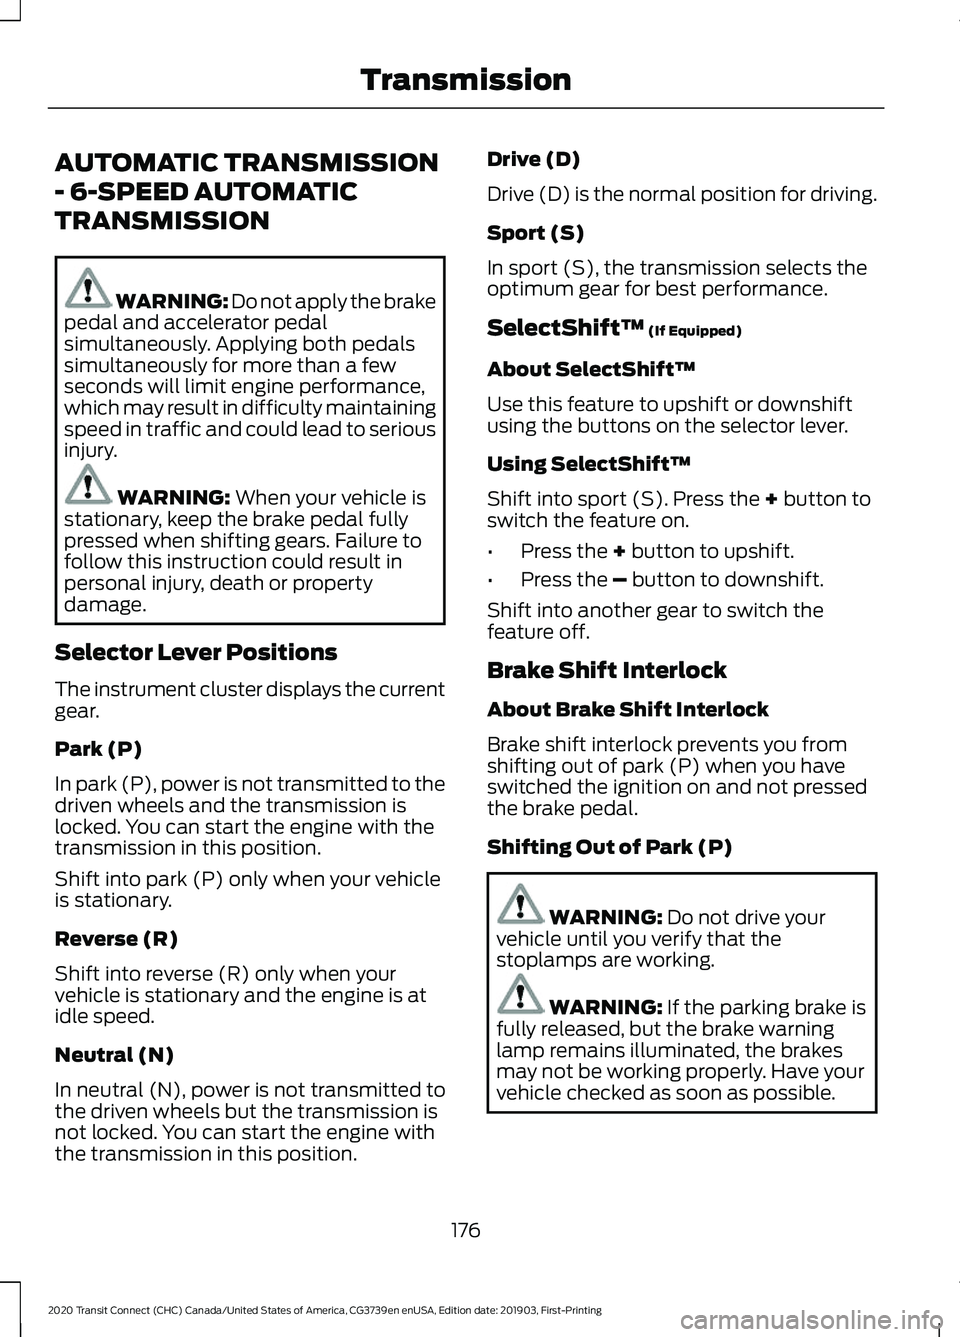
Use the brake shift interlock lever to move
the selector lever out of park (P) if you
cannot start the engine.
In the event of an electrical malfunction,
it is possible that a fuse has blown or the
stoplamps are not working. See Fuse
Specification Chart (page 264).
If the vehicle battery has no charge, jump
start your vehicle. See Jump Starting the
Vehicle
(page 252). WARNING:
When doing this
procedure, you need to take the
transmission out of park (P) which
means your vehicle can roll freely. To
avoid unwanted vehicle movement,
always fully apply the parking brake prior
to doing this procedure. Use wheels
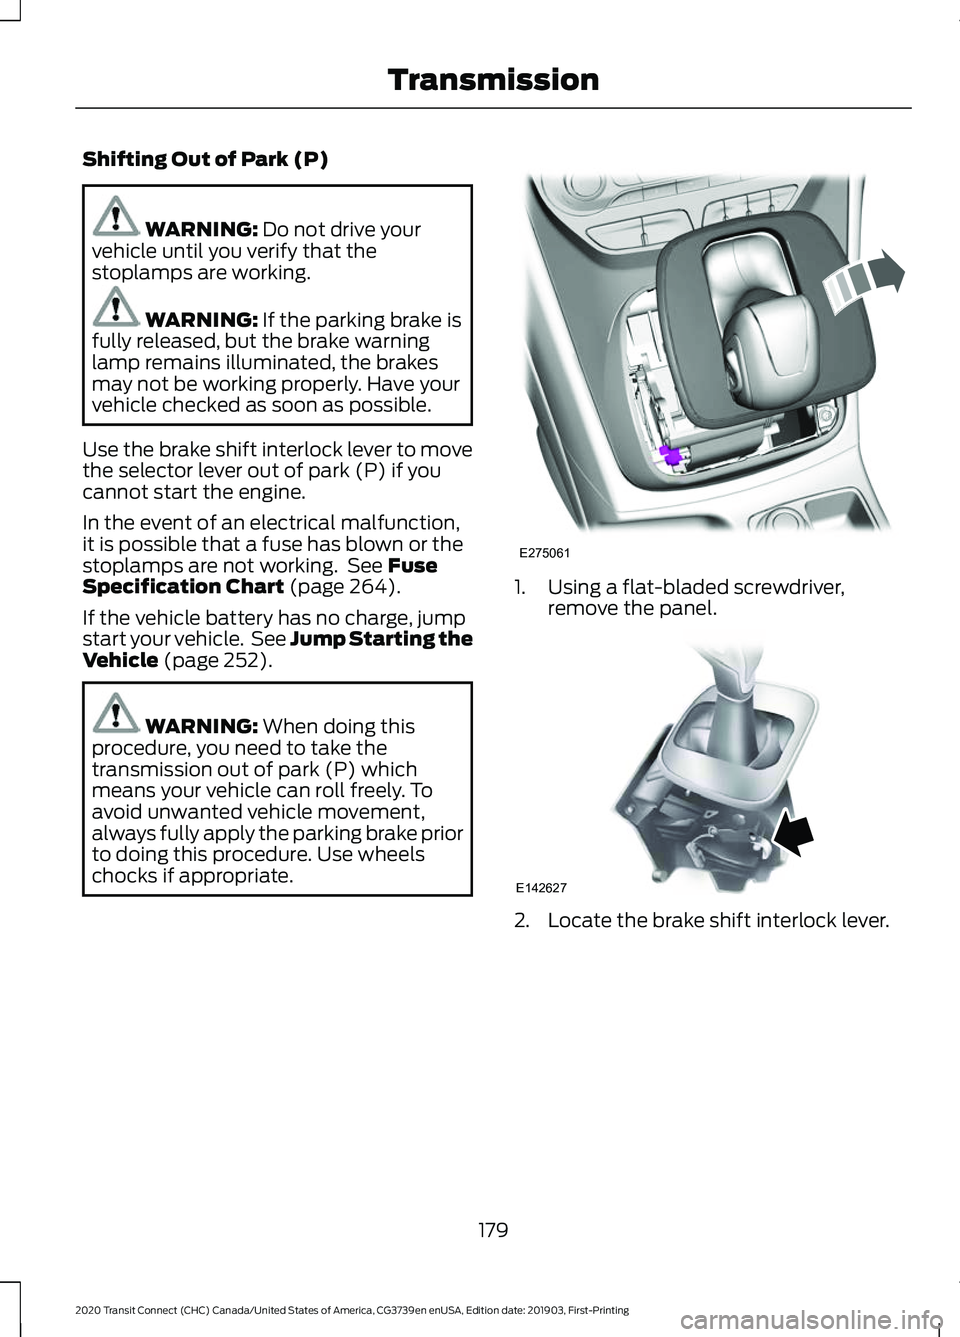
chocks if appropriate. 1. Using a flat-bladed screwdriver,
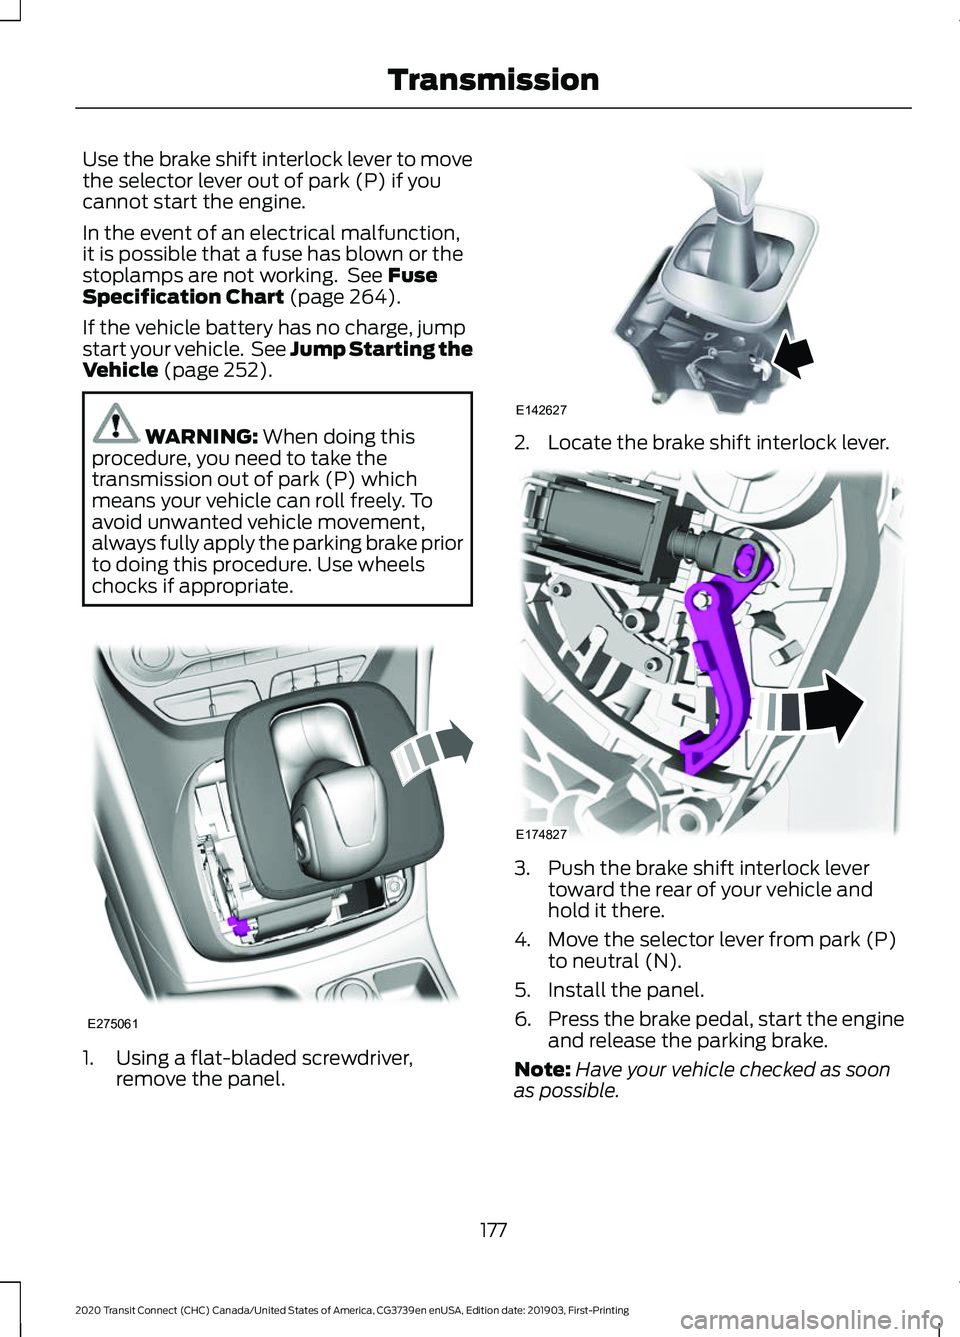
remove the panel. 2. Locate the brake shift interlock lever.
3. Push the brake shift interlock lever
toward the rear of your vehicle and
hold it there.
4. Move the selector lever from park (P) to neutral (N).
5. Install the panel.
6. Press the brake pedal, start the engine
and release the parking brake.
Note: Have your vehicle checked as soon
as possible.
177
2020 Transit Connect (CHC) Canada/United States of America, CG3739en enUSA, Edition date: 201903, First-Printing TransmissionE275061 E142627 E174827
Page 183 of 509
Shifting Out of Park (P)
WARNING: Do not drive your
vehicle until you verify that the
stoplamps are working. WARNING:
If the parking brake is
fully released, but the brake warning
lamp remains illuminated, the brakes
may not be working properly. Have your
vehicle checked as soon as possible.
Use the brake shift interlock lever to move
the selector lever out of park (P) if you
cannot start the engine.
In the event of an electrical malfunction,
it is possible that a fuse has blown or the
stoplamps are not working. See
Fuse
Specification Chart (page 264).
If the vehicle battery has no charge, jump
start your vehicle. See Jump Starting the
Vehicle
(page 252). WARNING:
When doing this
procedure, you need to take the
transmission out of park (P) which
means your vehicle can roll freely. To
avoid unwanted vehicle movement,
always fully apply the parking brake prior
to doing this procedure. Use wheels
chocks if appropriate. 1. Using a flat-bladed screwdriver,
remove the panel. 2. Locate the brake shift interlock lever.
179
2020 Transit Connect (CHC) Canada/United States of America, CG3739en enUSA, Edition date: 201903, First-Printing TransmissionE275061 E142627
Page 243 of 509
RV & Trailer Towing Guide Online
http://www.fleet.ford.com/towing-guides/
Website
TRAILER SWAY CONTROL
If the trailer begins to sway the stability
control warning lamp flashes in the
information display. The system applies
the brakes to the individual wheels and
reduces engine torque to aid vehicle
stability.
Stop your vehicle as soon as it is safe to
do so. Check the vertical weight on the tow
ball and trailer load distribution. See
Capacities and Specifications (page
337). See Load Carrying (page 229).
Note: This feature does not prevent trailer
sway, but reduces it once it begins.
Note: This feature cannot stop all trailers
from swaying.
Note: In some cases, if your vehicle speed
is too high, the system may turn on multiple
times, gradually reducing your vehicle speed.
RECOMMENDED TOWING
WEIGHTS
Your vehicle may tow a trailer. The
maximum loaded trailer weight
must be less than or equal to the
maximum loaded trailer weight
listed for your vehicle
configuration on the following
chart.
Do not exceed the maximum
loaded trailer weight for your
vehicle configuration listed in the
chart below. Note:
Make sure you take the
trailer frontal area into
consideration, do not exceed 20
feet² (1.86 meters²). Towing a
trailer that exceeds this frontal area
reduces the performance and fuel
economy of your vehicle when
towing. Select a trailer that has a
rounded front and an aerodynamic
design.
Note: For high altitude operation,
reduce the gross combined weight
by 2% per 1,000 ft (300 m)
starting at the 1,000 ft (300 m)
elevation point.
Note: Certain states require
electric trailer brakes for trailers
over a specified weight. Be sure to
check state regulations for this
specified weight. The maximum
loaded trailer weights listed may
be limited to this specified weight,
as the vehicle ’s electrical system
may not include the wiring
connector needed to activate
electric trailer brakes.
239
2020 Transit Connect (CHC) Canada/United States of America, CG3739en enUSA, Edition date: 201903, First-Printing Towing
Page 247 of 509
Trailer Brakes
WARNING: Do not connect a
trailer's hydraulic brake system directly
to your vehicle's brake system. Your
vehicle may not have enough braking
power and your chances of having a
collision greatly increase.
Electric brakes and manual, automatic or
surge-type trailer brakes are safe if you
install them correctly and adjust them to
the manufacturer's specifications. The
trailer brakes must meet local and federal
regulations.
The rating for the tow vehicle's braking
system operation is at the gross vehicle
weight rating, not the gross combined
weight rating.
Separate functioning brake systems are
required for safe control of towed vehicles
and trailers weighing more than 1500
pounds (680 kilograms) when loaded.
Trailer Lamps WARNING:
Never connect any
trailer lamp wiring to the vehicle's tail
lamp wiring; this may damage the
electrical system resulting in fire. Contact
your authorized dealer as soon as
possible for assistance in proper trailer
tow wiring installation. Additional
electrical equipment may be required.
Trailer lamps are required on most towed
vehicles. Make sure all running lights, brake
lights, turn signals and hazard warning
flashers are working. Before Towing a Trailer
Practice turning, stopping and backing up
to get the feel of your vehicle-trailer
combination before starting on a trip.
When turning, make wider turns so the
trailer wheels clear curbs and other
obstacles.
When Towing a Trailer
•
Do not drive faster than 70 mph (113
km/h) during the first 500 miles (800
kilometers).
• Do not make full-throttle starts.
• Check the trailer hitch, electrical
connections and trailer wheel lug nuts
thoroughly after you have traveled 50
miles (80 kilometers).
• When stopped in congested or heavy
traffic during hot weather, place the
transmission selector lever in position
P
to aid engine and transmission
cooling and to help A/C performance.
• Turn off the speed control with heavy
loads or in hilly terrain. The speed
control may turn off automatically
when you are towing on long, steep
grades.
• When driving down a long or steep hill,
if your vehicle is fitted with a
SelectShift Automatic® Transmission,
use a low gear. See
Automatic
Transmission (page 176). Do not
apply the brakes continuously, as they
may overheat and become less
effective.
• If the transmission is fitted with Grade
Assist or a Towing feature, use this
feature when towing. This provides
engine braking and helps eliminate
excessive transmission shifting for
optimum fuel economy and
transmission cooling.
243
2020 Transit Connect (CHC) Canada/United States of America, CG3739en enUSA, Edition date: 201903, First-Printing Towing
Page 255 of 509
Vehicles Sold in Canada: Getting
Roadside Assistance
To fully assist you should you have a
vehicle concern, Ford Motor Company of
Canada, Limited offers a complimentary
roadside assistance program. This program
is eligible within Canada or the continental
United States.
The service is available 24 hours a day,
seven days a week.
This program is separate from the New
Vehicle Limited Warranty, but the coverage
is concurrent with the powertrain coverage
period of your vehicle. Canadian roadside
coverage and benefits may differ from the
U.S. coverage.
If you require more information, please call
us in Canada at 1-800-665-2006, or visit
our website at www.ford.ca.
HAZARD FLASHERS
Note:
If used when the vehicle is not
running, the battery will lose charge. There
may be insufficient power to restart your
vehicle. The hazard warning button is
located on the instrument panel.
Use it when your vehicle is
creating a safety hazard for other
motorists.
• Press the button to turn on the hazard
warning function, and the front and
rear direction indicators will flash.
• Press the button again to turn them
off. FUEL SHUTOFF WARNING: If your vehicle has
been involved in a crash, have the fuel
system checked. Failure to follow this
instruction could result in fire, personal
injury or death.
In the event of a moderate to severe crash,
your vehicle is fitted with a fuel pump
shut-off feature that stops the flow of fuel
to the engine. Not every impact will cause
a shutoff.
Should the engine turn off after a crash,
you may restart the engine by carrying out
the following.
Ignition Switch
1. Switch the ignition off.
2. Switch the ignition to position
III.
3. Switch the ignition off.
4. Switch the ignition on again to re-enable the fuel pump.
Note: Various system checks are
automatically carried out before the vehicle
will restart. if your vehicle fails to restart
after the third attempt, the system has
detected a fault that requires service. We
recommend you contact an authorized
dealer.
Keyless Starting
(If Equipped)
1. Without applying the brake pedal, press and release the button once.
2. Press the brake pedal, and then press and release the button once.
3. Without applying the brake pedal, press and release the button once.
4. Press the brake pedal and then press the button until the engine starts.
251
2020 Transit Connect (CHC) Canada/United States of America, CG3739en enUSA, Edition date: 201903, First-Printing Roadside Emergencies
Page 286 of 509
Engine Coolant Temperature
Management (If Equipped)
WARNING:
To reduce the risk of
crash and injury, be prepared that the
vehicle speed may reduce and the
vehicle may not be able to accelerate
with full power until the coolant
temperature reduces.
If you tow a trailer with your vehicle, the
engine may temporarily reach a higher
temperature during severe operating
conditions, for example ascending a long
or steep grade in high ambient
temperatures.
At this time, you may notice the coolant
temperature gauge moves toward the red
zone and a message may appear in the
information display.
You may notice a reduction in vehicle
speed caused by reduced engine power in
order to manage the engine coolant
temperature. Your vehicle may enter this
mode if certain high-temperature and
high-load conditions take place. The
amount of speed reduction depends on
vehicle loading, grade and ambient
temperature. If this occurs, there is no
need to stop your vehicle. You can
continue to drive.
The air conditioning may automatically
turn on and off during severe operating
conditions to protect the engine from
overheating. When the coolant
temperature decreases to the normal
operating temperature, the air conditioning
turns on.
If the coolant temperature gauge moves
fully into the red zone, or if the coolant
temperature warning or service engine
soon messages appear in your information
display, do the following: 1. Stop your vehicle as soon as it is safe
to do so. Fully apply the parking brake,
shift into park (P) or neutral (N).
2. Leave the engine running until the coolant temperature gauge needle
returns to the normal position. If the
temperature does not drop after
several minutes, follow the remaining
steps.
3. Switch the engine off and wait for it to
cool. Check the coolant level.
4. If the coolant level is at or below the minimum mark, add prediluted coolant
immediately.
5. If the coolant level is normal, restart the engine and continue.
AUTOMATIC TRANSMISSION
FLUID CHECK
The automatic transmission does not have
a transmission fluid dipstick.
Have an authorized dealer check and
change the transmission fluid at the
correct service interval. See
Scheduled
Maintenance (page 428). Your
transmission does not consume fluid.
However, if the transmission slips, shifts
slowly or if you notice a sign of leaking
fluid, contact an authorized dealer.
Do not use supplemental transmission
fluid additives, treatments or cleaning
agents. The use of these materials may
affect transmission operation and result
in damage to internal transmission
components.
282
2020 Transit Connect (CHC) Canada/United States of America, CG3739en enUSA, Edition date: 201903, First-Printing Maintenance
Page 289 of 509
Because your vehicle
’s engine is
electronically-controlled by a computer,
some engine control settings are
maintained by power from the low voltage
battery. Some engine computer settings,
like the idle trim and fuel trim strategy,
optimize the driveability and performance
of the engine. Some other computer
settings, like the clock and radio station
presets, are also maintained in memory by
power from the low voltage battery. When
a technician disconnects and connects the
low voltage battery, these settings are
erased. Complete the following procedure
in order to restore the settings:
1. With the vehicle at a complete stop, set the parking brake.
2. Shift the transmission into park (P).
3. Switch off all accessories.
4. Fully press the brake pedal and start the vehicle.
5. Run the engine until it reaches normal operating temperature. While the
engine is warming up, complete the
following: Reset the clock. See Audio
System (page 367). Reset the power
windows bounce-back feature. See
Windows and Mirrors
(page 89).
Reset the radio station presets. See
Audio System
(page 367).
6. Allow the engine to idle for at least one
minute. If the engine turns off, press
the accelerator pedal to start the
engine.
7. While the engine is running, press the brake pedal and shift into neutral (N).
8. Allow the engine to run for at least one
minute by pressing on the accelerator
pedal.
9. Drive the vehicle at least 12 mi (20 km)
to completely relearn the idle and fuel
trim strategy. Note:
If you do not allow the engine to
relearn the idle and fuel trim strategy, the
idle quality of your vehicle may be adversely
affected until the engine computer
eventually relearns the idle trim and fuel
trim strategy.
Make sure that you dispose of old batteries
in an environmentally friendly way. Seek
advice from your local authority about
recycling old batteries.
CHECKING THE WIPER
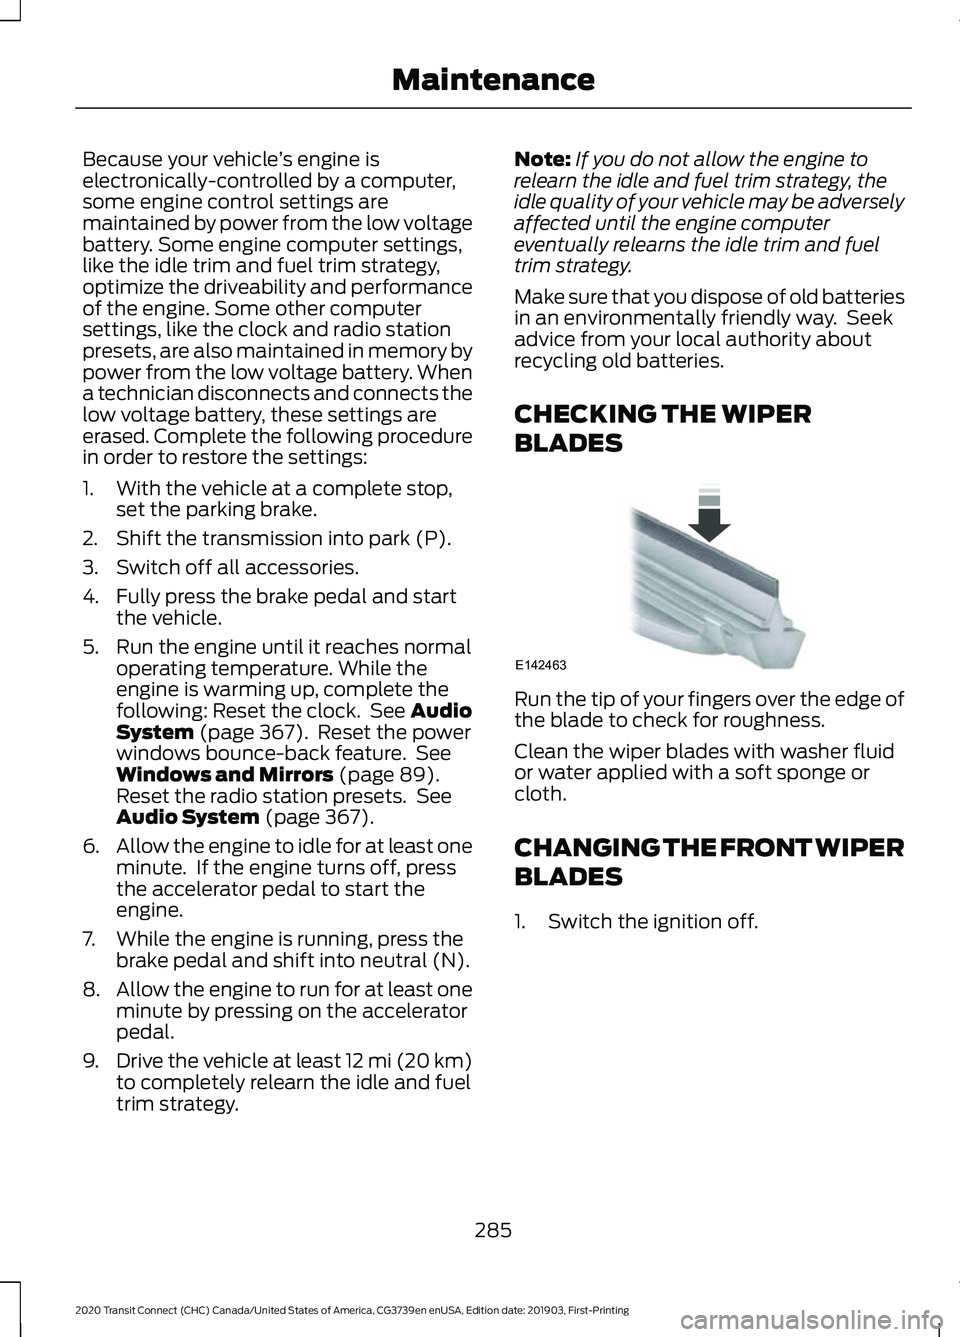
BLADES Run the tip of your fingers over the edge of
the blade to check for roughness.
Clean the wiper blades with washer fluid
or water applied with a soft sponge or
cloth.
CHANGING THE FRONT WIPER
BLADES
1. Switch the ignition off.
285
2020 Transit Connect (CHC) Canada/United States of America, CG3739en enUSA, Edition date: 201903, First-Printing MaintenanceE142463