engine FORD WINDSTAR 1999 2.G Owner's Guide
[x] Cancel search | Manufacturer: FORD, Model Year: 1999, Model line: WINDSTAR, Model: FORD WINDSTAR 1999 2.GPages: 248, PDF Size: 2.28 MB
Page 167 of 248
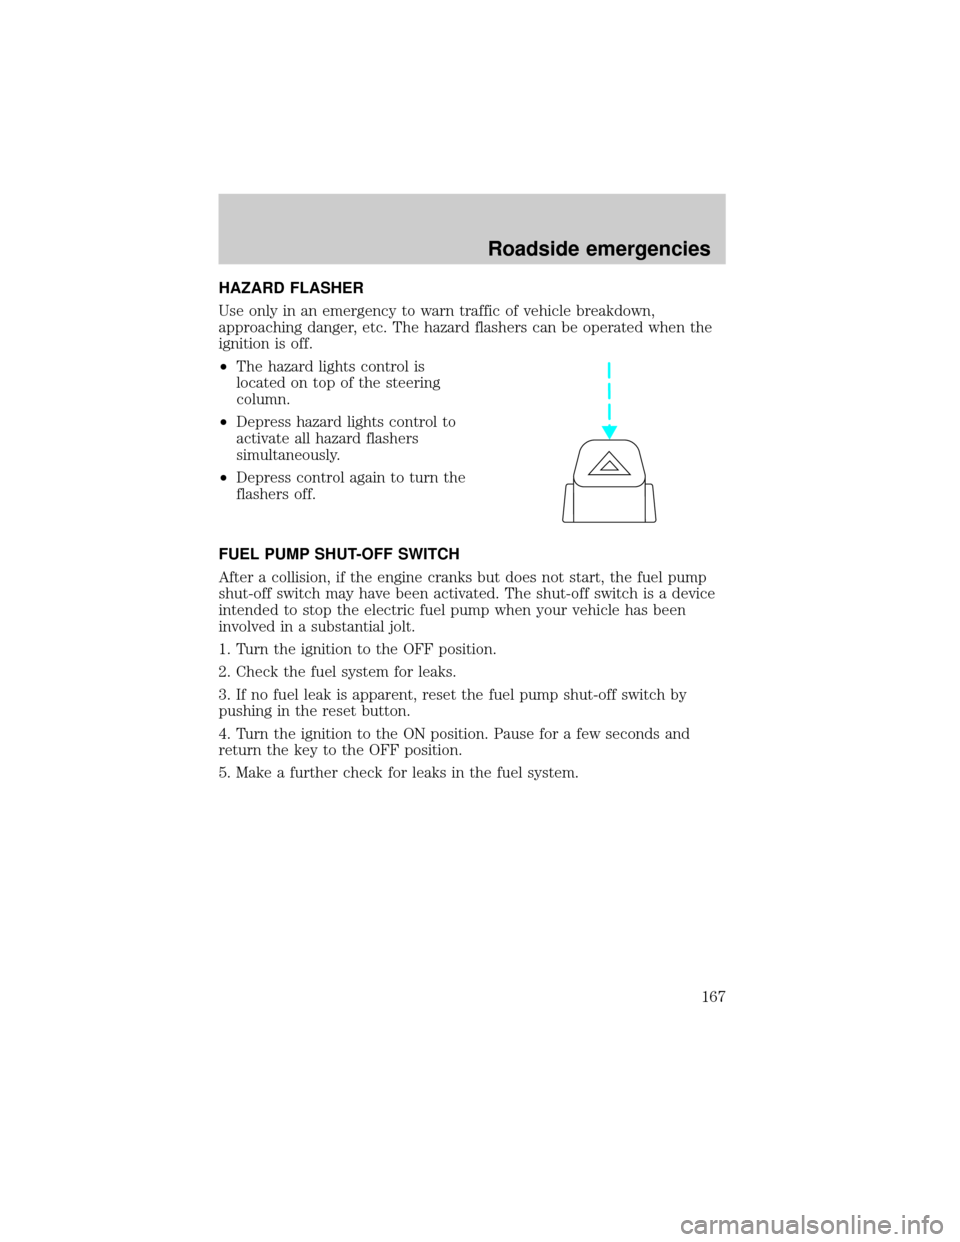
HAZARD FLASHER
Use only in an emergency to warn traffic of vehicle breakdown,
approaching danger, etc. The hazard flashers can be operated when the
ignition is off.
²The hazard lights control is
located on top of the steering
column.
²Depress hazard lights control to
activate all hazard flashers
simultaneously.
²Depress control again to turn the
flashers off.
FUEL PUMP SHUT-OFF SWITCH
After a collision, if the engine cranks but does not start, the fuel pump
shut-off switch may have been activated. The shut-off switch is a device
intended to stop the electric fuel pump when your vehicle has been
involved in a substantial jolt.
1. Turn the ignition to the OFF position.
2. Check the fuel system for leaks.
3. If no fuel leak is apparent, reset the fuel pump shut-off switch by
pushing in the reset button.
4. Turn the ignition to the ON position. Pause for a few seconds and
return the key to the OFF position.
5. Make a further check for leaks in the fuel system.
Roadside emergencies
167
Page 173 of 248
Fuse/Relay
LocationFuse Amp
RatingDescription
Relay 3 Ð Front Blower Motor Relay
Relay 4 Ð Switched System Power Relay #3
Relay 5 Ð Rear Defrost Relay
Relay 6 Ð Auxiliary Blower Motor Relay
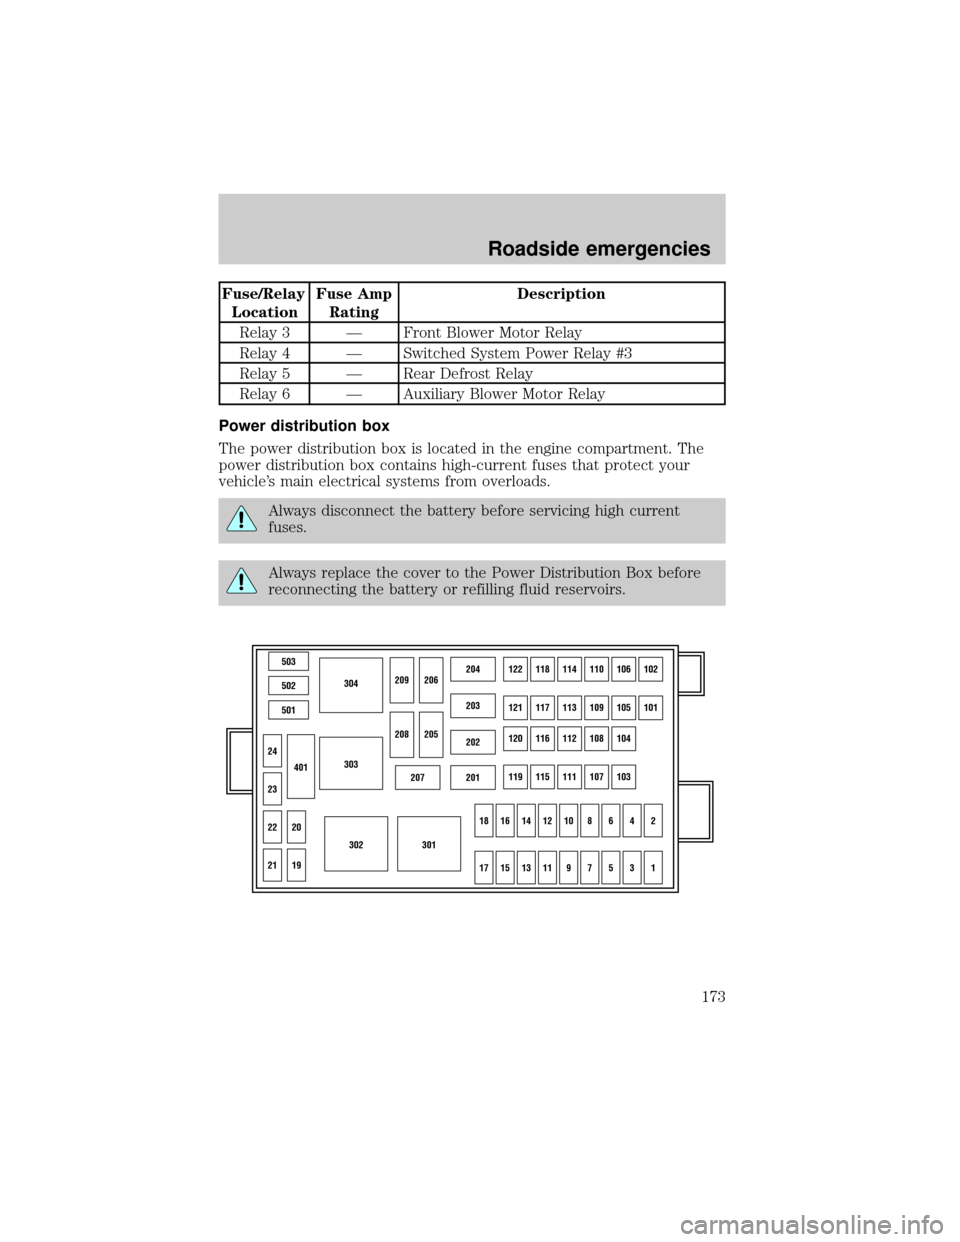
Power distribution box
The power distribution box is located in the engine compartment. The
power distribution box contains high-current fuses that protect your
vehicle's main electrical systems from overloads.
Always disconnect the battery before servicing high current
fuses.
Always replace the cover to the Power Distribution Box before
reconnecting the battery or refilling fluid reservoirs.
503
304
303
302301
502
501
207201
202
203
204122118114110106102
121117113109105101
120116112108104
119115111107103
24
209206
208
18161412108642
1715131197531
205
23
22
21
401
20
19
Roadside emergencies
173
Page 174 of 248
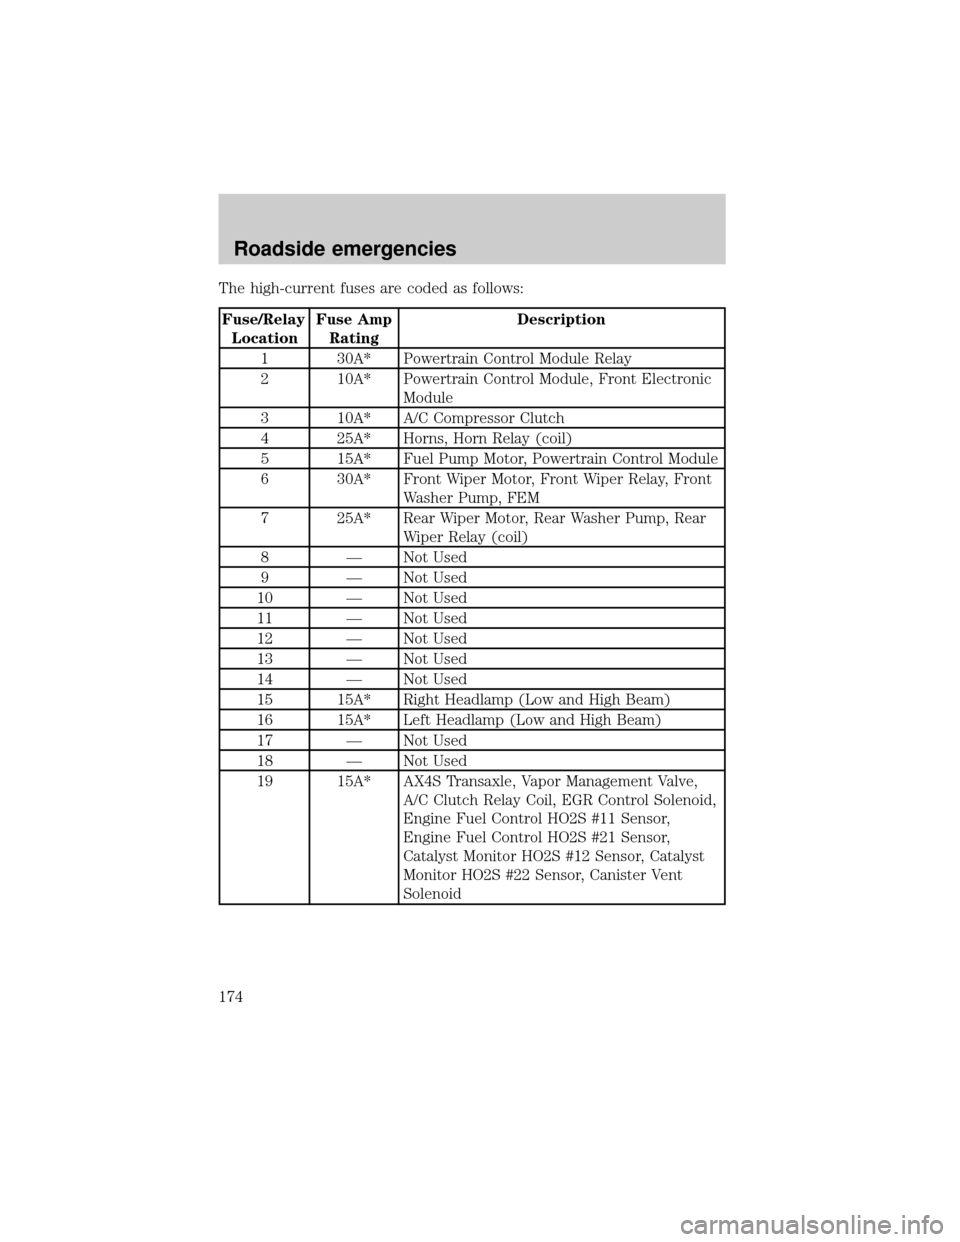
The high-current fuses are coded as follows:
Fuse/Relay
LocationFuse Amp
RatingDescription
1 30A* Powertrain Control Module Relay
2 10A* Powertrain Control Module, Front Electronic
Module
3 10A* A/C Compressor Clutch
4 25A* Horns, Horn Relay (coil)
5 15A* Fuel Pump Motor, Powertrain Control Module
6 30A* Front Wiper Motor, Front Wiper Relay, Front
Washer Pump, FEM
7 25A* Rear Wiper Motor, Rear Washer Pump, Rear
Wiper Relay (coil)
8 Ð Not Used
9 Ð Not Used
10 Ð Not Used
11 Ð Not Used
12 Ð Not Used
13 Ð Not Used
14 Ð Not Used
15 15A* Right Headlamp (Low and High Beam)
16 15A* Left Headlamp (Low and High Beam)
17 Ð Not Used
18 Ð Not Used
19 15A* AX4S Transaxle, Vapor Management Valve,
A/C Clutch Relay Coil, EGR Control Solenoid,
Engine Fuel Control HO2S #11 Sensor,
Engine Fuel Control HO2S #21 Sensor,
Catalyst Monitor HO2S #12 Sensor, Catalyst
Monitor HO2S #22 Sensor, Canister Vent
Solenoid
Roadside emergencies
174
Page 175 of 248
Fuse/Relay
LocationFuse Amp
RatingDescription
20 15A* Ignition Coil, Intake Air Control Valve, Fuel
Injectors #1, #2, #3, #4, #5, #6, Mass Air Flow
Sensor, Fuel Pump Relay Coil, Intake
Manifold Runner Control, HI-Speed Cooling
Fan Relay Coil, LO-Speed Cooling Fan Relay
Coil, Powertrain Control Module
21 10A* Front Electronic Module
(LH Door Lock Motor)
22 15A* Right Front Park Lamp, Right Front Turn
Lamp, Right Front Cornering Lamp
23 15A* Left Front Park Lamp, Left Front Turn Lamp,
Left Front Cornering Lamp
24 Ð Not Used
101 40A** ABS Module
102 40A** ABS Module
103 40A** SSP4 Relay, SSP4 Relay (coil)
104 40A** LH Power Seat Motors, LH Power Lumbar
Motor
105 30A** Starter Motor Solenoid, Ignition Switch
106 30A** Delayed Accessory Relay, Delayed Accessory
Relay (coil), Front Electronic Module, RHF
Window Motor
107 50A** RH/LH Engine Cooling Fan Motors, Cooling
Fan Dropping Resistor
108 40A** SSP2 Relay, SSP2 Relay (coil)
109 40A** SSP1 Relay, SSP1 Relay (coil)
110 50A** RH Power Sliding Door Module
111 Ð Not Used
112 30A** Electric Brake Controller
113 30A** Front Electronic Module (LH Window Motor)
114 40A** SSP3 Relay, SSP3 Relay (coil)
115 50A** Fuse Junction Box Bus #2
Roadside emergencies
175
Page 180 of 248
Tire change procedure
When one of the front wheels is off the ground, the transaxle
alone will not prevent the vehicle from moving or slipping off the
jack, even if the vehicle is in P (Park).
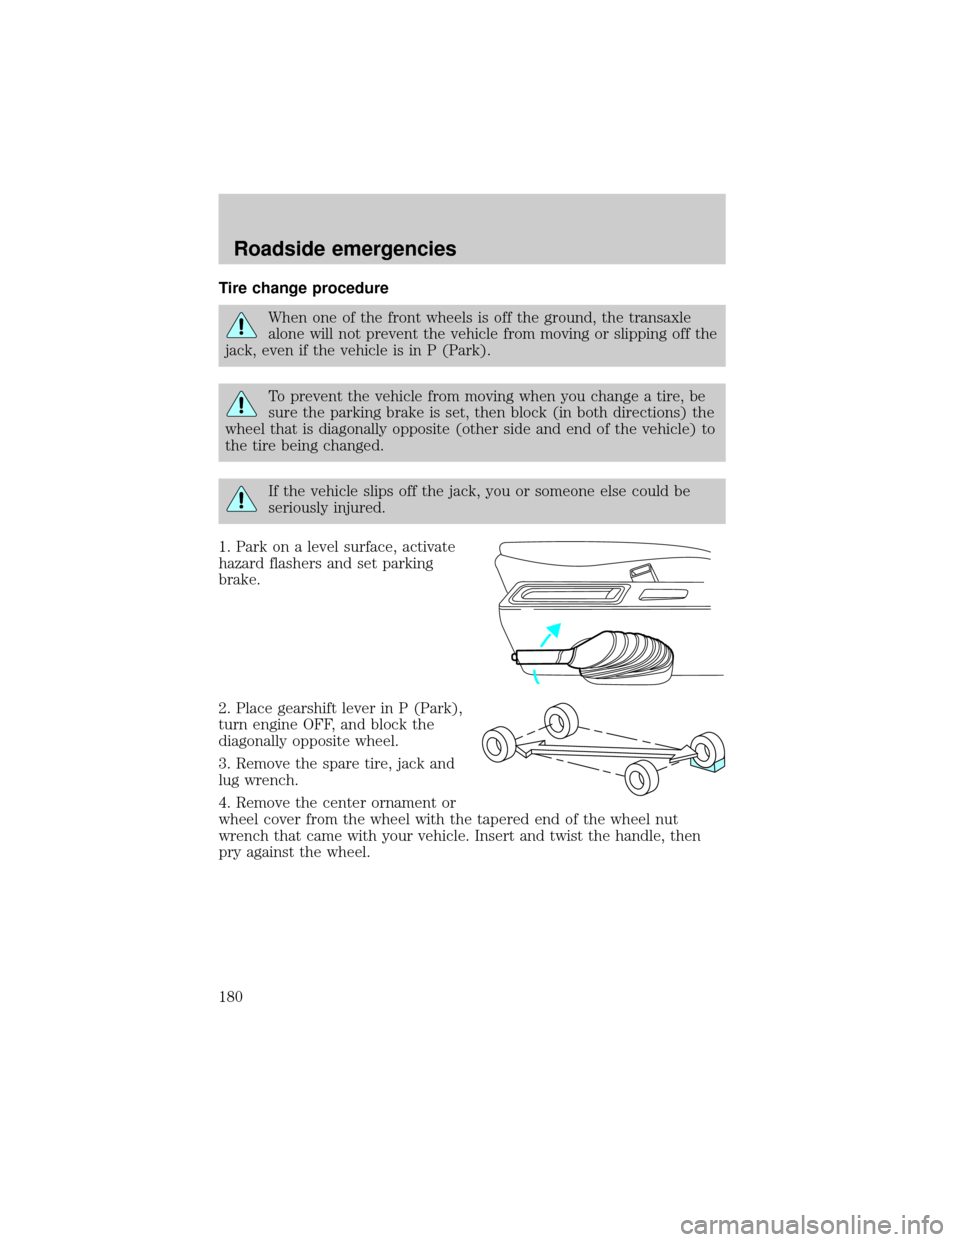
To prevent the vehicle from moving when you change a tire, be
sure the parking brake is set, then block (in both directions) the
wheel that is diagonally opposite (other side and end of the vehicle) to
the tire being changed.
If the vehicle slips off the jack, you or someone else could be
seriously injured.
1. Park on a level surface, activate
hazard flashers and set parking
brake.
2. Place gearshift lever in P (Park),
turn engine OFF, and block the
diagonally opposite wheel.
3. Remove the spare tire, jack and
lug wrench.
4. Remove the center ornament or
wheel cover from the wheel with the tapered end of the wheel nut
wrench that came with your vehicle. Insert and twist the handle, then
pry against the wheel.
Roadside emergencies
180
Page 181 of 248
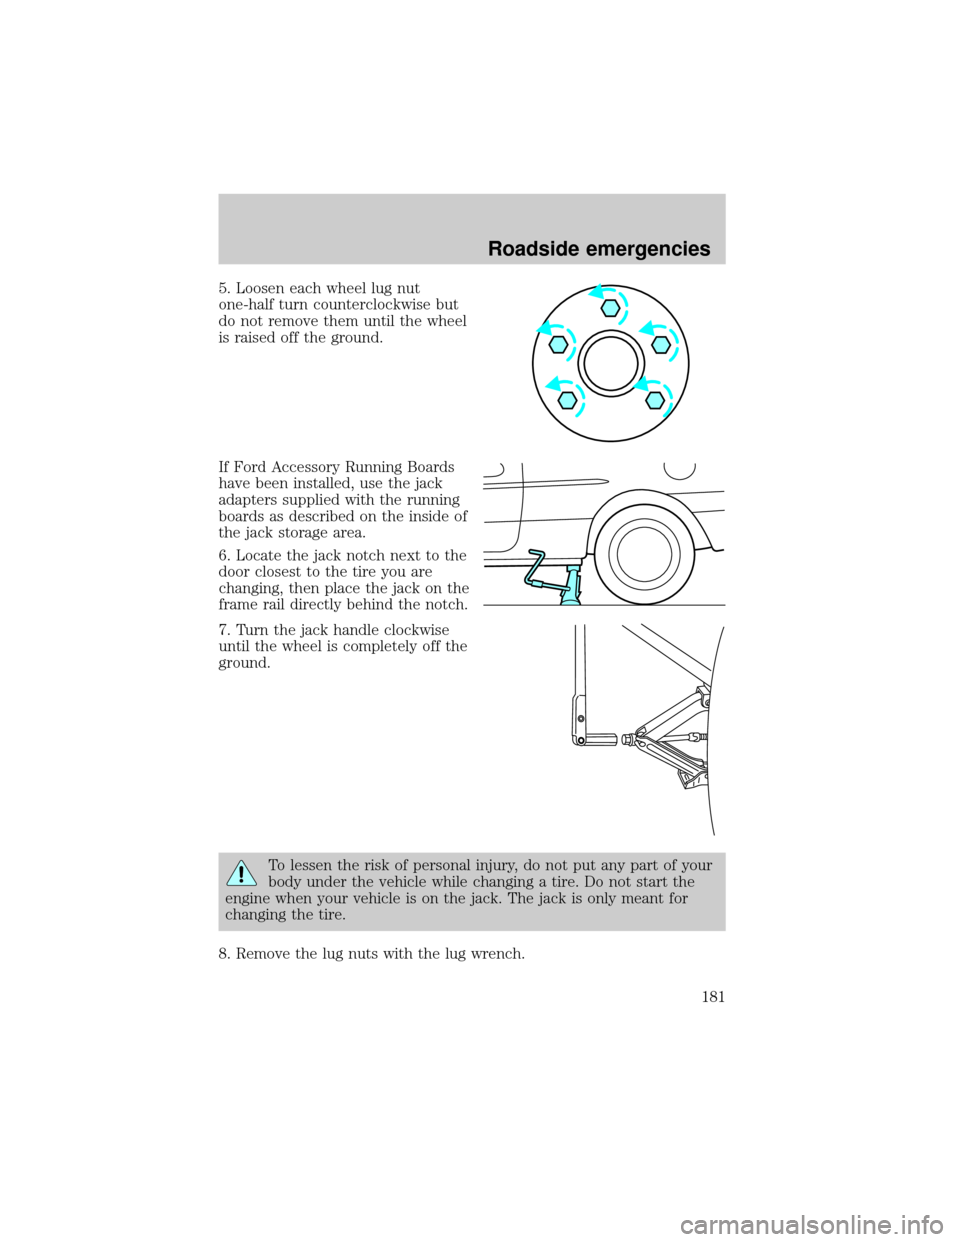
5. Loosen each wheel lug nut
one-half turn counterclockwise but
do not remove them until the wheel
is raised off the ground.
If Ford Accessory Running Boards
have been installed, use the jack
adapters supplied with the running
boards as described on the inside of
the jack storage area.
6. Locate the jack notch next to the
door closest to the tire you are
changing, then place the jack on the
frame rail directly behind the notch.
7. Turn the jack handle clockwise
until the wheel is completely off the
ground.
To lessen the risk of personal injury, do not put any part of your
body under the vehicle while changing a tire. Do not start the
engine when your vehicle is on the jack. The jack is only meant for
changing the tire.
8. Remove the lug nuts with the lug wrench.
Roadside emergencies
181
Page 183 of 248
3. Park the booster vehicle close to the hood of the disabled vehicle making
sure the two vehiclesdo nottouch. Set the parking brake on both vehicles
and stay clear of the engine cooling fan and other moving parts.
4. Check all battery terminals and remove any excessive corrosion before
you attach the battery cables. Ensure that vent caps are tight and level.
5. Turn the heater fan on in both vehicles to protect any electrical
surges. Turn all other accessories off.
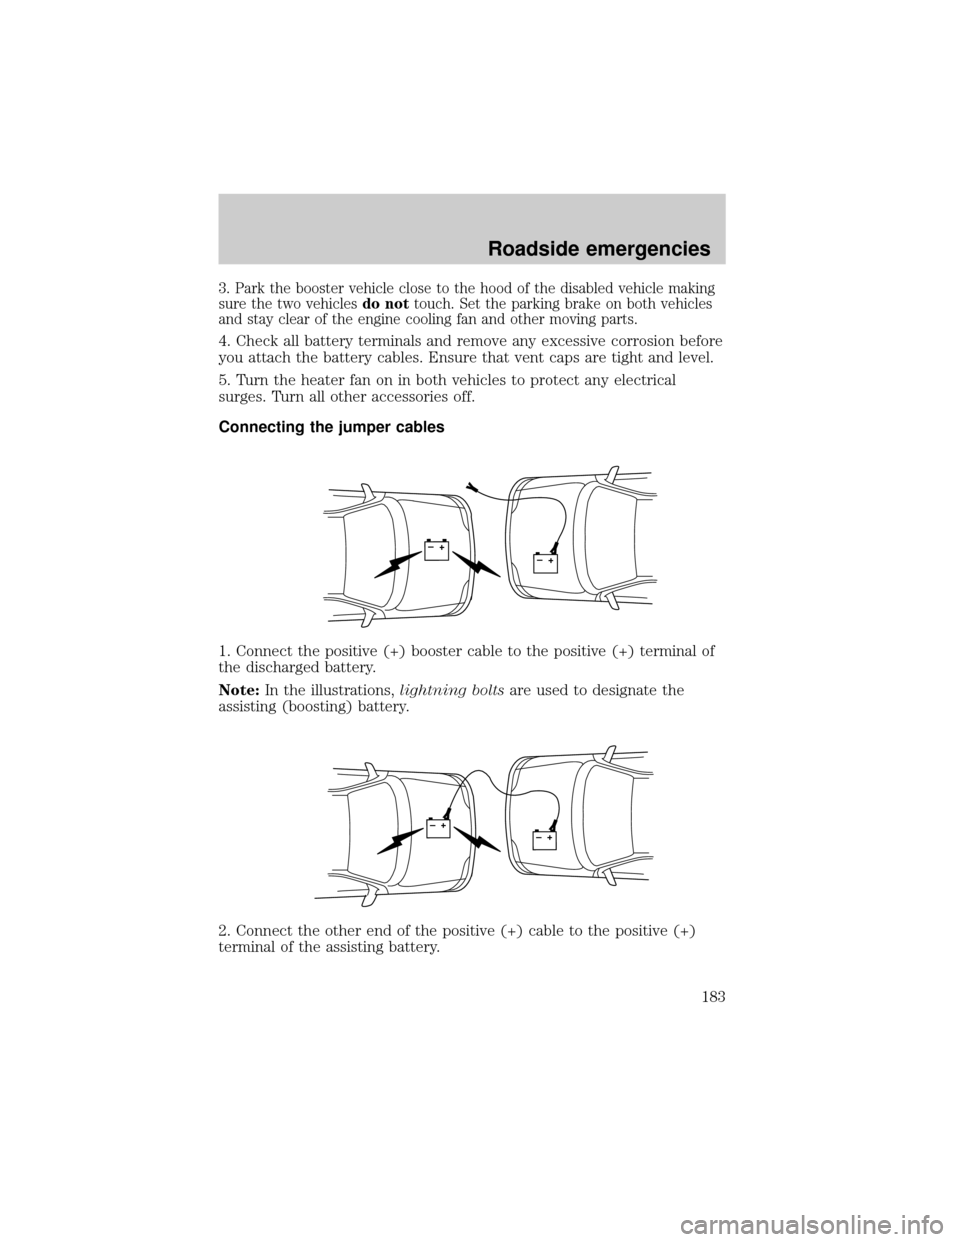
Connecting the jumper cables
1. Connect the positive (+) booster cable to the positive (+) terminal of
the discharged battery.
Note:In the illustrations,lightning boltsare used to designate the
assisting (boosting) battery.
2. Connect the other end of the positive (+) cable to the positive (+)
terminal of the assisting battery.
+–+–
+–+–
Roadside emergencies
183
Page 184 of 248
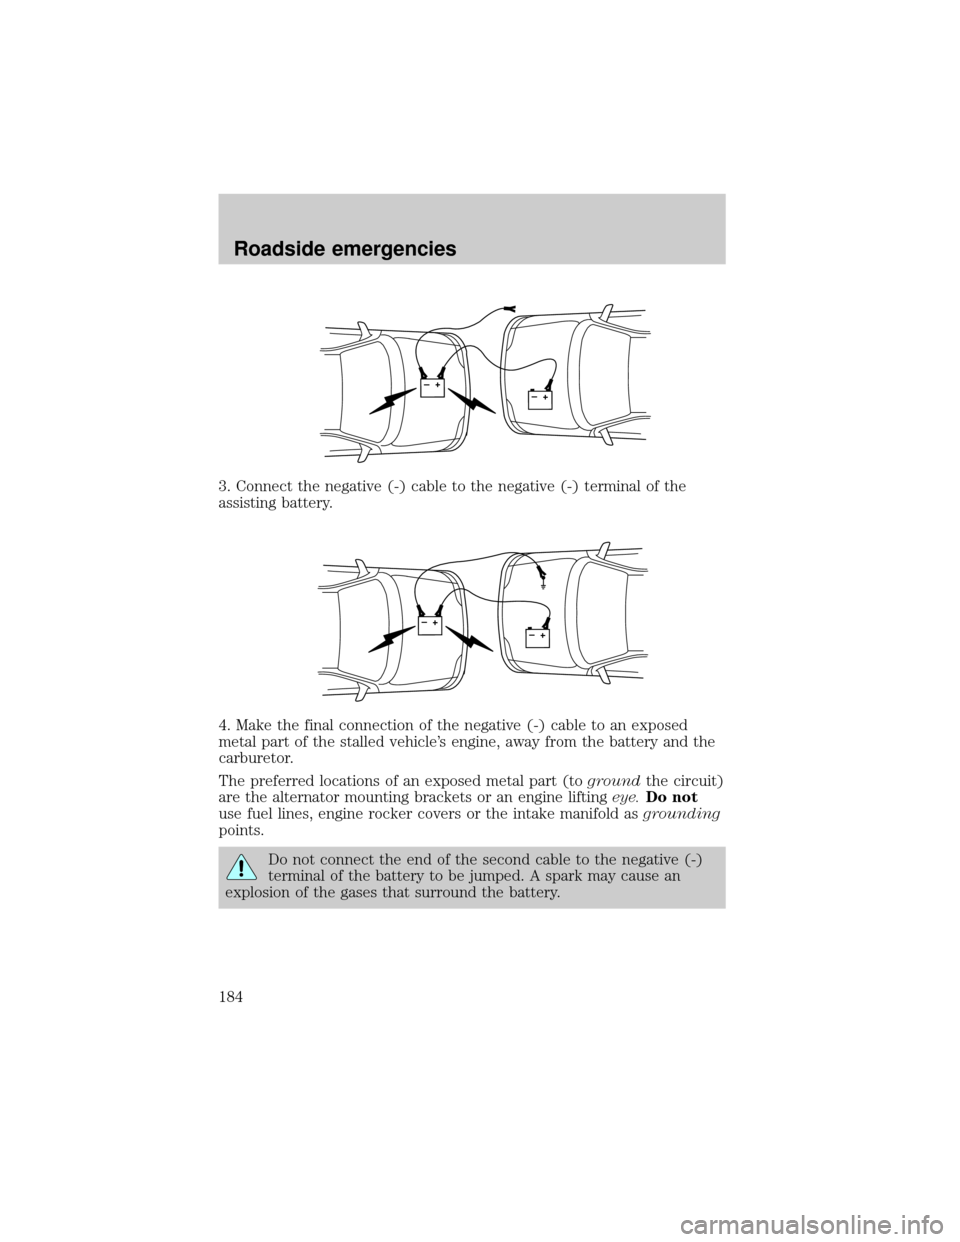
3. Connect the negative (-) cable to the negative (-) terminal of the
assisting battery.
4. Make the final connection of the negative (-) cable to an exposed
metal part of the stalled vehicle's engine, away from the battery and the
carburetor.
The preferred locations of an exposed metal part (togroundthe circuit)
are the alternator mounting brackets or an engine liftingeye.Do not
use fuel lines, engine rocker covers or the intake manifold asgrounding
points.
Do not connect the end of the second cable to the negative (-)
terminal of the battery to be jumped. A spark may cause an
explosion of the gases that surround the battery.
+–+–
+–+–
Roadside emergencies
184
Page 185 of 248
5. Be sure that the cables are clear of fan blades, belts and other moving
parts of both engines.
Jump starting
1. Start the engine of the booster vehicle and run the engine at
moderately increased speed.
2. Start the engine of the disabled vehicle.
3. Once the disabled vehicle has been started, run both engines for a
further three minutes before disconnecting the jumper cables.
Removing the jumper cables
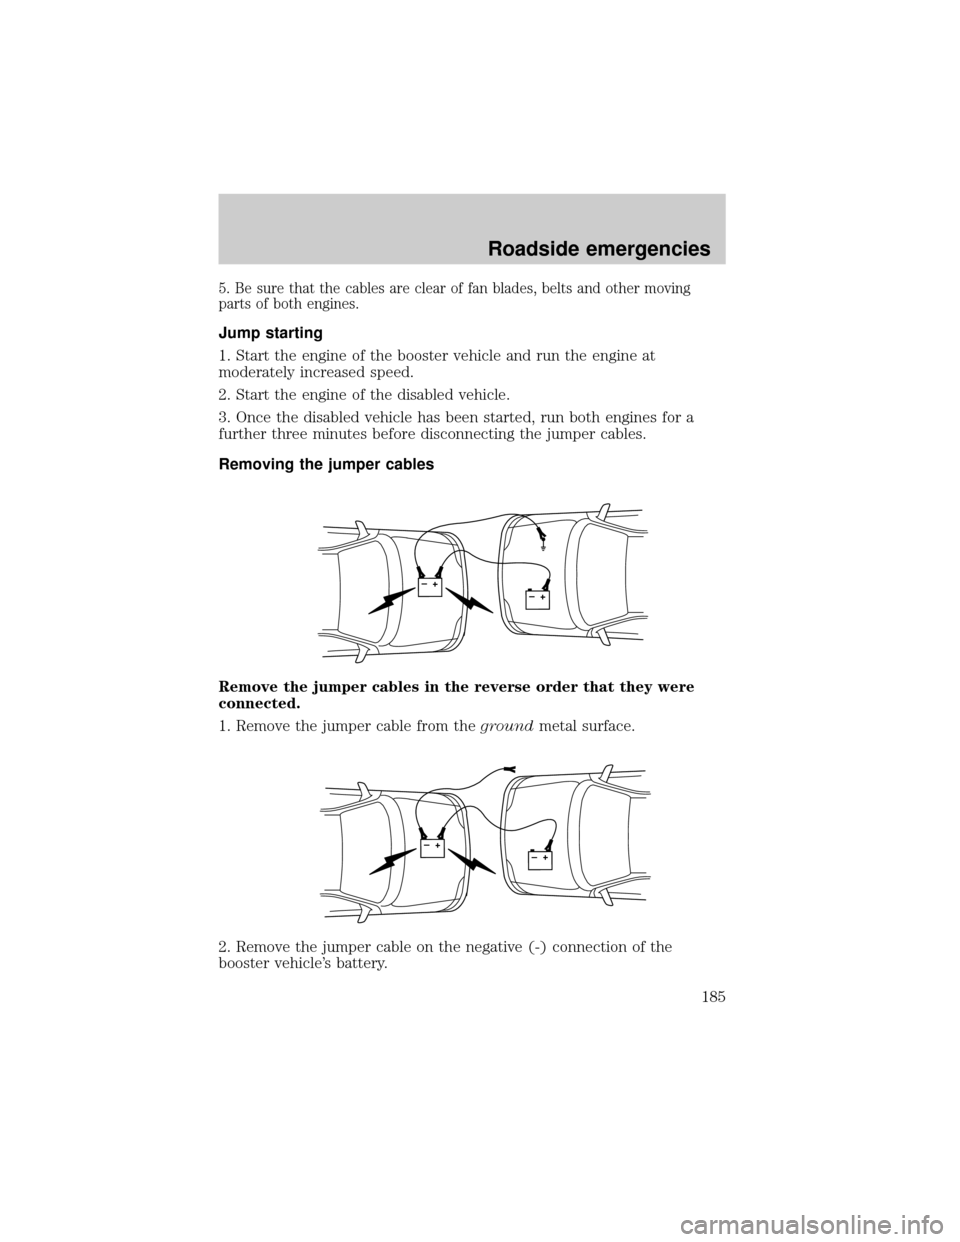
Remove the jumper cables in the reverse order that they were
connected.
1. Remove the jumper cable from thegroundmetal surface.
2. Remove the jumper cable on the negative (-) connection of the
booster vehicle's battery.
+–+–
+–+–
Roadside emergencies
185
Page 186 of 248
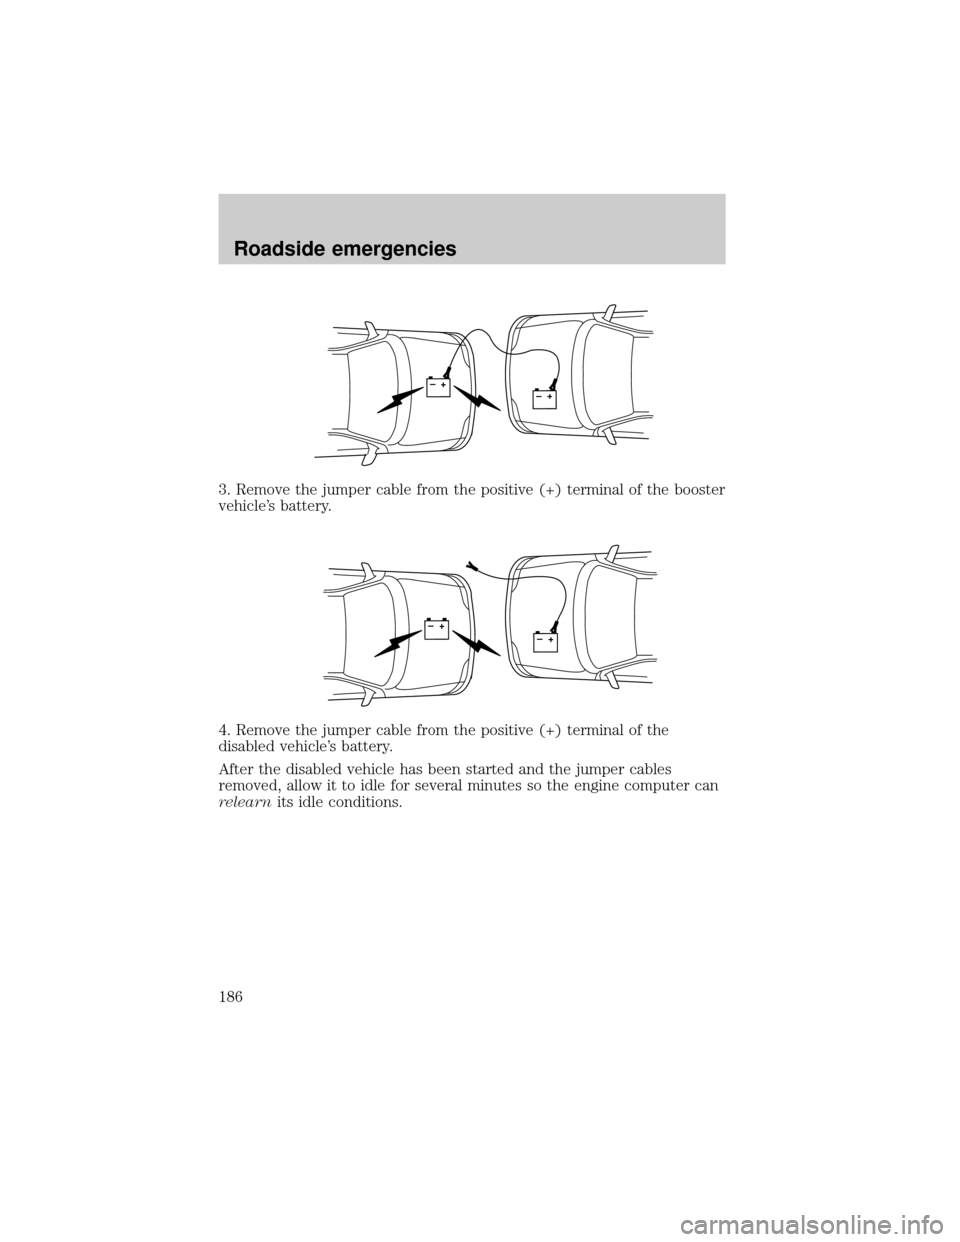
3. Remove the jumper cable from the positive (+) terminal of the booster
vehicle's battery.
4. Remove the jumper cable from the positive (+) terminal of the
disabled vehicle's battery.
After the disabled vehicle has been started and the jumper cables
removed, allow it to idle for several minutes so the engine computer can
relearnits idle conditions.
+–+–
+–+–
Roadside emergencies
186