headlamp FORD WINDSTAR 2002 2.G User Guide
[x] Cancel search | Manufacturer: FORD, Model Year: 2002, Model line: WINDSTAR, Model: FORD WINDSTAR 2002 2.GPages: 296, PDF Size: 2.45 MB
Page 76 of 296
4. Install the headlamp on vehicle by aligning the lamp with the rear
retainer, push rearward and secure with two retainer pins.
5. Turn the headlamps on and make sure they work properly. If the
headlamp was correctly aligned before you changed the bulb, you should
not need to align it again.
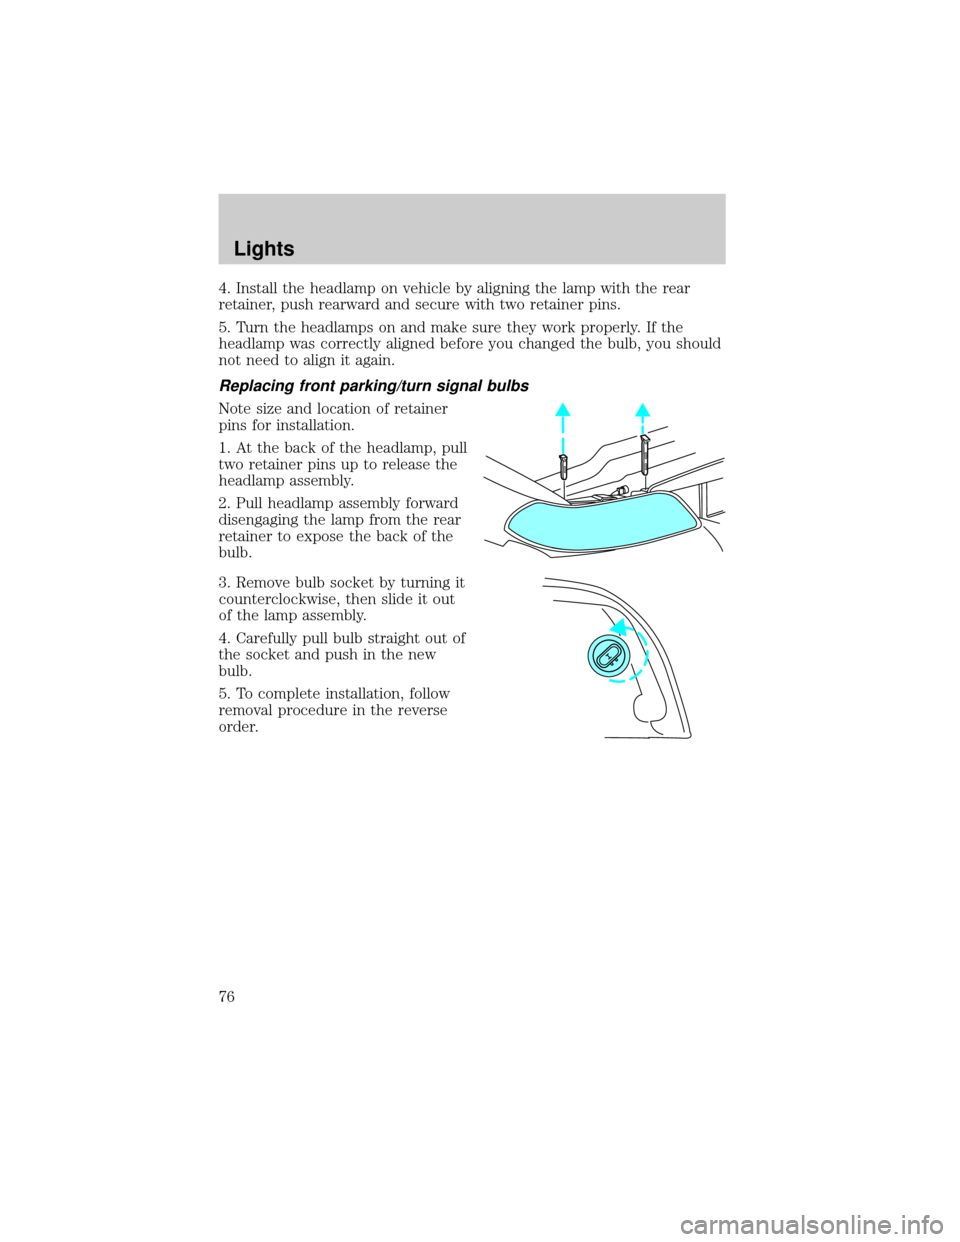
Replacing front parking/turn signal bulbs
Note size and location of retainer
pins for installation.
1. At the back of the headlamp, pull
two retainer pins up to release the
headlamp assembly.
2. Pull headlamp assembly forward
disengaging the lamp from the rear
retainer to expose the back of the
bulb.
3. Remove bulb socket by turning it
counterclockwise, then slide it out
of the lamp assembly.
4. Carefully pull bulb straight out of
the socket and push in the new
bulb.
5. To complete installation, follow
removal procedure in the reverse
order.
Lights
76
Page 102 of 296
The sequence of the system check report is as follows:
1. oil life in XX%
2. charging system
3. washer fluid level
4. brake fluid level
5. doors closed (driver and passenger side). This message can only be
reset by closing the door(s). If the RESET control is pressed, PLEASE
CLOSE DOOR will be displayed.
6. rear liftgate status
7. exterior lamps (headlamps, front turn, brake, tail and cornering/side
repeater lamp status)
8. Traction Controlyor AdvanceTracy(if equipped)
9. fuel level
10. distance to empty
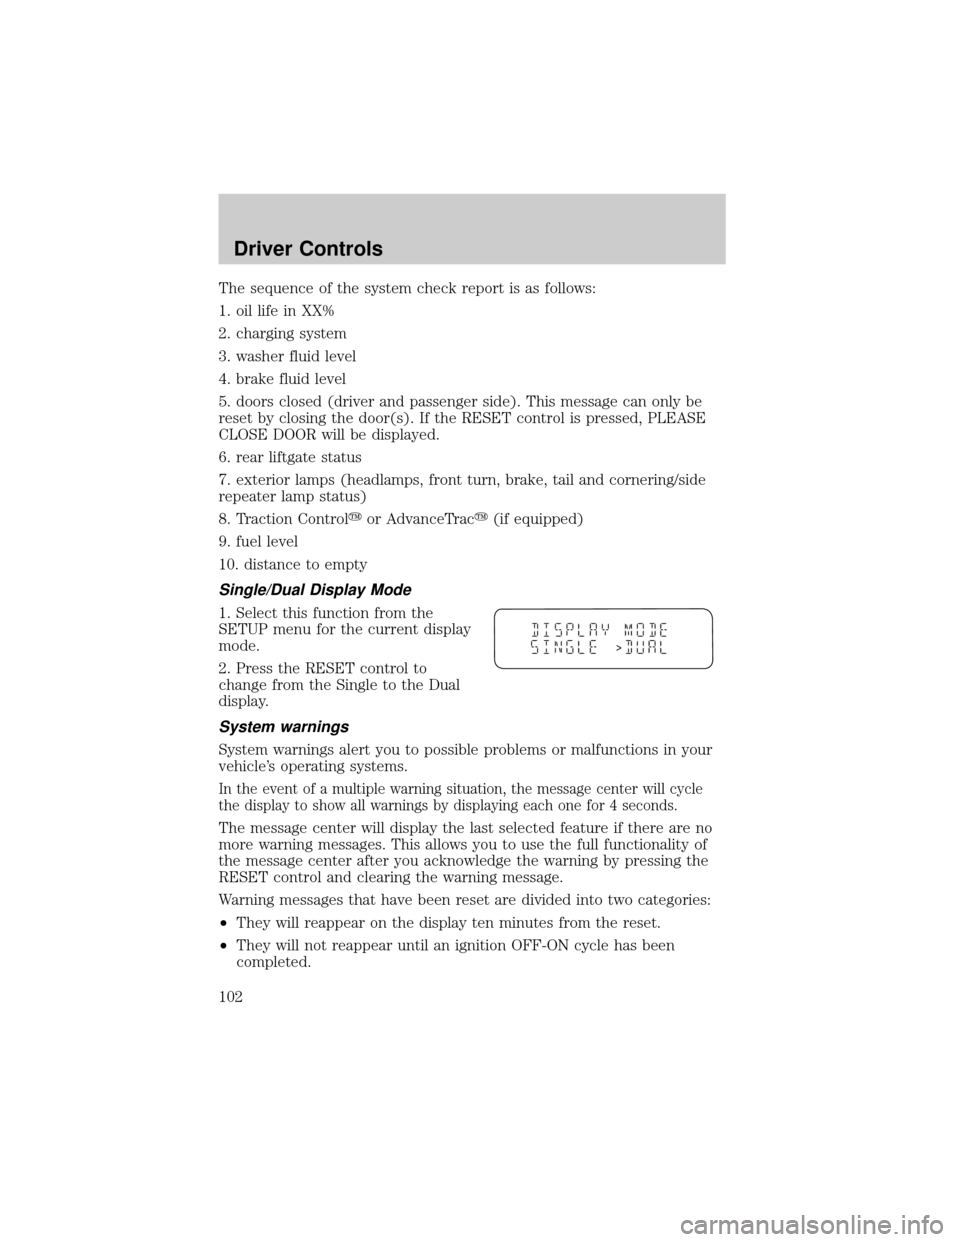
Single/Dual Display Mode
1. Select this function from the
SETUP menu for the current display
mode.
2. Press the RESET control to
change from the Single to the Dual
display.
System warnings
System warnings alert you to possible problems or malfunctions in your
vehicle's operating systems.
In the event of a multiple warning situation, the message center will cycle
the display to show all warnings by displaying each one for 4 seconds.
The message center will display the last selected feature if there are no
more warning messages. This allows you to use the full functionality of
the message center after you acknowledge the warning by pressing the
RESET control and clearing the warning message.
Warning messages that have been reset are divided into two categories:
²They will reappear on the display ten minutes from the reset.
²They will not reappear until an ignition OFF-ON cycle has been
completed.
>
Driver Controls
102
Page 103 of 296
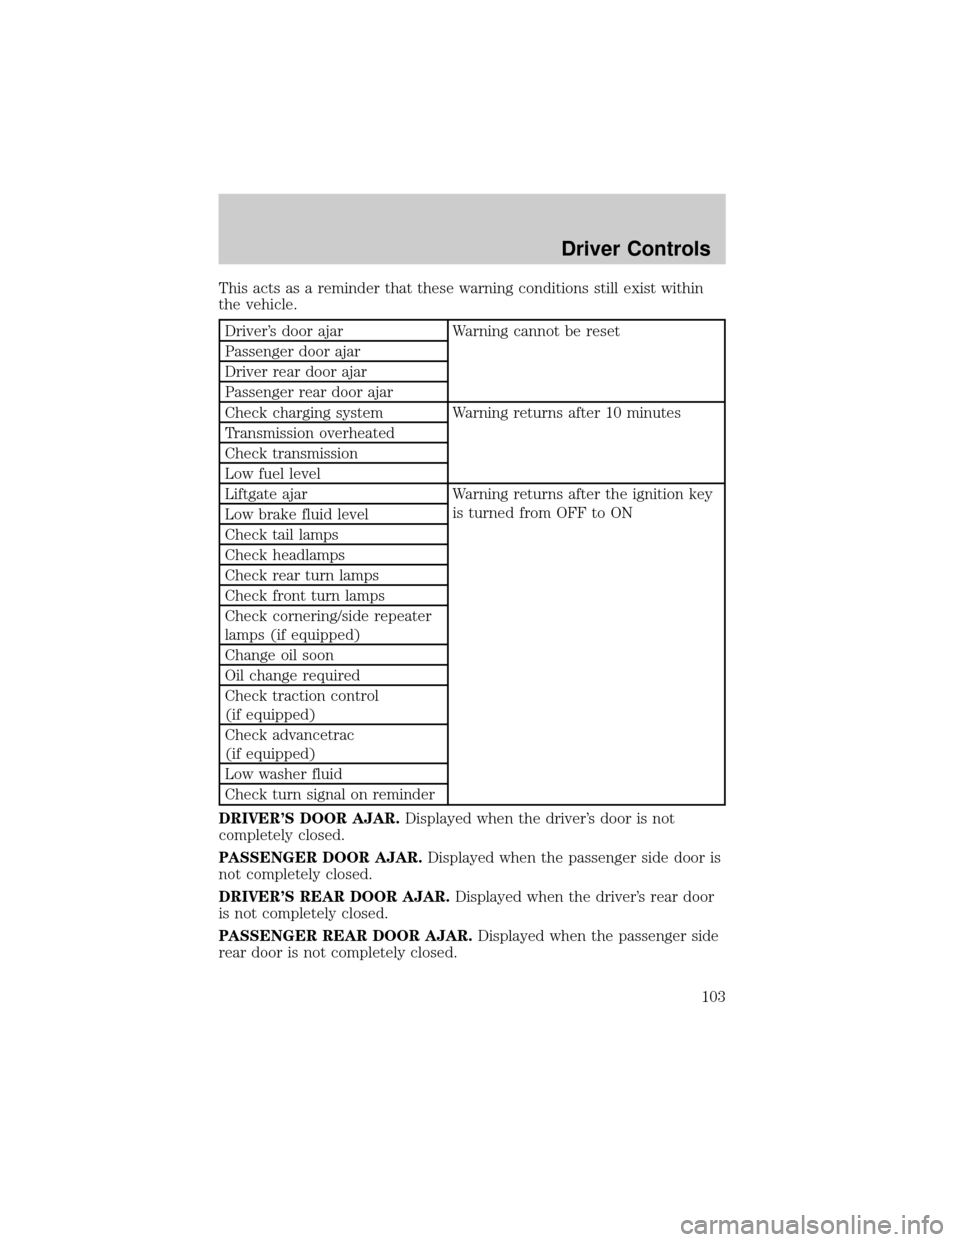
This acts as a reminder that these warning conditions still exist within
the vehicle.
Driver's door ajar Warning cannot be reset
Passenger door ajar
Driver rear door ajar
Passenger rear door ajar
Check charging system Warning returns after 10 minutes
Transmission overheated
Check transmission
Low fuel level
Liftgate ajar Warning returns after the ignition key
is turned from OFF to ON
Low brake fluid level
Check tail lamps
Check headlamps
Check rear turn lamps
Check front turn lamps
Check cornering/side repeater
lamps (if equipped)
Change oil soon
Oil change required
Check traction control
(if equipped)
Check advancetrac
(if equipped)
Low washer fluid
Check turn signal on reminder
DRIVER'S DOOR AJAR.Displayed when the driver's door is not
completely closed.
PASSENGER DOOR AJAR.Displayed when the passenger side door is
not completely closed.
DRIVER'S REAR DOOR AJAR.Displayed when the driver's rear door
is not completely closed.
PASSENGER REAR DOOR AJAR.Displayed when the passenger side
rear door is not completely closed.
Driver Controls
103
Page 104 of 296

LIFTGATE AJAR.Displayed when the liftgate is not completely closed.
CHECK CHARGING SYSTEM.Displayed when the electrical system is
not maintaining proper voltage. If you are operating electrical accessories
when the engine is idling at a low speed, turn off as many of the
electrical loads as soon as possible. If the warning stays on or comes on
when the engine is operating at normal speeds, have the electrical
system checked as soon as possible.
LOW FUEL LEVEL.Displayed as an early reminder of a low fuel
condition.
CHECK TRANSMISSION.Indicates the transmission is not operating
properly. If this warning stays on, contact your dealer as soon as
possible.
TRANSMISSION OVERHEATED.Indicates the transmission is
overheating. This warning may appear when towing heavy loads or when
driving in a low gear at a high speed for an extended period of time.
Stop the vehicle as soon as safely possible, turn off the engine and let it
cool. Check the transmission fluid and level. Refer toTransmission
fluidin theMaintenance and specificationschapter. If the warning
stays on or continues to come on, contact your dealer for transmission
service as soon as possible.
CHECK BRAKE LAMPS. Displayed when the brake lamps are
activated and at least one is burned out. Check the lamps as soon as
possible and have the burned out lamp replaced. The center high-mount
brakelamp is not monitored.
CHECK HEADLAMPS. Displayed when the headlamps are activated
and at least one is burned out. Check the lamps as soon as possible and
have the burned out lamp replaced. Refer toReplacing headlamp bulbs
in theLightschapter.
CHECK TAIL LAMPS.Displayed when the tail lamps are activated and
at least one is burned out. Check the lamps as soon as possible and have
the burned out lamp replaced.
CHECK FRONT TURN LAMPS.Displayed when the turn signals are
activated and at least one is burned out. Check the lamps as soon as
safely possible and have the burned out lamp replaced.
CHECK REAR TURN LAMPS.Displayed when the turn signals are
activated and at least one is burned out. Check the lamps as soon as
possible and have the burned out lamp replaced.
Driver Controls
104
Page 121 of 296

Reprogramming transmitters
To reprogram the transmitters yourself, place the key in the ignition and
turn from LOCK to OFF and cycle between OFF and ON eight times in
rapid succession (within 10 seconds) ending in the ON position. After
door locks lock/unlock, press any control on all transmitters (up to four).
With each control press of the transmitters, the door locks should cycle
(lock/unlock) to confirm programming. When completed, turn the
ignition to OFF. The door locks should cycle (lock/unlock) one last time
to confirm completion of programming.
Illuminated entry
The interior lights will illuminate when the remote entry Unlock or Panic
control is pressed with the doors closed or when unlocking or opening a
power sliding door (if equipped).
The system automatically turns off after 25 seconds or when the ignition
is turned to the RUN position. The panel dimmer control mustnotbe
set to the OFF position for the illuminated entry to operate.
The inside lights will not turn off if:
²they have been turned on with the instrument panel dimmer control
or
²any door is open
The battery saver will shut off the interior lamps in a short period of
time after the last door is closed even if the panel dimmer control is left
on.
Illuminated exit
The interior lights will illuminate when the key is removed from the
ignition. When the headlamp control is on the ªsleeping baby modeº, only
the lower interior lights will illuminate.
The system automatically turns off after 25 seconds. The panel dimmer
control mustnotbe set to the OFF position for the illuminated entry to
operate.
Autolock
This feature automatically locks all vehicle doors when:
²all doors are closed
²the engine is running
²you shift into any gear putting the vehicle in motion.
Locks and Security
121
Page 153 of 296
²the ignition switch is in the OFF position
²all vehicle doors are closed
²the driver's safety belt is unbuckled
²the parklamps/headlamps are in OFF position (If vehicle is equipped
with Autolamps, this will not affect the procedure.)
To reduce the risk of injury, do not deactivate/activate the Belt
Minder feature while driving the vehicle.
1. Turn the ignition switch to the RUN (or ON) position. (DO NOT
START THE ENGINE)
2. Wait until the safety belt warning light turns off. (Approximately 1
minute)
²Steps 3±5 must be completed within 60 seconds or the procedure will
have to be repeated.
3. Buckle then unbuckle the safety belt three times, ending with the
safety belt unbuckled. This can be done before or during BeltMinder
warning activation.
4. Turn on the parklamps/headlamps, turn off the parklamps/headlamps.
5. Buckle then unbuckle the safety belt three times, ending with the
safety belt unbuckled.
²After step 5 the safety belt warning light will be turned on for three
seconds.
6. Within seven seconds of the safety belt warning light turning off,
buckle then unbuckle the safety belt.
²This will disable BeltMinder if it is currently enabled, or enable
BeltMinder if it is currently disabled.
7. Confirmation of disabling BeltMinder is provided by flashing the safety
belt warning light four times per second for three seconds.
8. Confirmation of enabling BeltMinder is provided by flashing the safety
belt warning light four times per second for three seconds, followed by
three seconds with the safety belt warning light off, then followed by
flashing the safety belt warning light four times per second for three
seconds again.
9. After receiving confirmation, the deactivation/activation procedure is
complete.
Seating and Safety Restraints
153
Page 176 of 296
Do not start your vehicle in a closed garage or in other enclosed
areas. Exhaust fumes can be toxic. Always open the garage door
before you start the engine. SeeGuarding against exhaust fumesin
this chapter for more instructions.
If you smell exhaust fumes inside your vehicle, have your dealer
inspect your vehicle immediately. Do not drive if you smell
exhaust fumes.
Important safety precautions
A computer system controls the engine's idle revolutions per minute
(RPM). When the engine starts, the idle RPM runs faster to warm the
engine. If the engine idle speed does not slow down automatically, have
the vehicle checked. Do not allow the vehicle to idle for more than 10
minutes at the higher engine RPM.
Before starting the vehicle:
1. Make sure all vehicle occupants have buckled their safety belts. For
more information on safety belts and their proper usage, refer to the
Seating and safety restraintschapter.
2. Make sure the headlamps and vehicle accessories are off.
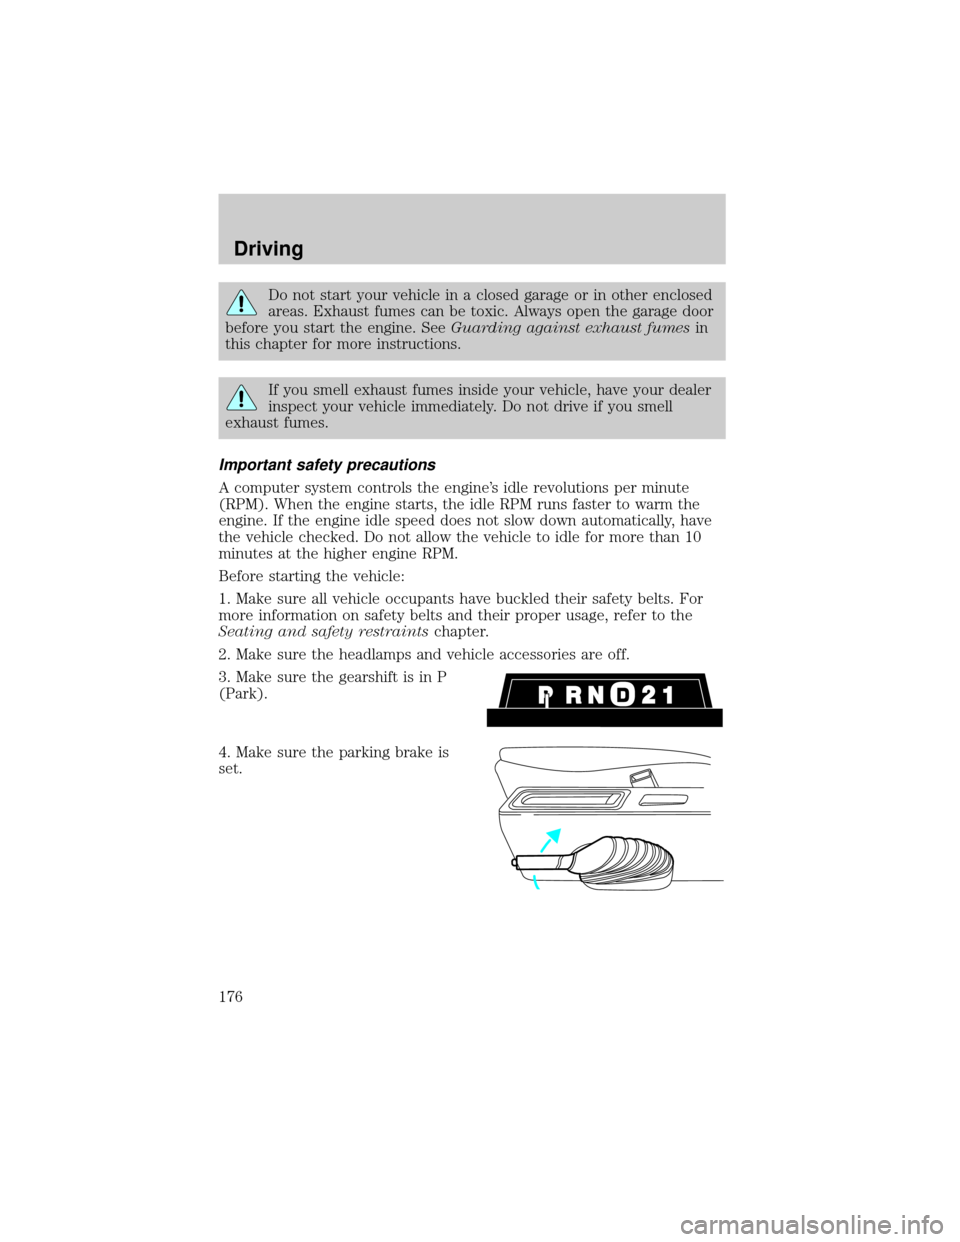
3. Make sure the gearshift is in P
(Park).
4. Make sure the parking brake is
set.
Driving
176
Page 209 of 296
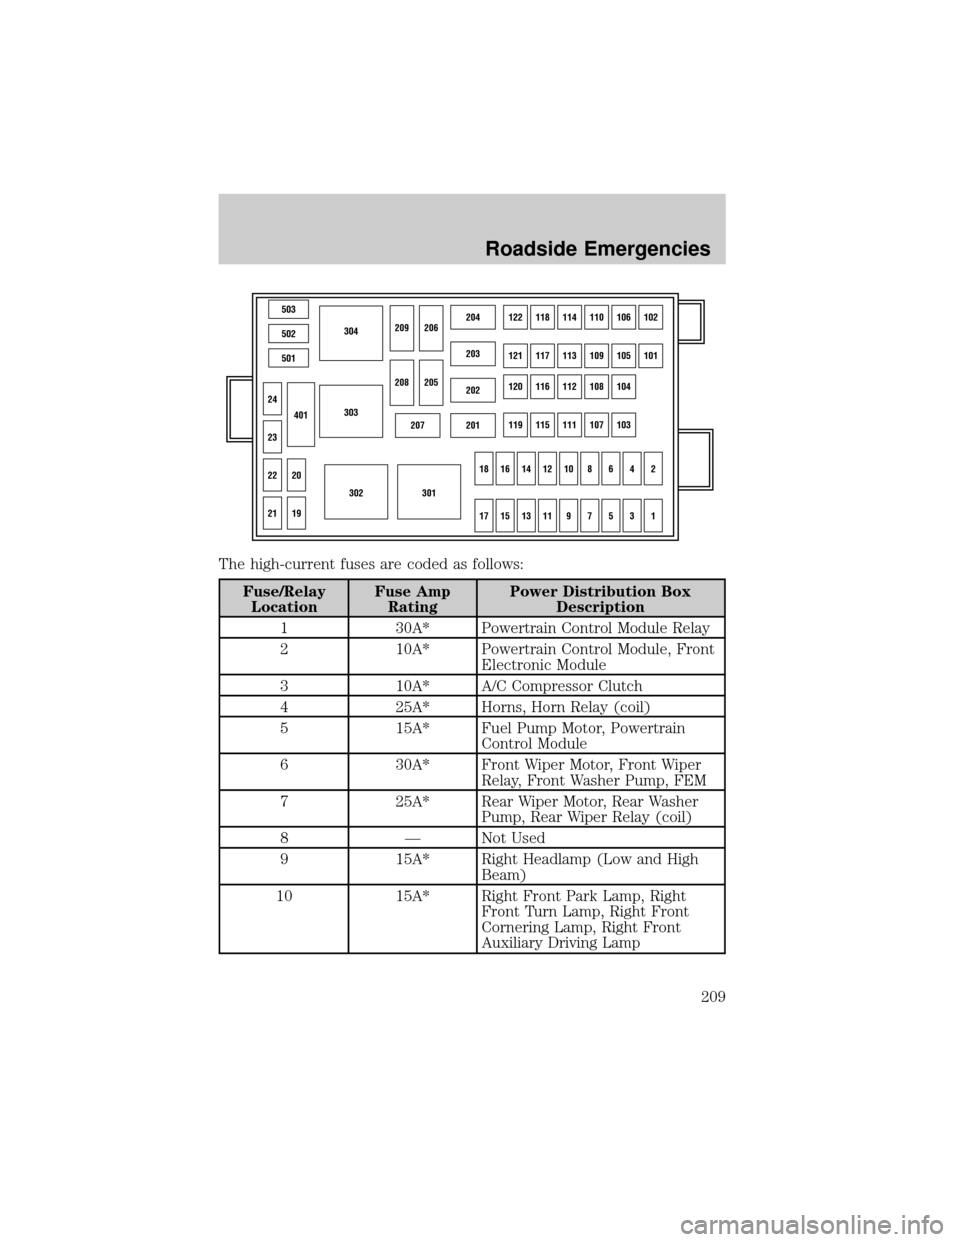
The high-current fuses are coded as follows:
Fuse/Relay
LocationFuse Amp
RatingPower Distribution Box
Description
1 30A* Powertrain Control Module Relay
2 10A* Powertrain Control Module, Front
Electronic Module
3 10A* A/C Compressor Clutch
4 25A* Horns, Horn Relay (coil)
5 15A* Fuel Pump Motor, Powertrain
Control Module
6 30A* Front Wiper Motor, Front Wiper
Relay, Front Washer Pump, FEM
7 25A* Rear Wiper Motor, Rear Washer
Pump, Rear Wiper Relay (coil)
8 Ð Not Used
9 15A* Right Headlamp (Low and High
Beam)
10 15A* Right Front Park Lamp, Right
Front Turn Lamp, Right Front
Cornering Lamp, Right Front
Auxiliary Driving Lamp
503
304
303
302301
502
501
207201
202
203
204122118114110106102
121117113109105101
120116112108104
119115111107103
24
209206
208
18161412108642
1715131197531
205
23
22
21
401
20
19
Roadside Emergencies
209
Page 210 of 296
Fuse/Relay
LocationFuse Amp
RatingPower Distribution Box
Description
11 15A* Left Front Park Lamp, Left Front
Turn Lamp, Left Front Cornering
Lamp, Left Front, Auxiliary
Driving Lamp
12 15A* Left Headlamp (Low and High
Beam)
13 10A* Alternator Field Sense
14 10A* Front Electronic Module (LH
Door Lock Motor)
15 20A* T/T park Lamps
16 20A* T/T Turn Lamps
17 Ð Not Used
18 Ð Not Used
19 15A* AX4S Transaxle, Vapor
Management Valve, A/C Clutch
Relay Coil, EGR Control Solenoid,
Engine Fuel Control HO2S #11
Sensor, Engine Fuel Control HO2S
#21 Sensor, Catalyst Monitor
HO2S #12 Sensor, Catalyst
Monitor HO2S #22 Sensor,
Canister Vent Solenoid, Intake
Manifold Runner Control
20 15A* Ignition Coil, Intake Air Control
Valve, Fuel Injectors #1, #2, #3,
#4, #5, #6, Mass Air Flow Sensor,
Fuel Pump Relay Coil, Intake
Manifold Runner Control,
HI-Speed Cooling Fan Relay Coil,
LO-Speed Cooling Fan Relay Coil,
Powertrain Control Module,
Passive Anti-Theft Receiver
21 Ð Not Used
22 Ð Not Used
23 Ð Not Used
24 Ð Not Used
Roadside Emergencies
210
Page 289 of 296

idle speed control ...................249
lubrication
specifications ..................279±280
refill capacities ........................278
service points ..........................244
starting after a collision .........201
Engine block heater .................178
Engine oil ..................................246
change oil soon warning,
message center .......................246
checking and adding ..............246
dipstick ....................................246
filter, specifications ........248, 277
recommendations ...................248
refill capacities ........................278
specifications ..................279±280
Exhaust fumes ..........................178
F
Floor mats ...................................96
Fluid capacities .........................278
Fuel ............................................257
calculating fuel economy .......262
cap .....................................11, 259
capacity ...................................278
choosing the right fuel ...........260
comparisons with EPA fuel
economy estimates .................265
detergent in fuel .....................261
filling your vehicle
with fuel ..................257, 259, 262
filter, specifications ........262, 277
fuel pump shut-off switch .....201
gauge .........................................17
improving fuel economy ........262
low fuel warning light ..............14
octane rating ...........260, 280±281
quality ......................................261
running out of fuel .................261safety information relating
to automotive fuels ................257
Fuses ..................................203±204
G
Garage door opener ..............82, 96
Gas cap (see Fuel cap) ......11, 259
Gas mileage
(see Fuel economy) .................262
Gauges .........................................16
engine coolant temperature
gauge .........................................16
fuel gauge ..................................17
odometer ...................................17
speedometer .............................17
tachometer ................................18
trip odometer ............................18
GAWR (Gross Axle Weight
Rating) .......................................193
calculating ...............................194
definition .................................193
driving with a heavy load ......193
location ....................................193
GVWR (Gross Vehicle Weight
Rating) .......................................193
calculating .......................193±194
definition .................................193
driving with a heavy load ......193
location ....................................193
H
Hazard flashers .........................201
Head restraints .................129, 133
Headlamps ...................................67
aiming ..................................69±70
autolamp system .......................67
bulb specifications ....................73
Index
289