coolant level GEELY CK 2008 Workshop Manual
[x] Cancel search | Manufacturer: GEELY, Model Year: 2008, Model line: CK, Model: GEELY CK 2008Pages: 392, PDF Size: 38.86 MB
Page 20 of 392

13Section 2 Engine Components Replacement1. Avoid gasoline ejection when work.
2. Drain the coolant to empty.
3. Remove air filter assembly with hose. See (Figure 23)
4. Remove battery
5. Remove fuel delivery pipe sub-assembly
6. Disconnect water hoses, disconnect heater outlet hose
from A/C hose.
7. Loose nut, remove accelerator control cable
8. Remove throttle body assembly
9. Remove power steering pump reservoir assembly
10. Remove front exhaust pipe assembly
11. Remove steering gear boot
12. Seperate steering column assembly. See (Figure 24)
13. Remove front wheel hub nut
14. Disconnect front wheel vehicle speed sensor (with ABS)
15. Detach steering tie rod ball stud pin assembly
16. Detach front lower swing arm sub-assembly
17. Detach front propeller assembly. See (Figure 25)
Detach front propeller from the shaft hub with plastic hammer.
18. Disconnect transmission shift cable or gear shift level assembly
19. Disconnect clutch cylinder assembly or disconnect clutch cable
20. Detach engine assembly and transaxle
(a) Hoisting engine ;
(b) Remove 3 bolts. Detach the right engine mounting bracket. See (Figure 26) ;
(c) Remove 1 bolt. Detach the left engine mounting bracket;
(d) Remove 1 bolt. Detach the rear engine mounting bracket;
(e) Remove engine and transaxle and put them on the pallet;
(f) Jack up the boday.Figure 23
Figure 24
Figure 25 Figure 26
Page 59 of 392

52Chapter 6 Cooling System Inspection
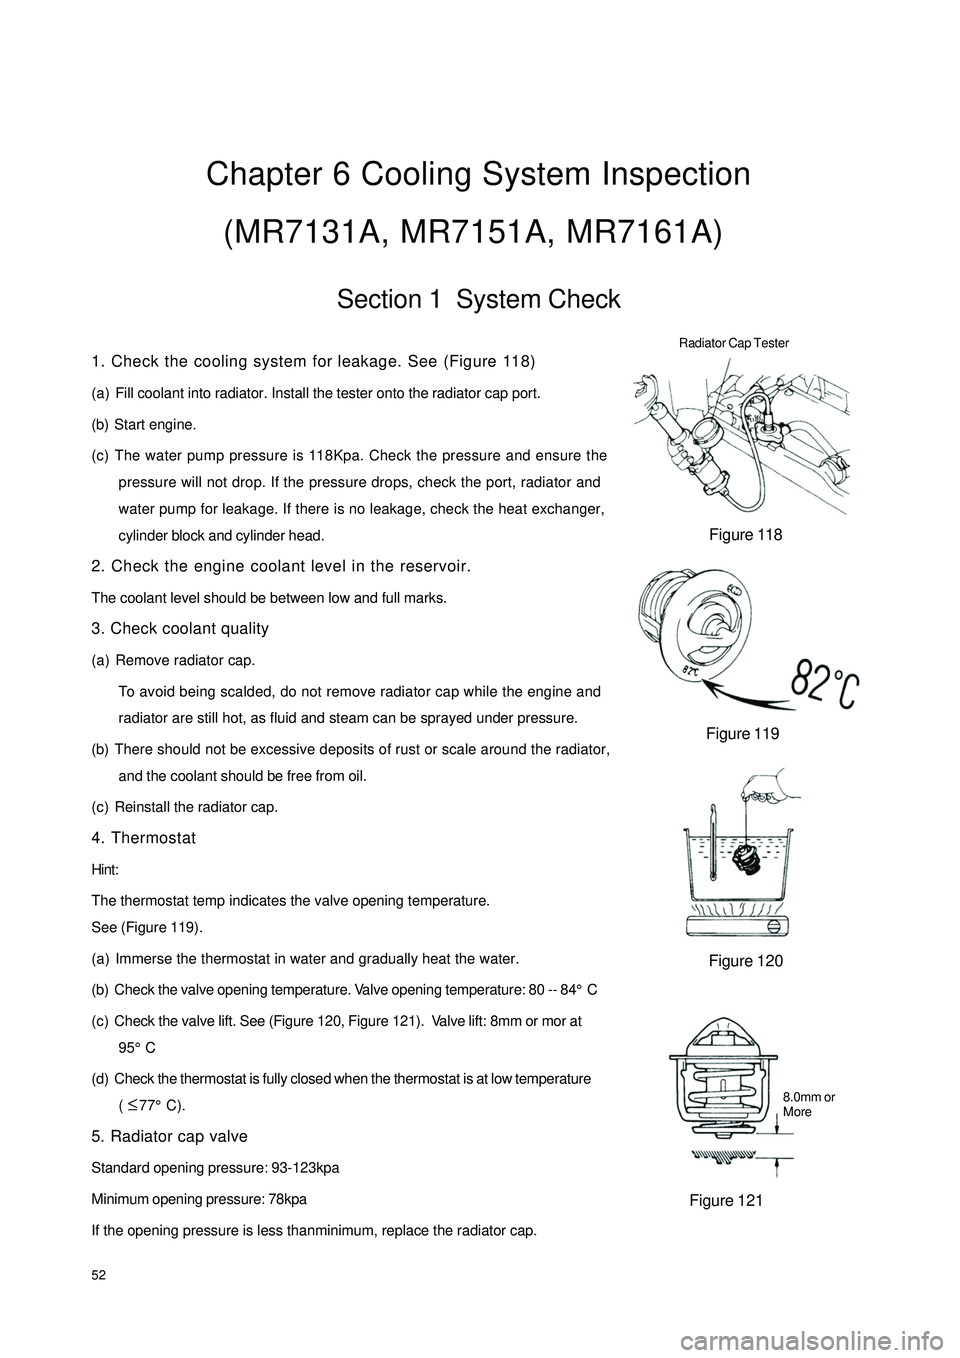
(MR7131A, MR7151A, MR7161A)Section 1 System Check1. Check the cooling system for leakage. See (Figure 118)
(a) Fill coolant into radiator. Install the tester onto the radiator cap port.
(b) Start engine.
(c) The water pump pressure is 118Kpa. Check the pressure and ensure the
pressure will not drop. If the pressure drops, check the port, radiator and
water pump for leakage. If there is no leakage, check the heat exchanger,
cylinder block and cylinder head.
2. Check the engine coolant level in the reservoir.
The coolant level should be between low and full marks.
3. Check coolant quality
(a) Remove radiator cap.
To avoid being scalded, do not remove radiator cap while the engine and
radiator are still hot, as fluid and steam can be sprayed under pressure.
(b) There should not be excessive deposits of rust or scale around the radiator,
and the coolant should be free from oil.
(c) Reinstall the radiator cap.
4. Thermostat
Hint:
The thermostat temp indicates the valve opening temperature.
See (Figure 119).
(a) Immerse the thermostat in water and gradually heat the water.
(b) Check the valve opening temperature. Valve opening temperature: 80 -- 84°C
(c) Check the valve lift. See (Figure 120, Figure 121). Valve lift: 8mm or mor at
95°C
(d) Check the thermostat is fully closed when the thermostat is at low temperature
( 77°C).
5. Radiator cap valve
Standard opening pressure: 93-123kpa
Minimum opening pressure: 78kpa
If the opening pressure is less thanminimum, replace the radiator cap.Figure 118
Figure 119
Figure 120
Figure 121 Radiator Cap Tester8.0mm or
More ≤
Page 180 of 392

1732. DEFINITION OF MULTIPIN PLUG-IN TERMINALDefinition of Terminal Color of Harness
1Empty
2EPS VG
3Empty
4Empty
5Empty
6Empty
7Empty
8 Combination switch (Position lamp P
9 Speed sensor groun B
10 Speed sensor power sourc RY
11 Speed sensor signal outpu YR
12 Fuel senso B
13 Alte rna tor WR
14 Brake fluid level switc GR
15 Oil pressure switc YG
16 Re a r de frost YB
1 Rear fog lamp Gr
2 Engine ma lfunc tion GY
3 S e a t be lt s w it c h R
4 P owe r sourc e Y
5 Engine coolant temperature senso YW
6 Park switch G
7 Power source groun B
8 Power source groun B
9ABS R
10 SRS (Ma in) RY
11 Engine re volution signa l BBl
12 Live wire (Fire wire) WG
13 High be am la mp + RB
14 Low bea m - RW
15 SRS (Sub) RG
16 Empty Terminal No.
A
B