battery replacement GEELY MK 2008 Workshop Manual
[x] Cancel search | Manufacturer: GEELY, Model Year: 2008, Model line: MK, Model: GEELY MK 2008Pages: 416, PDF Size: 25.19 MB
Page 15 of 416
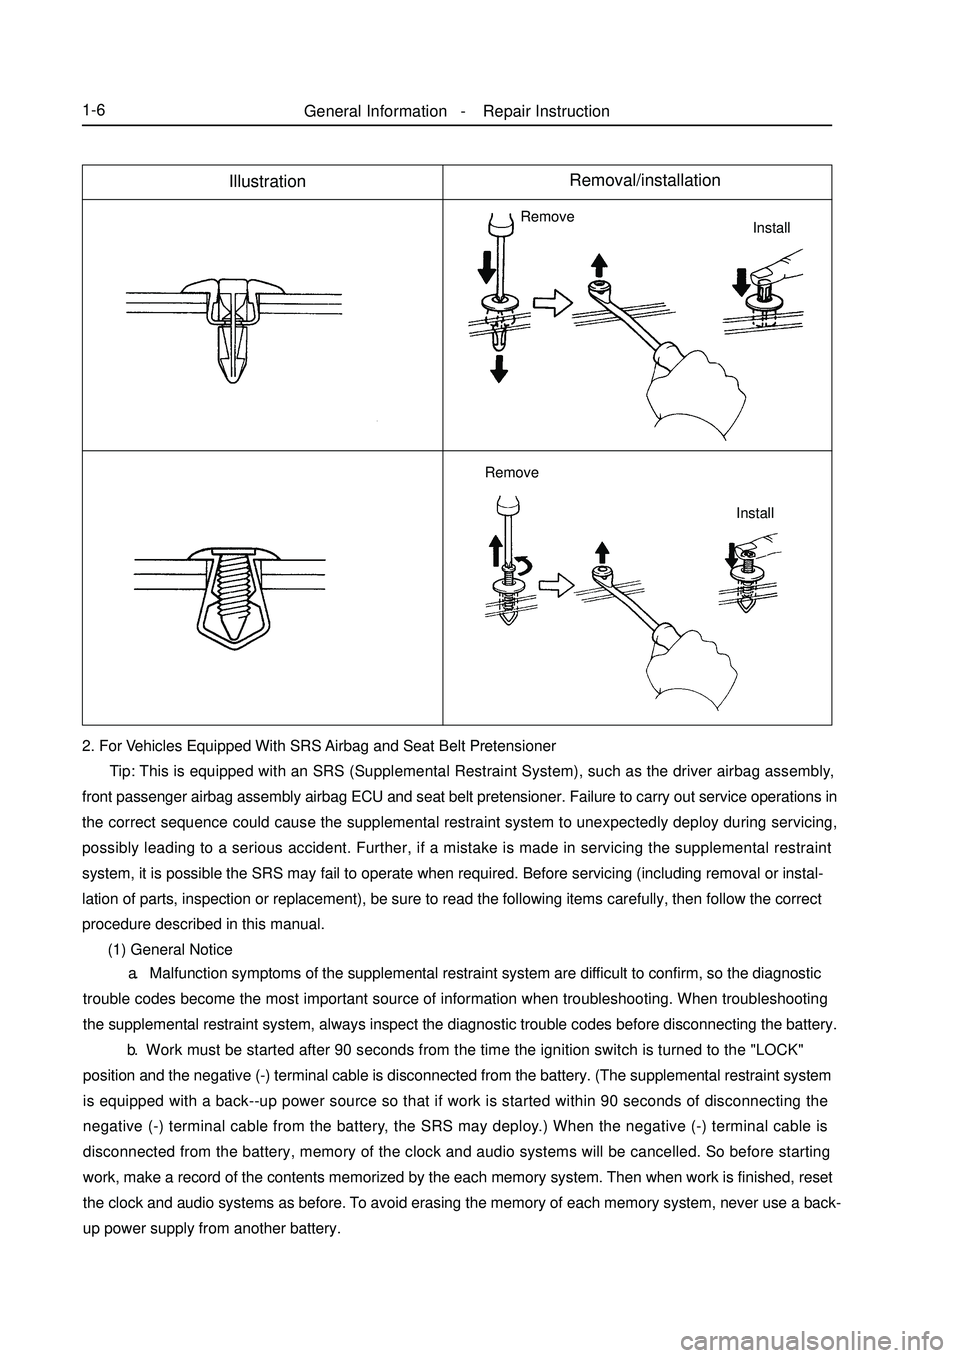
General Information - Repair Instruction1-6IllustrationRemoval/installation2. For Vehicles Equipped With SRS Airbag and Seat Belt Pretensioner
Tip: This is equipped with an SRS (Supplemental Restraint System), such as the driver airbag assembly,
front passenger airbag assembly airbag ECU and seat belt pretensioner. Failure to carry out service operations in
the correct sequence could cause the supplemental restraint system to unexpectedly deploy during servicing,
possibly leading to a serious accident. Further, if a mistake is made in servicing the supplemental restraint
system, it is possible the SRS may fail to operate when required. Before servicing (including removal or instal-
lation of parts, inspection or replacement), be sure to read the following items carefully, then follow the correct
procedure described in this manual.
(1) General NoticeInstall Remove
Install Remove a. Malfunction symptoms of the supplemental restraint system are difficult to confirm, so the diagnostic
trouble codes become the most important source of information when troubleshooting. When troubleshooting
the supplemental restraint system, always inspect the diagnostic trouble codes before disconnecting the battery.
b. Work must be started after 90 seconds from the time the ignition switch is turned to the "LOCK"
position and the negative (-) terminal cable is disconnected from the battery. (The supplemental restraint system
is equipped with a back--up power source so that if work is started within 90 seconds of disconnecting the
negative (-) terminal cable from the battery, the SRS may deploy.) When the negative (-) terminal cable is
disconnected from the battery, memory of the clock and audio systems will be cancelled. So before starting
work, make a record of the contents memorized by the each memory system. Then when work is finished, reset
the clock and audio systems as before. To avoid erasing the memory of each memory system, never use a back-
up power supply from another battery.
Page 68 of 416
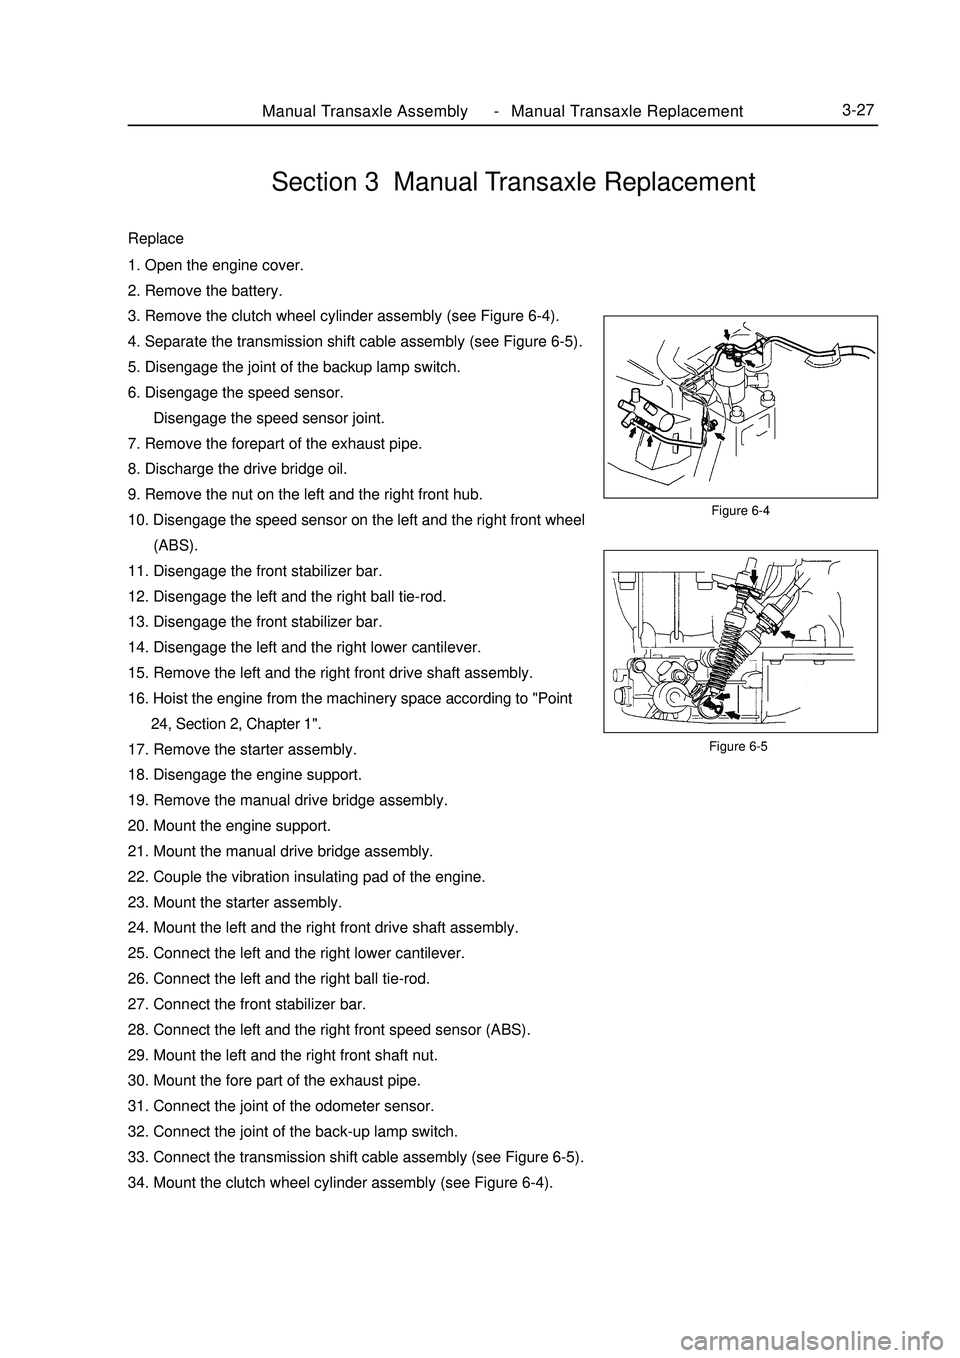
Figure 6-5Manual Transaxle Assembly Manual Transaxle Replacement3-27Section 3 Manual Transaxle ReplacementReplace1. Open the engine cover.
2. Remove the battery.
3. Remove the clutch wheel cylinder assembly (see Figure 6-4).
4. Separate the transmission shift cable assembly (see Figure 6-5).
5. Disengage the joint of the backup lamp switch.
6. Disengage the speed sensor.
Disengage the speed sensor joint.
7. Remove the forepart of the exhaust pipe.
8. Discharge the drive bridge oil.
9. Remove the nut on the left and the right front hub.
10. Disengage the speed sensor on the left and the right front wheel
(ABS).
11. Disengage the front stabilizer bar.
12. Disengage the left and the right ball tie-rod.
13. Disengage the front stabilizer bar.
14. Disengage the left and the right lower cantilever.
15. Remove the left and the right front drive shaft assembly.
16. Hoist the engine from the machinery space according to "Point
24, Section 2, Chapter 1".
17. Remove the starter assembly.
18. Disengage the engine support.
19. Remove the manual drive bridge assembly.
20. Mount the engine support.
21. Mount the manual drive bridge assembly.
22. Couple the vibration insulating pad of the engine.
23. Mount the starter assembly.
24. Mount the left and the right front drive shaft assembly.
25. Connect the left and the right lower cantilever.
26. Connect the left and the right ball tie-rod.
27. Connect the front stabilizer bar.
28. Connect the left and the right front speed sensor (ABS).
29. Mount the left and the right front shaft nut.
30. Mount the fore part of the exhaust pipe.
31. Connect the joint of the odometer sensor.
32. Connect the joint of the back-up lamp switch.
33. Connect the transmission shift cable assembly (see Figure 6-5).
34. Mount the clutch wheel cylinder assembly (see Figure 6-4).Figure 6-4 -
Page 91 of 416
b. Tighten the lock nut.
Torque: 12N.m
c. Check the pedal's height after adjusting the pedal's free
travel.
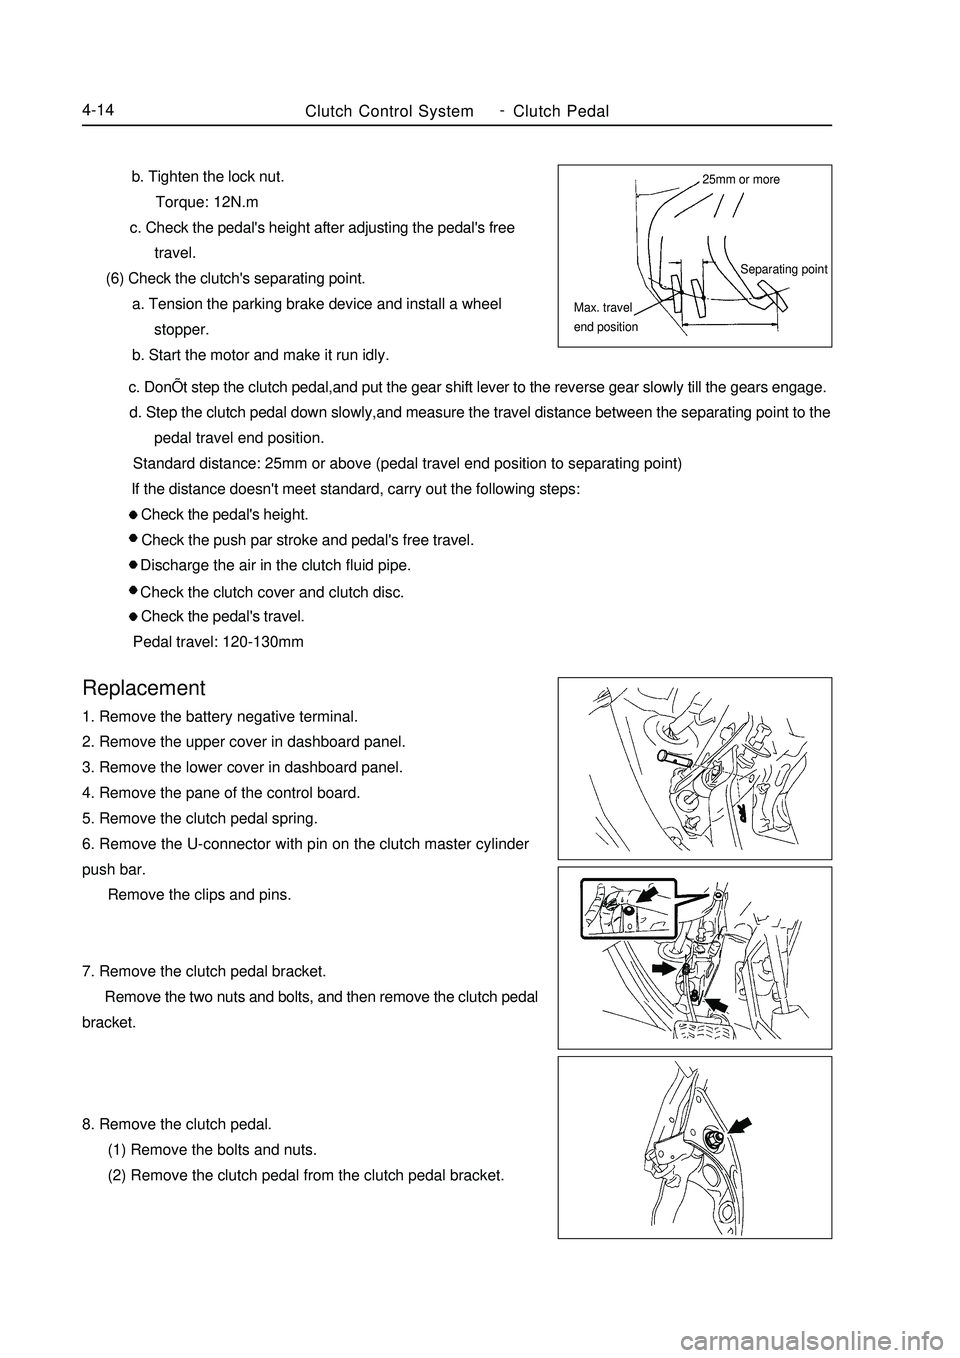
(6) Check the clutch's separating point.
a. Tension the parking brake device and install a wheel
stopper.
b. Start the motor and make it run idly. c. DonÕt step the clutch pedal,and put the gear shift lever to the reverse gear slowly till the gears engage.
d. Step the clutch pedal down slowly,and measure the travel distance between the separating point to the
pedal travel end position.
Standard distance: 25mm or above (pedal travel end position to separating point)
If the distance doesn't meet standard, carry out the following steps:
Check the pedal's height.
Check the push par stroke and pedal's free travel.
Discharge the air in the clutch fluid pipe.
Check the clutch cover and clutch disc.
Check the pedal's travel.
Pedal travel: 120-130mmReplacement1. Remove the battery negative terminal.
2. Remove the upper cover in dashboard panel.
3. Remove the lower cover in dashboard panel.
4. Remove the pane of the control board.
5. Remove the clutch pedal spring.
6. Remove the U-connector with pin on the clutch master cylinder
push bar.
Remove the clips and pins.
7. Remove the clutch pedal bracket.
Remove the two nuts and bolts, and then remove the clutch pedal
bracket.
8. Remove the clutch pedal.
(1) Remove the bolts and nuts.
(2) Remove the clutch pedal from the clutch pedal bracket.Clutch Control SystemClutch Pedal4-1425mm or more
Separating point
Max. travel
end position -
Page 148 of 416
Power Steering System
-Steering Drive and Control Mechanism4-71Replacement1. Precaution (refer to the steering system precaution)
2. Confirm that the wheel stays at a straight line running status.
3. Unfix the storage battery cathode terminal.
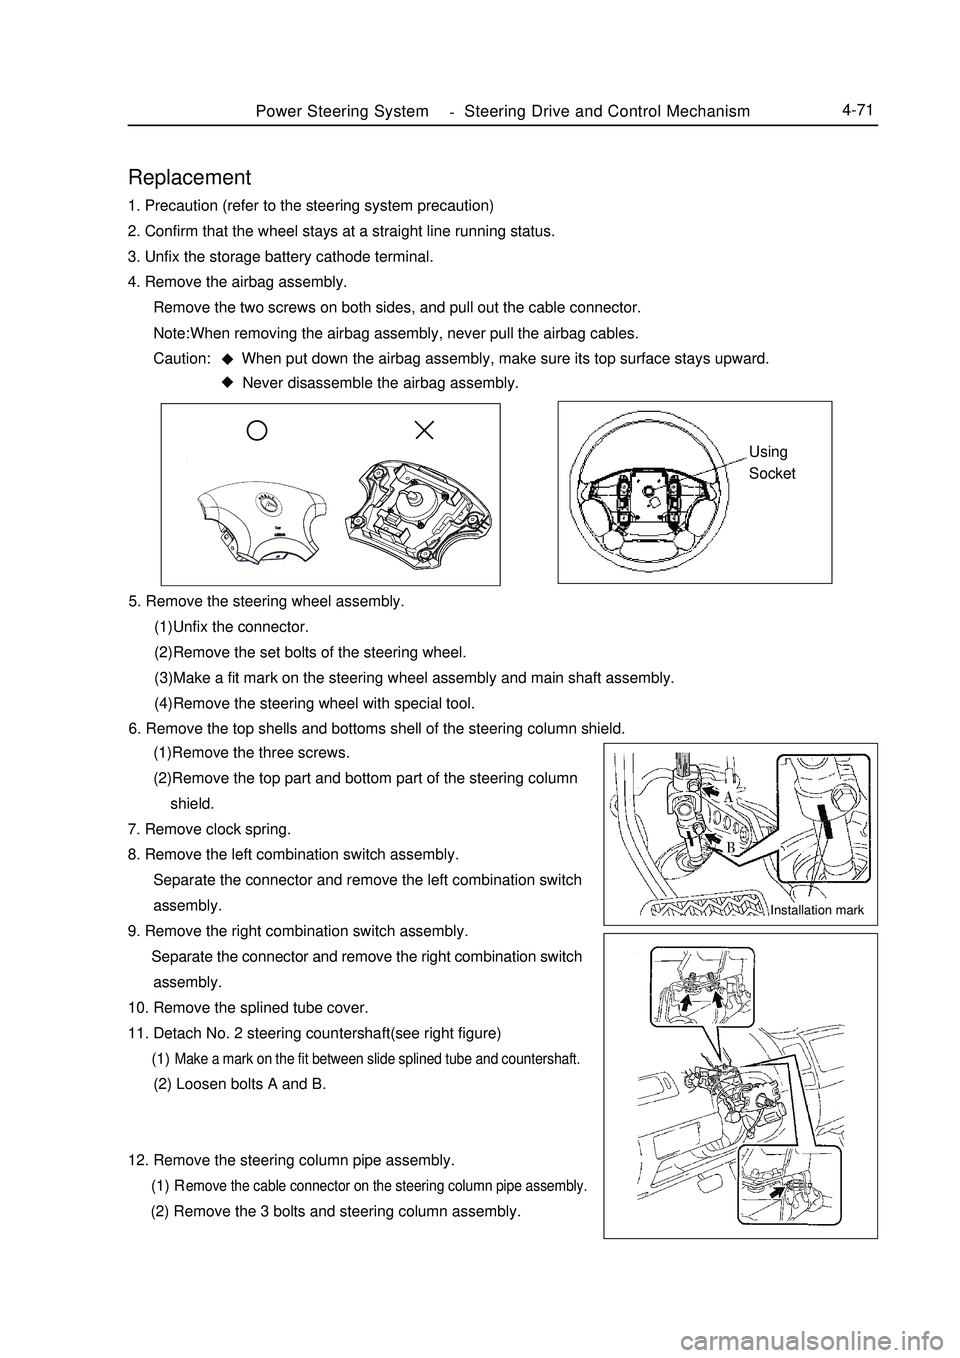
4. Remove the airbag assembly.
Remove the two screws on both sides, and pull out the cable connector.
Note: When removing the airbag assembly, never pull the airbag cables.
Caution: When put down the airbag assembly, make sure its top surface stays upward.
Never disassemble the airbag assembly.Using
Socket5. Remove the steering wheel assembly.
(1)Unfix the connector.
(2)Remove the set bolts of the steering wheel.
(3)Make a fit mark on the steering wheel assembly and main shaft assembly.
(4)Remove the steering wheel with special tool.
6. Remove the top shells and bottoms shell of the steering column shield.
(1)Remove the three screws.
(2)Remove the top part and bottom part of the steering column
shield.
7. Remove clock spring.
8. Remove the left combination switch assembly.
Separate the connector and remove the left combination switch
assembly.
9. Remove the right combination switch assembly.
Separate the connector and remove the right combination switch
assembly.
10. Remove the splined tube cover.
11. Detach No. 2 steering countershaft(see right figure)
(1) Make a mark on the fit between slide splined tube and countershaft. (2) Loosen bolts A and B.
12. Remove the steering column pipe assembly.
(1) Remove the cable connector on the steering column pipe assembly. (2) Remove the 3 bolts and steering column assembly.Installation mark
Page 189 of 416
Starting and Charging System-
Starting System5-23. WiringII. Starter assembly replacement (MR479Q, MR479QA, MR481QA)1. Remove starter assembly
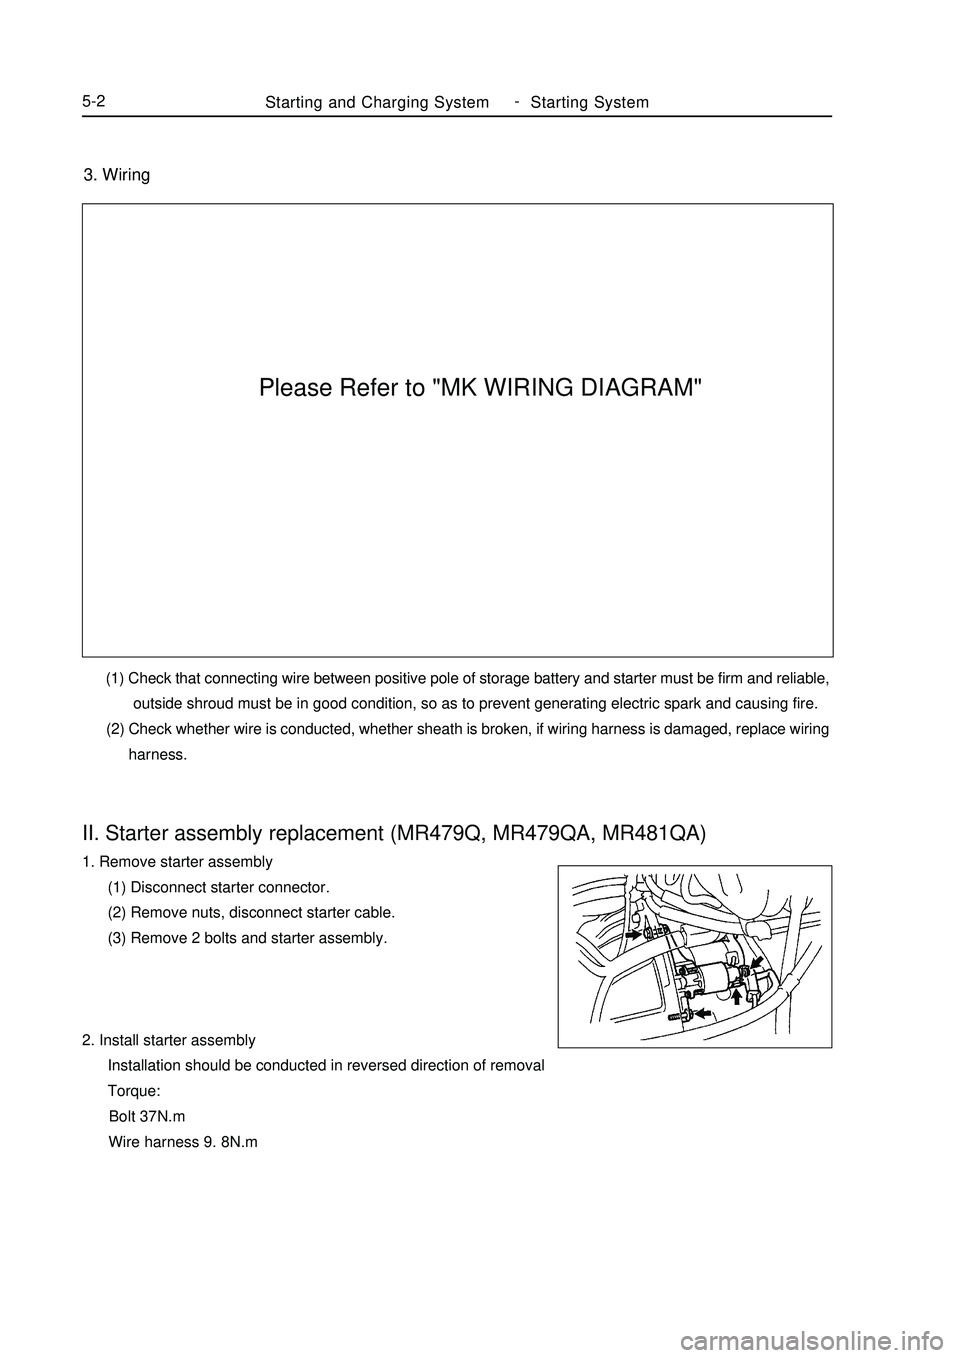
(1) Disconnect starter connector.
(2) Remove nuts, disconnect starter cable.
(3) Remove 2 bolts and starter assembly.
2. Install starter assembly
Installation should be conducted in reversed direction of removal
Torque:
Bolt 37N.m
Wire harness 9. 8N.m (1) Check that connecting wire between positive pole of storage battery and starter must be firm and reliable,
outside shroud must be in good condition, so as to prevent generating electric spark and causing fire.
(2) Check whether wire is conducted, whether sheath is broken, if wiring harness is damaged, replace wiring
harness.Please Refer to "MK WIRING DIAGRAM"
Page 210 of 416
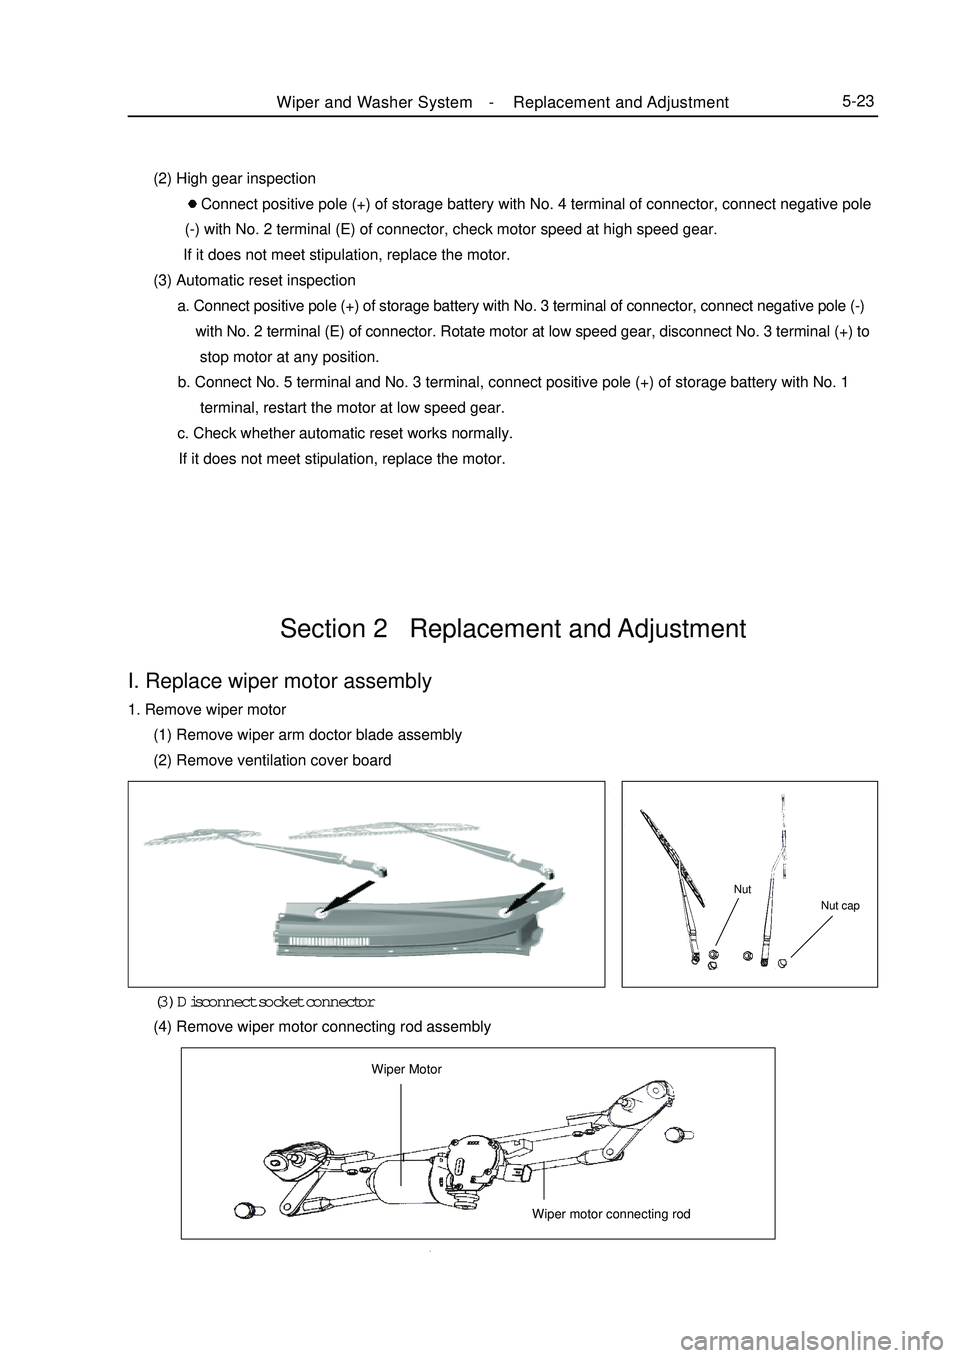
Section 2 Replacement and AdjustmentI. Replace wiper motor assembly1. Remove wiper motor
(1) Remove wiper arm doctor blade assembly
(2) Remove ventilation cover board
(3) Disconnect socket connector
(4) Remove wiper motor connecting rod assemblyNut capNutWiper MotorWiper motor connecting rodWiper and Washer System -Replacement and Adjustment5-23 (2) High gear inspection
Connect positive pole (+) of storage battery with No. 4 terminal of connector, connect negative pole
(-) with No. 2 terminal (E) of connector, check motor speed at high speed gear.
If it does not meet stipulation, replace the motor.
(3) Automatic reset inspection
a. Connect positive pole (+) of storage battery with No. 3 terminal of connector, connect negative pole (-)
with No. 2 terminal (E) of connector. Rotate motor at low speed gear, disconnect No. 3 terminal (+) to
stop motor at any position.
b. Connect No. 5 terminal and No. 3 terminal, connect positive pole (+) of storage battery with No. 1
terminal, restart the motor at low speed gear.
c. Check whether automatic reset works normally.
If it does not meet stipulation, replace the motor.
Page 221 of 416
9. Front foglight relay
Check whether front foglight relay is connected
(1) Check whether terminals are connected
check terminal Testing terminal Status
86-85 ON
30-87 OFF If it doest not meet stipulation, replace the relay.
(2) Apply storage battery voltage (10V-14V) between terminal 86 and 85, then check whether terminal 30 and
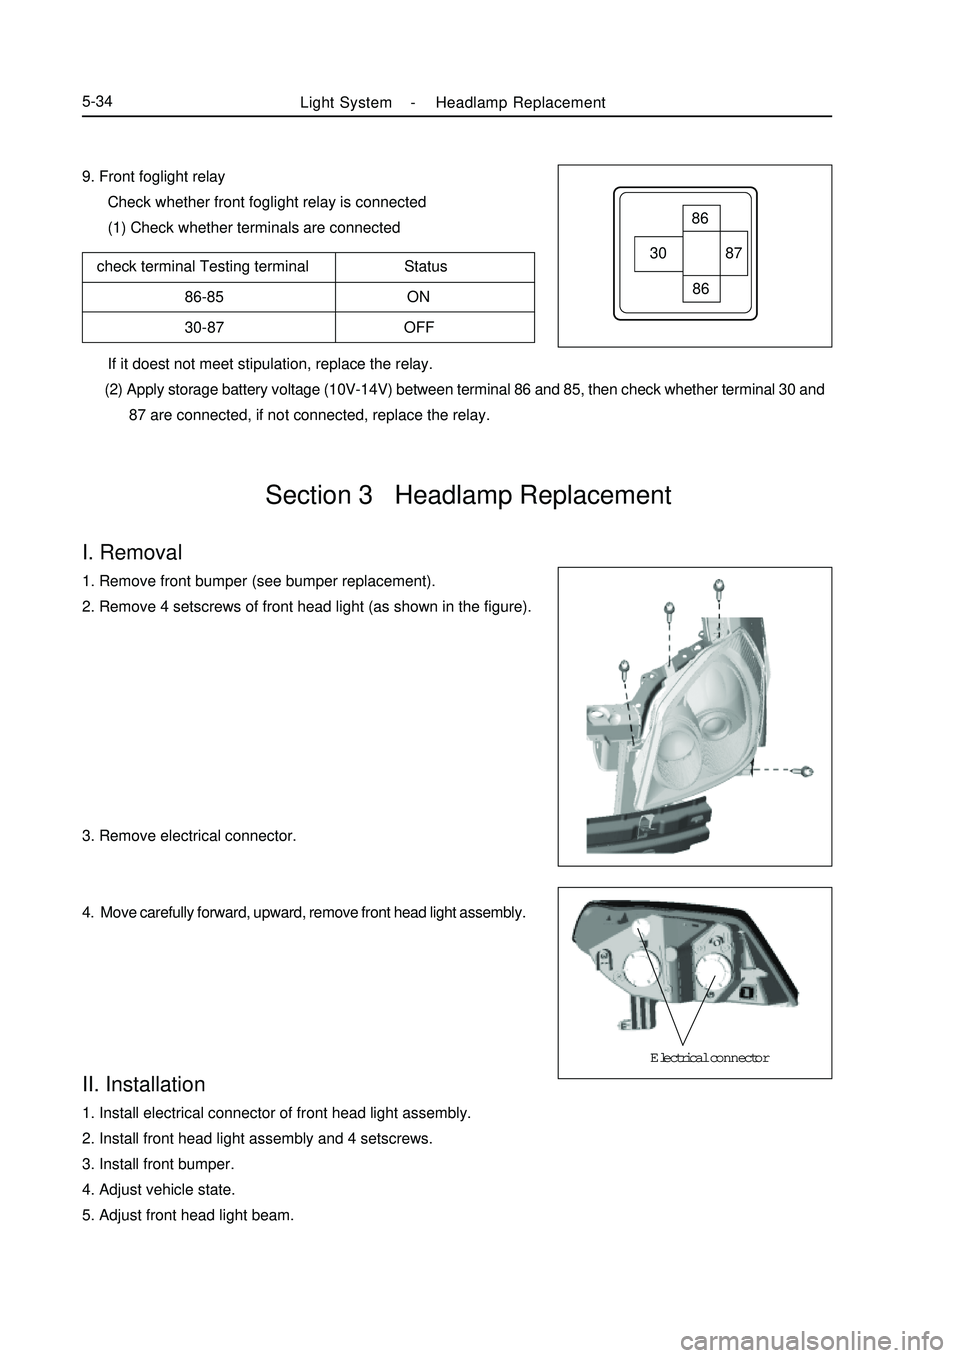
87 are connected, if not connected, replace the relay.Electrical connectorI. Removal1. Remove front bumper (see bumper replacement).
2. Remove 4 setscrews of front head light (as shown in the figure).
3. Remove electrical connector.
4. Move carefully forward, upward, remove front head light assembly.II. Installation1. Install electrical connector of front head light assembly.
2. Install front head light assembly and 4 setscrews.
3. Install front bumper.
4. Adjust vehicle state.
5. Adjust front head light beam.Section 3 Headlamp Replacement86
8687 30Light System -Headlamp Replacement5-34
Page 239 of 416
Section 4 Audio System ReplacementI. Notice on operation Please explain to the customer that the AM/FM broadcast channel information will be cleared when removing
the battery negative terminal cable. Record the channel information before removing the negative terminal cable
if necessary. Reset after connecting the negative terminal cable.
All cassette tapes and CDs must be taken out before radio removal and installation.
If the cassette tapes and CDs can not be taken out due to radio fault. Do not take them out by force. Drive the
vehicle to Service Station.
Make sure the grounding bolts are tightened before antenna removal and installation.
There will be noise when receiving electric wave if the grounding bolts are not tightened.
Don't touch the speaker cone.II. Radio assembly1. Remove middle instrument board (see internal decorations)
2. Remove radio with bracket assembly
a. Remove four screws
b. Disconnect connector
3. Remove left bracket
a. Remove four screws
4. Remove right bracket
a. Remove four screws
5. Remove radio assemblyAudio System -Audio System Replacement5-52III. Front loudspeaker assembly
1. Remove door handhold
2. Remove front door electric piovted window switch assembly
3. Remove front door decorative internal plate assembly
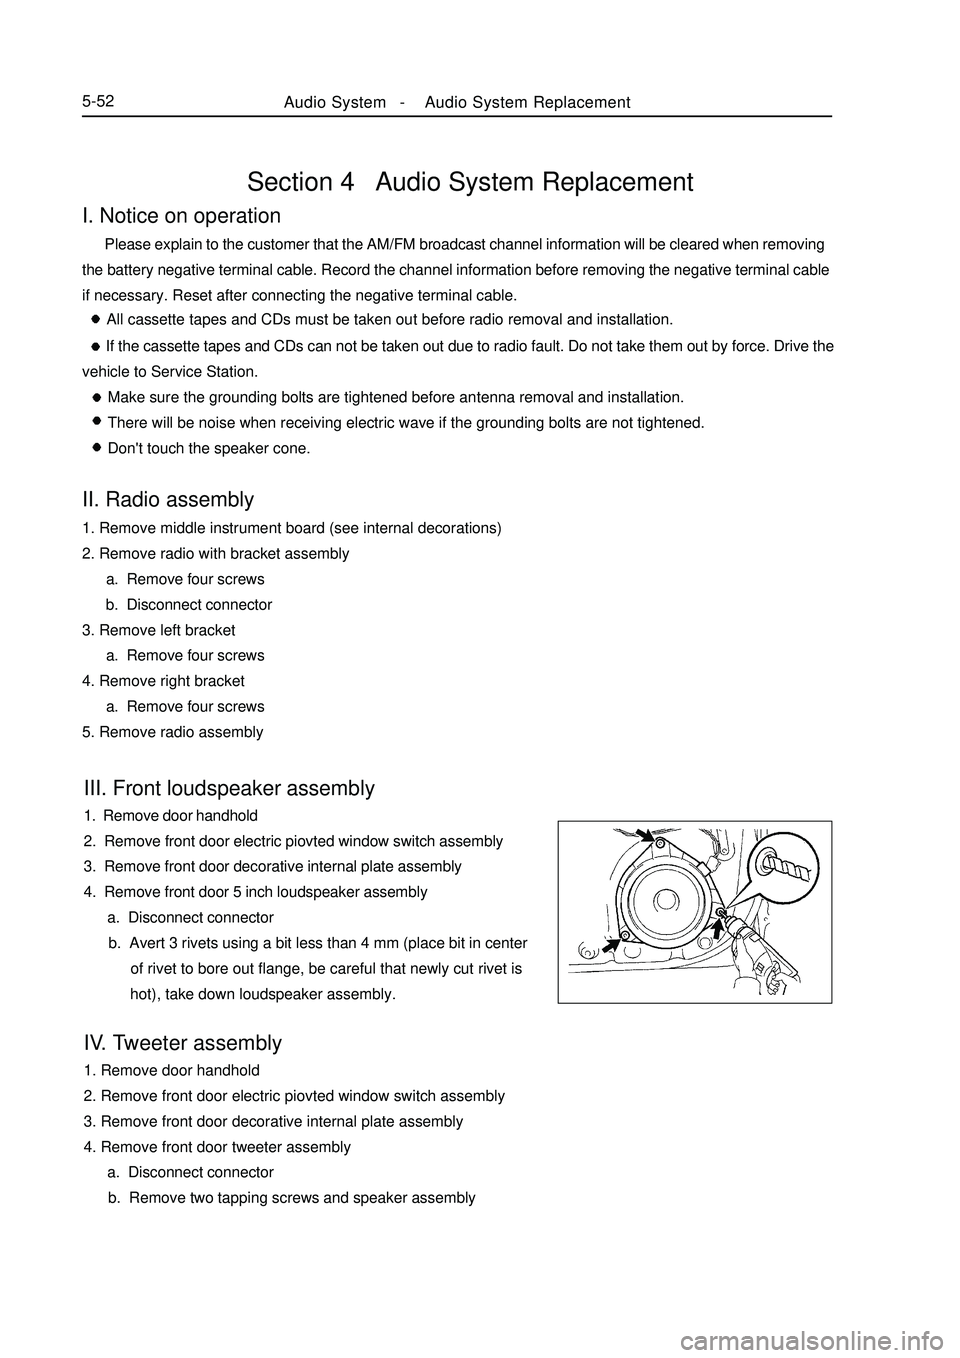
4. Remove front door 5 inch loudspeaker assembly
a. Disconnect connector
b. Avert 3 rivets using a bit less than 4 mm (place bit in center
of rivet to bore out flange, be careful that newly cut rivet is
hot), take down loudspeaker assembly.
IV. Tweeter assembly
1. Remove door handhold
2. Remove front door electric piovted window switch assembly
3. Remove front door decorative internal plate assembly
4. Remove front door tweeter assembly
a. Disconnect connector
b. Remove two tapping screws and speaker assembly
Page 311 of 416
1 2 3 45-124replacing air cleaner, always ensure that no dirt enters air duct, never
use ungraded air cleaner.
(2) Simple measuring method:
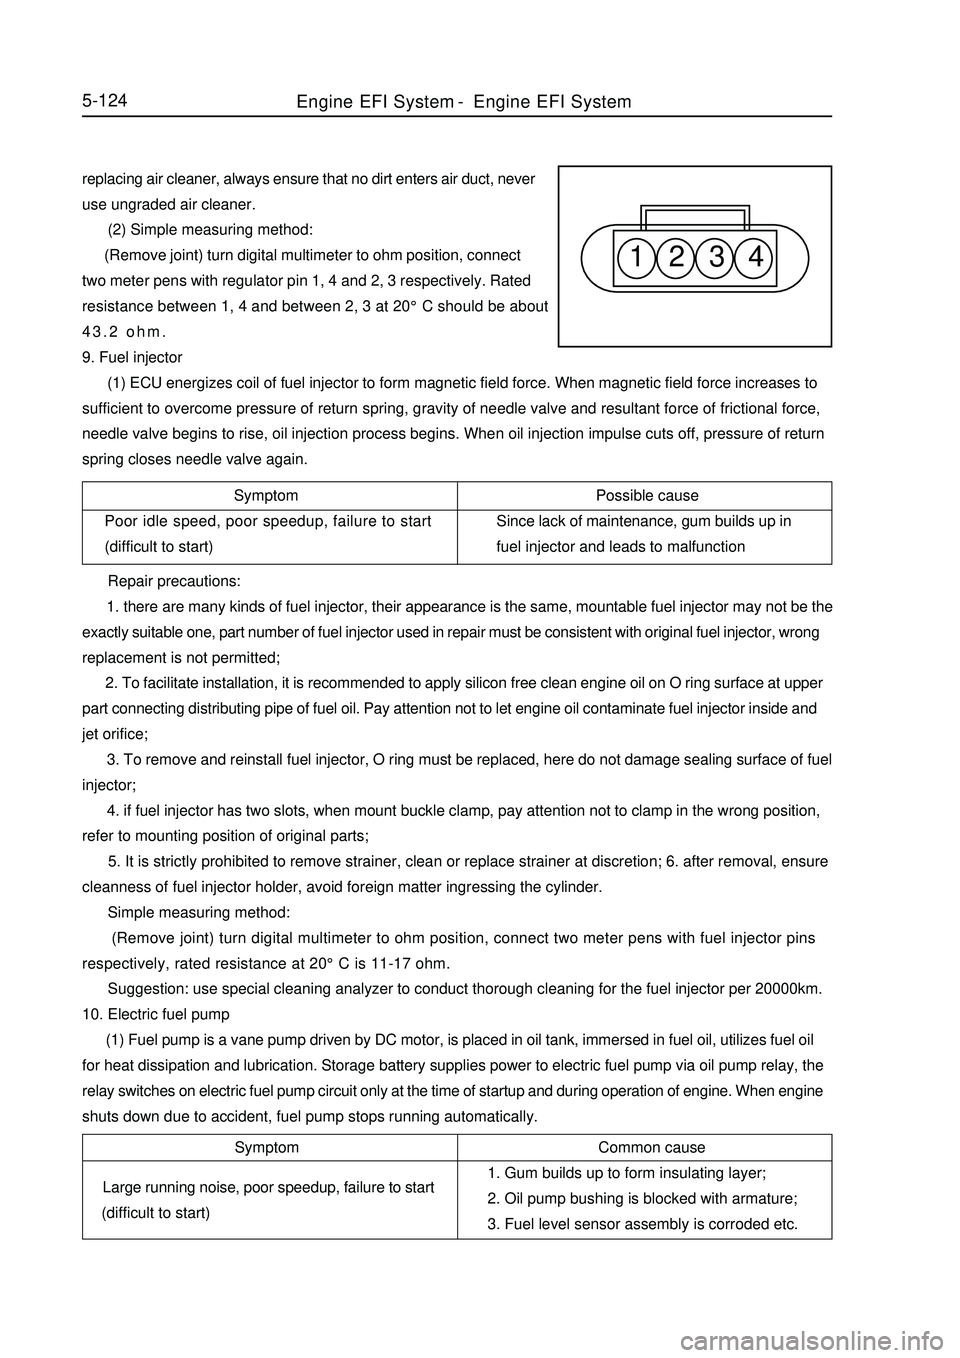
(Remove joint) turn digital multimeter to ohm position, connect
two meter pens with regulator pin 1, 4 and 2, 3 respectively. Rated
resistance between 1, 4 and between 2, 3 at 20°C should be about
43.2 ohm.
9. Fuel injector
(1) ECU energizes coil of fuel injector to form magnetic field force. When magnetic field force increases to
sufficient to overcome pressure of return spring, gravity of needle valve and resultant force of frictional force,
needle valve begins to rise, oil injection process begins. When oil injection impulse cuts off, pressure of return
spring closes needle valve again.
Symptom
Poor idle speed, poor speedup, failure to start
(difficult to start)Possible cause
Since lack of maintenance, gum builds up in
fuel injector and leads to malfunction
Repair precautions:
1. there are many kinds of fuel injector, their appearance is the same, mountable fuel injector may not be the
exactly suitable one, part number of fuel injector used in repair must be consistent with original fuel injector, wrong
replacement is not permitted;
2. To facilitate installation, it is recommended to apply silicon free clean engine oil on O ring surface at upper
part connecting distributing pipe of fuel oil. Pay attention not to let engine oil contaminate fuel injector inside and
jet orifice;
3. To remove and reinstall fuel injector, O ring must be replaced, here do not damage sealing surface of fuel
injector;
4. if fuel injector has two slots, when mount buckle clamp, pay attention not to clamp in the wrong position,
refer to mounting position of original parts;
5. It is strictly prohibited to remove strainer, clean or replace strainer at discretion; 6. after removal, ensure
cleanness of fuel injector holder, avoid foreign matter ingressing the cylinder.
Simple measuring method:
(Remove joint) turn digital multimeter to ohm position, connect two meter pens with fuel injector pins
respectively, rated resistance at 20°C is 11-17 ohm.
Suggestion: use special cleaning analyzer to conduct thorough cleaning for the fuel injector per 20000km.
10. Electric fuel pump
(1) Fuel pump is a vane pump driven by DC motor, is placed in oil tank, immersed in fuel oil, utilizes fuel oil
for heat dissipation and lubrication. Storage battery supplies power to electric fuel pump via oil pump relay, the
relay switches on electric fuel pump circuit only at the time of startup and during operation of engine. When engine
shuts down due to accident, fuel pump stops running automatically.Symptom
Large running noise, poor speedup, failure to start
(difficult to start)Common cause
1. Gum builds up to form insulating layer;
2. Oil pump bushing is blocked with armature;
3. Fuel level sensor assembly is corroded etc.Engine EFI System-Engine EFI System
Page 324 of 416
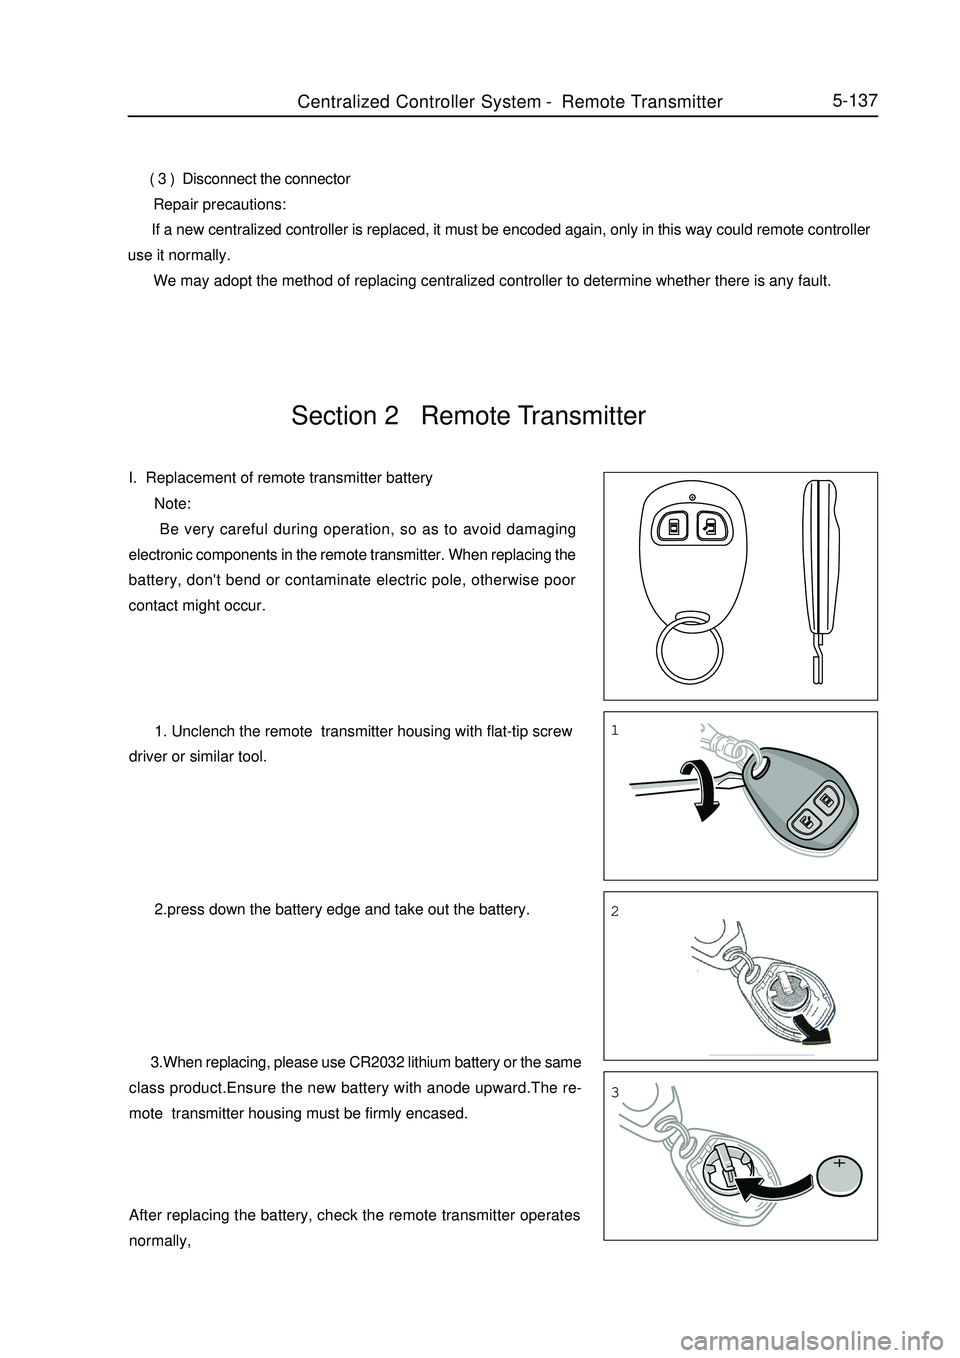
Section 2 Remote TransmitterI. Replacement of remote transmitter battery Note:
Be very careful during operation, so as to avoid damaging
electronic components in the remote transmitter. When replacing the
battery, don't bend or contaminate electric pole, otherwise poor
contact might occur.1
2
3 ( 3 ) Disconnect the connector
Repair precautions:
If a new centralized controller is replaced, it must be encoded again, only in this way could remote controller
use it normally.
We may adopt the method of replacing centralized controller to determine whether there is any fault.5-137Centralized Controller System-Remote Transmitter 1. Unclench the remote transmitter housing with flat-tip screw
driver or similar tool.
2.press down the battery edge and take out the battery.
3.When replacing, please use CR2032 lithium battery or the same
class product.Ensure the new battery with anode upward.The re-
mote transmitter housing must be firmly encased.
After replacing the battery, check the remote transmitter operates
normally,