coolant GEELY MK 2008 User Guide
[x] Cancel search | Manufacturer: GEELY, Model Year: 2008, Model line: MK, Model: GEELY MK 2008Pages: 416, PDF Size: 25.19 MB
Page 54 of 416
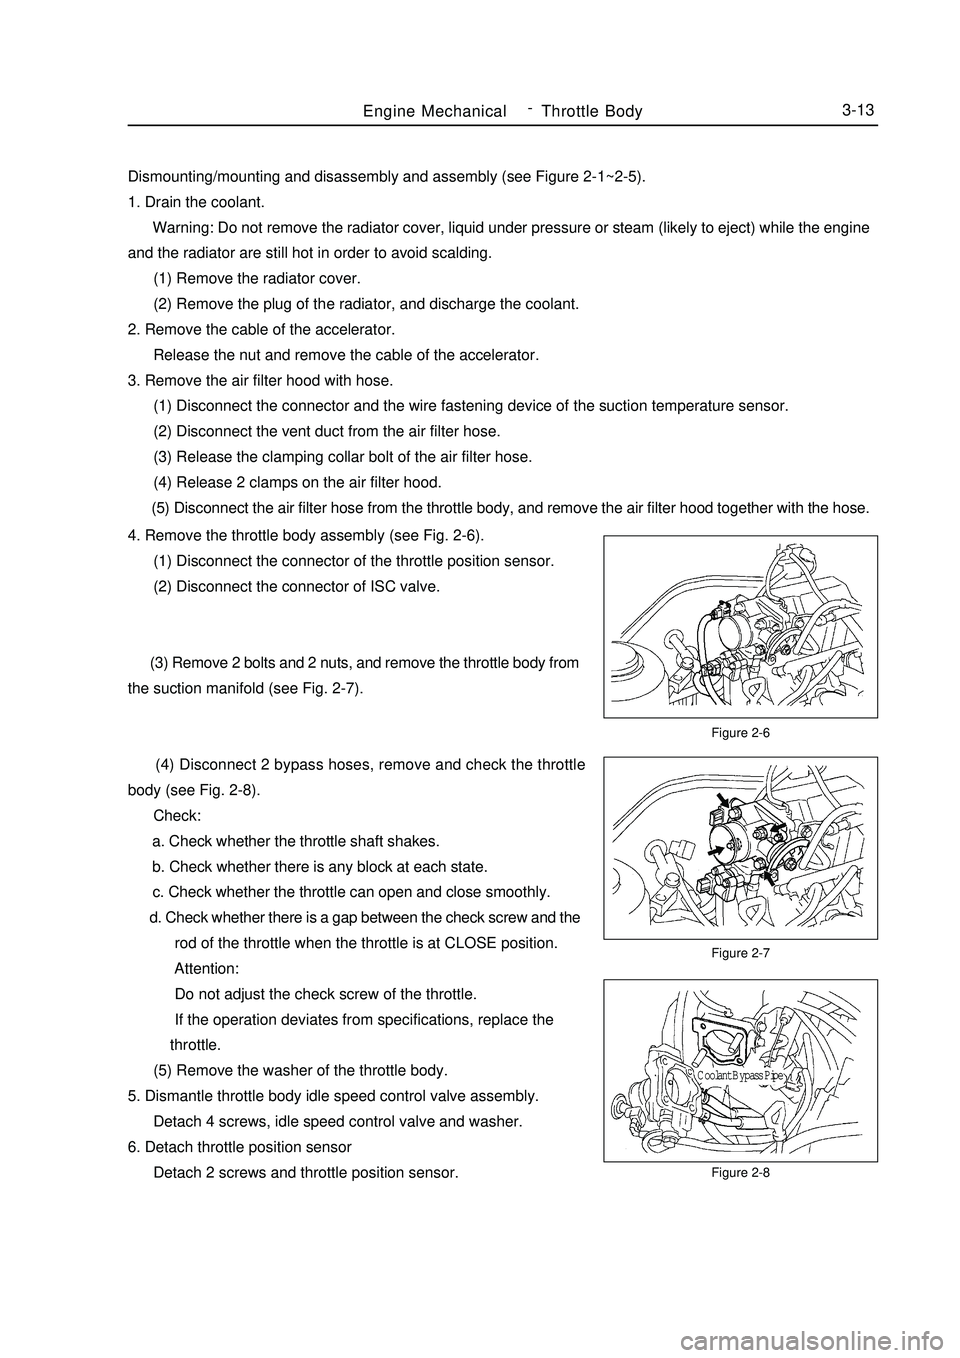
Dismounting/mounting and disassembly and assembly (see Figure 2-1~2-5).
1. Drain the coolant.
Warning: Do not remove the radiator cover, liquid under pressure or steam (likely to eject) while the engine
and the radiator are still hot in order to avoid scalding.
(1) Remove the radiator cover.
(2) Remove the plug of the radiator, and discharge the coolant.
2. Remove the cable of the accelerator.
Release the nut and remove the cable of the accelerator.
3. Remove the air filter hood with hose.
(1) Disconnect the connector and the wire fastening device of the suction temperature sensor.
(2) Disconnect the vent duct from the air filter hose.
(3) Release the clamping collar bolt of the air filter hose.
(4) Release 2 clamps on the air filter hood.
(5) Disconnect the air filter hose from the throttle body, and remove the air filter hood together with the hose.Figure 2-6
Figure 2-7
Figure 2-8Engine MechanicalThrottle Body3-134. Remove the throttle body assembly (see Fig. 2-6).
(1) Disconnect the connector of the throttle position sensor.
(2) Disconnect the connector of ISC valve.
(3) Remove 2 bolts and 2 nuts, and remove the throttle body from
the suction manifold (see Fig. 2-7).
(4) Disconnect 2 bypass hoses, remove and check the throttle
body (see Fig. 2-8).
Check:
a. Check whether the throttle shaft shakes.
b. Check whether there is any block at each state.
c. Check whether the throttle can open and close smoothly.
d. Check whether there is a gap between the check screw and the
rod of the throttle when the throttle is at CLOSE position.
Attention:
Do not adjust the check screw of the throttle.
If the operation deviates from specifications, replace the
throttle.
(5) Remove the washer of the throttle body.
5. Dismantle throttle body idle speed control valve assembly.
Detach 4 screws, idle speed control valve and washer.
6. Detach throttle position sensor
Detach 2 screws and throttle position sensor.Coolant Bypass Pipe -
Page 63 of 416
2. Check the engine coolant quantity in the compensating tank.
The coolant level should be between LOW and FULL.
3. Check the coolant quality.
(1) Remove the radiator cover.
Do not remove the radiator cover when the engine and the radiator are still hot in order to avoid scalding
since the liquid vapor may inject.
(2) Check whether there are excessive deposit and rust or sundries around the radiator cover. The coolant is
not allowed to contact with oil.
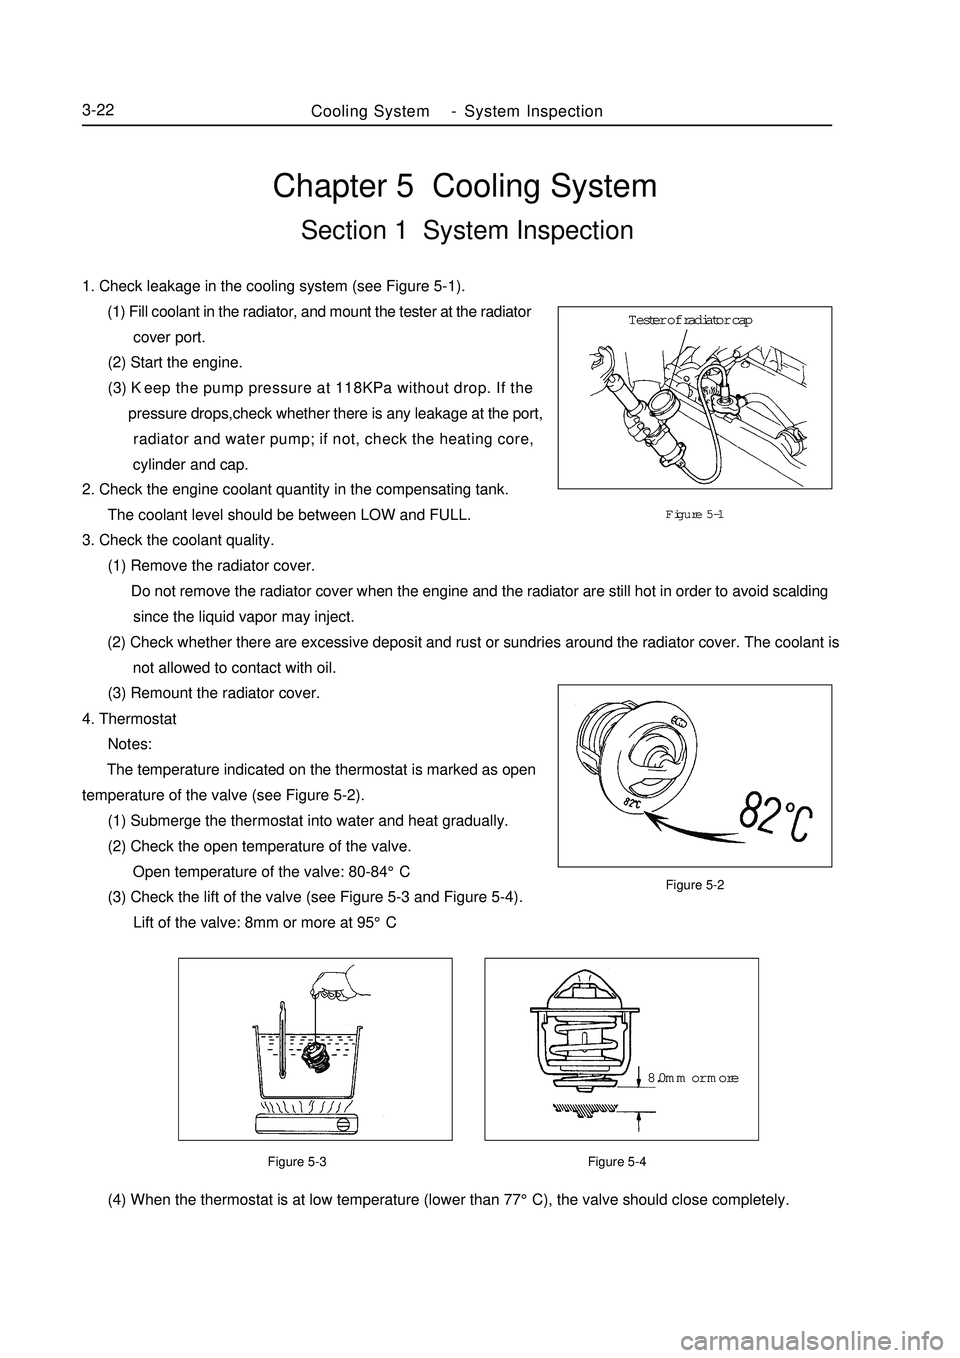
(3) Remount the radiator cover.Chapter 5 Cooling SystemSection 1 System Inspection1. Check leakage in the cooling system (see Figure 5-1).
(1) Fill coolant in the radiator, and mount the tester at the radiator
cover port.
(2) Start the engine.
(3) Keep the pump pressure at 118KPa without drop. If the
pressure drops,check whether there is any leakage at the port,
radiator and water pump; if not, check the heating core,
cylinder and cap.Figure 5-1
Figure 5-2
Figure 5-3 Figure 5-4 (4) When the thermostat is at low temperature (lower than 77°C), the valve should close completely.Cooling SystemSystem Inspection3-224. Thermostat
Notes:
The temperature indicated on the thermostat is marked as open
temperature of the valve (see Figure 5-2).
(1) Submerge the thermostat into water and heat gradually.
(2) Check the open temperature of the valve.
Open temperature of the valve: 80-84°C
(3) Check the lift of the valve (see Figure 5-3 and Figure 5-4).
Lift of the valve: 8mm or more at 95°CTester of radiator cap
8.0mm or more -
Page 64 of 416

Figure 5-6
Figure 5-7Above 93°CFigure 5-5Cooling SystemSystem Inspection3-235. Fan
(1) At low temperature (lower than 83°C), check the operation of
the cooling fan.
a. The ignition switch is set to ON.
b. The cooling fan should stop.
c. Disconnect the connector of the water temperature sensor.
(see Figure 5-5)
d.Touch the ground with a wire.
e.Check if the cooling fan rotates.
f. Re-connect the connector of the water temperature sensor.
(2) At high temperature (more than 93°C), check the operation of
the fan (see Figure 5-6).
a. Start the engine, and enable the coolant temperature higher
than 93°C.
b.Check whether the cooling fan rotates.
If not, replace the water temperature switch.
(3) Check the cooling fan (see Figure 5-7).
a. Disconnect the joint of the cooling fan.
b. Connect the battery and the ammeter with the connector.
c. The cooling fan should rotate stably and check the current
readings.
Standard current: 5.7-7.7A.
d. Connect the connector of the cooling fan.disconnectBattery Amper meter -
Page 65 of 416
Section 2 Radiator Replacement1. Replace the radiator.
(1) Open the radiator cover.
(2) Open the water drain valve and discharge the coolant.
(3) Disconnect the water inlet pipe of the radiator.
(4) Disconnect the water outlet pipe of the radiator.
(5) Disconnect the input pipe of the oil cooler of the automatic transmission (automatic transmission).
(6) Disconnect the output pipe of the oil cooler of the automatic transmission (automatic transmission).
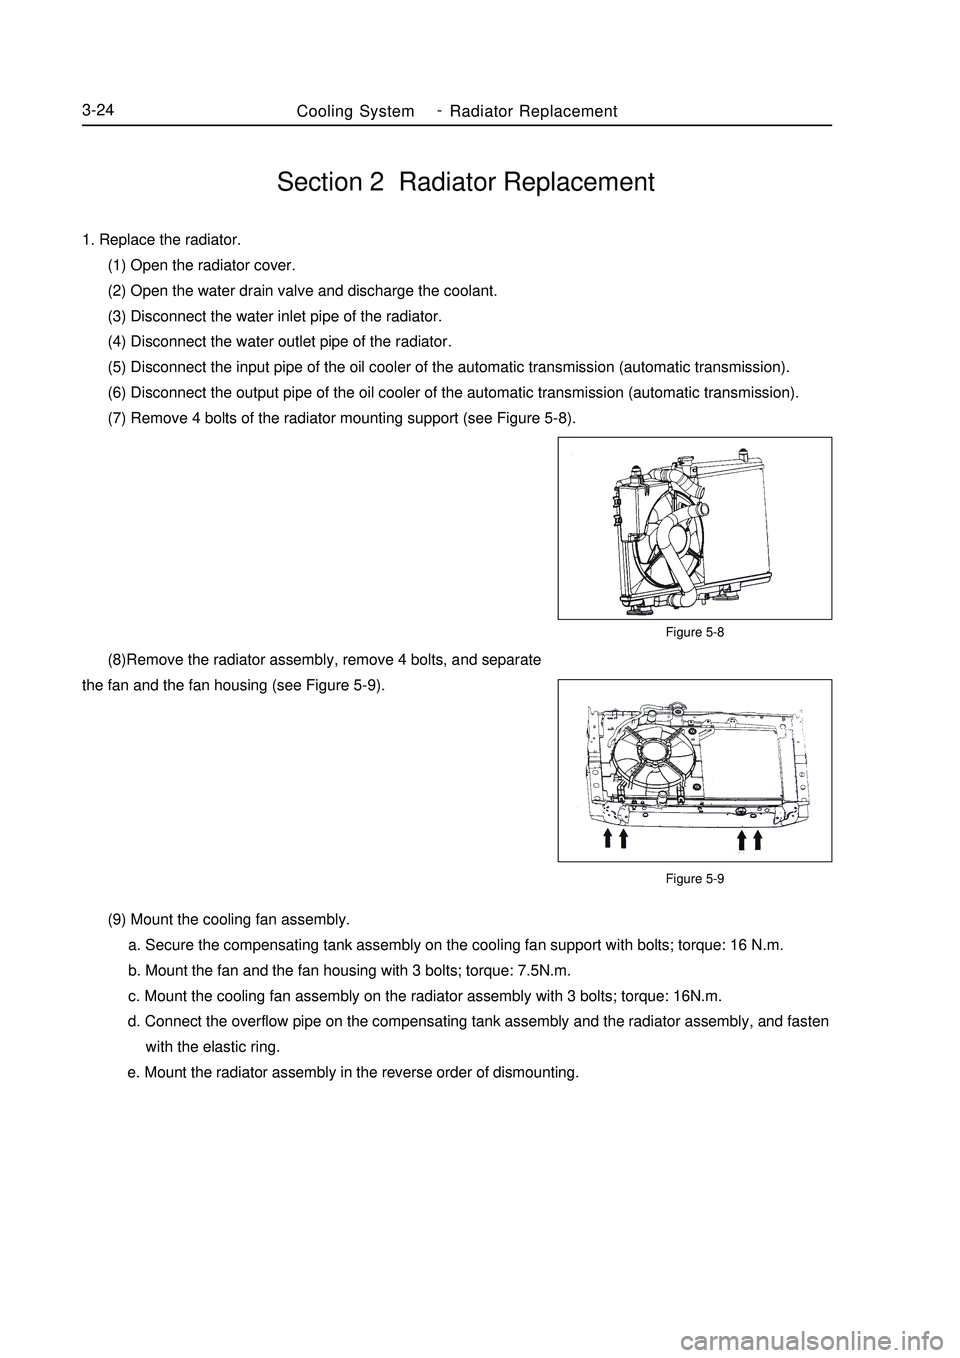
(7) Remove 4 bolts of the radiator mounting support (see Figure 5-8).Figure 5-8
Figure 5-9Cooling SystemRadiator Replacement3-24 (8)Remove the radiator assembly, remove 4 bolts, and separate
the fan and the fan housing (see Figure 5-9).
(9) Mount the cooling fan assembly.
a. Secure the compensating tank assembly on the cooling fan support with bolts; torque: 16 N.m.
b. Mount the fan and the fan housing with 3 bolts; torque: 7.5N.m.
c. Mount the cooling fan assembly on the radiator assembly with 3 bolts; torque: 16N.m.
d. Connect the overflow pipe on the compensating tank assembly and the radiator assembly, and fasten
with the elastic ring.
e. Mount the radiator assembly in the reverse order of dismounting. -
Page 196 of 416
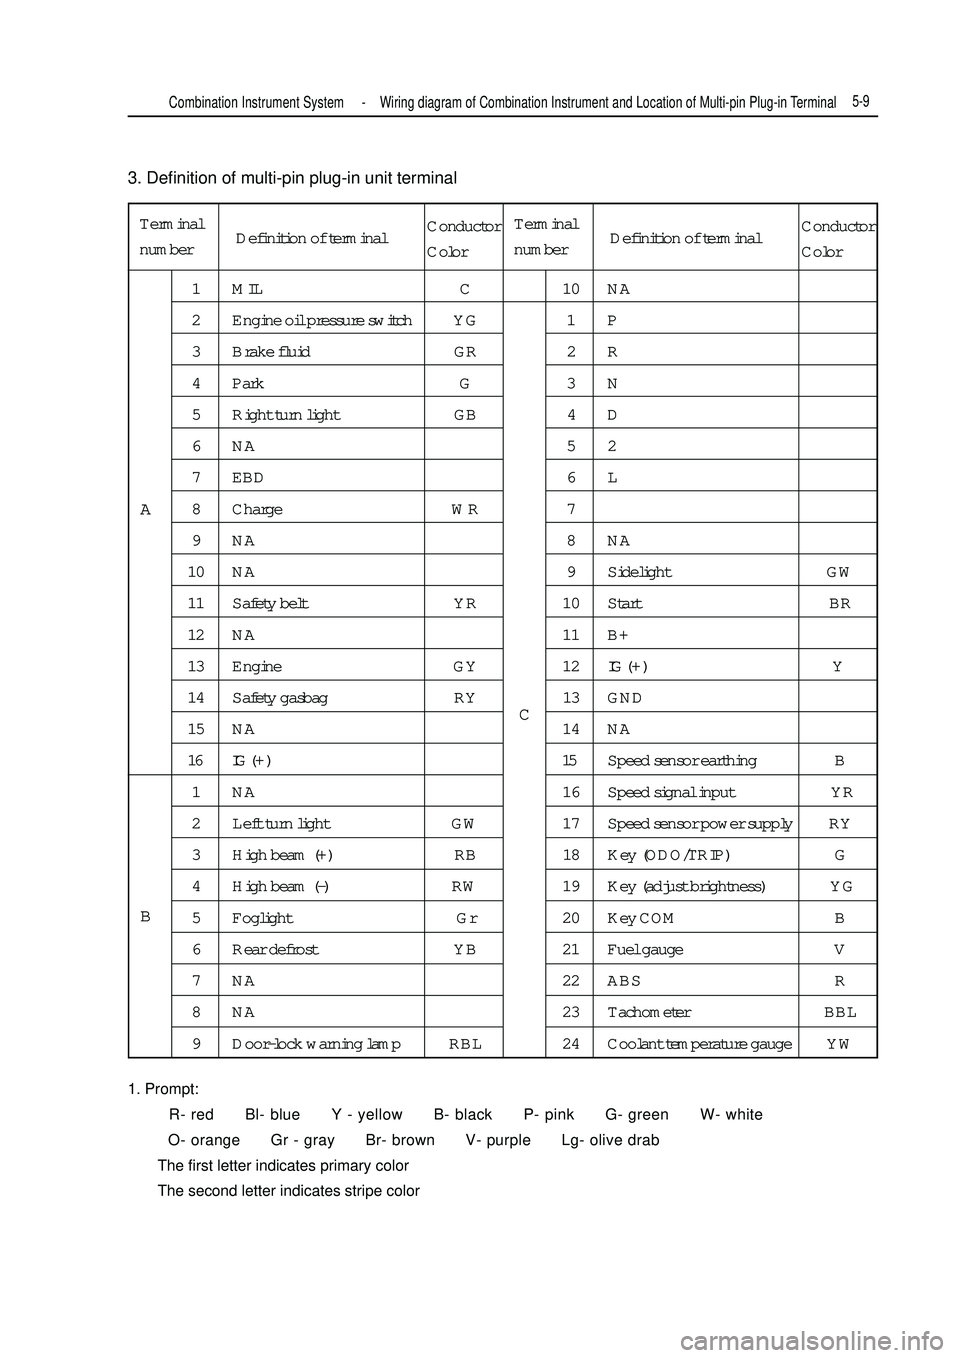
3. Definition of multi-pin plug-in unit terminal
1. Prompt:
R- red Bl- blue Y - yellow B- black P- pink G- green W- white
O- orange Gr - gray Br- brown V- purple Lg- olive drab
The first letter indicates primary color
The second letter indicates stripe colorTerminal
number1 MIL C 10 NA
2 Engine oil pressure switch YG 1 P
3 Brake fluid GR 2 R
4 Park G 3 N
5 Right turn light GB 4 D
6NA 52
7 EBD 6 L
8 Charge WR 7
9NA 8NA
10 NA 9 Sidelight GW
11 Safety belt YR 10 Start BR
12 NA 11 B+
13 Engine GY 12IG ( + ) Y
14 Safety gasbag RY 13 GND
15 NA 14 NA
16 IG ( + ) 15Speed sensor earthing B
1 NA 16 Speed signal input YR
2 Left turn light GW 17 Speed sensor power supply RY
3 High beam (+) RB 18 Key (ODO/TRIP) G
4 High beam (-) RW 19 Key (adjust brightness) YG
5 Foglight Gr 20 Key COM B
6 Rear defrost YB 21 Fuel gauge V
7 NA 22 ABS R
8 NA 23 Tachometer BBL
9 Door-lock warning lamp RBL 24 Coolant temperature gauge YWA
BCCombination Instrument System -Wiring diagram of Combination Instrument and Location of Multi-pin Plug-in Terminal5-9Definition of terminalConductor
ColorTerminal
numberDefinition of terminalConductor
Color
Page 200 of 416
5-13 c. Check voltage between terminals
Standard:Tester connectionConditions Standard condition
C 12- ground Turn ignition switch to ON position 7. 5-9V
Result and measures:
Abnormal, repair or replace wiring harness or connector
Normal, replace combination instrument assy.
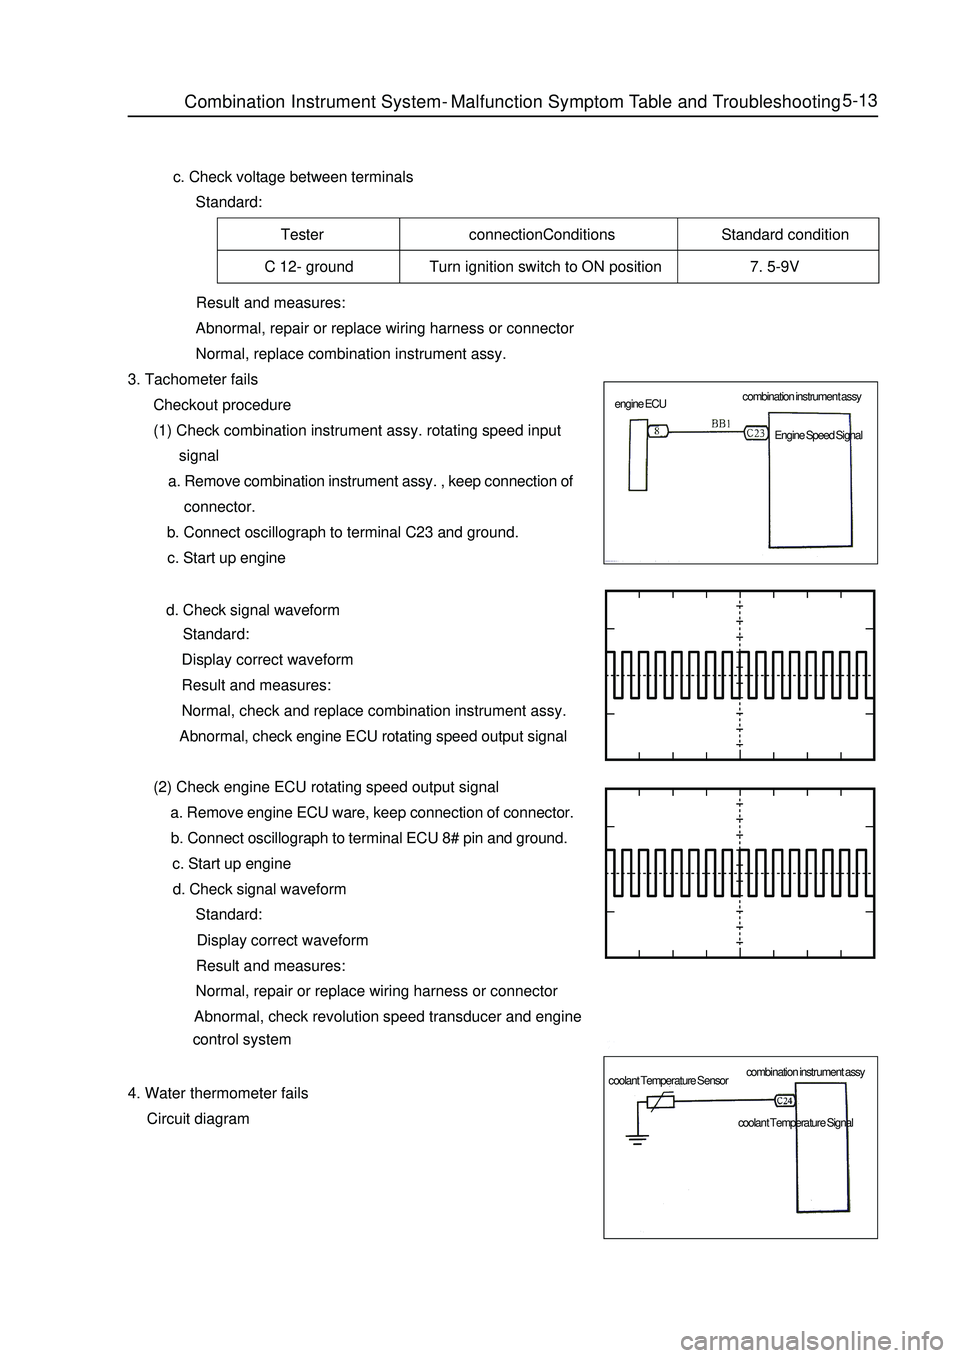
3. Tachometer fails
Checkout procedure
(1) Check combination instrument assy. rotating speed input
signal
a. Remove combination instrument assy. , keep connection of
connector.
b. Connect oscillograph to terminal C23 and ground.
c. Start up engine
d. Check signal waveform
Standard:
Display correct waveform
Result and measures:
Normal, check and replace combination instrument assy.
Abnormal, check engine ECU rotating speed output signal
(2) Check engine ECU rotating speed output signal
a. Remove engine ECU ware, keep connection of connector.
b. Connect oscillograph to terminal ECU 8# pin and ground.
c. Start up engine
d. Check signal waveform
Standard:
Display correct waveform
Result and measures:
Normal, repair or replace wiring harness or connector
Abnormal, check revolution speed transducer and engine
control system
4. Water thermometer fails
Circuit diagramCombination Instrument System -Malfunction Symptom Table and Troubleshooting combination instrument assy
combination instrument assy engine ECU
coolant Temperature SensorEngine Speed Signal
coolant Temperature Signal
Page 261 of 416
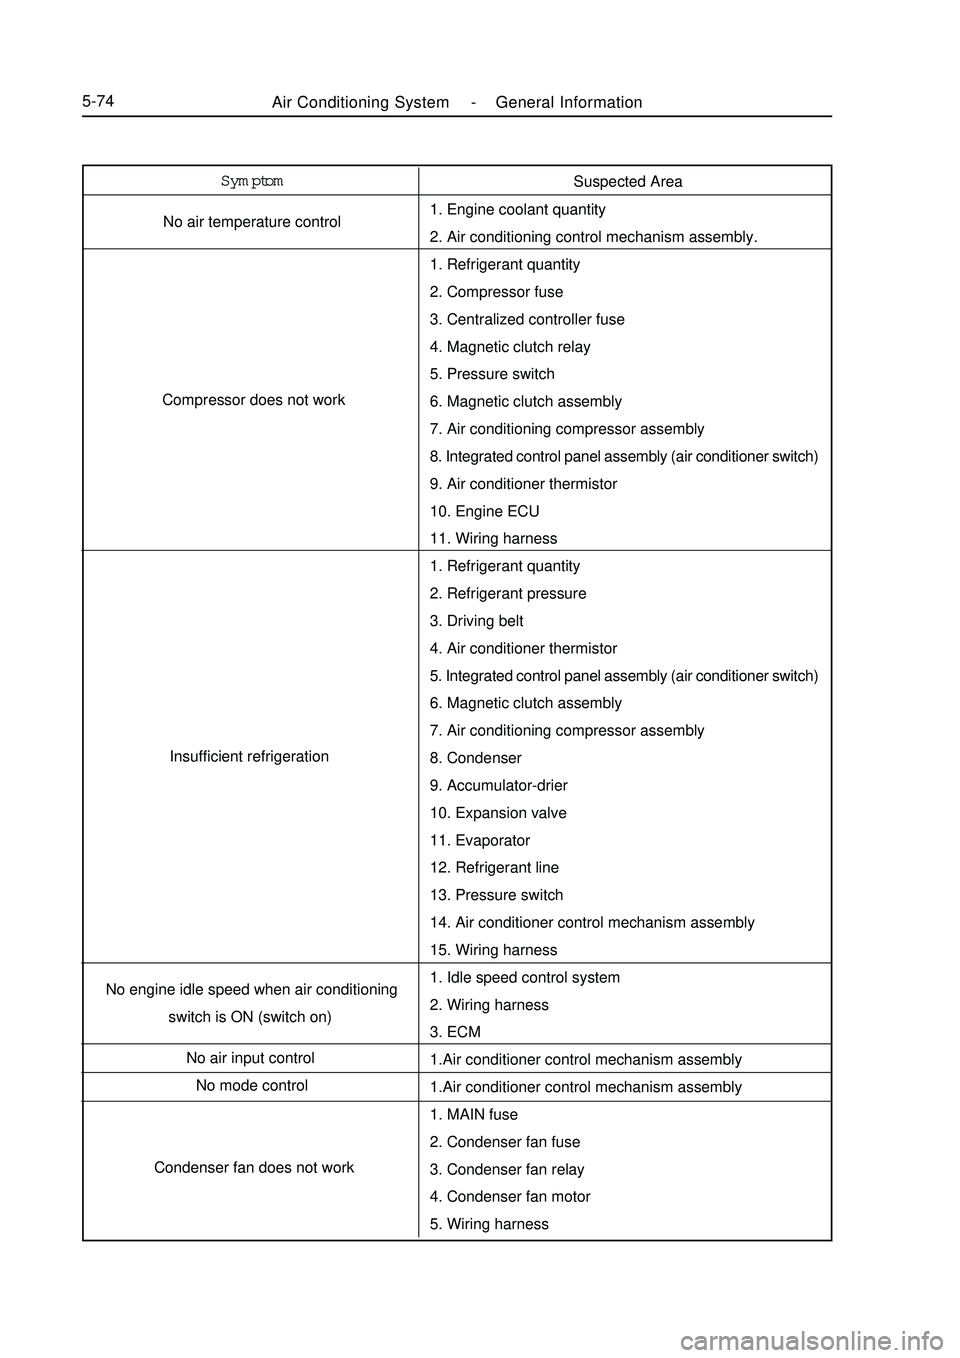
Air Conditioning System -General Information5-74Symptom
No air temperature control
Compressor does not work
Insufficient refrigeration
No engine idle speed when air conditioning
switch is ON (switch on)
No air input control
No mode control
Condenser fan does not workSuspected Area
1. Engine coolant quantity
2. Air conditioning control mechanism assembly.
1. Refrigerant quantity
2. Compressor fuse
3. Centralized controller fuse
4. Magnetic clutch relay
5. Pressure switch
6. Magnetic clutch assembly
7. Air conditioning compressor assembly
8. Integrated control panel assembly (air conditioner switch)
9. Air conditioner thermistor
10. Engine ECU
11. Wiring harness
1. Refrigerant quantity
2. Refrigerant pressure
3. Driving belt
4. Air conditioner thermistor
5. Integrated control panel assembly (air conditioner switch)
6. Magnetic clutch assembly
7. Air conditioning compressor assembly
8. Condenser
9. Accumulator-drier
10. Expansion valve
11. Evaporator
12. Refrigerant line
13. Pressure switch
14. Air conditioner control mechanism assembly
15. Wiring harness
1. Idle speed control system
2. Wiring harness
3. ECM
1.Air conditioner control mechanism assembly
1.Air conditioner control mechanism assembly
1. MAIN fuse
2. Condenser fan fuse
3. Condenser fan relay
4. Condenser fan motor
5. Wiring harness
Page 273 of 416

Section 4 Heater, Ventilation and Air ConditioningComponent View INo. 2 coolant TankNo.1 coolant Pipe Dual Steel Wire Circlip
Exhaust Pipe Exhaust Pipe Seal
RingSeal Ring A/C Head Unit AssemblyAir Conditioning System -Heater, Ventilation and Air Conditioning5-86
Page 275 of 416

Overhaul1. Drain the coolant (refer to Coolant for details).
2. Disconnect A/C pipeline assembly.
(1) Remove the bolt, disconnect A/C pipeline assembly
(2) Remove 2 O-rings form the A/C pipeline assembly.
Notice: O-ring is a non-reusable part.
3. Disconnect the water pipe assembly connecting the heater core.
Loosen the dual steel wire circlip, disconnect the water pipe
connecting the heater core.
4. Remove console assembly
Refer to Interior Trim: Removal of the Console Assembly
5. Remove central cross member assembly
(1) Unscrew the wire harness clip and screw.
(2) Remove the nut and bolt.
(3) Remove cross member assembly.
6. Remove A/C lower left and right air outlet pipe
(1) Unscrew the two clips, disconnect the A/C lower left air outlet
pipe.
(2) Unscrew the two clips, disconnect the A/C lower right air
outlet pipe.5-88clip clipclip
screw,nut and
boltAir Conditioning System ¡ª¡ªHeater, Ventilation and Air Conditioning
Page 281 of 416

Section 7 Compressor AssemblyComponent ViewReplacement1. System drains coolant (refer to Coolant for details)
2. Remove multi-wedge belt (refer to Multi-wedge Belt (A/C Compressor to Crankshaft Pulley for details)).Multi-Wedge Belt 4PK820Tensioner Assembly
Compressor Support
Hexagonal Bolt Spring and
Plate Washer Set (3 Pcs)Hexagonal Bolt
Spring and Plate
Washer Set
Compressor
Assembly
Hexagonal Bolt M8 x105Air Conditioning System -Compressor Assembly5-943. Disconnect the suction vent
(1) Remove the bolt, disconnect the suction vent.
(2) Remove the O-ring from the suction vent.
4. Disconnect the exhaust vent
(1) Remove the bolt, disconnect the exhaust vent.
(2) Remove the O-ring from the exhaust vent.
Notice:
Use vinyl tape seal all the interfaces of the disconnected
parts to avoid entry of water and foreign objects.
O ring is a non-reusable part.Suction port Discharge
port