wheel bolts GEELY MK 2008 User Guide
[x] Cancel search | Manufacturer: GEELY, Model Year: 2008, Model line: MK, Model: GEELY MK 2008Pages: 416, PDF Size: 25.19 MB
Page 121 of 416

Camber angle
Left-right wheel deviation
Caster angle
Manual steering
Power steering
Left-right wheel deviation
Kingpin inclination
Manual steering
Power steering
Left-right wheel deviation-0°30' ± 45' (-0.5° ± 0.75°)
45'(0.75°) or smaller
1°46' ± 45' (1.76° ± 0.75°)
45' (0.75°) or smaller
9°54' ± 45' (9.90° ± 0.75°)
45' (0.75°) or lessFront Suspension SystemFront Wheel Alignment4-44Manual steering Power steering
Inside wheel 9-137.2°±2°
Outside wheel32°±2° 32°±2°5. Check the steering angle of wheel
Fully steer the wheel and measure the angle
The angle of wheel:
If the kingpin caster angle and the kingpin inclination be out of spec, check the damage and abrasion of
suspension parts after the correct adjustment of camber angle. If there is deviation with spec for right and left wheel angle, check the rack length of left and right ends.
6. Check the camber, caster and steering axle inclination angle
7. Adjust the camber angle
Notice:
Check the toe-in after adjust the camber angle
(1)Remove the front wheel
(2)Remove the two nuts under the shock absorber
If you need to reuse the bolts and nuts, apply the engine oil on
the nut thread
(3)Clear the mounting surface of the knuckle and shock absorber.Front
Inside
Outside
meter
locator-9-1
Page 122 of 416

(9) Repeat the steps above, replace 1 or 2 bolts
Tips:
Only replace 1 bolt if 2 bolts are needed to be replaced.bolt
Adjustment
value
15'
30'
45'
1°00'Location bolt
AAdjusting bolt
BC
1 point
2 point12121211.
11.
11 .Front Suspension SystemFront Wheel Alignment4-45 Refer to the table below to fix the correct adjustment if the camber is out of spec, then select the bolts for camber
adjustment.
Notice: Tighten the adjustment nuts with washer and new nuts. (4) Mount 2 nuts temporarily.
(5) Adjust the camber angle by pushing or pulling the underside
of shock absorber in the direction of required adjustment.
(6) Tightening the nuts
Torque: 132N.m
(7) Mounting the front wheel
Torque: 103N.m
(8) Check the camber
Tips:
Adjust the camber to the median of spec.
Adjustment value of positioning the bolts: 6' ~ 30'.
(0.1° ~ 0.5°)Adjusting bolt-
Page 123 of 416

Front Suspension SystemFront Strut Assembly4-46Section 4 Front Strut AssemblyReplacement1. Remove screen wiper arm cover
2. Remove right screen wiper
3. Remove left screen wiper
4. Remove hood and seals of vehicle neck
5. Remove upper right ventilation shield of vehicle neck
6. Remove upper left ventilation shield of vehicle neck
7. Remove the wiper linkage assembly of windscreen
8. Remove the hood of vehicle neck
(1) Remove the bolt and 2 clips, disconnect the harness
(2) Remove the hose and harness (wiper)
(3) Remove the 8 bolts of ventilation shield of vehicle neck
9. Remove the front wheel
10. Remove the brake hose
(1) Remove the bolts, brake hose and the clamp of ABS sensor
harness from the shock absorber bracket (with ABS)
(2) Remove the bolts and brake hose from the shock absorber
(without ABS)
11. Remove the front shock absorber with helical spring
(1) Remove the shock absorber from knuckle after remove the two
nuts and bolts.
(2) Remove the front shock absorber with helical spring, remove
the three bolts mounting suspension bracket
12. Fix the front shock absorber with helical spring
(1) Mount the two bolts and one bolt onto the bracket of shock
absorber underside, and fix it onto the vise
(2) Hold down the helical spring
Notice: Don't use the impact wrench which can damage the
special tool-
Page 125 of 416

Front Suspension System-Front Strut Assembly4-4828. Mount the dust seals of left front suspension bracket
29. Mount the left front suspension bracket sub-assembly
30. Mount the front bracket onto the left front shock absorber nuts
(1) Hold the bracket by two bolts and a screwdriver or analogue.
Mount the new centre nut
Torque: 33N.m
Notice: DonÕt cause damage to the stud of suspension bracket.
(2) The special tool for remove
(3) Apply the multipurpose grease onto the suspension bracket
31. Mount the dust cap of left front suspension bracket
32. Mount the front stud assembly
(1) Mount the #2 suspension bracket
(2) Mount the front stud assembly by three nuts
Torque: 39N.m
(3) Mount the shock absorber onto the knuckle
(4) Film the engine oil onto the thread of two nuts
(5) Mount the two bolts and nuts
Torque: 132N.m
33. Mount the brake hose
Torque: 29N.m
34. Mount the front wheel
Torque: 103N.m
35. Mount the outside cover of vehicle neck
(1) Mount the outside cover of vehicle neck by 8 bolts
Torque: 5N.m
(2) Connect hose and harness (screen wiper)
(3) Mount the harness by bolts and two clips
36. Mount the linkage assembly of windshield wiper
37. Mount the ventilation hood of left vehicle neck
38. Mount the ventilation hood of right vehicle neck
39. Mount the engine hood and seals of vehicle neck
40. Mount the left front wiper arm
41. Mount the right front wiper arm
42. Check and adjust the front wheel alignmentMulti-purpose grease
Page 126 of 416

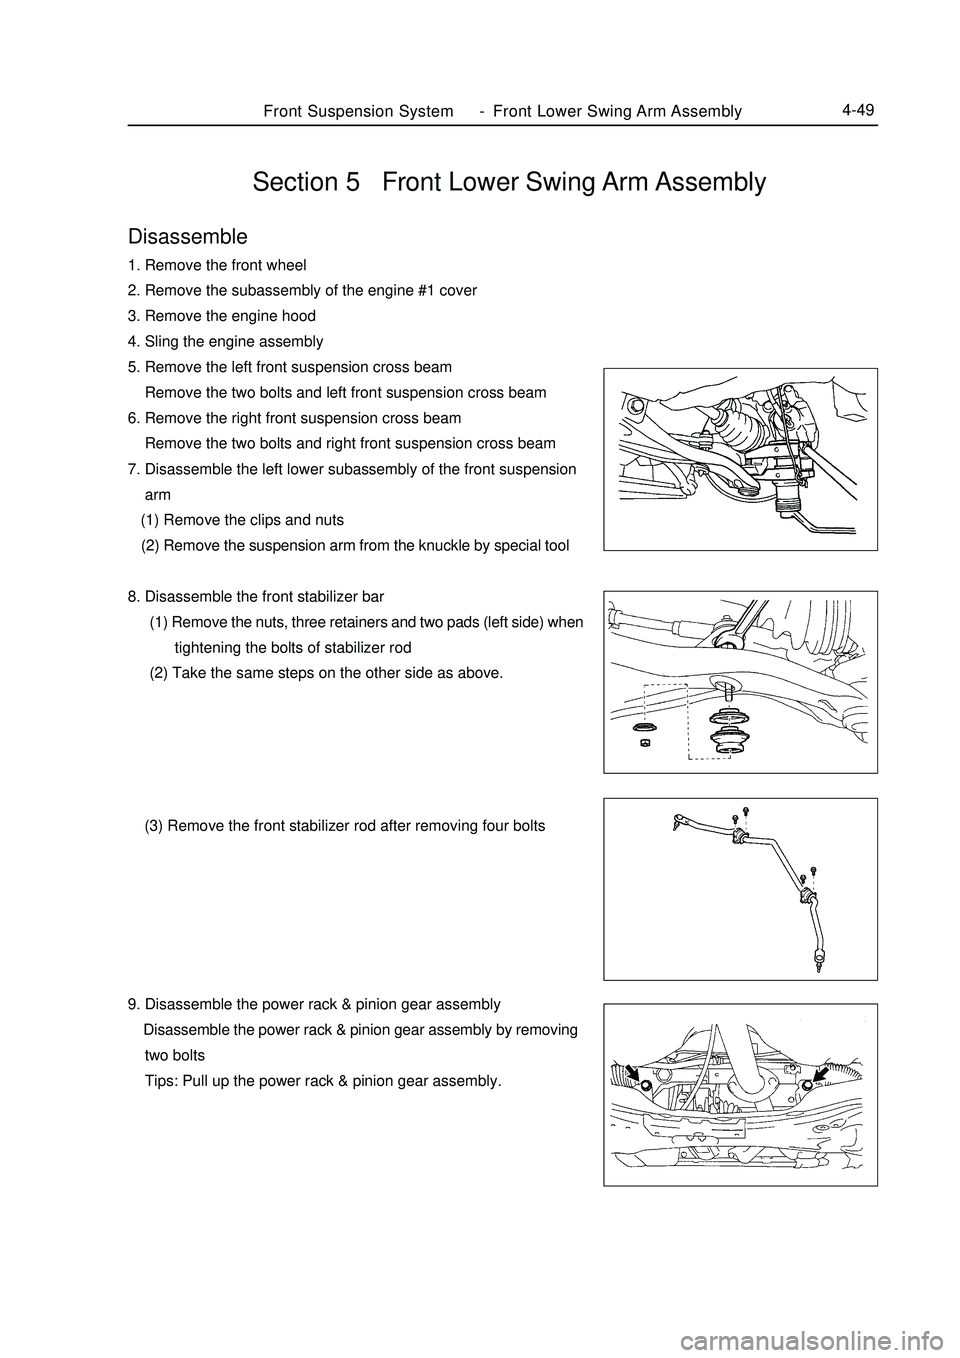
Front Suspension System-Front Lower Swing Arm Assembly4-49Section 5 Front Lower Swing Arm AssemblyDisassemble1. Remove the front wheel
2. Remove the subassembly of the engine #1 cover
3. Remove the engine hood
4. Sling the engine assembly
5. Remove the left front suspension cross beam
Remove the two bolts and left front suspension cross beam
6. Remove the right front suspension cross beam
Remove the two bolts and right front suspension cross beam
7. Disassemble the left lower subassembly of the front suspension
arm
(1) Remove the clips and nuts
(2) Remove the suspension arm from the knuckle by special tool
8. Disassemble the front stabilizer bar
(1) Remove the nuts, three retainers and two pads (left side) when
tightening the bolts of stabilizer rod
(2) Take the same steps on the other side as above.
(3) Remove the front stabilizer rod after removing four bolts
9. Disassemble the power rack & pinion gear assembly
Disassemble the power rack & pinion gear assembly by removing
two bolts
Tips: Pull up the power rack & pinion gear assembly.
Page 129 of 416

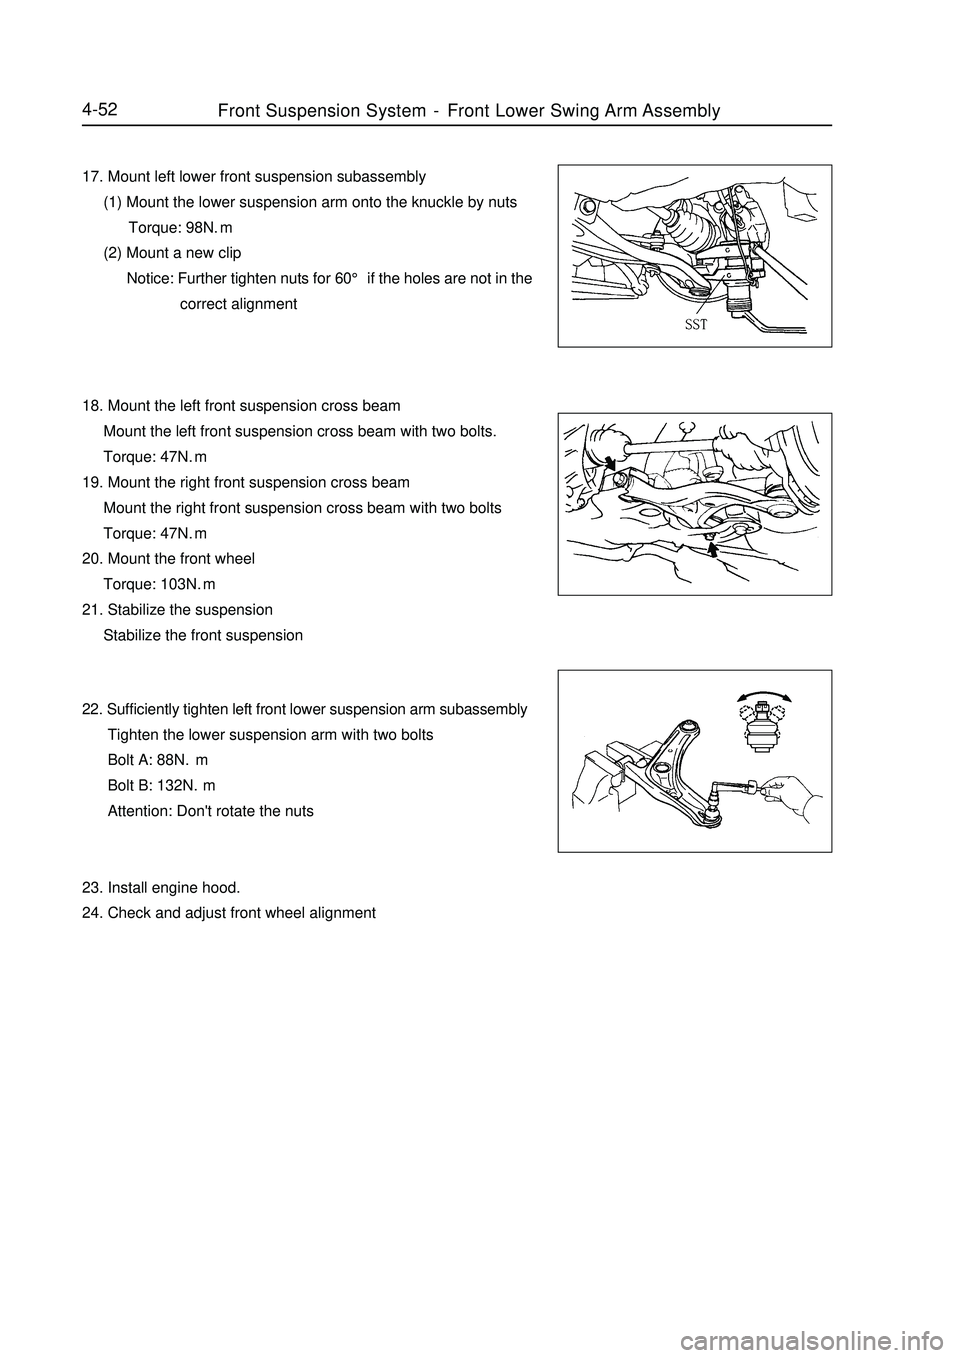
4-5217. Mount left lower front suspension subassembly
(1) Mount the lower suspension arm onto the knuckle by nuts
Torque: 98N.m
(2) Mount a new clip
Notice: Further tighten nuts for 60° if the holes are not in the
correct alignment
18. Mount the left front suspension cross beam
Mount the left front suspension cross beam with two bolts.
Torque: 47N.m
19. Mount the right front suspension cross beam
Mount the right front suspension cross beam with two bolts
Torque: 47N.m
20. Mount the front wheel
Torque: 103N.m
21. Stabilize the suspension
Stabilize the front suspension
22. Sufficiently tighten left front lower suspension arm subassembly
Tighten the lower suspension arm with two bolts
Bolt A: 88N.m
Bolt B: 132N.m
Attention: Don't rotate the nuts
23. Install engine hood.
24. Check and adjust front wheel alignmentFront Suspension System-Front Lower Swing Arm Assembly
Page 130 of 416

Section 6 Front Stabilizer Bar and Link Rod AssemblyDisassemble1. Remove the front wheel
2. Remove the front stabilizer bar bolts
(1) Remove two nuts, five retainers, four pads and stabilizer bolts when fixing bolts
(2) Take the same steps on other side as above.
3. Remove the front stabilizer bar
Remove four bolts and #1 front stabilizer bar bracket.
4. Mount the front stabilizer bar
Mount the stabilizer bar, two bushings, bracket and four bolts.
Torque: 37N.m
Notice:
Make the groove toward the vehicle rear
Tip:
Keep the bushing outside the paint line
5. Mount the front stabilizer bolts
(1) Mount the front stabilizer bolts, four pads and five retainers
Torque: 18N.m
(2) Take the same operations on other side as above process
6. Mount the front wheel
Torque: 103N.m4-53Installation markFront Suspension System-Front Stabilizer Bar and Link Rod Assembly
Page 134 of 416

Section 3 LH/RH Rear Suspension Coil SpringReplacement1. Remove rear wheel
2. Remove the wire of the wheel speed sensor(with ABS)
(1) Remove the connector of wheel speed sensor.
(2) Remove bolts and wheel speed sensor from rear axle
frame.
Notes:
Remove the right sensor wire by using same process as left.
3. Remove the load-sensing valve bracket (without ABS)
Remove two nuts and load-sensing valve bracket from the axle
bracket
4. Remove the proportioning valve and rear right brake tube
(1) Remove the proportioning valve and rear right brake tube by
the special tool
(2) Remove the clips
Notes: Don't reuse the clips
5. Remove the proportioning valve and rear left brake tube
Notes: use the same operations of the proportioning valve and
rear right brake tube to remove #3 rear brake tube.
6. Remove right parking brake cable assembly
Remove nuts and right parking brake cable assembly
assembly from rear axle frame
7. Remove left parking brake cable assembly
8. Loose the rear axle assembly
Loose two 2 boltsRear Suspension System-LH/RH Rear Suspension Coil Spring4-57
Page 136 of 416

Rear Suspension System-LH/RH Rear Suspension Coil Spring4-5918. Mount rear right brake tube
Tips:
Mount the right assembly by using same operations as left.
19. Mount sideslip control sensor wire (with ABS)
(1) Tighten sideslip control sensor wire by bolts
Torque: 8.0 N.m
(2) Mount sideslip control sensor wire
Attention: Mount the right wire by using same operations as left.
20. Mount load-sensing valve bracket (without ABS)
Mount load-sensing valve bracket by two buts
21. Sufficiently tighten the rear axle frame assembly
(1) Stabilize the shock absorber assembly
Use the lifting jack and add 90Kg force on rear luggage
carrier if bolts can not be tightened at this point.
(2) Sufficiently tighten bolts
Torque: 82 N.m
22. Sufficiently tighten the left rear shock absorber assembly
Sufficiently tighten nuts
Torque: 49 N.m
23. Sufficiently tighten the right rear shock absorber assembly
Tips: Mount the right rear shock absorber by using same opera-
tions as left.
24. Release the air in the brake hose
25. Mount the rear wheel
Torque: 103 N.m
26. Check rear the wheel alignment
27. Check the wheel speed sensor signal of ABS( with ABS)
Page 140 of 416

Rear Suspension System-Rear Suspension Crossmember4-63Disassemble:1. Remove rear wheel
2. Remove sideslip control sensor wire (with ABS)
3. Remove load-sensing valve bracket (without ABS)
4. Remove proportioning valve and right rear brake tube
5. Remove proportioning valve and left rear brake tube
6. Remove right parking brake cable assembly
7. Remove left parking brake cable assembly
Tips: Remove right parts by using same operations as left
8. Remove rear brake drum subassembly
9. Remove left rear hub and bearing assembly
(1) Remove nuts and right parking brake cable assembly from
rear axle frame
(2) Remove four bolts and left rear hub and bearing assembly
(3) Remove rear brake assembly from rear axle frame
10. Remove rear right hub and bearing assembly
Tips: Remove right parts by using same operations as left
11. Loosen rear axle frame assembly
12. Disassemble rear left shock absorber assembly
13. Disassemble rear right shock absorber assembly
Tips: Remove right parts by using same operations as left
14. Remove rear left helical spring
15. Remove rear right helical spring
Tips: Remove right parts by using same operations as left
16. Remove rear axle assembly
(1) Lift rear axle assembly by lifting axel
(2) Remove two bolts and rear axle frame assembly