engine GEELY MK 2008 Repair Manual
[x] Cancel search | Manufacturer: GEELY, Model Year: 2008, Model line: MK, Model: GEELY MK 2008Pages: 416, PDF Size: 25.19 MB
Page 89 of 416

Chapter 3 Clutch Control SystemSection 1 Introduction of Clutch CentrolI. Description A hydraulic clutch control system is equipped which can be used in cars with various displacements (including
1.3L, 1.5L and1.6L).II. Symptom Table The table below lists the common symptoms and possible causes of the failures. The number means the
possible sequence of the causes. Check the parts, and replace the corresponding parts if necessary.
Suspected area
1. Engine fixture is loosened.
2. Clutch disc shakes seriously.
3. Clutch disc is contaminated by oil or wore down.
4. Torque spring of the clutch disc is damaged.
5. Clutch disc is hardened.
6. Diaphragm spring is not aligned on the top.
1. There is air in the clutch oil pipe.
2. Cup of the master cylinder is damaged.
3. Cup of the wheel cylinder is damaged.
1. Clutch release bearing is worn out, contaminated or damaged.
2. Torque spring of the clutch disc is damaged.
1. Clutch pedal has maladjusted free stroke.
2. Clutch disc is contaminated by oil.
3. Clutch disc is worn.
4. Diaphragm spring is damaged.
5. Platen is deformed.
6. Flywheel is deformed.
1. Clutch pedal has maladjusted free stroke.
2. There is air in the clutch oil pipe.
3. Cup of the master cylinder is damaged.
4. Cup of the wheel cylinder is damaged.
5. Clutch disc id deformed or wiggled.
6. Clutch disc is worn out.
7. Clutch disc is contaminated or burned out.
8. Clutch disc is contaminated by oil.
9. Clutch disc has no lube on its spline. Symptom
Clutch is trapped or shaken.
Clutch pedal is loosened.
Abnormal noise occurs.
Clutch skids.
Clutch can not be separated.Clutch Control SystemIntroduction of Clutch Centrol4-12 -
Page 98 of 416

Overhaul1. Drain manual transmission oil (M/T transmission)
Torque: 39N.m
2. Drain automatic transmission oil (A/T transmission)
Torque: 25N.m
3. Remove front wheel
4. Remove engine bottom left shield (M/T transaxle)
5. Remove engine bottom right shield (M/T transaxle)
6. Remove engine bottom shield assembly (A/T transaxle)
7. Remove front wheel hub left bolt
(1) Using a hammer and a drive shaft nut chisel, unstake the
staked part of the left wheel hub nut.
(2) While applying the brake pedal, remove the left wheel hub
nut.
Notice: the staked part of the nut should be fully unstaked,
otherwise it may damage the thread of the drive shaft.
8. Remove left front vehicle speed sensor (with ABS)
(1) Remove the bolt and clip, remove vehicle speed sensor and
brake hose from left front shock absorber assembly.
(2) Remove the bolt, separate the left front vehicle speed sensor
from steering knuckle.
9. Remove front stabilizer bar
(1) Use a 10mm wrench to hold the bolt, remove the nut
(2) Remove two collars, No.1 and No.2 gaskets, remove front
stabilizer barPropeller Shaft/DriveshaftFront Driveshaft4-21 -
Page 106 of 416

Propeller Shaft/DriveshaftFront Driveshaft4-29 (2) Install the new cotter pins.
Notice:
If the pin holes are not aligned, further tighten the nut by 60°.
43. Install front stabilizer bar
(1) As shown in the illustration, install the stabilizer bar with two
No.1 collars and two gaskets and nuts.
Notice:
Make sure the gaskets and collars are correctly installed.
(2) Tighten the nut with a 10mm wrench.
Torque: 18N.m
44. Install left front vehicle speed sensor (with ABS)
(1) Install the left front vehicle speed sensor and brake hose on the
front shock absorber with bolts and clps.
Torque: 29N.m
(2) Install the vehicle speed sensor on the steering knuckle with
bolts.
Torque: 8.0N.m
Notice:
Be careful not to damage the wheel speed sensor.
Keep the vehicle speed sensor clean.
When installing the sensor,do not twist the sensor wire harness.
45. Install left steering knuckle wheel hub nut
(1) Install new left steering knuckle hub nuts
Torque: 216N.m
(2) Using a chisel and hammer, stake the hub locking nut.
46. Install engine bottom left shield
47. Install engine bottom right shield
48. Install engine bottom shield assembly
49. Install front wheel
Torque: 103 N.m
50. Add oil into manual transmission
51. Check and adjust the manual transmission fluid
52. Refill automatic transmission fluid
53. Check and adjust the automatic transmission fluid
54. Check and adjust front wheel alignment
55. Check ABS vehicle speed signal (with ABS) -
Page 110 of 416
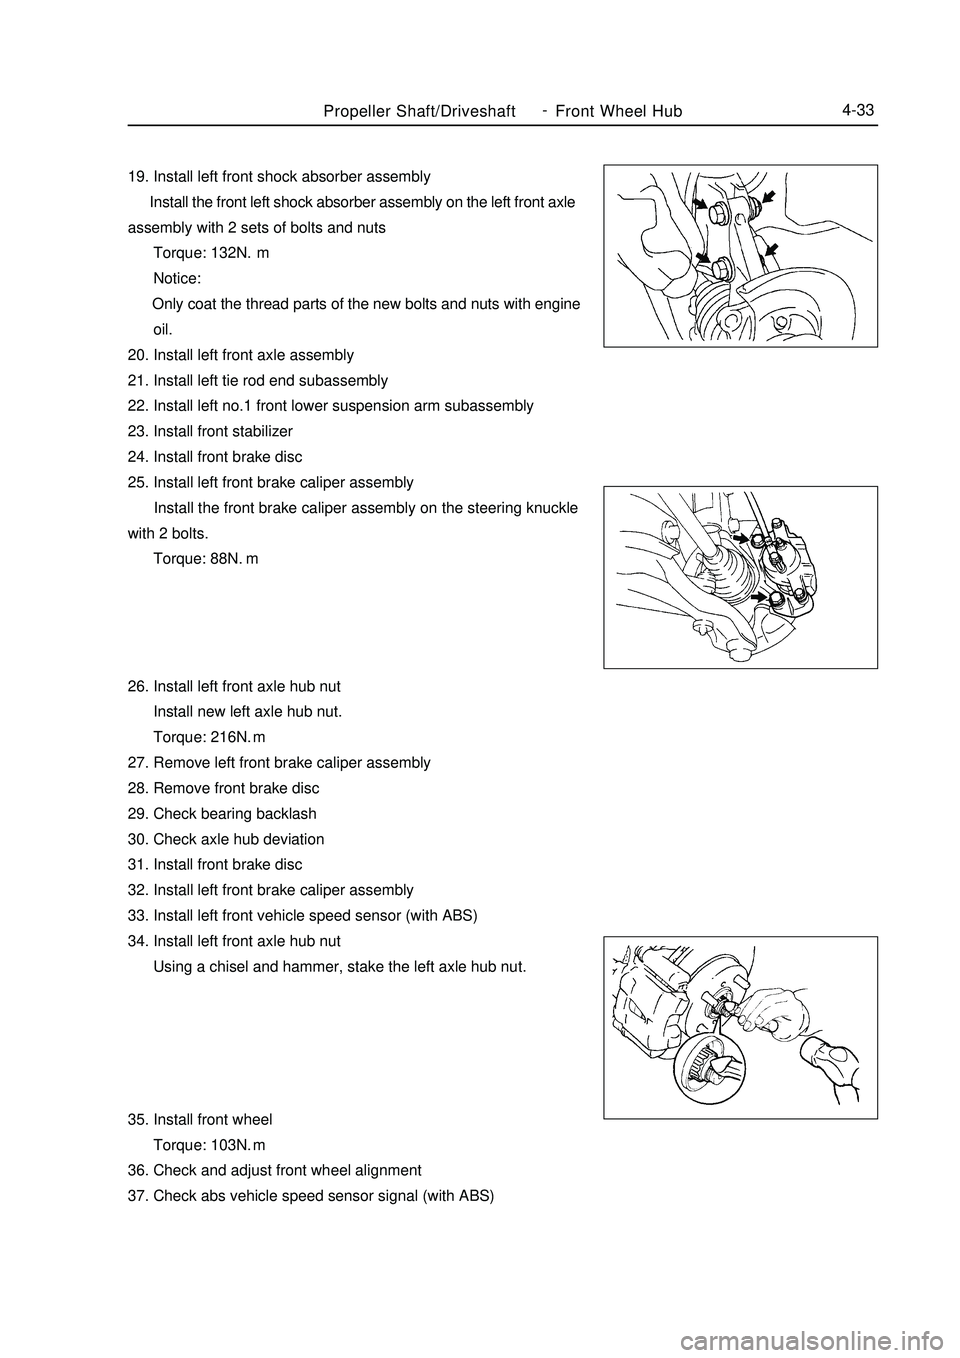
Propeller Shaft/DriveshaftFront Wheel Hub4-3319. Install left front shock absorber assembly
Install the front left shock absorber assembly on the left front axle
assembly with 2 sets of bolts and nuts
Torque: 132N.m
Notice:
Only coat the thread parts of the new bolts and nuts with engine
oil.
20. Install left front axle assembly
21. Install left tie rod end subassembly
22. Install left no.1 front lower suspension arm subassembly
23. Install front stabilizer
24. Install front brake disc
25. Install left front brake caliper assembly
Install the front brake caliper assembly on the steering knuckle
with 2 bolts.
Torque: 88N.
m
26. Install left front axle hub nut
Install new left axle hub nut.
Torque: 216N.m
27. Remove left front brake caliper assembly
28. Remove front brake disc
29. Check bearing backlash
30. Check axle hub deviation
31. Install front brake disc
32. Install left front brake caliper assembly
33. Install left front vehicle speed sensor (with ABS)
34. Install left front axle hub nut
Using a chisel and hammer, stake the left axle hub nut.
35. Install front wheel
Torque: 103N.m
36. Check and adjust front wheel alignment
37. Check abs vehicle speed sensor signal (with ABS) -
Page 115 of 416
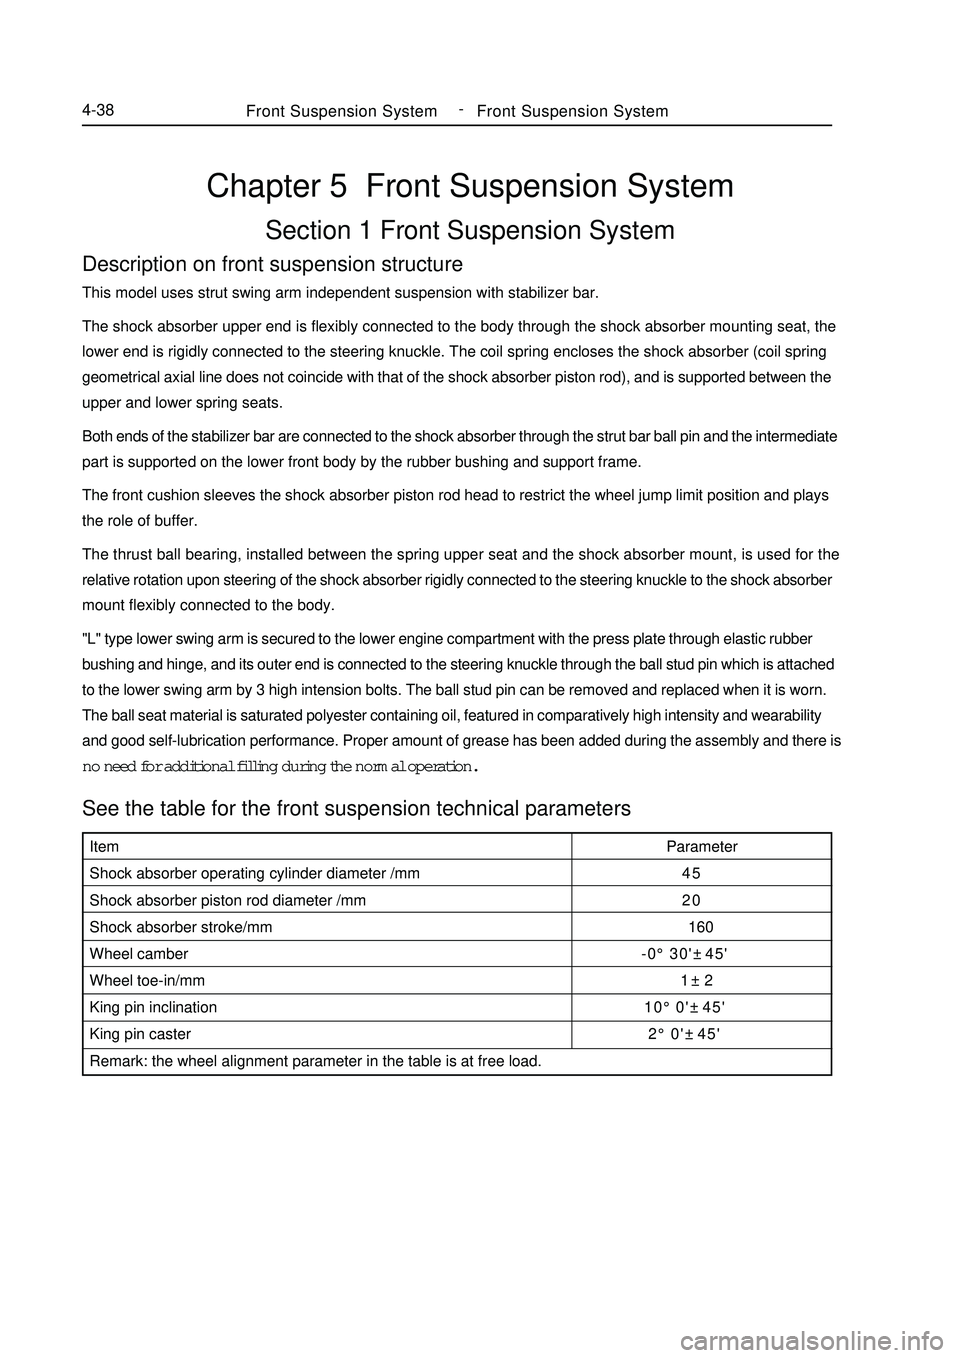
Chapter 5 Front Suspension SystemSection 1 Front Suspension SystemDescription on front suspension structureThis model uses strut swing arm independent suspension with stabilizer bar.
The shock absorber upper end is flexibly connected to the body through the shock absorber mounting seat, the
lower end is rigidly connected to the steering knuckle. The coil spring encloses the shock absorber (coil spring
geometrical axial line does not coincide with that of the shock absorber piston rod), and is supported between the
upper and lower spring seats.
Both ends of the stabilizer bar are connected to the shock absorber through the strut bar ball pin and the intermediate
part is supported on the lower front body by the rubber bushing and support frame.
The front cushion sleeves the shock absorber piston rod head to restrict the wheel jump limit position and plays
the role of buffer.
The thrust ball bearing, installed between the spring upper seat and the shock absorber mount, is used for the
relative rotation upon steering of the shock absorber rigidly connected to the steering knuckle to the shock absorber
mount flexibly connected to the body.
"L" type lower swing arm is secured to the lower engine compartment with the press plate through elastic rubber
bushing and hinge, and its outer end is connected to the steering knuckle through the ball stud pin which is attached
to the lower swing arm by 3 high intension bolts. The ball stud pin can be removed and replaced when it is worn.
The ball seat material is saturated polyester containing oil, featured in comparatively high intensity and wearability
and good self-lubrication performance. Proper amount of grease has been added during the assembly and there is
no need for additional filling during the normal operation.See the table for the front suspension technical parametersFront Suspension SystemFront Suspension System4-38Item
Shock absorber operating cylinder diameter /mm
Shock absorber piston rod diameter /mm
Shock absorber stroke/mm
Wheel camber
Wheel toe-in/mm
King pin inclination
King pin caster
Remark: the wheel alignment parameter in the table is at free load.Parameter
45
20
160
-0°30'±45'
1±2
10°0'±45'
2°0'±45' -
Page 118 of 416
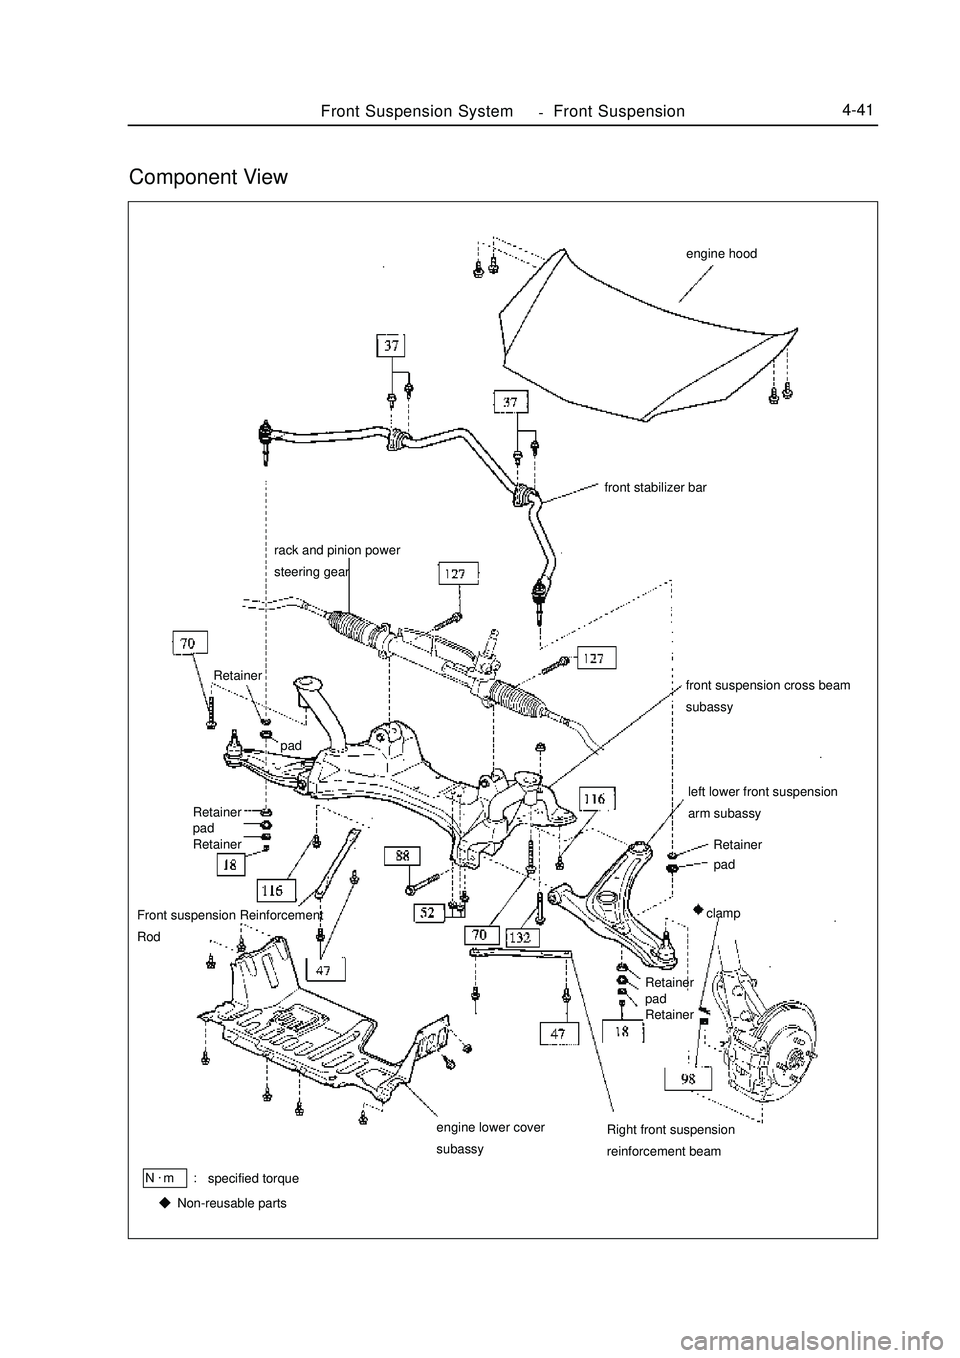
left lower front suspension
arm subassyFront Suspension SystemFront Suspension4-41rack and pinion power
steering gear
engine lower cover
subassyRight front suspension
reinforcement beam Front suspension Reinforcement
RodComponent Viewengine hood
front stabilizer bar
front suspension cross beam
subassy
Retainer
pad
clamp
Retainer
pad
Retainer Retainer
pad
RetainerRetainer
pad
specified torqueN.
m :
Non-reusable parts -
Page 121 of 416

Camber angle
Left-right wheel deviation
Caster angle
Manual steering
Power steering
Left-right wheel deviation
Kingpin inclination
Manual steering
Power steering
Left-right wheel deviation-0°30' ± 45' (-0.5° ± 0.75°)
45'(0.75°) or smaller
1°46' ± 45' (1.76° ± 0.75°)
45' (0.75°) or smaller
9°54' ± 45' (9.90° ± 0.75°)
45' (0.75°) or lessFront Suspension SystemFront Wheel Alignment4-44Manual steering Power steering
Inside wheel 9-137.2°±2°
Outside wheel32°±2° 32°±2°5. Check the steering angle of wheel
Fully steer the wheel and measure the angle
The angle of wheel:
If the kingpin caster angle and the kingpin inclination be out of spec, check the damage and abrasion of
suspension parts after the correct adjustment of camber angle. If there is deviation with spec for right and left wheel angle, check the rack length of left and right ends.
6. Check the camber, caster and steering axle inclination angle
7. Adjust the camber angle
Notice:
Check the toe-in after adjust the camber angle
(1)Remove the front wheel
(2)Remove the two nuts under the shock absorber
If you need to reuse the bolts and nuts, apply the engine oil on
the nut thread
(3)Clear the mounting surface of the knuckle and shock absorber.Front
Inside
Outside
meter
locator-9-1
Page 125 of 416

Front Suspension System-Front Strut Assembly4-4828. Mount the dust seals of left front suspension bracket
29. Mount the left front suspension bracket sub-assembly
30. Mount the front bracket onto the left front shock absorber nuts
(1) Hold the bracket by two bolts and a screwdriver or analogue.
Mount the new centre nut
Torque: 33N.m
Notice: DonÕt cause damage to the stud of suspension bracket.
(2) The special tool for remove
(3) Apply the multipurpose grease onto the suspension bracket
31. Mount the dust cap of left front suspension bracket
32. Mount the front stud assembly
(1) Mount the #2 suspension bracket
(2) Mount the front stud assembly by three nuts
Torque: 39N.m
(3) Mount the shock absorber onto the knuckle
(4) Film the engine oil onto the thread of two nuts
(5) Mount the two bolts and nuts
Torque: 132N.m
33. Mount the brake hose
Torque: 29N.m
34. Mount the front wheel
Torque: 103N.m
35. Mount the outside cover of vehicle neck
(1) Mount the outside cover of vehicle neck by 8 bolts
Torque: 5N.m
(2) Connect hose and harness (screen wiper)
(3) Mount the harness by bolts and two clips
36. Mount the linkage assembly of windshield wiper
37. Mount the ventilation hood of left vehicle neck
38. Mount the ventilation hood of right vehicle neck
39. Mount the engine hood and seals of vehicle neck
40. Mount the left front wiper arm
41. Mount the right front wiper arm
42. Check and adjust the front wheel alignmentMulti-purpose grease
Page 126 of 416
Front Suspension System-Front Lower Swing Arm Assembly4-49Section 5 Front Lower Swing Arm AssemblyDisassemble1. Remove the front wheel
2. Remove the subassembly of the engine #1 cover
3. Remove the engine hood
4. Sling the engine assembly
5. Remove the left front suspension cross beam
Remove the two bolts and left front suspension cross beam
6. Remove the right front suspension cross beam
Remove the two bolts and right front suspension cross beam
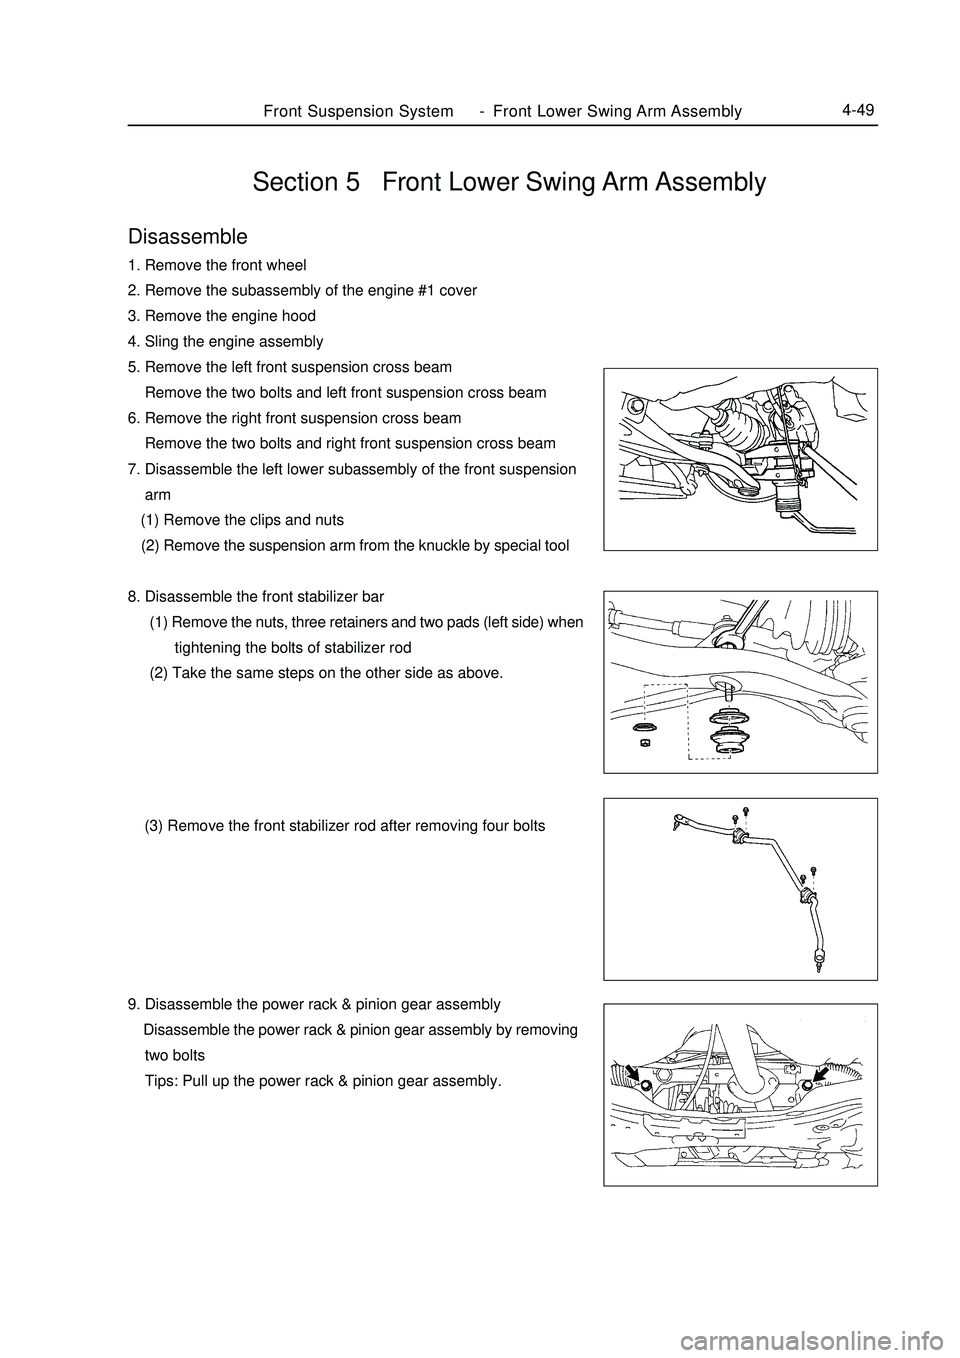
7. Disassemble the left lower subassembly of the front suspension
arm
(1) Remove the clips and nuts
(2) Remove the suspension arm from the knuckle by special tool
8. Disassemble the front stabilizer bar
(1) Remove the nuts, three retainers and two pads (left side) when
tightening the bolts of stabilizer rod
(2) Take the same steps on the other side as above.
(3) Remove the front stabilizer rod after removing four bolts
9. Disassemble the power rack & pinion gear assembly
Disassemble the power rack & pinion gear assembly by removing
two bolts
Tips: Pull up the power rack & pinion gear assembly.
Page 129 of 416
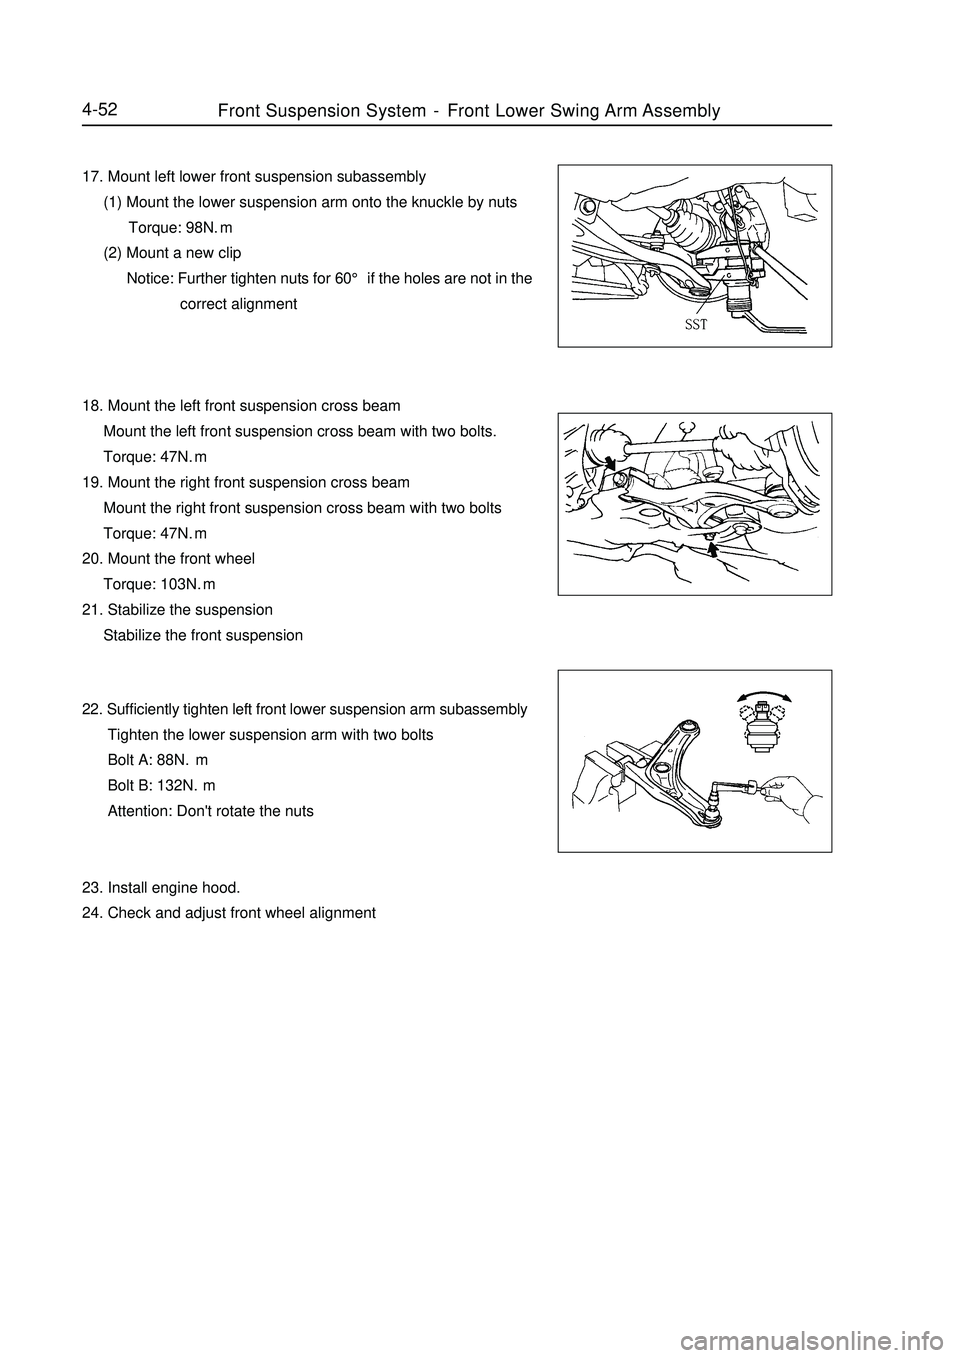
4-5217. Mount left lower front suspension subassembly
(1) Mount the lower suspension arm onto the knuckle by nuts
Torque: 98N.m
(2) Mount a new clip
Notice: Further tighten nuts for 60° if the holes are not in the
correct alignment
18. Mount the left front suspension cross beam
Mount the left front suspension cross beam with two bolts.
Torque: 47N.m
19. Mount the right front suspension cross beam
Mount the right front suspension cross beam with two bolts
Torque: 47N.m
20. Mount the front wheel
Torque: 103N.m
21. Stabilize the suspension
Stabilize the front suspension
22. Sufficiently tighten left front lower suspension arm subassembly
Tighten the lower suspension arm with two bolts
Bolt A: 88N.m
Bolt B: 132N.m
Attention: Don't rotate the nuts
23. Install engine hood.
24. Check and adjust front wheel alignmentFront Suspension System-Front Lower Swing Arm Assembly