oil filter GEELY MK 2008 Workshop Manual
[x] Cancel search | Manufacturer: GEELY, Model Year: 2008, Model line: MK, Model: GEELY MK 2008Pages: 416, PDF Size: 25.19 MB
Page 32 of 416

2-11a. Keep air filter clean, Block of air filter affects engine air induction efficiency and increases fuel
consumption. So it must be cleaned and replaced in time.
b. Keep ignition system under good work condition. Bad connection or electricity leak of ignition coil and
power distributor or inappropriate gap or carbon residue of spark plug decreases ignition power supply
and efficiency, which leads to engine fuel consumption increase. So they need regular inspection and
repair to keep their good work condition.
c. Fuel feeding system works well. Often check if fuel feeder pipe leaks, and check if injectors and other
parts perform well on regular basis (electrical injection engines).
d. Keep regular tire pressure. If the tire pressure is not enough, vehicle rolling resistance increases and
engine fuel consumption increases accordingly. So tire pressure must be checked on time (around once
a week).Usage and Maintenance of MK Series - Usage of MK Series
Page 33 of 416
2-12Section 2 Maintenance Category and Content of MK SedanAs the vehicle is being used, its technical performance changes as the mileage accumulates and being affected by
various factors, which results in decrease of power, fuel economy, safety, and increase of emission pollutions,
noise and incidents. So timely maintenance during vehicle usage eliminates potential risks and prevents incidents
from happening, improves vehicle integrity and technical functionality, and prolongs useful life of the vehicle.
According to the vehicle technical requirements and usage history, maintenance of freedom Cruiser sedan can be
classified into several categories.I. first time maintenanceFirst time maintenance is also called breaking-in maintenance. It is performed when the vehicle mileage has
accumulated to 1500~2500km in breaking-in period. First time maintenance must be conducted at the appointed
service shops. It includes:
1. Check if there is any leak in engine, transmission, and differential. Fix if there is any.
2. Replace engine oil filter, engine oil and ATF for A/T.
3. Check the level of engine coolant, braking fluid, windshield washing fluid, power steering fluid and if there
is any leak. Refill if the level is too low and repair if there is any leak.
4. Check if there is any damage in triangle arm and ball joint, connection ball joint, triangle arm flexible hinge,
or the ball joint is loose. If there is, fix or replace it.
5. Check if the drive shaft dust cover is damaged. If there is, replace it.
6. Check if there is any leak in steering mechanism, or front and rear absorber and fix it there is any.
7. Check the tire pressure, front 230kpa, and rear 210kpa.II. Regular maintenanceAfter first time maintenance, the vehicle is in regular usage life. During regular use, the vehicle needs to be
maintained regularly according to the way it is used in.
1.Regular maintenance for vehicles used under extreme bad conditions. Any of the condition below is defined
as extreme bad condition:
(1) Frequent start.
(2) Often drive the vehicle in dusty circumstances.
(3) Drive the vehicle in hot areas (such as in summer in the south).
(4) Often drive in cold areas (often runs short trips, engine temperate cannot reach regular work temperature).
Vehicles ran under extreme bad conditions need to be maintained every 5000km.
2. Regular maintenance for vehicles Vehicles that have not been through extreme bad conditions need to be
maintained every 7500km.
Regular maintenance is required to be performed at Geely service shop, too.
List of parts that need to be replaced regularly is in table 1.
Maintenance timetable is in table2.III. Geely maintenance programGeely recommends following Geely maintenance program.
The intervals of maintenance schedules are determined by mileage meter or time periods. Maintain the vehicle
when either meets the schedule. For details, please refer to the schedule.Usage and Maintenance of MK Series - Maintenance Category and Content of MK Sedan
Page 35 of 416

2-14
V. Table 1 List of parts to be replaced regularlyThe intervals in the part list are for cars driven under normal condition. If the car is driven in special circumstances,
the replacement can be advanced from the schedule above.SystemParts need to be replaced regularly
1
2
3
4
5
6
7
8
9
10
11
12
13
14
15
16
17
18
19
20
21
22Brake master cylinder cup valve and dust coverBrake master cylinder cup
Brake hose
Brake caliper valve
Brake booster rubber
Brake booster vacuum hose
Brake fluid
MT Transmission oil
AT Transmission oil
Steering fluid
Air Cleaner
Air c leaner f ilter
Lubricant
Oil filter
Fuel filter
Coolant
All hoses
Canister
Timing beltWedge belt (including the power steering pump,
air conditioner compressor and generator belts)PCV system
Spark plugEvery 2 years (or as required)
Every 2 years (or as required)
Every 2 years (or as required)
Every 4 years (or as required)
Every 2 years (or as required)
Every 4 years (or as required)
Every 2 years,or 40000km (or as required)
Every 2 years,or 40000km (or as required)
Every 2 years,or 40000km (or as required)
Every 2 years,or 40000km (or as required)
To be cleaned every 10,000km and changed
every 30,000km (or as required)
First 2500km or 2 months. Every 7500km or
6 months afterward (or as required)
First 2500km or 2 months. Every 7500km or
6 months afterward (or as required)
Every 5000km (or as required)
Every 40000km (or as required)
Every year (or as required)
Every 2 years (or as required)
Every 60000km (or as required)
Every 120000km (or as required)
Every 50000km (or as required)
Every 20000km or 12 months (or as required)
Every 20000km (or as required)Intervals
DrivelineSteering SystemBraking
SystemEngineA/C System
(API) SG or above(Table 1)Usage and Maintenance of MK Series - Maintenance Category and Content of MK Sedan
Page 38 of 416
2-17
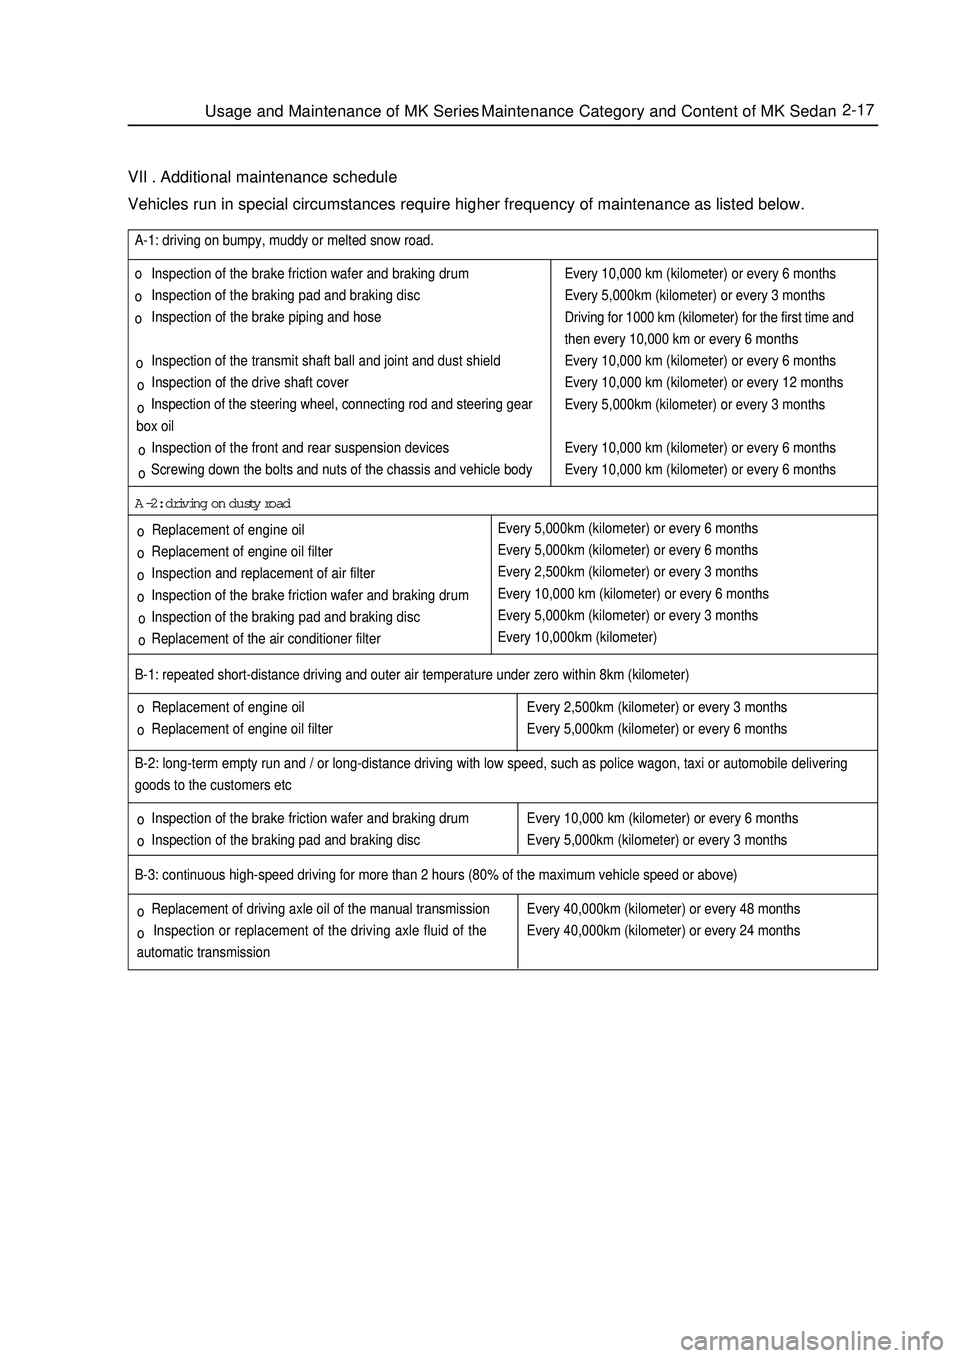
VII . Additional maintenance scheduleVehicles run in special circumstances require higher frequency of maintenance as listed below. Replacement of engine oil
Replacement of engine oil filter B-1: repeated short-distance driving and outer air temperature under zero within 8km (kilometer)
Inspection of the brake friction wafer and braking drum
Inspection of the braking pad and braking disc B-2: long-term empty run and / or long-distance driving with low speed, such as police wagon, taxi or automobile delivering
goods to the customers etcEvery 2,500km (kilometer) or every 3 months
Every 5,000km (kilometer) or every 6 months
Every 10,000 km (kilometer) or every 6 months
Every 5,000km (kilometer) or every 3 monthsB-3: continuous high-speed driving for more than 2 hours (80% of the maximum vehicle speed or above)
Replacement of driving axle oil of the manual transmission
Inspection or replacement of the driving axle fluid of the
automatic transmissionEvery 40,000km (kilometer) or every 48 months
Every 40,000km (kilometer) or every 24 months Inspection of the brake friction wafer and braking drum
Inspection of the braking pad and braking disc
Inspection of the brake piping and hose
Inspection of the transmit shaft ball and joint and dust shield
Inspection of the drive shaft cover
Inspection of the steering wheel, connecting rod and steering gear
box oil
Inspection of the front and rear suspension devices
Screwing down the bolts and nuts of the chassis and vehicle body A-1: driving on bumpy, muddy or melted snow road.
Replacement of engine oil
Replacement of engine oil filter
Inspection and replacement of air filter
Inspection of the brake friction wafer and braking drum
Inspection of the braking pad and braking disc
Replacement of the air conditioner filterA-2: driving on dusty roadEvery 10,000 km (kilometer) or every 6 months
Every 5,000km (kilometer) or every 3 months
Driving for 1000 km (kilometer) for the first time and
then every 10,000 km or every 6 months
Every 10,000 km (kilometer) or every 6 months
Every 10,000 km (kilometer) or every 12 months
Every 5,000km (kilometer) or every 3 months
Every 10,000 km (kilometer) or every 6 months
Every 10,000 km (kilometer) or every 6 months
Every 5,000km (kilometer) or every 6 months
Every 5,000km (kilometer) or every 6 months
Every 2,500km (kilometer) or every 3 months
Every 10,000 km (kilometer) or every 6 months
Every 5,000km (kilometer) or every 3 months
Every 10,000km (kilometer)Usage and Maintenance of MK Series - Maintenance Category and Content of MK Sedanoo o
o o o o
o o
o
o o
o o
o o
o ooo
Page 39 of 416

2-18Section 3 Daily Maintenance of MK SedanDaily maintenance means operation of vehicle regular inspection, cleaning, fastening, and refilling according to
vehicle usage and condition on the basis of regular maintenance to make sure the vehicle is at good status. Daily
maintenance can be performed by driver or professional automotive mechanics in daily use of vehicle. But some
of the items must be conducted by professional mechanics at service shops.
1. Maintenance of air cleaner
Air cleaner filters the air that is coming into engine for the first time. Dust and other dirt filtered out gathers in the
induction tube. Air cleaner filters a lot of dust and dirty, so it must be cleaned in time.
2. Maintenance of air filter
Air filter does not only filter the dust and dirt in the air, but also keeps smooth ventilation. Its status has great effects
on the fuel economy and power of the engine, so it must be checked and maintained in time.
Before it is time to replace air filter, maintain it. Remove the filter, knock it with hand or stick to get rid of dust
on the filter and remove dirt inside the filter cover according to the cleanness of the road that the vehicle usually
runs on.
ATTENTION: do not clean the filter with wet cloth. Fasten the filter well when installing it back.
3. Maintenance of battery
Battery is used to start the vehicle and supply power to electrical facilities. Its status directly affects the regular
usage of the vehicle, especially for vehicles equipped with electrical controlled facilities. Keeping the battery in
good technical status and connections is especially important. It is necessary to often perform the following
inspections and maintenance in regular usage:
(1) Clean the outside of battery Inspect if the battery case or cover surface is dirty or has dirt, oil, or other dirty
things regularly. Clean it and keep the surface dry to avoid electrical leak caused by cover deformation.
(2) Check battery connections Bad connection between battery electrode and cable results in low engine start
speed which makes it difficult to start the vehicle or the vehicle cannot be started because of low output voltage
from battery. Loose connection at battery end leads to damage of electrical components and loss of trouble code
and other information stored in RAM of the computer system as a result of low voltage. Therefore, it is necessary
to check if the connection of cables on the battery electrode is good. When it is found loose, it must be fastened.
If there is any rust, the cables must be loosened, washed clean and be connected again.
4. Maintenance of tires and wheels
(1) Keeping tires and wheels under good condition is very important to vehicle fuel consumption and driving
safety. Therefore, inspect and maintain the tires regularly. Every 10000 km, the wheels should be adjusted. Follow
the sequence in picture 3:
Judge if there is any hidden problems in vehicle chassis mechanism by observing wear in different places, andfinding out the hidden problems does not only help you to understand
the technical status of the vehicle, but also benefits driving safety.
a. Serious wear on both edges of tire tread, means tires often
work with low tire pressure.
b. Wear of middle of the tire tread is mainly because the tires
are used with high tire pressure.This kind of wear shortens
the useful life of tires, and may result in sudden flat tire
when the vehicle runs on uneven road surface or meets any
obstacles.Usage and Maintenance of MK Series - Daily Maintenance of MK Sedan
Page 42 of 416
Part III EngineChpater 1 Engine AssemblyInformation about engine accessories in MK-1 Car Maintenance Manual deals with only that concerned with a
complete car. Please refer to separated Maintenance Manual for information about the engine body. Engines
concerned are MR479Q, MR479QA and MR481QA.Section 1 Engine Inspection1. Check the engine oil
(1) Check the oil level.
(2) Start the engine, and reach warm-up temperature.
(3) Shut the engine down, wait for 3-5min, and check the oil level.
(4) Check whether the oil level is in within the range marked by the scale; if it is lower than the limit (mark
L), fill oil to mark F.
(5) Keep the oil clean without any coolant or petrol mixed in and with appropriate viscosity.
2. Change oil.
(1) Start the engine. When normal temperature is reached, shut down the engine.
(2) Open the oil cap, remove the oil drain plug, and drain the oil.
(3) Tighten the oil drain plug to a specified torque 54N.m.
(4) Fill fresh oil into the crank case with oil quantity 2.8L in case of the filter not changed, 3.0L in case of the
filter changed and 3.5L in case of the dry filter.
(5) Fit on the oil filling cap.
(6) Start the engine.
(7) Shut down the engine and check the oil quantity, and fill oil to the mark F on the oil scale if necessary.
3. Replace the oil filter.
(1) Remove the oil filter.
(2) Before mounting the oil filter, apply a small quantity of engine oil to the O-ring of the new oil filter.
(3) Tight the oil filter to a specified torque (12.7N.m).
(4) Start the engine, and check whether there is any leakage
(5) Shut down the engine, check the oil quantity and fill as required.
4. Oil selection
Oil over PAI SG grade is preferred.
SAE10W-30 or SAE10W-40 is preferred, and ASE5W-30 is used in cold region in the winter.
Note: For the best effect and the greatest safety, it is advisable to use the following lubrication oil.
a. Meet the requirements of API level.
b. Select proper SAE viscosity rating within expected ambient temperature.
The lubrication oil that can not meet the requirements of SAE viscosity and API label at the same time is not
allowed.
5. Check the coolant.
(1) After the engine is cooled down, remove the radiator cover.EngineEngine Assembly3-1 -
Page 46 of 416

Table 3Section 2 Removal of the Engine Assembly from the Vehicle1. Avoid petrol overflowing (Disconnect from the fuel tank).
2. Remove the front wheel.Figure 1-5Engine AssemblyRemoval of the Engine Assembly from the Vehicle3-5CO
Normal
Low
HighHC
High
High
HighProblems
Bad idle speed
Bad idle speed
(HC reading fluctuates)
Bad idle speed
(Black smoke exhausts)Causes
1. Ignition fault:
Incorrect ignition timing;
Dirt, short circuit, or incorrect spark plug gap.
2. Incorrect valve gap.
3. Suction and exhaust valve leak.
4. Cylinder leaks.
1. Vacuum leaks.
PCV pipe . manifold;
Idle speed control valve;
Brake booster pipeline.
2. Spark lacks since the mixed gas is too thin.
1. Air filter is blocked.
2. PCV valve is blocked.
3. EFI system fails.
ECU fails.
Pressure regulator of fuel oil is out of order.
Water temperature sensor does not work.
Suction pressure/temperature sensor fails.
Injector fails.
The throttle position sensor fails.3. Discharge the coolant completely.
4. Remove the air filter assembly with hose (see Figure 1-5).
(1) Disconnect the joint of the temperature sensor and the wire
plug.
(2) Disconnect the vent duct from the hose of the air filter.
(3) Release the wire clip bolt on the air filter.
(4) Disconnect the hose of the air filter from the throttle body.
(5) Remove 3 bolts and the air filter assemblies.
5. Remove the battery.
6. Remove the fuel pipe sub-assembly.
7. Disconnect the water pipe; disconnect the water outlet pipe of the
heater from the air conditioner pipe.
8. Release the nut and remove the accelerator control cable. -
Page 49 of 416

Chapter 2 Engine MechanicalSection 1 Engine ComponentsComponent ViewFigure 2-1Engine MechanicalEngine Components3-8Upside of radiator support
Engine cover lock assembly
Starter assembly
Output pipe of oil cooler
Input pipe of oil coolerTransmission control cable assembly Fuel oil sub-assembly Accelerator control cable assemble
Water inlet pipe of heater
Water outlet pipe of heaterTransmission control cable assemblySuitable for 1.5L/1.6L(Tight coupling)Suitable for 1.3L/1.5L(Non-tight coupling) Radiator assemblyAir filter assembly with hose
Clutch release assembly
Water inlet pipe of radiator
Water outlet pipe of radiator
Battery -
Page 51 of 416
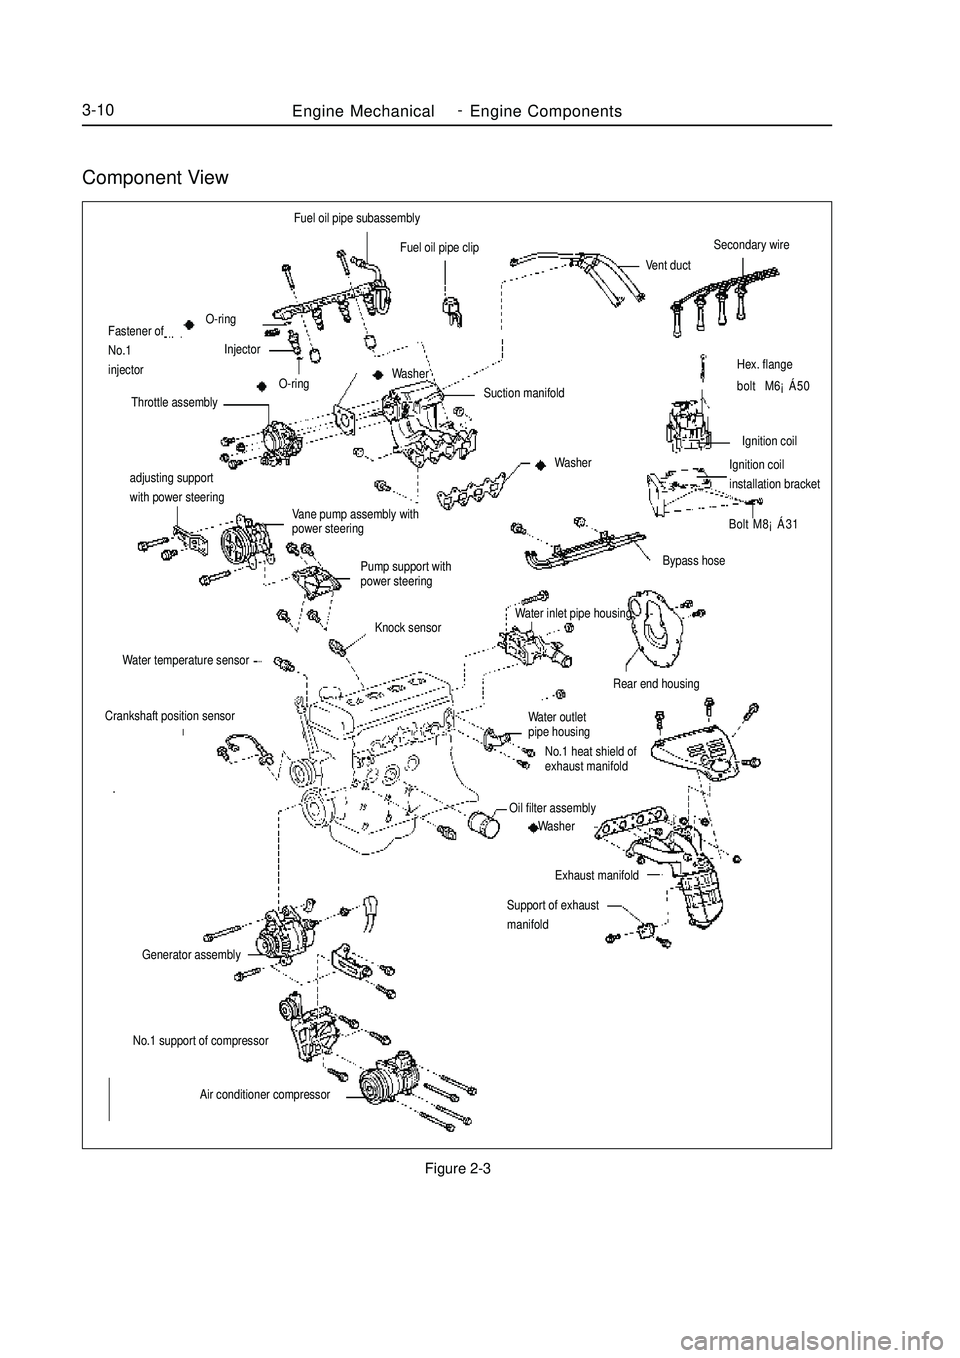
Component ViewFigure 2-3Engine MechanicalEngine Components3-10adjusting support
with power steering
Vane pump assembly with
power steering
Pump support with
power steeringHex. flange
bolt M6¡Á50
Ignition coil
Ignition coilinstallation bracket
Bolt M8¡Á31Fuel oil pipe subassembly
Fuel oil pipe clip
Vent ductSecondary wireBypass hose
Rear end housingWater outlet
pipe housing
No.1 heat shield of
exhaust manifoldOil filter assembly
Washer
Exhaust manifold
Support of exhaust
manifoldO-ring
Fastener of
No.1
injectorInjector
O-ring
Throttle assemblySuction manifold Washer
WasherKnock sensor
Water temperature sensorCrankshaft position sensorGenerator assemblyNo.1 support of compressor
Air conditioner compressorWater inlet pipe housing -
Page 56 of 416
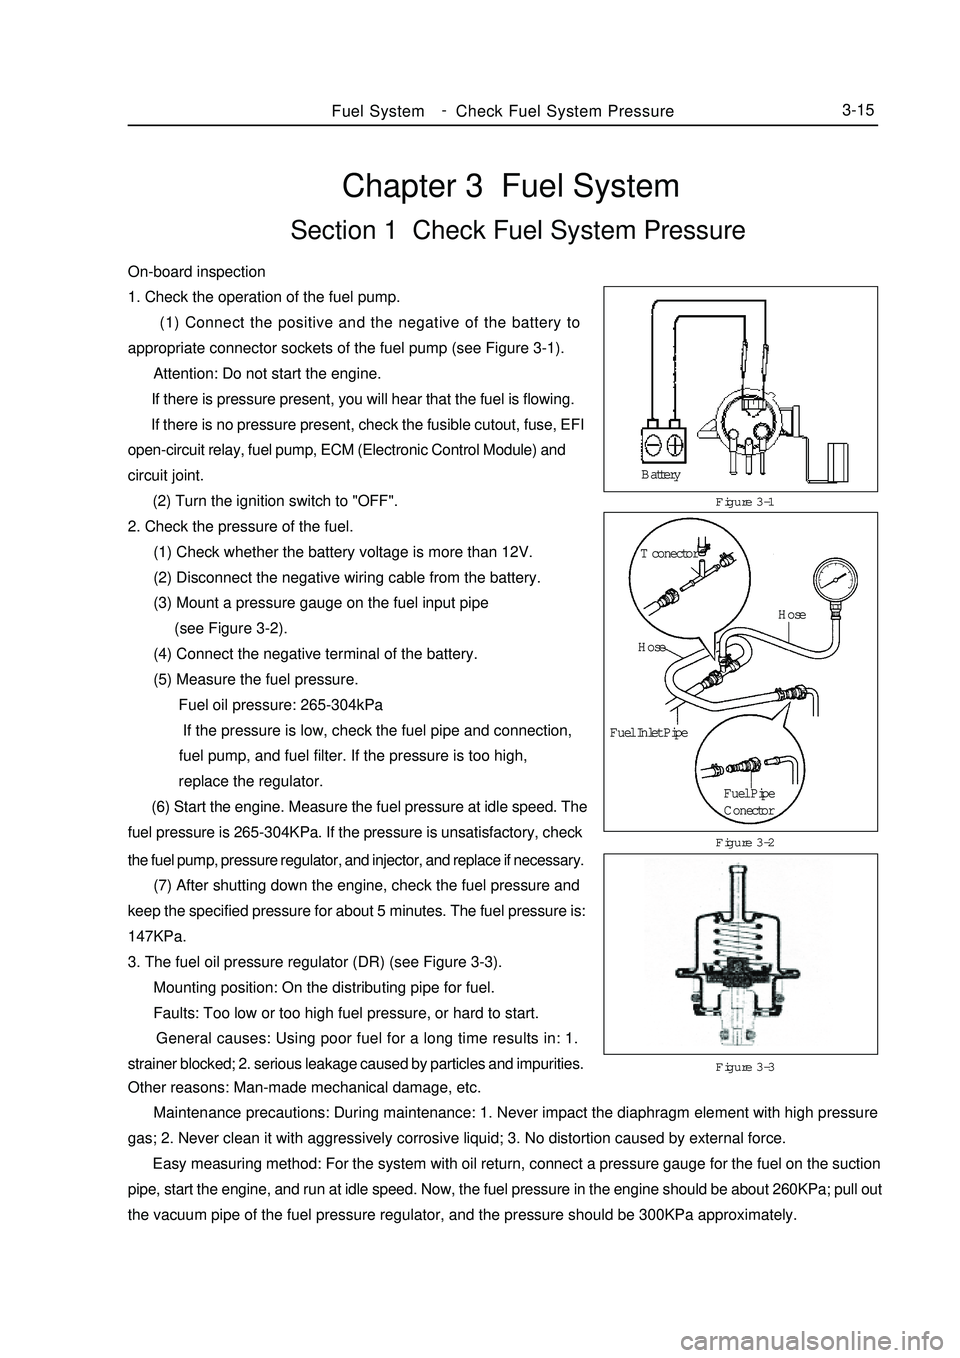
Chapter 3 Fuel SystemSection 1 Check Fuel System PressureOn-board inspection
1. Check the operation of the fuel pump.
(1) Connect the positive and the negative of the battery to
appropriate connector sockets of the fuel pump (see Figure 3-1).
Attention: Do not start the engine.
If there is pressure present, you will hear that the fuel is flowing.
If there is no pressure present, check the fusible cutout, fuse, EFI
open-circuit relay, fuel pump, ECM (Electronic Control Module) and
circuit joint.
(2) Turn the ignition switch to "OFF".
2. Check the pressure of the fuel.
(1) Check whether the battery voltage is more than 12V.
(2) Disconnect the negative wiring cable from the battery.
(3) Mount a pressure gauge on the fuel input pipe
(see Figure 3-2).
(4) Connect the negative terminal of the battery.
(5) Measure the fuel pressure.
Fuel oil pressure: 265-304kPa
If the pressure is low, check the fuel pipe and connection,
fuel pump, and fuel filter. If the pressure is too high,
replace the regulator.
(6) Start the engine. Measure the fuel pressure at idle speed. The
fuel pressure is 265-304KPa. If the pressure is unsatisfactory, checkFigure 3-1
Figure 3-3 Figure 3-2Fuel SystemCheck Fuel System Pressure3-15the fuel pump, pressure regulator, and injector, and replace if necessary.
(7) After shutting down the engine, check the fuel pressure and
keep the specified pressure for about 5 minutes. The fuel pressure is:
147KPa.
3. The fuel oil pressure regulator (DR) (see Figure 3-3).
Mounting position: On the distributing pipe for fuel.
Faults: Too low or too high fuel pressure, or hard to start.
General causes: Using poor fuel for a long time results in: 1.
strainer blocked; 2. serious leakage caused by particles and impurities.
Other reasons: Man-made mechanical damage, etc.
Maintenance precautions: During maintenance: 1. Never impact the diaphragm element with high pressure
gas; 2. Never clean it with aggressively corrosive liquid; 3. No distortion caused by external force.
Easy measuring method: For the system with oil return, connect a pressure gauge for the fuel on the suction
pipe, start the engine, and run at idle speed. Now, the fuel pressure in the engine should be about 260KPa; pull out
the vacuum pipe of the fuel pressure regulator, and the pressure should be 300KPa approximately.Battery
T conector
Hose
Hose
Fuel Inlet Pipe
Fuel Pipe
Conector -