tow GENESIS G70 2021 Owner's Guide
[x] Cancel search | Manufacturer: GENESIS, Model Year: 2021, Model line: G70, Model: GENESIS G70 2021Pages: 516, PDF Size: 12.84 MB
Page 380 of 516
5-131
Driving your vehicle
5
Information
The ESC system must be turned OFF
before rocking the vehicle.
If you are still stuck after rocking
the vehicle a few times, have the
vehicle pulled out by a tow vehicle
to avoid engine overheating, pos-
sible damage to the transmission,
and tire damage. See "Towing" in
chapter 6.
Smooth Cornering
Avoid braking or gear changing in
corners, especially when roads are
wet. Ideally, corners should always
be taken under gentle acceleration.
Driving at Night
Night driving presents more hazards
than driving in the daylight. Here are
some important tips to remember:
• Slow down and keep more dis-
tance between you and other vehi-
cles, as it may be more difficult to
see at night, especially in areas
where there may not be any street
lights.
• Adjust your mirrors to reduce the
glare from other driver's head-
lamps.
• Keep your headlamps clean and
properly aimed. Dirty or improperly
aimed headlamps will make it
much more difficult to see at night.
• Avoid staring directly at the head-
lamps of oncoming vehicles. You
could be temporarily blinded, and it
will take several seconds for your
eyes to readjust to the darkness.
Driving in the Rain
Rain and wet roads can make driving
dangerous. Here are a few things to
consider when driving in the rain or
on slick pavement:
• Slow down and allow extra follow-
ing distance. A heavy rainfall
makes it harder to see and increas-
es the distance needed to stop
your vehicle.
• Turn OFF your Cruise Control.
• Replace your windshield wiper
blades when they show signs of
streaking or missing areas on the
windshield.
• Tires should be properly main-
tained with at least 2/32nds of an
inch of tread depth. If your tires do
not have enough tread, making a
quick stop on wet pavement can
cause a skid and possibly lead to
an accident.See "Tire
Replacement" in chapter 7.
• Turn on your headlamps to make it
easier for others to see you.
NOTICE
i
Page 382 of 516

5-133
Driving your vehicle
5
WINTER DRIVING
The severe weather conditions of
winter quickly wear out tires and
cause other problems. To minimize
winter driving problems, you should
take the following suggestions:
Snow or Icy Conditions
You need to keep sufficient distance
between your vehicle and the vehicle
in front of you.
Apply the brakes gently. Speeding,
rapid acceleration, sudden brake
applications, and sharp turns are
potentially very hazardous practices.
During deceleration, use engine
braking to the fullest extent. Sudden
brake applications on snowy or icy
roads may cause the vehicle to skid.
To drive your vehicle in deep snow, it
may be necessary to use snow tires
or to install tire chains on your tires.
Always carry emergency equipment.
Some of the items you may want to
carry include tire chains, tow straps
or chains, a flashlight, emergency
flares, sand, a shovel, jumper cables,
a window scraper, gloves, ground
cloth, coveralls, a blanket, etc.
Snow tires
Standard tire Recommended snow tire
Front Rear Front Rear
Tire sizeWheel
sizeTire sizeWheel
sizeTire size
Wheel
sizeTire sizeWheel
size
225/45R18 8.0Jx18 225/45R18 8.0Jx18 225/45R18
8.0Jx18 225/45R18 8.0Jx18
225/40ZR198.0Jx19255/35ZR198.5Jx19 225/40R198.0Jx19 255/35R19 8.5Jx19
225/40R198.0Jx19255/35R198.5Jx19 225/40R198.0Jx19 255/35R19 8.5Jx19
We recommend you use snow tires when road temperature is below 45°F
(7°C). Refer to the below chart, and mount the recommended snow tire for
your vehicle.
If you mount snow tires on your vehicle, make sure to use the same inflation
pressure as the original tires. Mount snow tires on all four wheels to balance
your vehicle's handling in all weather conditions. The traction provided by
snow tires on dry road may not be as high as your vehicle's original equip-
ment tires. Check with the tire dealer for maximum speed recommendations.
Information
Do not install studded tires without first checking local, state and municipal reg-
ulations for possible restrictions against their use.
i
Page 389 of 516
5-140
Driving your vehicle
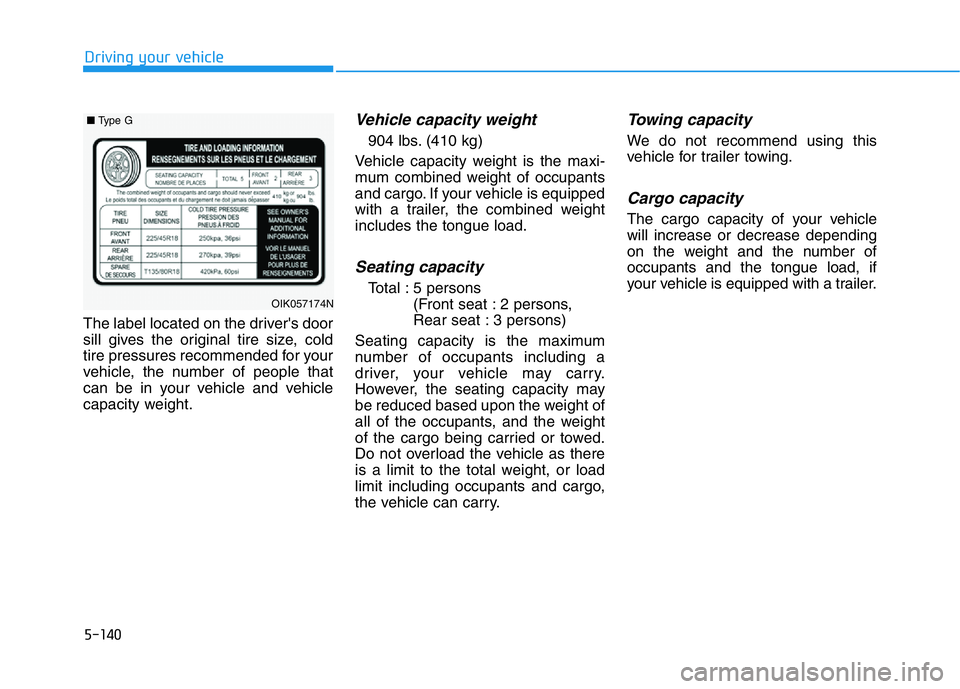
The label located on the driver's door
sill gives the original tire size, cold
tire pressures recommended for your
vehicle, the number of people that
can be in your vehicle and vehicle
capacity weight.
Vehicle capacity weight
904 lbs. (410 kg)
Vehicle capacity weight is the maxi-
mum combined weight of occupants
and cargo. If your vehicle is equipped
with a trailer, the combined weight
includes the tongue load.
Seating capacity
Total : 5 persons
(Front seat : 2 persons,
Rear seat : 3 persons)
Seating capacity is the maximum
number of occupants including a
driver, your vehicle may carry.
However, the seating capacity may
be reduced based upon the weight of
all of the occupants, and the weight
of the cargo being carried or towed.
Do not overload the vehicle as there
is a limit to the total weight, or load
limit including occupants and cargo,
the vehicle can carry.
Towing capacity
We do not recommend using this
vehicle for trailer towing.
Cargo capacity
The cargo capacity of your vehicle
will increase or decrease depending
on the weight and the number of
occupants and the tongue load, if
your vehicle is equipped with a trailer.
OIK057174N
■Type G
Page 390 of 516
5-141
Driving your vehicle
Steps for determining correct
load limit
1. Locate the statement "The com-
bined weight of occupants and
cargo should never exceed XXX
kg or XXX lbs." on your vehicle's
placard.
2. Determine the combined weight of
the driver and passengers that will
be riding in your vehicle.
3. Subtract the combined weight of
the driver and passengers from
XXX kg or XXX lbs.
4. The resulting figure equals the
available amount of cargo and lug-
gage load capacity. For example, if
the "XXX" amount equals 1400
lbs. and there will be five 150 lb
passengers in your vehicle, the
amount of available cargo and lug-
gage load capacity is 650 lbs.
(1400 - 750 (5 x 150) = 650 lbs.)5. Determine the combined weight of
luggage and cargo being loaded
on the vehicle. That weight may
not safely exceed the available
cargo and luggage load capacity
calculated in Step 4.
6. If your vehicle will be towing a trail-
er, load from your trailer will be
transferred to your vehicle. Consult
this manual to determine how this
reduces the available cargo and
luggage load capacity of your vehi-
cle.
5
Do not overload the vehicle as
there is a limit to the total
weight, or load limit, including
occupants and cargo, the vehi-
cle can carry. Overloading can
shorten the life of the vehicle. If
the GVWR or the GAWR is
exceeded, parts on the vehicle
can break, and it can change
the handling of your vehicle.
These could cause you to lose
control and result in an acci-
dent.
WARNING
Page 393 of 516
Overloading your vehicle may
cause damage. Repairs would not
be covered by your warranty. Do
not overload your vehicle.
NOTICE
If you carry items inside your
vehicle (e.g., suitcases, tools,
packages, or anything else),
they are moving as fast as the
vehicle. If you have to stop or
turn quickly, or if there is a
crash, the items will keep going
and can cause an injury if they
strike the driver or a passenger.
•Put items in the cargo area of
your vehicle. Try to spread the
weight evenly.
•Do not stack items, like suit-
cases, inside the vehicle
above the tops of the seats.
•Do not leave an unsecured
child restraint in your vehicle.
•When you carry something
inside the vehicle, secure it.
WARNING
TRAILER TOWING
We do not recommend using this vehicle for trailer towing. Driving your vehicle
5-144
Page 394 of 516
What to do in an emergency
6
Hazard Warning Flasher .......................................6-2
In Case of an Emergency While Driving.............6-2
If the Engine Stalls While Driving .................................6-2
If the Engine Stalls at a Crossroad or Crossing ........6-2
If you Have a Flat Tire While Driving ..........................6-2
If the Engine Will Not Start..................................6-3
If the Engine Doesn't Turn Over or
Turns Over Slowly .............................................................6-3
If the Engine Turns Over Normally but
Doesn't Start ......................................................................6-3
Jump Starting ..........................................................6-4
Push-starting .....................................................................6-6
If the Engine Overheats........................................6-6
Tire Pressure Monitoring System (TPMS).........6-8
Check Tire Pressure .........................................................6-8
Tire Pressure Monitoring System .................................6-9
Low Tire Pressure Telltale ............................................6-10
Low Tire Pressure LCD Display
with Position Indicator ...................................................6-10
TPMS Malfunction Indicator ........................................6-11
Changing a Tire with TPMS..........................................6-12
If You Have a Flat Tire (With Spare Tire)........6-14
Jack and Tools .................................................................6-14
Changing Tires ................................................................6-15
If You Have a Flat Tire
(With Tire Mobility Kit) .......................................6-21
Introduction ......................................................................6-21
Components of the Tire Mobility Kit .........................6-23
Using the Tire Mobility Kit............................................6-24
Towing ...................................................................6-27
Towing Service .................................................................6-27
Removable Towing Hook ...............................................6-29
Emergency Towing..........................................................6-30
Tie-down Hook ................................................................6-31
Page 397 of 516
6-4
What to do in an emergency
Jump starting can be dangerous if
done incorrectly. Follow the jump
starting procedure in this section to
avoid serious injury or damage to
your vehicle. If in doubt about how to
properly jump start your vehicle, we
strongly recommend that you have a
service technician or towing service
do it for you.
Information
An inappropriately disposed
battery can be harmful to the
environment and human
health. Dispose of the battery
according to your local law(s)
or regulations.
To prevent damage to your vehicle:
• Only use a 12-volt power supply
(battery or jumper system) to
jump start your vehicle.
• Do not attempt to jump start
your vehicle by push-starting.
NOTICE
i
JUMP STARTING
To prevent SERIOUS INJURY or
DEATH to you or bystanders,
always follow these precautions
when working near or handling
the battery:
Always read and follow
instructions carefully
when handling a battery.
Wear eye protection
designed to protect the
eyes from acid splashes.
Keep all flames, sparks,
or smoking materials
away from the battery.
WARNING
Hydrogen is always
present in battery cells,
is highly combustible,
and may explode if ignit-
ed.
Keep batteries out of
reach of children.
Batteries contain sulfu-
ric acid which is highly
corrosive. Do not allow
acid to contact your
eyes, skin or clothing.
If acid gets into your eyes, flush
your eyes with clean water for at
least 15 minutes and get imme-
diate medical attention. If acid
gets on your skin, thoroughly
wash the area. If you feel pain or
a burning sensation, get med-
ical attention immediately.
•When lifting a plastic-cased
battery, excessive pressure
on the case may cause battery
acid to leak. Lift with a battery
carrier or with your hands on
opposite corners.
•Do not attempt to jump start
your vehicle if your battery is
frozen.
•NEVER attempt to recharge
the battery when the vehicle's
battery cables are connected
to the battery.
•The electrical ignition system
works with high voltage.
NEVER touch these compo-
nents with the engine running
or when the Engine Start/Stop
button is in the ON position.
Pb
Page 400 of 516

6-7
What to do in an emergency
6
4. Check for coolant leaking from the
radiator, hoses or under the vehi-
cle. (If the air conditioning had
been in use, it is normal for cold
water to be draining from it when
you stop.)
5. If engine coolant is leaking out,
stop the engine immediately and
call the nearest authorized retailer
of Genesis Branded products for
assistance.6. If you cannot find the cause of the
overheating, wait until the engine
temperature has returned to nor-
mal. Then, if coolant has been
lost, carefully add coolant to the
reservoir to bring the fluid level in
the reservoir up to the halfway
mark.
7. Proceed with caution, keeping
alert for further signs of overheat-
ing. If overheating happens again,
call an authorized retailer of
Genesis Branded products for
assistance. While the engine is
running, keep hands,
clothing and tools
away from the mov-
ing parts such as the
cooling fan and drive
belt to prevent seri-
ous injury.
WARNING
Serious loss of coolant indi-
cates a leak in the cooling sys-
tem and should be checked as
soon as possible by an author-
ized retailer of Genesis Branded
products.
CAUTION
Your vehicle is
equipped with a pres-
surized coolant
reserve tank. NEVER
remove the engine
coolant reservoir tank/radiator
cap or the drain plug while the
engine and radiator are HOT.
Hot coolant and steam may
blow out under pressure, caus-
ing serious injury.
Turn the engine off and wait
until the engine cools down.
Use extreme care when remov-
ing the engine coolant reservoir
tank/radiator cap. Wrap a towel
or thick rag around it, and turn it
counterclockwise slowly to
release some of the pressure
from the system. Step back
while the pressure is released.
When you are sure all the pres-
sure has been released, contin-
ue turning the cap counter-
clockwise to remove it.
WARNING
Page 405 of 516
6-12
What to do in an emergency
The TPMS Malfunction Indicator
may illuminate after blinking for
one minute if the vehicle is near
electric power supply cables or
radio transmitters such as police
stations, government and public
offices, broadcasting stations,
military installations, airports,
transmitting towers, etc.
Additionally, the TPMS Malfunction
Indicator may illuminate if snow
chains are used or electronic
devices such as computers, charg-
ers, remote starters, navigation,
etc. This may interfere with normal
operation of the TPMS.
Changing a Tire with TPMS
If you have a flat tire, the Low Tire
Pressure and LCD position indicator
will come on. Have the flat tire
repaired by an authorized retailer of
Genesis Branded products as soon
as possible or replace the flat tire
with the spare tire.
The spare tire (if equipped) does not
come with a tire pressure monitoring
sensor. When the low pressure tire or
the flat tire is replaced with the spare
tire, the Low Tire Pressure LCD posi-
tion indicator will remain on.Also, the TPMS Malfunction Indicator
will illuminate after blinking for one
minute if the vehicle is driven at
speed above 15.5 mph (25 km/h) for
approximately 20 minutes.
Once the original tire equipped with
a tire pressure monitoring sensor is
reinflated to the recommended pres-
sure and reinstalled on the vehicle,
the Low Tire Pressure LCD position
indicator and TPMS Malfunction
Indicator will go off within a few min-
utes of driving.
If the indicators do not disappear after
a few minutes, please visit an author-
ized retailer of Genesis Branded prod-
ucts.
Each wheel is equipped with a tire
pressure sensor mounted inside the
tire behind the valve stem (except for
the spare tire). You must use TPMS
specific wheels. It is recommended
that you always have your tires serv-
iced by an authorized retailer of
Genesis Branded products.
NOTICE
Never use a puncture-repairing
agent not approved by an
authorized retailer of Genesis
Branded products to repair
and/or inflate a low pressure
tire. Tire sealant not approved
by an authorized retailer of
Genesis Branded products may
damage the tire pressure sen-
sor.
CAUTION
Page 408 of 516
6-15
What to do in an emergency
6
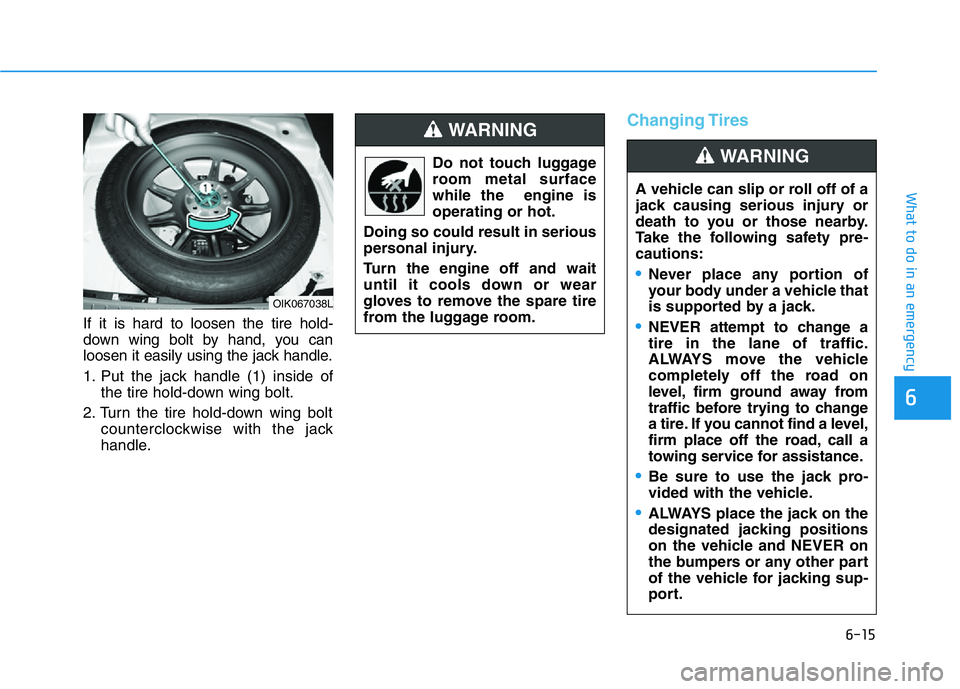
If it is hard to loosen the tire hold-
down wing bolt by hand, you can
loosen it easily using the jack handle.
1. Put the jack handle (1) inside of
the tire hold-down wing bolt.
2. Turn the tire hold-down wing bolt
counterclockwise with the jack
handle.
Changing Tires
A vehicle can slip or roll off of a
jack causing serious injury or
death to you or those nearby.
Take the following safety pre-
cautions:
•Never place any portion of
your body under a vehicle that
is supported by a jack.
•NEVER attempt to change a
tire in the lane of traffic.
ALWAYS move the vehicle
completely off the road on
level, firm ground away from
traffic before trying to change
a tire. If you cannot find a level,
firm place off the road, call a
towing service for assistance.
•Be sure to use the jack pro-
vided with the vehicle.
•ALWAYS place the jack on the
designated jacking positions
on the vehicle and NEVER on
the bumpers or any other part
of the vehicle for jacking sup-
port.
WARNING
OIK067038L
Do not touch luggage
room metal surface
while the engine is
operating or hot.
Doing so could result in serious
personal injury.
Turn the engine off and wait
until it cools down or wear
gloves to remove the spare tire
from the luggage room.
WARNING