display GENESIS G80 2018 User Guide
[x] Cancel search | Manufacturer: GENESIS, Model Year: 2018, Model line: G80, Model: GENESIS G80 2018Pages: 516, PDF Size: 81.01 MB
Page 111 of 516
3-23
Convenient features of your vehicle
3
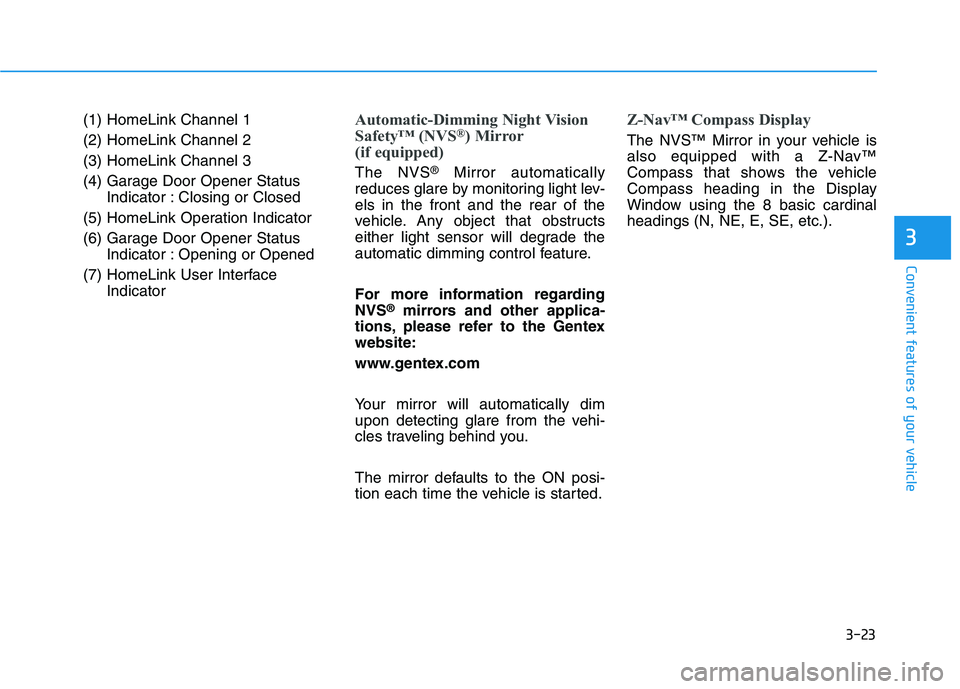
(1) HomeLink Channel 1
(2) HomeLink Channel 2
(3) HomeLink Channel 3
(4) Garage Door Opener Status
Indicator : Closing or Closed
(5) HomeLink Operation Indicator
(6) Garage Door Opener Status
Indicator : Opening or Opened
(7) HomeLink User Interface
IndicatorAutomatic-Dimming Night Vision
Safety™ (NVS®) Mirror
(if equipped)
The NVS®Mirror automatically
reduces glare by monitoring light lev-
els in the front and the rear of the
vehicle. Any object that obstructs
either light sensor will degrade the
automatic dimming control feature.
For more information regarding
NVS
®mirrors and other applica-
tions, please refer to the Gentex
website:
www.gentex.com
Your mirror will automatically dim
upon detecting glare from the vehi-
cles traveling behind you.
The mirror defaults to the ON posi-
tion each time the vehicle is started.
Z-Nav™ Compass Display
The NVS™ Mirror in your vehicle is
also equipped with a Z-Nav™
Compass that shows the vehicle
Compass heading in the Display
Window using the 8 basic cardinal
headings (N, NE, E, SE, etc.).
Page 112 of 516
3-24
Convenient features of your vehicle
Compass function
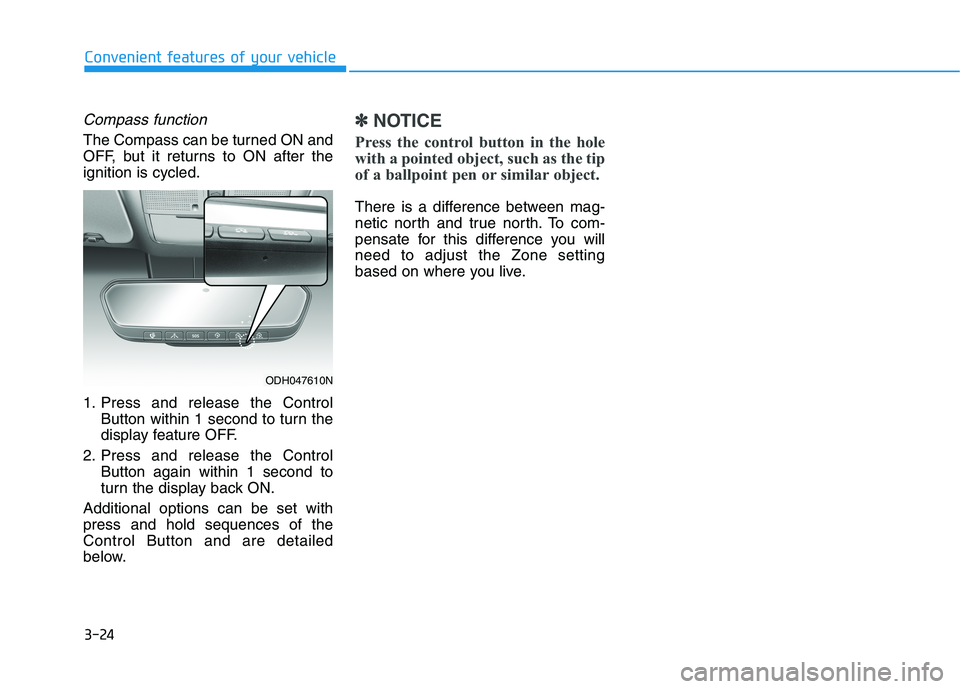
The Compass can be turned ON and
OFF, but it returns to ON after the
ignition is cycled.
1. Press and release the Control
Button within 1 second to turn the
display feature OFF.
2. Press and release the Control
Button again within 1 second to
turn the display back ON.
Additional options can be set with
press and hold sequences of the
Control Button and are detailed
below.
✽ ✽
NOTICE
Press the control button in the hole
with a pointed object, such as the tip
of a ballpoint pen or similar object.
There is a difference between mag-
netic north and true north. To com-
pensate for this difference you will
need to adjust the Zone setting
based on where you live.
ODH047610N
Page 113 of 516
3-25
Convenient features of your vehicle
3
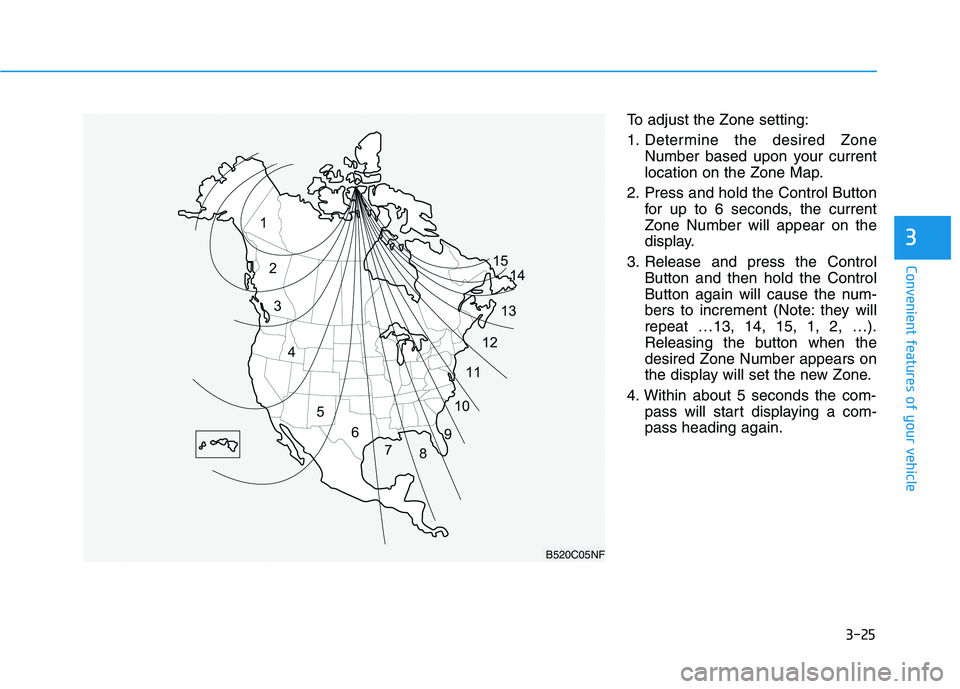
To adjust the Zone setting:
1. Determine the desired Zone
Number based upon your current
location on the Zone Map.
2. Press and hold the Control Button
for up to 6 seconds, the current
Zone Number will appear on the
display.
3. Release and press the Control
Button and then hold the Control
Button again will cause the num-
bers to increment (Note: they will
repeat …13, 14, 15, 1, 2, …).
Releasing the button when the
desired Zone Number appears on
the display will set the new Zone.
4. Within about 5 seconds the com-
pass will start displaying a com-
pass heading again.
B520C05NF
Page 114 of 516
3-26
Convenient features of your vehicle
There are some conditions that can
cause changes to the vehicle mag-
nets, such as installing a ski rack or
a CB antenna. Body repair work on
the vehicle can also cause changes
to the vehicle's magnetic field. In
these situations, the compass will
need to be re-calibrated to quickly
correct these changes.
If you need to recalibrate the com-
pass:
1. Press and hold the Control Button
for more than 6 seconds. When
the compass memory is cleared, a
"C" will appear in the display.
2. Drive the vehicle in 2 complete cir-
cles at less than 5 mph (8 km/h).
Integrated HomeLink®Wireless
Control System
The HomeLink®Wireless Control
System can replace up to three
hand-held radio-frequency (RF)
transmitters with a single built-in
device. This innovative feature will
learn the radio frequency codes of
most current transmitters to operate
devices such as gate operators,
garage door openers, entry door
locks, security systems, even home
lighting. Both standard and rolling
code-equipped transmitters can be
programmed by following the out-
lined procedures.
Additional HomeLink
®information
can be found at: www.homelink.com,
www.youtube.com/HomeLinkGentex
or by calling 1-800-355-3515.
Retain the original transmitter of the
RF device you are programming for
use in other vehicles as well as for
future HomeLink
®programming. It is
also suggested that upon the sale of
the vehicle, the programmed
HomeLink
®buttons be erased for
security purposes.Before programming HomeLink
®
to a garage door opener or gate
operator, make sure people and
objects are out of the way of the
device to prevent potential harm
or damage. Do not use the
HomeLink
®with any garage
door opener that lacks the safe-
ty stop and reverse features
required by U.S. federal safety
standards (this includes any
garage door opener model man-
ufactured before April 1, 1982). A
garage door that cannot detect
an object - signaling the door to
stop and reverse - does not meet
current U.S. federal safety stan-
dards. Using a garage door
opener without these features
increases the risk of serious
injury or death.
WARNING
Page 139 of 516
3-51
Convenient features of your vehicle
3
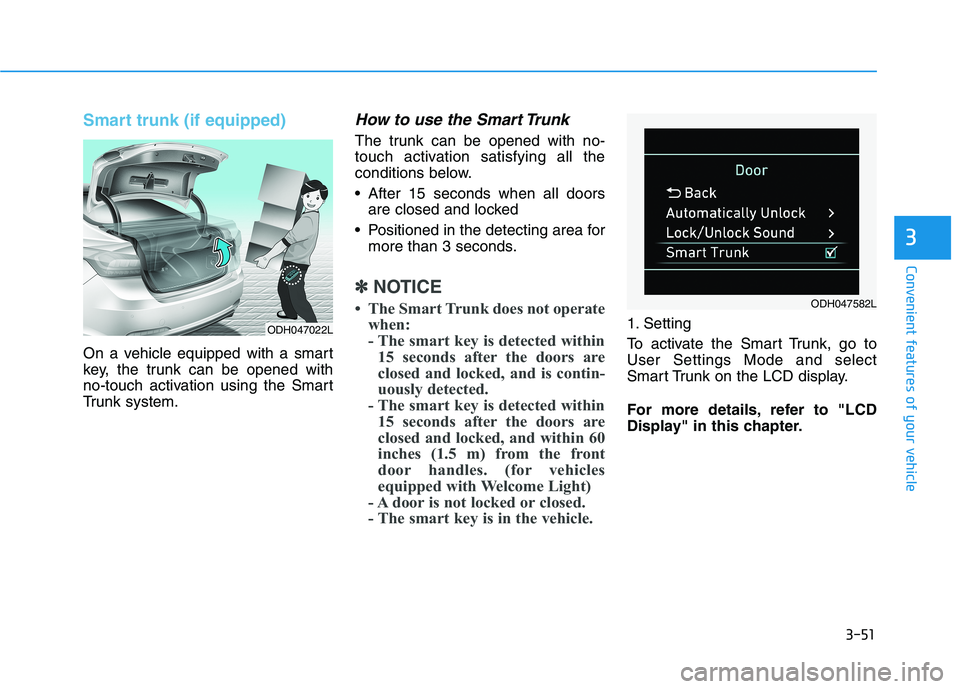
Smart trunk (if equipped)
On a vehicle equipped with a smart
key, the trunk can be opened with
no-touch activation using the Smart
Trunk system.
How to use the Smart Trunk
The trunk can be opened with no-
touch activation satisfying all the
conditions below.
After 15 seconds when all doors
are closed and locked
Positioned in the detecting area for
more than 3 seconds.
✽ ✽
NOTICE
• The Smart Trunk does not operate
when:
- The smart key is detected within
15 seconds after the doors are
closed and locked, and is contin-
uously detected.
- The smart key is detected within
15 seconds after the doors are
closed and locked, and within 60
inches (1.5 m) from the front
door handles. (for vehicles
equipped with Welcome Light)
- A door is not locked or closed.
- The smart key is in the vehicle. 1. Setting
To activate the Smart Trunk, go to
User Settings Mode and select
Smart Trunk on the LCD display.
For more details, refer to "LCD
Display" in this chapter.
ODH047582L
ODH047022L
Page 146 of 516
3-58
Convenient features of your vehicle
I IN
NS
ST
TR
RU
UM
ME
EN
NT
T
C
CL
LU
US
ST
TE
ER
R
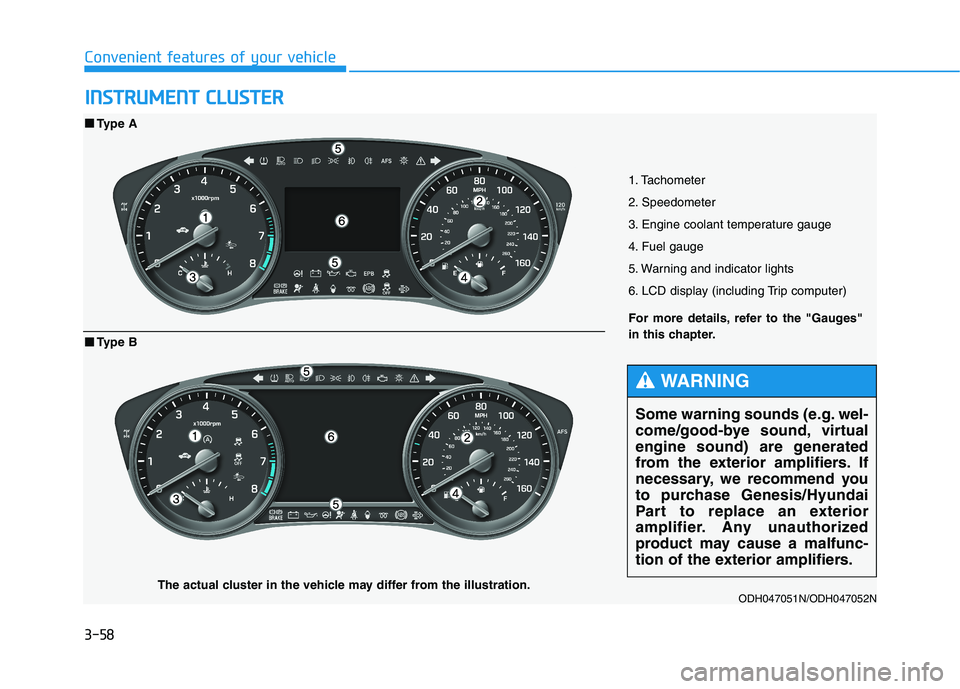
1. Tachometer
2. Speedometer
3. Engine coolant temperature gauge
4. Fuel gauge
5. Warning and indicator lights
6. LCD display (including Trip computer)
ODH047051N/ODH047052N
■ ■
Type A
For more details, refer to the "Gauges"
in this chapter.
■ ■
Type B
The actual cluster in the vehicle may differ from the illustration.
Some warning sounds (e.g. wel-
come/good-bye sound, virtual
engine sound) are generated
from the exterior amplifiers. If
necessary, we recommend you
to purchase Genesis/Hyundai
Part to replace an exterior
amplifier. Any unauthorized
product may cause a malfunc-
tion of the exterior amplifiers.
WARNING
Page 147 of 516
3-59
Convenient features of your vehicle
3
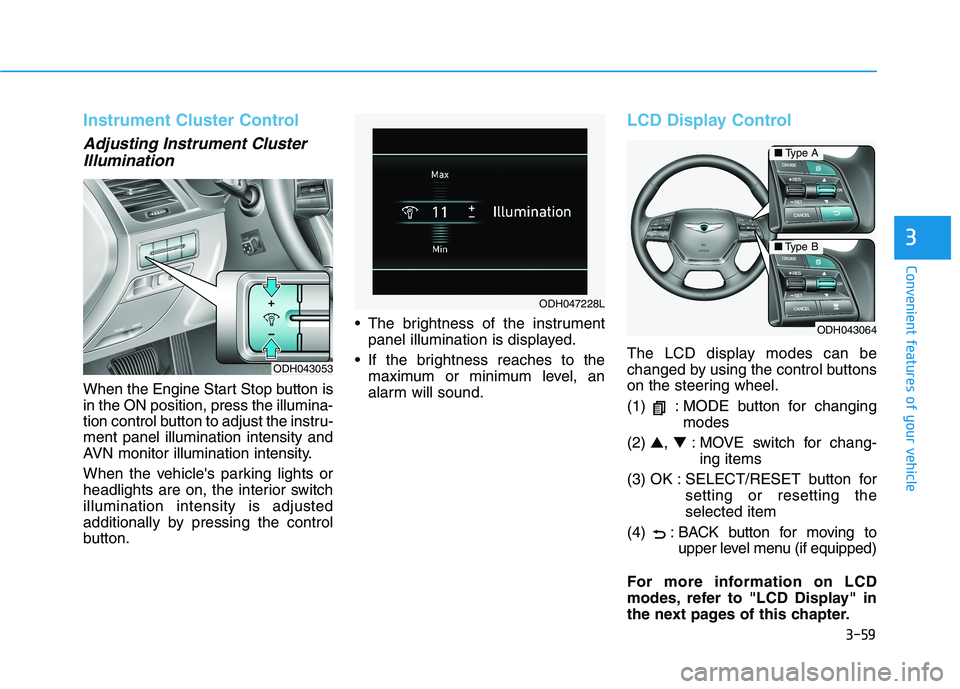
Instrument Cluster Control
Adjusting Instrument Cluster
Illumination
When the Engine Start Stop button is
in the ON position, press the illumina-
tion control button to adjust the instru-
ment panel illumination intensity and
AVN monitor illumination intensity.
When the vehicle's parking lights or
headlights are on, the interior switch
illumination intensity is adjusted
additionally by pressing the control
button. The brightness of the instrument
panel illumination is displayed.
If the brightness reaches to the
maximum or minimum level, an
alarm will sound.
LCD Display Control
The LCD display modes can be
changed by using the control buttons
on the steering wheel.
(1) : MODE button for changing
modes
(2) ▲, ▼: MOVE switch for chang-
ing items
(3) OK : SELECT/RESET button for
setting or resetting the
selected item
(4) : BACK button for moving to
upper level menu (if equipped)
For more information on LCD
modes, refer to "LCD Display" in
the next pages of this chapter.ODH043053
ODH047228L
ODH043064
■Type A
■Type B
Page 151 of 516
3-63
Convenient features of your vehicle
3
- User Settings Mode in the Cluster :
You can change the temperature
unit in the "Other Features -
Temperature unit".
- Automatic climate control system :
While pressing the OFF button,
press the AUTO button for 3 sec-
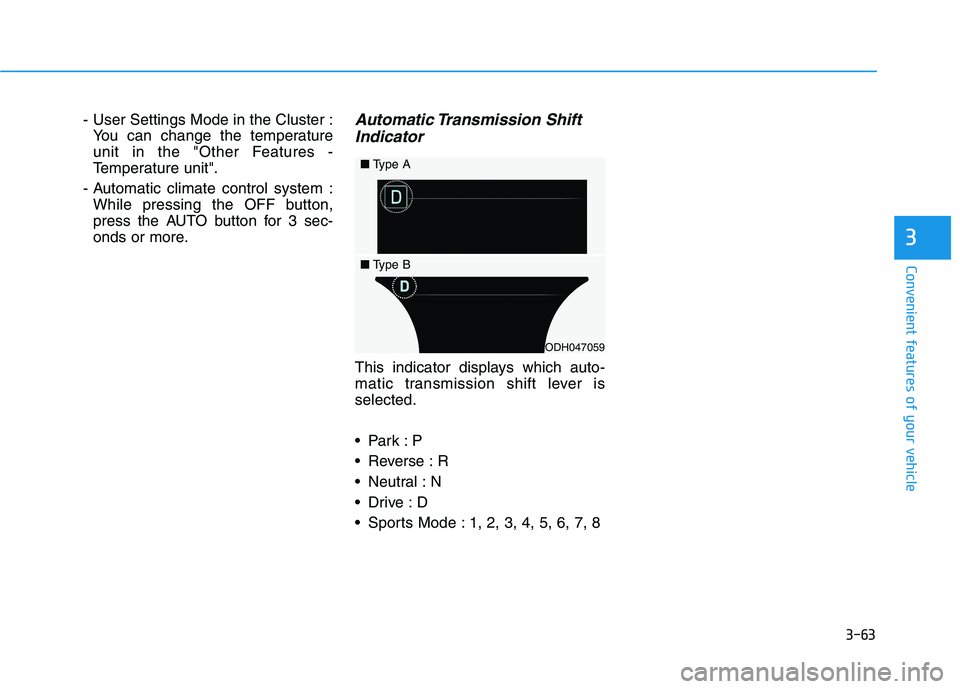
onds or more.Automatic Transmission Shift
Indicator
This indicator displays which auto-
matic transmission shift lever is
selected.
Reverse : R
Neutral : N
Sports Mode : 1, 2, 3, 4, 5, 6, 7, 8
ODH047059
■Type A
■Type B
Page 152 of 516
3-64
Convenient features of your vehicle
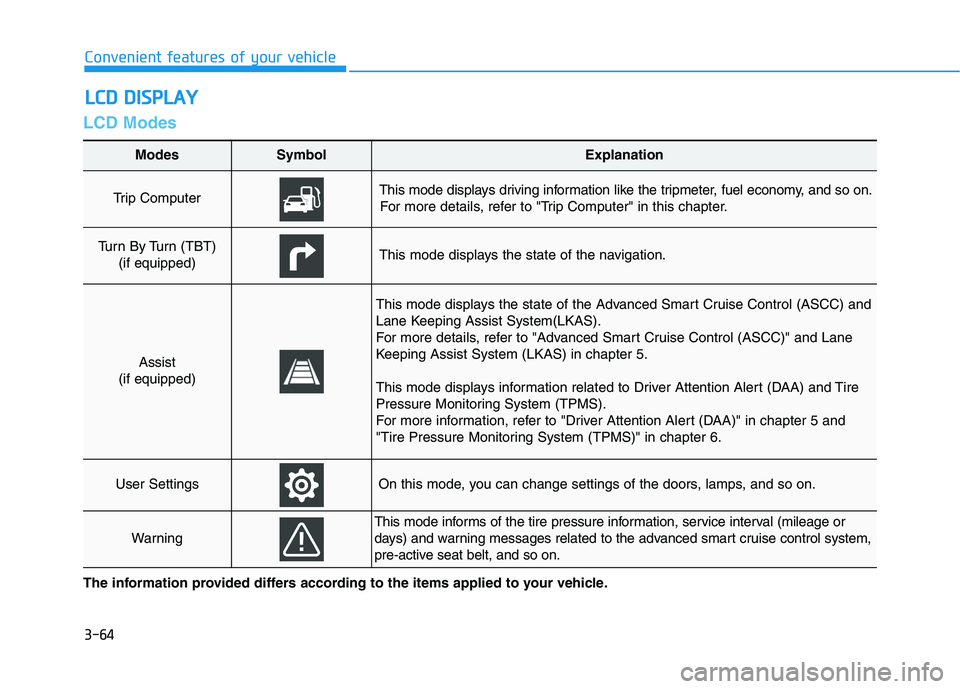
LCD Modes
L LC
CD
D
D
DI
IS
SP
PL
LA
AY
Y
The information provided differs according to the items applied to your vehicle.
Modes SymbolExplanation
Trip Computer This mode displays driving information like the tripmeter, fuel economy, and so on.
For more details, refer to "Trip Computer" in this chapter.
Turn By Turn (TBT)
(if equipped)This mode displays the state of the navigation.
Assist
(if equipped)
This mode displays the state of the Advanced Smart Cruise Control (ASCC) and
Lane Keeping Assist System(LKAS).
For more details, refer to "Advanced Smart Cruise Control (ASCC)" and Lane
Keeping Assist System (LKAS) in chapter 5.
This mode displays information related to Driver Attention Alert (DAA) and Tire
Pressure Monitoring System (TPMS).
For more information, refer to "Driver Attention Alert (DAA)" in chapter 5 and
"Tire Pressure Monitoring System (TPMS)" in chapter 6.
User SettingsOn this mode, you can change settings of the doors, lamps, and so on.
Warning
This mode informs of the tire pressure information, service interval (mileage or
days) and warning messages related to the advanced smart cruise control system,
pre-active seat belt, and so on.
Page 153 of 516
3-65
Convenient features of your vehicle
3
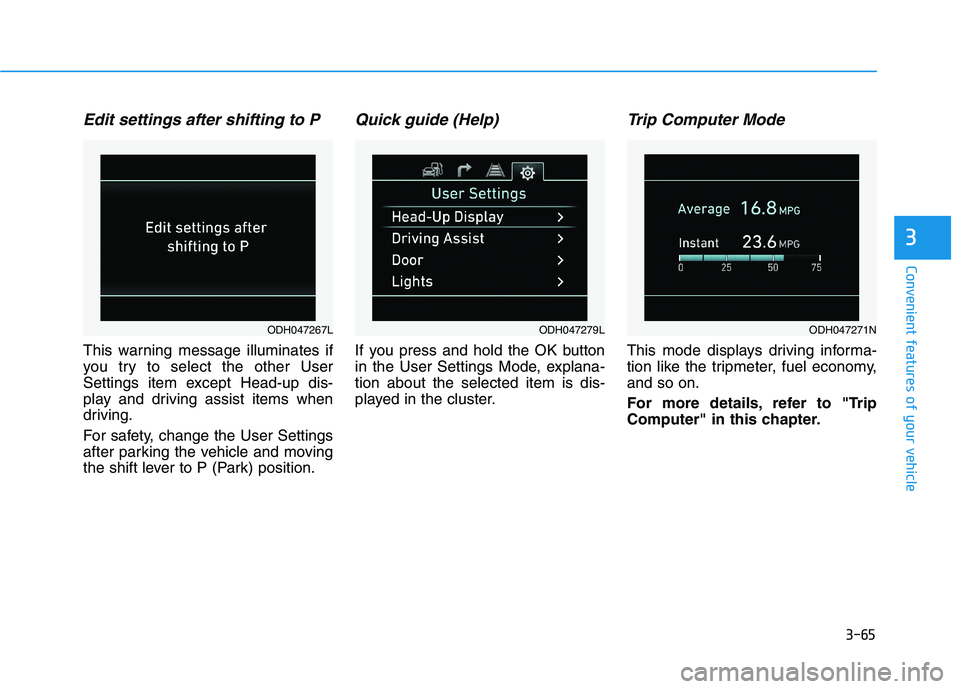
Edit settings after shifting to P
This warning message illuminates if
you try to select the other User
Settings item except Head-up dis-
play and driving assist items when
driving.
For safety, change the User Settings
after parking the vehicle and moving
the shift lever to P (Park) position.
Quick guide (Help)
If you press and hold the OK button
in the User Settings Mode, explana-
tion about the selected item is dis-
played in the cluster.
Trip Computer Mode
This mode displays driving informa-
tion like the tripmeter, fuel economy,
and so on.
For more details, refer to "Trip
Computer" in this chapter.
ODH047267LODH047279LODH047271N