instrument cluster GENESIS G80 2018 Owner's Manual
[x] Cancel search | Manufacturer: GENESIS, Model Year: 2018, Model line: G80, Model: GENESIS G80 2018Pages: 516, PDF Size: 81.01 MB
Page 16 of 516
1-5
Your vehicle at a glance
1
I IN
NS
ST
TR
RU
UM
ME
EN
NT
T
P
PA
AN
NE
EL
L
O
OV
VE
ER
RV
VI
IE
EW
W
(
(I
I)
)
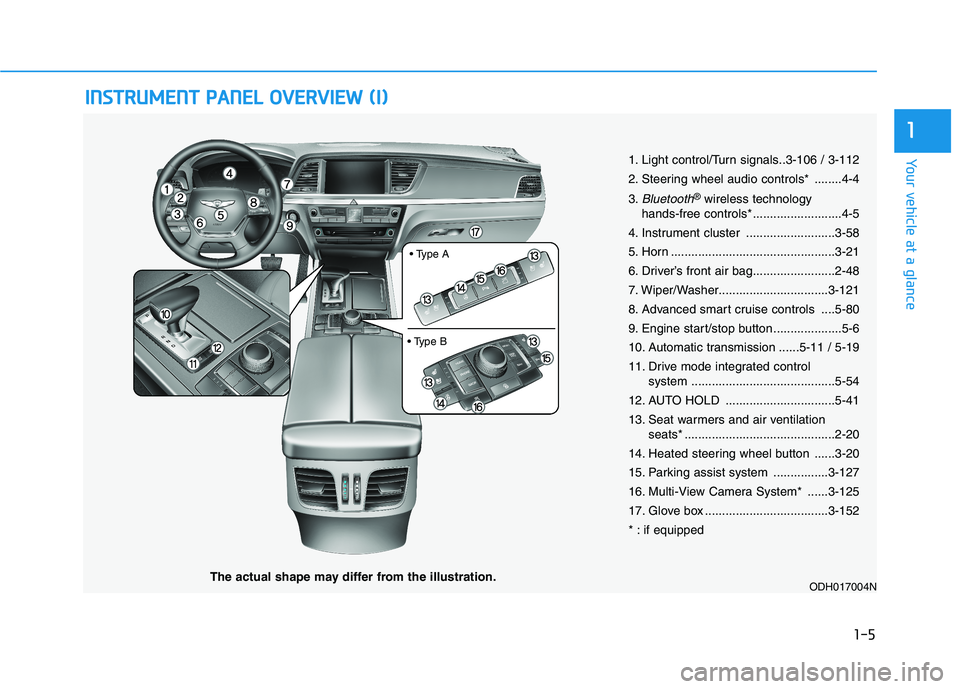
1. Light control/Turn signals..3-106 / 3-112
2. Steering wheel audio controls* ........4-4
3.
Bluetooth®wireless technology
hands-free controls* ..........................4-5
4. Instrument cluster ..........................3-58
5. Horn ................................................3-21
6. Driver’s front air bag........................2-48
7. Wiper/Washer................................3-121
8. Advanced smart cruise controls ....5-80
9. Engine start/stop button ....................5-6
10. Automatic transmission ......5-11 / 5-19
11. Drive mode integrated control
system ..........................................5-54
12. AUTO HOLD ................................5-41
13. Seat warmers and air ventilation
seats* ............................................2-20
14. Heated steering wheel button ......3-20
15. Parking assist system ................3-127
16. Multi-View Camera System* ......3-125
17. Glove box ....................................3-152
* : if equipped
ODH017004NThe actual shape may differ from the illustration.
Page 75 of 516

2-56
Safety system of your vehicle
After complete inflation, the air bag
immediately starts deflating,
enabling the driver to maintain for-
ward visibility and the ability to steer
or operate other controls.
What to expect after an air bag
inflates
After a frontal or side air bag inflates,
it will deflate very quickly. Air bag
inflation will not prevent the driver
from seeing out of the windshield or
being able to steer. Curtain air bags
may remain partially inflated for
some time after they deploy.
After an air bag inflates, take
the following precautions:
Open your windows and
doors as soon as possible
after impact to reduce pro-
longed exposure to the smoke
and powder released by the
inflating air bag.
Do not touch the air bag stor-
age area's internal compo-
nents immediately after an air
bag has inflated. The parts
that come into contact with an
inflating air bag may be very
hot.
(Continued)
WARNING
OLMB033056
■Driver’s front air bag (3)
OLMB033057
■Passenger’s front air bag
To prevent objects from becom-
ing dangerous projectiles when
the passenger's air bag inflates:
Do not install or place any
objects (drink holder, CD
holder, stickers, etc.) on the
front passenger's panel above
the glove box where the pas-
senger's air bag is located.
Do not install a container of
liquid air freshener near the
instrument cluster or on the
instrument panel surface.
WARNING
Page 89 of 516

Convenient features of your vehicle
Accessing your vehicle .........................................3-4
Smart key ............................................................................3-4
Immobilizer System ...........................................................3-9
Door locks .............................................................3-11
Operating door locks from outside the vehicle ......3-11
Power Door Latch ...........................................................3-12
Operating door locks from inside the vehicle .........3-12
Auto door lock/unlock features..................................3-14
Child-protector rear door locks ..................................3-14
Theft-alarm system.............................................3-15
Driver position memory system .........................3-16
Storing positions into memory ...................................3-16
Resetting the driver's seat memory system ............3-17
Easy access function .....................................................3-18
Steering wheel......................................................3-19
Electric power steering (EPS) ......................................3-19
Tilt steering / Telescope steering...............................3-19
Heated steering wheel ...................................................3-20
Horn ....................................................................................3-21
Mirrors ...................................................................3-22
Inside rearview mirror....................................................3-22
Side view mirrors.............................................................3-32
Reverse parking aid function.......................................3-34
Windows ................................................................3-35
Power windows ................................................................3-36
Panorama sunroof ...............................................3-39
Sunshade ...........................................................................3-39
Sliding the sunroof .........................................................3-40
Tilting the sunroof ..........................................................3-40
Closing the sunroof ........................................................3-41
Resetting the sunroof ....................................................3-42
Exterior features .................................................3-43
Hood ...................................................................................3-43
Trunk ..................................................................................3-44
Smart trunk.......................................................................3-51
Fuel filler door .................................................................3-54
Instrument cluster................................................3-58
Instrument Cluster Control............................................3-59
LCD Display Control ........................................................3-59
Gauges ...............................................................................3-60
3
Page 107 of 516

3-19
Convenient features of your vehicle
3
S ST
TE
EE
ER
RI
IN
NG
G
W
WH
HE
EE
EL
L
Electric power steering (EPS)
The system assists you with steering
the vehicle. If the engine is turned off
or if the power steering system
becomes inoperative, you may still
steer the vehicle, but it will require
increased steering effort.
Should you notice any change in the
effort required to steer during normal
vehicle operation, we recommend
that the system be checked by an
authorized retailer of Genesis
Branded products.
✽ ✽
NOTICE
The following symptoms may occur
during normal vehicle operation:
• The steering effort may be high
immediately after placing the
Engine Start/Stop button in the
ON position.
This happens as the system per-
forms the EPS system diagnostics.
When the diagnostics is complet-
ed, the steering wheel will return
to its normal condition.
• A click noise may be heard from
the EPS relay after the Engine
Start/Stop button is in the ON or
OFF position.
• Motor noise may be heard when
the vehicle is at stop or at a low
driving speed.
• When you operate the steering
wheel in low temperature, abnor-
mal noise may occur. If tempera-
ture rises, the noise will disappear.
This is a normal condition.
Tilt steering / Telescope steering
Adjust the steering wheel so it points
toward your chest, not toward your
face. Make sure you can see the
instrument panel warning lights and
gauges. After adjusting, push the
steering wheel both up and down to
be certain it is locked in position.
Always adjust the position of the
steering wheel before driving.
If the Electric Power Steering
System does not operate nor-
mally, the warning light ( ) will
illuminate on the instrument
cluster. The steering wheel will
require increase effort. Take
your vehicle to an authorized
retailer of Genesis Branded
products and have the system
checked as soon as possible.
CAUTION
NEVER adjust the steering
wheel while driving. This may
cause loss of vehicle control
resulting in an accident.
WARNING
Page 147 of 516
3-59
Convenient features of your vehicle
3
Instrument Cluster Control
Adjusting Instrument Cluster
Illumination
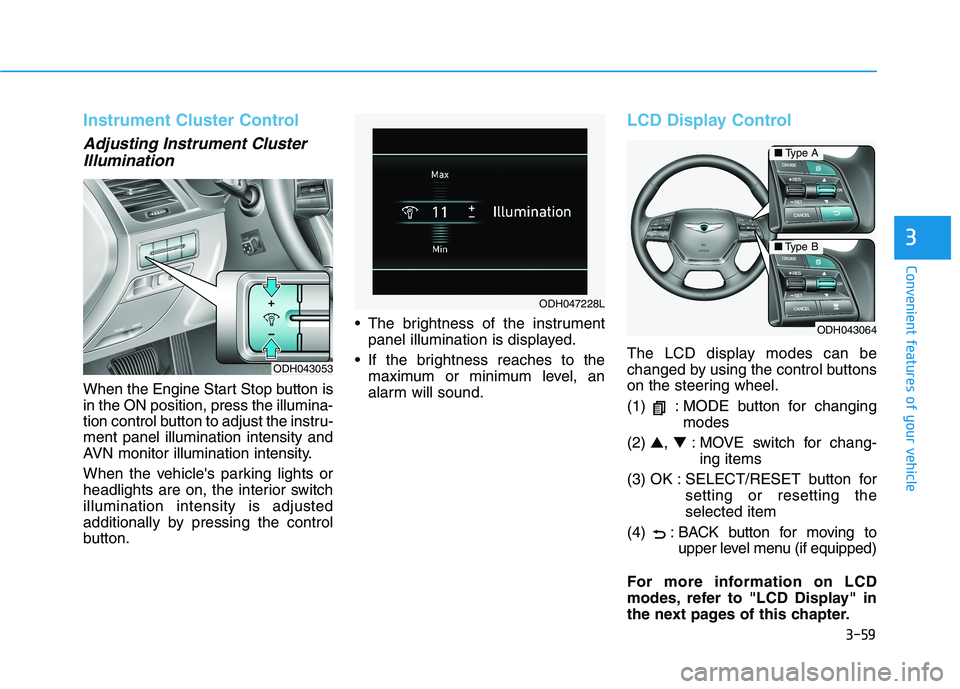
When the Engine Start Stop button is
in the ON position, press the illumina-
tion control button to adjust the instru-
ment panel illumination intensity and
AVN monitor illumination intensity.
When the vehicle's parking lights or
headlights are on, the interior switch
illumination intensity is adjusted
additionally by pressing the control
button. The brightness of the instrument
panel illumination is displayed.
If the brightness reaches to the
maximum or minimum level, an
alarm will sound.
LCD Display Control
The LCD display modes can be
changed by using the control buttons
on the steering wheel.
(1) : MODE button for changing
modes
(2) ▲, ▼: MOVE switch for chang-
ing items
(3) OK : SELECT/RESET button for
setting or resetting the
selected item
(4) : BACK button for moving to
upper level menu (if equipped)
For more information on LCD
modes, refer to "LCD Display" in
the next pages of this chapter.ODH043053
ODH047228L
ODH043064
■Type A
■Type B
Page 156 of 516
3-68
Convenient features of your vehicle
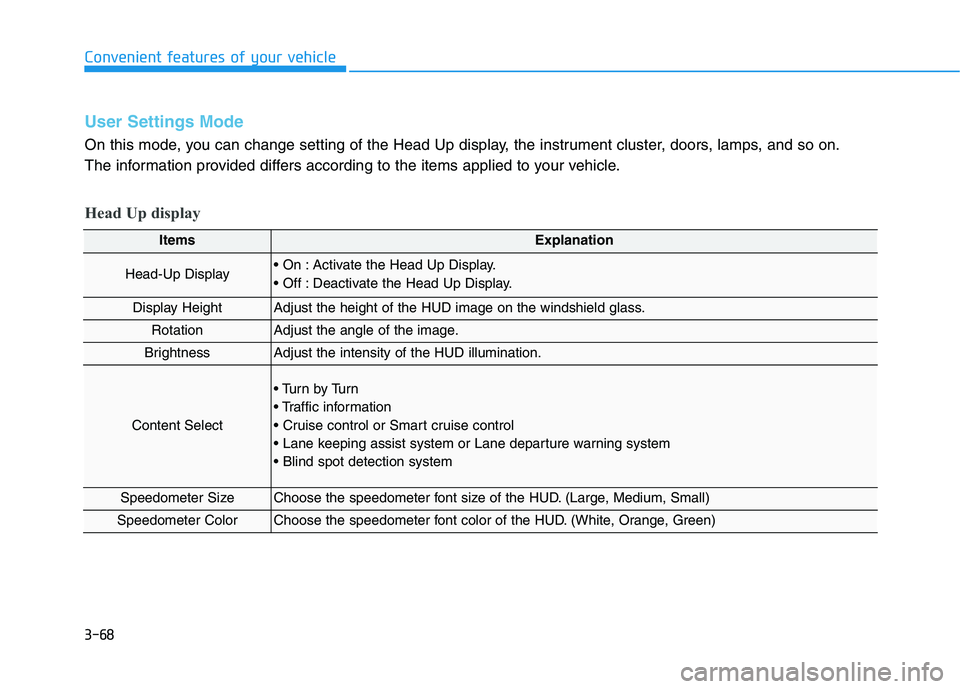
ItemsExplanation
Head-Up Display Activate the Head Up Display.
Deactivate the Head Up Display.
Display HeightAdjust the height of the HUD image on the windshield glass.
RotationAdjust the angle of the image.
BrightnessAdjust the intensity of the HUD illumination.
Content Select
Tu r n b y Tu r n
Speedometer SizeChoose the speedometer font size of the HUD. (Large, Medium, Small)
Speedometer ColorChoose the speedometer font color of the HUD. (White, Orange, Green)
User Settings Mode
On this mode, you can change setting of the Head Up display, the instrument cluster, doors, lamps, and so on.
The information provided differs according to the items applied to your vehicle.
Head Up display
Page 191 of 516

3-103
Convenient features of your vehicle
3
The head up display is a transparent
display which projects a shadow of
some information of the instrument
cluster and navigation on the wind-
shield glass.
Precautions while using the
head up display
It may be difficult to read information
on the head up display in the follow-
ing situations.
- The driver is improperly positioned
in the driver's seat.
- The diver wears polarizing-filter
sunglasses.
- An object is located above the
head up display cover.
- The vehicle is driven on a wet road.
- Any improper lighting accessory is
installed inside the vehicle, or there
is incoming light from outside of
the vehicle.
- The driver wears glasses.
- The driver wears contact lenses.
When it is difficult to read the head
up display information, adjust the
head up display angle or the head up
display brightness level in the User
Settings Mode. For more information,
refer to "LCD Display" in this chapter.
H HE
EA
AD
D
U
UP
P
D
DI
IS
SP
PL
LA
AY
Y
(
(H
HU
UD
D)
)
(
(I
IF
F
E
EQ
QU
UI
IP
PP
PE
ED
D)
)
Do not tint the front wind-
shield glass or add other
types of metallic coating.
Otherwise, the head up dis-
play image may be invisible.
Do not place any accessories
on the crash pad or attach any
objects on the windshield
glass.
The blind spot detection
warnings on the head up dis-
play are mere supplemental.
Do not solely depend on them
to change lanes. Always take
a look around before chang-
ing lanes.
WARNING
ODH047065N
Page 241 of 516

3-153
Convenient features of your vehicle
3
Cellular Phone Holder
To open:
Push the cover.
✽ ✽
NOTICE
Items other than a cellular phone
may not fit inside the cellular phone
storage in accordance with its size or
shape. Do not forcefully push items
into the cellular phone storage and
close the cover. It may damage or
distort those items. In addition, do
not forcefully open the cellular
phone storage cover, when it is
jammed with a stored item inside.
Wireless Cellular Phone
Charging System (if equipped)
There is a wireless cellular phone
charging inside the front console.
The system is available when all
doors are closed, and when the
Engine Start/Stop button is in the
ACC/ON position.
To charge a cellular phone
The wireless cellular phone charging
system charges only the Qi-enabled
cellular phones ( ). Read the label
on the cellular phone accessory
cover or visit your cellular phone
manufacturer’s website to check
whether your cellular phone supports
the Qi technology.
The wireless charging process starts
when you put a Qi-enabled cellular
phone on the wireless charging unit.
1. Remove other items, including the
smart key, from the wireless charg-
ing unit. If not, the wireless charg-
ing process may be interrupted.
2. The indicator illuminates in orange
during the charging process. The
indicator color changes to green,
when the charging process is
completed.
3. You can turn ON or OFF the wire-
less charging function in the user
settings mode on the instrument
cluster. (For further information,
refer to the "LCD Modes" in this
chapter.)
ODH047568
ODH047579
Page 268 of 516
5-13
Driving your vehicle
R (Reverse)
Use this position to drive the vehicle
backward.
N (Neutral)
The wheels and transmission are not
engaged.
Use N (Neutral) if you need to restart
a stalled engine, or if it is necessary
to stop with the engine ON. Shift into
P (Park) if you need to leave your
vehicle for any reason.
Always depress the brake pedal
when you are shifting from N
(Neutral) to another gear.
D (Drive)
This is the normal driving position.
The transmission will automatically
shift through a 8-gear sequence, pro-
viding the best fuel economy and
power.
For extra power when passing anoth-
er vehicle or driving uphill depress
the accelerator pedal further until
you feel the transmission downshift
to a lower gear.
The DRIVE MODE switch, located
on the shift lever console, allows the
driver to switch from NORMAL mode
to SPORT, ECO or SNOW mode.
When driving in ice or snow condi-
tions, it is recommended you switch
to SNOW mode. Press the DRIVE
MODE switch for 2~3 seconds until
"SNOW" displays in the center of the
instrument cluster. To cancel SNOW
mode, press the DRIVE MODE
switch one time to select NORMAL
mode.
For more information, refer to
"Drive Mode Integrated Control
System" later in this chapter.
5
Always come to a complete
stop before shifting into or out
of R (Reverse); you may dam-
age the transmission if you shift
into R (Reverse) while the vehi-
cle is in motion.
CAUTION
Do not shift into gear unless
your foot is firmly on the brake
pedal. Shifting into gear when
the engine is running at high
speed can cause the vehicle to
move very rapidly. You could
lose control of the vehicle and
hit people or objects.
WARNING
Page 284 of 516
5-29
Driving your vehicle
5
Using All Wheel Drive (AWD)
The All Wheel Drive (AWD) System
delivers engine power to front and
rear wheels for maximum traction.
AWD is useful when extra traction is
required, such as when driving on
slippery, muddy, wet, or snow-cov-
ered roads.
If the system determines there is a
need for four wheel drive, the
engine's driving power is distributed
to all four wheels automatically.
✽ ✽
NOTICE
• Do not drive in water if the level is
higher than the bottom of the vehi-
cle.
• Shorten your scheduled mainte-
nance interval if you drive in off-
road conditions such as sand, mud
or water (see "Maintenance Under
Severe Usage Conditions" in chap-
ter 7).
• Make sure that an AWD vehicle is
towed by flatbed tow truck.
A AL
LL
L
W
WH
HE
EE
EL
L
D
DR
RI
IV
VE
E
(
(A
AW
WD
D)
)
(
(I
IF
F
E
EQ
QU
UI
IP
PP
PE
ED
D)
)
To reduce the risk of SERIOUS
INJURY or DEATH:
Do not drive in conditions that
exceed the vehicles intended
design such as challenging
off-road conditions.
Avoid high speeds when cor-
nering or turning.
Do not make quick steering
wheel movements, such as
sharp lane changes or fast,
sharp turns.
The risk of a rollover is great-
ly increased if you lose con-
trol of your vehicle at highway
speeds.
Loss of control often occurs if
two or more wheels drop off
the roadway and the driver
over steers to reenter the
roadway.
(Continued)
(Continued)
In the event your vehicle
leaves the roadway, do not
steer sharply. Instead, slow
down before pulling back into
the travel lanes.
Always drive safely and use
caution when driving an AWD
vehicle.
WARNING
If the AWD warning light ( )
stays on the instrument cluster,
your vehicle may have a mal-
function with the AWD system.
When the AWD warning light
( ) illuminates have your
vehicle checked by an author-
ized retailer of Genesis Branded
products as soon as possible.
WARNING