turn signal GENESIS G80 2021 Owner's Manual
[x] Cancel search | Manufacturer: GENESIS, Model Year: 2021, Model line: G80, Model: GENESIS G80 2021Pages: 604, PDF Size: 11.47 MB
Page 21 of 604
02
2-9
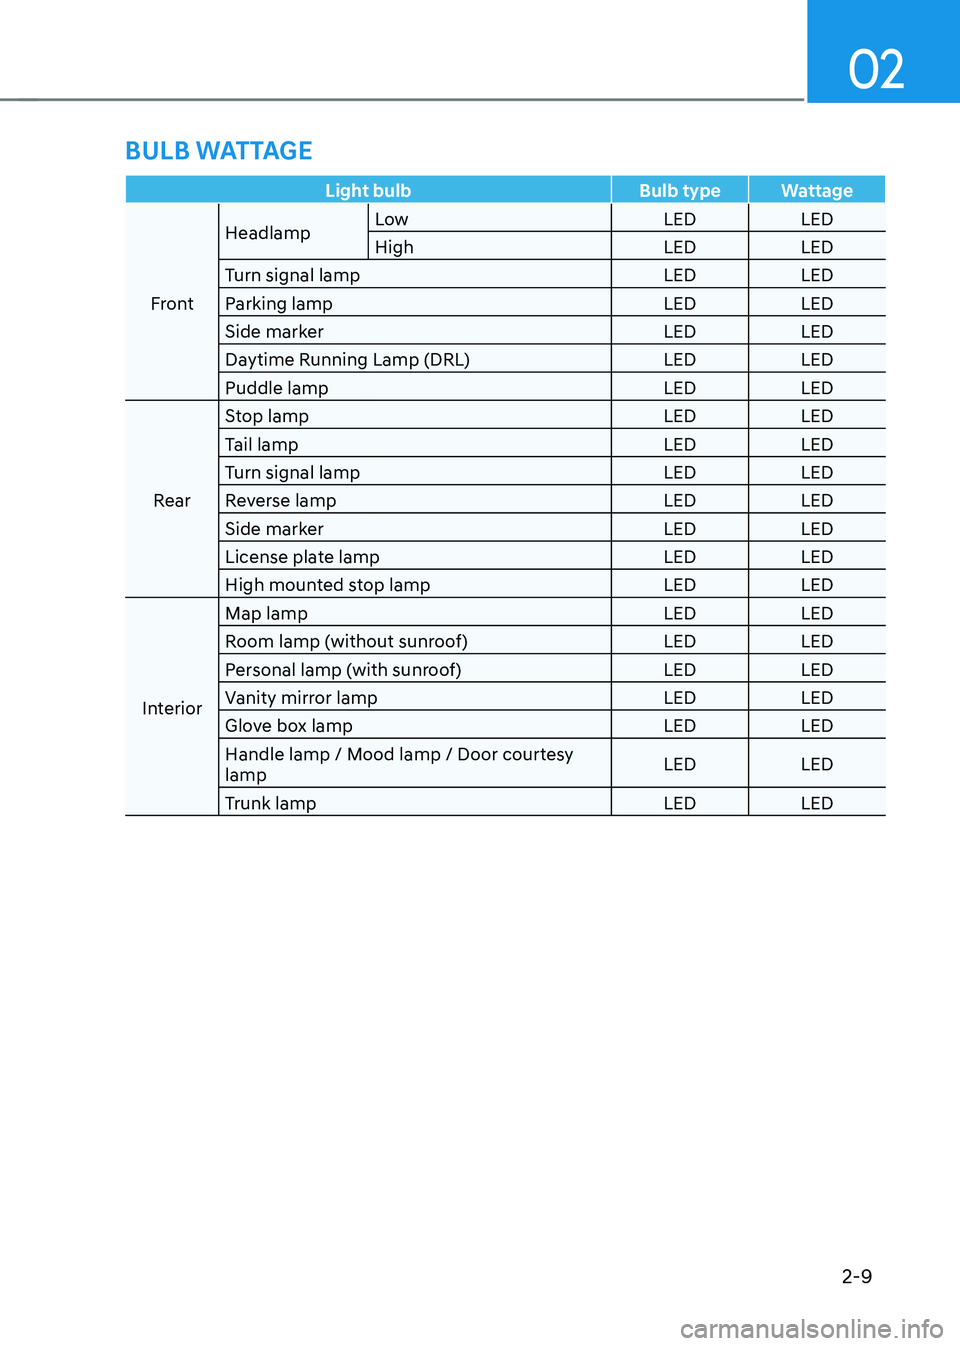
Light bulbBulb typeWattage
Front Headlamp
Low
LEDLED
High LEDLED
Turn signal lamp LEDLED
Parking lamp LEDLED
Side marker LEDLED
Daytime Running Lamp (DRL) LEDLED
Puddle lamp LEDLED
Rear Stop lamp
LEDLED
Tail lamp LEDLED
Turn signal lamp LEDLED
Reverse lamp LEDLED
Side marker LEDLED
License plate lamp LEDLED
High mounted stop lamp LEDLED
Interior Map lamp
LEDLED
Room lamp (without sunroof) LEDLED
Personal lamp (with sunroof) LEDLED
Vanity mirror lamp LEDLED
Glove box lamp LEDLED
Handle lamp / Mood lamp / Door courtesy
lamp LED
LED
Trunk lamp LEDLED
BULB WATTAGE
Page 83 of 604
03
3-53
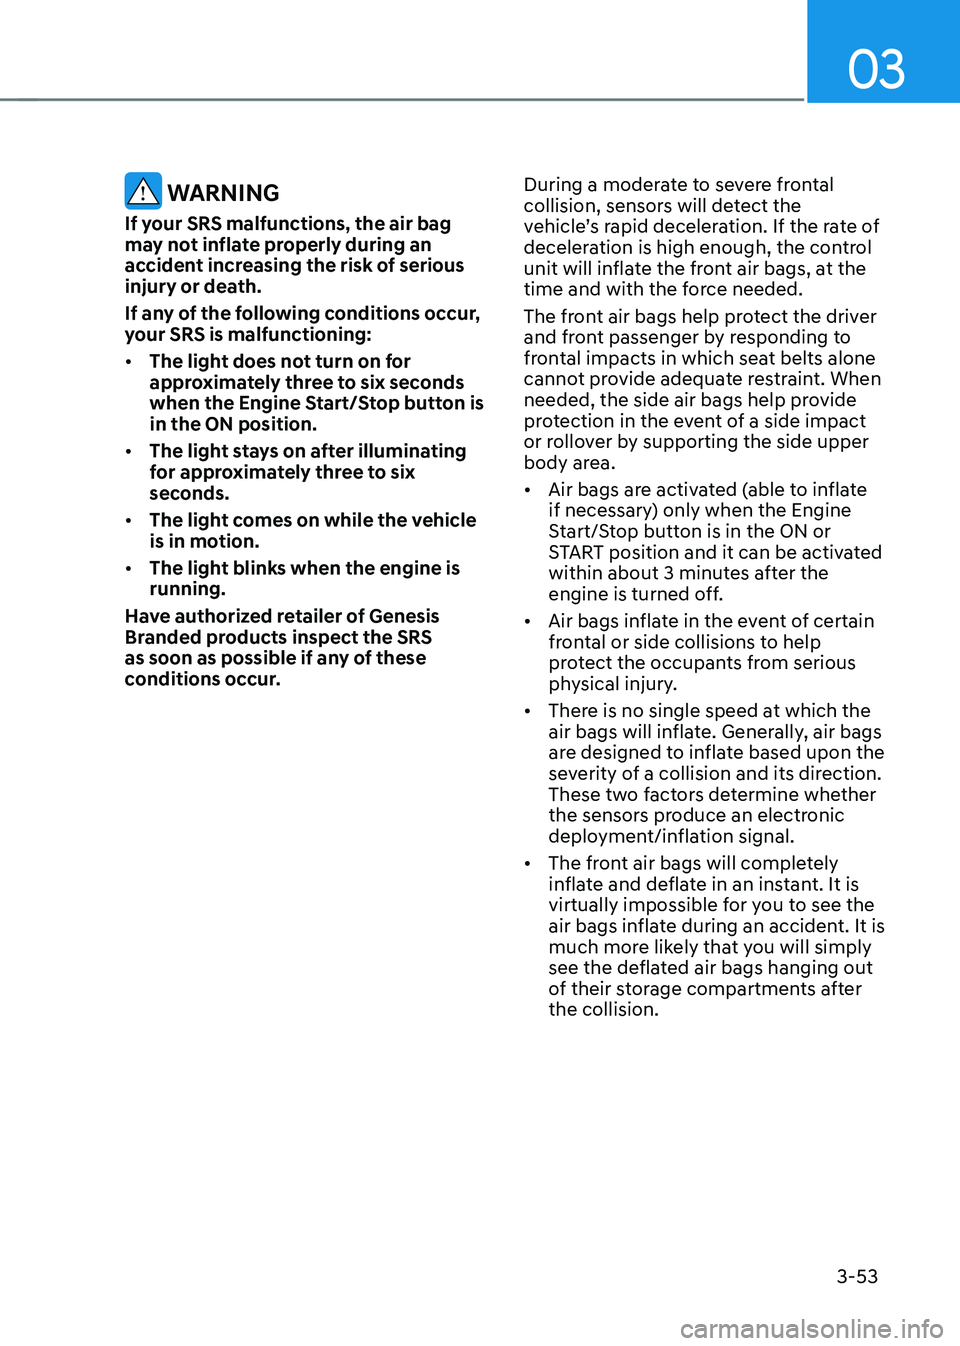
WARNING
If your SRS malfunctions, the air bag
may not inflate properly during an
accident increasing the risk of serious
injury or death.
If any of the following conditions occur,
your SRS is malfunctioning:
• The light does not turn on for
approximately three to six seconds
when the Engine Start/Stop button is
in the ON position.
• The light stays on after illuminating
for approximately three to six
seconds.
• The light comes on while the vehicle
is in motion.
• The light blinks when the engine is
running.
Have authorized retailer of Genesis
Branded products inspect the SRS
as soon as possible if any of these
conditions occur. During a moderate to severe frontal
collision, sensors will detect the
vehicle’s rapid deceleration. If the rate of
deceleration is high enough, the control
unit will inflate the front air bags, at the
time and with the force needed.
The front air bags help protect the driver
and front passenger by responding to
frontal impacts in which seat belts alone
cannot provide adequate restraint. When
needed, the side air bags help provide
protection in the event of a side impact
or rollover by supporting the side upper
body area.
• Air bags are activated (able to inflate
if necessary) only when the Engine
Start/Stop button is in the ON or
START position and it can be activated
within about 3 minutes after the
engine is turned off.
• Air bags inflate in the event of certain
frontal or side collisions to help
protect the occupants from serious
physical injury.
• There is no single speed at which the
air bags will inflate. Generally, air bags
are designed to inflate based upon the
severity of a collision and its direction.
These two factors determine whether
the sensors produce an electronic
deployment/inflation signal.
• The front air bags will completely
inflate and deflate in an instant. It is
virtually impossible for you to see the
air bags inflate during an accident. It is
much more likely that you will simply
see the deflated air bags hanging out
of their storage compartments after
the collision.
Page 103 of 604
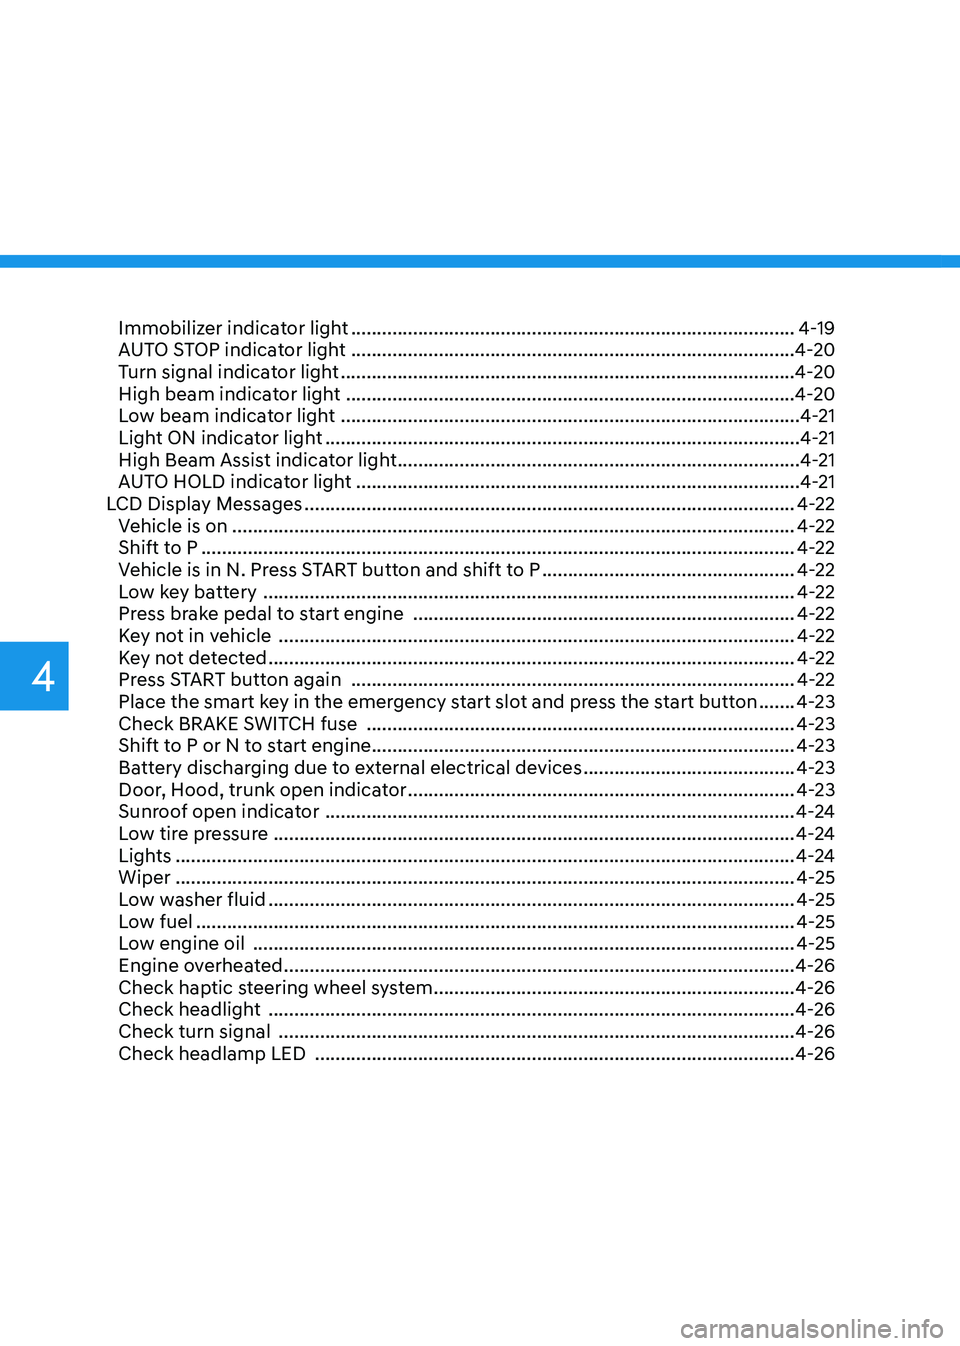
Immobilizer indicator light ........................................................................\
..............4-19
AUTO STOP indicator light ........................................................................\
..............4-20
Turn signal indicator light ........................................................................\
................4-20
High beam indicator light ........................................................................\
...............4-20
Low beam indicator light ........................................................................\
.................4-21
Light ON indicator light ........................................................................\
....................4-21
High Beam Assist indicator light ........................................................................\
......4-21
AUTO HOLD indicator light ........................................................................\
..............4-21
LCD Display Messages ........................................................................\
.......................4-22
Vehicle is on ........................................................................\
.....................................4-22
Shift to P ........................................................................\
...........................................4-22
Vehicle is in N. Press START button and shift to P .................................................4-22
Low key battery ........................................................................\
...............................4-22
Press brake pedal to start engine ........................................................................\
..4-22
Key not in vehicle ........................................................................\
............................4-22
Key not detected ........................................................................\
..............................4-22
Press START button again ........................................................................\
..............4-22
Place the smart key in the emergency start slot and press the start button .......4-23
Check BRAKE SWITCH fuse ........................................................................\
...........4-23
Shift to P or N to start engine ........................................................................\
..........4-23
Battery discharging due to external electrical devices .........................................4-23
Door, Hood, trunk open indicator
........................................................................\
...4-23
Sunroof open indicator ........................................................................\
...................4-24
Low tire pressure ........................................................................\
.............................4-24
Lights ........................................................................\
................................................4-24
Wiper ........................................................................\
................................................4-25
Low washer fluid ........................................................................\
..............................4-25
Low fuel ........................................................................\
............................................4-25
Low engine oil ........................................................................\
.................................4-25
Engine overheated ........................................................................\
...........................4-26
Check haptic steering wheel system ......................................................................4-26
Check headlight ........................................................................\
..............................4-26
Check turn signal ........................................................................\
............................4-26
Check headlamp LED ........................................................................\
.....................4-26
4
Page 121 of 604

Instrument Cluster
4-20
AUTO STOP indicator light
(if equipped)
This indicator light illuminates:
When the engine enters the Idle Stop
mode of ISG (Idle Stop and Go) system.
This indicator light blinks:
When the engine automatically starts,
the AUTO STOP indicator on the cluster
will blink for 5 seconds.
For more details, refer to "ISG (Idle Stop
and Go) system" section in chapter 6.
Information
When the engine automatically starts
by the ISG system, some warning lights
(ABS, ESC, ESC OFF, EPS or Parking
brake warning light) may turn on for a
few seconds. This happens because of
low battery voltage. It does not mean the
system has malfunctioned.
Turn signal indicator light
This indicator light blinks:
When you operate the turn signal
indicator stalk.
If any of the following occur, there may
be a malfunction with the turn signal
system.
-The turn signal indicator light
illuminates but does not blink
-The turn signal indicator light blinks
rapidly
-The turn signal indicator light does not
illuminate at all
If any of these conditions occur, have
the vehicle inspected by an authorized
retailer of Genesis Branded products.
High beam indicator light
This indicator light illuminates:
• When the headlamps are on and in
the high beam position
• When the turn signal lever is pulled
into the Flash-to-Pass position.
Page 127 of 604
Instrument Cluster
4-26
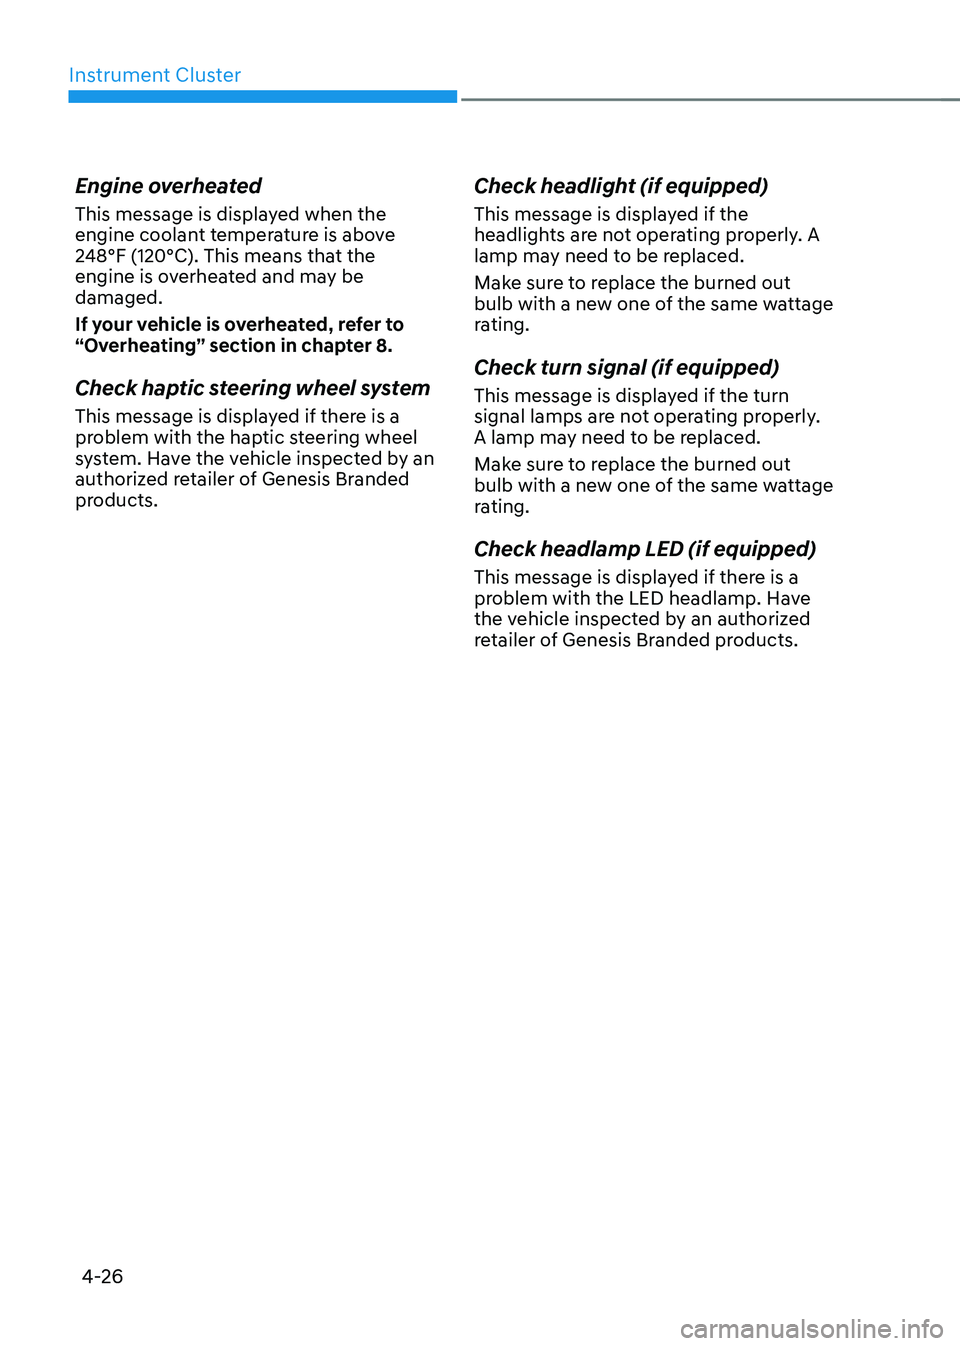
Engine overheated
This message is displayed when the
engine coolant temperature is above
248°F (120°C). This means that the
engine is overheated and may be
damaged.
If your vehicle is overheated, refer to
“Overheating” section in chapter 8.
Check haptic steering wheel system
This message is displayed if there is a
problem with the haptic steering wheel
system. Have the vehicle inspected by an
authorized retailer of Genesis Branded
products.
Check headlight (if equipped)
This message is displayed if the
headlights are not operating properly. A
lamp may need to be replaced.
Make sure to replace the burned out
bulb with a new one of the same wattage
rating.
Check turn signal (if equipped)
This message is displayed if the turn
signal lamps are not operating properly.
A lamp may need to be replaced.
Make sure to replace the burned out
bulb with a new one of the same wattage
rating.
Check headlamp LED (if equipped)
This message is displayed if there is a
problem with the LED headlamp. Have
the vehicle inspected by an authorized
retailer of Genesis Branded products.
Page 182 of 604

Convenient Features
5-44
WARNING
Before programming HomeLink® to a
garage door opener or gate operator,
make sure people and objects are out
of the way of the device to prevent
potential harm or damage. Do not
use the HomeLink® with any garage
door opener that lacks the safety
stop and reverse features required
by U.S. federal safety standards (this
includes any garage door opener model
manufactured before April 1, 1982).
A garage door that cannot detect an
object - signaling the door to stop and
reverse - does not meet current U.S.
federal safety standards. Using a garage
door opener without these features
increases the risk of serious injury or
death.
Programming HomeLink
®
Please note the following:
• When programming a garage door
opener, it is advised to park the
vehicle outside of the garage.
• It is recommended that a new battery
be placed in the hand-held transmitter
of the device being programmed to
HomeLink® for quicker training and
accurate transmission of the radio-
frequency signal.
• Some vehicles may require the
Engine Start/Stop button to be in the
ACC (or “Accessories”) position for
programming and/or operation of
HomeLink®.
• In the event that there are still
programming difficulties or questions
after following the programming steps
listed below, contact HomeLink® at:
www.homelink.com, www.youtube.
com/HomeLinkGentex or by calling
1-800-355-3515.Programming
To program most devices, follow these
instructions:
ORG3050209N
1. Press and release (1), (2) or (3) button.
• If the indicator (4) is turned ON in
Orange, go to Step 3) since it is a new
programming.
• If the indicator (4) is continuously
turned ON or flashes in Green rapidly
several times, go to Step 2) since it is a
programmed button.
2. Press and hold the button you wish
to program for approximately 15-
25 seconds until the LED flashes in
Orange for several times.
3. 3.Hold the Garage Door Opener
Original Transmitter near the
HomeLink Mirror.
Page 184 of 604

Convenient Features
5-46
Gate operator & Canadian programming
During programming, your handheld
transmitter may automatically stop
transmitting. Continue to press the
Integrated HomeLink® Wireless Control
System button while you press and re-
press (“cycle”) your handheld transmitter
every two seconds until the frequency
signal has been learned. The indicator
light will flash slowly and then rapidly
after several seconds upon successful
training.
ORG3050209N
Operating HomeLink®
1. Press and release one of the
HomeLink buttons (1, 2 or 3) that
programed.
2. The HomeLink indicator (4) will
operate as below:
-Indicates Green and is continuously
ON (Fixed Code Garage Door
Opener)
-Flashes in Green rapidly (Rolling
Code Garage Door Opener)
ORG3050211N
Erasing HomeLink® buttons
1. Press and hold the button (1) and (3)
simultaneously.
2. The indicator (4) is turned
continuously ON in orange for about
10 seconds.
3. Then the indicator (4) color changes
to Green and flashes rapidly.
Release the buttons once the green
indicator flashes.
4. Now HomeLink button (1), (2) and (4)
memories are all cleared.
NVS® is a registered trademark and
Z-Nav™ is a trademark of the Gentex
Corporation, Zeeland, Michigan.
HomeLink® is a registered trademark
owned by Johnson Controls,
Incorporated, Milwaukee, Wisconsin.
FCC ID: NZLUAHL5A
IC: 4112A-UAHL5A
Information
This device complies with Part 15 of the
FCC Rules. Operation is subject to the
following three conditions:
1. This device may not cause harmful
interference, and
2. This device must accept any
interference received, including
interference that may cause undesired
operation.
Page 218 of 604

Convenient Features
5-80
High beam operation
OJX1059062
To turn on the high beam headlamp,
push the lever away from you. The lever
will return to its original position.
The high beam indicator will light when
the headlamp high beams are switched
on.
To turn off the high beam headlamp, pull
the lever towards you. The low beams
will turn on.
OJX1059061
To flash the high beam headlamp, pull
the lever towards you, then release the
lever. The high beams will remain ON as
long as you hold the lever towards you.
Turn signals and lane change signals
OJX1059065
To signal a turn, push down on the lever
for a left turn or up for a right turn in
position (A).
If an indicator stays on and does not flash
or if it flashes abnormally, one of the turn
signal bulbs may be burned out and will
require replacement.
One touch turn signal
To use One Touch Turn Signal push the
turn signal lever up or down to position
(B) and then release it.
The lane change signals will blink 3, 5 or
7 times.
You can enable the One Touch Turn
Signal function or choose the number
of blinking by selecting ‘Setup → Vehicle
Settings → Lights → One Touch Turn Signal
(or One-touch indicator) → 3 flashes/5
flashes /7 flashes/Off’ in the infotainment
system screen.
For detailed information, refer to the
separately supplied manual.
Page 249 of 604

05
5-111
Auto Defogging System
ORG3050065
Auto defogging helps reduce the
possibility of fogging up the inside of the
windshield by automatically sensing the
moisture on inside the windshield.
The auto defogging system operates
when the heater or air conditioning is on.
Information
The auto defogging system may not
operate normally, when the outside
temperature is below 14 °F (-10 °C).
When the Auto Defogging System operates, the indicator
will illuminate.
If a high amount of humidity is detected
in the vehicle, the Auto Defogging
System will be enabled. The following
steps will be performed automatically:
Step 1) Air conditioning will turn ON.
Step 2) Air intake control will change to
Fresh mode.
Step 3) Fan speed will be set to MAX.
Step 4) Mode will change to defrost to
direct airflow to the windshield.
If the air conditioning is off or
recirculation mode is manually selected
while Auto Defogging System is ON, the
Auto Defogging System indicator will
blink 3 times to signal that the manual
operation has been canceled.
CLIMATE CONTROL ADDITIONAL FEATURES
Page 250 of 604
Convenient Features
5-112
Turning the Auto Defogging System
ON or OFF
Climate control system
Press the front windshield defroster
button for 3 seconds when the Engine
Start/Stop button is in the ON position.
When the Auto Defogging System is
turned off, the ADS OFF symbol will blink
3 times and ADS OFF will be displayed on
the climate control information screen.
When the Auto Defogging System is
turned on, the ADS OFF symbol will blink
6 times without a signal.
Infotainment system
Auto Defogging System can be turned
on and off by selecting ‘Setup →
Vehicle Settings → Climate → Defog/
Defrost Options → Auto Defog’ from the
infotainment system screen.
For detailed information, refer to the
separately supplied manual.
Information
• When the air conditioning is turned
on by Auto Defogging System, if you
try to turn off the air conditioning, the
indicator will blink 3 times and the air
conditioning will not be turned off.
• To maintain the effectiveness and
efficiency of the Auto Defogging
System, do not select Recirculation
mode while the system is operating.
• When Auto Defogging System is
operating, fan speed adjustment,
temperature adjustment, and air intake
control selection are all disabled.
NOTICE
Do not remove the sensor cover located
on the upper end of the windshield
glass.
Damage to system parts could occur
and may not be covered by your vehicle
warranty.
Auto Dehumidify (if equipped)
To increase cabin air quality and reduce
windshield misting, recirculation mode
switches off automatically after about 5
to 30 minutes, depending on the outside
temperature, and the air intake will
change to fresh mode.
Turning Auto Dehumidify ON or OFF
Climate control system
To turn the Auto Dehumidify feature
on or off, select Face level (
) mode
and press the air intake control ()
button at least five times within three
seconds. When Auto Dehumidify is
turned on, the air intake control button
indicator will blink 6 times. When turned
off, the indicator will blink 3 times.
Infotainment system
Auto Dehumidify can be turned on and
off by selecting ‘Setup → Vehicle Settings
→ Climate → Automatic Ventilation →
Auto Dehumidify’ from the infotainment
system screen.
For detailed information, refer to the
separately supplied manual.