clock GENESIS G90 2017 User Guide
[x] Cancel search | Manufacturer: GENESIS, Model Year: 2017, Model line: G90, Model: GENESIS G90 2017Pages: 524, PDF Size: 19.3 MB
Page 393 of 524

6-18
What to do in an emergency
Follow these steps to change your
vehicle's tire:
1. Park on a level, firm surface.
2. Move the shift lever into P(Park), apply the parking brake, and place
the Engine Start/Stop button in the
OFF position.
3. Press the hazard warning flasher button.
4. Remove the wheel lug nut wrench, jack, jack handle, and spare tire
from the vehicle.
5. Block both the front and rear of the tire diagonally opposite of the tire
you are changing. 6. Loosen the wheel lug nuts coun-
terclockwise one turn each in the
order shown above, but do not
remove any lug nuts until the tire
has been raised off of the ground.
7. Place the jack at the designated jacking position under the frame
closest to the tire you are chang-
ing. The jacking positions are
plates welded to the frame with
two notches and two dimples.
Never jack any other position or
part of the vehicle. Doing so may
damage the side seal molding or
other parts of the vehicle.
OHI066012N
OHI066010N
OHI066013N
■ Front
■ Rear
Page 394 of 524
6-19
06
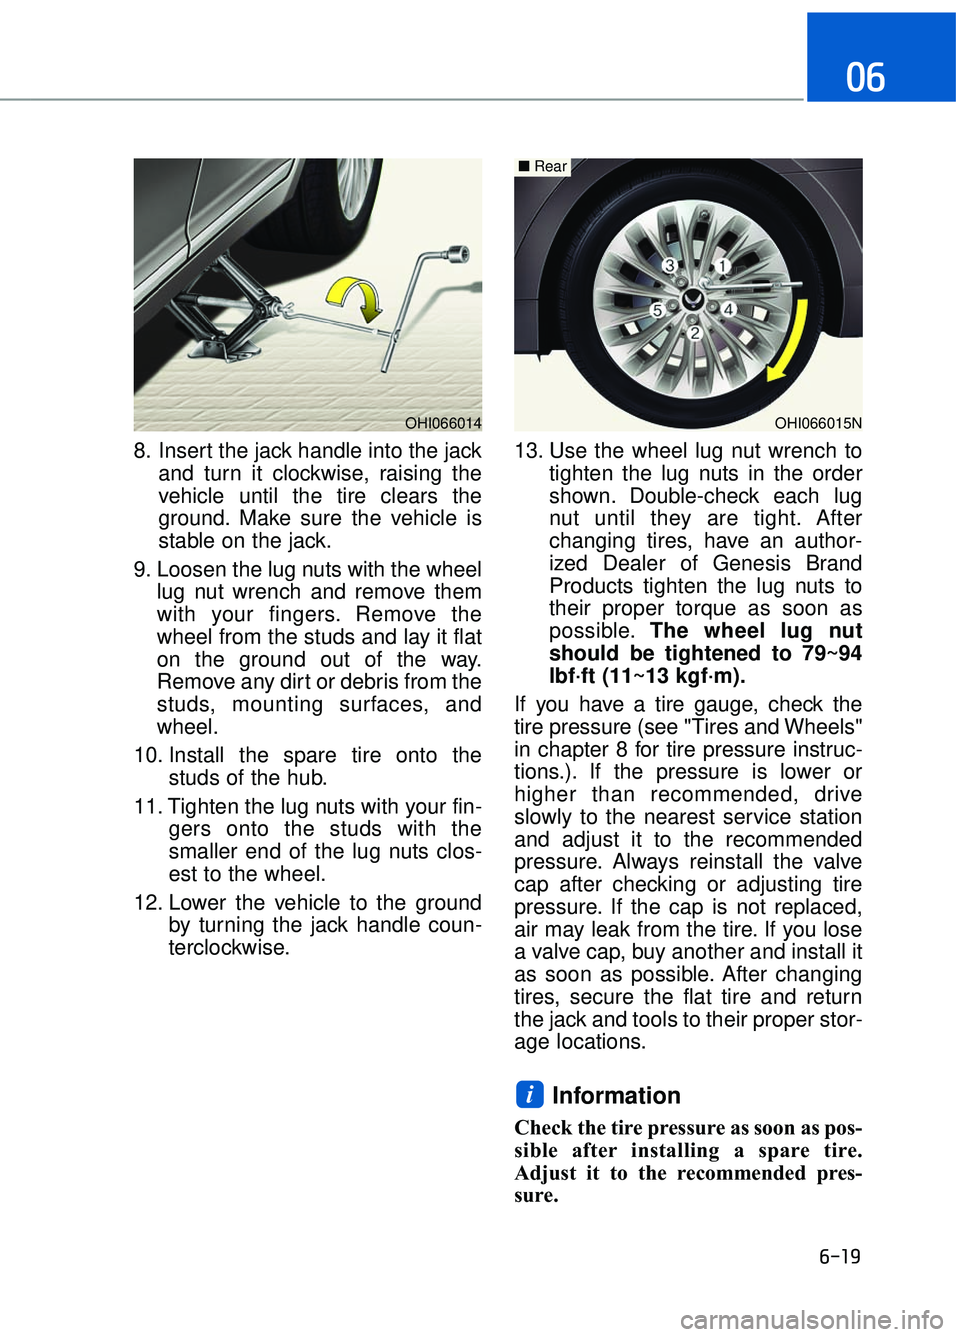
8. Insert the jack handle into the jackand turn it clockwise, raising the
vehicle until the tire clears the
ground. Make sure the vehicle is
stable on the jack.
9. Loosen the lug nuts with the wheel lug nut wrench and remove them
with your fingers. Remove the
wheel from the studs and lay it flat
on the ground out of the way.
Remove any dirt or debris from the
studs, mounting surfaces, and
wheel.
10. Install the spare tire onto the studs of the hub.
11. Tighten the lug nuts with your fin- gers onto the studs with the
smaller end of the lug nuts clos-
est to the wheel.
12. Lower the vehicle to the ground by turning the jack handle coun-
terclockwise. 13. Use the wheel lug nut wrench to
tighten the lug nuts in the order
shown. Double-check each lug
nut until they are tight. After
changing tires, have an author-
ized Dealer of Genesis Brand
Products tighten the lug nuts to
their proper torque as soon as
possible. The wheel lug nut
should be tightened to 79~94
lbf·ft (11~13 kgf·m).
If you have a tire gauge, check the
tire pressure (see "Tires and Wheels"
in chapter 8 for tire pressure instruc-
tions.). If the pressure is lower or
higher than recommended, drive
slowly to the nearest service station
and adjust it to the recommended
pressure. Always reinstall the valve
cap after checking or adjusting tire
pressure. If the cap is not replaced,
air may leak from the tire. If you lose
a valve cap, buy another and install it
as soon as possible. After changing
tires, secure the flat tire and return
the jack and tools to their proper stor-
age locations.
Information
Check the tire pressure as soon as pos-
sible after installing a spare tire.
Adjust it to the recommended pres-
sure.
i
OHI066015N
■ Rear
OHI066014
Page 400 of 524
6-25
06
Removable Towing Hook
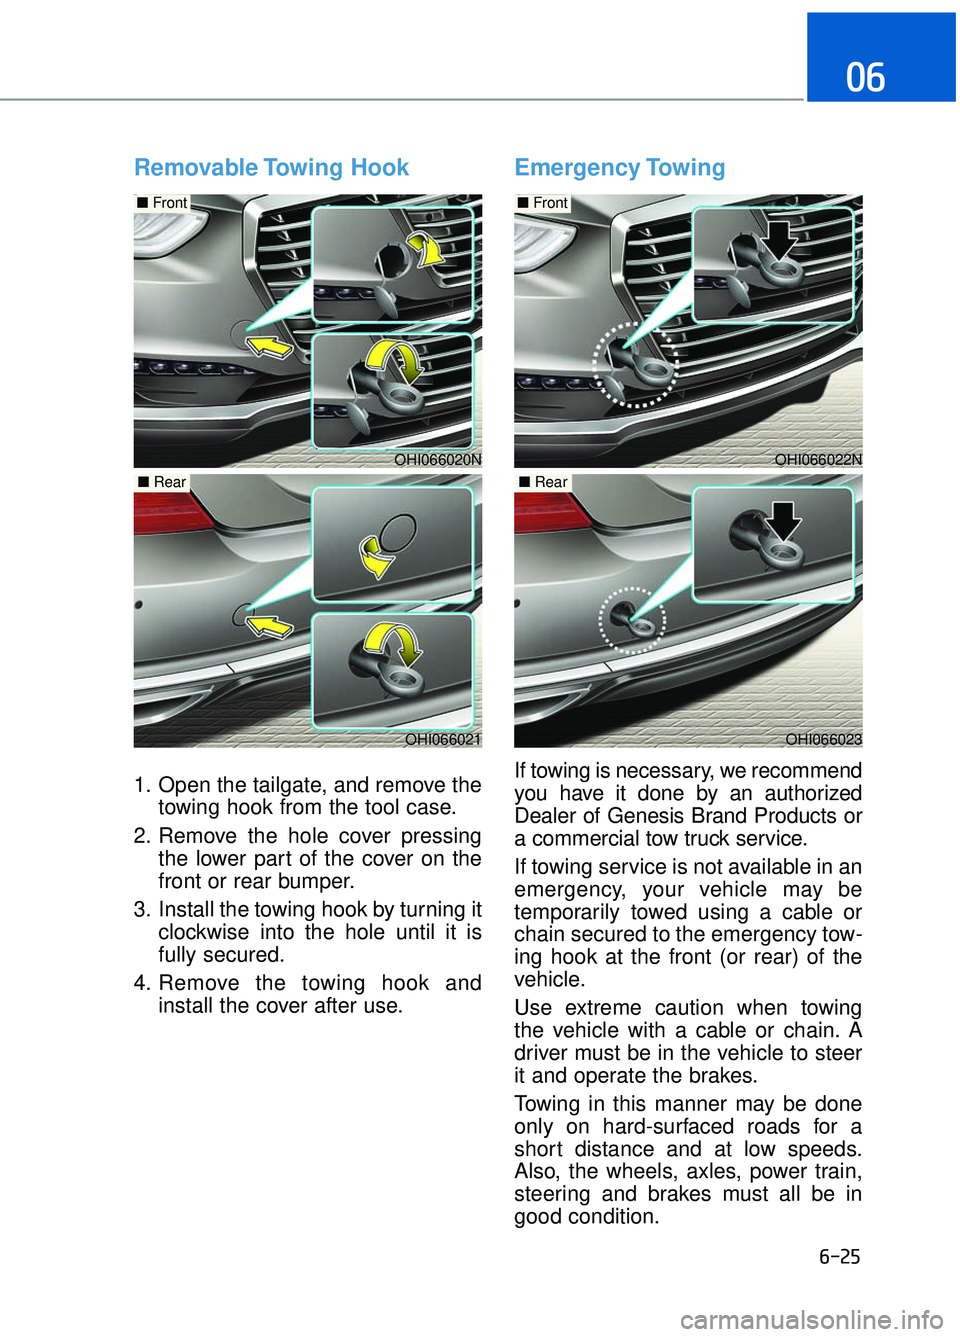
1. Open the tailgate, and remove thetowing hook from the tool case.
2. Remove the hole cover pressing the lower part of the cover on the
front or rear bumper.
3. Install the towing hook by turning it clockwise into the hole until it is
fully secured.
4. Remove the towing hook and install the cover after use.
Emergency Towing
If towing is necessary, we recommend
you have it done by an authorized
Dealer of Genesis Brand Products or
a commercial tow truck service.
If towing service is not available in an
emergency, your vehicle may be
temporarily towed using a cable or
chain secured to the emergency tow-
ing hook at the front (or rear) of the
vehicle.
Use extreme caution when towing
the vehicle with a cable or chain. A
driver must be in the vehicle to steer
it and operate the brakes.
Towing in this manner may be done
only on hard-surfaced roads for a
short distance and at low speeds.
Also, the wheels, axles, power train,
steering and brakes must all be in
good condition.
OHI066022N
■ Front
OHI066023
■ Rear
OHI066020N
OHI066021
■ Rear
■ Front
Page 433 of 524
7-31
07
Recommended engine coolant
When adding coolant, use onlydeionized water, distilled water or
soft water for your vehicle and
never mix hard water in the coolant
filled at the factory.
An improper coolant mixture can result in severe malfunction or
engine damage.
The engine in your vehicle has alu- minum engine parts and must be
protected by an ethylene-glycol
with phosphate based coolant to
prevent corrosion and freezing.
Do not use alcohol or methanol coolant or mix them with the spec-
ified coolant.
Do not use a solution that contains more than 60% antifreeze or less
than 35% antifreeze, which would
reduce the effectiveness of the
solution.
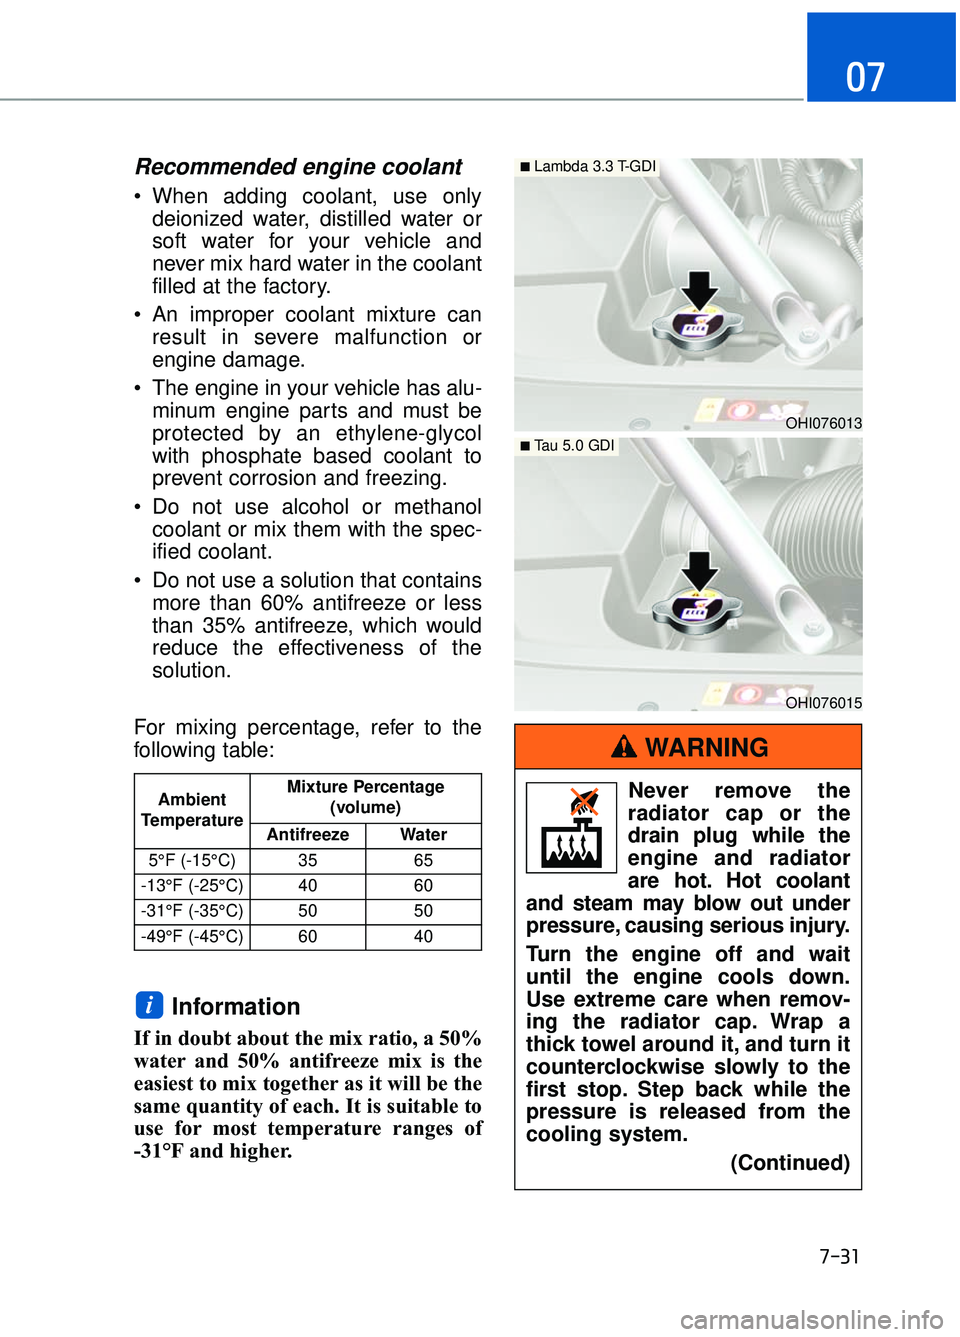
For mixing percentage, refer to the
following table:
Information
If in doubt about the mix ratio, a 50%
water and 50% antifreeze mix is the
easiest to mix together as it will be the
same quantity of each. It is suitable to
use for most temperature ranges of
-31°F and higher.
i
Ambient
Temperature Mixture Percentage
(volume)
Antifreeze Water
5°F (-15°C) 35 65
-13°F (-25°C) 40 60
-31°F (-35°C) 50 50
-49°F (-45°C) 60 40
OHI076013
■ Lambda 3.3 T-GDI
OHI076015
■ Tau 5.0 GDI
Never remove the
radiator cap or the
drain plug while the
engine and radiator
are hot. Hot coolant
and steam may blow out under
pressure, causing serious injury.
Turn the engine off and wait
until the engine cools down.
Use extreme care when remov-
ing the radiator cap. Wrap a
thick towel around it, and turn it
counterclockwise slowly to the
first stop. Step back while the
pressure is released from the
cooling system.
(Continued)
WARNING
Page 434 of 524
7-32
Maintenance
The electric motor for the cooling fan
is controlled by engine coolant tem-
perature, refrigerant pressure and
vehicle speed. As the engine coolant
temperature decreases, the electric
motor will automatically shut off. This
is a normal condition. If your vehicle
is equipped with GDI, the electric
motor for the cooling fan may begin
to operate at any time and continue
to operate until you disconnect the
negative battery cable.
Changing Engine Coolant
Have coolant changed by an authorized
Dealer of Genesis Brand Products
according to the Maintenance Schedule
at the beginning of this chapter.
To prevent damage to engine
parts, put a thick towel around the
radiator cap before refilling the
coolant to prevent the coolant
from overflowing into engine
parts, such as the generator.
NOTICE
The electric motor for
the cooling fan may
continue to operate
or start up when the
engine is not running
and can cause seri-
ous injury. Keep
hands, clothing and tools away
from the rotating fan blades of
the cooling fan.
WARNINGDo not use engine coolant or
antifreeze in the washer fluid
reservoir.
Engine coolant can severely
obscure visibility when sprayed
on the windshield and may
cause loss of vehicle control
resulting in an accident.
Engine coolant may also cause
damage to paint and body trim.
WARNING
(Continued)
When you are sure all the pres-
sure has been released, press
down on the cap, using a thick
towel, and continue turning
counterclockwise to remove it.
Page 444 of 524
7-42
Maintenance
By jump starting
After a jump start from a good bat-
tery, drive the vehicle for 20-30 min-
utes before it is shutoff. The vehicle
may not restart if you shut it off
before the battery had a chance to
adequately recharge. See "Jump
Starting" in chapter 6 for more infor-
mation on jump starting procedures.
Information
An inappropriately disposedbattery can be harmful to
the environment and human
health.
Dispose the battery according to your
local law(s) or regulation.
Reset features
Some items need to be reset after
the battery has been discharged or
the battery has been disconnected.
See chapter 3 for:
Auto up/down window
Sunroof
Trip computer
Climate control system
Power trunk
Clock
Seat position memory system
i
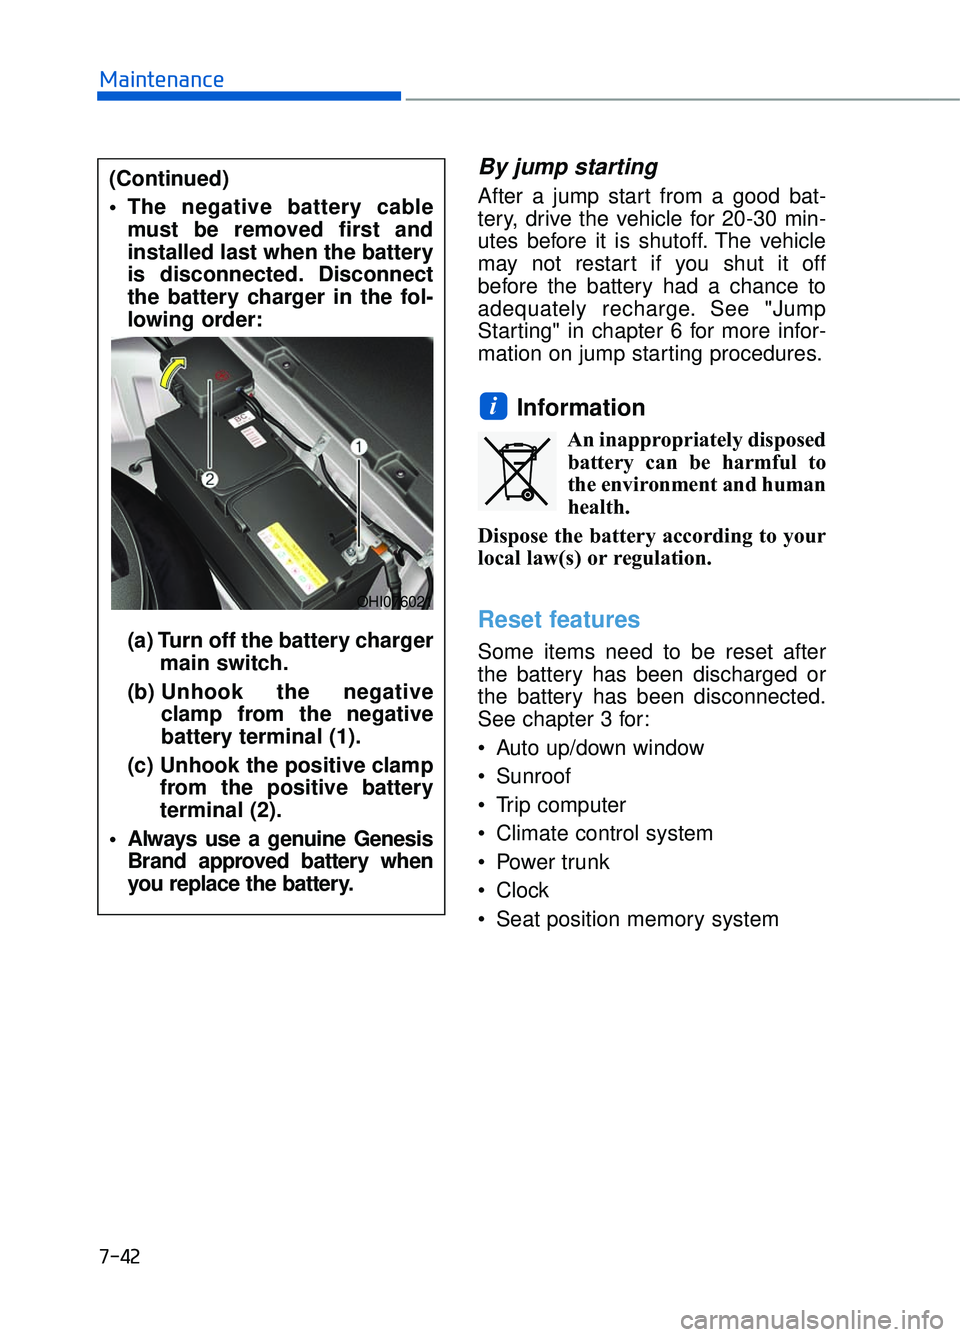
(Continued)
The negative battery cable must be removed first and
installed last when the battery
is disconnected. Disconnect
the battery charger in the fol-
lowing order:
(a) Turn off the battery charger main switch.
(b) Unhook the negative
clamp from the negative
battery terminal (1).
(c) Unhook the positive clamp from the positive battery
terminal (2).
Always use a genuine Genesis Brand approved battery when
you replace the battery.
OHI076021
Page 462 of 524
7-60
Maintenance
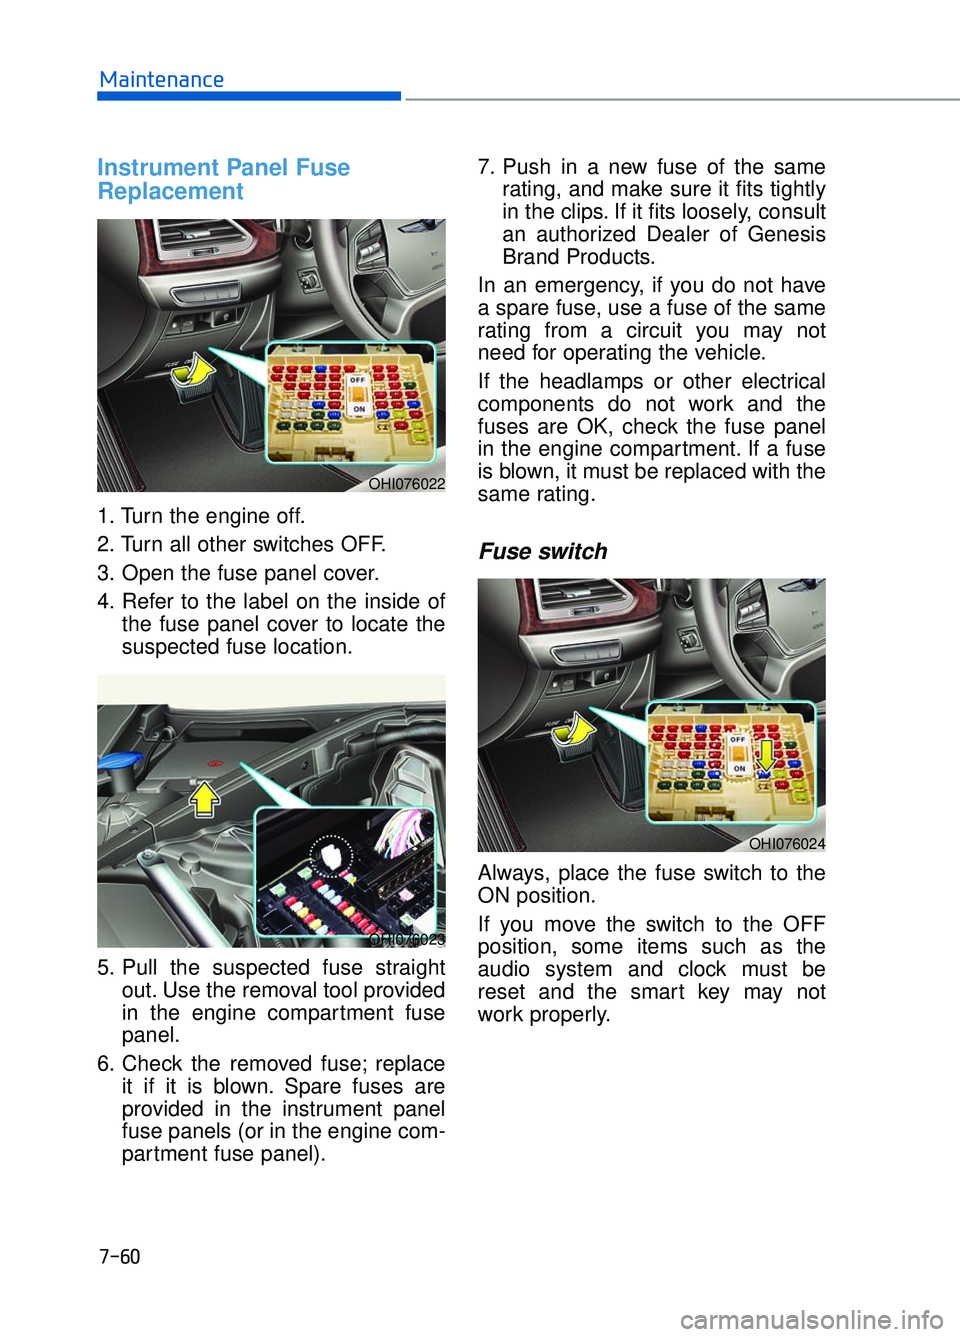
Instrument Panel Fuse
Replacement
1. Turn the engine off.
2. Turn all other switches OFF.
3. Open the fuse panel cover.
4. Refer to the label on the inside ofthe fuse panel cover to locate the
suspected fuse location.
5. Pull the suspected fuse straight out. Use the removal tool provided
in the engine compartment fuse
panel.
6. Check the removed fuse; replace it if it is blown. Spare fuses are
provided in the instrument panel
fuse panels (or in the engine com-
partment fuse panel). 7. Push in a new fuse of the same
rating, and make sure it fits tightly
in the clips. If it fits loosely, consult
an authorized Dealer of Genesis
Brand Products.
In an emergency, if you do not have
a spare fuse, use a fuse of the same
rating from a circuit you may not
need for operating the vehicle.
If the headlamps or other electrical
components do not work and the
fuses are OK, check the fuse panel
in the engine compartment. If a fuse
is blown, it must be replaced with the
same rating.
Fuse switch
Always, place the fuse switch to the
ON position.
If you move the switch to the OFF
position, some items such as the
audio system and clock must be
reset and the smart key may not
work properly.
OHI076022
OHI076023
OHI076024
Page 467 of 524

7-65
07
Instrument panel fuse panel
Fuse name Fuse rating Circuit protected
MODULE5 10AStop Lamp Switch, Driver/Passenger Door Module
MODULE7 10A
Electro Chromic Mirror, A/V & Navigation Head Unit, AMP,
A/C Control Module, Front A/C Controller, Air Quality
Sensor, Rear Seat Warmer Control Module LH/RH Head
Lamp LH/RH Driver/Passenger CCS Module
Rear CCS Module LH/RH, Driver/Passenger IMS Control
Module, Rear IMS Control Module LH/RH, Rear Seat
Console Switch
IBU3 10AIBU Control Module
E-SHIFTER2 10AElectronic ATM Shift Lever
MEMORY1 10A
Security Indicator, A/C Control Module, Front A/C Controller,
Instrument Cluster, Driver/Passenger IMS Control Module,
Rear IMS Control Module LH/RH, Head-Up Display, Analog
Clock
Driver/Passenger Seat Control Switch, Power Trunk Module,
Rear Seat Control Switch LH/RHM Driver/Passenger Smart
Key, Outside Handle Rear Smart Key Outside Handle
LH/RH
RR LH2P/SEAT25ARear IMS Control Module LH
DRIVER
P/SEAT225ADriver IMS Control Module
P/WINDOW RH30APassenger Power Window Module
Rear Power Window Module RH
MODULE 610A
Crash Pad Switch, Blind Spot Detection Radar LH/RH ECS
Unit, Electric Parking Brake Module, Lane Keeping Assist
Module, Front Console Switch, Steering Tilt & Telescopic
Module
MODULE 10 10ACooling Fan Controller (BLDC), Rear Seat Console Switch,
Around View Unit, Parking Guide Unit
MODULE3 10AGATEWAY (B+ (MCU)), Data Link Connector, Hazard
Switch
SUNROOF 25ASunroof Motor
PASSENGER P/SEAT2 25APassenger IMS Control Module
Page 468 of 524
7-66
Maintenance
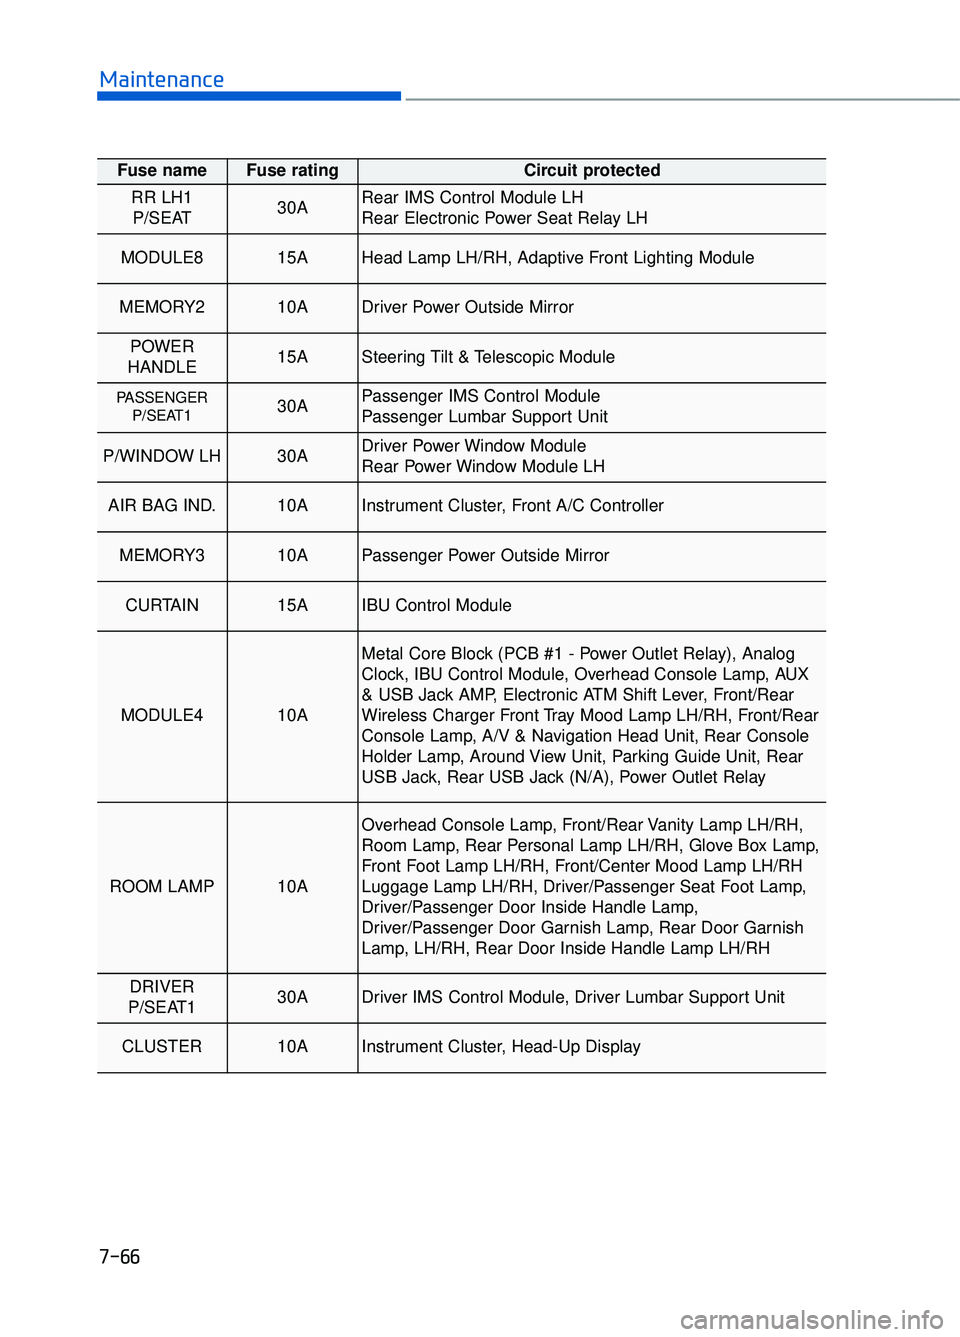
Fuse name Fuse rating Circuit protected
RR LH1P/SEAT 30ARear IMS Control Module LH
Rear Electronic Power Seat Relay LH
MODULE8 15AHead Lamp LH/RH, Adaptive Front Lighting Module
MEMORY2 10ADriver Power Outside Mirror
POWER
HANDLE 15ASteering Tilt & Telescopic Module
PASSENGER P/SEAT1 30APassenger IMS Control Module
Passenger Lumbar Support Unit
P/WINDOW LH30ADriver Power Window Module
Rear Power Window Module LH
AIR BAG IND.10AInstrument Cluster, Front A/C Controller
MEMORY3 10APassenger Power Outside Mirror
CURTAIN 15AIBU Control Module
MODULE4 10A
Metal Core Block (PCB #1 - Power Outlet Relay), Analog
Clock, IBU Control Module, Overhead Console Lamp, AUX
& USB Jack AMP, Electronic ATM Shift Lever, Front/Rear
Wireless Charger Front Tray Mood Lamp LH/RH, Front/Rear
Console Lamp, A/V & Navigation Head Unit, Rear Console
Holder Lamp, Around View Unit, Parking Guide Unit, Rear
USB Jack, Rear USB Jack (N/A), Power Outlet Relay
ROOM LAMP 10A
Overhead Console Lamp, Front/Rear Vanity Lamp LH/RH,
Room Lamp, Rear Personal Lamp LH/RH, Glove Box Lamp,
Front Foot Lamp LH/RH, Front/Center Mood Lamp LH/RH
Luggage Lamp LH/RH, Driver/Passenger Seat Foot Lamp,
Driver/Passenger Door Inside Handle Lamp,
Driver/Passenger Door Garnish Lamp, Rear Door Garnish
Lamp, LH/RH, Rear Door Inside Handle Lamp LH/RH
DRIVER
P/SEAT1 30ADriver IMS Control Module, Driver Lumbar Support Unit
CLUSTER 10AInstrument Cluster, Head-Up Display
Page 509 of 524

Changing a Tire with TPMS ........................................................................\
........6-14
Checking tire inflation pressure ........................................................................\
...7-45
Child restraint system (CRS) ........................................................................\
.......2-45Booster seats........................................................................\
........................2-48
Children always in the rear ........................................................................\
.2-45
Forward-facing child restraint system ........................................................2-48
Installing a child restraint system (CRS) ....................................................2-48
Lower Anchors and tether for children .......................................................2-49
Rearward-facing child restraint system..................................\
.....................2-47
Securing a child restraint system seat with "Tether Anchor" system .........3-52
Securing a child restraint system with a lap/shoulder belt .........................3-53
Securing a child restraint with the the LATCH anchors system.................2-51
Selecting a child restraint system (CRS) ....................................................2-46
Child-protector rear door lock........................................................................\
......3-13
Clean air ........................................................................\
.....................................3-141
Climate control air filter........................................................................\
...............7-36
Clock ........................................................................\
..........................................3-151
Clothes hanger ........................................................................\
............................3-151
Combined instrument, see instrument cluster ......................................................3-60
Compact spare tire replacement ........................................................................\
...7-48
Consumer information........................................................................\
..................8-10
Coolant ........................................................................\
.........................................7-30
Cooling fluid, see engine coolant........................................................................\
.7-30
Crankcase emission control system .....................................................................7-8\
8
Cruise control system ........................................................................\
...................5-80
Cup holder ........................................................................\
..................................3-147
Curtain air bags ........................................................................\
............................2-62
Dashboard illumination, see instrument panel illumination ................................3-61
Dashboard, see instrument cluster .......................................................................3\
-60
Daytime running light (DRL) ........................................................................\
....3-107
Defogging (Windshield) ........................................................................\
.............3-138
Defroster ........................................................................\
.....................................3-121 Rear window defroster ........................................................................\
......3-121
Side view mirror defroster ........................................................................\
3-121
Defrosting (Windshield) ........................................................................\
.............3-138
Dimensions ........................................................................\
.....................................8-2
DIS navigation system ........................................................................\
...................4-4
Display illumination, see instrument panel illumination .....................................3-61
I-5
I
D