reset GENESIS G90 2017 User Guide
[x] Cancel search | Manufacturer: GENESIS, Model Year: 2017, Model line: G90, Model: GENESIS G90 2017Pages: 524, PDF Size: 19.3 MB
Page 199 of 524

3-97
03
Accumulated Info display
This display shows the accumulated
trip distance (1), the average fuel
economy (2), and the total driving
time (3).
The information is calculated starting
from the last reset.
To manually reset the information,
press and hold the OK button when
viewing the Accumulated driving info.
The trip distance, the average fuel
economy, and total driving time will
reset simultaneously.
The accumulated driving information
will continue to be counted while the
engine is still running (for example,
when the vehicle is in traffic or
stopped at a stop light.)
Information
The vehicle must be driven for a min-
imum of 0.19 miles (300 meters) since
the last ignition key cycle before the
average fuel economy will be recalcu-
lated.
Digital speedometer
This message shows the speed of
the vehicle.
i
OHI046173NOHI046172N
Page 231 of 524
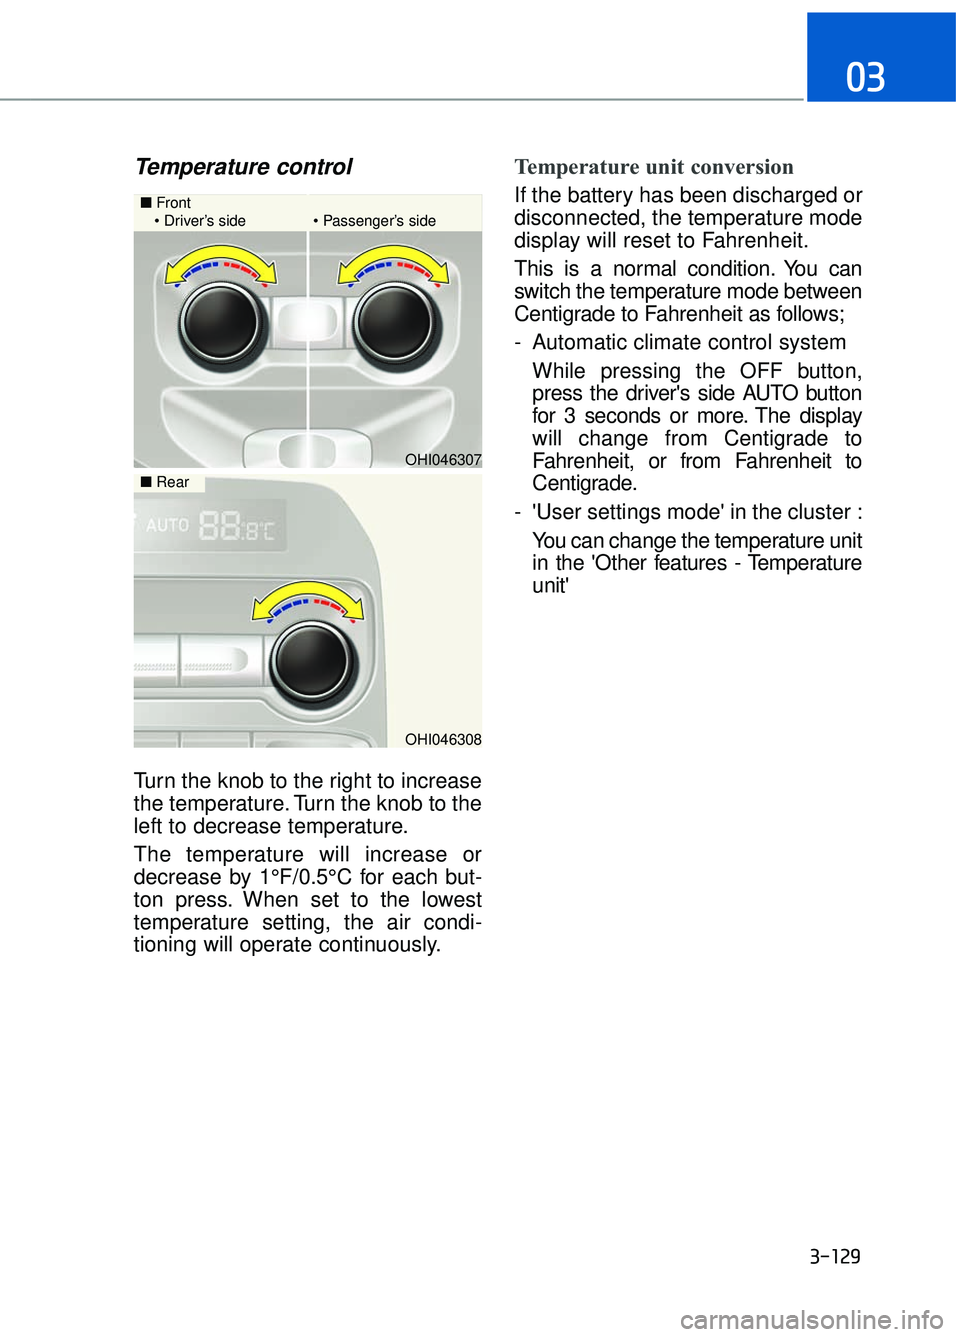
Temperature control
Turn the knob to the right to increase
the temperature. Turn the knob to the
left to decrease temperature.
The temperature will increase or
decrease by 1°F/0.5°C for each but-
ton press. When set to the lowest
temperature setting, the air condi-
tioning will operate continuously.
Temperature unit conversion
If the battery has been discharged or
disconnected, the temperature mode
display will reset to Fahrenheit.
This is a normal condition. You can
switch the temperature mode between
Centigrade to Fahrenheit as follows;
- Automatic climate control systemWhile pressing the OFF button,
press the driver's side AUTO button
for 3 seconds or more. The display
will change from Centigrade to
Fahrenheit, or from Fahrenheit to
Centigrade.
- 'User settings mode' in the cluster : You can change the temperature unit
in the 'Other features - Temperature
unit'
3-129
03
OHI046307
■ Front
Driver’s side Passenger’s side
OHI046308
■ Rear
Page 241 of 524

To defrost outside windshield
1. Set the fan speed to the highestposition.
2. Set the temperature to the extreme hot (HI) position.
3. Press the defroster button ( ).
4. The air conditioning will turn on according to the detected ambient
temperature and outside (fresh)
air position will be selected auto-
matically.
Defogging logic
To reduce the possibility of fogging
up the inside of the windshield, the
air intake is controlled automatically
according to certain conditions such
as or position. To cancel or
return the defogging logic, perform
the following steps:
1. Turn the Engine Start/Stop Buttonto the ON position.
2. Select the defrost position press- ing defrost button ( ).
3. While holding the air conditioning button (A/C) pressed, press the air
intake control button at least 5
times within 3 seconds.
The indicator on the air intake control
button blinks 3 times with 0.5 second
of interval. It indicates that the defog-
ging logic is canceled or returned to
the programmed status.
If the battery has been discharged or
disconnected, the system resets to
the preprogrammed defogging logic.
3-139
03
OHI046328NOHI046329N
Page 260 of 524
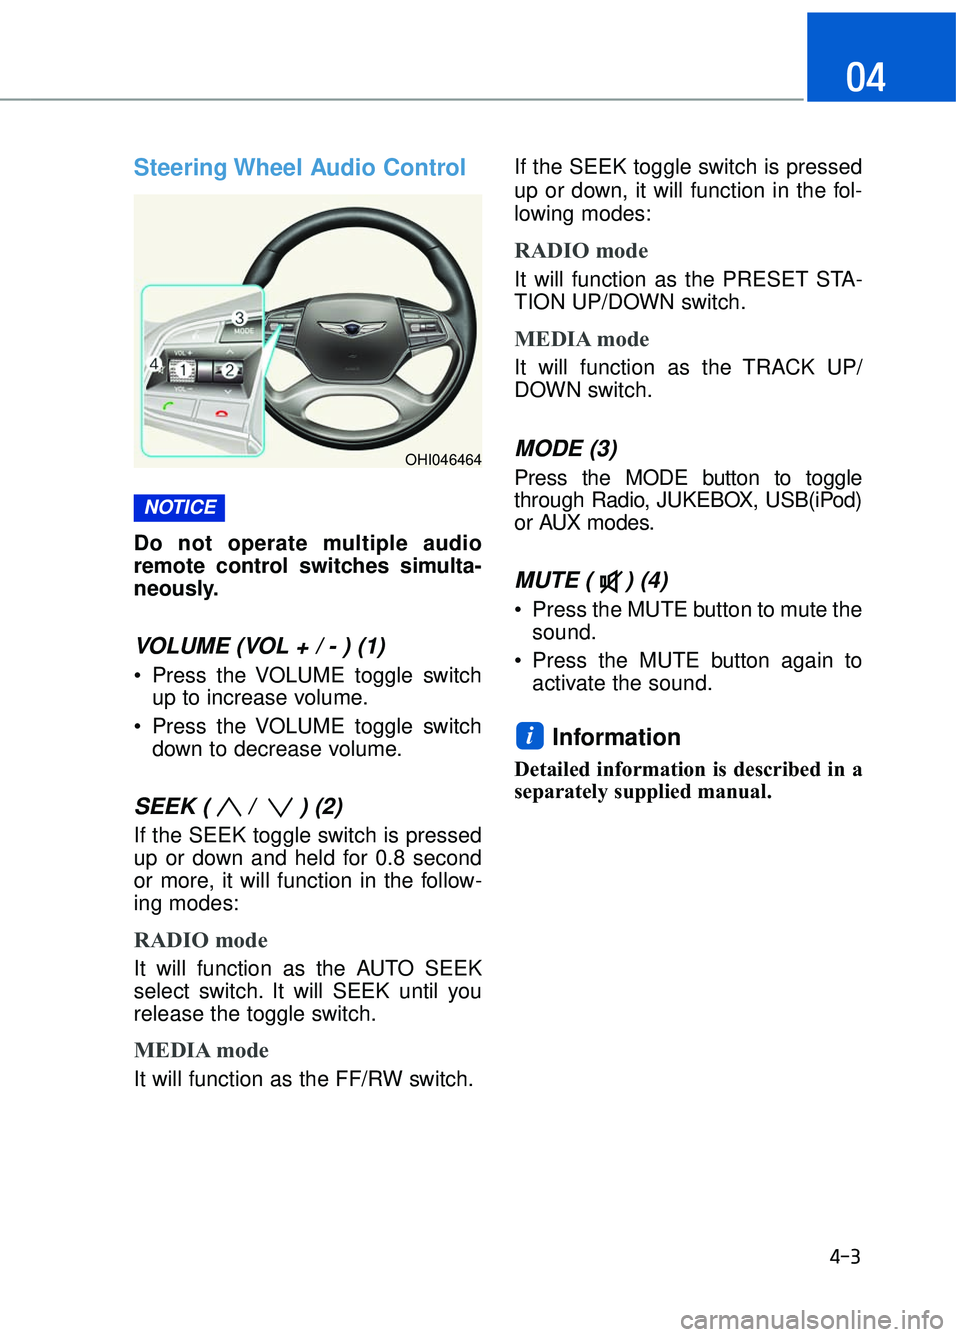
Steering Wheel Audio Control
Do not operate multiple audio
remote control switches simulta-
neously.
VOLUME (VOL + / - ) (1)
Press the VOLUME toggle switchup to increase volume.
Press the VOLUME toggle switch down to decrease volume.
SEEK ( / ) (2)
If the SEEK toggle switch is pressed
up or down and held for 0.8 second
or more, it will function in the follow-
ing modes:
RADIO mode
It will function as the AUTO SEEK
select switch. It will SEEK until you
release the toggle switch.
MEDIA mode
It will function as the FF/RW switch. If the SEEK toggle switch is pressed
up or down, it will function in the fol-
lowing modes:
RADIO mode
It will function as the PRESET STA-
TION UP/DOWN switch.
MEDIA mode
It will function as the TRACK UP/
DOWN switch.
MODE (3)
Press the MODE button to toggle
through Radio, JUKEBOX, USB(iPod)
or AUX modes.
MUTE ( ) (4)
Press the MUTE button to mute the
sound.
Press the MUTE button again to activate the sound.
Information
Detailed information is described in a
separately supplied manual.
i
NOTICE
4-3
04
OHI046464
Page 263 of 524

5
Automatic Emergency Braking (AEB) .....................................5-61
System Setting and Activation ...............................................................5-61
AEB Warning Message and System Control .......................................5-63
AEB Front Radar Sensor ........................................................................\
.5-65
System Malfunction ........................................................................\
..........5-66
Limitations of the System .......................................................................5\
-68
Lane Keeping Assist System (LKAS) .......................................5-72
LKAS Operation ........................................................................\
..................5-73
Warning light and message .....................................................................5-7\
7
LKAS Function Change ........................................................................\
.....5-78
Limitations of the System .......................................................................5\
-79
Advanced Smart Cruise Control System (ASCC) ...................5-80
To Adjust the Sensitivity of Smart Cruise Control ............................5-81
To Convert to Cruise Control Mode ......................................................5-82
Smart Cruise Control Speed ....................................................................5-83\
Smart Cruise Control Vehicle-to-Vehicle Distance ...........................5-88
Front Radar Sensor........................................................................\
...........5-91
Limitations of the System .......................................................................5\
-92
Driver Attention Alert system (DAA) ......................................5-97
System Setting and Activation ...............................................................5-97
Resetting the System........................................................................\
........5-99
System Disabled ........................................................................\
.................5-99
System Malfunction ........................................................................\
........5-100
Special Driving Conditions ......................................................5-102
Hazardous Driving Conditions ..............................................................5-102
Rocking the Vehicle ........................................................................\
........5-102
Smooth Cornering ........................................................................\
...........5-103
Driving at Night ........................................................................\
................5-103
Driving in the Rain........................................................................\
...........5-103
Driving in Flooded Areas .......................................................................5\
-104
Highway Driving ........................................................................\
...............5-104
Page 360 of 524

5-99
05
Resetting the System
The last break time is set to 00:00and the driver's attention level is
set to 5 (very attentive) when the
driver resets the Driver Attention
Alert system.
The Driver Attention Alert system resets the last break time to 00:00
and the driver's attention level to 5
in the following situations.
- The engine is turned OFF.
- The driver unfastens the seat beltand then opens the driver's door.
- The engine has been idled con- tinuously over 10 minutes.
The Driver Attention Alert system operates again, when the driver
restarts driving.
System Standby
The Driver Attention Alert system
enters the ready status and displays
the 'Standby' screen in the following
situations.
- The camera sensor keeps failing todetect the lanes.
- Driving speed remains under 40 mph (60 km/h) or over 110 mph
(180 km/h).
OHI056218LOHI056215L
Page 403 of 524
Engine Compartment ...................................................................7-3
Maintenance Services .................................................................7-5
Owner's Responsibility ........................................................................\
.......7-5
Owner Maintenance Precautions ............................................................7-5
Owner Maintenance ....................................................................7-6
Owner Maintenance Schedule..................................................................7-7
Scheduled Maintenance Service................................................7-8
Normal Maintenance Schedule.................................................................7-9
Maintenance Under Severe Usage Conditions...................................7-23
Explanation of Scheduled Maintenance Items ......................7-25
Engine oil........................................................................\
.............7-28
Checking the Engine Oil Level................................................................7-28
Checking the Engine Oil and Filter .......................................................7-29
Engine Coolant ........................................................................\
...7-30
Checking the Engine Coolant Level ......................................................7-30
Changing Engine Coolant........................................................................\
.7-32
Brake Fluid ........................................................................\
..........7-33
Checking the Brake Fluid Level .............................................................7-33
Washer Fluid ........................................................................\
.......7-34
Checking the Washer Fluid Level ..........................................................7-34
Air Cleaner ........................................................................\
..........7-35
Filter Replacement........................................................................\
.............7-35
Climate Control Air Filter ..........................................................7-36
Filter Inspection ........................................................................\
.................7-36
Wiper Blades ........................................................................\
.......7-37
Blade Inspection ........................................................................\
.................7-37
Blade Replacement ........................................................................\
............7-37
Battery ........................................................................\
.................7-39
For Best Battery Service ........................................................................\
.7-40
Battery Recharging ........................................................................\
...........7-41
Reset features ........................................................................\
....................7-42
Tires and Wheels .......................................................................7\
-43
Tire Care ........................................................................\
..............................7-43
Recommended Cold Tire Inflation Pressures......................................7-44
7
M Ma
ai
in
n t
te
e n
n a
an
n c
ce
e
Page 444 of 524
7-42
Maintenance
By jump starting
After a jump start from a good bat-
tery, drive the vehicle for 20-30 min-
utes before it is shutoff. The vehicle
may not restart if you shut it off
before the battery had a chance to
adequately recharge. See "Jump
Starting" in chapter 6 for more infor-
mation on jump starting procedures.
Information
An inappropriately disposedbattery can be harmful to
the environment and human
health.
Dispose the battery according to your
local law(s) or regulation.
Reset features
Some items need to be reset after
the battery has been discharged or
the battery has been disconnected.
See chapter 3 for:
Auto up/down window
Sunroof
Trip computer
Climate control system
Power trunk
Clock
Seat position memory system
i
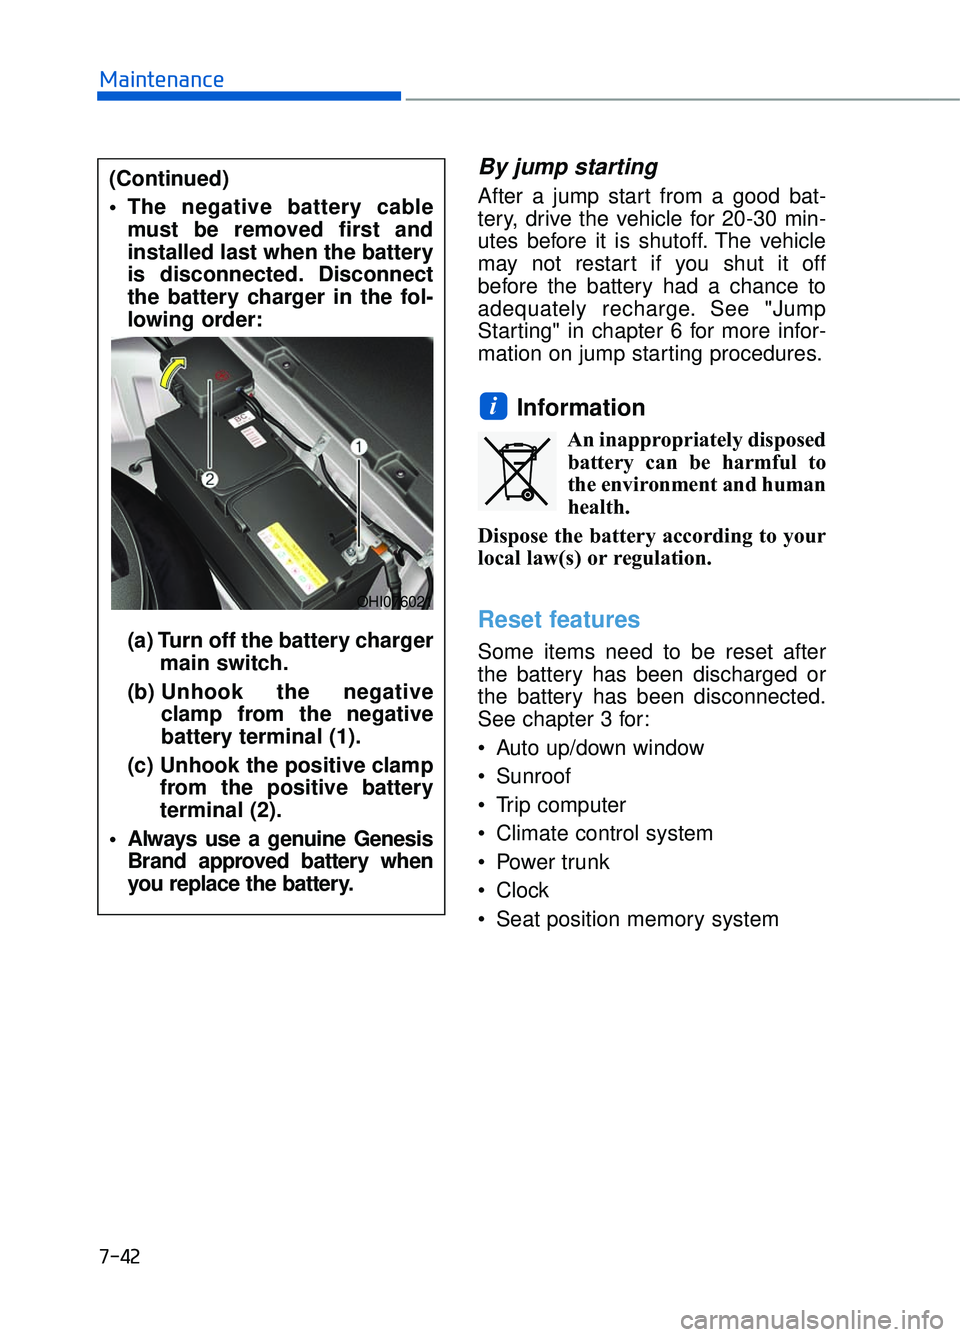
(Continued)
The negative battery cable must be removed first and
installed last when the battery
is disconnected. Disconnect
the battery charger in the fol-
lowing order:
(a) Turn off the battery charger main switch.
(b) Unhook the negative
clamp from the negative
battery terminal (1).
(c) Unhook the positive clamp from the positive battery
terminal (2).
Always use a genuine Genesis Brand approved battery when
you replace the battery.
OHI076021
Page 448 of 524
7-46
Maintenance
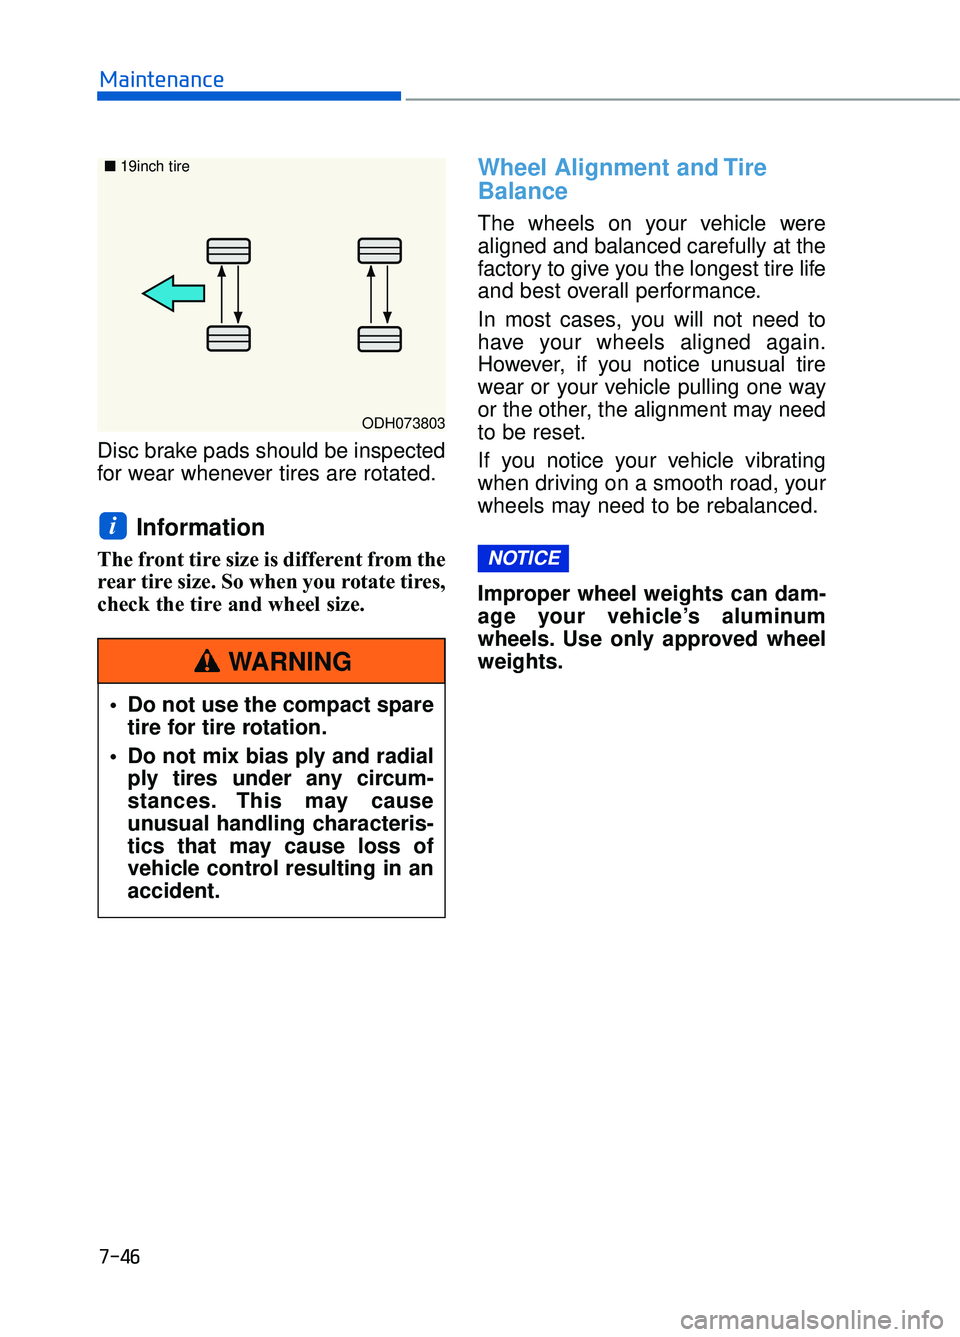
Disc brake pads should be inspected
for wear whenever tires are rotated.
Information
The front tire size is different from the
rear tire size. So when you rotate tires,
check the tire and wheel size.
Wheel Alignment and Tire
Balance
The wheels on your vehicle were
aligned and balanced carefully at the
factory to give you the longest tire life
and best overall performance.
In most cases, you will not need to
have your wheels aligned again.
However, if you notice unusual tire
wear or your vehicle pulling one way
or the other, the alignment may need
to be reset.
If you notice your vehicle vibrating
when driving on a smooth road, your
wheels may need to be rebalanced.
Improper wheel weights can dam-
age your vehicle’s aluminum
wheels. Use only approved wheel
weights.
NOTICE
i
ODH073803
■
19inch tire
Do not use the compact spare
tire for tire rotation.
Do not mix bias ply and radial ply tires under any circum-
stances. This may cause
unusual handling characteris-
tics that may cause loss of
vehicle control resulting in an
accident.
WARNING
Page 462 of 524
7-60
Maintenance
Instrument Panel Fuse
Replacement
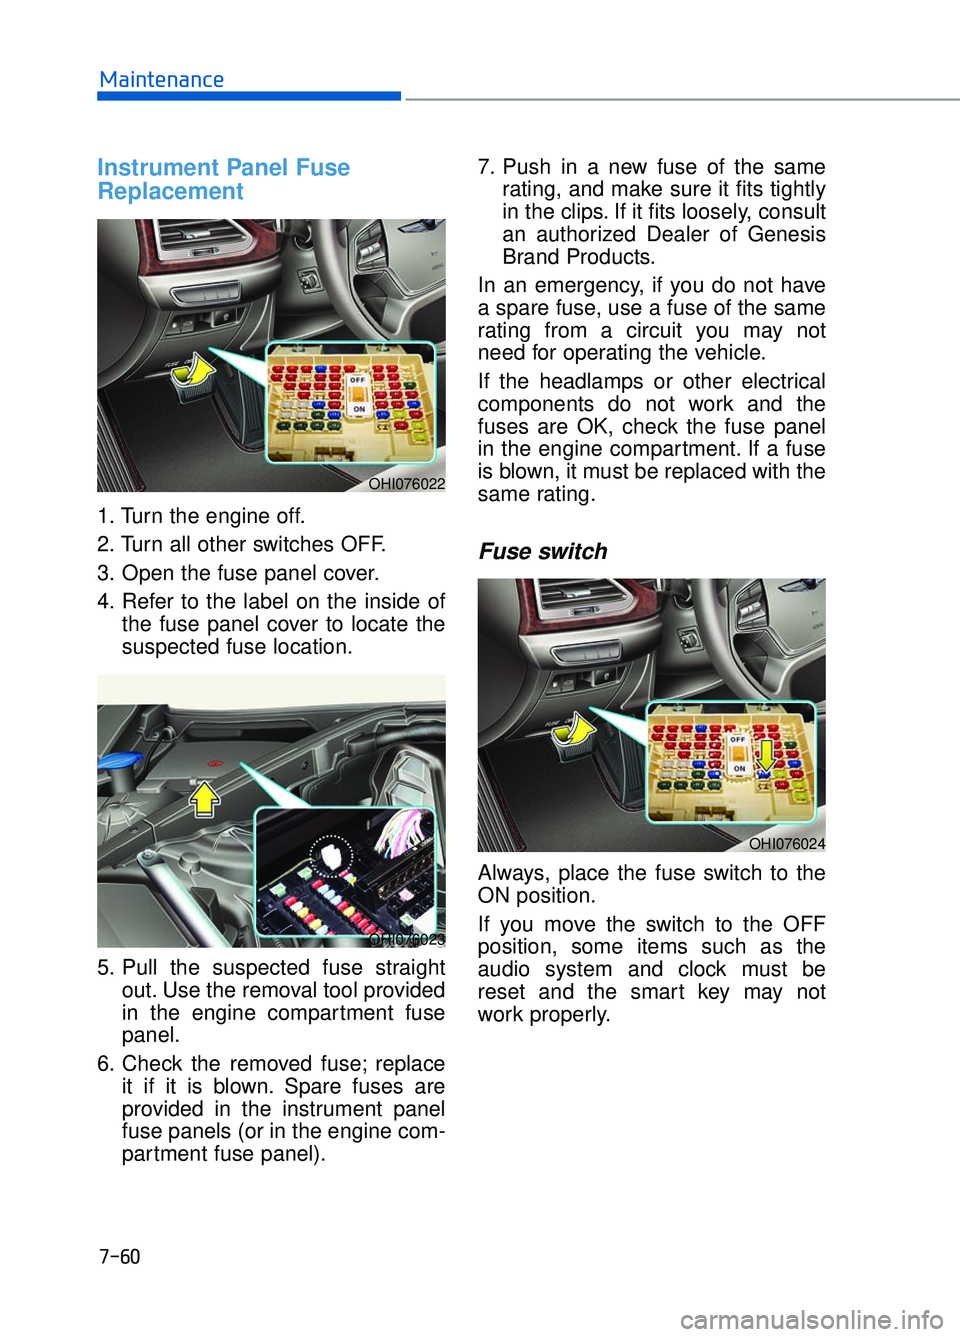
1. Turn the engine off.
2. Turn all other switches OFF.
3. Open the fuse panel cover.
4. Refer to the label on the inside ofthe fuse panel cover to locate the
suspected fuse location.
5. Pull the suspected fuse straight out. Use the removal tool provided
in the engine compartment fuse
panel.
6. Check the removed fuse; replace it if it is blown. Spare fuses are
provided in the instrument panel
fuse panels (or in the engine com-
partment fuse panel). 7. Push in a new fuse of the same
rating, and make sure it fits tightly
in the clips. If it fits loosely, consult
an authorized Dealer of Genesis
Brand Products.
In an emergency, if you do not have
a spare fuse, use a fuse of the same
rating from a circuit you may not
need for operating the vehicle.
If the headlamps or other electrical
components do not work and the
fuses are OK, check the fuse panel
in the engine compartment. If a fuse
is blown, it must be replaced with the
same rating.
Fuse switch
Always, place the fuse switch to the
ON position.
If you move the switch to the OFF
position, some items such as the
audio system and clock must be
reset and the smart key may not
work properly.
OHI076022
OHI076023
OHI076024