start stop button GENESIS G90 2017 Manual Online
[x] Cancel search | Manufacturer: GENESIS, Model Year: 2017, Model line: G90, Model: GENESIS G90 2017Pages: 524, PDF Size: 19.3 MB
Page 393 of 524

6-18
What to do in an emergency
Follow these steps to change your
vehicle's tire:
1. Park on a level, firm surface.
2. Move the shift lever into P(Park), apply the parking brake, and place
the Engine Start/Stop button in the
OFF position.
3. Press the hazard warning flasher button.
4. Remove the wheel lug nut wrench, jack, jack handle, and spare tire
from the vehicle.
5. Block both the front and rear of the tire diagonally opposite of the tire
you are changing. 6. Loosen the wheel lug nuts coun-
terclockwise one turn each in the
order shown above, but do not
remove any lug nuts until the tire
has been raised off of the ground.
7. Place the jack at the designated jacking position under the frame
closest to the tire you are chang-
ing. The jacking positions are
plates welded to the frame with
two notches and two dimples.
Never jack any other position or
part of the vehicle. Doing so may
damage the side seal molding or
other parts of the vehicle.
OHI066012N
OHI066010N
OHI066013N
■ Front
■ Rear
Page 399 of 524
6-24
What to do in an emergency
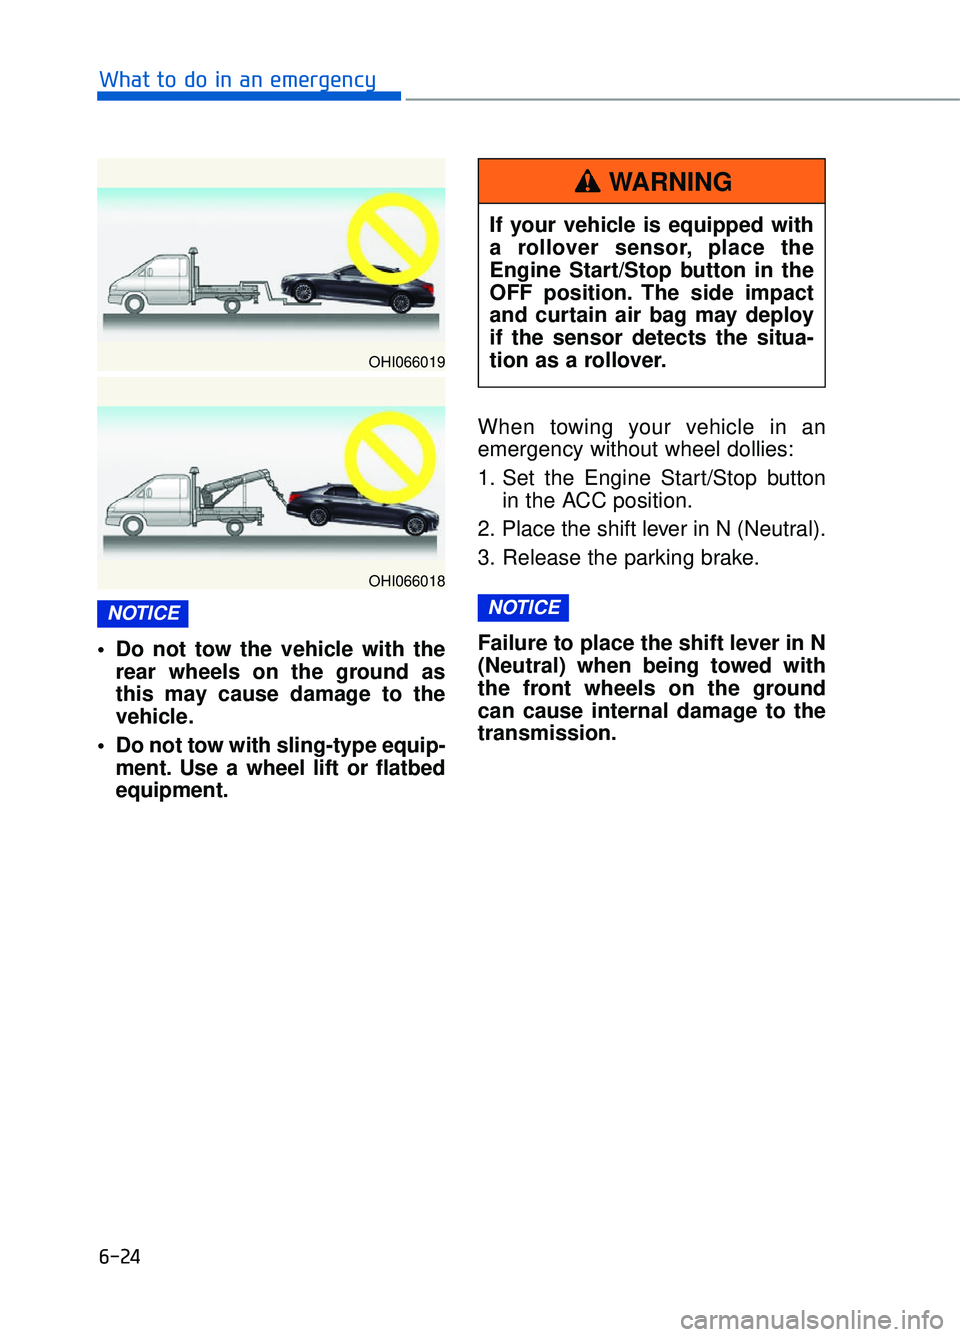
Do not tow the vehicle with the rear wheels on the ground as
this may cause damage to the
vehicle.
Do not tow with sling-type equip- ment. Use a wheel lift or flatbed
equipment. When towing your vehicle in an
emergency without wheel dollies:
1. Set the Engine Start/Stop button
in the ACC position.
2. Place the shift lever in N (Neutral).
3. Release the parking brake.
Failure to place the shift lever in N
(Neutral) when being towed with
the front wheels on the ground
can cause internal damage to the
transmission.
NOTICENOTICE
OHI066019
OHI066018
If your vehicle is equipped with
a rollover sensor, place the
Engine Start/Stop button in the
OFF position. The side impact
and curtain air bag may deploy
if the sensor detects the situa-
tion as a rollover.
WARNING
Page 401 of 524
6-26
What to do in an emergency
Always follow these emergency tow-
ing precautions:
Place the Engine Start/Stop button in the ACC position so the steering
wheel is not locked.
Place the shift lever in N (Neutral).
Release the parking brake.
Depress the brake pedal with more force than normal since you will
have reduced braking perform-
ance.
More steering effort will be required because the power steer-
ing system will be disabled.
Use a vehicle heavier than your own to tow your vehicle.
The drivers of both vehicles should communicate with each other fre-
quently.
Before emergency towing, check that the hook is not broken or dam-
aged.
Fasten the towing cable or chain securely to the hook.
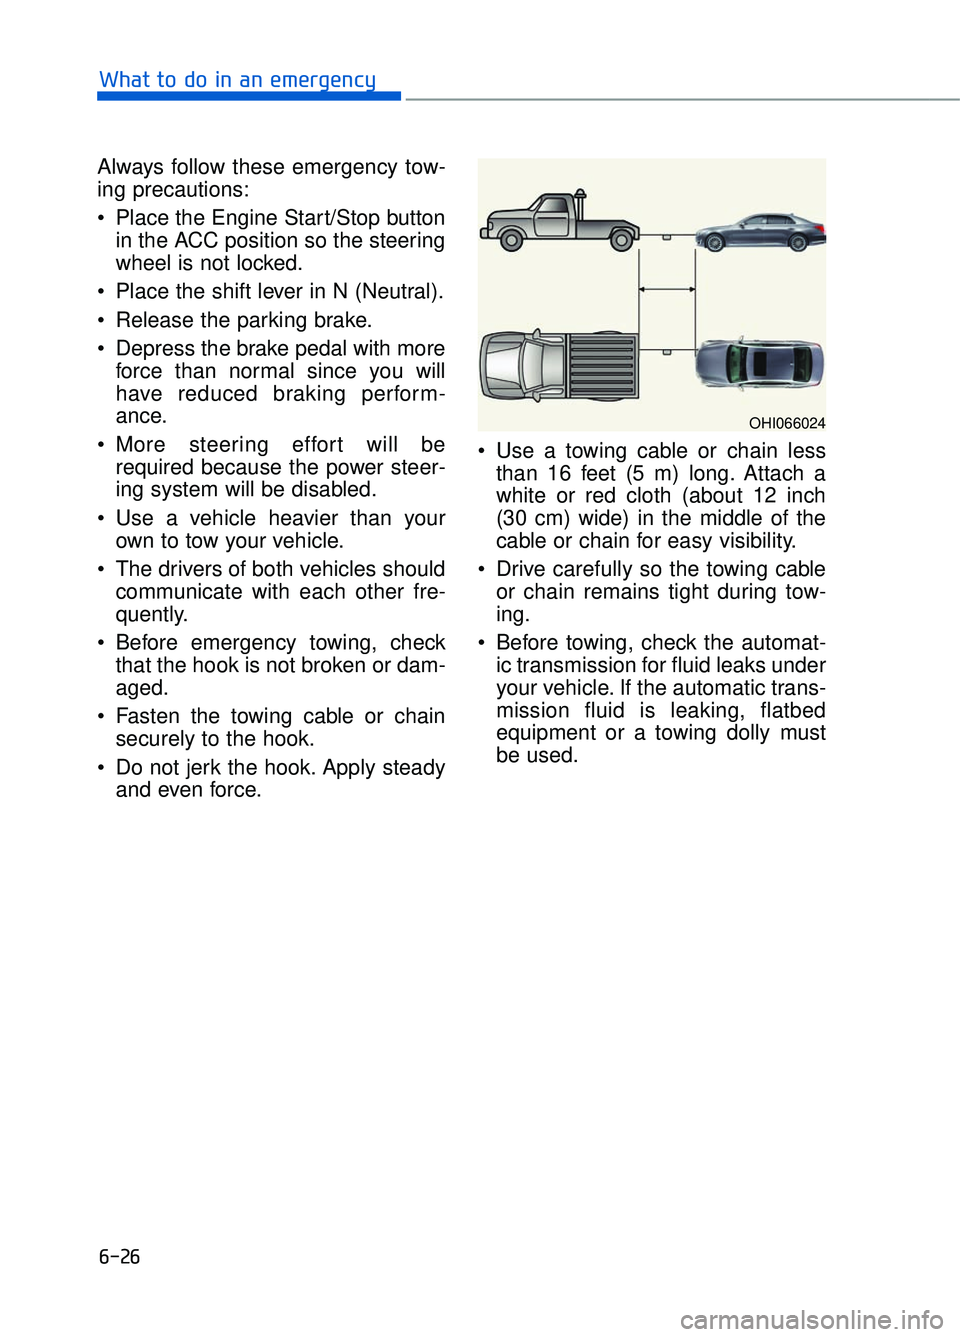
Do not jerk the hook. Apply steady and even force. Use a towing cable or chain less
than 16 feet (5 m) long. Attach a
white or red cloth (about 12 inch
(30 cm) wide) in the middle of the
cable or chain for easy visibility.
Drive carefully so the towing cable or chain remains tight during tow-
ing.
Before towing, check the automat- ic transmission for fluid leaks under
your vehicle. If the automatic trans-
mission fluid is leaking, flatbed
equipment or a towing dolly must
be used.
OHI066024
Page 408 of 524

7-6
MaintenanceThe following lists are vehicle checks
and inspections that should be per-
formed by the owner or an author-
ized Dealer of Genesis Brand
Products at the frequencies indicat-
ed to help ensure safe, dependable
operation of your vehicle.
Any adverse conditions should be
brought to the attention of your deal-
er as soon as possible.
These Owner Maintenance vehicle
checks are generally not covered by
warranties and you may be charged
for labor, parts and lubricants used.
O OW
W N
NE
ER
R
M
M A
AI
IN
N T
TE
EN
N A
AN
N C
CE
E
Performing maintenance work
on a vehicle can be dangerous.
If you lack sufficient knowledge
and experience or the proper
tools and equipment to do the
work, have it done by an author-
ized Dealer of Genesis Brand
Products.
ALWAYS follow these precau-
tions for performing mainte-
nance work:
• Park your vehicle on level
ground, move the shift lever
into the P (Park) position,
apply the parking brake, place
the Engine Start/Stop button
in the OFF position.
Block the tires (front and back) to prevent the vehicle
from moving.
Remove loose clothing or jew-
elry that can become entan-
gled in moving parts.
If you must run the engine during maintenance, do so
out doors or in an area with
plenty of ventilation.
Keep flames, sparks, or smok- ing materials away from the
battery and fuel-related parts.
WARNING
Touching metal parts
Do not touch metal parts
(including strut bars) while the
engine is operating or hot.
Doing so could result in serious
personal injury. Turn the engine
off and wait until the metal parts
cool down to perform mainte-
nance work on the vehicle.
WARNING
Page 441 of 524
7-39
07
B
BA
A T
TT
TE
ER
R Y
Y
To prevent SERIOUS INJURY or
DEATH to you or bystanders,
always follow these precautions
when working near or handling
the battery:
Always read and follow
instructions carefully
when handling a battery.Wear eye protection
designed to protect the
eyes from acid splashes.
Keep all flames, sparks,
or smoking materials
away from the battery.
Hydrogen is always present in battery cells,
is highly combustible,
and may explode if ignit-
ed.
Keep batteries out of
reach of children.
Batteries contain sulfu-
ric acid which is highly
corrosive. Do not allow
acid to contact your
eyes, skin or clothing.
If acid gets into your eyes, flush
your eyes with clean water for at
least 15 minutes and get imme-
diate medical attention. If acid
gets on your skin, thoroughly
wash the area. If you feel pain or
a burning sensation, get med-
ical attention immediately. (Continued)
WARNING(Continued)
When lifting a plastic-casedbattery, excessive pressure
on the case may cause battery
acid to leak. Lift with a battery
carrier or with your hands on
opposite corners.
Do not attempt to jump start your vehicle if your battery is
frozen.
NEVER attempt to recharge the battery when the vehicle’s
battery cables are connected
to the battery.
The electrical ignition system works with high voltage.
NEVER touch these compo-
nents with the engine running
or when the Engine Start/Stop
button is in the ON position.
Page 443 of 524
7-41
07
Battery Recharging
By battery charger
Your vehicle has a maintenance-free,
calcium-based battery.
If the battery becomes dischargedin a short time (because, for exam-
ple, the headlights or interior lights
were left on while the vehicle was
not in use), recharge it by slow
charging (trickle) for 10 hours.
If the battery gradually discharges because of high electric load while
the vehicle is being used, recharge
it at 20-30A for two hours.
AGM battery
Absorbent Glass Matt (AGM) batteries are maintenance-free
and we recommend that the
AGM battery be serviced by an
authorized Dealer of Genesis
Brand Products. For charging
your AGM battery, use only fully
automatic battery chargers that
are specially developed for AGM
batteries.
When replacing the AGM bat- tery, we recommend that you
use parts for replacement from
an authorized Dealer of Genesis
Brand Products.
Do not open or remove the cap on top of the battery. This may
cause leaks of internal elec-
trolyte that could result in
severe injury.
NOTICE
Always follow these instruc-
tions when recharging your
vehicle's battery to avoid the
risk of SERIOUS INJURY or
DEATH from explosions or acid
burns:
Before performing mainte-nance or recharging the bat-
tery, turn off all accessories
and press the Engine Start/
Stop button to the OFF posi-
tion.
Keep all flames, sparks, or smoking materials away from
the battery.
Always work outdoors or in an area with plenty of ventilation.
Wear eye protection when checking the battery during
charging.
The battery must be removed from the vehicle and placed in
a well ventilated area.
Watch the battery during charging, and stop or reduce
the charging rate if the battery
cells begin boiling violently.
(Continued)
WARNING
Page 469 of 524
7-67
07
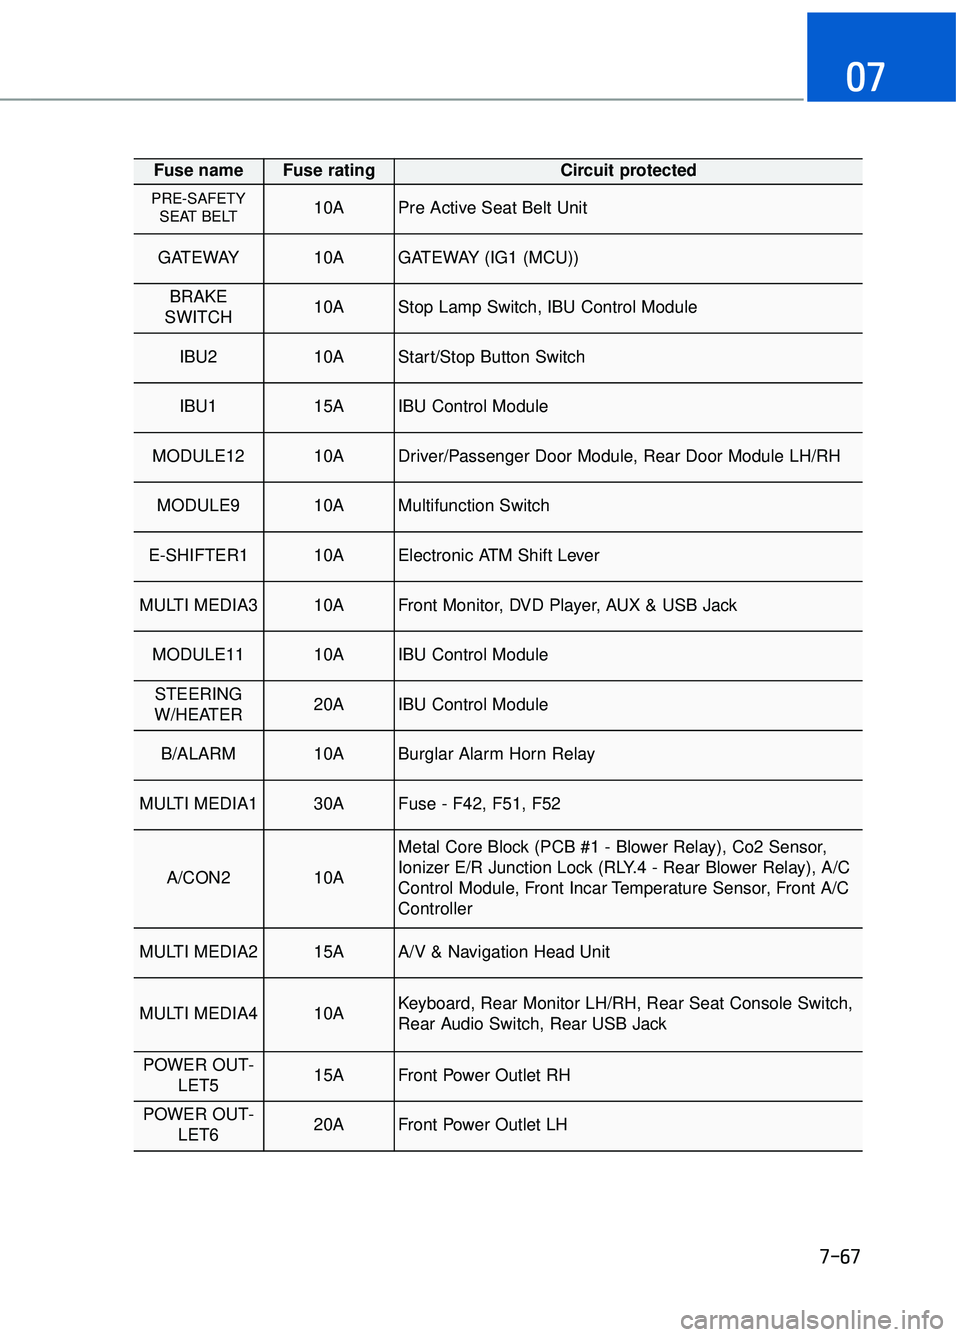
Fuse name Fuse rating Circuit protected
PRE-SAFETYSEAT BELT 10APre Active Seat Belt Unit
GATEWAY 10AGATEWAY (IG1 (MCU))
BRAKE
SWITCH 10AStop Lamp Switch, IBU Control Module
IBU2 10AStart/Stop Button Switch
IBU1 15AIBU Control Module
MODULE12 10ADriver/Passenger Door Module, Rear Door Module LH/RH
MODULE9 10AMultifunction Switch
E-SHIFTER1 10AElectronic ATM Shift Lever
MULTI MEDIA3 10AFront Monitor, DVD Player, AUX & USB Jack
MODULE11 10AIBU Control Module
STEERING
W/HEATER 20AIBU Control Module
B/ALARM 10ABurglar Alarm Horn Relay
MULTI MEDIA1 30AFuse - F42, F51, F52
A/CON2 10A
Metal Core Block (PCB #1 - Blower Relay), Co2 Sensor,
Ionizer E/R Junction Lock (RLY.4 - Rear Blower Relay), A/C
Control Module, Front Incar Temperature Sensor, Front A/C
Controller
MULTI MEDIA2 15AA/V & Navigation Head Unit
MULTI MEDIA4 10AKeyboard, Rear Monitor LH/RH, Rear Seat Console Switch,
Rear Audio Switch, Rear USB Jack
POWER OUT- LET5 15AFront Power Outlet RH
POWER OUT-LET6 20AFront Power Outlet LH
Page 479 of 524

7-77
07
Consult an authorized HYUNDAI
dealer to replace most vehicle light
bulbs. It is difficult to replace vehicle
light bulbs because other parts of the
vehicle must be removed before you
can get to the bulb. This is especially
true for removing the headlamp
assembly to get to the bulb(s).
Removing/installing the headlamp
assembly can result in damage to
the vehicle.
Information
After heavy driving, rain or washing,
headlamp and trunk lenses could
appear frosty. This condition is caused
by the temperature difference between
the lamp inside and the outside tem-
perature. This is similar to the con-
densation on your windows inside
your vehicle during the rain and does-
n't indicate a problem with your vehi-
cle. If the water leaks into the lamp
bulb circuitry, have your vehicle
checked by an authorized Dealer of
Genesis Brand Products.
Headlamp, Parking Lamp, Turn
Signal Lamp, Daytime Running
Light and Side Marker
Replacement
Type A – HID headlamp
(1) Headlamp (Low/High)
(2) Parking lamp
(3) Turn signal lamp/ Daytime running light
(4) Side marker
Headlamp (Low, High)
If the light bulb does not operate,
have the vehicle checked by an
authorized Dealer of Genesis Brand
Products.
i
L L I
IG
G H
H T
T
B
B U
U L
LB
B S
S
Prior to replacing a lamp,
depress the foot brake, move
the shift lever into P (Park)
apply the parking brake, place
the Engine Start/Stop button
to the OFF position, and take
the key with you when leaving
the vehicle to avoid sudden
movement of the vehicle and
to prevent possible electric
shock.
Be aware the bulbs may be hot and may burn your fin-
gers.
WARNING
OHI076038N
Do not attempt to replace or
inspect the low/high beam
(XENON bulb) due to electric
shock danger. If the low/high
beam (XENON bulb) is not work-
ing, have your vehicle checked
by an authorized Dealer of
Genesis Brand Products.
WARNING
Page 508 of 524

Bottle holder ........................................................................\
...............................3-147
Brake fluid ........................................................................\
....................................7-33
Brake system ........................................................................\
................................5-25Anti-lock brake system (ABS) ....................................................................5-35\
Auto hold........................................................................\
.............................5-31
Disc brakes wear indicator ........................................................................\
..5-26
Electronic parking brake (EPB) ..................................................................5-26
Electronic stability control (ESC) ...............................................................5-37
Good braking practices ........................................................................\
.......5-42
Hill-start assist control (HAC) ....................................................................5-41\
Power brakes ........................................................................\
.......................5-25
Vehicle stability management (VSM) .........................................................5-40
Bulb replacement Daytime running light ........................................................................\
.........7-77
Front turn signal lamp ........................................................................\
.........7-77
Headlamp ........................................................................\
............................7-77
High mounted stop lamp ........................................................................\
.....7-79
Interior light bulb ........................................................................\
................7-80
License plate light bulb ........................................................................\
.......7-79
Rear combination light bulb........................................................................\
7-79
Side marker ........................................................................\
.........................7-77
Side repeater lamp ........................................................................\
..............7-79
Bulb wattage........................................................................\
...................................8-3
Button start/stop, see engine start/stop button .......................................................5-7
California perchlorate notice ........................................................................\
........7-91
Camera (Rear view) ........................................................................\
...................3-115
Capacities (Lubricants) ........................................................................\
..................3-6
Care Exterior care ........................................................................\
........................7-81 Interior care ........................................................................\
.........................7-86
Tire care........................................................................\
...............................7-43
Cartridge type fuse ........................................................................\
.......................7-63
Cellular phone holder ........................................................................\
.................3-145
Center console storage ........................................................................\
...............3-143
Central door lock switch ........................................................................\
..............3-11
Certification label ........................................................................\
...........................8-8
Chains Tire chains ........................................................................\
.........................5-106
I-4
Index
C
Page 511 of 524
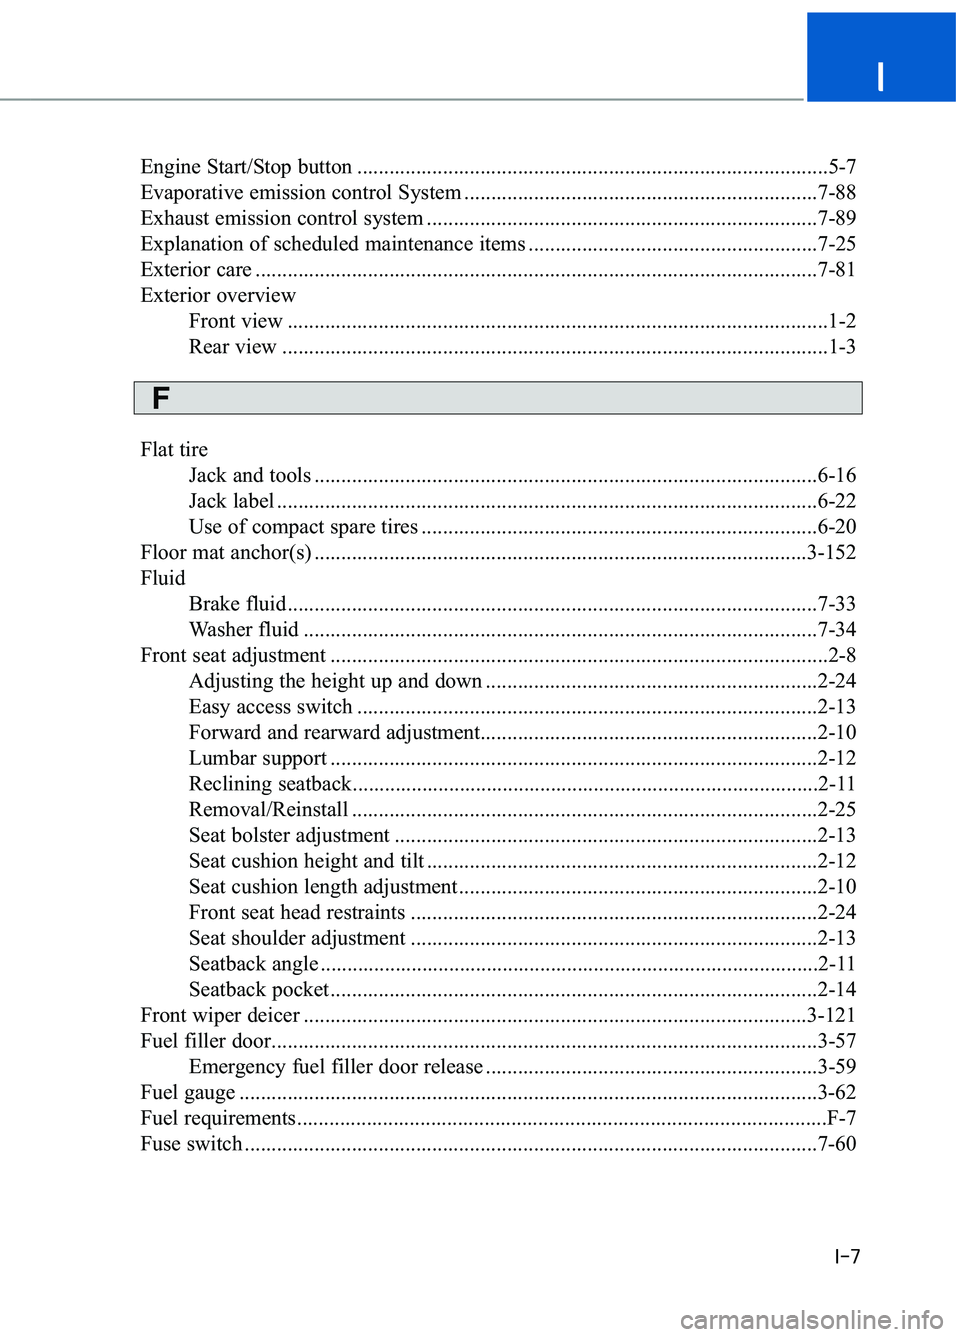
Engine Start/Stop button ........................................................................\
................5-7
Evaporative emission control System ..................................................................7-88
Exhaust emission control system ........................................................................\
.7-89
Explanation of scheduled maintenance items ......................................................7-25
Exterior care ........................................................................\
.................................7-81
Exterior overviewFront view ........................................................................\
.............................1-2
Rear view ........................................................................\
..............................1-3
Flat tire Jack and tools ........................................................................\
......................6-16
Jack label ........................................................................\
.............................6-22
Use of compact spare tires ........................................................................\
..6-20
Floor mat anchor(s) ........................................................................\
....................3-152
Fluid Brake fluid........................................................................\
...........................7-33
Washer fluid ........................................................................\
........................7-34
Front seat adjustment ........................................................................\
.....................2-8 Adjusting the height up and down ..............................................................2-24
Easy access switch ........................................................................\
..............2-13
Forward and rearward adjustment.........................................\
......................2-10
Lumbar support ........................................................................\
...................2-12
Reclining seatback........................................................................\
...............2-11
Removal/Reinstall ........................................................................\
...............2-25
Seat bolster adjustment ........................................................................\
.......2-13
Seat cushion height and tilt ........................................................................\
.2-12
Seat cushion length adjustment ...................................................................2-10
Front seat head restraints ........................................................................\
....2-24
Seat shoulder adjustment ........................................................................\
....2-13
Seatback angle ........................................................................\
.....................2-11
Seatback pocket........................................................................\
...................2-14
Front wiper deicer ........................................................................\
......................3-121
Fuel filler door........................................................................\
..............................3-57 Emergency fuel filler door release ..............................................................3-59
Fuel gauge ........................................................................\
....................................3-62
Fuel requirements........................................................................\
...........................F-7
Fuse switch ........................................................................\
...................................7-60
I-7
I
F