length GENESIS G90 2017 Owner's Manual
[x] Cancel search | Manufacturer: GENESIS, Model Year: 2017, Model line: G90, Model: GENESIS G90 2017Pages: 524, PDF Size: 19.3 MB
Page 25 of 524

2-5
02
Front seat
(1) Seat sliding forward or rearward/Seat cushion tilt adjustment
/Seat cushion height adjustment
(2) Seat cushion length adjustment
(3) Seatback angle adjustment
(4) Lumbar support adjustment
(5) Seat bolster adjustment*
(6) Seat position memory system (7) Head restraint adjustment
(8) Shoulder adjustment*
(9) Seat warmer
/Seat cooler (by air)
(10) Seat sliding forward or rearward
/Seatback angle adjustment
(for front passenger seat)
* : if equipped
S S E
E A
A T
TS
S
OHI036001N
Page 30 of 524

2-10
Safety system of your vehicle
Forward and rearward adjust-ment
To move the seat forward or rear-
ward:
1. Push the control switch forward or
rearward.
2. Release the switch once the seat reaches the desired position.
When the seat is adjusted forward or
rearward, the headrest height and
the seatback angle is automatically
adjusted according to the position of
the seat.
Information
The forward/rearward seat adjust-
ment may be restricted, when the seat-
back is leaned back. Adjust your seat,
as follows, before adjusting the seat
position rearward.
- Push and hold the control switch rearward as far as possible, release
the control switch, and re-push the
control switch rearward again.
Then, the seat position is adjusted
rearward, while putting the seat-
back upright.
Seat cushion length adjustment(for driver's seat)
To move the front part of the cushion
forward:
1. Push the front part of the control
switch to move the seat cushion
to the desired length.
2. Release the switch once the seat cushion reaches the desired
length.
To move the front part of the cushion
rearward:
1. Push the rear part of the control switch to move the seat cushion to
the desired length.
2. Release the switch once the seat cushion reaches the desired
length.
Be careful not to damage your
body or clothes when using the
cushion adjustment.
NOTICE
i
OHI036002OHI036003
Page 55 of 524

2-35
02
Front Seat Belt – Driver's 3-point system with emergencylocking retractor
To fasten your seat belt:
Pull the seat belt out of the retractor
and insert the metal tab (1) into the
buckle (2). There will be an audible
"click" when the tab locks into the
buckle.
The seat belt automatically adjusts to
the proper length after the lap belt por-
tion is adjusted manually so that it fits
snugly around your hips. If you lean
forward in a slow, easy motion, the belt
will extend and move with you.
If there is a sudden stop or impact,
the belt will lock into position. It will
also lock if you try to lean forward too
quickly.
Information
If you are not able to smoothly pull
enough of the seat belt out from the
retractor, firmly pull the seat belt out
and release it. After release, you will
be able to pull the belt out smoothly.
Height adjustment
You can adjust the height of the
shoulder belt anchor to one of the
three different positions for maximum
comfort and safety.
The shoulder portion should be
adjusted so it lies across your chest
and midway over your shoulder near-
est the door, not over your neck.
To adjust the height of the seat belt
anchor, lower or raise the height
adjuster into an appropriate position.
To raise the height adjuster, pull it up
(1). To lower it, push it down (3) while
pressing the height adjuster button (2).
Release the button to lock the anchor
into position. Try sliding the height
adjuster to make sure that it has
locked into position.
i
OHI036036
■ Front seat
OHI036102
Page 56 of 524

2-36
Safety system of your vehicle
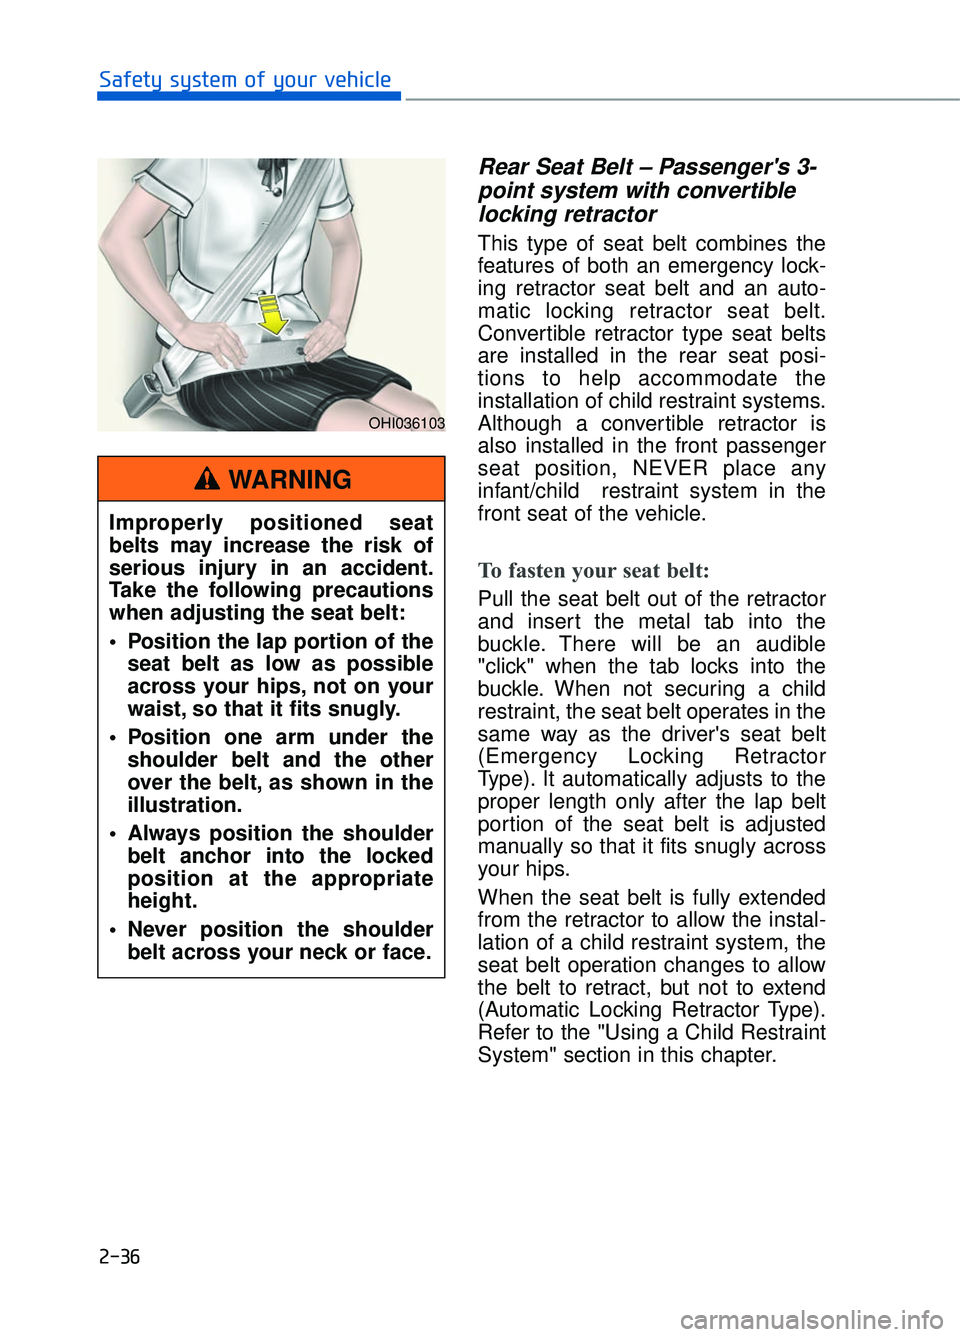
Rear Seat Belt – Passenger's 3-point system with convertiblelocking retractor
This type of seat belt combines the
features of both an emergency lock-
ing retractor seat belt and an auto-
matic locking retractor seat belt.
Convertible retractor type seat belts
are installed in the rear seat posi-
tions to help accommodate the
installation of child restraint systems.
Although a convertible retractor is
also installed in the front passenger
seat position, NEVER place any
infant/child restraint system in the
front seat of the vehicle.
To fasten your seat belt:
Pull the seat belt out of the retractor
and insert the metal tab into the
buckle. There will be an audible
"click" when the tab locks into the
buckle. When not securing a child
restraint, the seat belt operates in the
same way as the driver's seat belt
(Emergency Locking Retractor
Type). It automatically adjusts to the
proper length only after the lap belt
portion of the seat belt is adjusted
manually so that it fits snugly across
your hips.
When the seat belt is fully extended
from the retractor to allow the instal-
lation of a child restraint system, the
seat belt operation changes to allow
the belt to retract, but not to extend
(Automatic Locking Retractor Type).
Refer to the "Using a Child Restraint
System" section in this chapter.
Improperly positioned seat
belts may increase the risk of
serious injury in an accident.
Take the following precautions
when adjusting the seat belt:
Position the lap portion of the
seat belt as low as possible
across your hips, not on your
waist, so that it fits snugly.
Position one arm under the shoulder belt and the other
over the belt, as shown in the
illustration.
Always position the shoulder belt anchor into the locked
position at the appropriate
height.
Never position the shoulder belt across your neck or face.
WARNING
OHI036103
Page 308 of 524

5-47
05
SPORT mode
SPORT mode manages
the driving dynamics by
automatically adjusting
the steering effort, and
the engine and transmission control
logic for enhanced driver perform-
ance.
When SPORT mode is selected by pressing the DRIVE MODE button,
the SPORT indicator (yellow color)
will illuminate.
Whenever the engine is restarted, the Drive Mode will revert back to
SMART mode. If SPORT mode is
desired, re-select SPORT mode
from the DRIVE MODE button.
When SPORT mode is activated: - The engine rpm will tend toremain raised over a certain
length of time even after releas-
ing the accelerator
- Upshifts are delayed when accel- erating
Information
In SPORT mode, the fuel efficiency
may decrease.
Virtual engine sounds are gener-
ated from the exterior amplifiers.
Pay extreme caution while replac-
ing amplifier components. The
use of any after-market compo-
nents or speakers may damage
the exterior amplifiers causing the
virtual engine sounds not to prop-
erly operate.
ECO mode
When the Drive Mode is
set to ECO mode, the
engine and transmission
control logic are changed
to maximize fuel efficiency.
When ECO mode is selected by pressing the DRIVE MODE button,
the ECO indicator (green color) will
illuminate.
If the vehicle is set to ECO mode, when the engine is turned OFF
and restarted the Drive Mode set-
ting will remain in ECO mode.
Information
Fuel efficiency depends on the driver's
driving habit and road condition.
i
NOTICE
i
Page 495 of 524

D
DI
IM
M E
EN
N S
SI
IO
O N
NS
S
8-2
Specifications & Consumer information
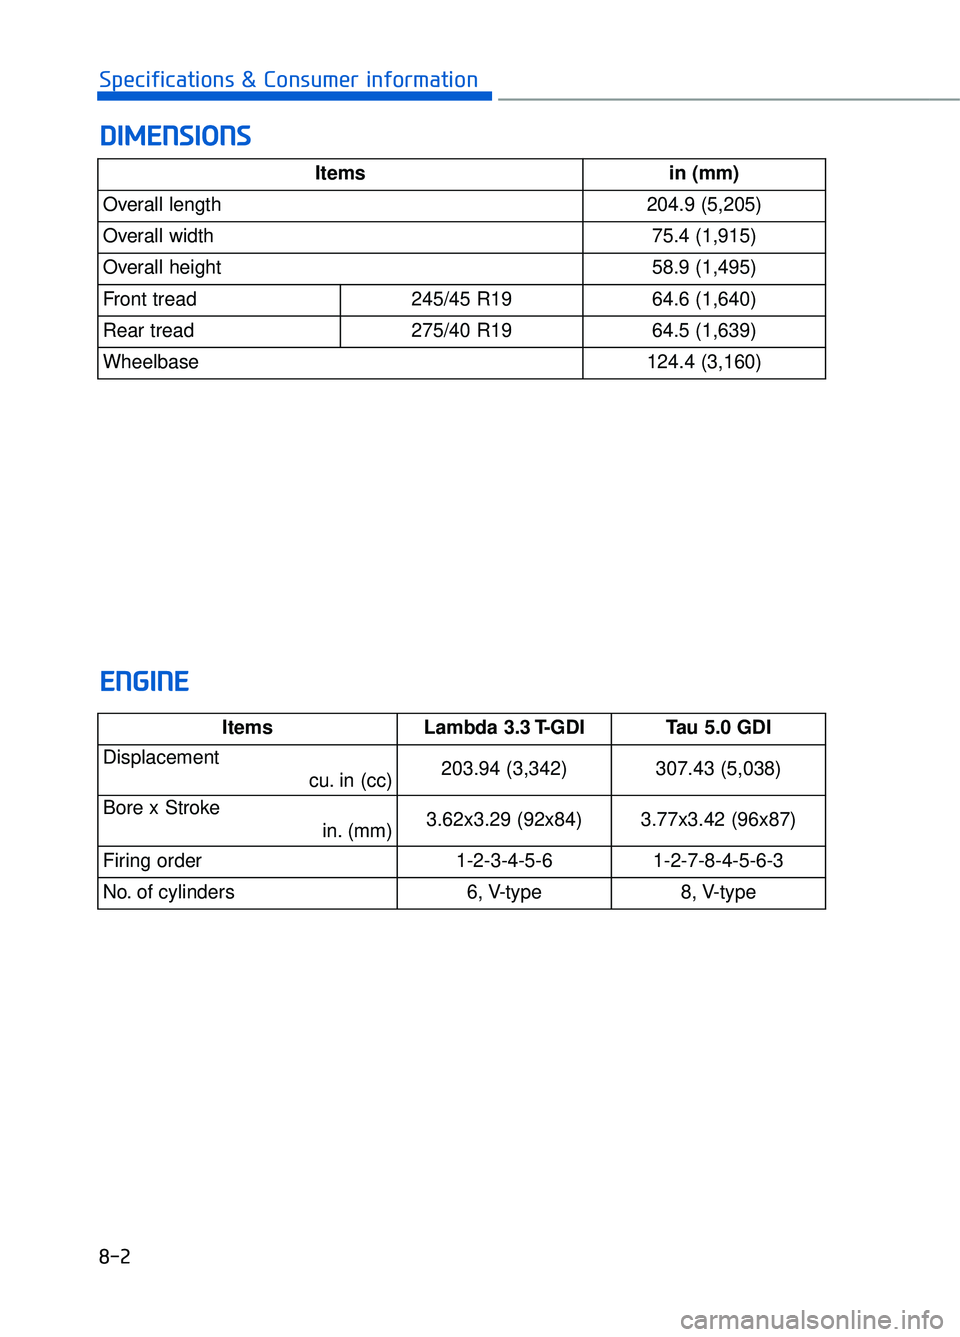
Itemsin (mm)
Overall length204.9 (5,205)
Overall width75.4 (1,915)
Overall height58.9 (1,495)
Front tread245/45 R1964.6 (1,640)
Rear tread 275/40 R1964.5 (1,639)
Wheelbase124.4 (3,160)
Items Lambda 3.3 T-GDITau 5.0 GDI
Displacement
cu. in (cc)203.94 (3,342)307.43 (5,038)
Bore x Stroke in. (mm)3.62x3.29 (92x84)3.77x3.42 (96x87)
Firing order1-2-3-4-5-61-2-7-8-4-5-6-3
No. of cylinders6, V-type8, V-type
E
EN
N G
GI
IN
N E
E
Page 511 of 524

Engine Start/Stop button ........................................................................\
................5-7
Evaporative emission control System ..................................................................7-88
Exhaust emission control system ........................................................................\
.7-89
Explanation of scheduled maintenance items ......................................................7-25
Exterior care ........................................................................\
.................................7-81
Exterior overviewFront view ........................................................................\
.............................1-2
Rear view ........................................................................\
..............................1-3
Flat tire Jack and tools ........................................................................\
......................6-16
Jack label ........................................................................\
.............................6-22
Use of compact spare tires ........................................................................\
..6-20
Floor mat anchor(s) ........................................................................\
....................3-152
Fluid Brake fluid........................................................................\
...........................7-33
Washer fluid ........................................................................\
........................7-34
Front seat adjustment ........................................................................\
.....................2-8 Adjusting the height up and down ..............................................................2-24
Easy access switch ........................................................................\
..............2-13
Forward and rearward adjustment.........................................\
......................2-10
Lumbar support ........................................................................\
...................2-12
Reclining seatback........................................................................\
...............2-11
Removal/Reinstall ........................................................................\
...............2-25
Seat bolster adjustment ........................................................................\
.......2-13
Seat cushion height and tilt ........................................................................\
.2-12
Seat cushion length adjustment ...................................................................2-10
Front seat head restraints ........................................................................\
....2-24
Seat shoulder adjustment ........................................................................\
....2-13
Seatback angle ........................................................................\
.....................2-11
Seatback pocket........................................................................\
...................2-14
Front wiper deicer ........................................................................\
......................3-121
Fuel filler door........................................................................\
..............................3-57 Emergency fuel filler door release ..............................................................3-59
Fuel gauge ........................................................................\
....................................3-62
Fuel requirements........................................................................\
...........................F-7
Fuse switch ........................................................................\
...................................7-60
I-7
I
F