ECO mode GENESIS G90 2017 Quick Reference Guide
[x] Cancel search | Manufacturer: GENESIS, Model Year: 2017, Model line: G90, Model: GENESIS G90 2017Pages: 25, PDF Size: 8.92 MB
Page 3 of 25
126 3
9
AIRBAG
GENESIS12
6 3
9
AIRBAG
GENESIS
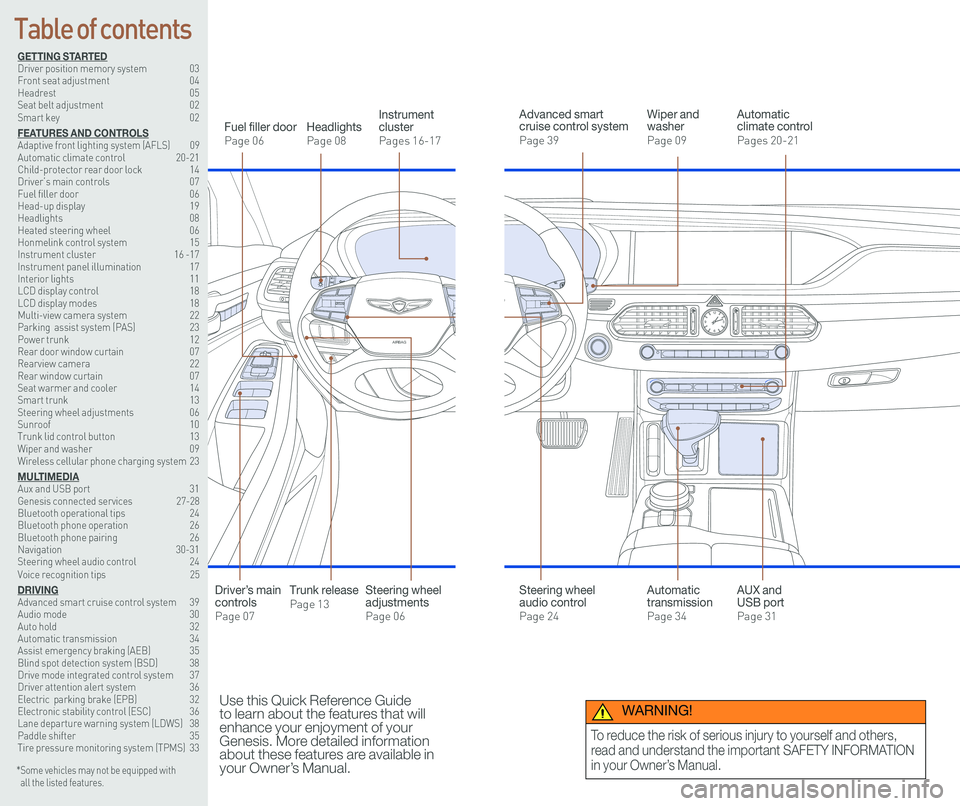
GETTING STARTEDDriver position memory system 03Front seat adjustment 04Headrest 05Seat belt adjustment 02Smart key 02
FEATURES AND CONTROLSAdaptive front lighting system (AFLS) 09 Automatic climate control 20-21Child-protector rear door lock 14Driver’s main controls 07Fuel filler door 06Head-up display 19Headlights 08Heated steering wheel 06Honmelink control system 15Instrument cluster 16 -17Instrument panel illumination 17Interior lights 11LCD display control 18LCD display modes 18Multi-view camera system 22 Parking assist system (PAS) 23Power trunk 12 Rear door window curtain 07Rearview camera 22Rear window curtain 07Seat warmer and cooler 14Smart trunk 13Steering wheel adjustments 06Sunroof 10Trunk lid control button 13Wiper and washer 09Wireless cellular phone charging system 23
MULTIMEDIAAux and USB port 31Genesis connected services 27-28Bluetooth operational tips 24Bluetooth phone operation 26Bluetooth phone pairing 26Navigation 30-31Steering wheel audio control 24Voice recognition tips 25
DRIVINGAdvanced smart cruise control system 39Audio mode 30Auto hold 32Automatic transmission 34Assist emergency braking (AEB) 35Blind spot detection system (BSD) 38Drive mode integrated control system 37Driver attention alert system 36Electric parking brake (EPB) 32Electronic stability control (ESC) 36Lane departure warning system (LDWS) 38Paddle shifter 35Tire pressure monitoring system (TPMS) 33
Headlights
Page 08
Fuel filler door
Page 06
Steering wheel adjustments
Page 06
Wiper and washer
Page 09
Advanced smart cruise control system
Page 39
Automatic climate control
Pages 20-21
Instrument cluster
Pages 16-17
* Some vehicles may not be equipped with all the listed features.
Use this Quick Reference Guide to learn about the features that will enhance your enjoyment of your Genesis. More detailed information about these features are available in your Owner’s Manual.
Steering wheel audio control
Page 24
Trunk release
Page 13
Automatic transmission
Page 34
AUX and USB port
Page 31
Driver’s main controls
Page 07
Table of contents
WARNING!
To reduce the risk of serious injury to yourself and others,
read and understand the important SAFETY INFORMATION
in your Owner’s Manual.
Page 9 of 25
Quick Reference Guide I 1312 I Quick Reference Guide
FEATURES AND CONTROLS
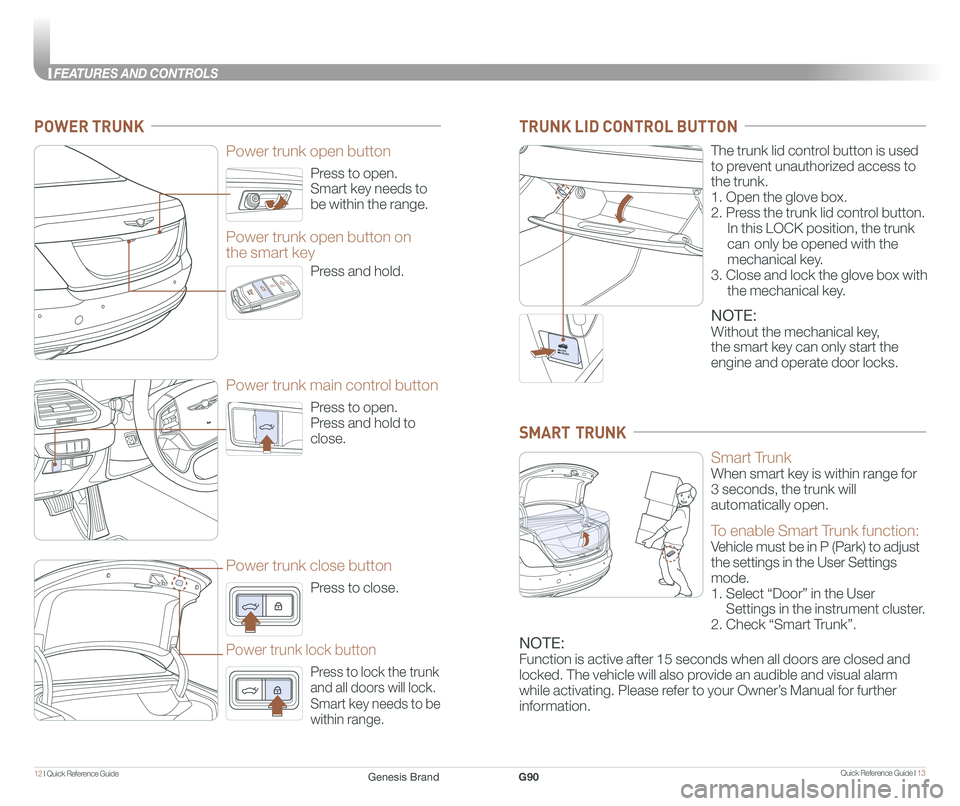
Press to open.
Smart key needs to
be within the range.
Power trunk open button
Press to open.
Press and hold to
close.
Power trunk main control button
Press to close.
Power trunk close button
Press to lock the trunk
and all doors will lock.
Smart key needs to be
within range.
Power trunk lock button
Press and hold.
Power trunk open button on
the smart key
POWER TRUNK
The trunk lid control button is used
to prevent unauthorized access to
the trunk.
1. Open the glove box.
2. Press the trunk lid control button.
In this LOCK position, the trunk
can only be opened with the
mechanical key.
3. Close and lock the glove box with
the mechanical key.
NOTE:
Without the mechanical key,
the smart key can only start the
engine and operate door locks.
TRUNK LID CONTROL BUTTON
Smart Trunk
When smart key is within range for
3 seconds, the trunk will
automatically open.
To enable Smart Trunk function:
Vehicle must be in P (Park) to adjust
the settings in the User Settings
mode.
1. Select “Door” in the User
Settings in the instrument cluster.
2. Check “Smart Trunk”.
NOTE:
Function is active after 15 seconds when all doors are closed and
locked. The vehicle will also provide an audible and visual alarm
while activating. Please refer to your Owner’s Manual for further
information.
SMART TRUNK
Genesis BrandG90
Page 11 of 25
Quick Reference Guide I 1716 I Quick Reference Guide
FEATURES AND CONTROLS
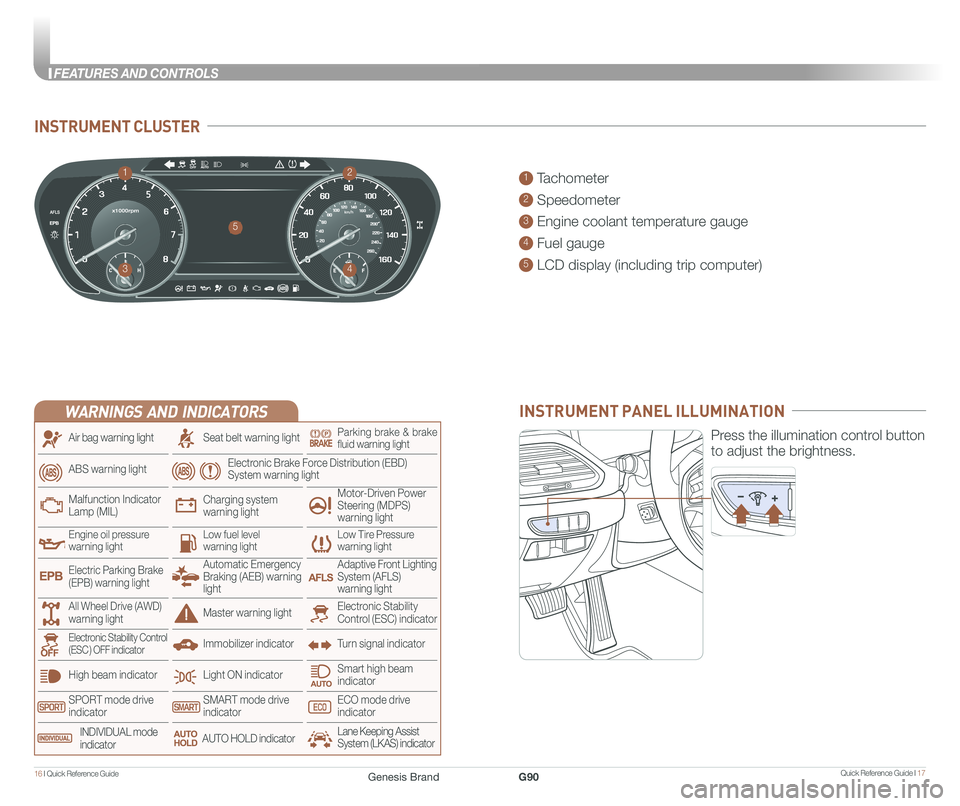
INSTRUMENT CLUSTER
1 Tachometer
2 Speedometer
3 Engine coolant temperature gauge
4 Fuel gauge
5 LCD display (including trip computer)
12
34
5
INSTRUMENT PANEL ILLUMINATION
Press the illumination control button
to adjust the brightness.
WARNINGS AND INDICATORS
Light ON indicator
Seat belt warning light
Charging system warning light
Electronic Brake Force Distribution (EBD) System warning light
High beam indicator
SPORT mode drive indicatorSMART mode drive indicatorECO mode drive indicator
Smart high beam indicator
Electronic Stability Control (ESC) indicatorMaster warning light
Adaptive Front Lighting System (AFLS) warning light
Motor-Driven Power Steering (MDPS) warning light
Immobilizer indicator
Air bag warning light
ABS warning light
Low Tire Pressurewarning lightEngine oil pressurewarning lightLow fuel level warning light
Malfunction IndicatorLamp (MIL)
Turn signal indicatorElectronic Stability Control (ESC ) OFF indicator
Electric Parking Brake (EPB) warning light
Automatic Emergency Braking (AEB) warning light
All Wheel Drive (AWD) warning light
INDIVIDUAL mode indicatorAUTO HOLD indicatorLane Keeping Assist System (LKAS) indicator
Parking brake & brake fluid warning light
Genesis BrandG90
Page 12 of 25
Quick Reference Guide I 1918 I Quick Reference Guide
FEATURES AND CONTROLS
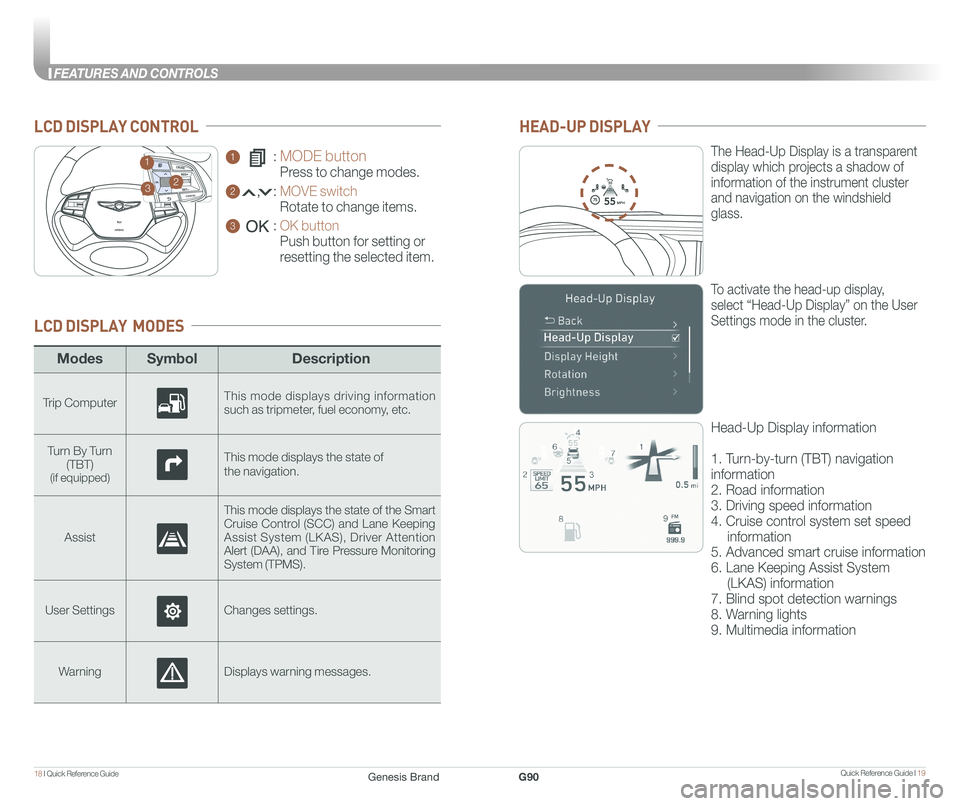
ModesSymbol Description
Trip ComputerThis mode displays driving information such as tripmeter, fuel economy, etc.
Turn By Turn
(TBT)(if equipped)
This mode displays the state of
the navigation.
Assist
This mode displays the state of the Smart Cruise Control (SCC) and Lane Keeping Assist System (LKAS), Driver Attention Alert (DAA), and Tire Pressure Monitoring System (TPMS).
User SettingsChanges settings.
WarningDisplays warning messages.
LCD DISPLAY MODES
GENESIS
1 : MODE button
Press to change modes.
2 : MOVE switch
Rotate to change items.
3 : OK button
Push button for setting or
resetting the selected item.
LCD DISPLAY CONTROL
GENESIS
HEAD-UP DISPLAY
5575
55
MPH
The Head-Up Display is a transparent
display which projects a shadow of
information of the instrument cluster
and navigation on the windshield
glass.
To activate the head-up display,
select “Head-Up Display” on the User
Settings mode in the cluster.
Head-Up Display information
1. Turn-by-turn (TBT) navigation
information
2. Road information
3. Driving speed information
4. Cruise control system set speed
information
5. Advanced smart cruise information
6. Lane Keeping Assist System
(LKAS) information
7. Blind spot detection warnings
8. Warning lights
9. Multimedia information
23
1
Genesis BrandG90
Page 14 of 25
Quick Reference Guide I 2322 I Quick Reference Guide
FEATURES AND CONTROLS
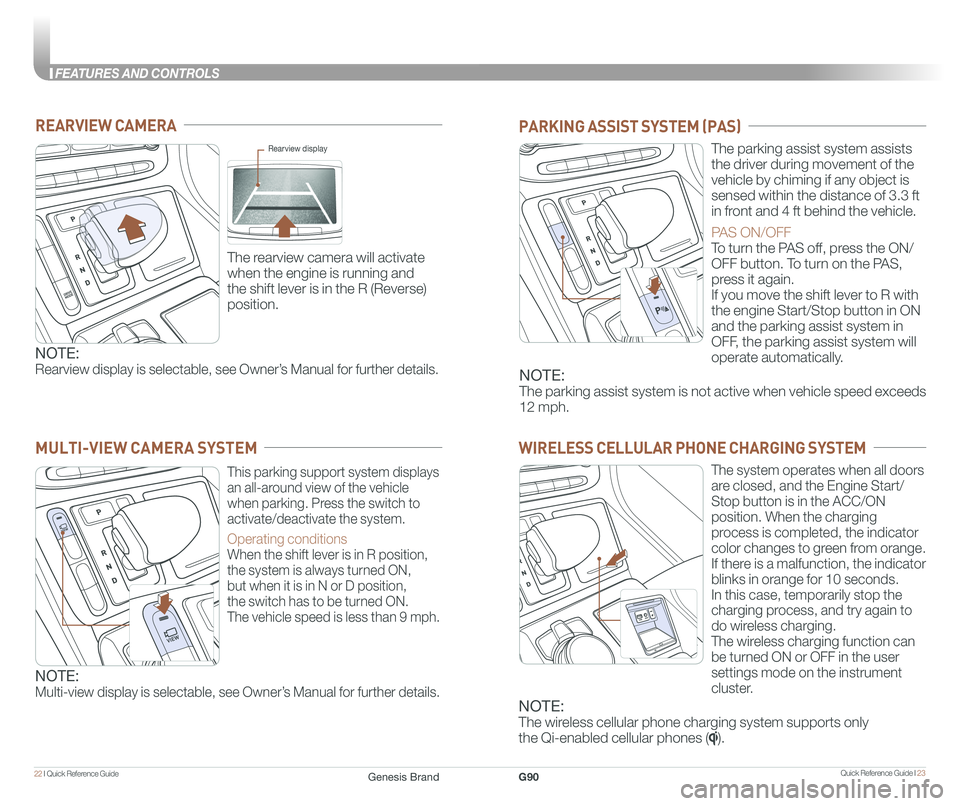
REARVIEW CAMERA
The rearview camera will activate
when the engine is running and
the shift lever is in the R (Reverse)
position.
Rearview display
PARKING ASSIST SYSTEM (PAS)
The parking assist system assists
the driver during movement of the
vehicle by chiming if any object is
sensed within the distance of 3.3 ft
in front and 4 ft behind the vehicle.
PAS ON/OFF
To turn the PAS off, press the ON/
OFF button. To turn on the PAS,
press it again.
If you move the shift lever to R with
the engine Start/Stop button in ON
and the parking assist system in
OFF, the parking assist system will
operate automatically.
WIRELESS CELLULAR PHONE CHARGING SYSTEM
The system operates when all doors
are closed, and the Engine Start/
Stop button is in the ACC/ON
position. When the charging
process is completed, the indicator
color changes to green from orange.
If there is a malfunction, the indicator
blinks in orange for 10 seconds.
In this case, temporarily stop the
charging process, and try again to
do wireless charging.
The wireless charging function can
be turned ON or OFF in the user
settings mode on the instrument
cluster.
NOTE:
Rearview display is selectable, see Owner’s Manual for further details.NOTE:
The parking assist system is not active when vehicle speed exceeds
12 mph.
This parking support system displays
an all-around view of the vehicle
when parking. Press the switch to
activate/deactivate the system.
Operating conditions
When the shift lever is in R position,
the system is always turned ON,
but when it is in N or D position,
the switch has to be turned ON.
The vehicle speed is less than 9 mph.
MULTI-VIEW CAMERA SYSTEM
NOTE:
Multi-view display is selectable, see Owner’s Manual for further details.
NOTE:
The wireless cellular phone charging system supports only
the Qi-enabled cellular phones ().
Genesis BrandG90
Page 15 of 25
Quick Reference Guide I 2524 I Quick Reference Guide
MULTIMEDIA
Making a call using voice recognition:
The menu tree identifies available voice recognition Bluetooth® functions.
Calling by Name:
1. Press button.
2. Say the following command:
• “Call
• “ Call
Connects the call to John’s Mobile, Home, or Office phone
number.
Dialing by Number:
1. Press the button.
2. Say “Dial Number”.
3. Say the desired phone numbers.
For complete list of commands, please refer to your Owner’s Manual.
GENESIS
GENESIS
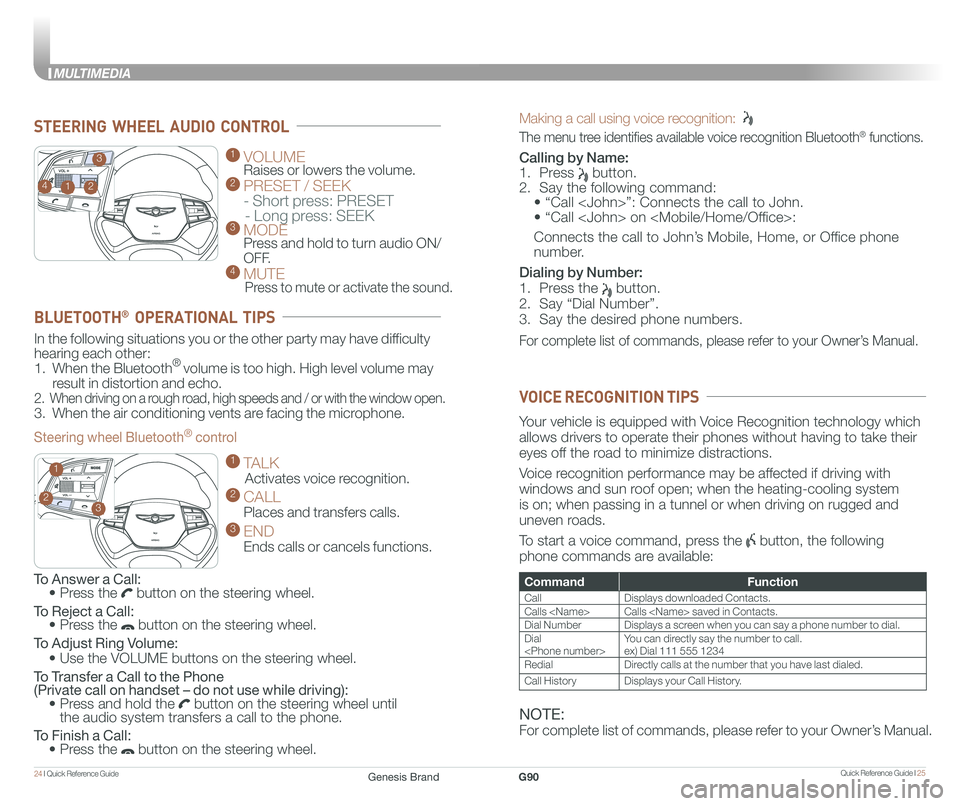
1 VOLUME
Raises or lowers the volume. 2 PRESET / SEEK
- Short press: PRESET
- Long press: SEEK3 MODE Press and hold to turn audio ON/
OFF.4 MUTE
Press to mute or activate the sound.
2
3
14
GENESIS
GENESIS23
1
STEERING WHEEL AUDIO CONTROL
CommandFunction
CallDisplays downloaded Contacts.
Calls
Dial NumberDisplays a screen when you can say a phone number to dial.
Dial
RedialDirectly calls at the number that you have last dialed.
Call HistoryDisplays your Call History.
Your vehicle is equipped with Voice Recognition technology which
allows drivers to operate their phones without having to take their
eyes off the road to minimize distractions.
Voice recognition performance may be affected if driving with
windows and sun roof open; when the heating-cooling system
is on; when passing in a tunnel or when driving on rugged and
uneven roads.
To start a voice command, press the button, the following
phone commands are available:
VOICE RECOGNITION TIPS
To Answer a Call: • Press the button on the steering wheel.
To Reject a Call: • Press the button on the steering wheel.
To Adjust Ring Volume:
• Use the VOLUME buttons on the steering wheel.
To Transfer a Call to the Phone (Private call on handset – do not use while driving): • Press and hold the button on the steering wheel until the audio system transfers a call to the phone.
To Finish a Call: • Press the button on the steering wheel.
In the following situations you or the other party may have difficulty
hearing each other:
1. When the Bluetooth® volume is too high. High level volume may
result in distortion and echo.
2. When driving on a rough road, high speeds and / or with the window open.
3. When the air conditioning vents are facing the microphone.
Steering wheel Bluetooth® control
1 TALK
Activates voice recognition.
2 CALL
Places and transfers calls.
3 END
Ends calls or cancels functions.
BLUETOOTH® OPERATIONAL TIPS
NOTE:
For complete list of commands, please refer to your Owner’s Manual.
Genesis BrandG90
Page 17 of 25
Quick Reference Guide I 2928 I Quick Reference Guide
MULTIMEDIA
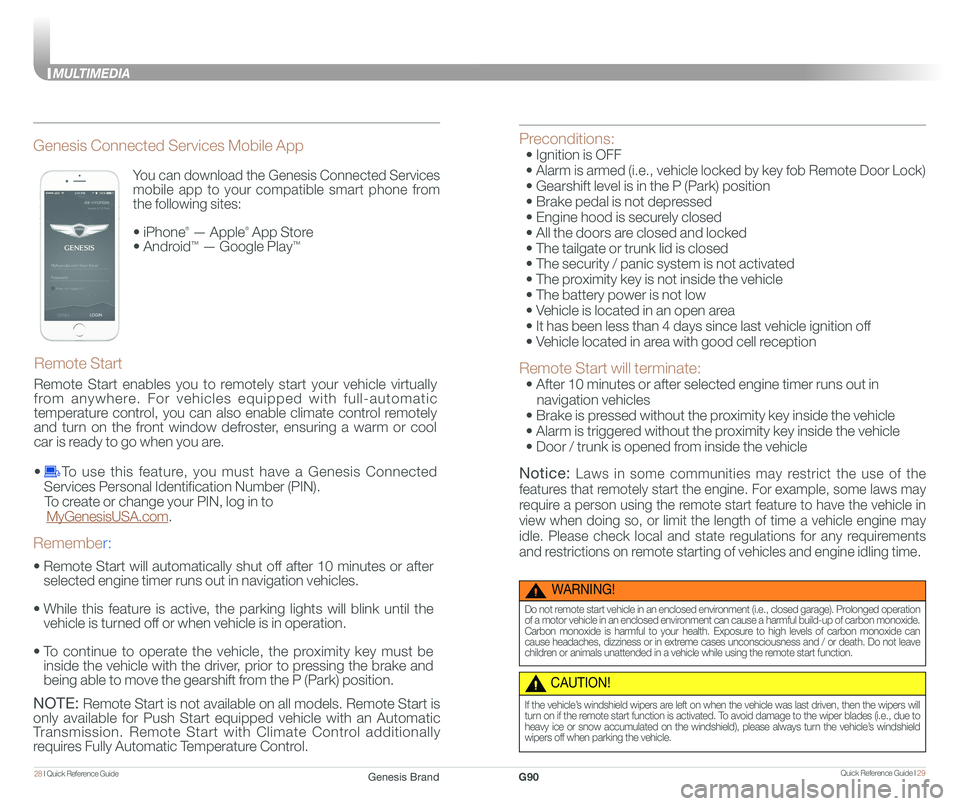
You can download the Genesis Connected Services
mobile app to your compatible smart phone from
the following sites:
• iPhone® — Apple® App Store
• Android™ — Google Play™
Remote Start
Genesis Connected Services Mobile App
•
Remote Start will automatically shut off after 10 minutes or after
selected engine timer runs out in navigation vehicles.
•
While this feature is active, the parking lights will blink until the
vehicle is turned off or when vehicle is in operation.
•
To continue to operate the vehicle, the proximity key must be
inside the vehicle with the driver, prior to pressing the brake and
being able to move the gearshift from the P (Park) position.
Remember:
NOTE: Remote Start is not available on all models. Remote Start is
only available for Push Start equipped vehicle with an Automatic
Transmission. Remote Start with Climate Control additionally
requires Fully Automatic Temperature Control.
Preconditions:
• Ignition is OFF
• Alarm is armed (i.e., vehicle locked by key fob Remote Door Lock)
• Gearshift level is in the P (Park) position
• Brake pedal is not depressed
• Engine hood is securely closed
• All the doors are closed and locked
• The tailgate or trunk lid is closed
• The security / panic system is not activated
• The proximity key is not inside the vehicle
• The battery power is not low
• Vehicle is located in an open area
• It has been less than 4 days since last vehicle ignition off
• Vehicle located in area with good cell reception
Remote Start will terminate:
• After 10 minutes or after selected engine timer runs out in
navigation vehicles
• Brake is pressed without the proximity key inside the vehicle
• Alarm is triggered without the proximity key inside the vehicle
• Door / trunk is opened from inside the vehicle
Notice: Laws in some communities may restrict the use of the
features that remotely start the engine. For example, some laws may
require a person using the remote start feature to have the vehicle in
view when doing so, or limit the length of time a vehicle engine may
idle. Please check local and state regulations for any requirements
and restrictions on remote starting of vehicles and engine idling time.
WARNING!
Do not remote start vehicle in an enclosed environment (i.e., closed garage). Prolonged operation of a motor vehicle in an enclosed environment can cause a harmful build-up of carbon monoxide. Carbon monoxide is harmful to your health. Exposure to high levels of carbon monoxide can cause headaches, dizziness or in extreme cases unconsciousness and / or death. Do not leave children or animals unattended in a vehicle while using the remote start function.
CAUTION!
If the vehicle’s windshield wipers are left on when the vehicle was last driven, then the wipers will turn on if the remote start function is activated. To avoid damage to the wiper blades (i.e., due to heavy ice or snow accumulated on the windshield), please always turn the vehicle’s windshield wipers off when parking the vehicle.
Remote Start enables you to remotely start your vehicle virtually
from anywhere. For vehicles equipped with full-automatic
temperature control, you can also enable climate control remotely
and turn on the front window defroster, ensuring a warm or cool
car is ready to go when you are.
• To use this feature, you must have a Genesis Connected
Services Personal Identification Number (PIN).
To create or change your PIN, log in to
MyGenesisUSA.com.
Genesis BrandG90
Page 18 of 25
Quick Reference Guide I 3130 I Quick Reference Guide
MULTIMEDIA
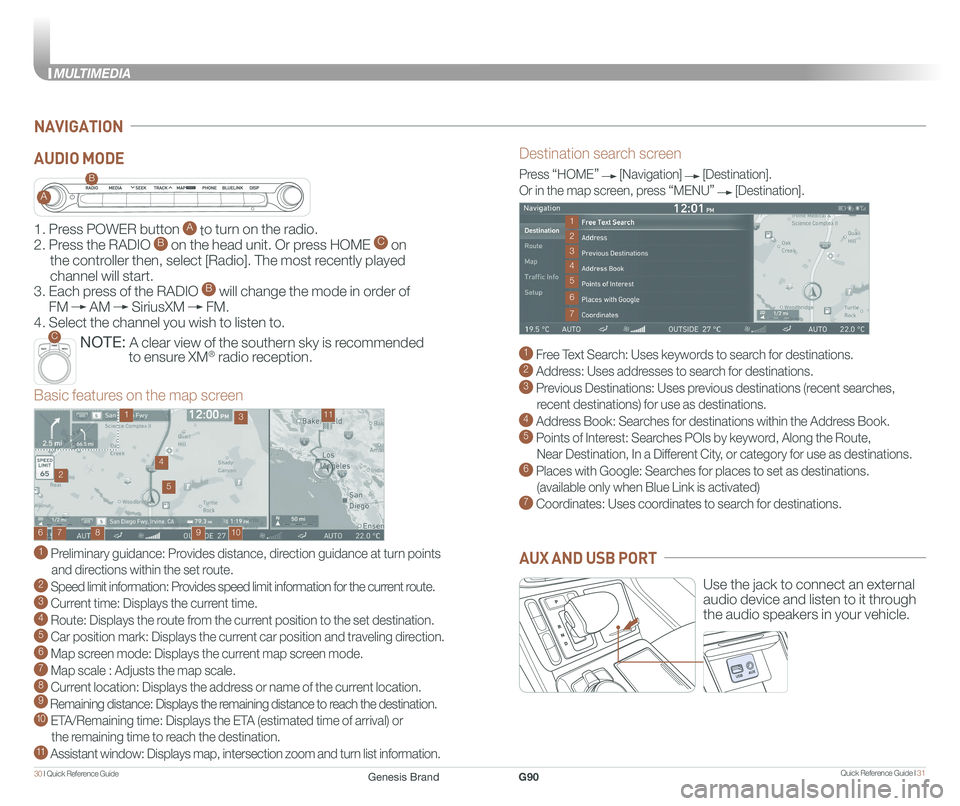
NAVIGATION
Destination search screen
1 Free Text Search: Uses keywords to search for destinations. 2 Address: Uses addresses to search for destinations. 3 Previous Destinations: Uses previous destinations (recent searches,
recent destinations) for use as destinations. 4 Address Book: Searches for destinations within the Address Book. 5 Points of Interest: Searches POIs by keyword, Along the Route,
Near Destination, In a Different City, or category for use as destinations.6 Places with Google: Searches for places to set as destinations.
(available only when Blue Link is activated) 7 Coordinates: Uses coordinates to search for destinations.
Press “HOME” [Navigation] [Destination].
Or in the map screen, press “MENU” [Destination].
Basic features on the map screen
1 Preliminary guidance: Provides distance, direction guidance at turn points
and directions within the set route. 2 Speed limit information: Provides speed limit information for the current route.3 Current time: Displays the current time. 4 Route: Displays the route from the current position to the set destination. 5 Car position mark: Displays the current car position and traveling direction. 6 Map screen mode: Displays the current map screen mode. 7 Map scale : Adjusts the map scale. 8 Current location: Displays the address or name of the current location. 9 Remaining distance: Displays the remaining distance to reach the destination.10 ETA/Remaining time: Displays the ETA (estimated time of arrival) or
the remaining time to reach the destination.11 Assistant window: Displays map, intersection zoom and turn list information.
10
1113
9876
24
5
1
3
7
6
2
4
5
Use the jack to connect an external
audio device and listen to it through
the audio speakers in your vehicle.
AUX AND USB PORT
1. Press POWER button A to turn on the radio.
2. Press the RADIO B on the head unit. Or press HOME C on
the controller then, select [Radio]. The most recently played
channel will start.
3. Each press of the RADIO B will change the mode in order of
FM AM SiriusXM FM.
4. Select the channel you wish to listen to.
NOTE: A clear view of the southern sky is recommended
to ensure XM® radio reception.
A
B
C
AUDIO MODE
Genesis BrandG90
Page 20 of 25
Quick Reference Guide I 3534 I Quick Reference Guide
DRIVING
AIRBAG
GENESIS
P Button
UNLOCK Button
PADDLE SHIFTER (Manual Mode)AUTOMATIC TRANSMISSION
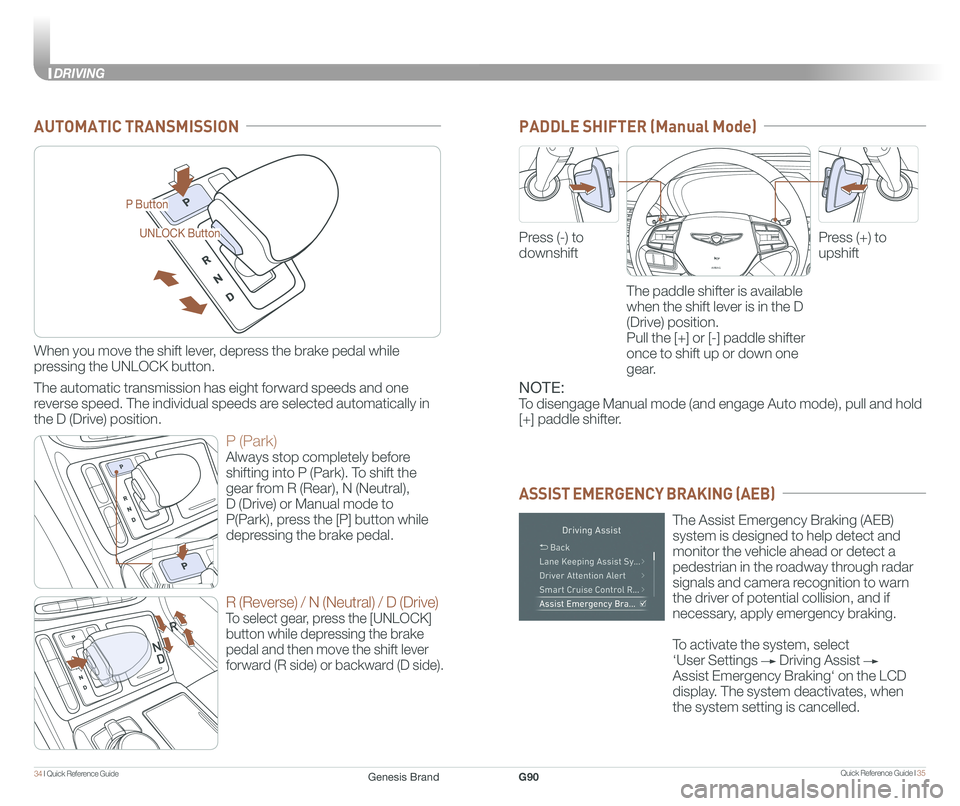
When you move the shift lever, depress the brake pedal while
pressing the UNLOCK button.
The automatic transmission has eight forward speeds and one
reverse speed. The individual speeds are selected automatically in
the D (Drive) position.
P (Park)
Always stop completely before
shifting into P (Park). To shift the
gear from R (Rear), N (Neutral),
D (Drive) or Manual mode to
P(Park), press the [P] button while
depressing the brake pedal.
R (Reverse) / N (Neutral) / D (Drive)
To select gear, press the [UNLOCK]
button while depressing the brake
pedal and then move the shift lever
forward (R side) or backward (D side).
The Assist Emergency Braking (AEB)
system is designed to help detect and
monitor the vehicle ahead or detect a
pedestrian in the roadway through radar
signals and camera recognition to warn
the driver of potential collision, and if
necessary, apply emergency braking.
To activate the system, select
‘User Settings Driving Assist
Assist Emergency Braking‘ on the LCD
display. The system deactivates, when
the system setting is cancelled.
The paddle shifter is available
when the shift lever is in the D
(Drive) position.
Pull the [+] or [-] paddle shifter
once to shift up or down one
gear.
Press (-) to
downshift
Press (+) to
upshift
ASSIST EMERGENCY BRAKING (AEB)
AIRBAG
GENESIS
AIRBAG
GENESIS
NOTE:
To disengage Manual mode (and engage Auto mode), pull and hold
[+] paddle shifter.
Genesis BrandG90
Page 21 of 25
Quick Reference Guide I 3736 I Quick Reference Guide
DRIVING
ELECTRONIC STABILITY CONTROL (ESC)
DRIVER ATTENTION ALERT SYSTEM
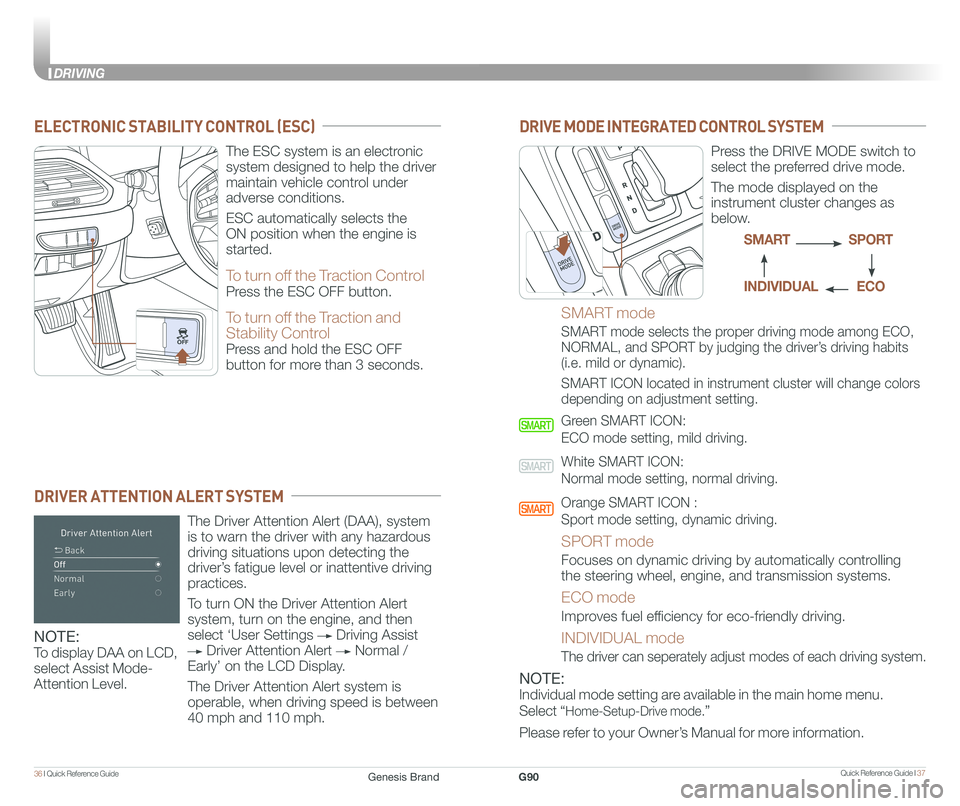
The ESC system is an electronic
system designed to help the driver
maintain vehicle control under
adverse conditions.
ESC automatically selects the
ON position when the engine is
started.
To turn off the Traction Control
Press the ESC OFF button.
To turn off the Traction and
Stability Control
Press and hold the ESC OFF
button for more than 3 seconds.
The Driver Attention Alert (DAA), system
is to warn the driver with any hazardous
driving situations upon detecting the
driver’s fatigue level or inattentive driving
practices.
To turn ON the Driver Attention Alert
system, turn on the engine, and then
select ‘User Settings Driving Assist
Driver Attention Alert Normal /
Early’ on the LCD Display.
The Driver Attention Alert system is
operable, when driving speed is between
40 mph and 110 mph.
DRIVE MODE INTEGRATED CONTROL SYSTEM
Press the DRIVE MODE switch to
select the preferred drive mode.
The mode displayed on the
instrument cluster changes as
below.
SMART mode
SMART mode selects the proper driving mode among ECO,
NORMAL, and SPORT by judging the driver’s driving habits
(i.e. mild or dynamic).
SMART ICON located in instrument cluster will change colors
depending on adjustment setting.
Green SMART ICON:
ECO mode setting, mild driving.
White SMART ICON:
Normal mode setting, normal driving.
Orange SMART ICON :
Sport mode setting, dynamic driving.
SPORT mode
Focuses on dynamic driving by automatically controlling
the steering wheel, engine, and transmission systems.
ECO mode
Improves fuel efficiency for eco-friendly driving.
INDIVIDUAL mode
The driver can seperately adjust modes of each driving system.
SPORTSMART
ECOINDIVIDUAL
NOTE:
To display DAA on LCD,
select Assist Mode-
Attention Level.NOTE:
Individual mode setting are available in the main home menu.
Select “Home-Setup-Drive mode.”
Please refer to your Owner’s Manual for more information.
Genesis BrandG90