key GENESIS G90 2019 Quick Reference Guide
[x] Cancel search | Manufacturer: GENESIS, Model Year: 2019, Model line: G90, Model: GENESIS G90 2019Pages: 13, PDF Size: 3.59 MB
Page 5 of 13
Quick Reference Guide I 0403 I Quick Reference Guide
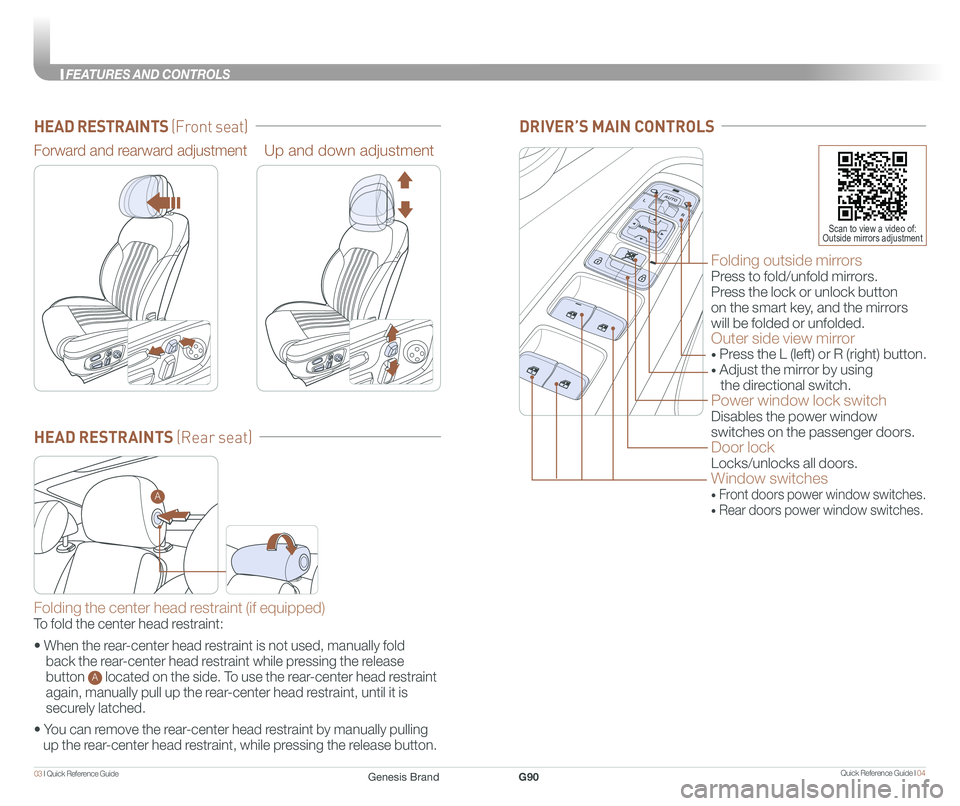
HEAD RESTRAINTS (Front seat)
HEAD RESTRAINTS (Rear seat)
Forward and rearward adjustmentUp and down adjustment
Folding the center head restraint (if equipped)
To fold the center head restraint:
• When the rear-center head restraint is not used, manually fold
back the rear-center head restraint while pressing the release
button A located on the side. To use the rear-center head restraint
again, manually pull up the rear-center head restraint, until it is
securely latched.
• You can remove the rear-center head restraint by manually pulling
up the rear-center head restraint, while pressing the release button.
Folding outside mirrors
Press to fold/unfold mirrors.
Press the lock or unlock button
on the smart key, and the mirrors
will be folded or unfolded.
Outer side view mirror
• Press the L (left) or R (right) button.
• Adjust the mirror by using
the directional switch.
Power window lock switch
Disables the power window
switches on the passenger doors.
Door lock
Locks/unlocks all doors.
Window switches
• Front doors power window switches.
• Rear doors power window switches.
DRIVER’S MAIN CONTROLS
Scan to view a video of: Outside mirrors adjustment
A
Genesis BrandG90
FEA
Page 6 of 13
Quick Reference Guide I 0605 I Quick Reference Guide
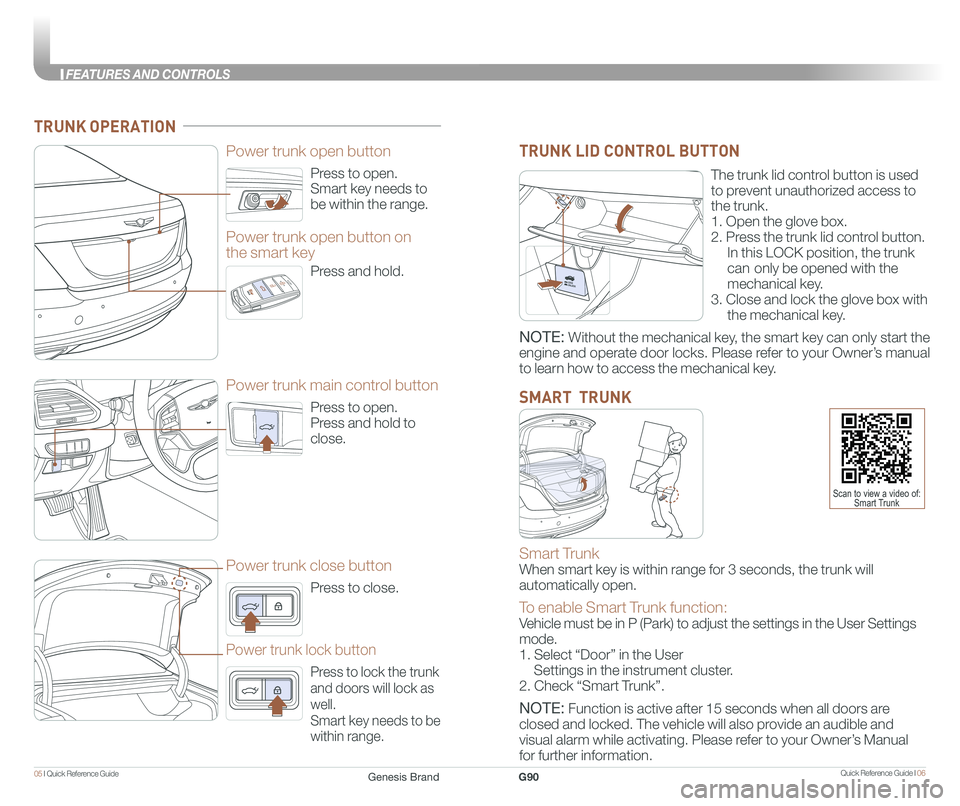
Press to open.
Smart key needs to
be within the range.
Power trunk open button
Press to open.
Press and hold to
close.
Power trunk main control button
Press to close.
Power trunk close button
Press to lock the trunk
and doors will lock as
well.
Smart key needs to be
within range.
Power trunk lock button
Press and hold.
Power trunk open button on
the smart key
TRUNK OPERATION
The trunk lid control button is used
to prevent unauthorized access to
the trunk.
1. Open the glove box.
2. Press the trunk lid control button.
In this LOCK position, the trunk
can only be opened with the
mechanical key.
3. Close and lock the glove box with
the mechanical key.
TRUNK LID CONTROL BUTTON
Smart Trunk
When smart key is within range for 3 seconds, the trunk will
automatically open.
To enable Smart Trunk function:
Vehicle must be in P (Park) to adjust the settings in the User Settings\
mode.
1. Select “Door” in the User
Settings in the instrument cluster.
2. Check “Smart Trunk”.
NOTE: Function is active after 15 seconds when all doors are
closed and locked. The vehicle will also provide an audible and
visual alarm while activating. Please refer to your Owner’s Manual
for further information.
SMART TRUNK
Scan to view a video of: Smart Trunk
NOTE: Without the mechanical key, the smart key can only start the
engine and operate door locks. Please refer to your Owner’s manual
to learn how to access the mechanical key.
Genesis BrandG90
FEA
Page 9 of 13
Quick Reference Guide I 1211 I Quick Reference Guide
BLUETOOTH® PHONE PAIRING
NOTE: Vehicle must be parked to complete the pairing process.
NOTE: You can add/delete additional phones in the main home
screen. Home-Setup-Bluetooth – Bluetooth Connection.
Please refer to your Owner’s Manual for further information.
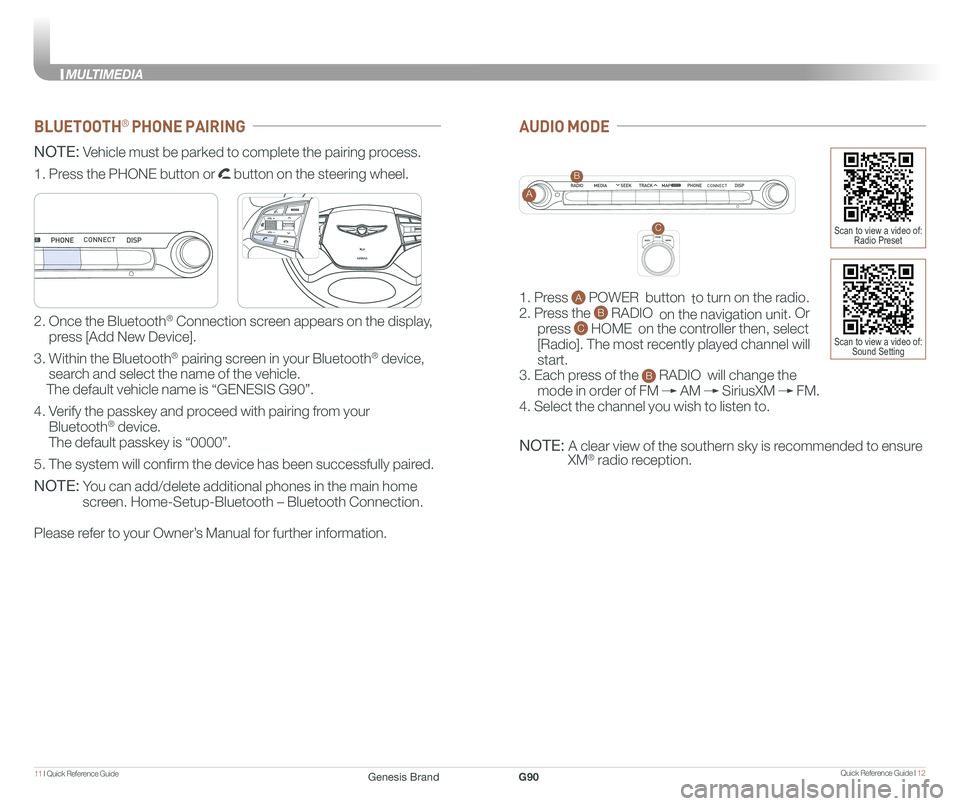
1. Press the PHONE button or button on the steering wheel.
2. Once the Bluetooth® Connection screen appears on the display,
press [Add New Device].
3. Within the Bluetooth® pairing screen in your Bluetooth® device,
search and select the name of the vehicle.
The default vehicle name is “GENESIS G90”.
4. Verify the passkey and proceed with pairing from your
Bluetooth® device.
The default passkey is “0000”.
5. The system will confirm the device has been successfully paired.
GENESIS
GENESIS
CONNECT
AUDIO MODE
1. Press A POWER button to turn on the radio.
2. Press the B RADIO on the navigation unit. Or
press C HOME on the controller then, select
[Radio]. The most recently played channel will
start.
3. Each press of the B RADIO will change the
mode in order of FM AM SiriusXM FM.
4. Select the channel you wish to listen to.
NOTE: A clear view of the southern sky is recommended to ensure
XM® radio reception.
CONNECTA
B
CScan to view a video of: Radio Preset
Scan to view a video of: Sound Setting
Genesis BrandG90
MULTIMEDIA
Page 10 of 13
Quick Reference Guide I 1413 I Quick Reference Guide
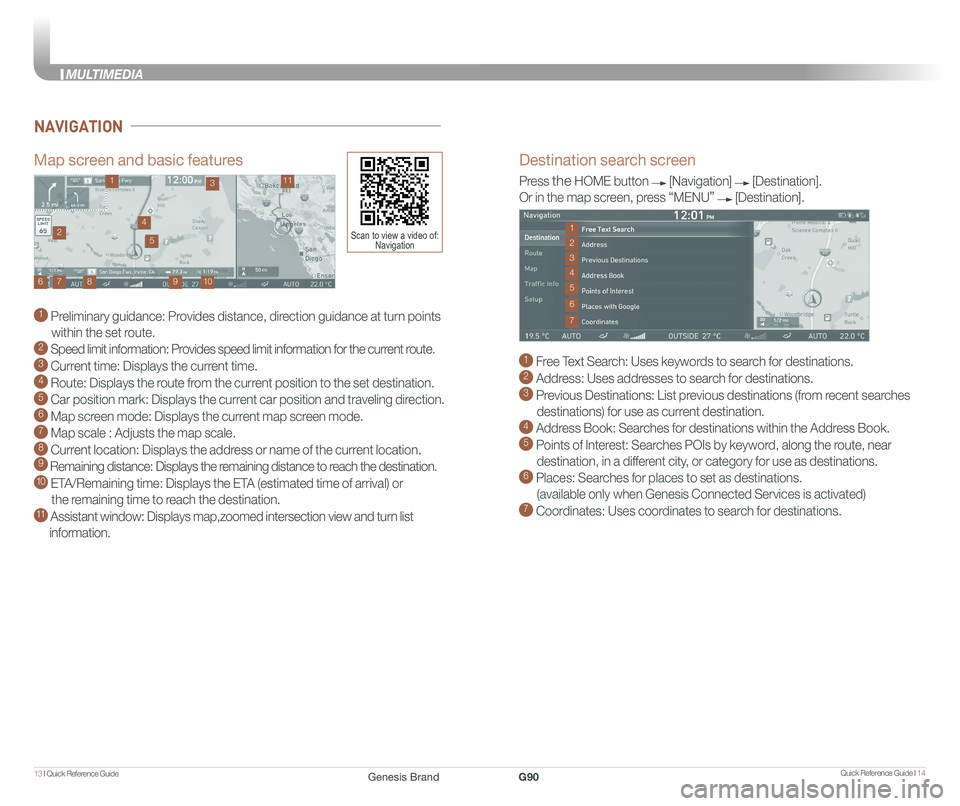
Destination search screen
1 Free Text Search: Uses keywords to search for destinations. 2 Address: Uses addresses to search for destinations. 3 Previous Destinations: List previous destinations (from recent searches
destinations) for use as current destination. 4 Address Book: Searches for destinations within the Address Book. 5 Points of Interest: Searches POIs by keyword, along the route, near
destination, in a different city, or category for use as destinations.6 Places: Searches for places to set as destinations.
(available only when Genesis Connected Services is activated) 7 Coordinates: Uses coordinates to search for destinations.
Press the HOME button [Navigation] [Destination].
Or in the map screen, press “MENU” [Destination].
1
3
7
6
2
4
5
Map screen and basic features
1 Preliminary guidance: Provides distance, direction guidance at turn points
within the set route. 2 Speed limit information: Provides speed limit information for the current route.3 Current time: Displays the current time. 4 Route: Displays the route from the current position to the set destination. 5 Car position mark: Displays the current car position and traveling direction. 6 Map screen mode: Displays the current map screen mode. 7 Map scale : Adjusts the map scale. 8 Current location: Displays the address or name of the current location. 9 Remaining distance: Displays the remaining distance to reach the destination.10 ETA/Remaining time: Displays the ETA (estimated time of arrival) or
the remaining time to reach the destination.11 Assistant window: Displays map,zoomed intersection view and turn list
information.
10
1113
9876
24
5Scan to view a video of: Navigation
NAVIGATION
Genesis BrandG90
MULTIMEDIA
Page 13 of 13
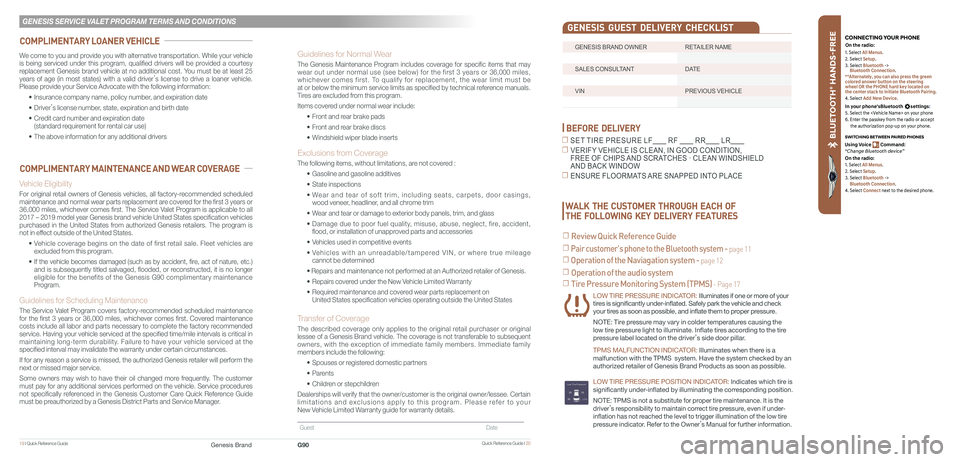
Quick Reference Guide I 20G90
GENESIS BRAND OWNER RETAILER NAME
SALES CONSULTANT DATE
VIN PREVIOUS VEHICLE
GENESIS GUEST DELIVERY CHECKLIST
BEFORE DELIVERY
☐ SET TIRE PRESURE LF RF RR LR
☐ VERIFY VEHICLE IS CLEAN, IN GOOD CONDITION, FREE OF CHIPS AND SCRATCHES · CLEAN WINDSHIELD AND BACK WINDOW
☐ ENSURE FLOORMATS ARE SNAPPED INTO PLACE
☐ Tire Pressure Monitoring System (TPMS) - Page 17
LOW TIRE PRESSURE INDICATOR: Illuminates if one or more of your tires is significantly under-inflated. Safely park the vehicle and check your tires as soon as possible, and inflate them to proper pressure.
NOTE: Tire pressure may vary in colder temperatures causing the
low tire pressure light to illuminate. Inflate tires according to the tire
pressure label located on the driver’s side door pillar.
TPMS MALFUNCTION INDICATOR: Illuminates when there is a
malfunction with the TPMS system. Have the system checked by an
authorized retailer of Genesis Brand Products as soon as possible.
LOW TIRE PRESSURE POSITION INDICATOR: lndicates which tire is
significantly under-inflated by illuminating the corresponding position.
NOTE: TPMS is not a substitute for proper tire maintenance. It is the
driver’s responsibility to maintain correct tire pressure, even if under-
inflation has not reached the level to trigger illumination of the low tire
pressure indicator. Refer to the Owner’s Manual for further information.
WALK THE CUSTOMER THROUGH EACH OF
THE FOLLOWING KEY DELIVERY FEATURES
☐ Review Quick Reference Guide
☐ Pair customer's phone to the Bluetooth system - page 11
☐ Operation of the Naviagation system - page 12
☐ Operation of the audio system
B LU ETO OTH
®
SWIT CHING BETWEEN P AIRED PHONES
On the r adio:
CONNE CTING \fOUR PHONEOn the r adio:
U sing Voic e Command:
“Change Blue too th de vice”1. Select All Menus.
2. Select Setup.
3. Select Bluetooth ->
Bluetooth Connection.
**Alternately, you can also press the green
colored answer button on the steering
wheel OR the PHONE hard key located on
the center stack to initiate Bluetooth Pairing.
4. Select Add New Device.
In your phone’sBluetooth settings:
5. Select the
6. Enter the passkey from the radio or accept
the authorization pop-up on your phone.
1. Select All Menus.
2. Select Setup.
3. Select Bluetooth ->
Bluetooth Connection.
4. Select Connect next to the desired phone.
19 I Quick Reference Guide Genesis Brand
GENESIS SERVICE VALET PROGRAM TERMS AND CONDITIONS
We come to you and provide you with alternative transportation. While your vehicle is being serviced under this program, qualified drivers will be provided a courtesy replacement Genesis brand vehicle at no additional cost. You must be at least 25 years of age (in most states) with a valid driver’s license to drive a loaner vehicle. Please provide your Service Advocate with the following information:
• Insurance company name, policy number, and expiration date
• Driver’s license number, state, expiration and birth date
• Credit card number and expiration date (standard requirement for rental car use)
• The above information for any additional drivers
Vehicle Eligibility
For original retail owners of Genesis vehicles, all factory-recommended scheduled maintenance and normal wear parts replacement are covered for the first 3 years or 36,000 miles, whichever comes first. The Service Valet Program is applicable to all 2017 – 2019 model year Genesis brand vehicle United States specificat\
ion vehicles purchased in the United States from authorized Genesis retailers. The program is not in effect outside of the United States.
• Vehicle coverage begins on the date of first retail sale. Fleet vehicles are excluded from this program.
• If the vehicle becomes damaged (such as by accident, fire, act of nature, etc.) and is subsequently titled salvaged, flooded, or reconstructed, it is no longer eligible for the benefits of the Genesis G90 complimentary maintenance Program.
Guidelines for Scheduling Maintenance
The Service Valet Program covers factory-recommended scheduled maintenance for the first 3 years or 36,000 miles, whichever comes first. Covered maintenance costs include all labor and parts necessary to complete the factory recommended service. Having your vehicle serviced at the specified time/mile interva\
ls is critical in maintaining long-term durability. Failure to have your vehicle serviced at the specified interval may invalidate the warranty under certain circumstances.
If for any reason a service is missed, the authorized Genesis retailer will perform the next or missed major service.
Some owners may wish to have their oil changed more frequently. The customer must pay for any additional services performed on the vehicle. Service p\
rocedures not specifically referenced in the Genesis Customer Care Quick Reference Guide must be preauthorized by a Genesis District Parts and Service Manager.
COMPLIMENTARY LOANER VEHICLE
COMPLIMENTARY MAINTENANCE AND WEAR COVERAGE
Guidelines for Normal Wear
The Genesis Maintenance Program includes coverage for specific items that may wear out under normal use (see below) for the first 3 years or 36,000 miles, whichever comes first. To qualify for replacement, the wear limit must be at or below the minimum service limits as specified by technical reference manuals. Tires are excluded from this program.
Items covered under normal wear include:
• Front and rear brake pads
• Front and rear brake discs
• Windshield wiper blade inserts
Exclusions from Coverage
The following items, without limitations, are not covered :
• Gasoline and gasoline additives
• State inspections
• Wear and tear of soft trim, including seats, carpets, door casings, wood veneer, headliner, and all chrome trim
• Wear and tear or damage to exterior body panels, trim, and glass
• Damage due to poor fuel quality, misuse, abuse, neglect, fire, accident, flood, or installation of unapproved parts and accessories
• Vehicles used in competitive events
• Vehicles with an unreadable/tampered VIN, or where true mileage cannot be determined
• Repairs and maintenance not performed at an Authorized retailer of Genesis.
• Repairs covered under the New Vehicle Limited Warranty
• Required maintenance and covered wear parts replacement on United States specification vehicles operating outside the United States\
Transfer of Coverage
The described coverage only applies to the original retail purchaser or original lessee of a Genesis Brand vehicle. The coverage is not transferable to s\
ubsequent owners, with the exception of immediate family members. Immediate family members include the following:
• Spouses or registered domestic partners
• Parents
• Children or stepchildren
Dealerships will verify that the owner/customer is the original owner/le\
ssee. Certain limitations and exclusions apply to this program. Please refer to your New Vehicle Limited Warranty guide for warranty details.
Guest Date