display GENESIS G90 2021 Owner's Manual
[x] Cancel search | Manufacturer: GENESIS, Model Year: 2021, Model line: G90, Model: GENESIS G90 2021Pages: 538, PDF Size: 13.02 MB
Page 19 of 538
1-6
Your vehicle at a glance
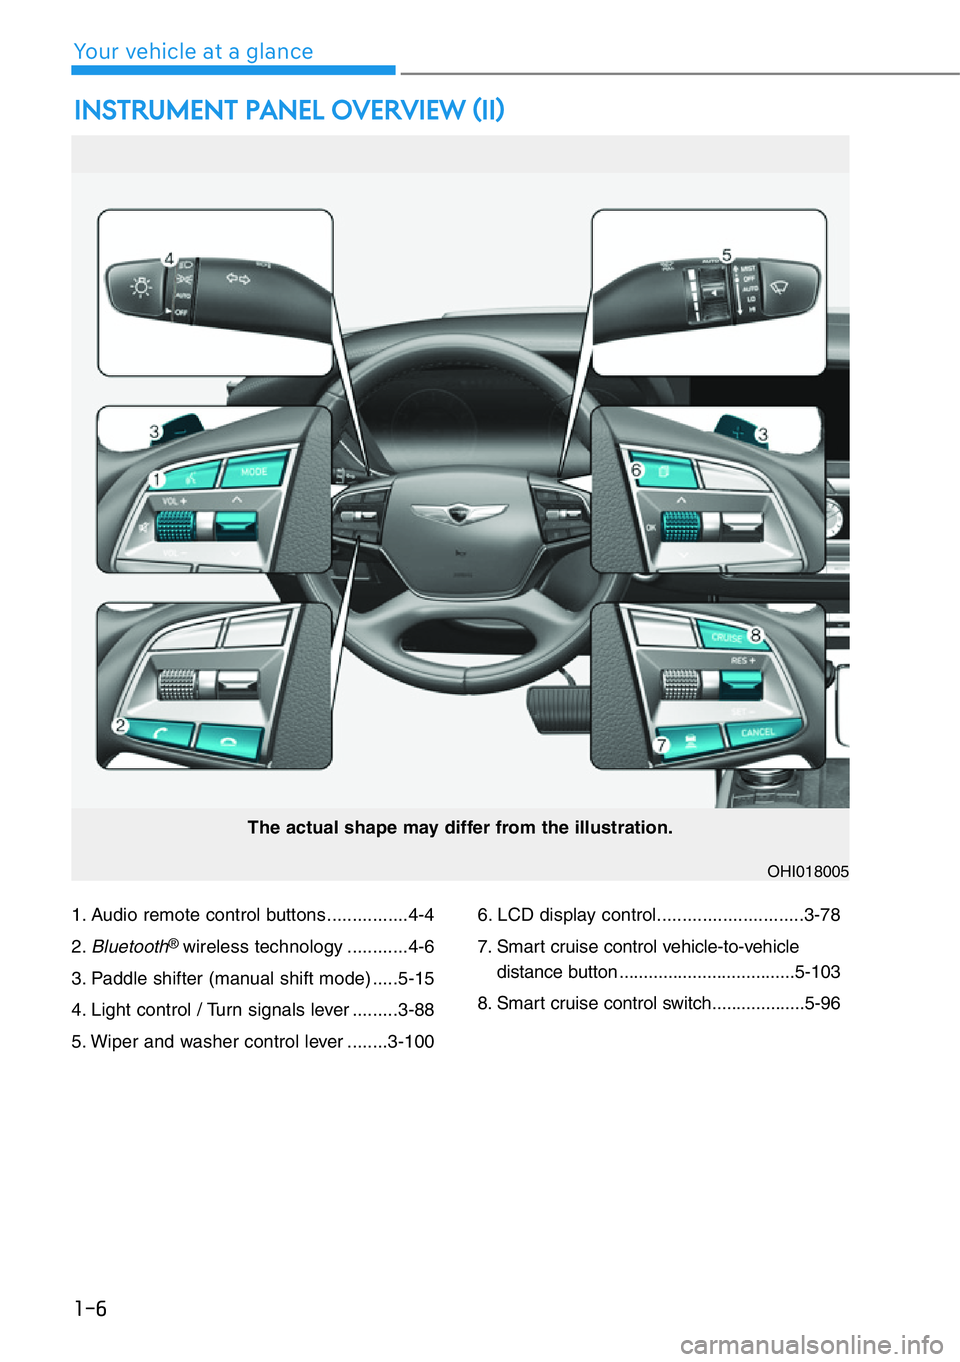
1. Audio remote control buttons ................4-4
2.
Bluetooth® wireless technology ............4-6
3. Paddle shifter (manual shift mode) .....5-15
4. Light control / Turn signals lever .........3-88
5. Wiper and washer control lever ........3-1006. LCD display control.............................3-78
7. Smart cruise control vehicle-to-vehicle
distance button ....................................5-103
8. Smart cruise control switch...................5-96
INSTRUMENT PANEL OVERVIEW (II)
The actual shape may differ from the illustration.
OHI018005
Page 84 of 538

2-64
Safety system of your vehicle
SRS warning light
The SRS (Supplement Restraint
System) air bag warning light on the
instrument panel displays the air bag
symbol depicted in the illustration.
The system checks the air bag elec-
trical system for malfunctions. The
light indicates that there is a potential
malfunction with your air bag system,
which could include your side and
curtain air bags used for rollover pro-
tection.
If your SRS malfunctions, the
air bag may not inflate properly
during an accident increasing
the risk of serious injury or
death.
If any of the following condi-
tions occur, your SRS is mal-
functioning:
• The light does not turn on for
approximately six seconds
when the Engine Start/Stop
button is in the ON or START
position.
• The light stays on after illumi-
nating for approximately six
seconds.
• The light comes on while the
vehicle is in motion.
• The light blinks when the
engine is running.
Have an authorized retailer of
Genesis Branded products
inspect the SRS as soon as
possible if any of these condi-
tions occur.
WARNING
Page 102 of 538
3
3. Convenient Features of
Your Vehicle
Accessing Your Vehicle ................3-3
Smart Key ..........................................3-3
Immobilizer System ........................3-8
Door Locks ....................................3-9
Operating Door Locks from Outside
the Vehicle ......................................3-9
Operating Door Locks from Inside
the Vehicle ......................................3-11
Auto Door Lock and Unlock
Features ..........................................3-13
Child-Protector Rear Door locks....3-13
Safe Exit Assist (SEA) System ........3-14
Theft-Alarm System ....................3-15
Seat Position Memory System ....3-16
Storing Positions into Memory ......3-16
Recalling Positions from Memory..3-17
Resetting the Seat Position Memory
System ............................................3-17
Easy Access Function ....................3-18
Smart Posture Care System ........3-19
Steering wheel ............................3-20
Motor-Driven Power
Steering (MDPS) ............................3-20
Tilt Steering / Telescopic Steering 3-21
Heated Steering Wheel ..................3-21
Horn ................................................3-22
Mirrors ..........................................3-23
Inside Rearview Mirror ..................3-23
Side View Mirrors ..........................3-30
Reverse Parking Aid Function........3-32
Windows ......................................3-33Sunroof ........................................3-37
Sunroof Opening and Closing ......3-38
Tilting the Sunroof ........................3-39
Sunshade ........................................3-39
Resetting the Sunroof ..................3-40
Sunroof Open Warning ..................3-40
Exterior Features ........................3-41
Hood ................................................3-41
Trunk................................................3-42
Smart Trunk ....................................3-48
Fuel Filler Door ................................3-51
Instrument Cluster ......................3-54
Instrument Cluster Control............3-55
Gauges and Meters ........................3-55
Transmission Shift Indicator..........3-59
Warning and Indicator Lights ......3-60
LCD Display Messages ....................3-71
LCD Display..................................3-78
LCD Display Control ......................3-78
LCD Display Modes ........................3-79
Trip Computer ............................3-82
Trip Modes ......................................3-82
Vehicle Settngs ..........................3-85
Head-Up Display ........................3-86
Lighting ......................................3-88
Exterior Lights ................................3-88
Interior Lights ................................3-96
Welcome System ........................3-99
Wipers and Washers ..................3-101
Windshield Wipers ......................3-101
Windshield Washers ....................3-102
Surround View Monitor ............3-104
3
Page 117 of 538
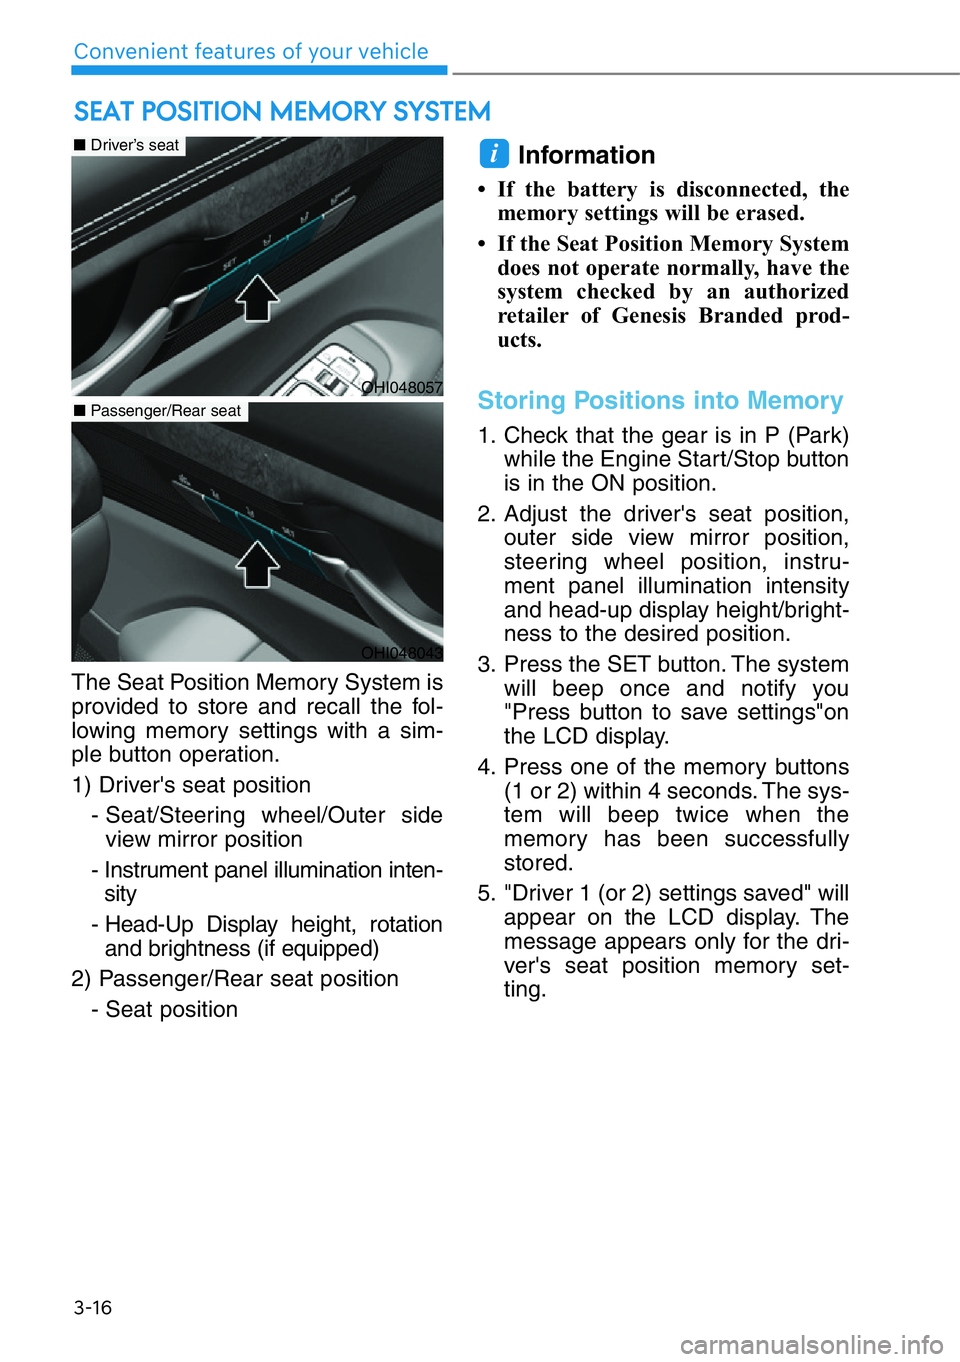
The Seat Position Memory System is
provided to store and recall the fol-
lowing memory settings with a sim-
ple button operation.
1) Driver's seat position
- Seat/Steering wheel/Outer side
view mirror position
- Instrument panel illumination inten-
sity
- Head-Up Display height, rotation
and brightness (if equipped)
2) Passenger/Rear seat position
- Seat position
Information
• If the battery is disconnected, the
memory settings will be erased.
• If the Seat Position Memory System
does not operate normally, have the
system checked by an authorized
retailer of Genesis Branded prod-
ucts.
Storing Positions into Memory
1. Check that the gear is in P (Park)
while the Engine Start/Stop button
is in the ON position.
2. Adjust the driver's seat position,
outer side view mirror position,
steering wheel position, instru-
ment panel illumination intensity
and head-up display height/bright-
ness to the desired position.
3. Press the SET button. The system
will beep once and notify you
"Press button to save settings"on
the LCD display.
4. Press one of the memory buttons
(1 or 2) within 4 seconds. The sys-
tem will beep twice when the
memory has been successfully
stored.
5. "Driver 1 (or 2) settings saved" will
appear on the LCD display. The
message appears only for the dri-
ver's seat position memory set-
ting.
i
SEAT POSITION MEMORY SYSTEM
3-16
Convenient features of your vehicle
OHI048057
■Driver’s seat
■Passenger/Rear seat
OHI048043
Page 118 of 538

3-17
03
Recalling Positions from
Memory
1. Check that the gear is in P (Park)
while the Engine Start/Stop button
is in the ON position.
2. Press the desired memory button
(1 or 2). The system will beep
once, and then the driver's seat
position, outer side view mirror
position, steering wheel position,
instrument panel illumination
intensity and head-up display
height/brightness will automatical-
ly adjust to the stored positions.
3. "Driver 1(or 2) settings applied"
will appear on the LCD display.
The message appears only for
the driver's seat position memory
setting.
Information
• If you press the SET button or num-
ber 1 button with the number 1 set-
ting in operation, the setting will tem-
porarily deactivate. If you press the
number 2 button, the number 2 set-
ting will activate.
• If you press the number 2 button or
SET button with the number 2 button
in operation, the number 2 setting
will temporarily deactivate. Press the
number 1 button, the number 1 set-
ting will activate.
• If you operate the seat adjustment
switch, side view mirror, steering
wheel, instrument panel illumination
or head-up display while recalling the
stored positions, the pre-set settings
will become ineffective.
Resetting the Seat Position
Memory System
Take the following procedures to
reset the seat position memory sys-
tem, when it does not operate prop-
erly.
To reset the seat position mem-
ory system
1. Stop the vehicle and open the dri-
ver's door with the Engine
Start/Stop button in the ON posi-
tion and the gear shifted to P
(Park).
2. Operate the control switch to set
the driver's seat and seatback to
the foremost position.
3. Simultaneously press the SET
button and push forward the dri-
ver's seat movement switch over 2
seconds.
While resetting the seat posi-
tion memory system
1. It starts with the notification sound.
2. The driver's seat and seatback is
adjusted to the rearward position
with the notification sound.
3. The driver's seat and seatback is
re-adjusted to the default position
(central position) with the notifica-
tion sound.
However, in the following cases, the
resetting procedure and the notifica-
tion sound may stop.
- The memory button is pressed.
- The seat control switch is operated.
- The gear is shifted out of P (Park).
- The driving speed exceeds 2 mph
(3 km/h).
- The driver's door is closed.
i
Page 120 of 538

3-19
03
The Smart Posture Care system
automatically provides a healthy pos-
ture (position) for the driver's back,
and sets the steering wheel, outer
side view mirrors, head-up display
positions according to the driver's
body measurements.
Information
If the Seat Posture Care System does
not operate normally, have the system
checked by an authorized retailer of
Genesis Branded products.1. Check that the gear is in P (Park)
while the Engine Start/Stop button
is in the ON position.
2. Press the SMART button on the
driver's door or select 'Setup →
Vehicle Settings →Convenience
→Smart Posture Care' from the
Settings menu in the AVN system
screen.
3. Enter information (Height, Pants
Inseam Length, Weight) in the
AVN system screen.
4. After entering the driver’s informa-
tion, press 'Adjust Posture'. The
driver’s seat, steering wheel, side
view mirror and head-up display
will be adjusted.
5. Press 'Save' and save the adjust-
ed seat position in 'Driver 1' or
'Driver 2'.
Reference table
For detailed information, scan the
QR code in a separately supplied
simple manual.
i
SMART POSTURE CARE SYSTEM (IF EQUIPPED)
OHI048042OHI049513N
Height4' 9'' ~ 6' 6"
Pants
Inseam
Length
Short/Average/Tall
Weight109 lbs. or Below ~
264 lbs. or Above
Page 141 of 538

Resetting the Sunroof
The sunroof may need to be reset if
the following conditions occur:
• The battery is discharged or dis-
connected or the sunroof fuse has
been replaced or disconnected
• The sunroof control lever is not
operating correctly
To reset the sunroof, perform the fol-
lowing steps:
1. Turn the engine on and close the
sunroof glass and sunshade com-
pletely.
2. Release the control lever.
3. Push and hold the sunroof control
lever forward for about 10 seconds
until the sunroof moves slightly,
then release the control lever.
4. Push and hold the sunroof control
lever forward until the sunroof
operates as follows:
TILT DOWN
→SLIDE OPEN →
SLIDE CLOSE
Then, release the control lever.
When this is complete, the sunroof
system is reset.
For more information, contact an
authorized retailer of Genesis
Branded products.
Information
If you do not reset the sunroof, it may
not work properly.
Sunroof Open Warning
(if equipped)
• If the driver turns off the engine
when the sunroof is not fully
closed, the warning chime will
sound for approximately 3 seconds
and the sunroof open warning will
appear on the cluster LCD display.
• If the driver turns off the engine
and opens the door when the sun-
roof is not fully closed, the sunroof
open warning will appear on the
cluster LCD display until the door is
closed or the sunroof is fully closed.
Close the sunroof securely when
leaving your vehicle.
i
3-40
Convenient features of your vehicle
OHI048126
Page 142 of 538
3-41
03
Hood
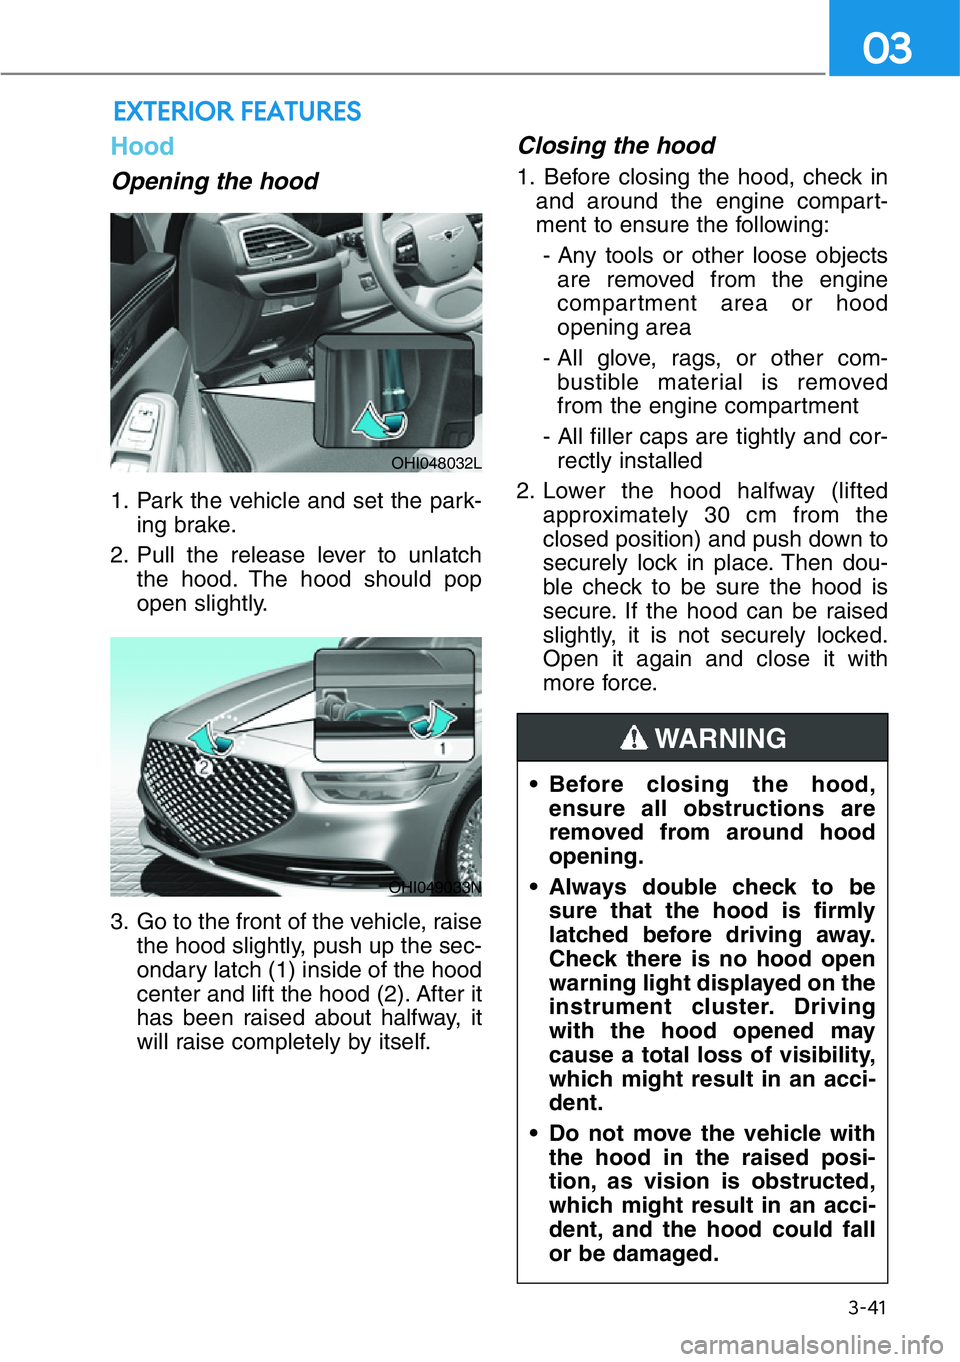
Opening the hood
1. Park the vehicle and set the park-
ing brake.
2. Pull the release lever to unlatch
the hood. The hood should pop
open slightly.
3. Go to the front of the vehicle, raise
the hood slightly, push up the sec-
ondary latch (1) inside of the hood
center and lift the hood (2). After it
has been raised about halfway, it
will raise completely by itself.
Closing the hood
1. Before closing the hood, check in
and around the engine compart-
ment to ensure the following:
- Any tools or other loose objects
are removed from the engine
compartment area or hood
opening area
- All glove, rags, or other com-
bustible material is removed
from the engine compartment
- All filler caps are tightly and cor-
rectly installed
2. Lower the hood halfway (lifted
approximately 30 cm from the
closed position) and push down to
securely lock in place. Then dou-
ble check to be sure the hood is
secure. If the hood can be raised
slightly, it is not securely locked.
Open it again and close it with
more force.
EXTERIOR FEATURES
• Before closing the hood,
ensure all obstructions are
removed from around hood
opening.
• Always double check to be
sure that the hood is firmly
latched before driving away.
Check there is no hood open
warning light displayed on the
instrument cluster. Driving
with the hood opened may
cause a total loss of visibility,
which might result in an acci-
dent.
• Do not move the vehicle with
the hood in the raised posi-
tion, as vision is obstructed,
which might result in an acci-
dent, and the hood could fall
or be damaged.
WARNING
OHI048032L
OHI049033N
Page 155 of 538
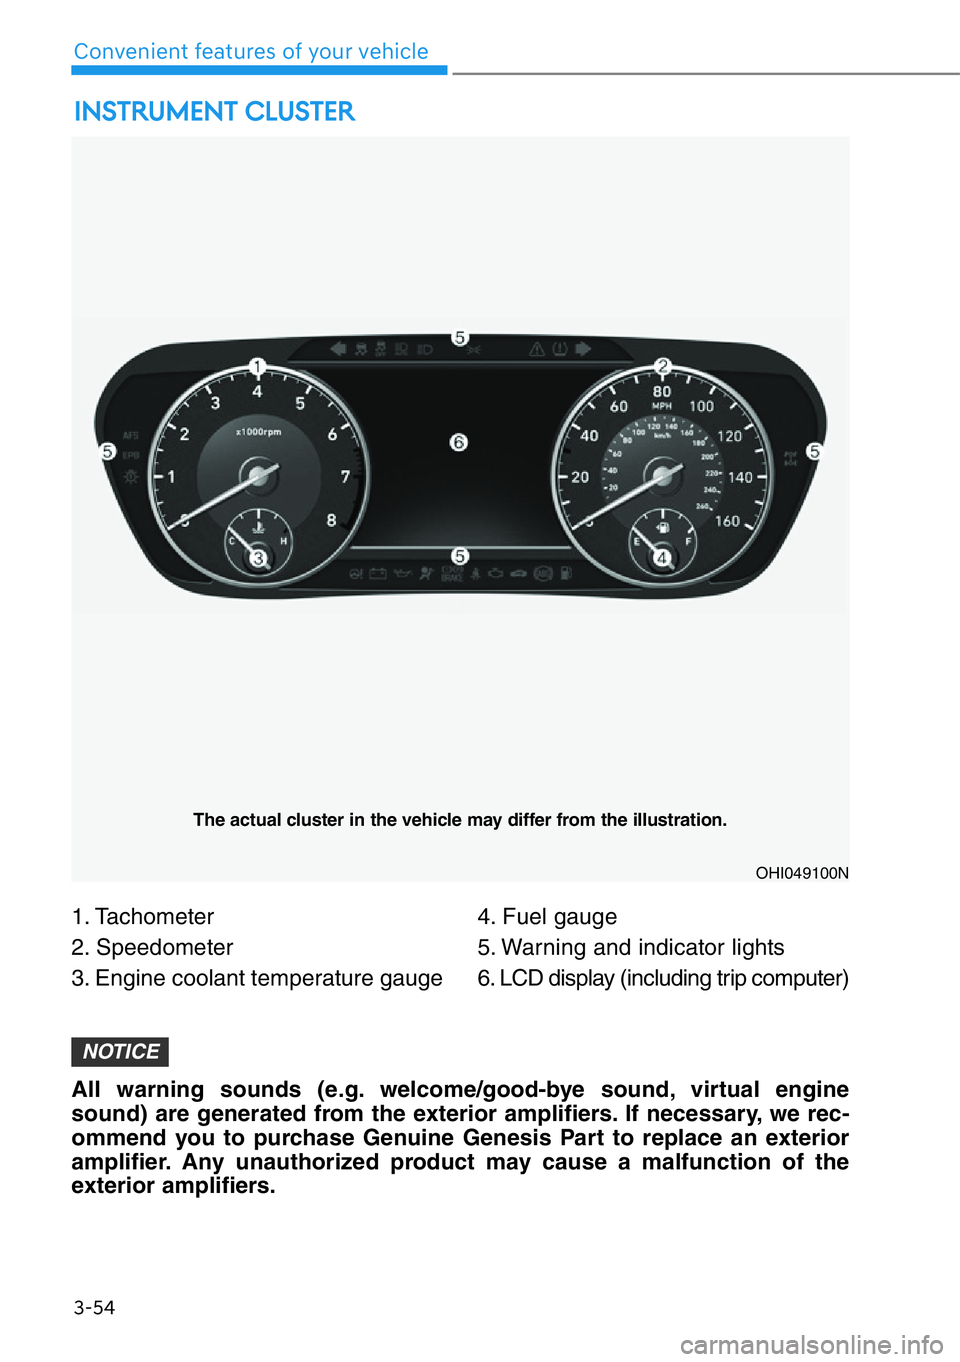
3-54
Convenient features of your vehicle
1. Tachometer
2. Speedometer
3. Engine coolant temperature gauge4. Fuel gauge
5. Warning and indicator lights
6. LCD display (including trip computer)
INSTRUMENT CLUSTER
OHI049100N
The actual cluster in the vehicle may differ from the illustration.
All warning sounds (e.g. welcome/good-bye sound, virtual engine
sound) are generated from the exterior amplifiers. If necessary, we rec-
ommend you to purchase Genuine Genesis Part to replace an exterior
amplifier. Any unauthorized product may cause a malfunction of the
exterior amplifiers.
NOTICE
Page 156 of 538

3-55
03
Instrument Cluster Control
Adjusting instrument cluster
illumination
When the vehicle's parking lights or
headlights are on, press the illumina-
tion control button to adjust the
brightness of the instrument panel
illumination.
When pressing the illumination con-
trol button, the interior switch illumi-
nation intensity is also adjusted.• The brightness of the instrument
panel illumination is displayed.
• If the brightness reaches the maxi-
mum or minimum level, a chime
will sound.
Gauges and Meters
Speedometer
The speedometer indicates the speed
of the vehicle and is calibrated in miles
per hour (mph) and/or kilometers per
hour (km/h).
OHI048412
OHI048110L
OHI048101L
Never adjust the instrument
cluster while driving. Doing so
could lead to driver distraction
which may cause an accident
and lead to vehicle damage,
serious injury, or death.
WARNING