low GENESIS G90 2021 Quick Reference Guide
[x] Cancel search | Manufacturer: GENESIS, Model Year: 2021, Model line: G90, Model: GENESIS G90 2021Pages: 31, PDF Size: 8.91 MB
Page 1 of 31
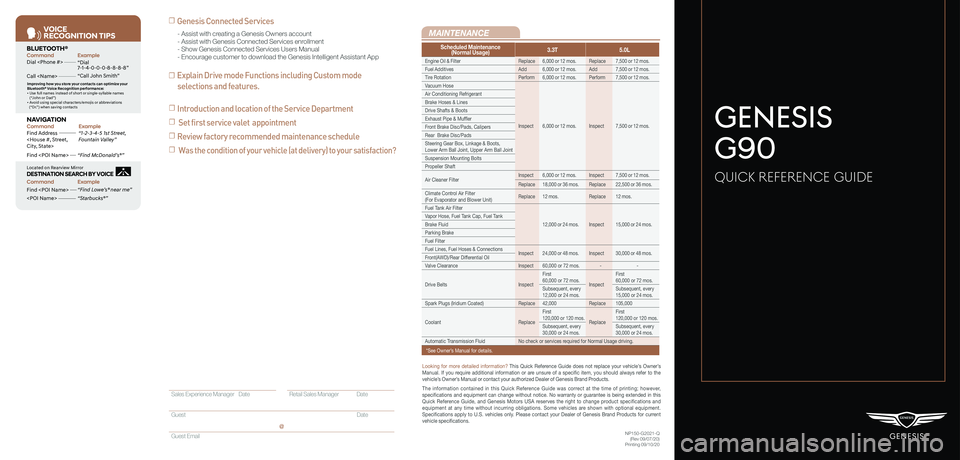
VOICE
RE COGNITION TIPS
Command ExampleBL UET OOTH®
Dial
Call
7 -1-4- 0-0-0- 8-8-8-8”
“Call John Smith ”
Command ExampleNA VIG ATION
Find Addr ess
2-3-4-5 1s t Stree t,
F oun tain Valle y”
C ommand Example
Loca ted on R earview Mirr or DESTINATION SEARCH \DB\f VOICE
Find
ow e’s ® near me”
“S tarbuck s®”
Impr oving ho w you s tor e your con tacts can op timize your
Blue too th® Voic e R ecognition perf ormance:
• U se full names ins tead o f short or single-s yllable names
(“ John or Dad”)
• Avoid using special char acters/emojis or abbrevia tions
(“Dr .”) when sa ving contacts
Find
MAINTENANCE
NP150-G2021-Q(Rev 09/07/20)Printing 09/10/20
Looking for more detailed information? This Quick Reference Guide does not replace your vehicle’s Owner’s Manual. If you require additional information or are unsure of a specific item, you should always refer to the vehicle’s Owner’s Manual or contact your authorized Dealer of Genesis Brand Products.
The information contained in this Quick Reference Guide was correct at the time of printing; however, specifications and equipment can change without notice. No warranty or g\
uarantee is being extended in this Quick Reference Guide, and Genesis Motors USA reserves the right to change product specifications and equipment at any time without incurring obligations. Some vehicles are shown with optional equipment. Specifications apply to U.S. vehicles only. Please contact your Dealer of Genesis Brand Products for current vehicle specifications.
☐ Genesis Connected Services
☐ Explain Drive mode Functions including Custom mode
selections and features.
- Assist with creating a Genesis Owners account- Assist with Genesis Connected Services enrollment- Show Genesis Connected Services Users Manual- Encourage customer to download the Genesis Intelligent Assistant App
GENESIS
G90
QUICK REFERENCE GUIDE
Scheduled Maintenance(Normal Usage)3.3T5.0L
Engine Oil & FilterReplace6,000 or 12 mos.Replace7,500 or 12 mos.
Fuel AdditivesAdd6,000 or 12 mos.Add7,500 or 12 mos.
Tire RotationPerform6,000 or 12 mos.Perform7,500 or 12 mos.
Vacuum Hose
Inspect6,000 or 12 mos.Inspect7,500 or 12 mos.
Air Conditioning Refrigerant
Brake Hoses & Lines
Drive Shafts & Boots
Exhaust Pipe & Muffler
Front Brake Disc/Pads, Calipers
Rear Brake Disc/Pads
Steering Gear Box, Linkage & Boots, Lower Arm Ball Joint, Upper Arm Ball Joint
Suspension Mounting Bolts
Propeller Shaft
Air Cleaner FilterInspect6,000 or 12 mos.Inspect7,500 or 12 mos.
Replace18,000 or 36 mos.Replace22,500 or 36 mos.
Climate Control Air Filter(For Evaporator and Blower Unit)Replace12 mos.Replace12 mos.
Fuel Tank Air Filter
12,000 or 24 mos.Inspect15,000 or 24 mos.
Vapor Hose, Fuel Tank Cap, Fuel Tank
Brake Fluid
Parking Brake
Fuel Filter
Fuel Lines, Fuel Hoses & ConnectionsInspect24,000 or 48 mos.Inspect30,000 or 48 mos.Front(AWD)/Rear Differential Oil
Valve ClearanceInspect60,000 or 72 mos.--
Drive BeltsInspect
First60,000 or 72 mos.Inspect
First60,000 or 72 mos.
Subsequent, every12,000 or 24 mos.Subsequent, every15,000 or 24 mos.
Spark Plugs (Iridium Coated)Replace42,000Replace105,000
CoolantReplace
First120,000 or 120 mos.Replace
First120,000 or 120 mos.
Subsequent, every30,000 or 24 mos.Subsequent, every30,000 or 24 mos.
Automatic Transmission FluidNo check or services required for Normal Usage driving.
*See Owner’s Manual for details.
Sales Experience Manager Date Retail Sales Manager Date
Guest Date
Guest Email
@
☐ Introduction and location of the Service Department
☐ Set first service valet appointment
☐ Review factory recommended maintenance schedule
☐ Was the condition of your vehicle (at delivery) to your satisfaction?
Page 3 of 31
126 3
9
AIRBAG
GENESIS12
6 3
9
AIRBAG
GENESIS
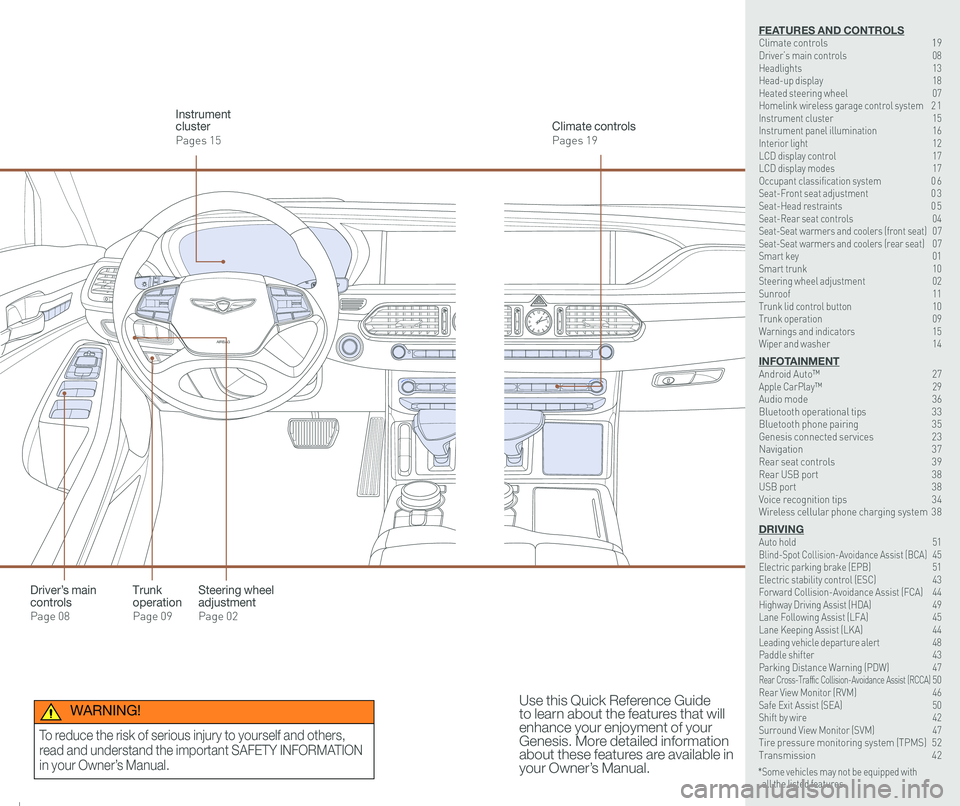
Steering wheel adjustment
Page 02
Climate controls
Pages 19
Instrument cluster
Pages 15
Use this Quick Reference Guide to learn about the features that will enhance your enjoyment of your Genesis. More detailed information about these features are available in your Owner’s Manual.
Trunk operation
Page 09
Driver’s main controls
Page 08
* Some vehicles may not be equipped with all the listed features.
WARNING!
To reduce the risk of serious injury to yourself and others,
read and understand the important SAFETY INFORMATION
in your Owner’s Manual.
FEATURES AND CONTROLSClimate controls 19Driver’s main controls 08Headlights 13Head-up display 18Heated steering wheel 07Homelink wireless garage control system 2 1Instrument cluster 15Instrument panel illumination 16Interior light 12LCD display control 17LCD display modes 17Occupant classification system 0 6 Seat-Front seat adjustment 0 3Seat-Head restraints 0 5Seat-Rear seat controls 04Seat-Seat warmers and coolers (front seat) 07Seat-Seat warmers and coolers (rear seat) 07Smart key 01 Smart trunk 10Steering wheel adjustment 02Sunroof 11Trunk lid control button 10Trunk operation 09Warnings and indicators 15Wiper and washer 14
INFOTAINMENTAndroid Auto™ 27Apple CarPlay™ \
29Audio mode 36Bluetooth operational tips 33Bluetooth phone pairing 35Genesis connected services 23Navigation 37Rear seat controls 39Rear USB port 38USB port 38Voice recognition tips 34Wireless cellular phone charging system 38
DRIVINGAuto hold 51 Blind-Spot Collision-Avoidance Assist (BCA) 45 Electric parking brake (EPB) 51 Electric stability control (ESC) 43Forward Collision-Avoidance Assist (FCA) 44Highway Driving Assist (HDA) 49Lane Following Assist (LFA) 45 Lane Keeping Assist (LKA) 44Leading vehicle departure alert 48 Paddle shifter 43Parking Distance Warning (PDW) 47Rear Cross-Traffic Collision-Avoidance Assist (RCCA) 50 Rear View Monitor (RVM) 46 Safe Exit Assist (SEA) 50 Shift by wire 42 Surround View Monitor (SVM) 47 Tire pressure monitoring system (TPMS) 52Transmission 42
Page 6 of 31
Quick Reference Guide I 0605 I Quick Reference Guide
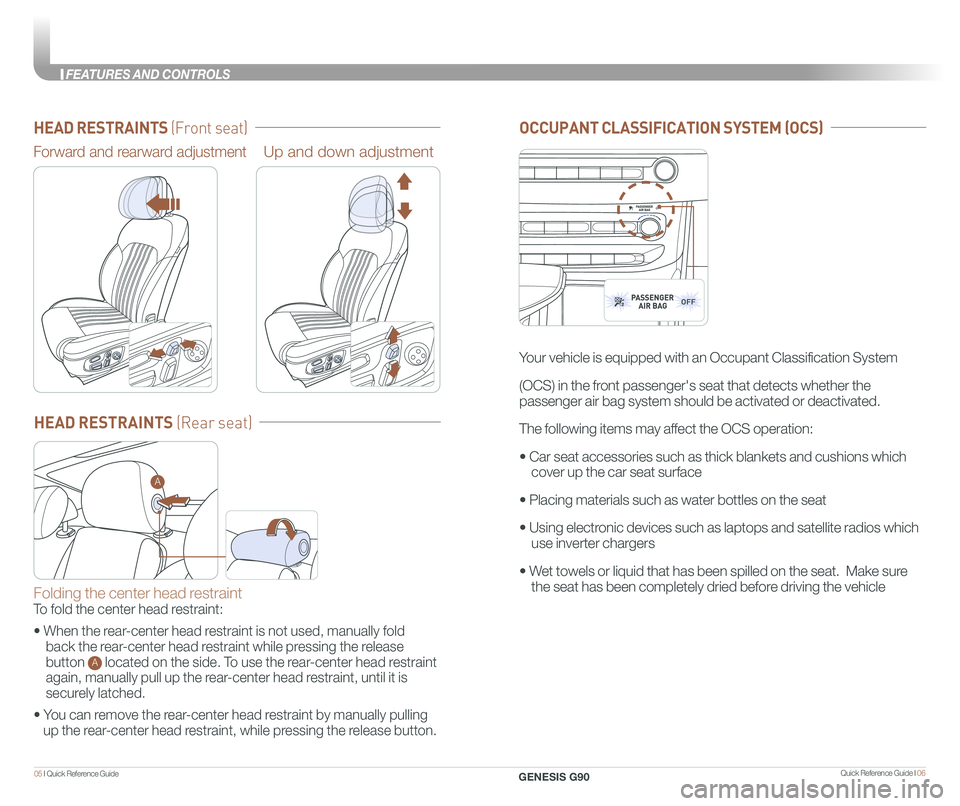
HEAD RESTRAINTS (Front seat)
Forward and rearward adjustmentUp and down adjustment
HEAD RESTRAINTS (Rear seat)
Folding the center head restraint
To fold the center head restraint:
• When the rear-center head restraint is not used, manually fold
back the rear-center head restraint while pressing the release
button A located on the side. To use the rear-center head restraint
again, manually pull up the rear-center head restraint, until it is
securely latched.
• You can remove the rear-center head restraint by manually pulling
up the rear-center head restraint, while pressing the release button.
A
12
6 3
9
2
OCCUPANT CLASSIFICATION SYSTEM (OCS)
Your vehicle is equipped with an Occupant Classification System
(OCS) in the front passenger's seat that detects whether the
passenger air bag system should be activated or deactivated.
The following items may affect the OCS operation:
• Car seat accessories such as thick blankets and cushions which
cover up the car seat surface
• Placing materials such as water bottles on the seat
• Using electronic devices such as laptops and satellite radios which
use inverter chargers
• Wet towels or liquid that has been spilled on the seat. Make sure
the seat has been completely dried before driving the vehicle
12
6 3
9
2
GENESIS G90
FEATURES AND CONTROLS
Page 7 of 31
Quick Reference Guide I 0807 I Quick Reference Guide
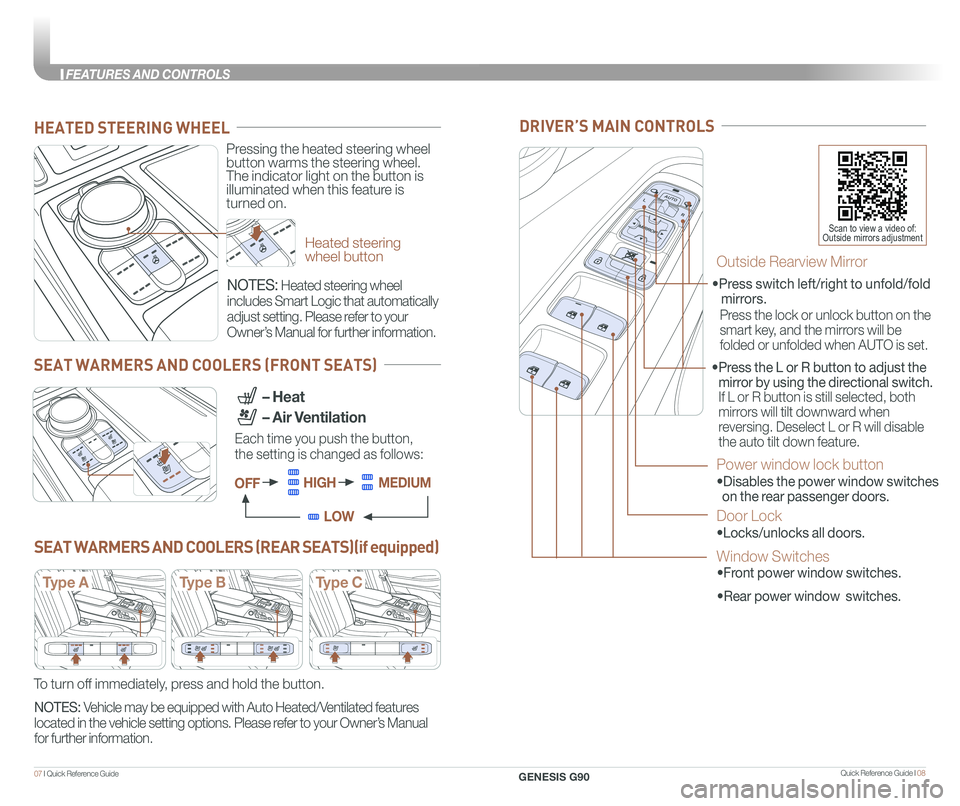
DRIVER’S MAIN CONTROLS
Scan to view a video of: Outside mirrors adjustmentHeated steering wheel button
Pressing the heated steering wheel button warms the steering wheel. The indicator light on the button is illuminated when this feature is turned on.
HEATED STEERING WHEEL
SEAT WARMERS AND COOLERS (FRONT SEATS)
SEAT WARMERS AND COOLERS (REAR SEATS)(if equipped)
NOTES: Heated steering wheel
includes Smart Logic that automatically
adjust setting. Please refer to your
Owner’s Manual for further information.
NOTES: Vehicle may be equipped with Auto Heated/Ventilated features
located in the vehicle setting options. Please refer to your Owner’s Manual
for further information.
Each time you push the button,
the setting is changed as follows:
– Heat
– Air Ventilation
OFFHIGHMEDIUM
LOW
Type AType BType C
To turn off immediately, press and hold the button.
• Front power window switches.
•Press switch left/right to unfold/fold
mirrors.
•
Rear power window switches.
• Press the L or R button to adjust the
mirror by using the directional switch.
If L or R button is still selected, both
mirrors will tilt downward when
reversing. Deselect L or R will disable
the auto tilt down feature.
Outside Rearview Mirror
Press the lock or unlock button on the
smart key, and the mirrors will be
folded or unfolded when AUTO is set.
Power window lock button
•Disables the power window switches
on the rear passenger doors.
Door Lock
•Locks/unlocks all doors.
Window Switches
GENESIS G90
FEATURES AND CONTROLS
Page 10 of 31
Quick Reference Guide I 1413 I Quick Reference Guide
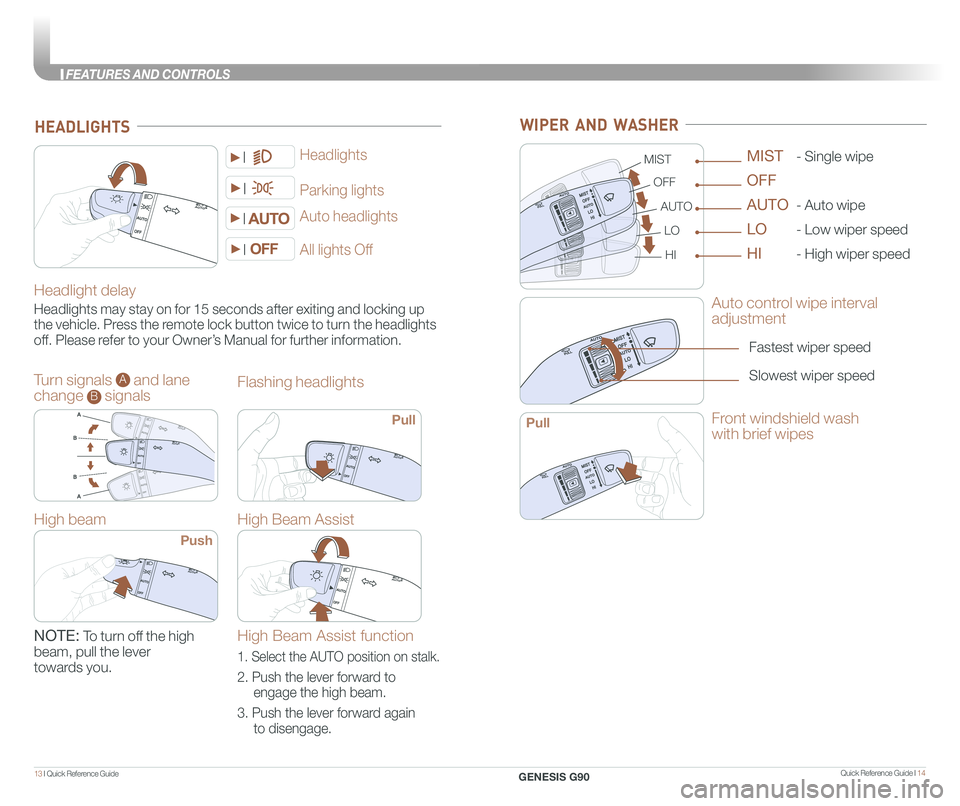
Headlight delay
Headlights may stay on for 15 seconds after exiting and locking up
the vehicle. Press the remote lock button twice to turn the headlights
off. Please refer to your Owner’s Manual for further information.
Auto headlights
Headlights
Parking lights
HEADLIGHTS
All lights Off
Turn signals A and lane
change B signals
High beam
Push
NOTE: To turn off the high
beam, pull the lever
towards you.
Flashing headlights
High Beam Assist
Pull
High Beam Assist function
1. Select the AUTO position on stalk.
2. Push the lever forward to
engage the high beam.
3. Push the lever forward again
to disengage.
WIPER AND WASHER
Auto control wipe interval
adjustment
Fastest wiper speed
Slowest wiper speed
MIST
OFF
AUTO
LO
HI
- Single wipe
- Auto wipe
- Low wiper speed
- High wiper speed
MIST
OFF
AUTO
LO
HI
Front windshield wash
with brief wipesPull
GENESIS G90
FEATURES AND CONTROLS
Page 11 of 31
Quick Reference Guide I 1615 I Quick Reference Guide
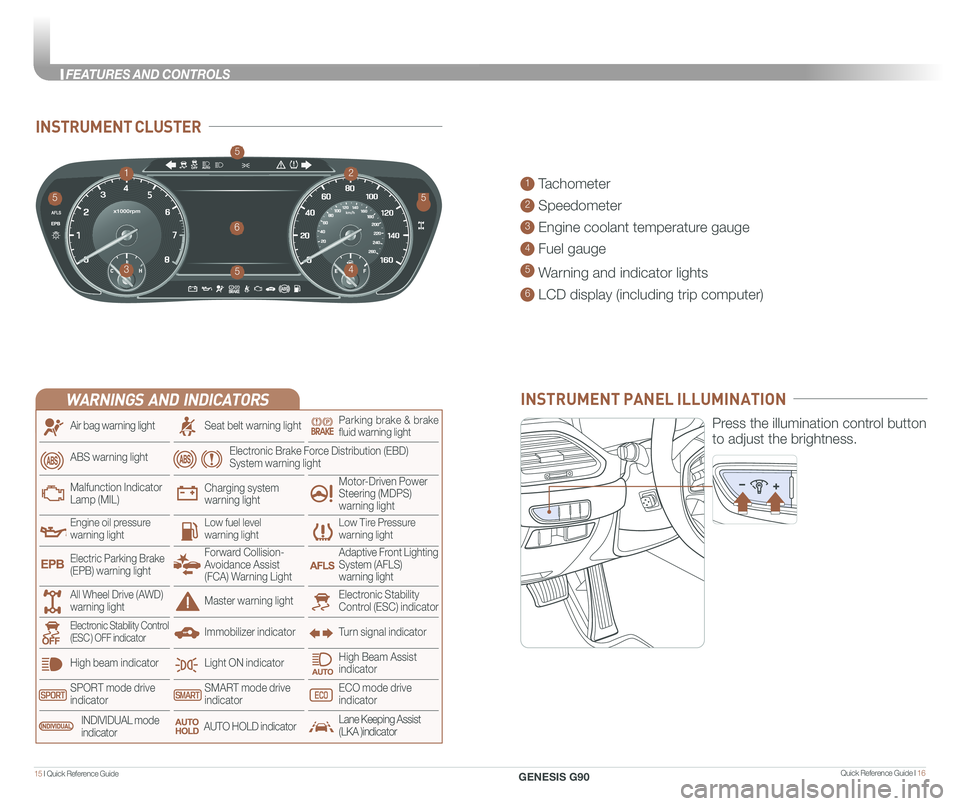
INSTRUMENT CLUSTER
1 Tachometer
2 Speedometer
3 Engine coolant temperature gauge
4 Fuel gauge
5 Warning and indicator lights
6 LCD display (including trip computer)
12
34
6
55
5
5
INSTRUMENT PANEL ILLUMINATION
Press the illumination control button
to adjust the brightness.
WARNINGS AND INDICATORS
Light ON indicator
Seat belt warning light
Charging system warning light
Electronic Brake Force Distribution (EBD) System warning light
High beam indicator
SPORT mode drive indicatorSMART mode drive indicatorECO mode drive indicator
High Beam Assist indicator
Electronic Stability Control (ESC) indicatorMaster warning light
Adaptive Front Lighting System (AFLS) warning light
Motor-Driven Power Steering (MDPS) warning light
Immobilizer indicator
Air bag warning light
ABS warning light
Low Tire Pressurewarning lightEngine oil pressurewarning lightLow fuel level warning light
Malfunction IndicatorLamp (MIL)
Turn signal indicatorElectronic Stability Control (ESC ) OFF indicator
Electric Parking Brake (EPB) warning light
Forward Collision-Avoidance Assist (FCA) Warning Light
All Wheel Drive (AWD) warning light
INDIVIDUAL mode indicatorAUTO HOLD indicatorLane Keeping Assist(LKA )indicator
Parking brake & brake fluid warning light
GENESIS G90
FEATURES AND CONTROLS
Page 12 of 31
Quick Reference Guide I 1817 I Quick Reference Guide
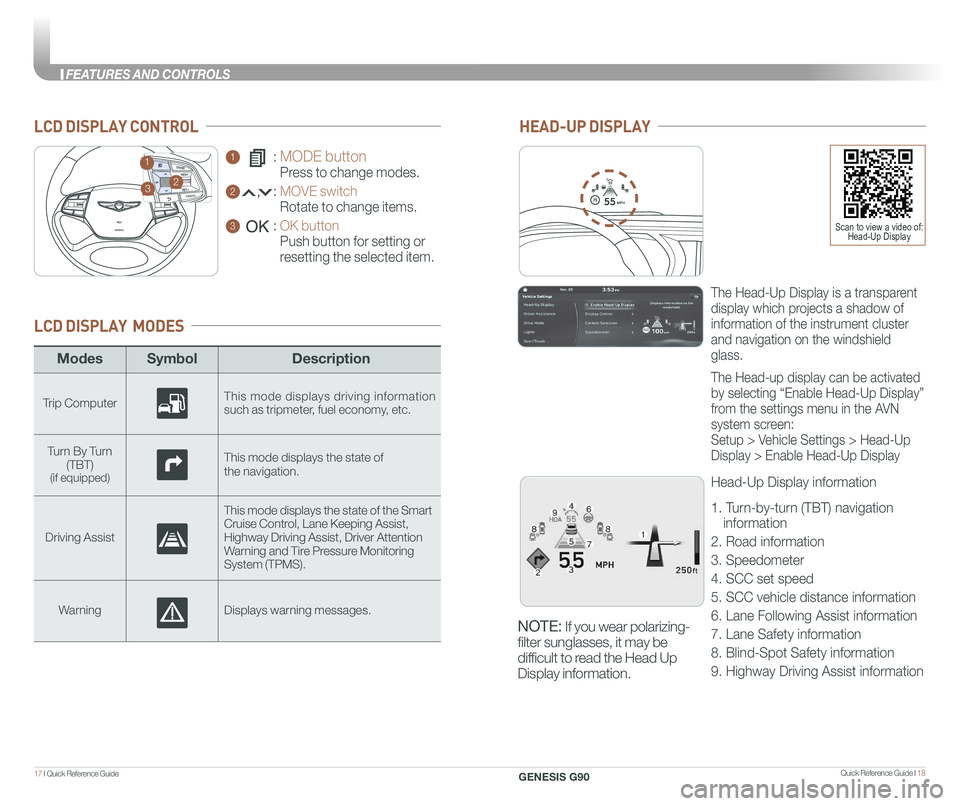
ModesSymbol Description
Trip ComputerThis mode displays driving information such as tripmeter, fuel economy, etc.
Turn By Turn (TBT)(if equipped)
This mode displays the state of
the navigation.
Driving Assist
This mode displays the state of the Smart Cruise Control, Lane Keeping Assist,Highway Driving Assist, Driver AttentionWarning and Tire Pressure Monitoring System (TPMS).
WarningDisplays warning messages.
LCD DISPLAY MODES
GENESIS
1 : MODE button
Press to change modes.
2 : MOVE switch
Rotate to change items.
3 : OK button
Push button for setting or
resetting the selected item.
LCD DISPLAY CONTROL
GENESIS
HEAD-UP DISPLAY
5575
55
MPH
The Head-Up Display is a transparent
display which projects a shadow of
information of the instrument cluster
and navigation on the windshield
glass.
The Head-up display can be activated
by selecting “Enable Head-Up Display”
from the settings menu in the AVN
system screen:
Setup > Vehicle Settings > Head-Up
Display > Enable Head-Up Display
Head-Up Display information
1. Turn-by-turn (TBT) navigation
information
2. Road information
3. Speedometer
4. SCC set speed
5. SCC vehicle distance information
6. Lane Following Assist information
7. Lane Safety information
8. Blind-Spot Safety information
9. Highway Driving Assist information
23
1
Scan to view a video of: Head-Up Display
NOTE: If you wear polarizing-
filter sunglasses, it may be
difficult to read the Head Up
Display information.
GENESIS G90
FEATURES AND CONTROLS
Page 13 of 31
Quick Reference Guide I 2019 I Quick Reference Guide
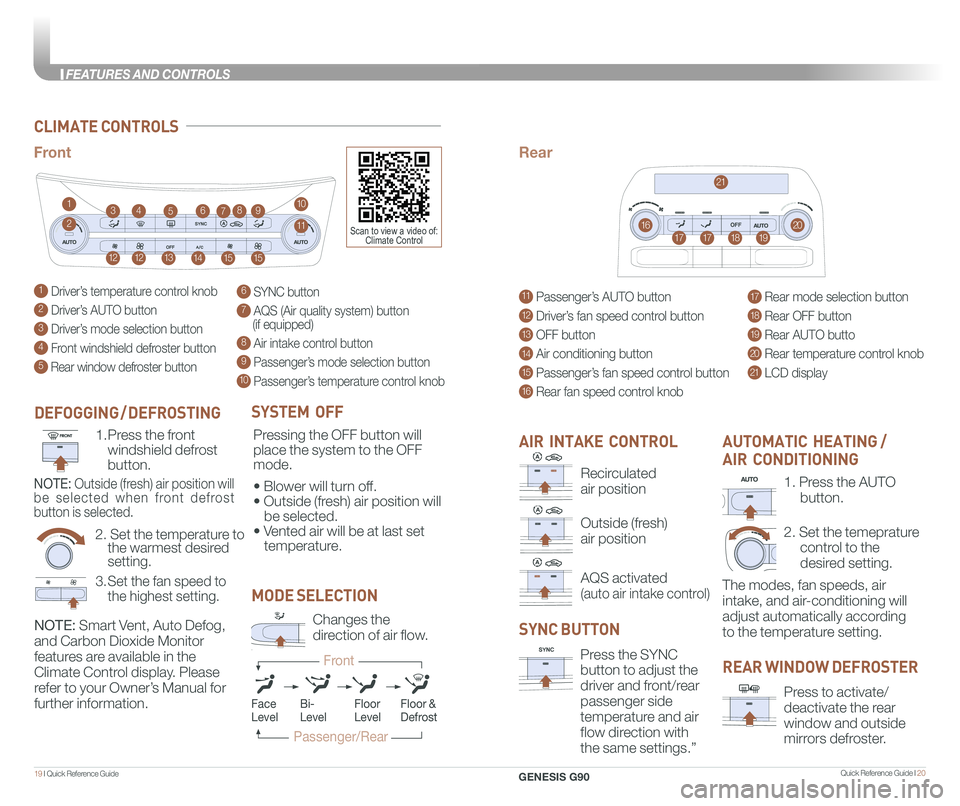
CLIMATE CONTROLS
1 Driver’s temperature control knob
2 Driver’s AUTO button
3 Driver’s mode selection button
4 Front windshield defroster button
5 Rear window defroster button
11 Passenger’s AUTO button
12 Driver’s fan speed control button
13 OFF button
14 Air conditioning button
15 Passenger’s fan speed control button
16 Rear fan speed control knob
6 SYNC button
7 AQS (Air quality system) button (if equipped)
8 Air intake control button
9 Passenger’s mode selection button
10 Passenger’s temperature control knob
17 Rear mode selection button
18 Rear OFF button
19 Rear AUTO butto
20 Rear temperature control knob
21 LCD display
1
1515
23
14
764910
16111717
1212
21
20
13
18
85
19
FrontRear
SYSTEM OFF
Pressing the OFF button will
place the system to the OFF
mode.
• Blower will turn off.
• Outside (fresh) air position will
be selected.
• Vented air will be at last set
temperature.
NOTE: Smart Vent, Auto Defog,
and Carbon Dioxide Monitor
features are available in the
Climate Control display. Please
refer to your Owner’s Manual for
further information.
AIR INTAKE CONTROL
SYNC BUTTON
Press the SYNC
button to adjust the
driver and front/rear
passenger side
temperature and air
flow direction with
the same settings.”
REAR WINDOW DEFROSTER
Press to activate/
deactivate the rear
window and outside
mirrors defroster.
1. Press the AUTO
button.
2. Set the temeprature
control to the
desired setting.
The modes, fan speeds, air
intake, and air-conditioning will
adjust automatically according
to the temperature setting.
AUTOMATIC HEATING /
AIR CONDITIONING
MODE SELECTION
Changes the
direction of air flow.
FaceLevelFloorLevelFloor &Defrost
Passenger/Rear
Front
Bi-Level
Scan to view a video of: Climate Control
Recirculated
air position
Outside (fresh)
air position
AQS activated
(auto air intake control)
DEFOGGING / DEFROSTING
2. Set the temperature to the warmest desired setting.
1. Press the front
windshield defrost
button.
3. Set the fan speed to
the highest setting.
NOTE: Outside (fresh) air position will
be selected when front defrost
button is selected.
GENESIS G90
FEATURES AND CONTROLS
Page 14 of 31
Quick Reference Guide I 2221 I Quick Reference Guide
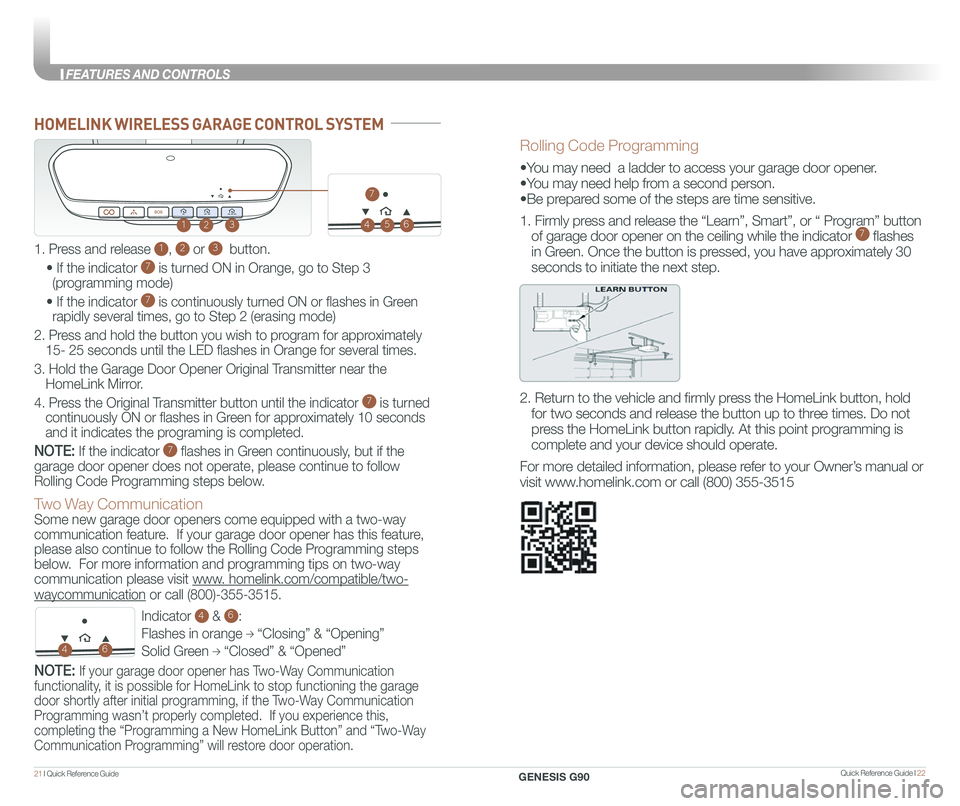
HOMELINK WIRELESS GARAGE CONTROL SYSTEM
Indicator 4 & 6:
Flashes in orange → “Closing” & “Opening”
Solid Green → “Closed” & “Opened”
123
46
Two Way Communication
Some new garage door openers come equipped with a two-way
communication feature. If your garage door opener has this feature,
please also continue to follow the Rolling Code Programming steps
below. For more information and programming tips on two-way
communication please visit www. homelink.com/compatible/two-
waycommunication or call (800)-355-3515.
NOTE: If your garage door opener has Two-Way Communication
functionality, it is possible for HomeLink to stop functioning the garage
door shortly after initial programming, if the Two-Way Communication
Programming wasn’t properly completed. If you experience this,
completing the “Programming a New HomeLink Button” and “Two-Way
Communication Programming” will restore door operation.
Rolling Code Programming
•You may need a ladder to access your garage door opener.
•You may need help from a second person.
•Be prepared some of the steps are time sensitive.
1. Firmly press and release the “Learn”, Smart”, or “ Program” button
of garage door opener on the ceiling while the indicator 7 flashes
in Green. Once the button is pressed, you have approximately 30
seconds to initiate the next step.
2. Return to the vehicle and firmly press the HomeLink button, hold
for two seconds and release the button up to three times. Do not
press the HomeLink button rapidly. At this point programming is
complete and your device should operate.
For more detailed information, please refer to your Owner’s manual or
visit www.homelink.com or call (800) 355-3515
1. Press and release 1, 2 or 3 button.
• If the indicator 7 is turned ON in Orange, go to Step 3
(programming mode)
• If the indicator 7 is continuously turned ON or flashes in Green
rapidly several times, go to Step 2 (erasing mode)
2. Press and hold the button you wish to program for approximately
15- 25 seconds until the LED flashes in Orange for several times.
3. Hold the Garage Door Opener Original Transmitter near the
HomeLink Mirror.
4. Press the Original Transmitter button until the indicator 7 is turned
continuously ON or flashes in Green for approximately 10 seconds
and it indicates the programing is completed.
NOTE: If the indicator 7 flashes in Green continuously, but if the
garage door opener does not operate, please continue to follow
Rolling Code Programming steps below.
45
7
6
GENESIS G90
FEATURES AND CONTROLS
Page 15 of 31
Quick Reference Guide I 2423 I Quick Reference Guide
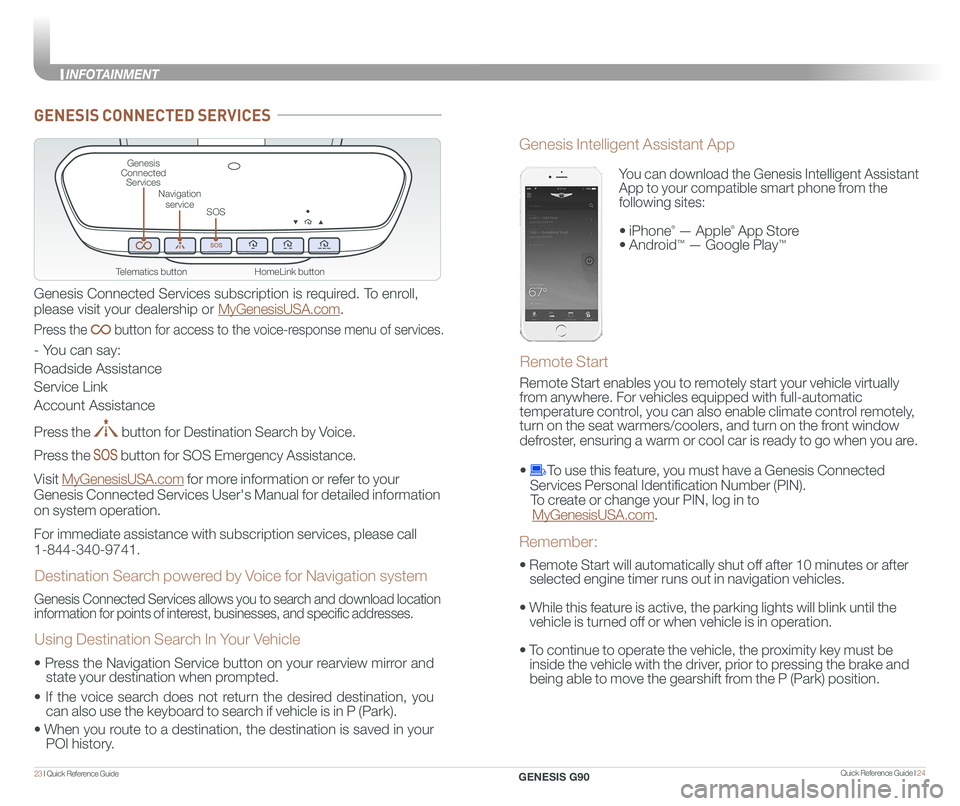
HomeLink button
Genesis Connected Services
SOS
Navigation service
Telematics button
GENESIS CONNECTED SERVICES
Genesis Connected Services subscription is required. To enroll,
please visit your dealership or MyGenesisUSA.com.
Press the button for access to the voice-response menu of services.
- You can say:
Roadside Assistance
Service Link
Account Assistance
Press the button for Destination Search by Voice.
Press the button for SOS Emergency Assistance.
Visit MyGenesisUSA.com for more information or refer to your
Genesis Connected Services User's Manual for detailed information
on system operation.
For immediate assistance with subscription services, please call
1-844-340-9741.
Genesis Connected Services allows you to search and download location
information for points of interest, businesses, and specific addresses.
Destination Search powered by Voice for Navigation system
Using Destination Search In Your Vehicle
• Press the Navigation Service button on your rearview mirror and
state your destination when prompted.
• If the voice search does not return the desired destination, you
can also use the keyboard to search if vehicle is in P (Park).
•
When you route to a destination, the destination is saved in your
POI history.
You can download the Genesis Intelligent Assistant
App to your compatible smart phone from the
following sites:
• iPhone® — Apple® App Store
• Android™ — Google Play™
Remote Start
Genesis Intelligent Assistant App
• Remote Start will automatically shut off after 10 minutes or after
selected engine timer runs out in navigation vehicles.
• While this feature is active, the parking lights will blink until the
vehicle is turned off or when vehicle is in operation.
• To continue to operate the vehicle, the proximity key must be
inside the vehicle with the driver, prior to pressing the brake and
being able to move the gearshift from the P (Park) position.
Remember:
Remote Start enables you to remotely start your vehicle virtually
from anywhere. For vehicles equipped with full-automatic
temperature control, you can also enable climate control remotely,
turn on the seat warmers/coolers, and turn on the front window
defroster, ensuring a warm or cool car is ready to go when you are.
• To use this feature, you must have a Genesis Connected
Services Personal Identification Number (PIN).
To create or change your PIN, log in to
MyGenesisUSA.com.
GENESIS G90
INFOT