wheel GENESIS GV80 2021 Owner's Manual
[x] Cancel search | Manufacturer: GENESIS, Model Year: 2021, Model line: GV80, Model: GENESIS GV80 2021Pages: 632, PDF Size: 9.37 MB
Page 505 of 632
07
7-157
The function will pause in the following
conditions when:
• There is a pedestrian, animal or object
in the direction the vehicle is moving
• The door or tailgate is open
• The Forward () or Reverse ()
button is not continuously pressed
• Simultaneously pressing multiple
buttons on a smart key
• The smart key is not operated within
13 ft. (4m) from the vehicle
• Button of another smart key is pressed
in addition to the operating smart key
• Blind-Spot Collision-Avoidance Assist
or Rear-Cross Traffic Collision Assist
operates while the vehicle is being
controlled in the reverse direction
• The vehicle moves 22 ft. (7 m) while the smart key is pressed with Remote
Entry/Exit Parking function (maximum
travel distance per button press)
When Remote Entry/Exit Parking
function is paused, the vehicle will stop.
If the condition that made the function
to pause disappears, the function may
operate again.
The function will cancel in the following
conditions when:
• The steering wheel is steered
• The gear is shifted while the vehicle is
moving
• Operating EPB while the vehicle is
moving
• The engine hood is open
• Vehicle speed is above 3 mph (5 km/h)
• Rapid acceleration occurs
• Vehicle skid occurs
• The wheel is stuck by an obstacle and
cannot move
• There are pedestrians, animals or
objects at the front and rear of the
vehicle at the same time
• Approximately 3 minutes and 50
seconds have past after Remote
Entry/Exit Parking function has started
to operate
• The slope of the road exceeds the
operational range
• The steering wheel, gearshift, braking,
and drive controls are not working
normally
• The function is paused for more than
1 minute
• The total travel distance of the vehicle
has exceeded 45 ft. (14 m) after
Remote Entry/Exit Parking function
operation
• There is a problem with the smart key
or the smart key battery is low
• ABS, TCS or ESC system operates due
to slippery road conditions
• The brake pedal or accelerator pedal
is depressed when all the doors are
closed
• The smart key is outside the vehicle
when the brake pedal is depressed
while the driver's door is open.
• The alarm of the Theft Alarm System
sounds
When Remote Entry/Exit Parking
function is canceled, the vehicle will
automatically stop, shift the gear to
P (Park) and engage EPB (Electronic
Parking Brake).
CAUTION
Check whether the doors are locked
when Remote Entry/Exit Parking
function is canceled.
Page 508 of 632
Driver Assistance System
7-160
OJX1079199LOJX1079199L
System standby
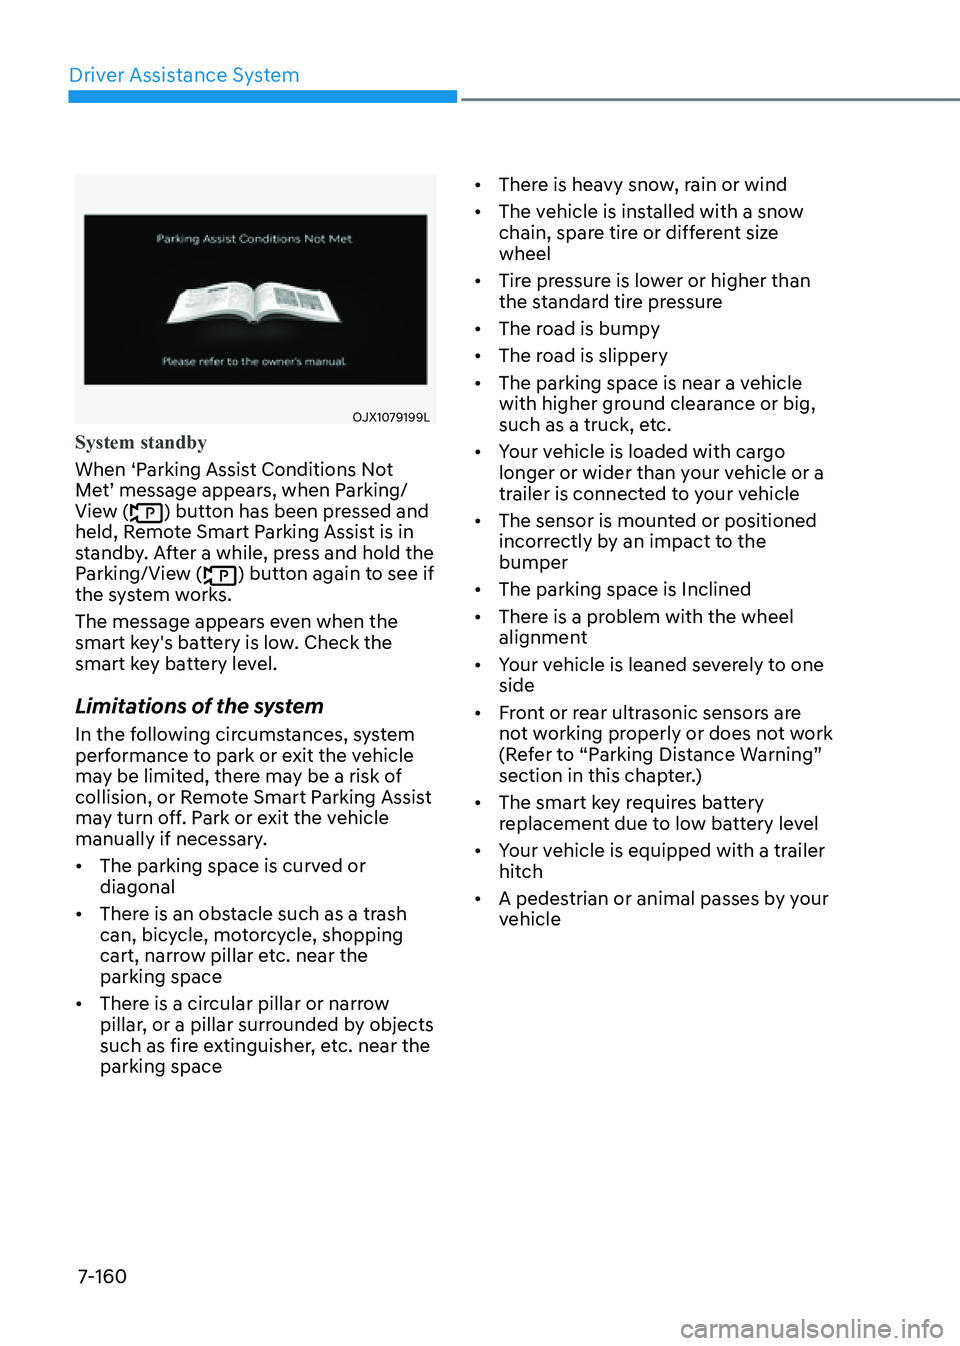
When ‘Parking Assist Conditions Not
Met’ message appears, when Parking/
View (
) button has been pressed and
held, Remote Smart Parking Assist is in
standby. After a while, press and hold the
Parking/View (
) button again to see if
the system works.
The message appears even when the
smart key's battery is low. Check the
smart key battery level.
Limitations of the system
In the following circumstances, system
performance to park or exit the vehicle
may be limited, there may be a risk of
collision, or Remote Smart Parking Assist
may turn off. Park or exit the vehicle
manually if necessary.
• The parking space is curved or
diagonal
• There is an obstacle such as a trash
can, bicycle, motorcycle, shopping
cart, narrow pillar etc. near the
parking space
• There is a circular pillar or narrow
pillar, or a pillar surrounded by objects
such as fire extinguisher, etc. near the
parking space
• There is heavy snow, rain or wind
• The vehicle is installed with a snow
chain, spare tire or different size
wheel
• Tire pressure is lower or higher than
the standard tire pressure
• The road is bumpy
• The road is slippery
• The parking space is near a vehicle
with higher ground clearance or big,
such as a truck, etc.
• Your vehicle is loaded with cargo
longer or wider than your vehicle or a
trailer is connected to your vehicle
• The sensor is mounted or positioned
incorrectly by an impact to the
bumper
• The parking space is Inclined
• There is a problem with the wheel
alignment
• Your vehicle is leaned severely to one
side
• Front or rear ultrasonic sensors are
not working properly or does not work
(Refer to “Parking Distance Warning”
section in this chapter.)
• The smart key requires battery
replacement due to low battery level
• Your vehicle is equipped with a trailer
hitch
• A pedestrian or animal passes by your
vehicle
Page 520 of 632

08
8-9
Tire Pressure Monitoring System
WARNING
Over-inflation or under-inflation can
reduce tire life, adversely affect vehicle
handling, and lead to sudden tire failure
that may cause loss of vehicle control
resulting in an accident.
Each tire, including the spare (if
provided), should be checked monthly
when cold and inflated to the inflation
pressure recommended by the vehicle
manufacturer on the vehicle placard
or tire inflation pressure label. (If your
vehicle has tires of a different size than
the size indicated on the vehicle placard
or tire inflation pressure label, you should
determine the proper tire inflation
pressure for those tires.)
As an added safety feature, your
vehicle has been equipped with a tire
pressure monitoring system (TPMS)
that illuminates a low tire pressure
telltale when one or more of your tires is
significantly under-inflated. Accordingly,
when the low tire pressure telltale
illuminates, you should stop and check
your tires as soon as possible, and inflate
them to the proper pressure. Driving on
a significantly under-inflated tire causes
the tire to overheat and can lead to tire
failure.
Under-inflation also reduces fuel
efficiency and tire tread life, and may
affect the vehicle’s handling and
stopping ability.
Please note that the TPMS is not a
substitute for proper tire maintenance,
and it is the driver’s responsibility to
maintain correct tire pressure, even if
under-inflation has not reached the level
to trigger illumination of the TPMS low
tire pressure telltale.
Your vehicle has also been equipped with
a TPMS malfunction indicator to indicate
when the system is not operating
properly. The TPMS malfunction
indicator is combined with the low
tire pressure telltale. When the system
detects a malfunction, the telltale will
flash for approximately one minute and
then remain continuously illuminated.
This sequence will continue upon
subsequent vehicle start-ups as long as
the malfunction exists.
When the malfunction indicator is
illuminated, the system may not be able
to detect or signal low tire pressure as
intended. TPMS malfunctions may occur
for a variety of reasons, including the
installation of replacement or alternate
tires or wheels on the vehicle that
prevent the TPMS from functioning
properly.
Always check the TPMS malfunction
telltale after replacing one or more tires
or wheels on your vehicle to ensure that
the replacement or alternate tires and
wheels allow the TPMS to continue to
function properly.
NOTICE
If any of the below happens, have
the system checked by an authorized
retailer of Genesis Branded products.
1. The Low Tire Pressure Telltale/ TPMS
Malfunction Indicator does not
illuminate for 3 seconds when the
Engine Start/Stop button is pressed
to the ON position or when the
engine is running.
2. The TPMS Malfunction Indicator
remains illuminated after blinking for
approximately 1 minute.
3. The Low Tire Pressure Position
Telltale remains illuminated.
Page 522 of 632

08
8-11
TPMS (Tire Pressure
Monitoring System)
Malfunction Indicator
The TPMS Malfunction Indicator
will illuminate after it blinks for
approximately one minute when there
is a problem with the Tire Pressure
Monitoring System.
Have the system checked by an
authorized retailer of Genesis Branded
products as soon as possible.
NOTICE
If there is a malfunction with the TPMS,
the Low Tire Pressure Position Telltale
will not be displayed even though the
vehicle has an under-inflated tire.
NOTICE
The TPMS Malfunction Indicator may
illuminate after blinking for one minute
if the vehicle is near electric power
supply cables or radio transmitters
such as police stations, government
and public offices, broadcasting
stations, military installations, airports,
transmitting towers, etc.
Additionally, the TPMS Malfunction
Indicator may illuminate if snow chains
are used or electronic devices such as
computers, chargers, remote starters,
navigation, etc. This may interfere with
normal operation of the TPMS.
Changing a Tire with TPMS
If you have a flat tire, the Low Tire
Pressure and Position telltales will come
on. Have the flat tire repaired by an
authorized retailer of Genesis Branded
products as soon as possible or replace
the flat tire with the spare tire.
NOTICE
It is recommended that you do not use a
puncture-repairing agent not approved
by an authorized retailer of Genesis
Branded products to repair and/or
inflate a low pressure tire. Tire sealant
not approved by an authorized retailer
of Genesis Branded products may
damage the tire pressure sensor.
The spare tire does not come with a
tire pressure monitoring sensor. When
the low pressure tire or the flat tire is
replaced with the spare tire, the Low
Tire Pressure LCD position indicator will
remain on. Also, the TPMS Malfunction
Indicator will illuminate after blinking
for one minute if the vehicle is driven
at speed above 15.5 mph (25 km/h) for
approximately 20 minutes.
Once the original wheel equipped with
a tire pressure monitoring sensor is
reinflated to the recommended pressure
and reinstalled on the vehicle, the
Low Tire Pressure Telltale and TPMS
Malfunction Indicator will go off within a
few minutes of driving.
Page 523 of 632
Emergency Situations
8-12
If the indicators do not extinguish after a
few minutes, please visit an authorized
retailer of Genesis Branded products.
Each wheel is equipped with a tire
pressure sensor mounted inside the tire
behind the valve stem (except for the
spare tire). You must use TPMS specific
wheels. It is recommended that you
always have your tires serviced by an
authorized retailer of Genesis Branded
products.
You may not be able to identify a tire
with low pressure by simply looking at it.
Always use a good quality tire pressure
gauge to measure. Please note that a tire
that is hot (from being driven) will have a
higher pressure measurement than a tire
that is cold.
A cold tire means the vehicle has been
sitting for 3 hours and driven for less
than 1 mile (1.6 km) in that 3 hour period.
Allow the tire to cool before measuring
the inflation pressure. Always be sure
the tire is cold before inflating to the
recommended pressure.
WARNING
• The TPMS cannot alert you to severe
and sudden tire damage caused by
external factors such as nails or road
debris.
• If you feel any vehicle instability,
immediately take your foot off
the accelerator, apply the brakes
gradually with light force, and slowly
move to a safe position off the road.
WARNING
Tampering with, modifying, or disabling
the Tire Pressure Monitoring System
(TPMS) components may interfere
with the system’s ability to warn the
driver of low tire pressure conditions
and/or TPMS malfunctions. Tampering
with, modifying, or disabling the Tire
Pressure Monitoring System (TPMS)
components may void the warranty for
that portion of the vehicle.
WARNING
This device complies with Part 15 of the
FCC rules.
1. This device may not cause harmful
interference.
2. This device must accept any
interference received, including
interference that may cause
undesired operation.
3. Changes or modifications not
expressly approved by the party
responsible for compliance could
void the user’s authority to operate
the equipment.
Page 524 of 632

08
8-13
IF YOU HAVE A FLAT TIRE (WITH SPARE TIRE, IF EQUIPPED)
WARNING
Changing a tire can be dangerous.
Follow the instructions in this section
when changing a tire to reduce the risk
of serious injury or death.
CAUTION
Be careful as you use the jack handle to
stay clear of the flat end. The flat end
has sharp edges that could cause cuts.
Jack and Tools
OJX1089025OJX1089025
1. Jack handle
2. Jack
3. Wheel lug wrench
4. Centering pin
The jack, jack handle, and wheel lug
wrench are stored in the luggage
compartment under the luggage box
cover.
The jack is provided for emergency tire
changing only.
OJX1089026OJX1089026
Turn the winged hold down bolt
counterclockwise to remove the spare
tire.
Store the spare tire in the same
compartment by turning the winged hold
down bolt clockwise.
To prevent the spare tire and tools from
“rattling”, store them in their proper
location.
OJX1089027OJX1089027
If it is hard to loosen the tire hold-down
wing bolt by hand, you can loosen
it easily using the wheel lug wrench
(1). Turn the tire hold-down wing bolt
counterclockwise with the wheel lug
wrench.
Page 525 of 632
Emergency Situations
8-14
Changing Tires
WARNING
A vehicle can slip or roll off of a jack
causing serious injury or death to you or
those nearby. Take the following safety
precautions:
• Do not get under a vehicle that is
supported by a jack.
• NEVER attempt to change a tire in
the lane of traffic. ALWAYS move the
vehicle completely off the road on
level, firm ground away from traffic
before trying to change a tire. If you
cannot find a level, firm place off
the road, call a towing service for
assistance.
• Be sure to use the jack provided with
the vehicle.
• ALWAYS place the jack on the
designated jacking positions on the
vehicle and NEVER on the bumpers
or any other part of the vehicle for
jacking support.
• Do not start or run the engine while
the vehicle is on the jack.
• Do not allow anyone to remain in the
vehicle while it is on the jack.
• Keep children away from the road
and the vehicle.Follow these steps to change your
vehicle’s tire:
1. Park on a level, firm surface.
2. Shift the gear to P (Park), apply the
parking brake, and press the Engine
Start/Stop button to the OFF position.
3. Press the hazard warning flasher
button.
4. Remove the wheel lug wrench, jack,
jack handle, and spare tire from the
vehicle.
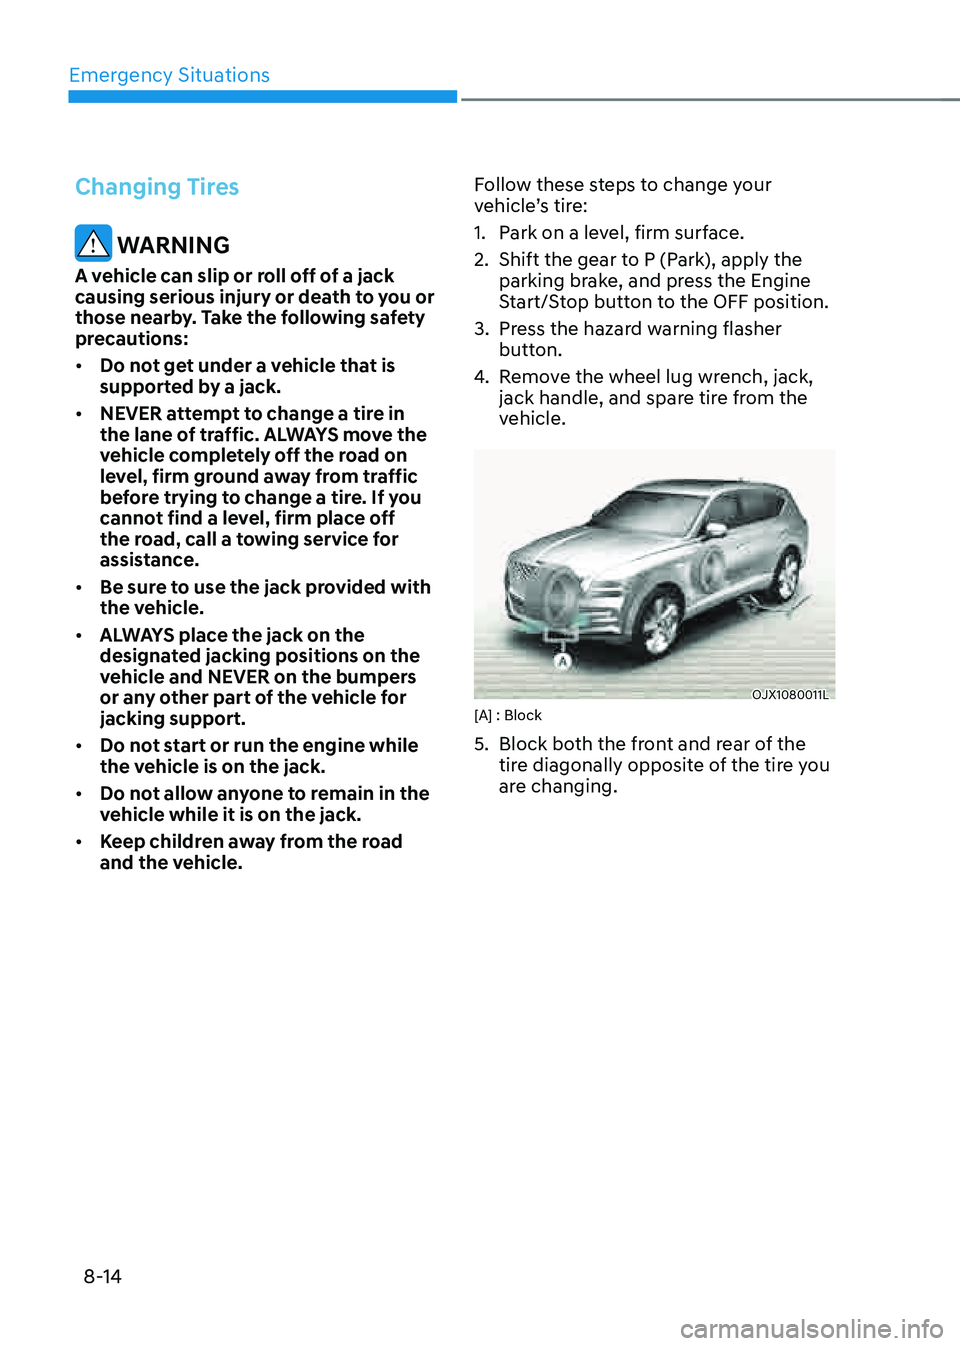
OJX1080011LOJX1080011L[A] : Block
5. Block both the front and rear of the
tire diagonally opposite of the tire you
are changing.
Page 526 of 632
08
8-15
OJX1080012LOJX1080012L
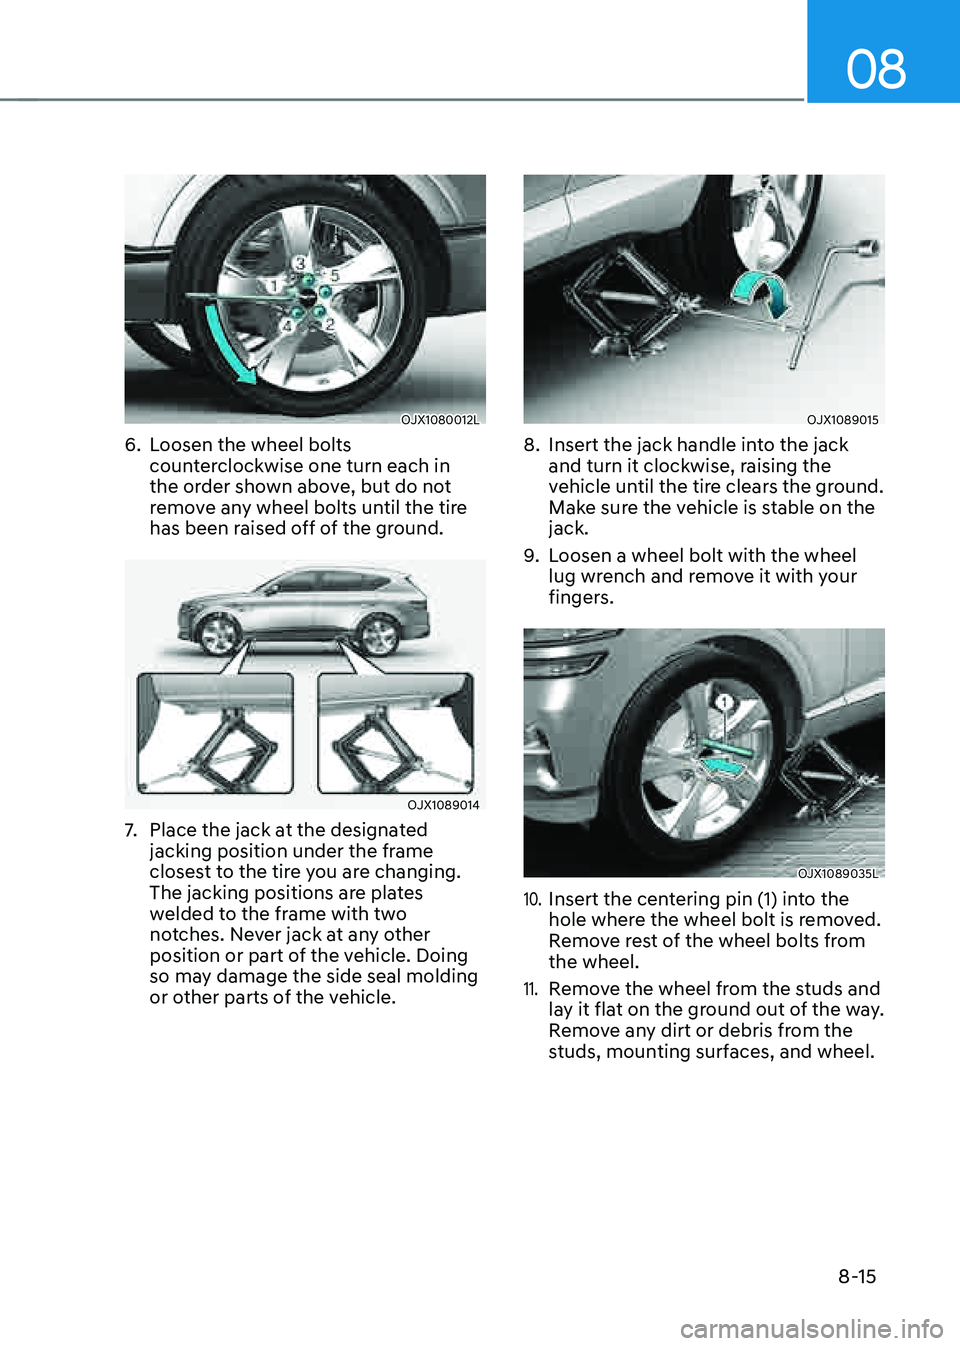
6. Loosen the wheel bolts
counterclockwise one turn each in
the order shown above, but do not
remove any wheel bolts until the tire
has been raised off of the ground.
OJX1089014OJX1089014
7. Place the jack at the designated
jacking position under the frame
closest to the tire you are changing.
The jacking positions are plates
welded to the frame with two
notches. Never jack at any other
position or part of the vehicle. Doing
so may damage the side seal molding
or other parts of the vehicle.
OJX1089015OJX1089015
8. Insert the jack handle into the jack
and turn it clockwise, raising the
vehicle until the tire clears the ground.
Make sure the vehicle is stable on the
jack.
9. Loosen a wheel bolt with the wheel
lug wrench and remove it with your
fingers.
OJX1089035LOJX1089035L
10. Insert the centering pin (1) into the
hole where the wheel bolt is removed.
Remove rest of the wheel bolts from
the wheel.
11. Remove the wheel from the studs and
lay it flat on the ground out of the way.
Remove any dirt or debris from the
studs, mounting surfaces, and wheel.
Page 527 of 632
Emergency Situations
8-16
OJX1089036LOJX1089036L
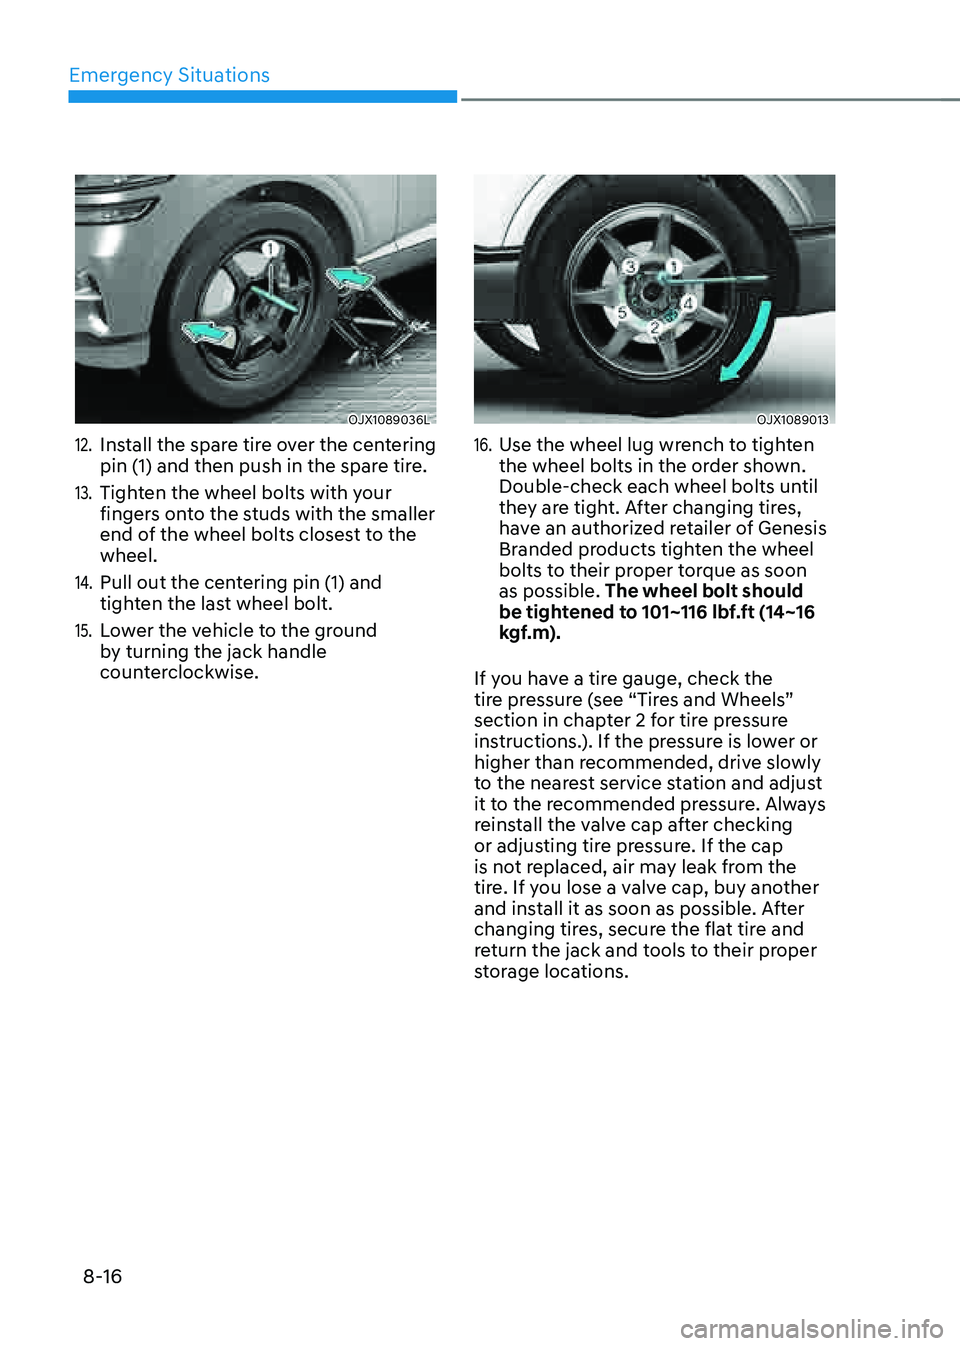
12. Install the spare tire over the centering
pin (1) and then push in the spare tire.
13. Tighten the wheel bolts with your
fingers onto the studs with the smaller
end of the wheel bolts closest to the
wheel.
14. Pull out the centering pin (1) and
tighten the last wheel bolt.
15. Lower the vehicle to the ground
by turning the jack handle
counterclockwise.
OJX1089013OJX1089013
16. Use the wheel lug wrench to tighten
the wheel bolts in the order shown.
Double-check each wheel bolts until
they are tight. After changing tires,
have an authorized retailer of Genesis
Branded products tighten the wheel
bolts to their proper torque as soon
as possible. The wheel bolt should
be tightened to 101~116 lbf.ft (14~16
kgf.m).
If you have a tire gauge, check the
tire pressure (see “Tires and Wheels”
section in chapter 2 for tire pressure
instructions.). If the pressure is lower or
higher than recommended, drive slowly
to the nearest service station and adjust
it to the recommended pressure. Always
reinstall the valve cap after checking
or adjusting tire pressure. If the cap
is not replaced, air may leak from the
tire. If you lose a valve cap, buy another
and install it as soon as possible. After
changing tires, secure the flat tire and
return the jack and tools to their proper
storage locations.
Page 528 of 632
08
8-17
NOTICE
Check the tire pressure as soon as
possible after installing a spare tire.
Adjust it to the recommended pressure.
CAUTION
Your vehicle has metric threads on the
studs and wheel bolts. Make certain
during tire changing that the same bolts
that were removed are reinstalled. If
you have to replace your wheel bolts
make sure they have metric threads to
avoid damaging the studs and ensure
the wheel is properly secured to the
hub. Consult an authorized retailer
of Genesis Branded products for
assistance.
If any of the equipment such as the jack,
wheel bolts, studs, or other equipment
is damaged or in poor condition, do not
attempt to change the tire and call for
assistance.
Use of compact spare tires
(if equipped)
Compact spare tires are designed for
emergency use only. Drive carefully on
the compact spare tire and always follow
the safety precautions.
WARNING
To prevent compact spare tire failure
and loss of control possibly resulting in
an accident:
• Use the compact spare tire only in an
emergency.
• NEVER operate your vehicle over 50 mph (80 km/h).
• Do not exceed the vehicle’s
maximum load rating or the load
carrying capacity shown on the
sidewall of the compact spare tire.
• Do not use the compact spare tire
continuously. Repair or replace the
original tire as soon as possible to
avoid failure of the compact spare
tire.