light GENESIS GV80 2021 Owner's Manual
[x] Cancel search | Manufacturer: GENESIS, Model Year: 2021, Model line: GV80, Model: GENESIS GV80 2021Pages: 632, PDF Size: 9.37 MB
Page 488 of 632
Driver Assistance System
7-140
• A collision may occur if a pedestrian,
animal, or object suddenly appears
while Remote Smart Parking Assist is
operating.
• Do not use Remote Smart Parking
Assist when under the influence of
alcohol.
• Do not let children or other people to
use the smart key.
• When operating Remote Smart
Parking Assist, be careful of objects
such as flower pots or parking
blocks located above or below the
ultrasonic sensor. Such object may
damage the vehicle or other objects.
CAUTION
• Remote Smart Parking Assist may not
operate properly depending on the
surroundings and other conditions.
• If the Remote Smart Parking Assist is
used continuously for a long period,
it may adversely affect system
performance.
• Remote Smart Parking Assist may
not operate normally if the vehicle
needs wheel alignment adjustment
such as when the vehicle tilts to one
side. Have the vehicle checked by
an authorized retailer of Genesis
Branded products.
• If you use a different tire or
wheel size rather than the size
recommended, it may adversely
affect Remote Smart Parking Assist
performance.
• Remote Smart Parking Assist
performance may be reduced on
uneven surfaces (curbstone, speed
bump, etc.).
• If you attach objects or install any
types of cover on the steering wheel,
it may cancel Remote Smart Parking
Assist operation.
• Noise may be heard when braking
occurs by Remote Smart Parking
Assist or when the brake pedal is
depressed by the driver.
• Remote Smart Parking Assist may
suddenly apply the brake to avoid a
collision.
• Use the system only in a parking
space that is large enough for the
vehicle to move safely.
NOTICE
• If the 3rd stage warning (continuous
beep) of the Forward/Reverse
Parking Distance Warning sounds
while Remote Smart Parking
Assist is operating, it means the
obstacle detected is close to your
vehicle. At this time, Remote Smart
Parking Assist will temporarily stop
operating. Make sure there are no
pedestrians, animals, or objects
around your vehicle.
• Depending on brake operation, the
stop lights may come on while the
vehicle is moving.
Page 506 of 632

Driver Assistance System
7-158
System operation status
Smart key LED / Hazard warning light
The operation status of Smart Parking Assist is indicated by the smart key LED and the
hazard warning light.
Operation statusSmart key LEDHazard
warning light
Remote Smart Parking
/ Remote Entry/Exit
Parking in operation
OJX1079172OJX1079172
Green LED
continuously blinks -
Remote Smart Parking
/ Remote Entry/Exit
Parking paused Red LED
continuously blinks
Blinks
Remote Smart Parking
/ Remote Entry/Exit
Parking operation off Red LED illuminates
for 4 seconds and
then turns off
Blinks 3 times
and turns off
Remote Smart Parking
/ Remote Entry/Exit
Parking operation
complete Green LED
illuminates for 4
seconds and then
turns off
Blinks 1 time
and turns off
Ã
Operation status by the hazard warning light may not be applicable based on the
regulation of your country.
ÃIf the smart key is not within the operating range from the vehicle (approximately 13
ft. (4 m)), the smart key LED will not illuminate or blink. Use the smart key within the
operating range.
Turn signal light
The operation status of Remote Smart Parking Assist is indicated by the turn signal
light.
Operation status Turn signal light
Smart Parking / Remote
Smart Parking in operation During parking, the turn signal lights will blink in the
direction of parking until the vehicle moves rearward.
Smart Exit in operation The turn signal lights will blink in the direction of exit until
the exit is completed or canceled.
Page 512 of 632
Emergency Situations
Hazard Warning Flasher ........................................................................\
...........8-2
In Case of an Emergency While Driving
..........................................................8-2If the Engine Stalls While Driving ........................................................................\
........8-2
If the Engine Stalls at a Crossroad or Crossing ..........................................................8-2
If You Have a Flat Tire While Driving ........................................................................\
...8-3
If the Engine Will Not Start ........................................................................\
.......8-3
Jump Starting
........................................................................\
...........................8-4
If the Engine Overheats
........................................................................\
............8-6
Tire Pressure Monitoring System (TPMS)
........................................................8-8Check Tire Pressure ........................................................................\
.............................8-8
Tire Pressure Monitoring System ........................................................................\
.......8-9
Low Tire Pressure Warning Light ........................................................................\
.......8-10
Low Tire Pressure Position and Tire Pressure Telltale ..............................................8-10
TPMS (Tire Pressure Monitoring System) Malfunction Indicator .............................8-11
Changing a Tire with TPMS ........................................................................\
................8-11
If You Have a Flat Tire (with Spare Tire) ..........................................................8-13Jack and Tools ........................................................................\
....................................8-13
Changing Tires ........................................................................\
....................................8-14
Jack Label ........................................................................\
...........................................8-19
If You Have a Flat Tire (with Tire Mobility Kit) ...............................................8-20Introduction ........................................................................\
.......................................8-20
Notes on the Safe Use of the Tire Mobility Kit .........................................................8-21
Components of the Tire Mobility Kit ........................................................................\
.8-22
Using the Tire Mobility Kit ........................................................................\
.................8-23
Checking the Tire Inflation Pressure ........................................................................\
.8-25
Towing ........................................................................\
......................................8-27Towing Service ........................................................................\
...................................8-27
Removable Towing Hook ........................................................................\
...................8-28
Emergency Towing ........................................................................\
.............................8-29
8. Emergency Situations
8
Page 513 of 632

Emergency Situations
8-2
OJX1089001OJX1089001
The hazard warning flasher serves as
a warning to other drivers to exercise
extreme caution when approaching,
overtaking, or passing your vehicle.
It should be used whenever emergency
repairs are being made or when the
vehicle is stopped near the edge of a
roadway.
To turn the hazard warning flasher on
or off, press the hazard warning flasher
button with the Engine Start/Stop button
in any position. The hazard warning
flasher button is located in the center
fascia panel. All turn signal lights will
flash simultaneously.
• The hazard warning flasher operates
regardless of whether your vehicle is
running or not.
• The turn signals do not work when the
hazard flasher is on.
If the Engine Stalls While Driving
• Reduce your speed gradually, keeping
a straight line. Move cautiously off the
road to a safe place.
• Turn on your hazard warning flasher.
• Try to start the engine again. If your
vehicle will not start, contact an
authorized retailer of Genesis Branded
products or seek other qualified
assistance.
If the Engine Stalls at a Crossroad
or Crossing
If the engine stalls at a crossroads or
crossing, if safe to do so, shift the gear to
N (Neutral) and then push the vehicle to
a safe location.
HAZARD WARNING FLASHERIN CASE OF AN EMERGENCY
WHILE DRIVING
Page 514 of 632
08
8-3
If You Have a Flat Tire While
Driving
If a tire goes flat while you are driving:
• Take your foot off the accelerator
pedal and let the vehicle slow down
while driving straight ahead. Do not
apply the brakes immediately or
attempt to pull off the road as this
may cause loss of vehicle control
resulting in an accident. When the
vehicle has slowed to such a speed
that it is safe to do so, brake carefully
and pull off the road. Drive off the
road as far as possible and park on
firm, level ground. If you are on a
divided highway, do not park in the
median area between the two traffic
lanes.
• When the vehicle is stopped, press the
hazard warning flasher button, shift
the gear to P (Park), apply the parking
brake, and press the Engine Start/Stop
button to the OFF position.
• Have all passengers get out of the
vehicle. Be sure they all get out on the
side of the vehicle that is away from
traffic.
• When changing a flat tire, follow the
instructions provided later in this
chapter.
IF THE ENGINE WILL NOT
START
• Be sure to shift the gear to N (Neutral)
or P (Park). The engine starts only
when the gear is in N (Neutral) or P
(Park).
• Turn on the interior light. If the light
dims or goes out when you operate
the starter, the battery is drained.
See instructions for “Jump Starting”
provided in this chapter.
• Check the fuel level and add fuel if
necessary.
If the vehicle still does not start, call an
authorized retailer of Genesis Branded
products for assistance.
NOTICE
Push or pull starting the vehicle may
cause the catalytic converter to
overload which can lead to damage to
the emission control system.
Page 515 of 632
Emergency Situations
8-4
Jump starting can be dangerous if done
incorrectly. Follow the jump starting
procedure in this section to avoid serious
injury or damage to your vehicle. If in
doubt about how to properly jump start
your vehicle, we strongly recommend
that you have a service technician or
towing service do it for you.
WARNING
To prevent SERIOUS INJURY or DEATH
to you or bystanders, always follow
these precautions when working near
or handling the battery:
Always read and follow instructions carefully when
handling a battery.
Wear eye protection designed to protect the eyes from acid
splashes.
Keep all flames, sparks, or smoking materials away from
the battery.
Hydrogen is always present in battery cells, is highly
combustible, and may explode
if ignited.
Keep batteries out of reach of children.
Batteries contain sulfuric acid which is highly corrosive. Do
not allow acid to contact your
eyes, skin or clothing.If acid gets into your eyes, flush your
eyes with clean water for at least 15
minutes and get immediate medical
attention. If acid gets on your skin,
thoroughly wash the area. If you feel
pain or a burning sensation, get medical
attention immediately.
• When lifting a plastic-cased battery,
excessive pressure on the case may
cause battery acid to leak. Lift with a
battery carrier or with your hands on
opposite corners.
• Do not attempt to jump start your
vehicle if your battery is frozen.
• NEVER attempt to recharge the
battery when the vehicle’s battery
cables are connected to the battery.
• The electrical ignition system works
with high voltage.
NEVER touch these components
with the engine running or when the
Engine Start/Stop button is in the ON
position.
Jump starting procedure
Information
Your vehicle has a battery in the luggage
compartment, but when you jump start
your vehicle, use the jumper terminal in
the engine compartment.
1. Position the vehicles close enough
that the jumper cables will reach, but
do not allow the vehicles to touch.
2. Avoid fans or any moving parts in the
engine compartment at all times, even
when the vehicles are turned off.
3. Turn off all electrical devices such as
radios, lights, air conditioning, etc.
Put the vehicles in P (Park) and set the
parking brake. Turn both vehicles OFF.
4. Open the engine hood.
JUMP STARTING
Page 521 of 632
Emergency Situations
8-10
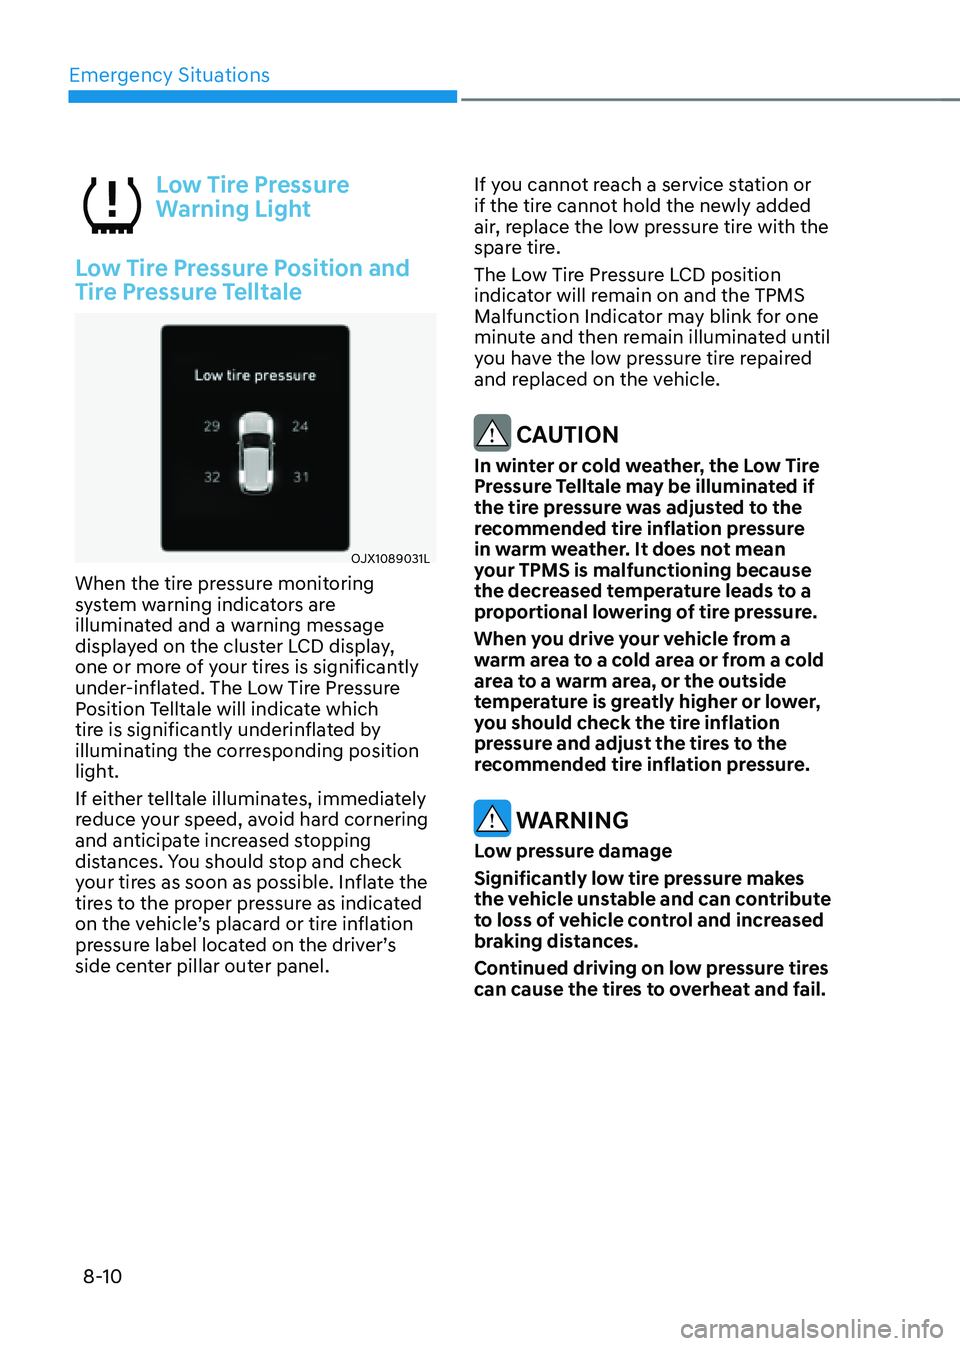
Low Tire Pressure
Warning Light
Low Tire Pressure Position and
Tire Pressure Telltale
OJX1089031LOJX1089031L
When the tire pressure monitoring
system warning indicators are
illuminated and a warning message
displayed on the cluster LCD display,
one or more of your tires is significantly
under-inflated. The Low Tire Pressure
Position Telltale will indicate which
tire is significantly underinflated by
illuminating the corresponding position
light.
If either telltale illuminates, immediately
reduce your speed, avoid hard cornering
and anticipate increased stopping
distances. You should stop and check
your tires as soon as possible. Inflate the
tires to the proper pressure as indicated
on the vehicle’s placard or tire inflation
pressure label located on the driver’s
side center pillar outer panel. If you cannot reach a service station or
if the tire cannot hold the newly added
air, replace the low pressure tire with the
spare tire.
The Low Tire Pressure LCD position
indicator will remain on and the TPMS
Malfunction Indicator may blink for one
minute and then remain illuminated until
you have the low pressure tire repaired
and replaced on the vehicle.
CAUTION
In winter or cold weather, the Low Tire
Pressure Telltale may be illuminated if
the tire pressure was adjusted to the
recommended tire inflation pressure
in warm weather. It does not mean
your TPMS is malfunctioning because
the decreased temperature leads to a
proportional lowering of tire pressure.
When you drive your vehicle from a
warm area to a cold area or from a cold
area to a warm area, or the outside
temperature is greatly higher or lower,
you should check the tire inflation
pressure and adjust the tires to the
recommended tire inflation pressure.
WARNING
Low pressure damage
Significantly low tire pressure makes
the vehicle unstable and can contribute
to loss of vehicle control and increased
braking distances.
Continued driving on low pressure tires
can cause the tires to overheat and fail.
Page 523 of 632
Emergency Situations
8-12
If the indicators do not extinguish after a
few minutes, please visit an authorized
retailer of Genesis Branded products.
Each wheel is equipped with a tire
pressure sensor mounted inside the tire
behind the valve stem (except for the
spare tire). You must use TPMS specific
wheels. It is recommended that you
always have your tires serviced by an
authorized retailer of Genesis Branded
products.
You may not be able to identify a tire
with low pressure by simply looking at it.
Always use a good quality tire pressure
gauge to measure. Please note that a tire
that is hot (from being driven) will have a
higher pressure measurement than a tire
that is cold.
A cold tire means the vehicle has been
sitting for 3 hours and driven for less
than 1 mile (1.6 km) in that 3 hour period.
Allow the tire to cool before measuring
the inflation pressure. Always be sure
the tire is cold before inflating to the
recommended pressure.
WARNING
• The TPMS cannot alert you to severe
and sudden tire damage caused by
external factors such as nails or road
debris.
• If you feel any vehicle instability,
immediately take your foot off
the accelerator, apply the brakes
gradually with light force, and slowly
move to a safe position off the road.
WARNING
Tampering with, modifying, or disabling
the Tire Pressure Monitoring System
(TPMS) components may interfere
with the system’s ability to warn the
driver of low tire pressure conditions
and/or TPMS malfunctions. Tampering
with, modifying, or disabling the Tire
Pressure Monitoring System (TPMS)
components may void the warranty for
that portion of the vehicle.
WARNING
This device complies with Part 15 of the
FCC rules.
1. This device may not cause harmful
interference.
2. This device must accept any
interference received, including
interference that may cause
undesired operation.
3. Changes or modifications not
expressly approved by the party
responsible for compliance could
void the user’s authority to operate
the equipment.
Page 543 of 632

Tires and Wheels ........................................................................\
.....................9-30Tire Care ........................................................................\
.............................................9-30
Recommended Cold Tire Inflation Pressures ..........................................................9-30
Check Tire Inflation Pressure ........................................................................\
.............9-31
Tire Rotation ........................................................................\
.......................................9-32
Wheel Alignment and Tire Balance ........................................................................\
...9-33
Tire Replacement ........................................................................\
...............................9-33
Wheel Replacement ........................................................................\
...........................9-34
Tire Traction ........................................................................\
........................................9-34
Tire Maintenance ........................................................................\
................................ 9-34
Tire Sidewall Labeling
........................................................................\
........................9-35
Tire Terminology and Definitions ........................................................................\
.....9-38
All Season Tires ........................................................................\
...................................9-41
Summer Tires ........................................................................\
.....................................9-41
Snow Tires ........................................................................\
.......................................... 9-42
Radial-Ply Tires
........................................................................\
..................................9-42
Low Aspect Ratio Tires ........................................................................\
......................9-43
Fuses ........................................................................\
........................................9-44Instrument Panel Fuse Replacement .......................................................................9-45
Engine Compartment Panel Fuse Replacement .....................................................9-46
Fuse/Relay Panel Description ........................................................................\
............ 9-47
Light Bulbs ........................................................................\
...............................9-60Headlamp, Position Lamp, Turn Signal Lamp, Daytime Running Light (DRL)
Replacement ........................................................................\
......................................9-61
Side Repeater Lamp Replacement ........................................................................\
..9-62
Puddle Lamp Replacement ........................................................................\
..............9-62
Rear combination Lamp Replacement ....................................................................9-63
High Mounted Stop Lamp Replacement .................................................................9-63
License Plate Lamp Replacement ........................................................................\
....9-64
Interior Light Replacement ........................................................................\
...............9-64
Appearance Care ........................................................................\
....................9-66Exterior Care ........................................................................\
......................................9-66
Interior Care ........................................................................\
........................................9-72
Emission Control System ........................................................................\
.........9-75
California Perchlorate Notice
........................................................................\
..9-779
Page 547 of 632
Maintenance
9-6
Owner Maintenance Schedule
When you stop for fuel:
• Check the engine oil level.
• Check the coolant level in the engine
coolant reservoir or the liquid-cooled
intercooler coolant reservoir.
• Check the windshield liquid fluid level.
• Check for low or under-inflated tires.
WARNING
Be careful when checking your coolant
level when the engine is hot. This may
result in coolant being blown out of the
opening and cause serious burns and
other injuries.
While operating your vehicle:
• Note any changes in the sound of the
exhaust or any smell of exhaust fumes
in the vehicle.
• Check for vibrations in the steering
wheel. Notice if there is any increased
steering effort or looseness in the
steering wheel, or change in its
straight-ahead position.
• Notice if your vehicle constantly turns
slightly or “pulls” to one side when
traveling on smooth, level road.
• When stopping, listen and check for
unusual sounds, pulling to one side,
increased brake pedal travel or “hard-
to-push” brake pedal.
• If any slipping or changes in the
operation of your transmission occurs,
check the transmission fluid level.
• Check the automatic transmission P
(Park) function.
• Check the parking brake.
• Check for fluid leaks under your
vehicle (water dripping from the air
conditioning system during or after
use is normal).
At least monthly:
• Check coolant level in the engine
coolant reservoir.
• Check the operation of all exterior
lights, including the stoplights, turn
signals and hazard warning flashers.
• Check the inflation pressures of all
tires including the spare for tires that
are worn, show uneven wear, or are
damaged.
• Check for loose wheel lug nuts.
At least twice a year: (i.e., every
Spring and Autumn)
• Check radiator, heater and air
conditioning hoses for leaks or
damage.
• Check windshield washer spray and
wiper operation. Clean wiper blades
with a clean cloth dampened with
washer fluid.
• Check headlamp alignment.
• Check muffler, exhaust pipes, shields
and clamps.
• Check the seat belts for wear and
function.
At least once a year:
• Clean body and door drain holes.
• Lubricate door hinges and hood
hinges.
• Lubricate door and hood locks and
latches.
• Lubricate door rubber weather strips.
• Check the air conditioning system.
• Inspect and lubricate automatic
transmission linkage and controls.
• Clean the battery and terminals.
• Check the brake fluid level.