infotainment GENESIS GV80 2021 Owner's Manual
[x] Cancel search | Manufacturer: GENESIS, Model Year: 2021, Model line: GV80, Model: GENESIS GV80 2021Pages: 632, PDF Size: 9.37 MB
Page 17 of 632
2-5
02
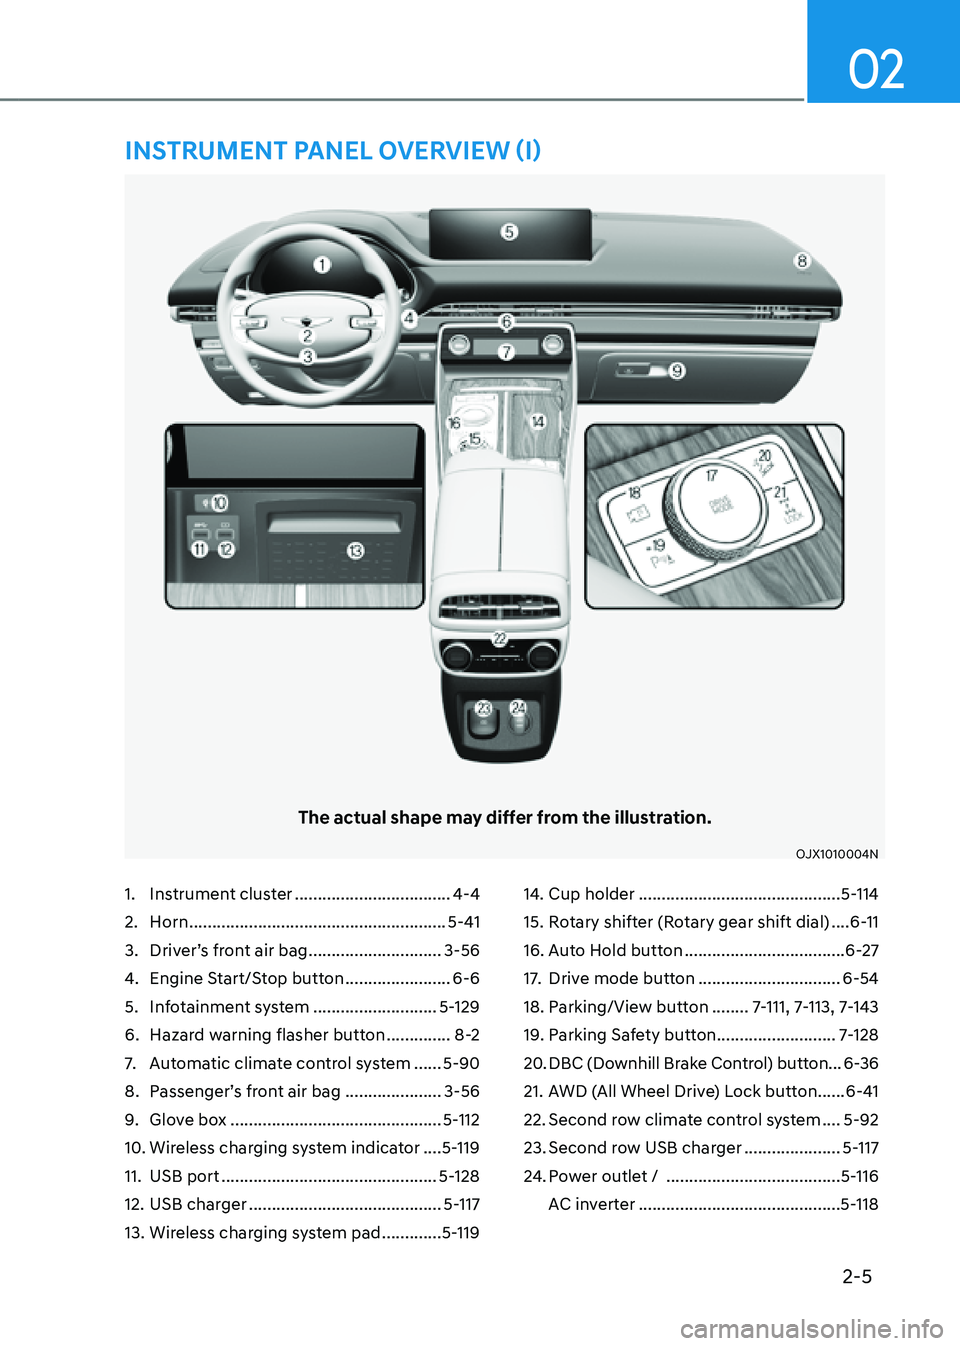
1. Instrument cluster ..................................4-4
2. Horn ........................................................5-41
3. Driver’s front air bag .............................3-56
4. Engine Start/Stop button .......................6-6
5. Infotainment system ...........................5-129
6. Hazard warning flasher button ..............8-2
7. Automatic climate control system ......5-90
8. Passenger’s front air bag .....................3-56
9. Glove box ..............................................5-112
10. Wireless charging system indicator ....5-119
11. USB port ...............................................5-128
12. USB charger ..........................................5-117
13. Wireless charging system pad .............5-119
14. Cup holder ............................................5-114
15. Rotary shifter (Rotary gear shift dial) ....6-11
16. Auto Hold button ...................................6-27
17. Drive mode button ...............................6-54
18. Parking/View button ........7-111, 7-113, 7-143
19. Parking Safety button ..........................7-128
20. DBC (Downhill Brake Control) button ...6-36
21. AWD (All Wheel Drive) Lock button ......6-41
22. Second row climate control system ....5-92
23. Second row USB charger .....................5-117
24. Power outlet / ......................................5-116
AC inverter
............................................5-118
The actual shape may differ from the illustration.
OJX1010004NOJX1010004N
INSTRUMENT PANEL OVERVIEW (I)
Page 35 of 632
Safety System
3-6
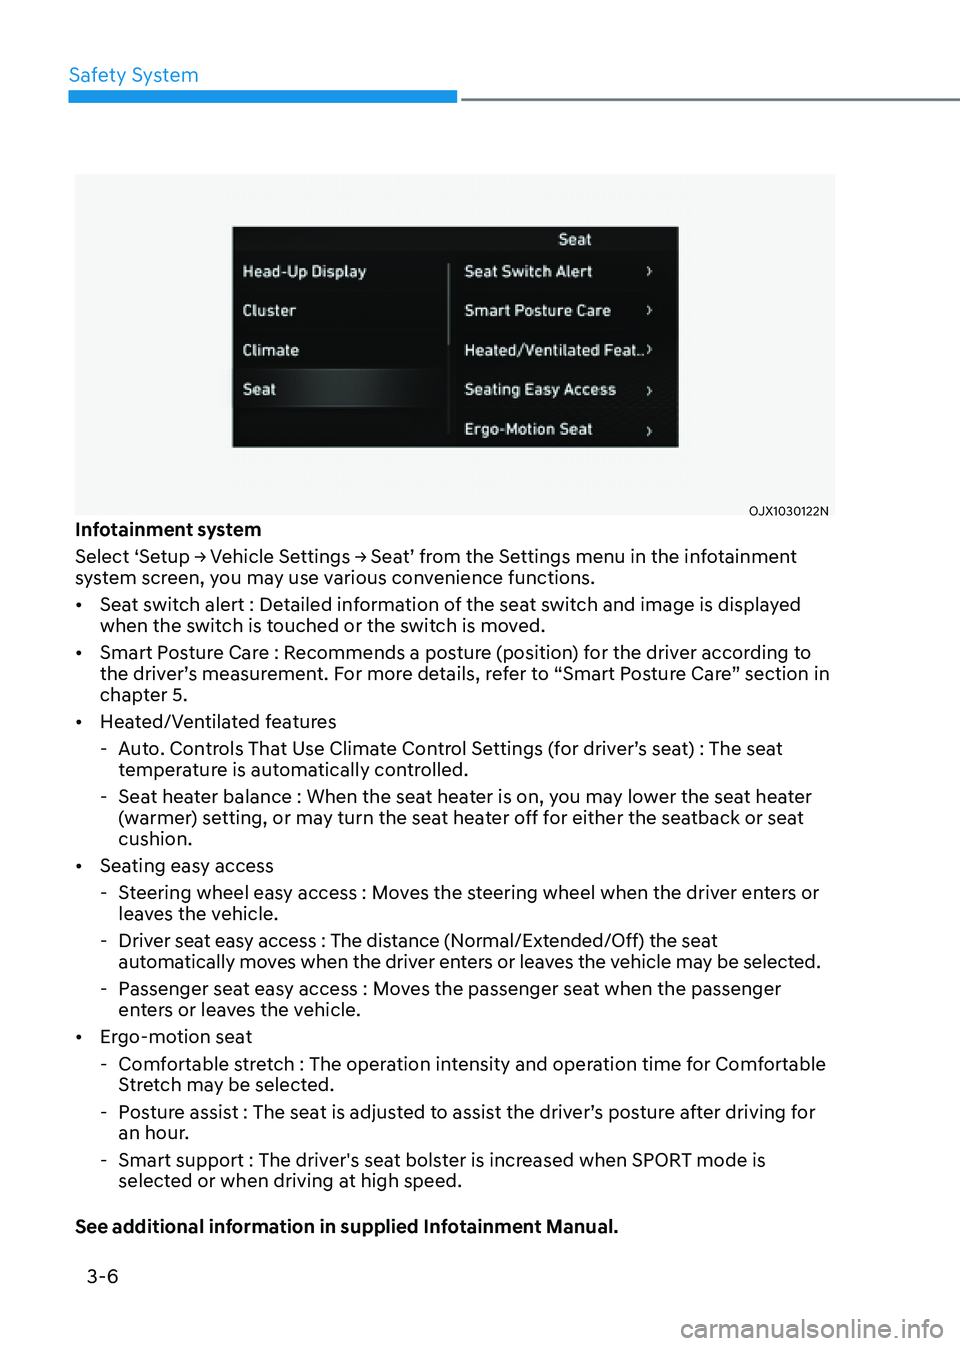
OJX1030122NOJX1030122NInfotainment system
Select ‘Setup -> Vehicle Settings -> Seat’ from the Settings menu in the infotainment
system screen, you may use various convenience functions.
• Seat switch alert : Detailed information of the seat switch and image is displayed
when the switch is touched or the switch is moved.
• Smart Posture Care : Recommends a posture (position) for the driver according to
the driver’s measurement. For more details, refer to “Smart Posture Care” section in
chapter 5.
• Heated/Ventilated features
-Auto. Controls That Use Climate Control Settings (for driver’s seat) : The seat
temperature is automatically controlled.
-Seat heater balance : When the seat heater is on, you may lower the seat heater
(warmer) setting, or may turn the seat heater off for either the seatback or seat
cushion.
• Seating easy access
-Steering wheel easy access : Moves the steering wheel when the driver enters or
leaves the vehicle.
-Driver seat easy access : The distance (Normal/Extended/Off) the seat
automatically moves when the driver enters or leaves the vehicle may be selected.
-Passenger seat easy access : Moves the passenger seat when the passenger
enters or leaves the vehicle.
• Ergo-motion seat
-Comfortable stretch : The operation intensity and operation time for Comfortable
Stretch may be selected.
-Posture assist : The seat is adjusted to assist the driver’s posture after driving for
an hour.
-Smart support : The driver's seat bolster is increased when SPORT mode is
selected or when driving at high speed.
See additional information in supplied Infotainment Manual.
Page 40 of 632
03
3-11
Seat cushion support adjustment
(for driver's seat) (if equipped)
OJX1039004OJX1039004
To adjust cushion support:
1. Push the control switch up to increase
cushion support or down to decrease
cushion support.
2. Release the switch once the seat
cushion support reaches the desired
position.
Lumbar support (if equipped)
OJX1039006OJX1039006
To adjust the lumbar support:
1. Press the front portion of the switch
(1) to increase support or the rear
portion of the switch (2) to decrease
support.
2. Press switch (3) or (4) to move the
support position up or down.
3. Release the switch once the lumbar
support reaches the desired position.
Seat bolster adjustment
(for driver's seat) (if equipped)
OJX1039007OJX1039007
To adjust seat bolster:
1. Push the adjustment lever clockwise,
the seatback bolster will be
adjusted inward. Push the switch
counterclockwise, the seatback
bolster will be adjusted outward.
2. Release the lever once the bolster
reaches the desired position.
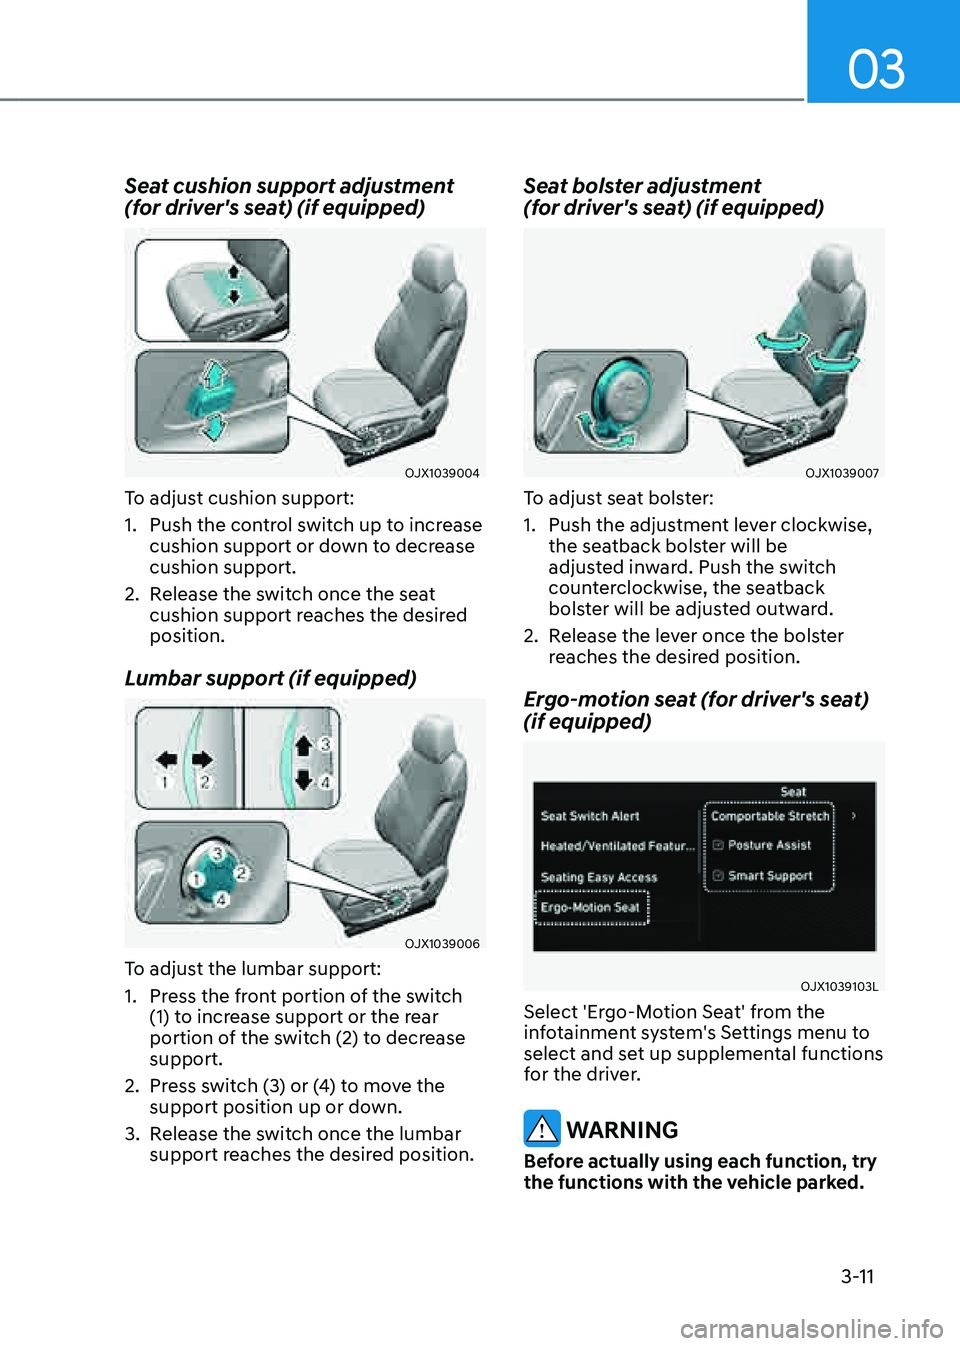
Ergo-motion seat (for driver's seat)
(if equipped)
OJX1039103LOJX1039103L
Select 'Ergo-Motion Seat' from the
infotainment system's Settings menu to
select and set up supplemental functions
for the driver.
WARNING
Before actually using each function, try
the functions with the vehicle parked.
Page 41 of 632
Safety System
3-12
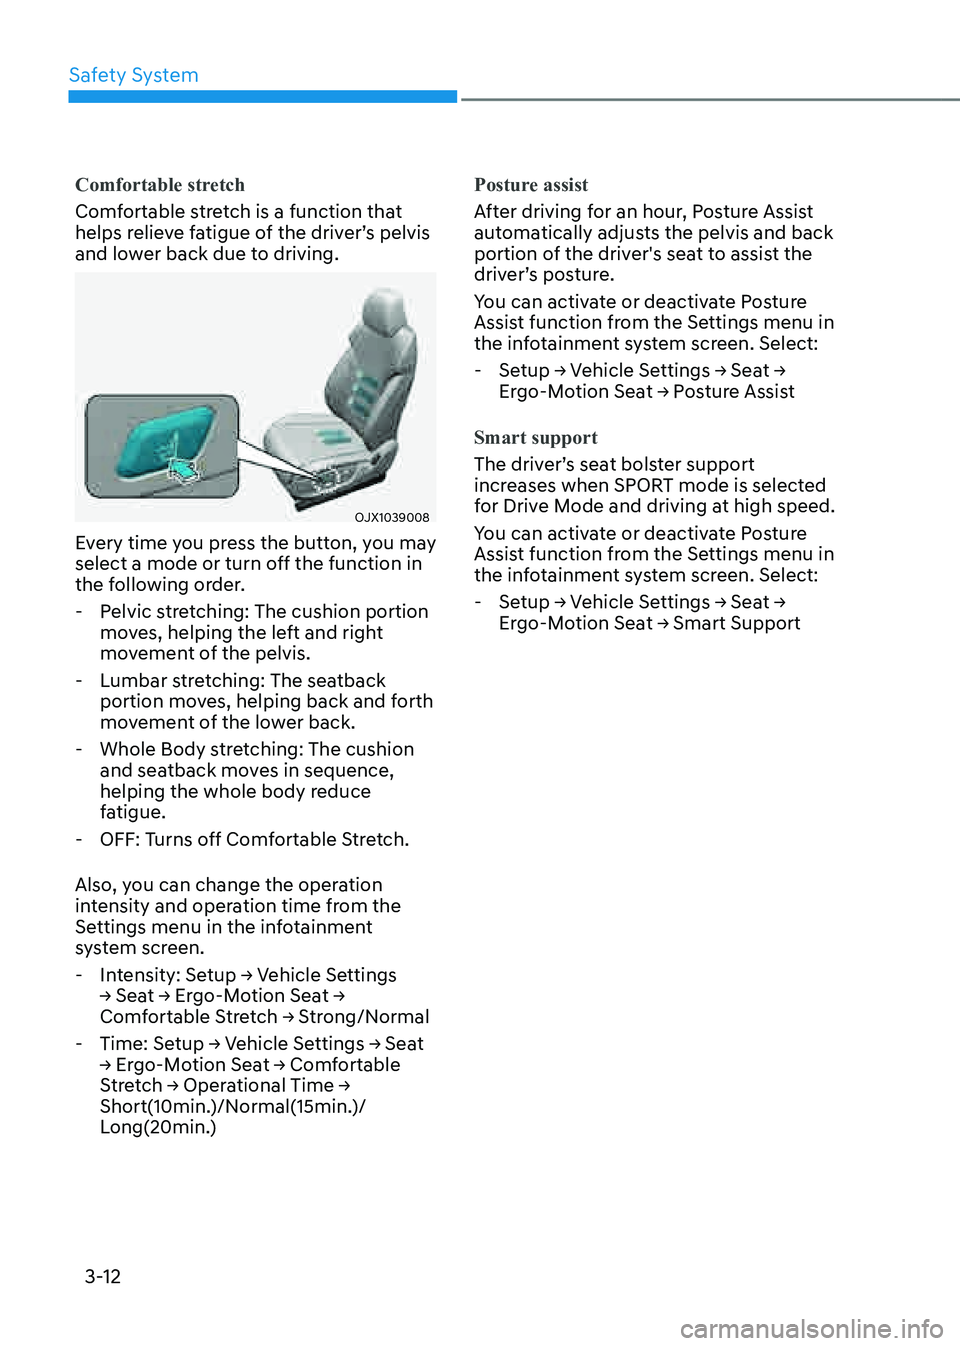
Comfortable stretch
Comfortable stretch is a function that
helps relieve fatigue of the driver’s pelvis
and lower back due to driving.
OJX1039008OJX1039008
Every time you press the button, you may
select a mode or turn off the function in
the following order.
-Pelvic stretching: The cushion portion
moves, helping the left and right
movement of the pelvis.
-Lumbar stretching: The seatback
portion moves, helping back and forth
movement of the lower back.
-Whole Body stretching: The cushion
and seatback moves in sequence,
helping the whole body reduce
fatigue.
-OFF: Turns off Comfortable Stretch.
Also, you can change the operation
intensity and operation time from the
Settings menu in the infotainment
system screen.
-Intensity: Setup -> Vehicle Settings -> Seat -> Ergo-Motion Seat -> Comfortable Stretch -> Strong/Normal
-Time: Setup -> Vehicle Settings -> Seat -> Ergo-Motion Seat -> Comfortable Stretch -> Operational Time -> Short(10min.)/Normal(15min.)/
Long(20min.) Posture assist
After driving for an hour, Posture Assist
automatically adjusts the pelvis and back
portion of the driver's seat to assist the
driver’s posture.
You can activate or deactivate Posture
Assist function from the Settings menu in
the infotainment system screen. Select:
-Setup -> Vehicle Settings -> Seat -> Ergo-Motion Seat -> Posture Assist
Smart support
The driver’s seat bolster support
increases when SPORT mode is selected
for Drive Mode and driving at high speed.
You can activate or deactivate Posture
Assist function from the Settings menu in
the infotainment system screen. Select:
-Setup -> Vehicle Settings -> Seat -> Ergo-Motion Seat -> Smart Support
Page 46 of 632
03
3-17
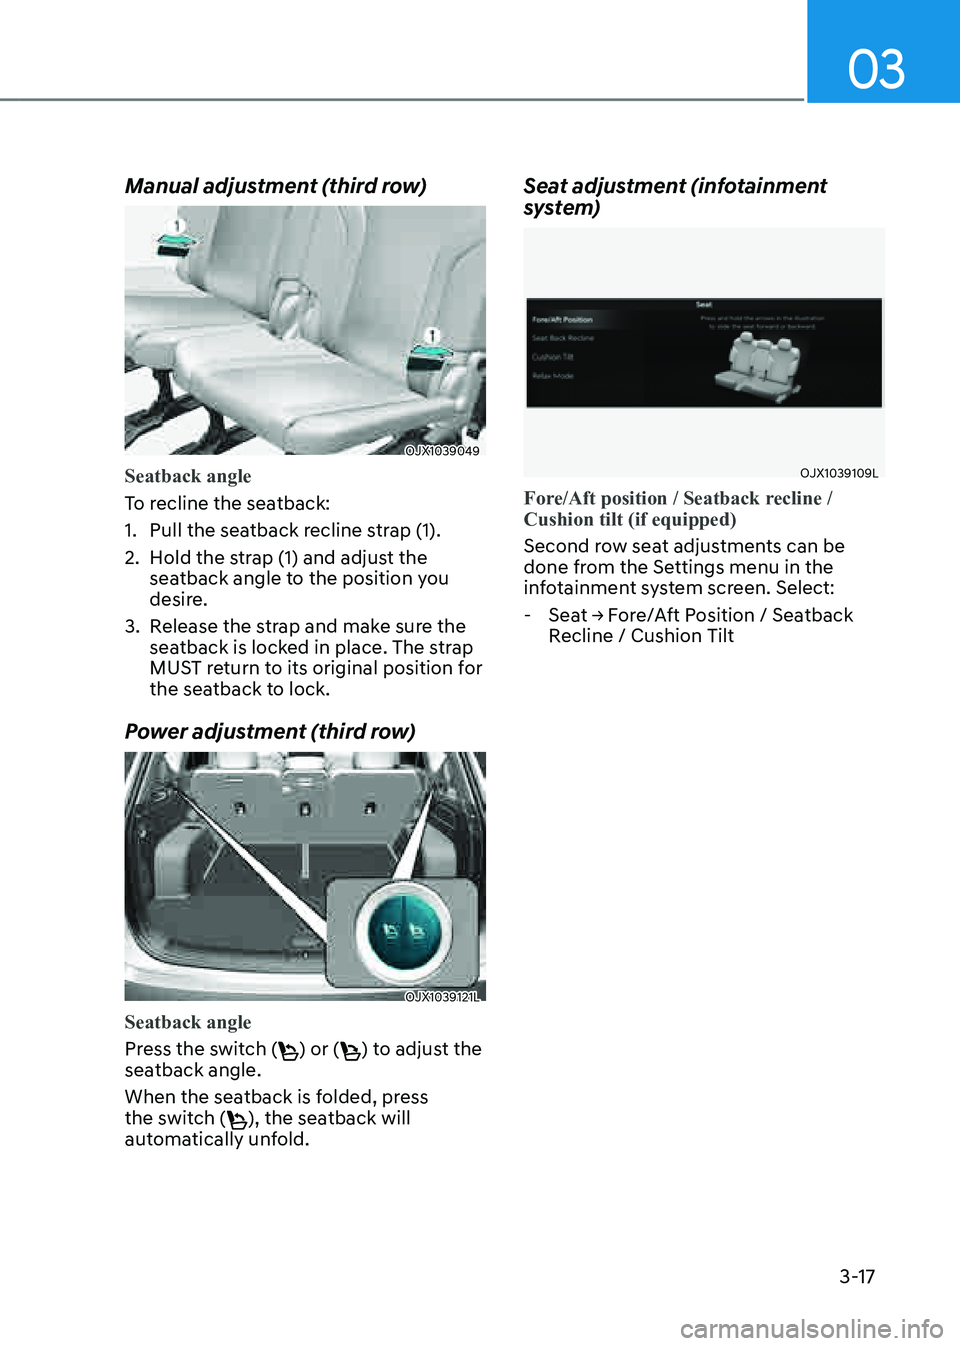
Manual adjustment (third row)
OJX1039049OJX1039049
Seatback angle
To recline the seatback:
1. Pull the seatback recline strap (1).
2. Hold the strap (1) and adjust the
seatback angle to the position you
desire.
3. Release the strap and make sure the
seatback is locked in place. The strap
MUST return to its original position for
the seatback to lock.
Power adjustment (third row)
OJX1039121LOJX1039121L
Seatback angle
Press the switch (
) or () to adjust the
seatback angle.
When the seatback is folded, press
the switch (
), the seatback will
automatically unfold.
Seat adjustment (infotainment
system)
OJX1039109LOJX1039109L
Fore/Aft position / Seatback recline /
Cushion tilt (if equipped)
Second row seat adjustments can be
done from the Settings menu in the
infotainment system screen. Select:
-Seat -> Fore/Aft Position / Seatback Recline / Cushion Tilt
Page 49 of 632
Safety System
3-20
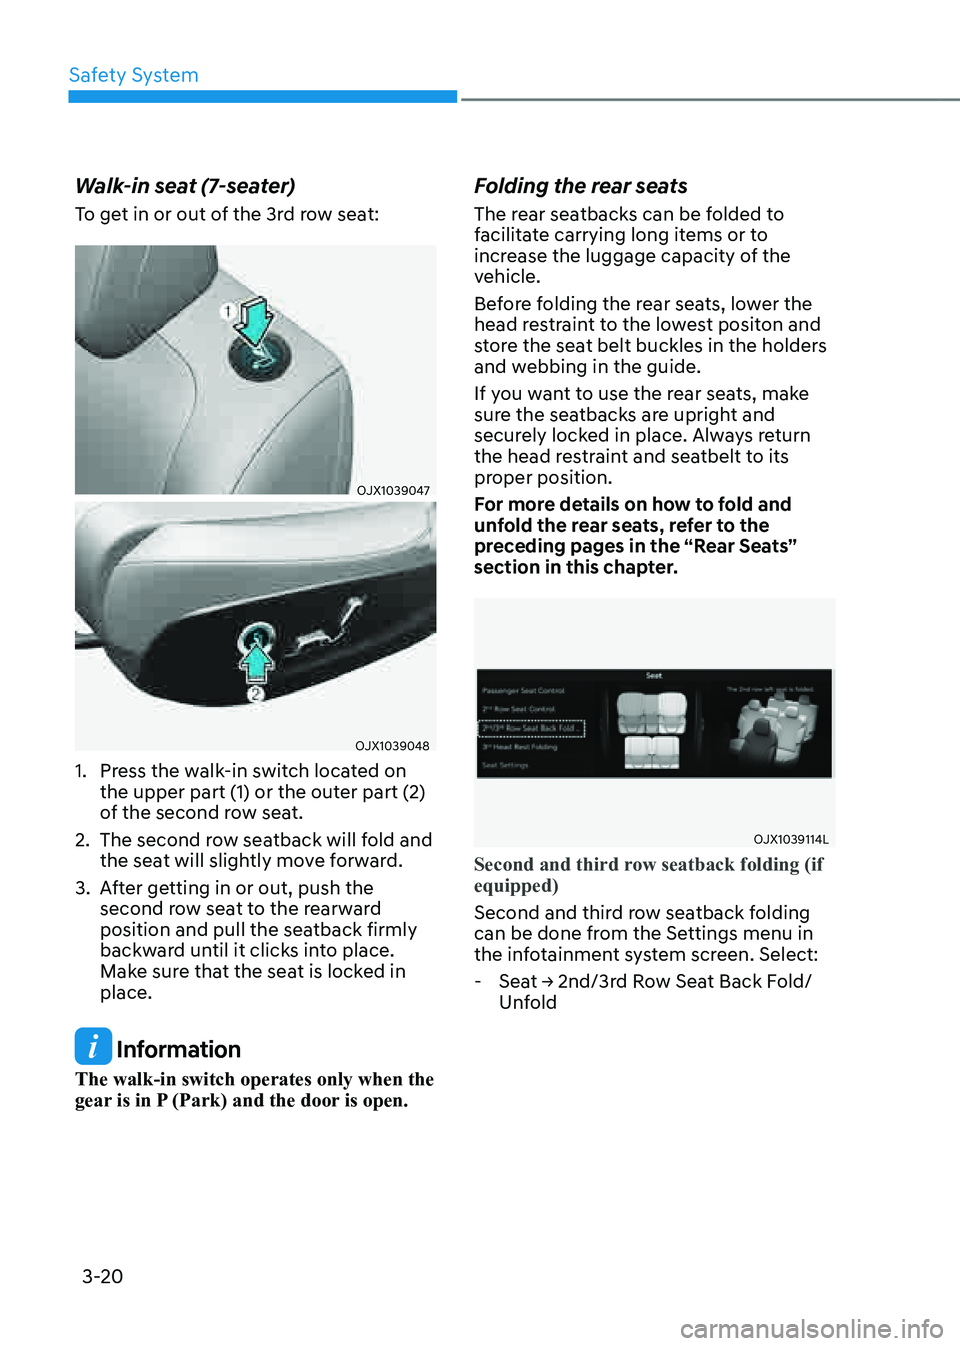
Walk-in seat (7-seater)
To get in or out of the 3rd row seat:
OJX1039047OJX1039047
OJX1039048OJX1039048
1. Press the walk-in switch located on
the upper part (1) or the outer part (2)
of the second row seat.
2. The second row seatback will fold and
the seat will slightly move forward.
3. After getting in or out, push the
second row seat to the rearward
position and pull the seatback firmly
backward until it clicks into place.
Make sure that the seat is locked in
place.
Information
The walk-in switch operates only when the
gear is in P (Park) and the door is open.
Folding the rear seats
The rear seatbacks can be folded to
facilitate carrying long items or to
increase the luggage capacity of the
vehicle.
Before folding the rear seats, lower the
head restraint to the lowest positon and
store the seat belt buckles in the holders
and webbing in the guide.
If you want to use the rear seats, make
sure the seatbacks are upright and
securely locked in place. Always return
the head restraint and seatbelt to its
proper position.
For more details on how to fold and
unfold the rear seats, refer to the
preceding pages in the “Rear Seats”
section in this chapter.
OJX1039114LOJX1039114L
Second and third row seatback folding (if
equipped)
Second and third row seatback folding
can be done from the Settings menu in
the infotainment system screen. Select:
-Seat -> 2nd/3rd Row Seat Back Fold/Unfold
Page 55 of 632
Safety System
3-26
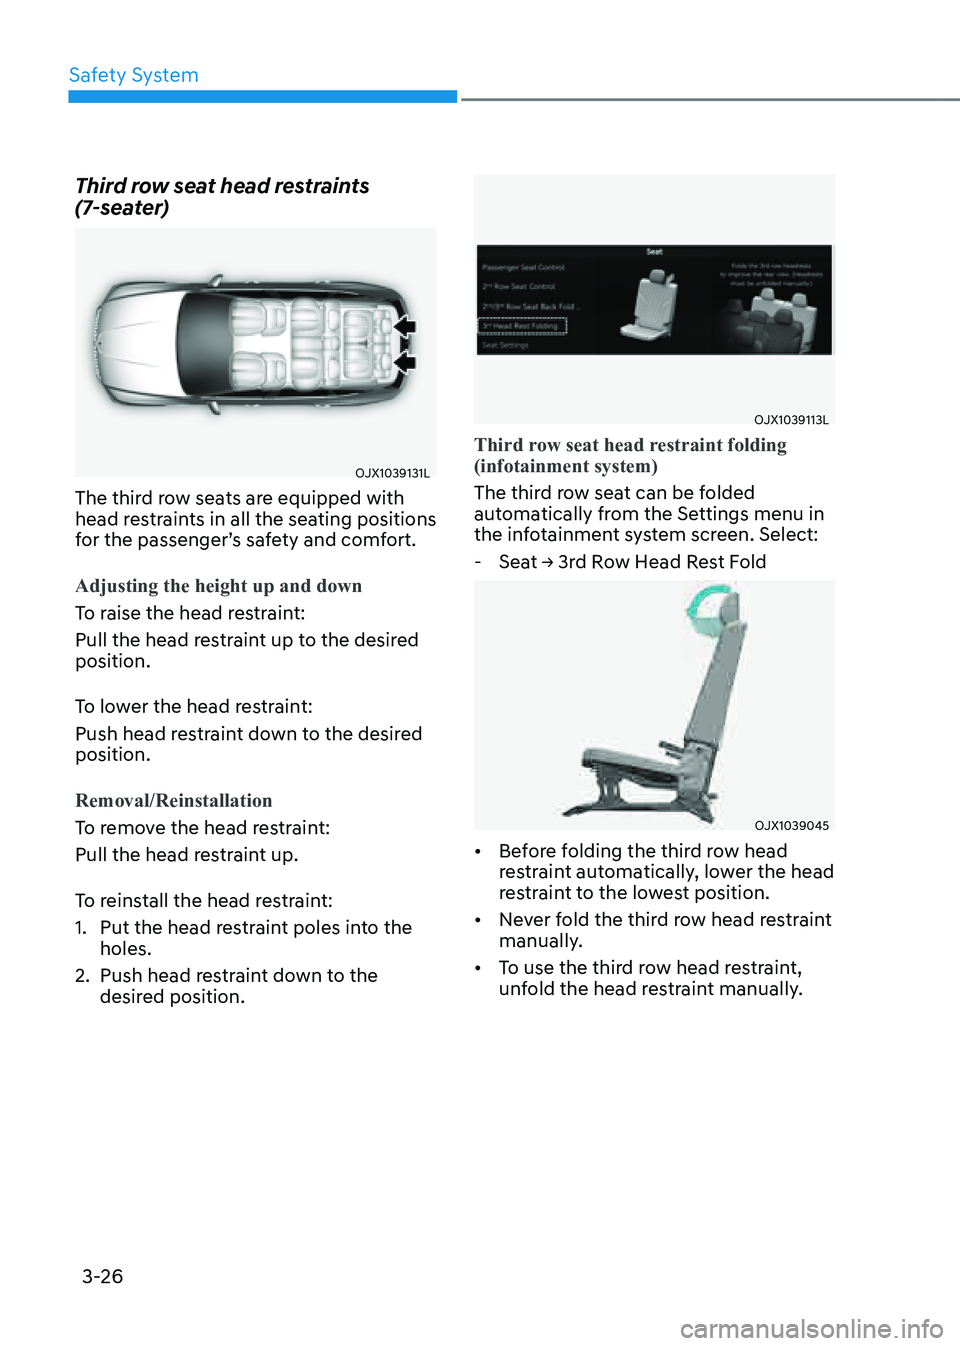
Third row seat head restraints
(7-seater)
OJX1039131LOJX1039131L
The third row seats are equipped with
head restraints in all the seating positions
for the passenger’s safety and comfort.
Adjusting the height up and down
To raise the head restraint:
Pull the head restraint up to the desired
position.
To lower the head restraint:
Push head restraint down to the desired
position.
Removal/Reinstallation
To remove the head restraint:
Pull the head restraint up.
To reinstall the head restraint:
1. Put the head restraint poles into the
holes.
2. Push head restraint down to the
desired position.
OJX1039113LOJX1039113L
Third row seat head restraint folding
(infotainment system)
The third row seat can be folded
automatically from the Settings menu in
the infotainment system screen. Select:
-Seat -> 3rd Row Head Rest Fold
OJX1039045OJX1039045
• Before folding the third row head
restraint automatically, lower the head
restraint to the lowest position.
• Never fold the third row head restraint
manually.
• To use the third row head restraint,
unfold the head restraint manually.
Page 57 of 632
Safety System
3-28
• Manual temperature control
Each time you touch the icon, the
temperature setting of the seat is
changed as follows :
OFF → HIGH ( ) → MIDDLE ( ) → LOW ( )
• Automatic temperature control
The seat warmer starts to
automatically control the seat
temperature in order to prevent
low temperature burns after being
manually turned ON.
OFF → HIGH ( ) → MIDDLE ( ) → LOW ( )
30 min 60 min
You may manually touch the icon to
increase seat temperature. However,
the seat temperature is automatically
adjusted again.
• Seat Heater Balance
You may lower the seat warmer
setting, or may turn the seat warmer
off for either the seatback or seat
cushion, when the seat warmer is on.
To use this function, it must be
enabled from the Settings menu in the
infotainment system screen. Select:
-Setup -> Vehicle Settings -> Seat -> Heated/Ventilated Features -> Seat Heater Balance
• When touching the icon for more than
1.5 seconds with the seat warmer
operating, the seat warmer will turn
OFF.
• The seat warmer defaults to the OFF
position whenever the Engine Start/
Stop button is pressed to the ON
position.
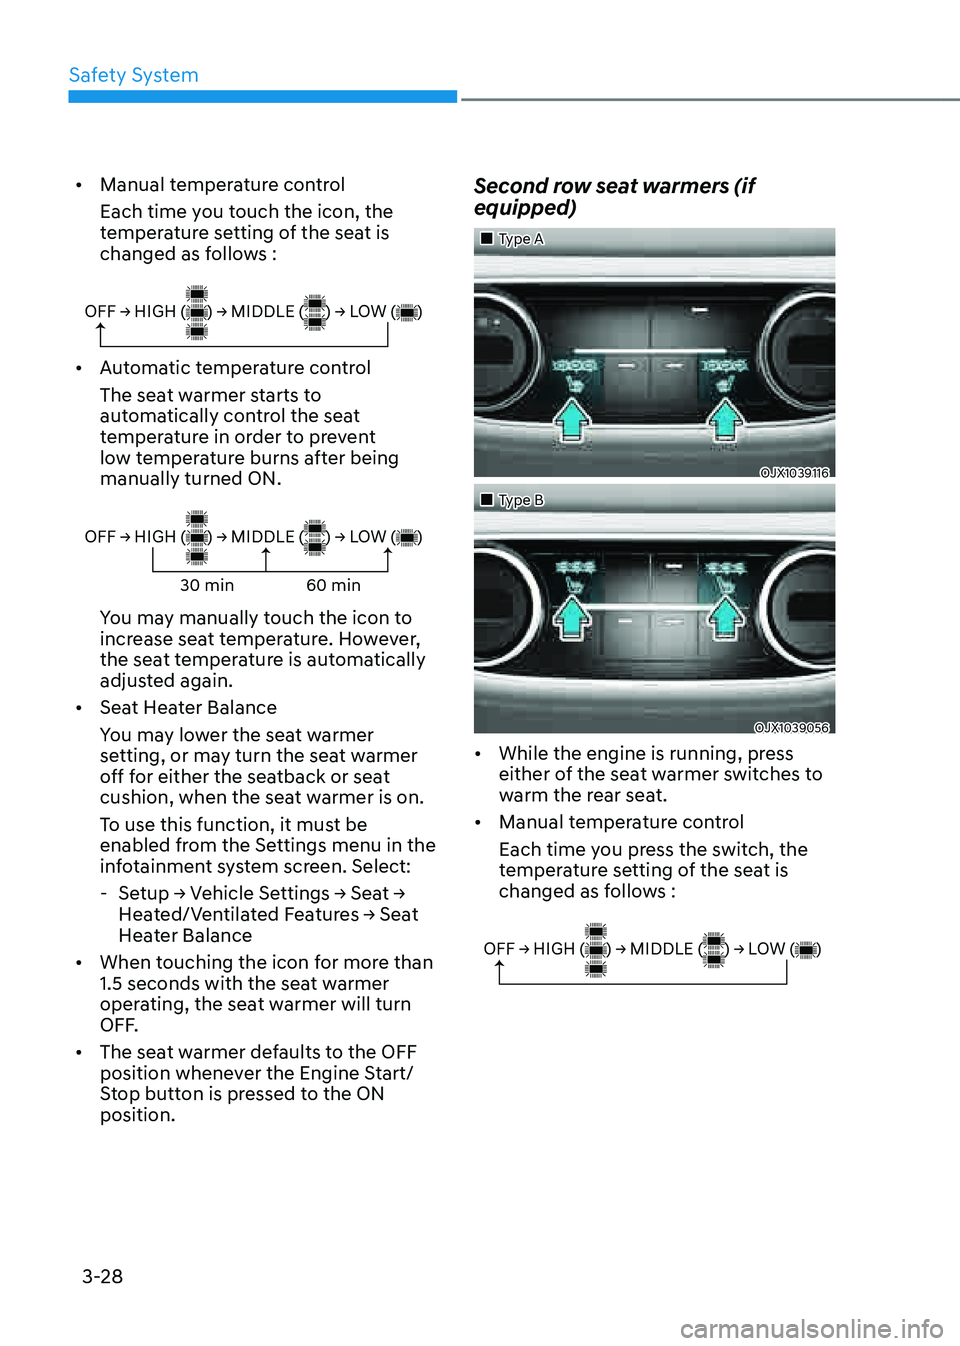
Second row seat warmers (if
equipped)
�
Page 108 of 632
4
4. Instrument Cluster
LCD Display ........................................................................\
..............................4-27LCD Display Control ........................................................................\
...........................4-27
View Modes ........................................................................\
........................................4-27
Driving Assist view ........................................................................\
...........................4-28
Turn By Turn (TBT) view ........................................................................\
...................4-28
Utility view ........................................................................\
........................................4-28
Additional information display ........................................................................\
........4-32
Option Menu ........................................................................\
.......................................4-32
Service messages ........................................................................\
............................4-33
3D cluster (for 12.3-inch 3D cluster) .......................................................................4-33
Head-up display ........................................................................\
...............................4-33
Driver Assistance settings ........................................................................\
...............4-33
Speed unit ........................................................................\
.......................................4-34
3D Instrument Cluster (for 12.3-Inch 3D Cluster) .....................................................4-34
3D cluster setting ........................................................................\
.............................4-34
Recommendations to optimize the 3D effect .......................................................4-34
Vehicle Settings (Infotainment System) ........................................................4-37Setting Your Vehicle ........................................................................\
..........................4-37
Page 115 of 632
Instrument Cluster
4-10
Information
• If the vehicle is not on level ground or
the battery power has been interrupted,
the distance to empty function may not
operate correctly.
• The distance to empty may differ
from the actual driving distance as it
is an estimate of the available driving
distance.
• The trip computer may not register
additional fuel if less than 2.4 gallons
(9 liters) of fuel are added to the vehicle.
• The distance to empty may vary
significantly based on driving
conditions, driving habits, and
condition of the vehicle.
Fuel economy (for 12.3-inch 3D
cluster)
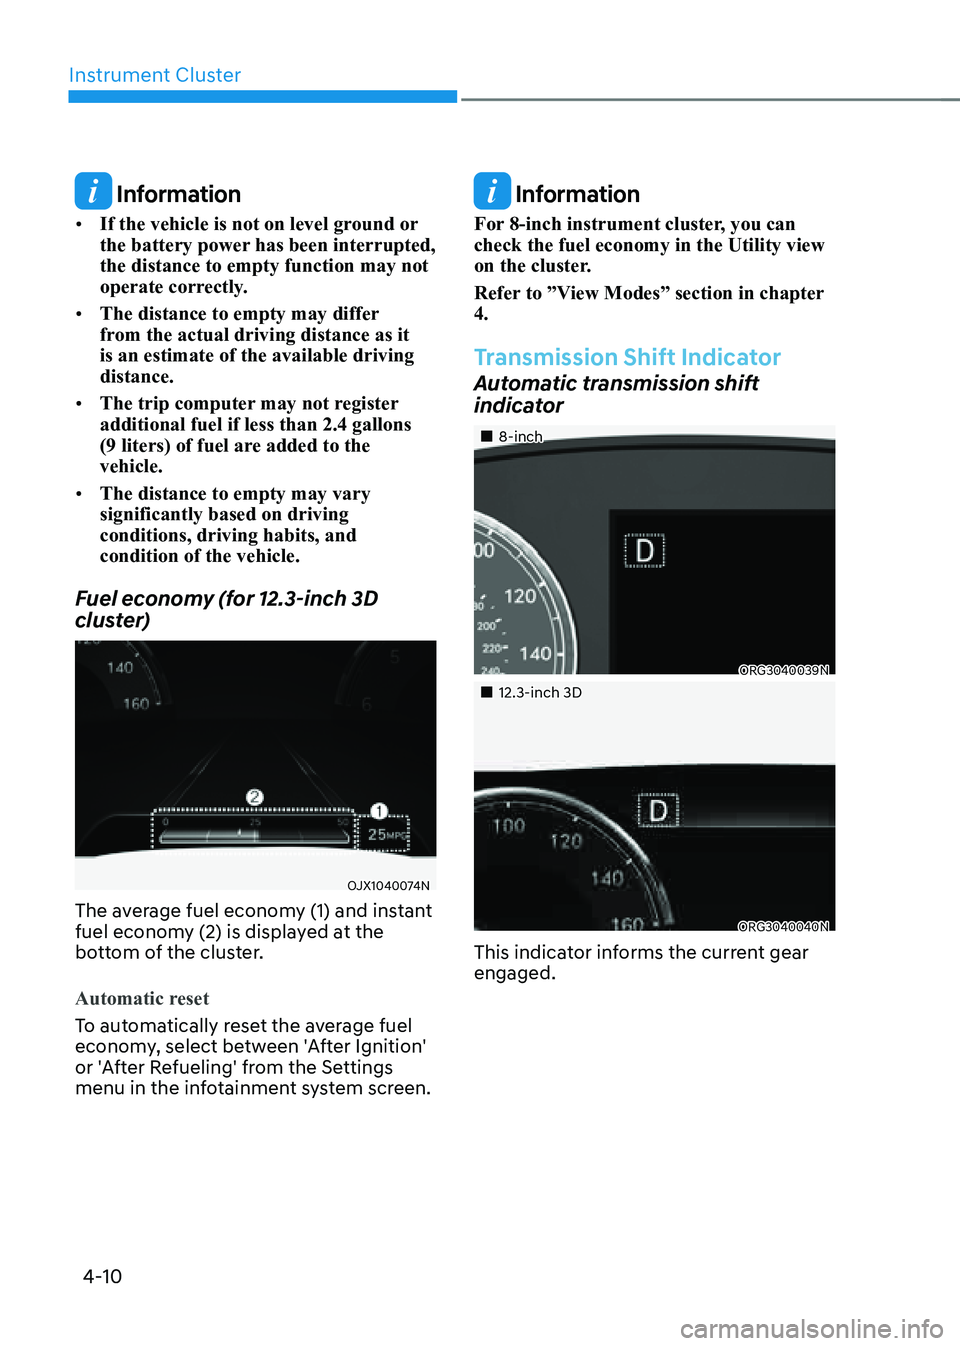
OJX1040074NOJX1040074N
The average fuel economy (1) and instant
fuel economy (2) is displayed at the
bottom of the cluster.
Automatic reset
To automatically reset the average fuel
economy, select between 'After Ignition'
or 'After Refueling' from the Settings
menu in the infotainment system screen.
Information
For 8-inch instrument cluster, you can
check the fuel economy in the Utility view
on the cluster.
Refer to ”View Modes” section in chapter
4.
Transmission Shift Indicator
Automatic transmission shift
indicator
�