rear window GENESIS GV80 2021 User Guide
[x] Cancel search | Manufacturer: GENESIS, Model Year: 2021, Model line: GV80, Model: GENESIS GV80 2021Pages: 632, PDF Size: 9.37 MB
Page 231 of 632
05
5-89
Rear Window Wiper and Washer
OJX1059270LOJX1059270L
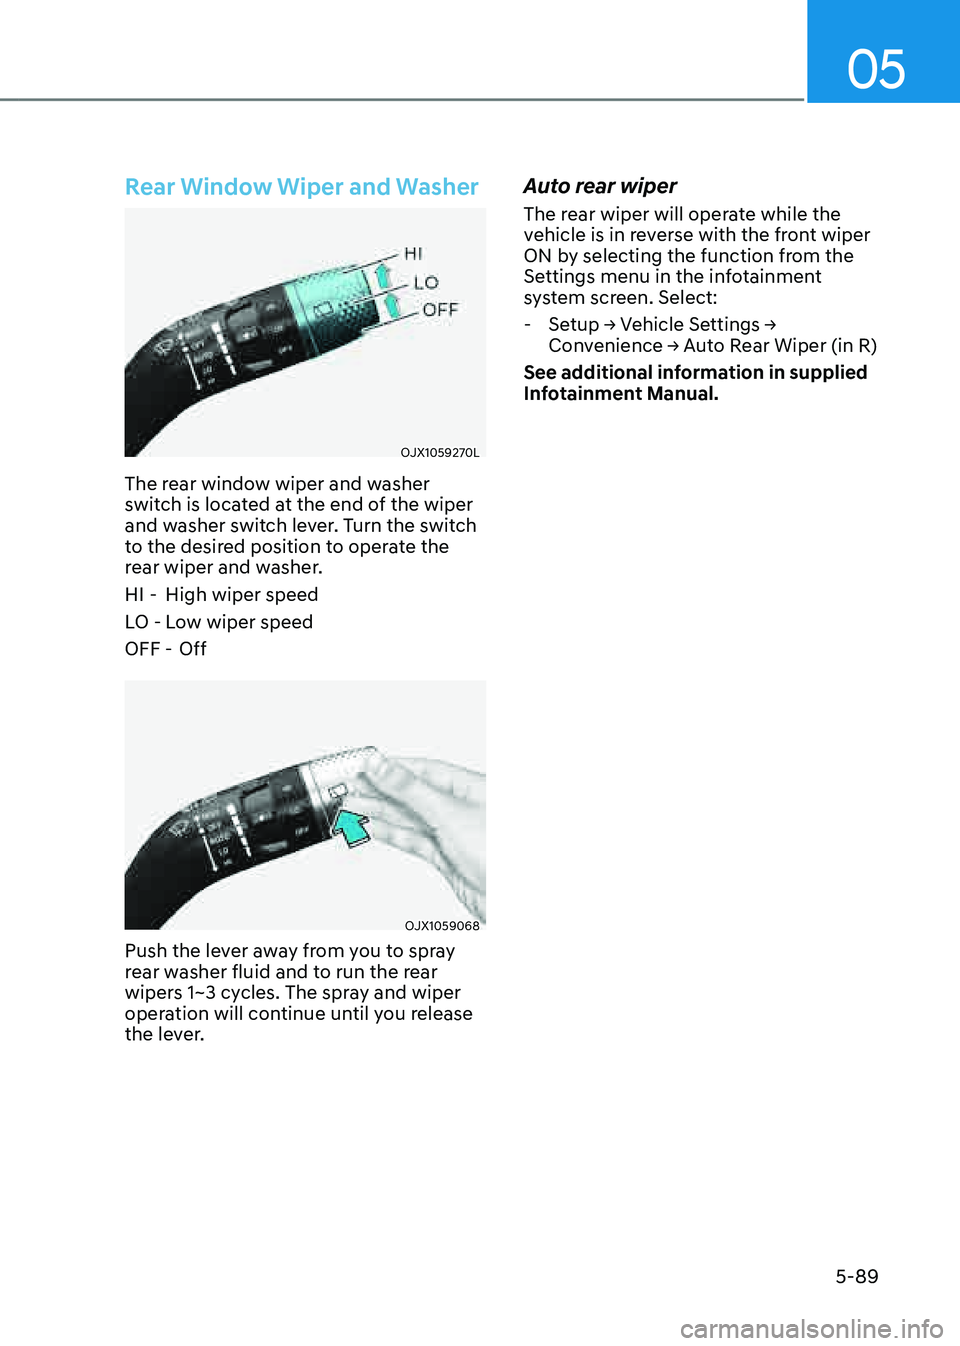
The rear window wiper and washer
switch is located at the end of the wiper
and washer switch lever. Turn the switch
to the desired position to operate the
rear wiper and washer.
HI -High wiper speed
LO - Low wiper speed
OFF - Off
OJX1059068OJX1059068
Push the lever away from you to spray
rear washer fluid and to run the rear
wipers 1~3 cycles. The spray and wiper
operation will continue until you release
the lever.
Auto rear wiper
The rear wiper will operate while the
vehicle is in reverse with the front wiper
ON by selecting the function from the
Settings menu in the infotainment
system screen. Select:
-Setup → Vehicle Settings →
Convenience → Auto Rear Wiper (in R)
See additional information in supplied
Infotainment Manual.
Page 239 of 632

05
5-97
• Front seat
Defrost (A, D)
Most of the air flow is directed to the
windshield.
Face-level (B, D, E, H)
Air flow is directed toward the upper
body and face. Additionally, each outlet
can be controlled to direct the air
discharged from the outlet.
Floor-level (A, C, F, G)
Most of the air flow is directed to the
floor, with a small amount of the air
being directed to the windshield and side
window defrosters.
• Rear seat
Face-level (E, H)
Air flow is directed toward the upper
body and face.
Floor-level (F, G)
Most of the air flow is directed to the
floor.
Information
Two to three air flow modes can be
selected at the same time.
Page 248 of 632
Convenient Features
5-106
WINDSHIELD DEFROSTING AND DEFOGGING
WARNING
Windshield heating
Do not use the
position during cooling operation in extremely humid
weather. The difference between the
temperature of the outside air and that
of the windshield could cause the outer
surface of the windshield to fog up,
causing loss of visibility could cause
an accident resulting in serious injury
or death. In this case, set the mode
selection button to the
position and fan speed control knob to a lower
speed.
• For maximum defrost performance,
set the temperature control to the
highest temperature setting and
the fan speed control to the highest
setting.
• If warm air to the floor is desired while
defrosting or defogging, set the mode
to the floor-defrost position.
• Before driving, clear all snow and ice
from the windshield, rear window,
side view mirrors, and all side
windows.
• Clear all snow and ice from the
hood and air inlet in the cowl grill
to improve heater and defroster
efficiency and to reduce the
probability of fogging up the inside of
the windshield.
NOTICE
If the engine temperature is still cold
after starting, then a brief engine warm
up period may be required for the
vented air flow to become warm or hot.
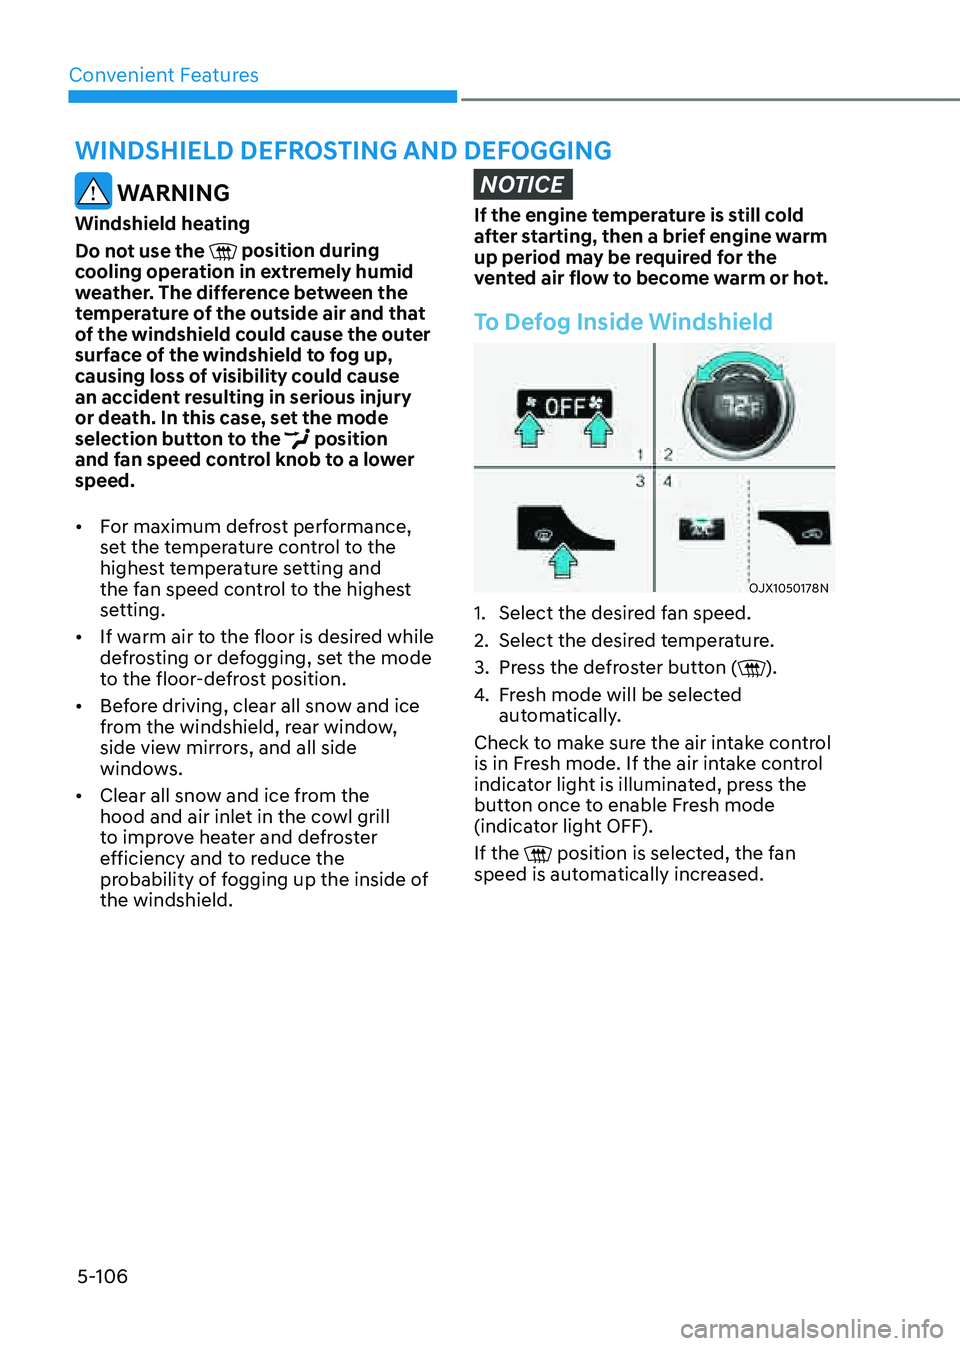
To Defog Inside Windshield
OJX1050178NOJX1050178N
1. Select the desired fan speed.
2. Select the desired temperature.
3. Press the defroster button ().
4. Fresh mode will be selected
automatically.
Check to make sure the air intake control
is in Fresh mode. If the air intake control
indicator light is illuminated, press the
button once to enable Fresh mode
(indicator light OFF).
If the
position is selected, the fan speed is automatically increased.
Page 250 of 632

Convenient Features
5-108
Rear Window DefrosterNOTICE
To prevent damage to the rear window
defroster conducting elements bonded
to the inside surface of the rear window,
never use sharp instruments or window
cleaners containing abrasives to clean
the window.
OJX1059180OJX1059180
The defroster heats the window to
remove frost, fog and thin ice from the
interior and exterior of the rear window,
while the engine is running.
• To activate the rear window defroster,
press the rear window defroster
button located in the center control
panel. The indicator on the rear
window defroster button illuminates
when the defroster is ON.
• To turn off the defroster, press the rear
window defroster button again.
Information
• If there is heavy accumulation of snow
on the rear window, brush it off before
operating the rear defroster.
• The rear window defroster
automatically turns off after
approximately 20 minutes or when the
Engine Start/Stop button is in the OFF
position.
Side view mirror defroster
If your vehicle is equipped with the side
view mirror defrosters, they will operate
at the same time you turn on the rear
window defroster.
Page 257 of 632

05
5-115
Sunvisor
OHI048444OHI048444
To use the sunvisor, pull it rearward.
To use the sunvisor to block the sun from
the side window, pull it rearward, release
it from the bracket (1) and swing it to the
side (2) towards the window.
To use the vanity mirror, pull down the
sunvisor and slide the mirror cover (3).
Adjust the sunvisor forward or backward
(4) as needed (if equipped). Use the
ticket holder (5) to hold tickets.
Close the vanity mirror cover securely
and return the sunvisor to its original
position after use.
WARNING
For your safety, do not block your view
when using the sunvisor.
NOTICE
The tab (5) adjacent to the vanity mirror
on the sunvisor can be used for toll
road tickets or self parking tickets. Use
caution when inserting tickets into the
ticket holder to avoid damage. Refrain
from putting several tickets in the ticket
holder as this could also damage the
retaining tab.
Page 265 of 632
05
5-123
Rear Side Window Sunshades
(if equipped)
Use the rear side window sunshade to
block external light coming through the
rear window glass.
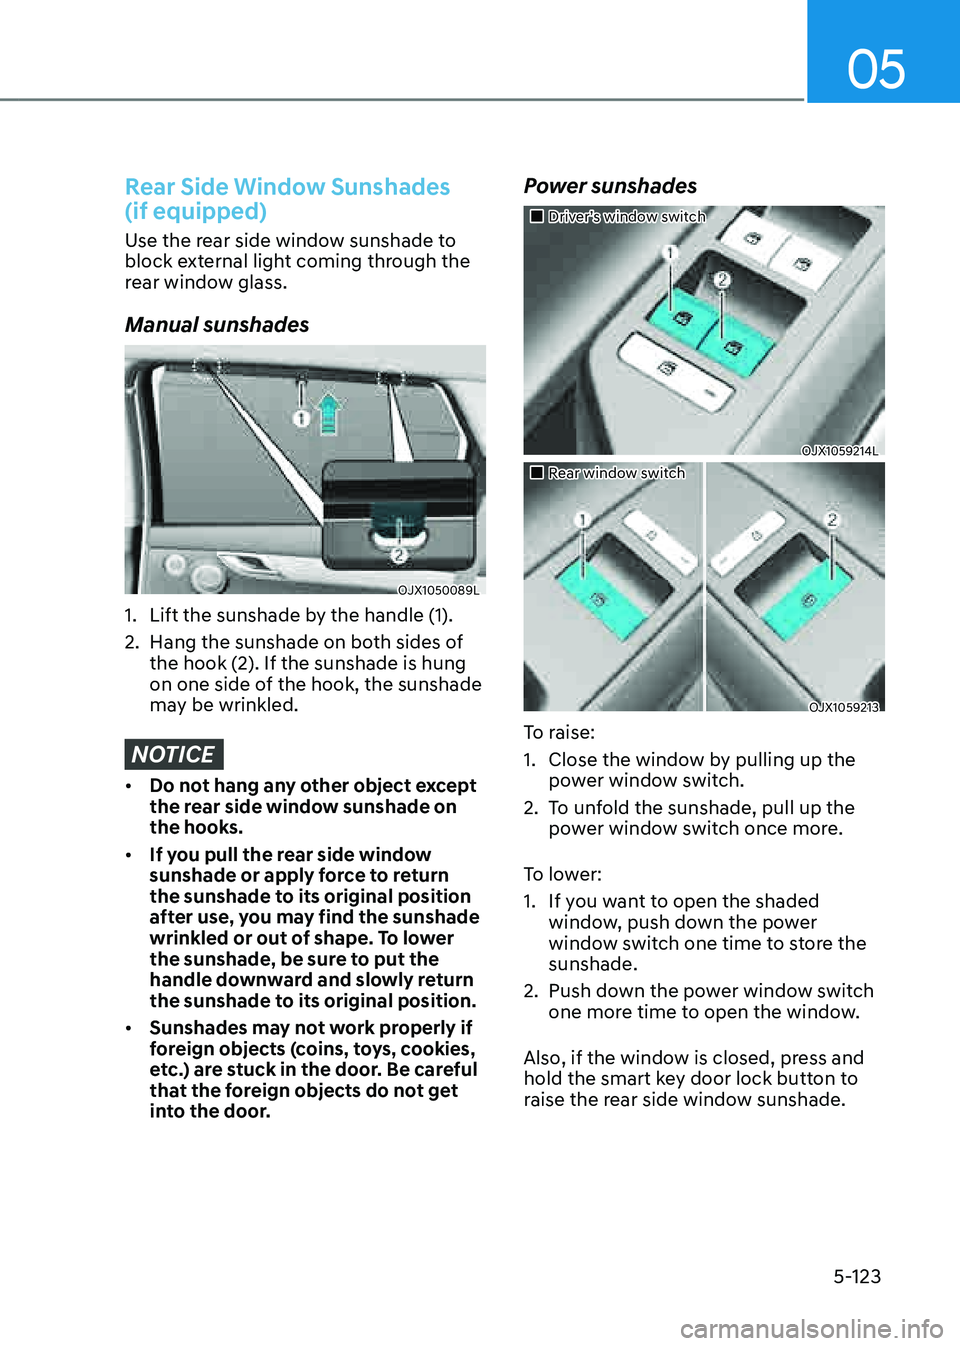
Manual sunshades
OJX1050089LOJX1050089L
1. Lift the sunshade by the handle (1).
2. Hang the sunshade on both sides of
the hook (2). If the sunshade is hung
on one side of the hook, the sunshade
may be wrinkled.
NOTICE
• Do not hang any other object except
the rear side window sunshade on
the hooks.
• If you pull the rear side window
sunshade or apply force to return
the sunshade to its original position
after use, you may find the sunshade
wrinkled or out of shape. To lower
the sunshade, be sure to put the
handle downward and slowly return
the sunshade to its original position.
• Sunshades may not work properly if
foreign objects (coins, toys, cookies,
etc.) are stuck in the door. Be careful
that the foreign objects do not get
into the door.
Power sunshades
�
Page 266 of 632
Convenient Features
5-124
Information
If the upward or downward movement of
the sunshade is blocked by an object or
part of the body, the sunshade will detect
the resistance and will stop movement and
move downward or upward.
NOTICE
• Do not apply excessive external force
on the rear side window sunshade
while operating. It may cause a
malfunction.
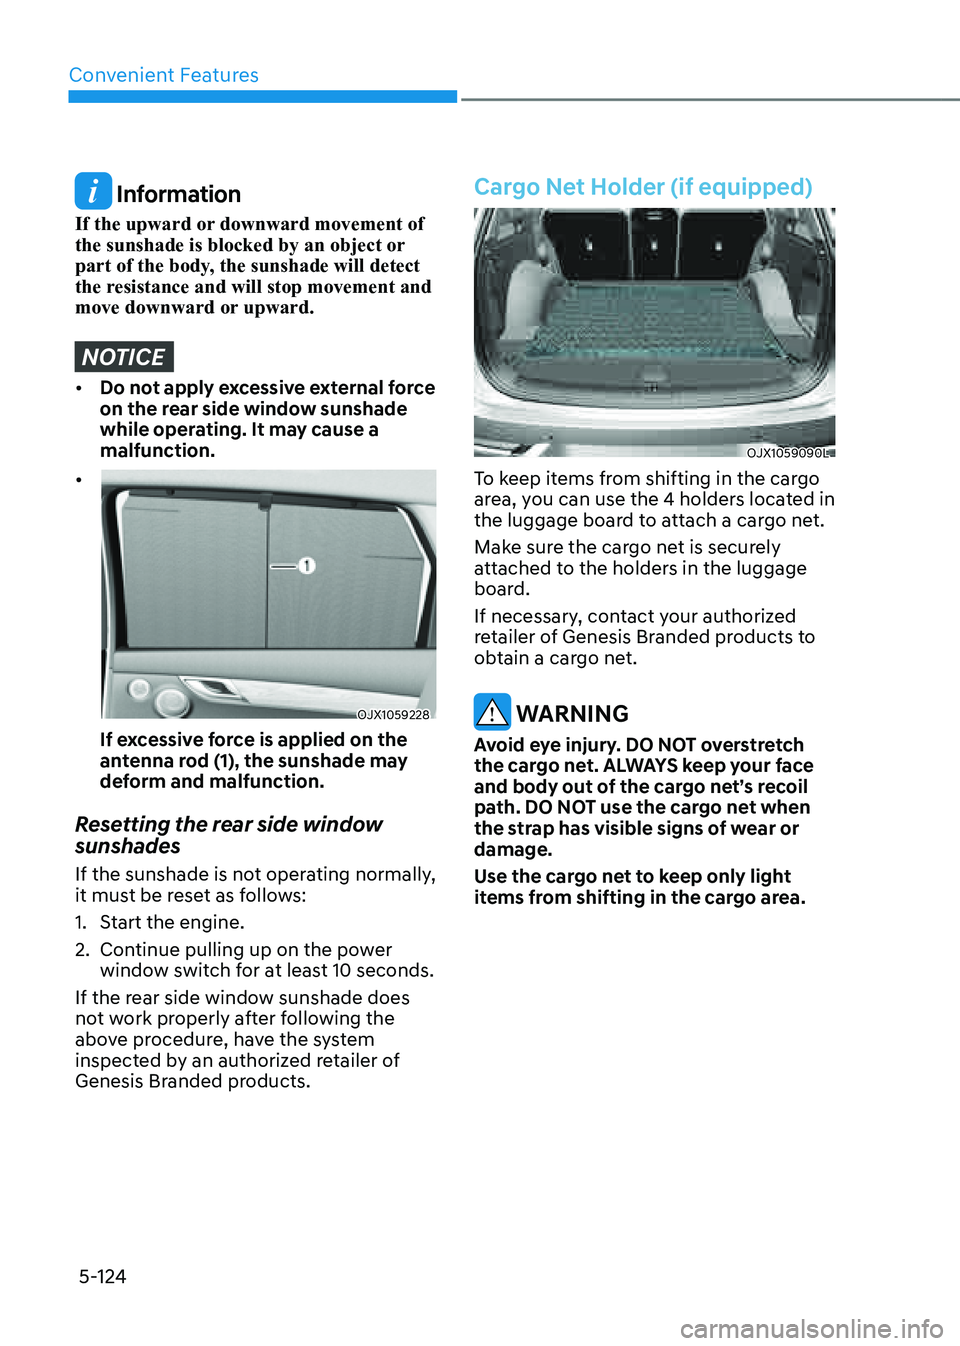
•
OJX1059228OJX1059228
If excessive force is applied on the
antenna rod (1), the sunshade may
deform and malfunction.
Resetting the rear side window
sunshades
If the sunshade is not operating normally,
it must be reset as follows:
1. Start the engine.
2. Continue pulling up on the power
window switch for at least 10 seconds.
If the rear side window sunshade does
not work properly after following the
above procedure, have the system
inspected by an authorized retailer of
Genesis Branded products.
Cargo Net Holder (if equipped)
OJX1059090LOJX1059090L
To keep items from shifting in the cargo
area, you can use the 4 holders located in
the luggage board to attach a cargo net.
Make sure the cargo net is securely
attached to the holders in the luggage
board.
If necessary, contact your authorized
retailer of Genesis Branded products to
obtain a cargo net.
WARNING
Avoid eye injury. DO NOT overstretch
the cargo net. ALWAYS keep your face
and body out of the cargo net’s recoil
path. DO NOT use the cargo net when
the strap has visible signs of wear or
damage.
Use the cargo net to keep only light
items from shifting in the cargo area.
Page 335 of 632
06
6-63
Check spark plugs and ignition system
Inspect the spark plugs, as specified in
chapter 8. If necessary, replace them.
Also check all ignition wirings and
components for any cracks, wear-out,
and damage.
To prevent locks from freezing
To prevent the locks from being frozen,
spray approved de-icing fluid or glycerin
into key holes. When a lock opening is
already covered with ice, spray approved
de-icing fluid over the ice to remove it.
When an internal part of a lock freezes,
try to thaw it with a heated key. Carefully
use the heated key to avoid an injury.
Use approved window washer anti-
freeze solution in system
To prevent the window washer from
being frozen, add authorized window
washer anti-freeze solution, as specified
on the window washer container.
Window washer anti-freeze solution is
available from an authorized retailer of
Genesis Branded products, and most
vehicle accessory outlets. Do not use
engine coolant or other types of anti-
freeze solution, to prevent any damage
to the vehicle paint.Do not let your parking brake freeze
Under some conditions your parking
brake can freeze in the engaged position.
This is most likely to happen when there
is an accumulation of snow or ice around
or near the rear brakes or if the brakes
are wet. When there is the risk that your
parking brake may freeze, temporarily
apply it with the gear in P (Park). Also,
block the rear wheels in advance, so the
vehicle may not roll. Then, release the
parking brake.
Do not let ice and snow accumulate
underneath
Under some conditions, snow and ice
can build up under the fenders and
interfere with the steering. When driving
in such conditions during the severe
winter, you should check underneath
the vehicle on a regular basis, to ensure
that the front wheels and the steering
components is unblocked.
Carry emergency equipment
In accordance with weather conditions,
you should carry appropriate emergency
equipment, while driving. Some of the
items you may want to carry include tire
chains, tow straps or chains, flashlight,
emergency flares, sand, shovel, jumper
cables, window scraper, gloves, ground
cloth, coveralls, blanket, etc.
Do not place objects or materials in the
engine compartment
Putting objects or materials in the engine
compartment may cause an engine
failure or combustion, because they may
block the engine cooling. Such damage
will not be covered by the manufacturer’s
warranty.
Page 567 of 632
Maintenance
9-26
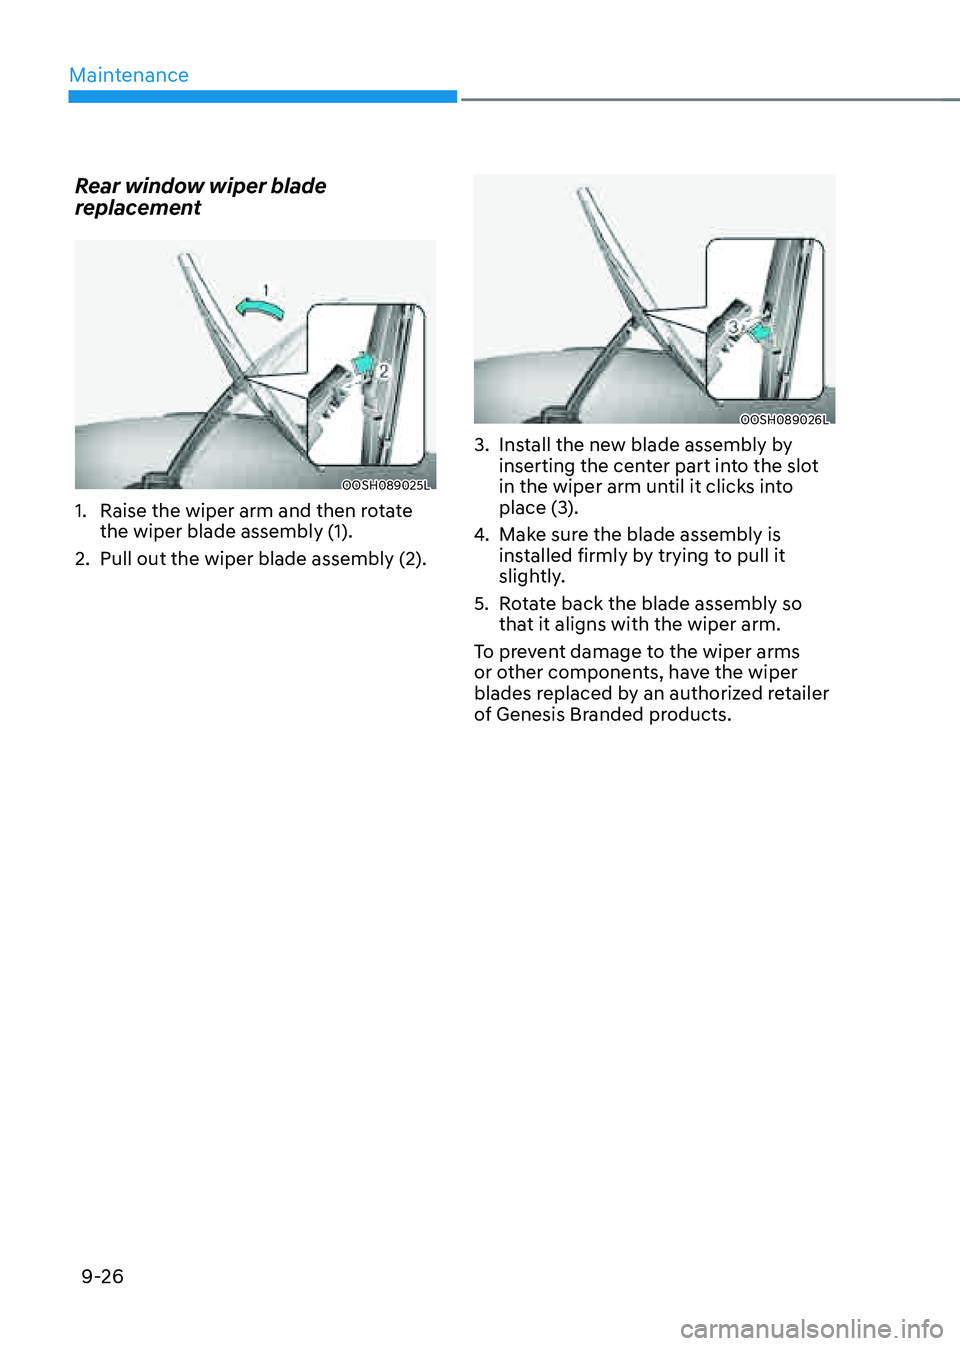
Rear window wiper blade
replacement
OOSH089025LOOSH089025L
1. Raise the wiper arm and then rotate
the wiper blade assembly (1).
2. Pull out the wiper blade assembly (2).
OOSH089026LOOSH089026L
3. Install the new blade assembly by
inserting the center part into the slot
in the wiper arm until it clicks into
place (3).
4. Make sure the blade assembly is
installed firmly by trying to pull it
slightly.
5. Rotate back the blade assembly so
that it aligns with the wiper arm.
To prevent damage to the wiper arms
or other components, have the wiper
blades replaced by an authorized retailer
of Genesis Branded products.
Page 570 of 632
09
9-29
• The negative battery cable must
be removed first and installed last
when the battery is disconnected.
Disconnect the battery charger in the
following order:
1. Turn off the battery charger main
switch.
2. Unhook the negative clamp from
the negative battery terminal.
3. Unhook the positive clamp from
the positive battery terminal.
• Always use a Genuine Genesis Part
approved battery when you replace
the battery.
NOTICE
AGM battery
• Absorbent Glass Matt (AGM)
batteries are maintenance-free and
we recommend that the AGM battery
be serviced by an authorized retailer
of Genesis Branded products. For
charging your AGM battery, use only
fully automatic battery chargers that
are specially developed for AGM
batteries.
• When replacing the AGM battery,
we recommend that you use parts
for replacement from an authorized
retailer of Genesis Branded products.
• Do not open or remove the cap on
top of the battery. This may cause
leaks of internal electrolyte that
could result in severe injury.
By jump starting
After a jump start from a good battery,
drive the vehicle for 20-30 minutes
before it is shutoff. The vehicle may
not restart if you shut it off before the
battery had a chance to adequately
recharge. See “Jump Starting” in chapter
6 for more information on jump starting
procedures.
Information
An inappropriately disposed battery can be harmful to the
environment and human health.
Dispose of the battery according
to your local law(s) or regulation.
Reset Items
The following items may need to be reset
after the battery has been discharged or
the battery has been disconnected.
• Fuel economy/Driving info/Since
refueling/Accumulated info (items in
Utility view) (see chapter 4)
• Integrated memory system (see
chapter 5)
• Power window (see chapter 5)
• Sunroof (see chapter 5)
• Power liftgate (see chapter 5)
• Climate control system (see chapter 5)
• Rear door window shade (see chapter
5)
• Clock (see Infotainment system
manual)
• Infotainment system (see
Infotainment system manual)