display GENESIS GV80 2021 Owner's Guide
[x] Cancel search | Manufacturer: GENESIS, Model Year: 2021, Model line: GV80, Model: GENESIS GV80 2021Pages: 632, PDF Size: 9.37 MB
Page 137 of 632
Instrument Cluster
4-32
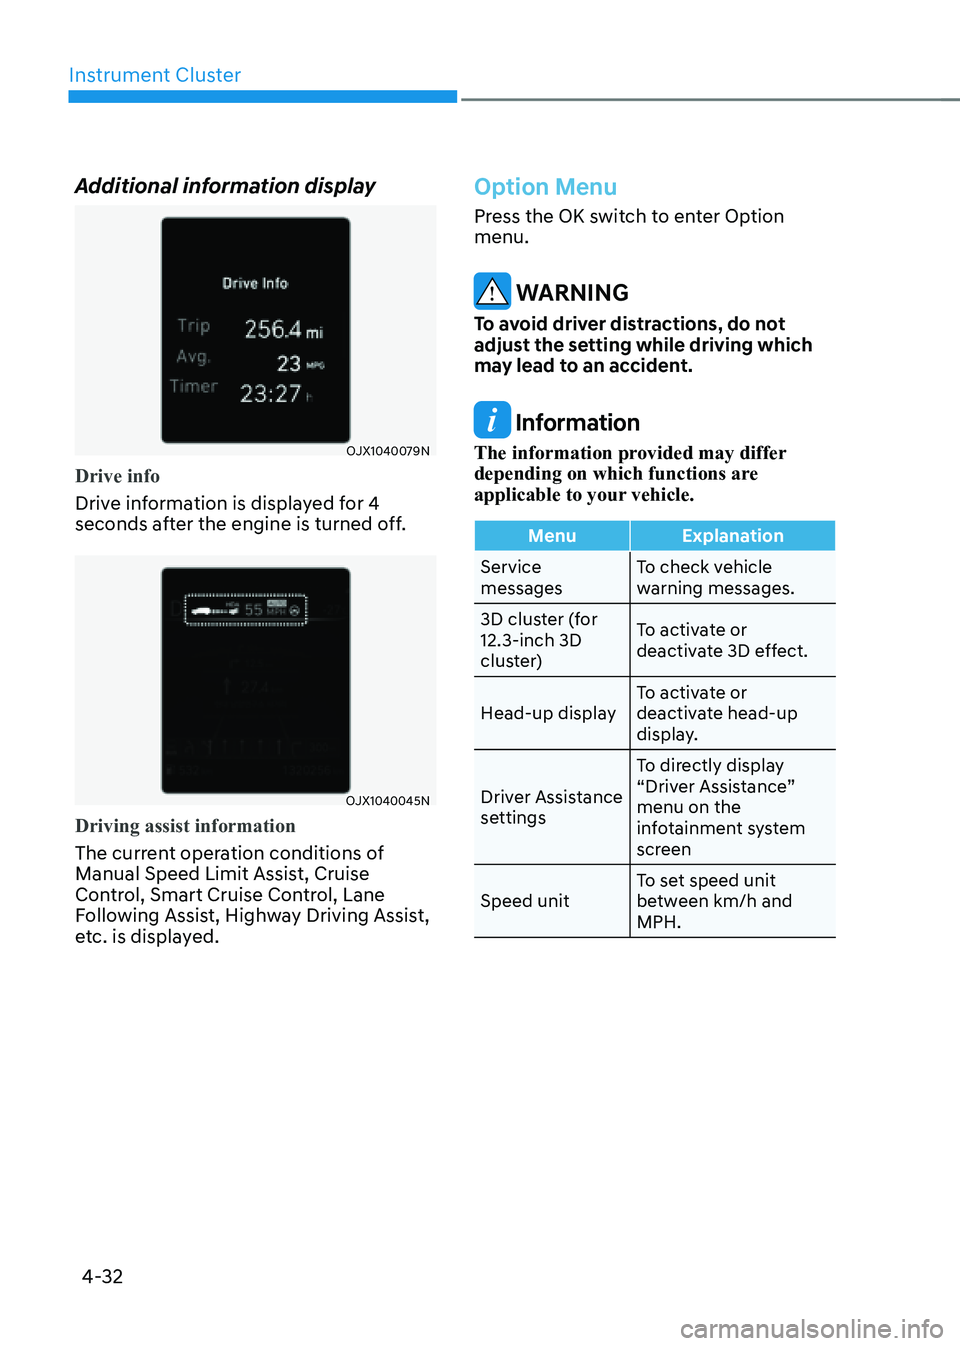
Additional information display
OJX1040079NOJX1040079N
Drive info
Drive information is displayed for 4
seconds after the engine is turned off.
OJX1040045NOJX1040045N
Driving assist information
The current operation conditions of
Manual Speed Limit Assist, Cruise
Control, Smart Cruise Control, Lane
Following Assist, Highway Driving Assist,
etc. is displayed.
Option Menu
Press the OK switch to enter Option
menu.
WARNING
To avoid driver distractions, do not
adjust the setting while driving which
may lead to an accident.
Information
The information provided may differ
depending on which functions are
applicable to your vehicle.
MenuExplanation
Service
messages To check vehicle
warning messages.
3D cluster (for
12.3-inch 3D
cluster) To activate or
deactivate 3D effect.
Head-up display To activate or
deactivate head-up
display.
Driver Assistance
settings To directly display
“Driver Assistance”
menu on the
infotainment system
screen
Speed unit To set speed unit
between km/h and
MPH.
Page 138 of 632
04
4-33
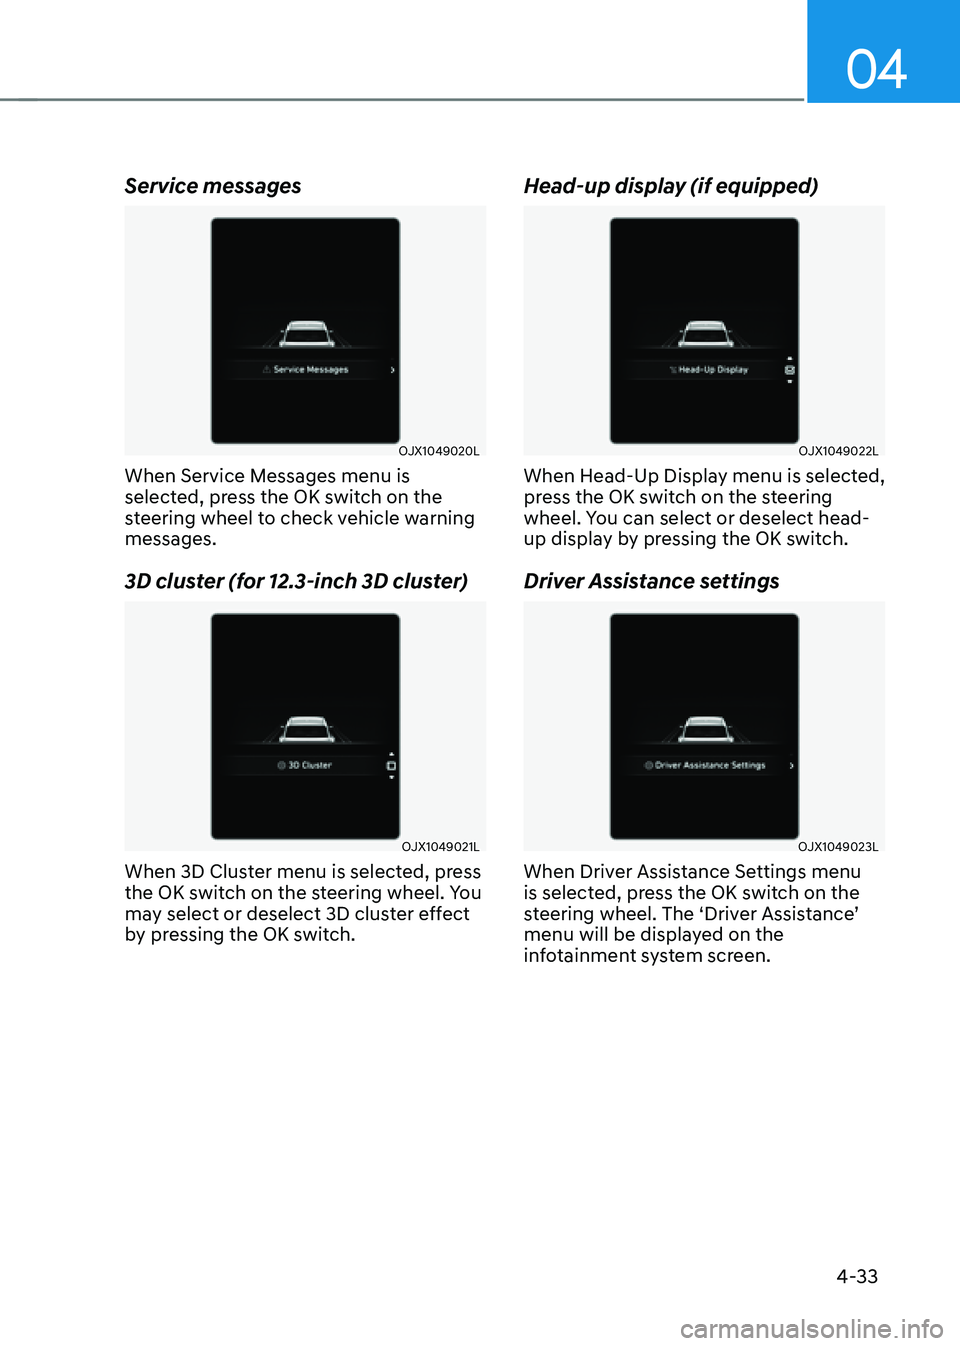
Service messages
OJX1049020LOJX1049020L
When Service Messages menu is
selected, press the OK switch on the
steering wheel to check vehicle warning
messages.
3D cluster (for 12.3-inch 3D cluster)
OJX1049021LOJX1049021L
When 3D Cluster menu is selected, press
the OK switch on the steering wheel. You
may select or deselect 3D cluster effect
by pressing the OK switch.
Head-up display (if equipped)
OJX1049022LOJX1049022L
When Head-Up Display menu is selected,
press the OK switch on the steering
wheel. You can select or deselect head-
up display by pressing the OK switch.
Driver Assistance settings
OJX1049023LOJX1049023L
When Driver Assistance Settings menu
is selected, press the OK switch on the
steering wheel. The ‘Driver Assistance’
menu will be displayed on the
infotainment system screen.
Page 142 of 632
04
4-37
VEHICLE SETTINGS (INFOTAINMENT SYSTEM)
OJX1050236NOJX1050236N
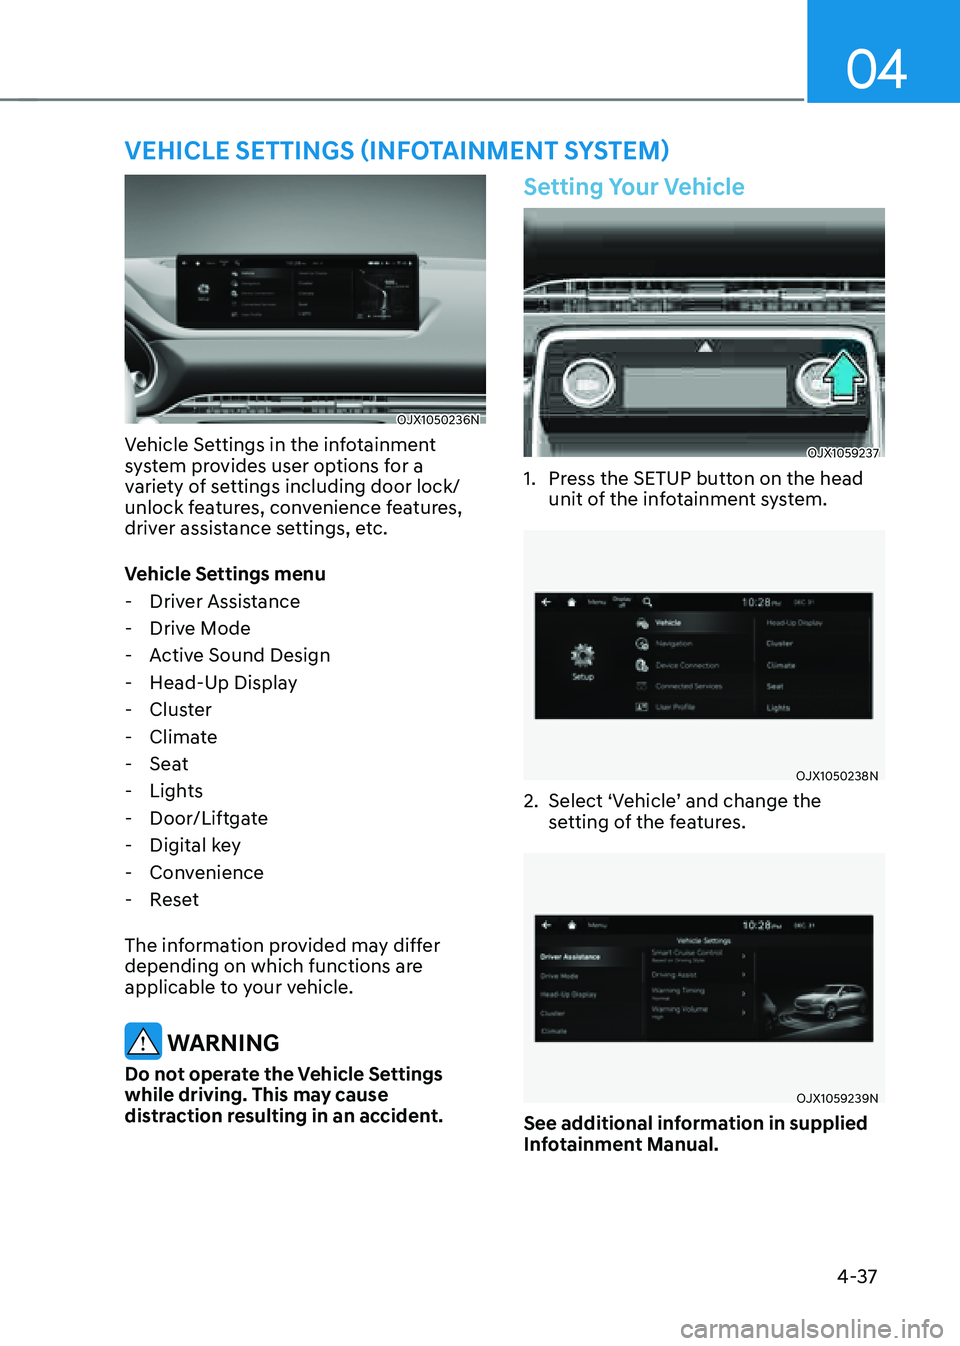
Vehicle Settings in the infotainment
system provides user options for a
variety of settings including door lock/
unlock features, convenience features,
driver assistance settings, etc.
Vehicle Settings menu
-Driver Assistance
-Drive Mode
-Active Sound Design
-Head-Up Display
-Cluster
-Climate
-Seat
-Lights
-Door/Liftgate
-Digital key
-Convenience
-Reset
The information provided may differ
depending on which functions are
applicable to your vehicle.
WARNING
Do not operate the Vehicle Settings
while driving. This may cause
distraction resulting in an accident.
Setting Your Vehicle
OJX1059237OJX1059237
1. Press the SETUP button on the head
unit of the infotainment system.
OJX1050238NOJX1050238N
2. Select ‘Vehicle’ and change the
setting of the features.
OJX1059239NOJX1059239N
See additional information in supplied
Infotainment Manual.
Page 144 of 632
Panoramic Sunroof ........................................................................\
.................5-56Sunshade ........................................................................\
............................................5-58
Sliding the Sunroof ........................................................................\
.............................5-58
Tilting the Sunroof ........................................................................\
..............................5-59
Closing the Sunroof ........................................................................\
...........................5-59
Resetting the Sunroof ........................................................................\
.......................5-60
Sunroof Open Warning ........................................................................\
......................5-61
Exterior Features ........................................................................\
.....................5-62Hood ........................................................................\
....................................................5-62
Power Liftgate ........................................................................\
....................................5-63
Smart Liftgate ........................................................................\
....................................5-69
Fuel Filler Door ........................................................................\
....................................5-71
Head-Up Display (HUD) ........................................................................\
........... 5 -74Head-Up Display Settings ........................................................................\
.................5 -74
Head-Up Display Information ........................................................................\
...........5 -74
Precautions While Using the Head-Up Display ........................................................5-75
Lighting ........................................................................\
.....................................5 -76Exterior Lights ........................................................................\
....................................5 -76
Interior Lights ........................................................................\
.....................................5-79
Welcome System ........................................................................\
................................5-83
High Beam Assist (HBA) ........................................................................\
........5-84System Setting ........................................................................\
................................... 5-84
System Operation ........................................................................\
...............................5-85
System Malfunction and Limitations ........................................................................\
5-85
Wipers and Washers ........................................................................\
...............5-87Front Windshield Wipers ........................................................................\
...................5-87
Front Windshield Washers ........................................................................\
................5-88
Rear Window Wiper and Washer ........................................................................\
.....5-89
Automatic Climate Control System ...............................................................5-90Automatic Temperature Control Mode .....................................................................5-93
Manual Temperature Control Mode ........................................................................\
.5-94
System Operation ........................................................................\
.............................5-102
System Maintenance ........................................................................\
.......................5-104
Windshield Defrosting and Defogging .........................................................5-106To Defog Inside Windshield ........................................................................\
.............5-106
To Defrost Outside Windshield ........................................................................\
.........5-107
Defogging Logic ........................................................................\
................................5-107
Rear Window Defroster ........................................................................\
.................... 5-108
5
Page 166 of 632
Convenient Features
5-24
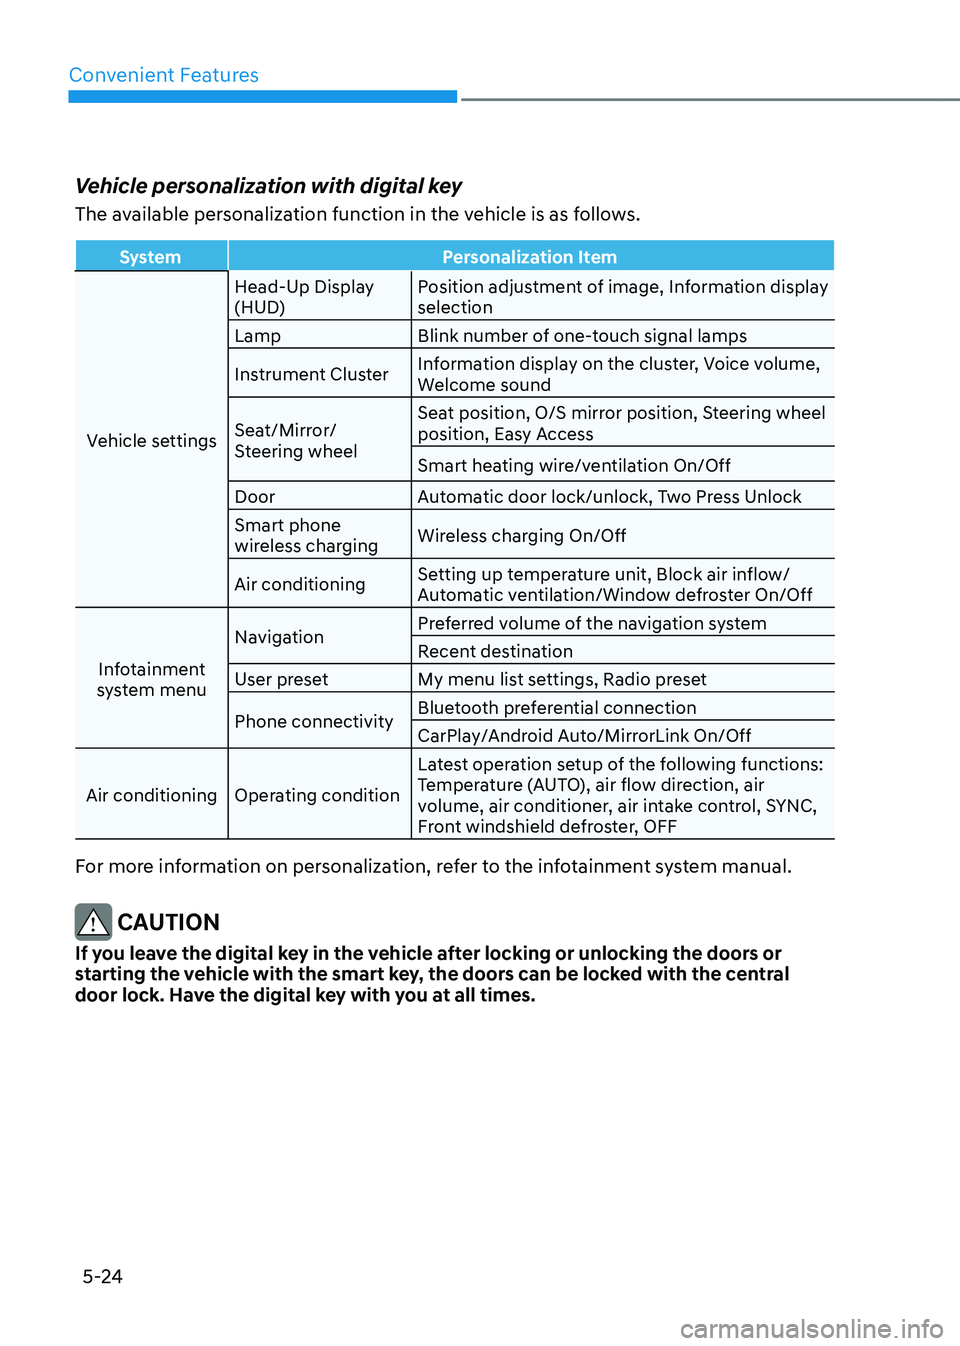
Vehicle personalization with digital key
The available personalization function in the vehicle is as follows.
SystemPersonalization Item
Vehicle settings Head-Up Display
(HUD)
Position adjustment of image, Information display
selection
Lamp Blink number of one-touch signal lamps
Instrument Cluster Information display on the cluster, Voice volume,
Welcome sound
Seat/Mirror/
Steering wheel Seat position, O/S mirror position, Steering wheel
position, Easy Access
Smart heating wire/ventilation On/Off
Door Automatic door lock/unlock, Two Press Unlock
Smart phone
wireless charging Wireless charging On/Off
Air conditioning Setting up temperature unit, Block air inflow/
Automatic ventilation/Window defroster On/Off
Infotainment
system menu Navigation
Preferred volume of the navigation system
Recent destination
User preset My menu list settings, Radio preset
Phone connectivity Bluetooth preferential connection
CarPlay/Android Auto/MirrorLink On/Off
Air conditioning Operating condition Latest operation setup of the following functions:
Temperature (AUTO), air flow direction, air
volume, air conditioner, air intake control, SYNC,
Front windshield defroster, OFF
For more information on personalization, refer to the infotainment system manual.
CAUTION
If you leave the digital key in the vehicle after locking or unlocking the doors or
starting the vehicle with the smart key, the doors can be locked with the central
door lock. Have the digital key with you at all times.
Page 174 of 632
Convenient Features
5-32
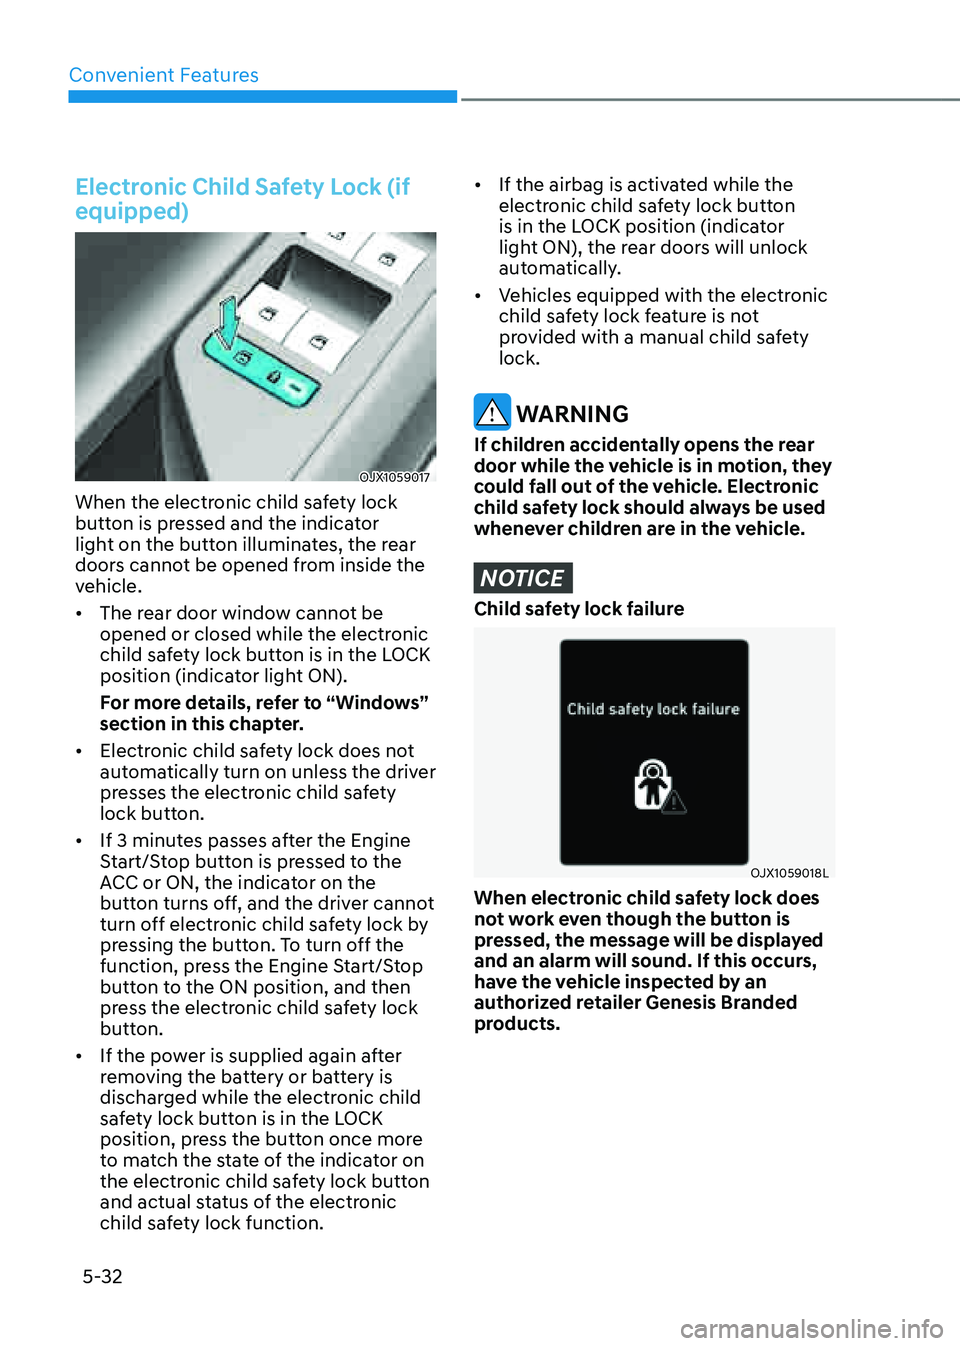
Electronic Child Safety Lock (if
equipped)
OJX1059017OJX1059017
When the electronic child safety lock
button is pressed and the indicator
light on the button illuminates, the rear
doors cannot be opened from inside the
vehicle.
• The rear door window cannot be
opened or closed while the electronic
child safety lock button is in the LOCK
position (indicator light ON).
For more details, refer to “Windows”
section in this chapter.
• Electronic child safety lock does not
automatically turn on unless the driver
presses the electronic child safety
lock button.
• If 3 minutes passes after the Engine
Start/Stop button is pressed to the
ACC or ON, the indicator on the
button turns off, and the driver cannot
turn off electronic child safety lock by
pressing the button. To turn off the
function, press the Engine Start/Stop
button to the ON position, and then
press the electronic child safety lock
button.
• If the power is supplied again after
removing the battery or battery is
discharged while the electronic child
safety lock button is in the LOCK
position, press the button once more
to match the state of the indicator on
the electronic child safety lock button
and actual status of the electronic
child safety lock function.
• If the airbag is activated while the
electronic child safety lock button
is in the LOCK position (indicator
light ON), the rear doors will unlock
automatically.
• Vehicles equipped with the electronic
child safety lock feature is not
provided with a manual child safety
lock.
WARNING
If children accidentally opens the rear
door while the vehicle is in motion, they
could fall out of the vehicle. Electronic
child safety lock should always be used
whenever children are in the vehicle.
NOTICE
Child safety lock failure
OJX1059018LOJX1059018L
When electronic child safety lock does
not work even though the button is
pressed, the message will be displayed
and an alarm will sound. If this occurs,
have the vehicle inspected by an
authorized retailer Genesis Branded
products.
Page 177 of 632
05
5-35
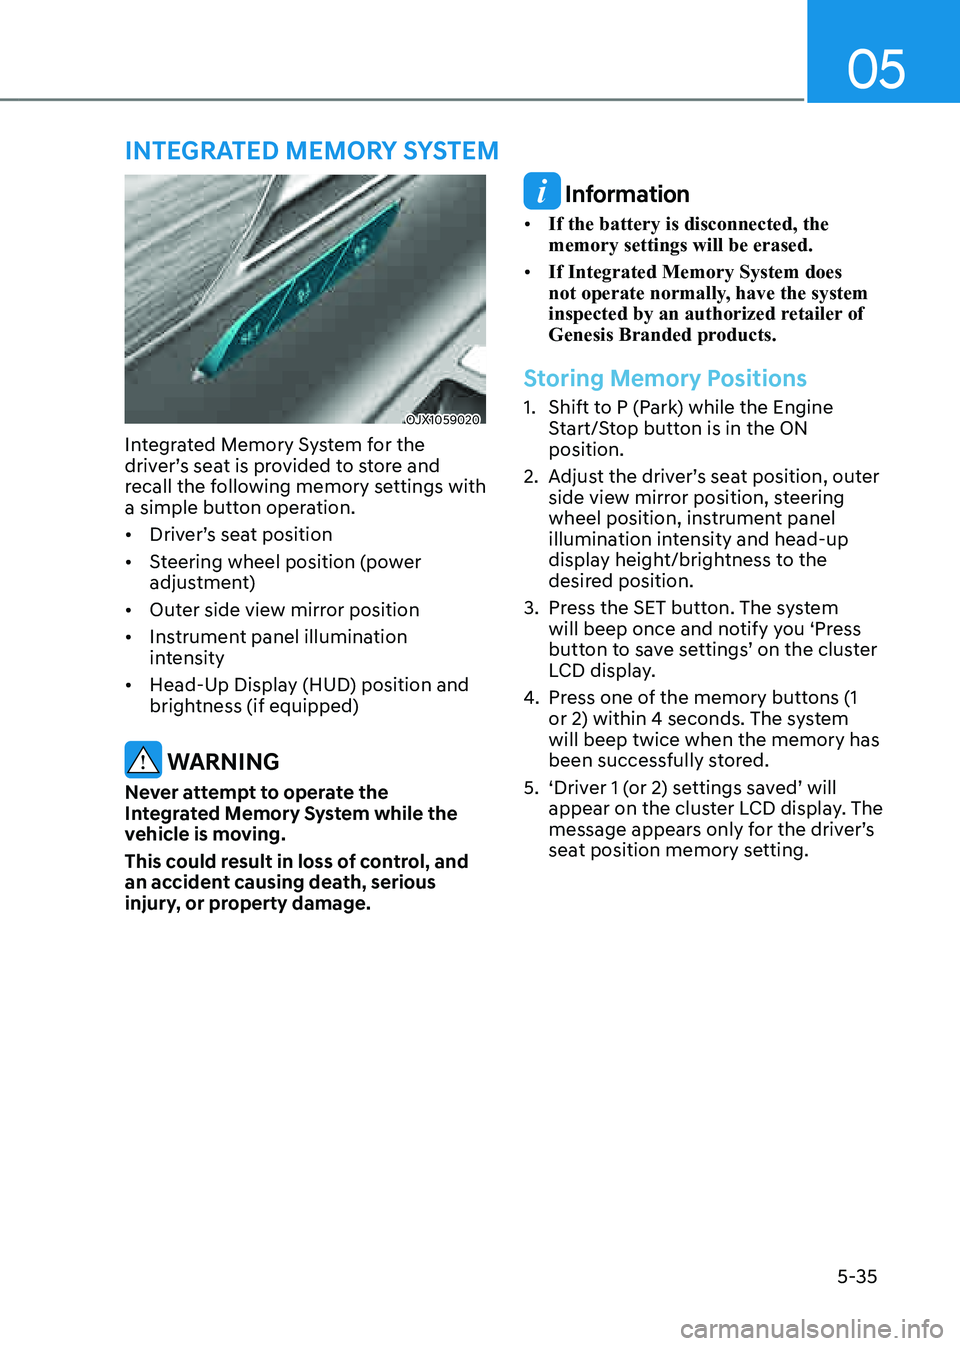
OJX1059020OJX1059020
Integrated Memory System for the
driver’s seat is provided to store and
recall the following memory settings with
a simple button operation.
• Driver’s seat position
• Steering wheel position (power
adjustment)
• Outer side view mirror position
• Instrument panel illumination
intensity
• Head-Up Display (HUD) position and
brightness (if equipped)
WARNING
Never attempt to operate the
Integrated Memory System while the
vehicle is moving.
This could result in loss of control, and
an accident causing death, serious
injury, or property damage.
Information
• If the battery is disconnected, the
memory settings will be erased.
• If Integrated Memory System does
not operate normally, have the system
inspected by an authorized retailer of
Genesis Branded products.
Storing Memory Positions
1. Shift to P (Park) while the Engine
Start/Stop button is in the ON
position.
2. Adjust the driver’s seat position, outer
side view mirror position, steering
wheel position, instrument panel
illumination intensity and head-up
display height/brightness to the
desired position.
3. Press the SET button. The system
will beep once and notify you ‘Press
button to save settings’ on the cluster
LCD display.
4. Press one of the memory buttons (1
or 2) within 4 seconds. The system
will beep twice when the memory has
been successfully stored.
5. ‘Driver 1 (or 2) settings saved’ will
appear on the cluster LCD display. The
message appears only for the driver’s
seat position memory setting.
INTEGRATED MEMORY SYSTEM
Page 178 of 632
Convenient Features
5-36
Recalling Memory Positions
1. Shift to P (Park) while the Engine
Start/Stop button is in the ON
position.
2. Press the desired memory button (1
or 2). The system will beep once, and
then the driver’s seat position, outer
side view mirror position, steering
wheel position, instrument panel
illumination intensity and head-
up display height/brightness will
automatically adjust to the stored
positions.
3. ‘Driver 1 (or 2) settings applied’ will
appear on the cluster LCD display.
Information
• If you press the SET button or the
corresponding button which the
setting is being recalled, the setting will
temporarily deactivate. If you press the
other buttons, the setting of the pressed
button will activate.
For example, if you press the SET
button or number 1 button with the
number 1 setting in operation, the
setting will temporarily deactivate. If
you press the number 2 button, the
number 2 setting will activate.
• If you adjust the seat, side view mirror,
steering wheel, instrument panel
illumination or head-up display while
recalling the stored positions, the pre-
set settings will become ineffective.
Resetting the System
Take the following procedures to reset
Integrated Memory System, when it does
not operate properly.
Resetting Integrated Memory
System
1. Stop the vehicle and open the driver’s
door with the vehicle shifted to P
(Park).
2. Adjust the driver’s seat and seatback
to the foremost position.
3. Press the SET button and push
forward the driver’s seat movement
switch over 2 seconds simultaneously.
While resetting Integrated Memory
System
1. Resetting starts with a notification
sound.
2. The driver’s seat and seatback is
adjusted to the rearward position with
the notification sound.
3. The driver’s seat and seatback is
re-adjusted to the default position
(central position) with the notification
sound.
However, in the following cases, the
resetting procedure and the notification
sound may stop.
• The memory button is pressed.
• The seat control switch is operated.
• The driving speed exceeds
2 mph (3 km/h).
• The driver’s door is closed.
Page 180 of 632

Convenient Features
5-38
The Smart Posture Care system
automatically provides a healthy posture
(position) for the driver’s back, and sets
the steering wheel, side view mirrors,
head-up display positions according to
the driver’s body measurements.
Information
If the Seat Posture Care system does
not operate normally, have the system
checked by an authorized retailer of
Genesis Branded products.
OJX1079170LOJX1079170L
1. Check that the gear is in P (Park) while
the Engine Start/Stop button is in the
ON position.
2. Select ‘Setup → Vehicle Settings → Seat
→ Smart Posture Care → Enter Driver’s
Information’ from the Settings menu
in the infotainment system screen.
3. Enter information (Height, Sitting
height, Weight) in the infotainment
system screen.
4. After entering the driver’s information,
press ‘Posture Analysis → Adjust
Posture → Save Current Posture’. The
driver’s seat, steering wheel, side view
mirror and head-up display will be
adjusted.
5. Save the adjusted seat position in
‘Settings 1’ or ‘Settings 2’.
See additional information in
supplied Infotainment Manual.
SMART POSTURE CARE SYSTEM (IF EQUIPPED)
Page 203 of 632
05
5-61
6. Within 3 seconds, push and hold
the control lever forward until the
sunshade and sunroof operates as
follows:
Sunshade Open → Glass Tilt Open →
Glass Slide Open → Glass Slide Close →
Sunshade Close
Do not release the lever until the
operation is completed.
If you release the control lever during
operation, start the procedure again from
step 2.
7. Release the sunroof control lever after
all steps have completed. The sunroof
system has been reset.
Information
If the sunroof is not reset when the vehicle
battery is disconnected or discharged, or
the sunroof fuse is blown, the sunroof may
not operate normally.
For more detailed information, contact
an authorized retailer of Genesis Branded
products.
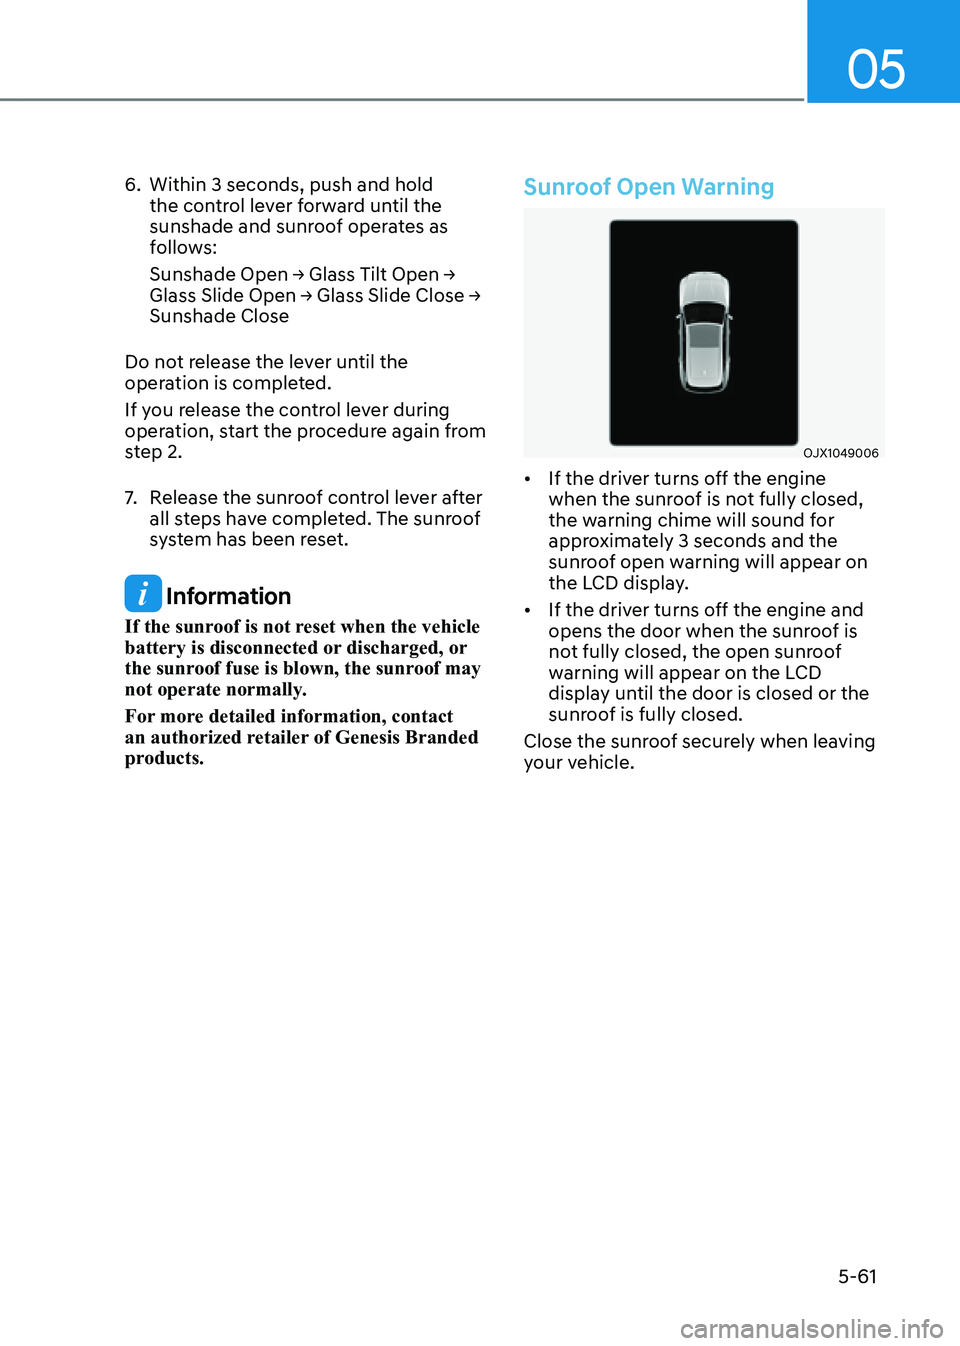
Sunroof Open Warning
OJX1049006 OJX1049006
• If the driver turns off the engine
when the sunroof is not fully closed,
the warning chime will sound for
approximately 3 seconds and the
sunroof open warning will appear on
the LCD display.
• If the driver turns off the engine and
opens the door when the sunroof is
not fully closed, the open sunroof
warning will appear on the LCD
display until the door is closed or the
sunroof is fully closed.
Close the sunroof securely when leaving
your vehicle.