lock GENESIS GV80 2021 Manual PDF
[x] Cancel search | Manufacturer: GENESIS, Model Year: 2021, Model line: GV80, Model: GENESIS GV80 2021Pages: 632, PDF Size: 9.37 MB
Page 234 of 632
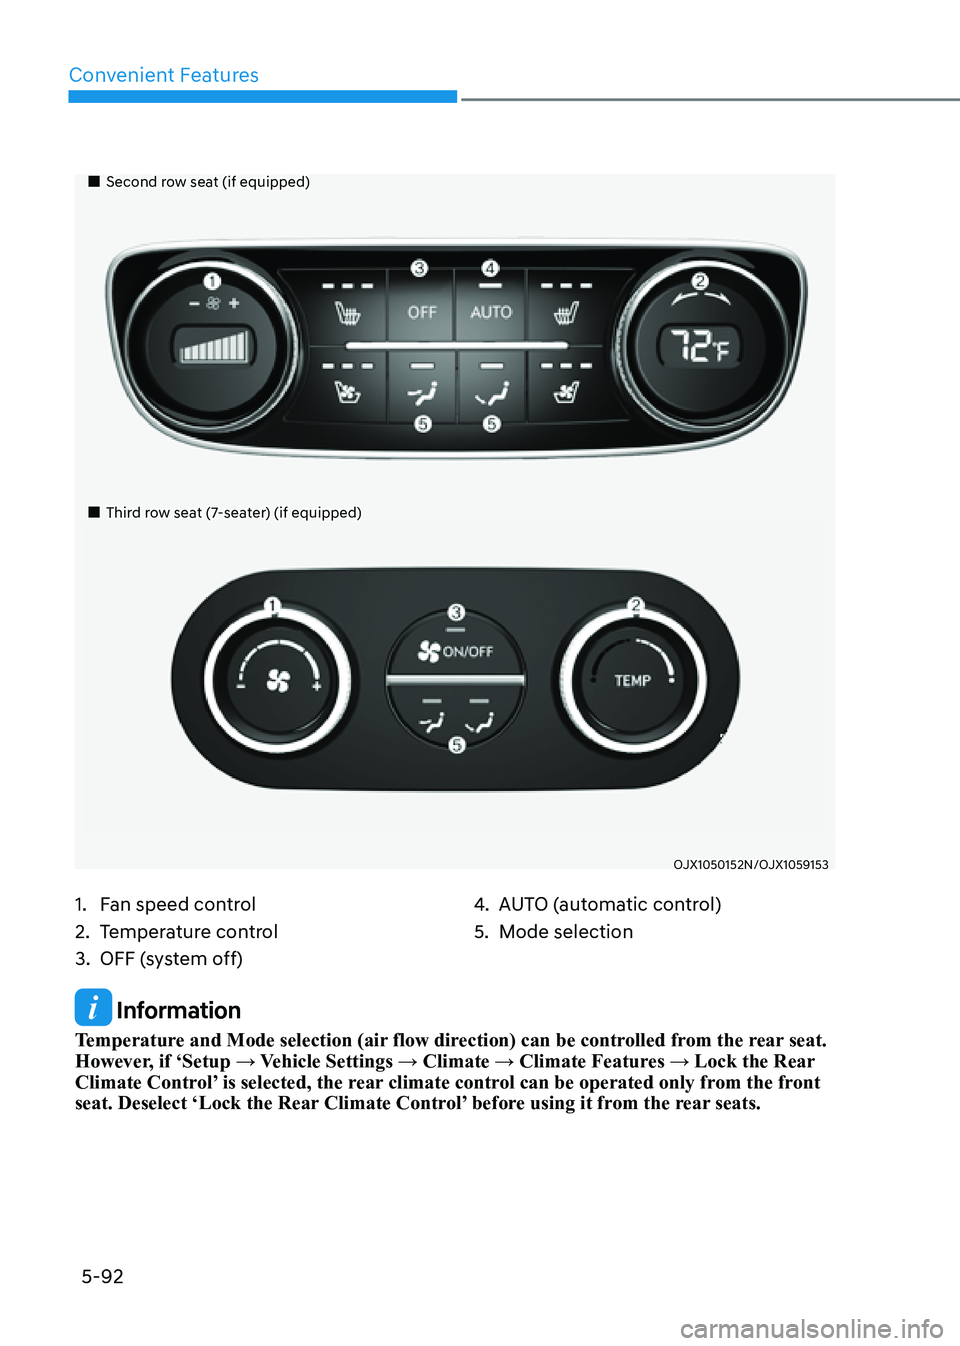
Convenient Features
5-92
Information
Temperature and Mode selection (air flow direction) can be controlled from the rear seat.
However, if ‘Setup → Vehicle Settings → Climate → Climate Features → Lock the Rear
Climate Control’ is selected, the rear climate control can be operated only from the front
seat. Deselect ‘Lock the Rear Climate Control’ before using it from the rear seats.
�
Page 253 of 632
05
5-111
Recirculating Air When Washer
Fluid Is Used
Recirculation mode automatically
activates to help reduce any
objectionable scent of the washer
fluid from entering the cabin when the
windshield washer is used.
Turning Activate upon Washer Fluid
Use ON or OFF
Climate control system
To turn the Activate upon Washer Fluid
Use feature on or off, select Floor level
(
) mode, and then press the air
intake control () button four times
within two seconds while pressing the
A/C icon.
When Activate upon Washer Fluid Use
ON is turned on, the air intake control
button indicator will blink 6 times. When
turned off, the indicator will blink 3
times.
Infotainment system
Activate upon Washer Fluid Use can be
turned on and off by selecting ‘Setup →
Vehicle Settings → Climate → Recirculate
Air → Activate upon Washer Fluid Use
(or Interlocking washer fluid)’ from the
infotainment system screen.
See additional information in supplied
Infotainment Manual.
However, in cold weather to prevent
the windshield from fogging up, the
Recirculation mode may not be selected.
Sunroof Inside Air Recirculation
(if equipped)
When the is sunroof opened, Fresh mode
will be automatically selected. At this
time, if you press the air intake control
button, Recirculation mode will be
selected but will change back to Fresh
mode after 3 minutes. When the sunroof
is closed, the air intake position will
return to the original position that was
selected.
Page 254 of 632
Convenient Features
5-112
WARNING
Never store cigarette lighters, propane
cylinders, or other flammable/explosive
materials in the vehicle. These items
may catch fire and/or explode if the
vehicle is exposed to hot temperatures
for extended periods.
WARNING
ALWAYS keep the storage compartment
covers closed securely while driving.
Items inside your vehicle are moving as
fast as the vehicle. If you have to stop
or turn quickly, or if there is a crash, the
items may fly out of the compartment
and may cause an injury if they strike
the driver or a passenger.
NOTICE
To avoid possible theft, do not leave
valuables in the storage compartments.
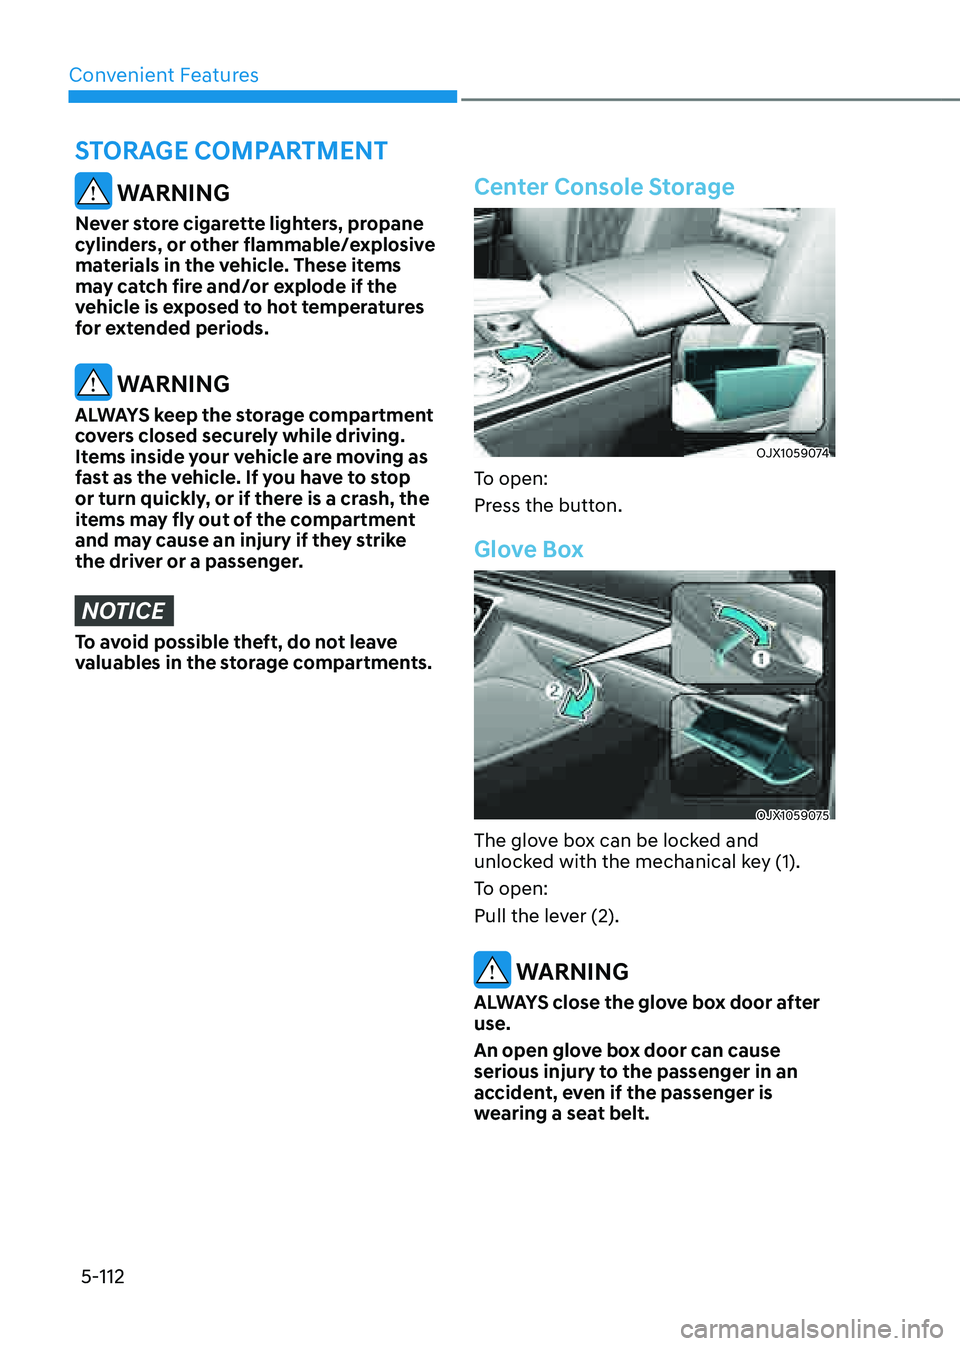
Center Console Storage
OJX1059074OJX1059074
To open:
Press the button.
Glove Box
OJX1059075OJX1059075
The glove box can be locked and
unlocked with the mechanical key (1).
To open:
Pull the lever (2).
WARNING
ALWAYS close the glove box door after
use.
An open glove box door can cause
serious injury to the passenger in an
accident, even if the passenger is
wearing a seat belt.
STORAGE COMPARTMENT
Page 255 of 632

05
5-113
Sunglass Holder
OJX1050203NOJX1050203N
To open:
Push and release the cover and the
holder will slowly open. Place your
sunglasses in the compartment door
with the lenses facing out.
To close:
Push back into position.
Make sure the sunglass holder is closed
while driving.
WARNING
• Do not keep objects except
sunglasses inside the sunglass
holder. Such objects can be thrown
from the holder in the event of a
sudden stop or an accident, possibly
injuring the passengers in the
vehicle.
• Do not open the sunglass holder
while the vehicle is moving. The side
view mirror of the vehicle can be
blocked by an open sunglass holder.
• Do not put the glasses forcibly into
a sunglass holder. It may cause
personal injury if you try to open
it forcibly when the glasses are
jammed in holder.
Storage Tray (7-seater)
OJX1059245OJX1059245
To open:
Press the button.
NOTICE
Be careful not to open the storage tray
manually as it may break the tray.
Page 257 of 632

05
5-115
Sunvisor
OHI048444OHI048444
To use the sunvisor, pull it rearward.
To use the sunvisor to block the sun from
the side window, pull it rearward, release
it from the bracket (1) and swing it to the
side (2) towards the window.
To use the vanity mirror, pull down the
sunvisor and slide the mirror cover (3).
Adjust the sunvisor forward or backward
(4) as needed (if equipped). Use the
ticket holder (5) to hold tickets.
Close the vanity mirror cover securely
and return the sunvisor to its original
position after use.
WARNING
For your safety, do not block your view
when using the sunvisor.
NOTICE
The tab (5) adjacent to the vanity mirror
on the sunvisor can be used for toll
road tickets or self parking tickets. Use
caution when inserting tickets into the
ticket holder to avoid damage. Refrain
from putting several tickets in the ticket
holder as this could also damage the
retaining tab.
Page 262 of 632
Convenient Features
5-120
2. The indicator light is orange when the
smart phone is charging. The indicator
light will turn blue when phone
charging is complete.
3. You can turn ON or OFF the wireless
charging function from the Settings
menu in the infotainment system
screen. Select:
-Setup → Vehicle → Convenience →
Wireless Charging
See additional information in
supplied Infotainment Manual.
If your smart phone is not charging:
- Slightly change the position of the
smart phone on the charging pad.
-Make sure the indicator light is
orange.
The indicator light will blink orange for 10
seconds if there is a malfunction in the
wireless charging system.
In this case, temporarily stop the
charging process, and re-attempt to
charge your smart phone again.
The system warns you with a message on
the LCD display if the smart phone is still
on the wireless charging unit after the
vehicle is turned OFF and the front door
is opened.
For some manufacturer’s smart phones,
the system may not warn you even
though the smart phone is left on the
wireless charging unit. This is due to the
particular characteristic of the smart
phone and not a malfunction of the
wireless charging.
NOTICE
• The wireless smart phone charging
system may not support certain
smart phones, which are not verified
for the Qi specification (
).
• When placing your smart phone on
the charging pad, position the phone
in the middle of the mat for optimal
charging performance. If your smart
phone is off to the side, the charging
rate may be less and in some cases
the smart phone may experience
higher heat conduction.
• In some cases, the wireless charging
may stop temporarily when the
smart key is used, either when
starting the vehicle or locking/
unlocking the doors, etc.
• When charging certain smart
phones, the charging indicator may
not change to blue when the smart
phone is fully charged.
• The wireless charging process may
temporarily stop, when temperature
abnormally increases inside the
wireless smart phone charging
system. The wireless charging
process restarts, when temperature
falls to a certain level.
• The wireless charging process may
temporarily stop when there is
any metallic item, such as a coin,
between the wireless smart phone
charging system and smart phone.
Page 263 of 632
05
5-121
• When charging some smart phones
with a self-protection feature,
the wireless charging speed may
decrease and the wireless charging
may stop.
• If the smart phone has a thick cover,
the wireless charging may not be
possible.
• If the smart phone is not completely
contacting the charging pad,
wireless charging may not operate
properly.
• Some magnetic items like credit
cards, phone cards or rail tickets may
be damaged if left with the smart
phone during the charging process.
• When any smart phone without
a wireless charging function or a
metallic object is placed on the
charging pad, a small noise may
sound. This small sound is due to the
vehicle discerning compatibility of
the object placed on the charging
pad. It does not affect your vehicle or
the smart phone in any way.
Information
If the Engine Start/Stop button is in the
OFF position, the charging also stops.
Clock
The clock can be set from the
infotainment system.
See additional information in supplied
Infotainment Manual.
WARNING
Do not attempt to adjust the clock
while driving. Doing so may result in
distracted driving which may lead to
an accident involving personal injury or
death.
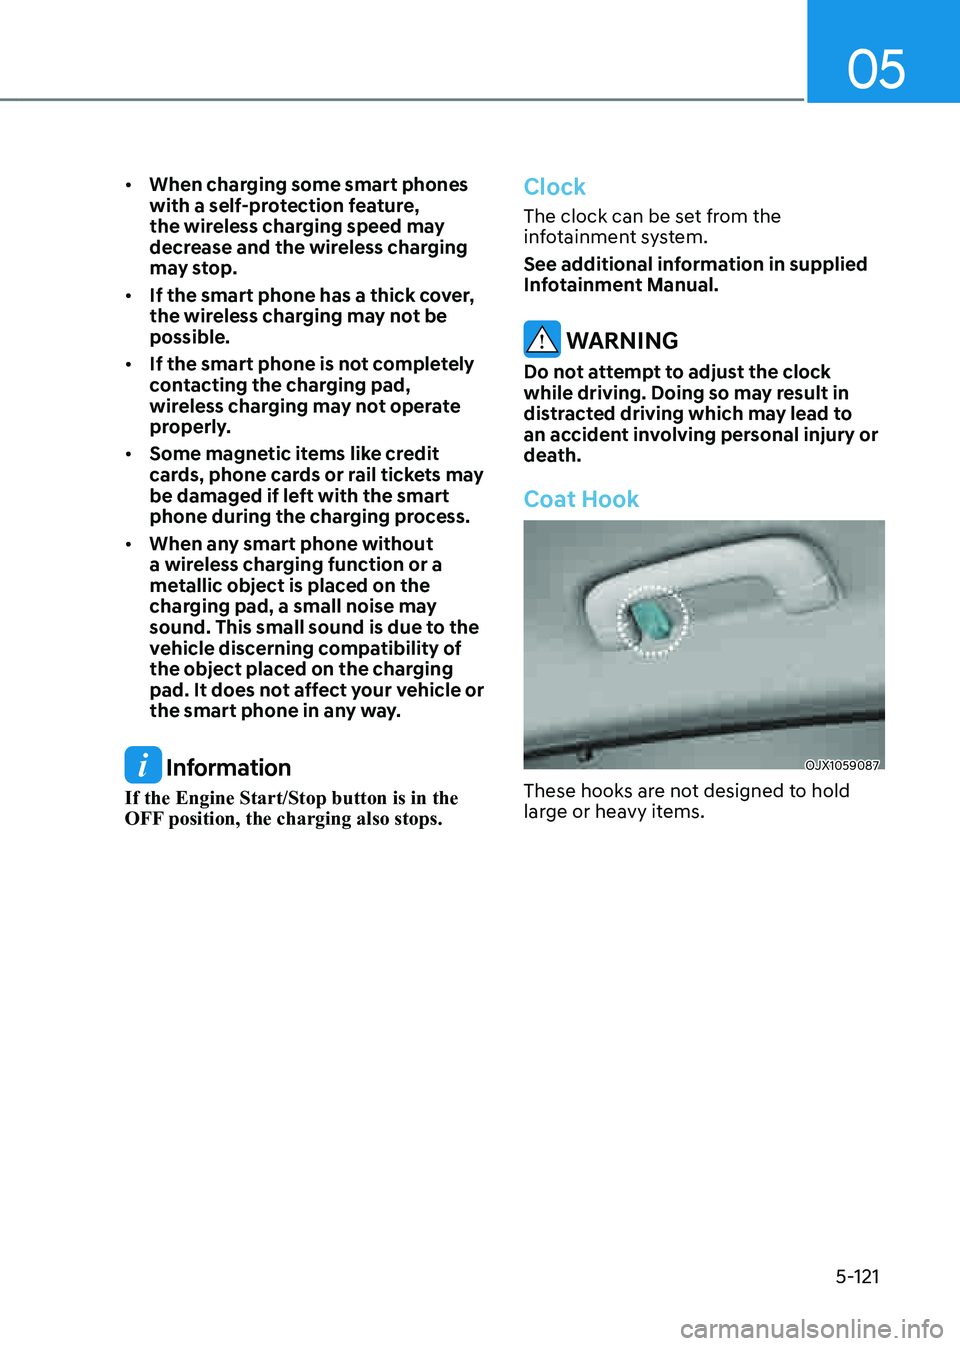
Coat Hook
OJX1059087OJX1059087
These hooks are not designed to hold
large or heavy items.
Page 265 of 632
05
5-123
Rear Side Window Sunshades
(if equipped)
Use the rear side window sunshade to
block external light coming through the
rear window glass.
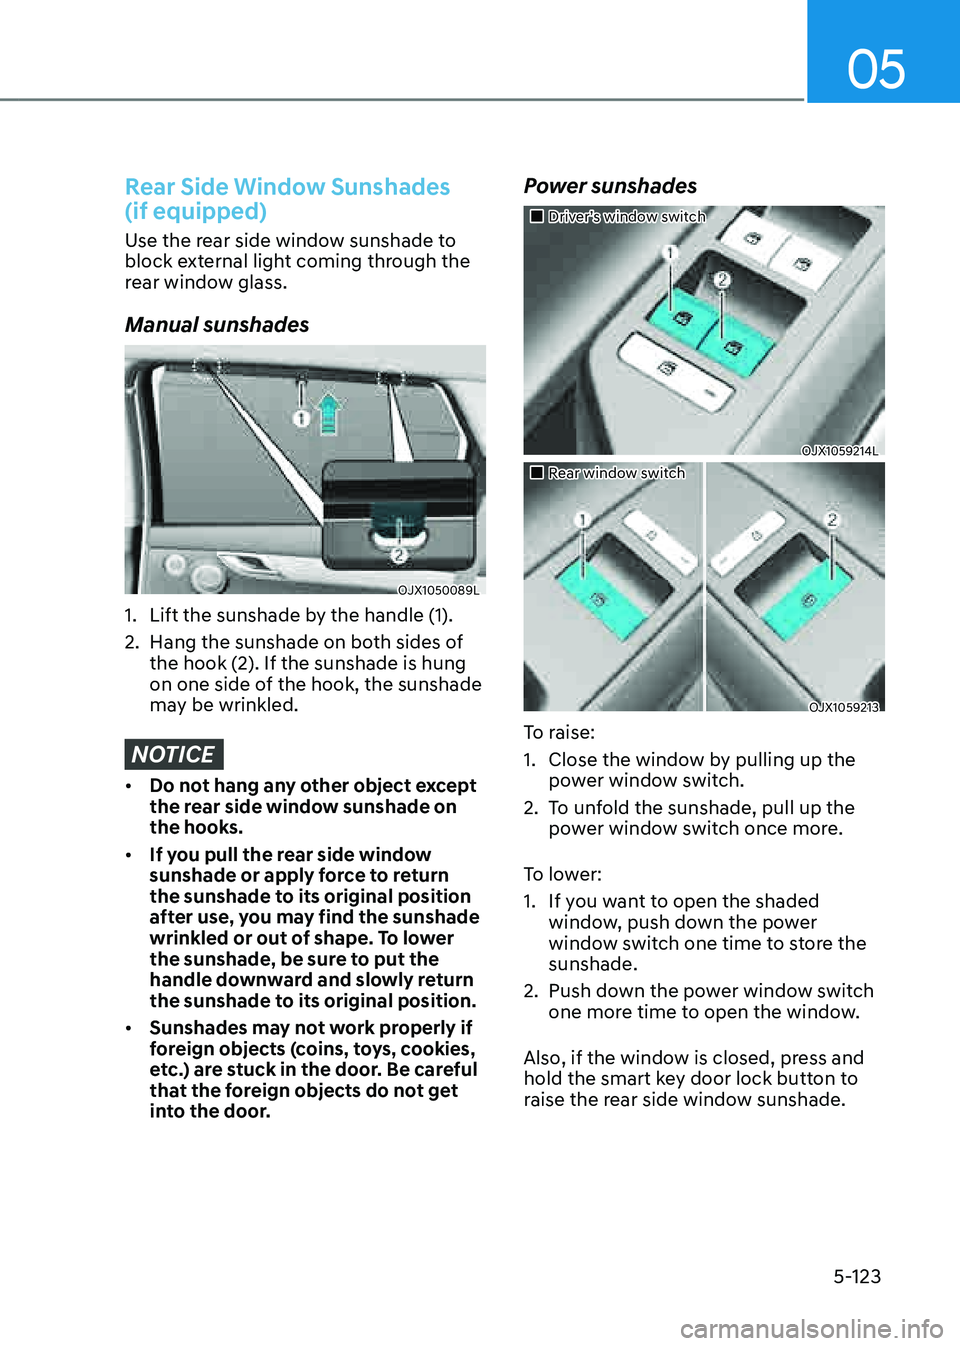
Manual sunshades
OJX1050089LOJX1050089L
1. Lift the sunshade by the handle (1).
2. Hang the sunshade on both sides of
the hook (2). If the sunshade is hung
on one side of the hook, the sunshade
may be wrinkled.
NOTICE
• Do not hang any other object except
the rear side window sunshade on
the hooks.
• If you pull the rear side window
sunshade or apply force to return
the sunshade to its original position
after use, you may find the sunshade
wrinkled or out of shape. To lower
the sunshade, be sure to put the
handle downward and slowly return
the sunshade to its original position.
• Sunshades may not work properly if
foreign objects (coins, toys, cookies,
etc.) are stuck in the door. Be careful
that the foreign objects do not get
into the door.
Power sunshades
�
Page 266 of 632
Convenient Features
5-124
Information
If the upward or downward movement of
the sunshade is blocked by an object or
part of the body, the sunshade will detect
the resistance and will stop movement and
move downward or upward.
NOTICE
• Do not apply excessive external force
on the rear side window sunshade
while operating. It may cause a
malfunction.
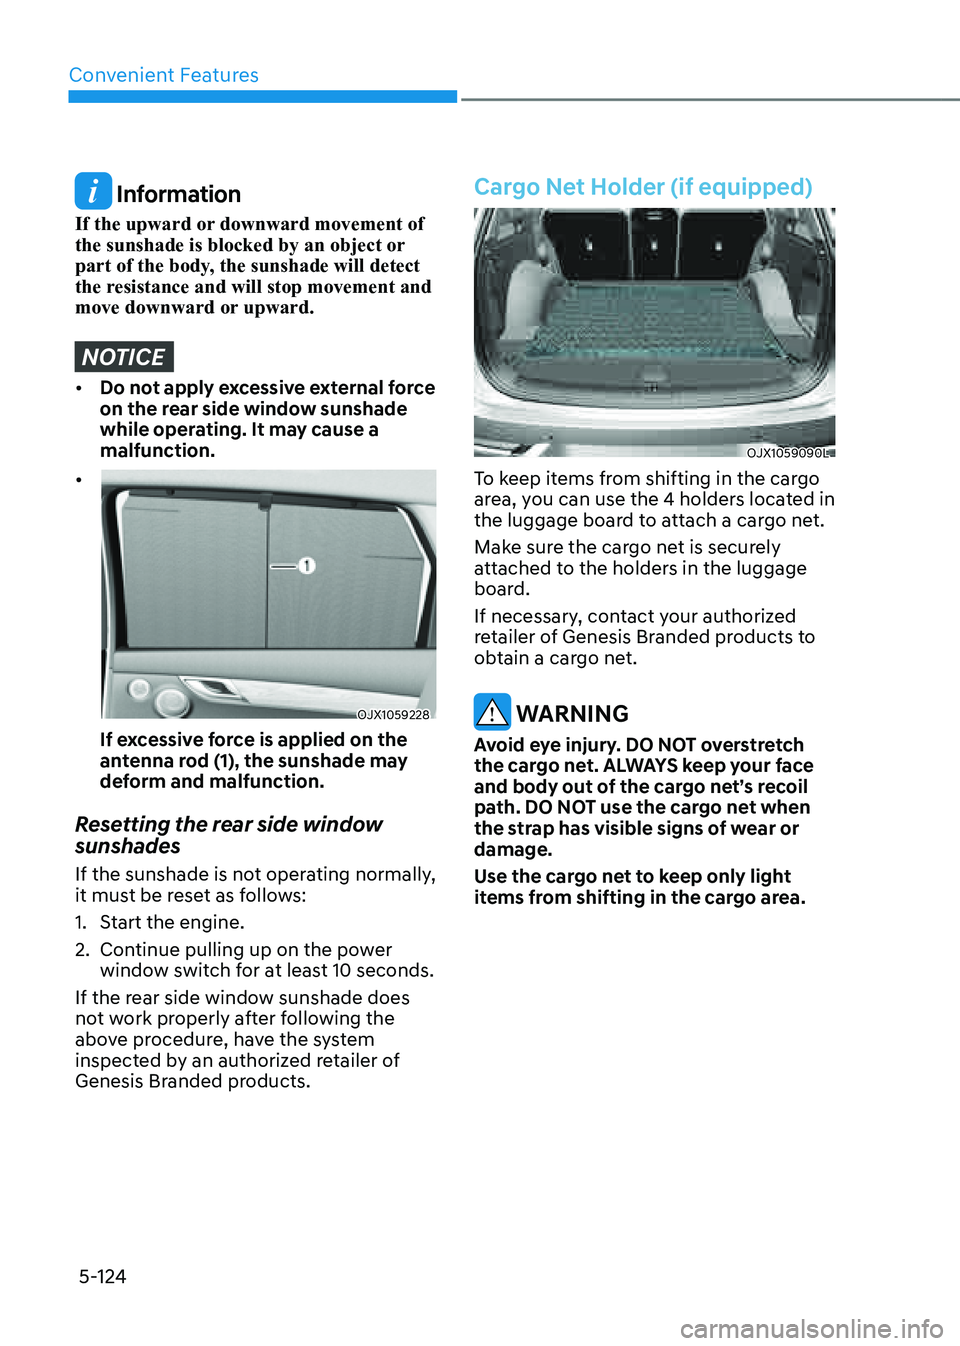
•
OJX1059228OJX1059228
If excessive force is applied on the
antenna rod (1), the sunshade may
deform and malfunction.
Resetting the rear side window
sunshades
If the sunshade is not operating normally,
it must be reset as follows:
1. Start the engine.
2. Continue pulling up on the power
window switch for at least 10 seconds.
If the rear side window sunshade does
not work properly after following the
above procedure, have the system
inspected by an authorized retailer of
Genesis Branded products.
Cargo Net Holder (if equipped)
OJX1059090LOJX1059090L
To keep items from shifting in the cargo
area, you can use the 4 holders located in
the luggage board to attach a cargo net.
Make sure the cargo net is securely
attached to the holders in the luggage
board.
If necessary, contact your authorized
retailer of Genesis Branded products to
obtain a cargo net.
WARNING
Avoid eye injury. DO NOT overstretch
the cargo net. ALWAYS keep your face
and body out of the cargo net’s recoil
path. DO NOT use the cargo net when
the strap has visible signs of wear or
damage.
Use the cargo net to keep only light
items from shifting in the cargo area.
Page 273 of 632
6
Before Driving ........................................................................\
...........................6-5Before Entering the Vehicle ........................................................................\
.................6-5
Before Starting ........................................................................\
.....................................6-5
Engine Start/Stop Button ........................................................................\
.........6-6Engine Stop/Start Button Positions ........................................................................\
....6 -7
Starting the Engine ........................................................................\
.............................6-8
Turning Off the Engine ........................................................................\
........................6-9
Remote Start ........................................................................\
.......................................6-10
Automatic Transmission ........................................................................\
...........6-11Automatic Transmission Operation ........................................................................\
....6-11
LCD Display Messages (Cluster) ........................................................................\
.........6-17
Paddle Shifter (Manual Shift Mode) ........................................................................\
.6-20
Good Driving Practices ........................................................................\
.....................6-20
Braking System ........................................................................\
.......................6-22Power-Assist Brakes ........................................................................\
...........................6-22
Disc Brakes Wear Indicator ........................................................................\
................ 6-22
High Performance Brake........................................................................\
.................... 6-23
Electronic Parking Brake (EPB)
........................................................................\
..........6-23
Auto Hold ........................................................................\
............................................6-27
Anti-lock Brake System (ABS) ........................................................................\
............6-31
Electronic Stability Control (ESC) ........................................................................\
.....6-32
Vehicle Stability Management (VSM) .......................................................................6-35
Hill-Start Assist Control (HAC) ........................................................................\
..........6-36
Downhill Brake Control (DBC) ........................................................................\
..........6-36
Good Braking Practices ........................................................................\
.....................6-39
All Wheel Drive (AWD) ........................................................................\
............6-40All Wheel Drive (AWD) Operation ........................................................................\
......6-41
Emergency Precautions ........................................................................\
....................6-43
Electronic Limited Slip Differential ................................................................6-45Drive Mode Selection ........................................................................\
........................6-45
Warning Messages ........................................................................\
............................6-45
6. Driving Your Vehicle
Driving Your Vehicle