change wheel GENESIS GV80 2021 Owner's Manual
[x] Cancel search | Manufacturer: GENESIS, Model Year: 2021, Model line: GV80, Model: GENESIS GV80 2021Pages: 632, PDF Size: 9.37 MB
Page 22 of 632
Vehicle Information, Consumer Information and Reporting Safety Defects
2-10
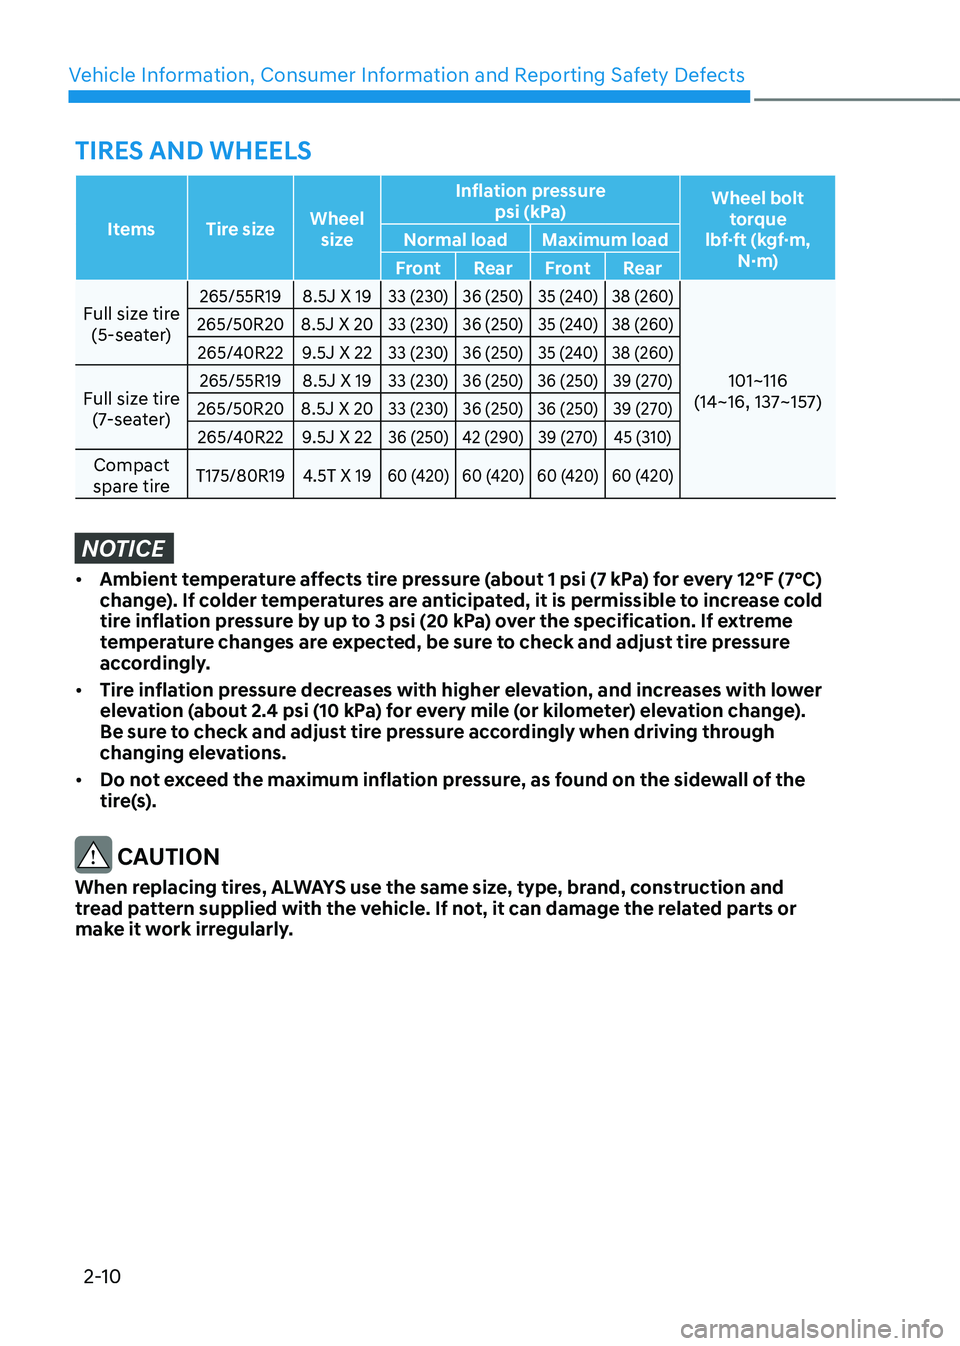
ItemsTire size Wheel
size Inflation pressure
psi (kPa) Wheel bolt
torque
lbf·ft (kgf·m, N·m)
Normal load
Maximum load
Front RearFront Rear
Full size tire (5-seater)
265/55R19 8.5J X 1933 (230)36 (250) 35 (240)38 (260)
101~116
(14~16, 137~157)
265/50R20 8.5J X 2033 (230)36 (250) 35 (240)38 (260)
265/40R22 9.5J X 2233 (230)36 (250) 35 (240)38 (260)
Full size tire
(7-seater)265/55R19 8.5J X 1933 (230)36 (250) 36 (250) 39 (270)
265/50R20 8.5J X 2033 (230)36 (250) 36 (250) 39 (270)
265/40R22 9.5J X 2236 (250)42 (290) 39 (270) 45 (310)
Compact
spare tireT175/80R19 4.5T X 1960 (420)60 (420)60 (420)60 (420)
NOTICE
• Ambient temperature affects tire pressure (about 1 psi (7 kPa) for every 12°F (7°C)
change). If colder temperatures are anticipated, it is permissible to increase cold
tire inflation pressure by up to 3 psi (20 kPa) over the specification. If extreme
temperature changes are expected, be sure to check and adjust tire pressure
accordingly.
• Tire inflation pressure decreases with higher elevation, and increases with lower
elevation (about 2.4 psi (10 kPa) for every mile (or kilometer) elevation change).
Be sure to check and adjust tire pressure accordingly when driving through
changing elevations.
• Do not exceed the maximum inflation pressure, as found on the sidewall of the
tire(s).
CAUTION
When replacing tires, ALWAYS use the same size, type, brand, construction and
tread pattern supplied with the vehicle. If not, it can damage the related parts or
make it work irregularly.
TIRES AND WHEELS
Page 136 of 632
04
4-31
OJX1049015LOJX1049015L
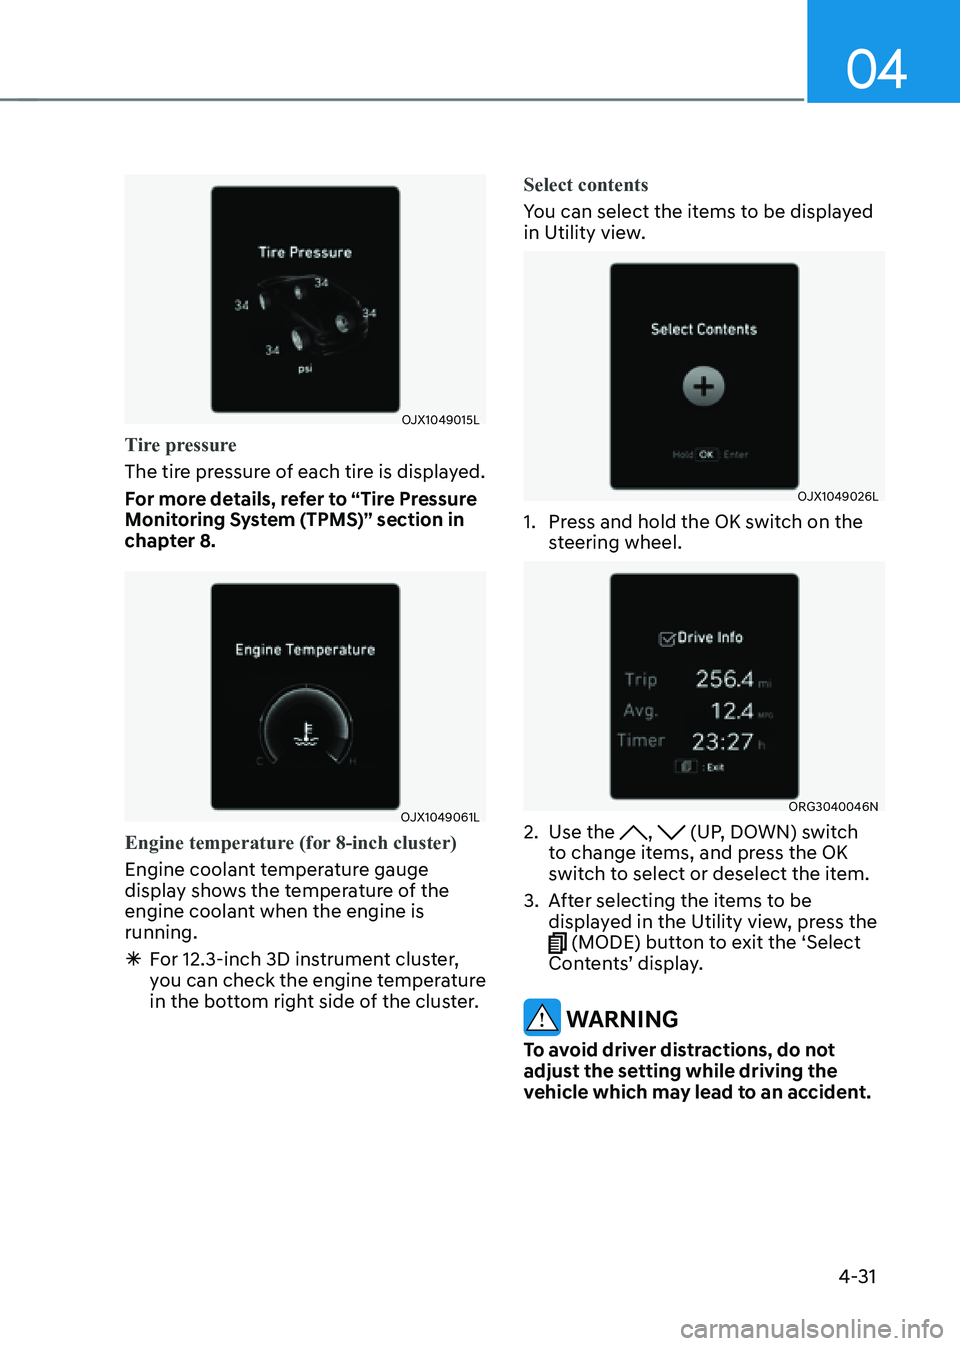
Tire pressure
The tire pressure of each tire is displayed.
For more details, refer to “Tire Pressure
Monitoring System (TPMS)” section in
chapter 8.
OJX1049061LOJX1049061L
Engine temperature (for 8-inch cluster)
Engine coolant temperature gauge
display shows the temperature of the
engine coolant when the engine is
running.
ÃFor 12.3-inch 3D instrument cluster,
you can check the engine temperature
in the bottom right side of the cluster. Select contents
You can select the items to be displayed
in Utility view.
OJX1049026LOJX1049026L
1. Press and hold the OK switch on the
steering wheel.
ORG3040046NORG3040046N
2. Use the , (UP, DOWN) switch
to change items, and press the OK
switch to select or deselect the item.
3. After selecting the items to be
displayed in the Utility view, press the
(MODE) button to exit the ‘Select
Contents’ display.
WARNING
To avoid driver distractions, do not
adjust the setting while driving the
vehicle which may lead to an accident.
Page 139 of 632
Instrument Cluster
4-34
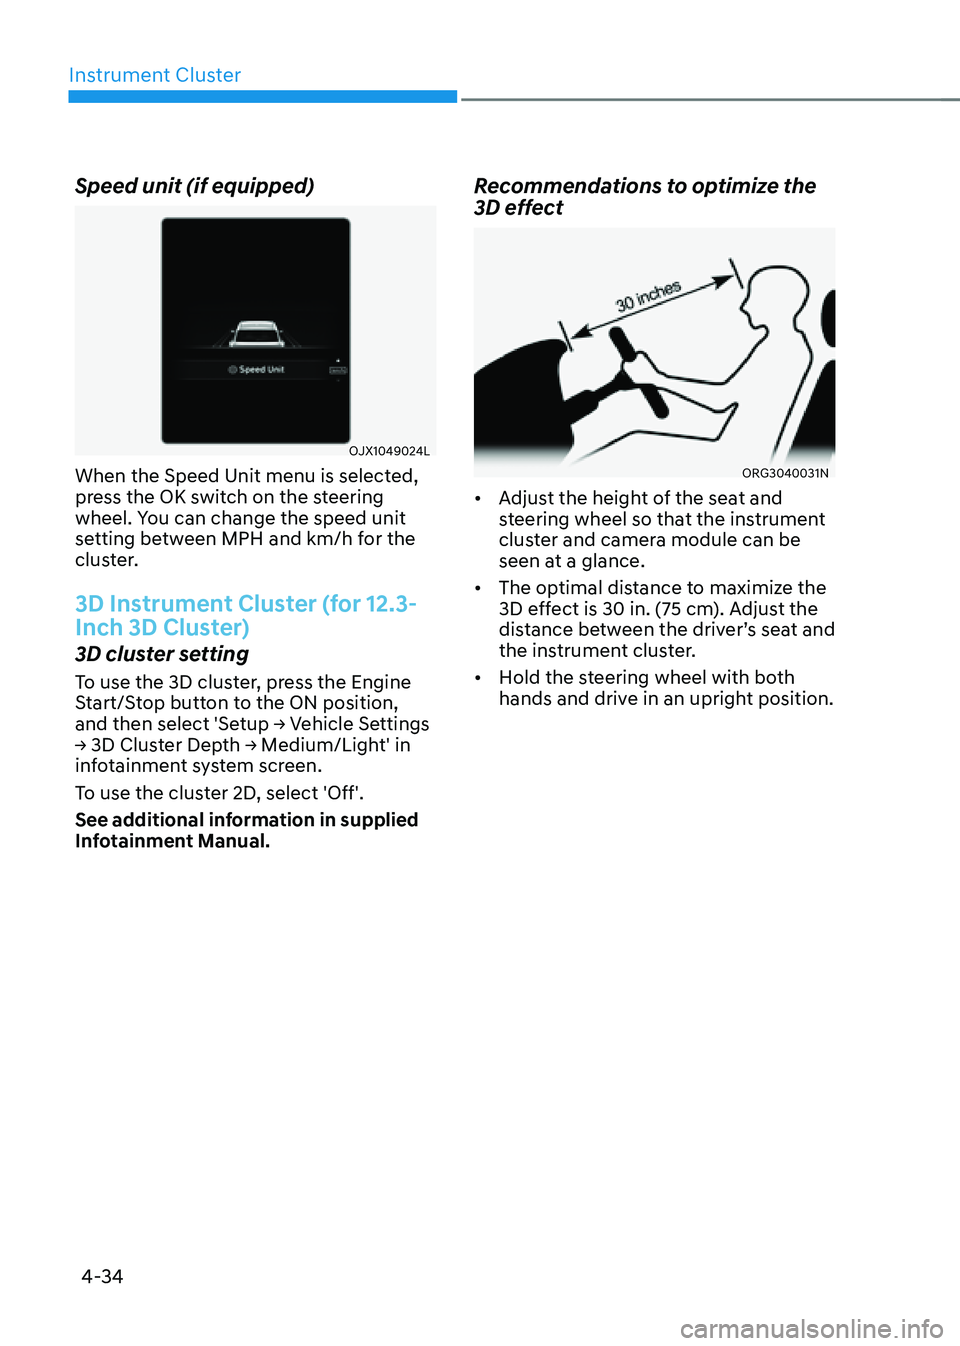
Speed unit (if equipped)
OJX1049024LOJX1049024L
When the Speed Unit menu is selected,
press the OK switch on the steering
wheel. You can change the speed unit
setting between MPH and km/h for the
cluster.
3D Instrument Cluster (for 12.3-
Inch 3D Cluster)
3D cluster setting
To use the 3D cluster, press the Engine
Start/Stop button to the ON position,
and then select 'Setup → Vehicle Settings
→ 3D Cluster Depth → Medium/Light' in
infotainment system screen.
To use the cluster 2D, select 'Off'.
See additional information in supplied
Infotainment Manual.
Recommendations to optimize the
3D effect
ORG3040031NORG3040031N
• Adjust the height of the seat and
steering wheel so that the instrument
cluster and camera module can be
seen at a glance.
• The optimal distance to maximize the
3D effect is 30 in. (75 cm). Adjust the
distance between the driver’s seat and
the instrument cluster.
• Hold the steering wheel with both
hands and drive in an upright position.
Page 140 of 632
04
4-35
Information
• When your face gets too close or far to
the instrument cluster, or the camera
on the instrument cluster is blocked by
the steering wheel or other objects, the
3D cluster changes to 2D automatically.
However if the object blocking the
camera is removed, the cluster changes
back to 3D automatically.
• If outside temperature is below 39°F
(4°C), it may change to 2D about 1 to
10 minutes.
• Two red lights may appear on the
camera in the following conditions
when:
-The outside brightness is dim or
driving at night
-The vehicle drives inside a building,
such as a basement parking lot
-The camera case of the instrument
cluster is partially damaged
CAUTION
• It may sometimes be difficult to
read information on the 3D cluster
in the following situations. You must
change the cluster to 2D for safe
driving.
-The driver is wearing sunglasses,
special glasses, infrared cutoff
glasses, refracting glasses or thick
glasses
-The driver has heavy eye makeup
(eyeliner, mascara, color makeup,
false eyelash) or eye piercing
-The driver’s view is blocked by his/
her hair, etc.
-The driver is winking or wearing an
eye patch on one eye
-The driver’s face is covered
partially by a mask, muffler, hood,
etc.
-The driver’s view is blocked by
incoming light from outside of the
vehicle
-Light from outside, sunlight or
infrared LED light of the camera
is reflected on the glasses or
sunglasses
-The driver turns or lowers his/her
head so that the face or an eye is
hidden from the camera
-The driver shakes his/her head
up and down, or adverse road
conditions cause excessive vehicle
vibrations while driving
-The driver is too tall or short
-More than two people are
looking at the instrument cluster
simultaneously from the driver’s
seat
-The driver’s eyesight of both eyes
are severely different
-The driver has a severe headache
• Do not look toward the camera
within 8 in (20 cm) for longer than a
minute.
• If you use the 3D cluster while your
vehicle is stopped, it can cause eye
strains or dizziness.
• We recommend people who are
pregnant, elderly or has motion
sickness, avoid using the cluster in
3D.
Page 181 of 632
05
5-39
Electric Power Steering (EPS)
The system assists you with steering the
vehicle. If the vehicle is turned off or
if the power steering system becomes
inoperative, you may still steer the
vehicle, but it will require increased
steering effort.
Should you notice any change in the
effort required to steer during normal
vehicle operation, have the system
checked by an authorized retailer of
Genesis Branded products.
CAUTION
If Electric Power Steering does not
operate normally, the warning light and the message ‘Check motor driven
power steering’ will illuminate on the
instrument cluster. You may steer the
vehicle, but it will require increased
steering efforts. Take the vehicle to an
authorized retailer of Genesis Branded
products and have the system checked
as soon as possible.
Information
The following symptoms may occur during
normal vehicle operation:
• The steering effort may be high
immediately after pressing the Engine
Start/Stop button to the ON position.
This happens as the system performs
the EPS system diagnostics. When the
diagnostics are completed, the steering
wheel effort will return to its normal
condition.
• When the battery voltage is low, you
may have to put more steering effort.
However, it is a temporary condition so
that it will return to normal condition
after charging the battery.
• A click noise may be heard from the
EPS relay after the Engine Start/Stop
button is in the ON or OFF position.
• Motor noise may be heard when the
vehicle is at a stop or at a low driving
speed.
• When you operate the steering wheel
in low temperatures, abnormal noise
may occur. If the temperature rises, the
noise will disappear. This is a normal
condition.
• When an error is detected from EPS,
the steering effort assist function will
not be activated in order to prevent
accidents. Instrument cluster warning
lights may be on or the steering effort
may be high. If these symptoms occur,
drive the vehicle to a safe area as soon
as it is safe to do so. Have the system
checked by an authorized retailer of
Genesis Branded products as soon as
possible.
STEERING WHEEL
Page 182 of 632
Convenient Features
5-40
Tilt / Telescopic Steering
When adjusting the steering wheel to a
comfortable position, adjust the steering
wheel so that it points toward your chest,
not toward your face. Make sure you can
see the instrument cluster warning lights
and gauges. After adjusting, push the
steering wheel both up and down to be
certain it is locked in position.
Always adjust the position of the steering
wheel before driving.
WARNING
NEVER adjust the steering wheel while
driving. This may cause loss of vehicle
control resulting in an accident.
Manual adjustment
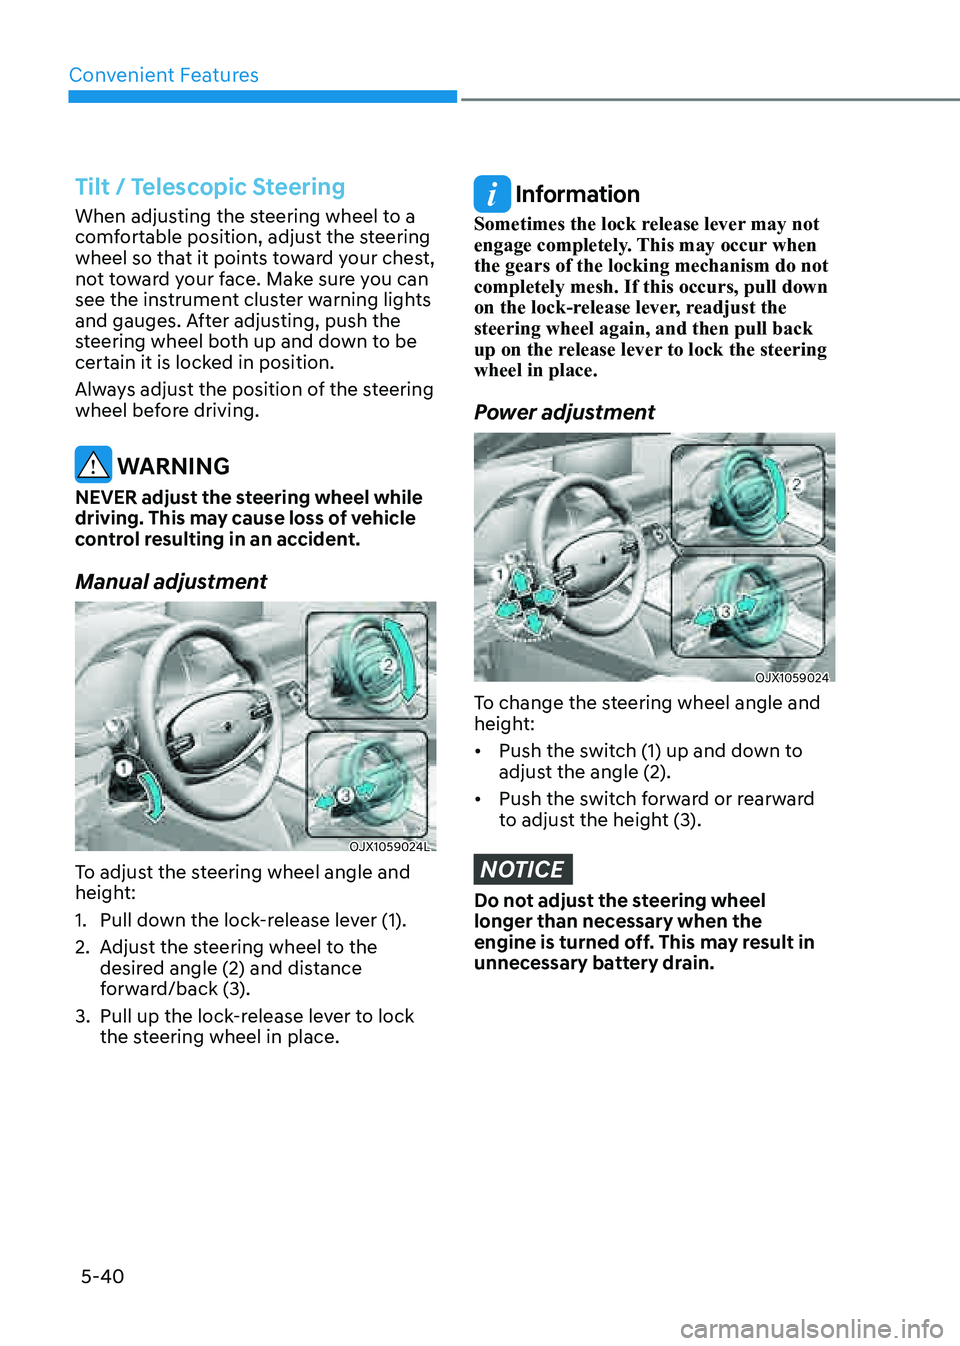
OJX1059024LOJX1059024L
To adjust the steering wheel angle and
height:
1. Pull down the lock-release lever (1).
2. Adjust the steering wheel to the
desired angle (2) and distance
forward/back (3).
3. Pull up the lock-release lever to lock
the steering wheel in place.
Information
Sometimes the lock release lever may not
engage completely. This may occur when
the gears of the locking mechanism do not
completely mesh. If this occurs, pull down
on the lock-release lever, readjust the
steering wheel again, and then pull back
up on the release lever to lock the steering
wheel in place.
Power adjustment
OJX1059024OJX1059024
To change the steering wheel angle and
height:
• Push the switch (1) up and down to
adjust the angle (2).
• Push the switch forward or rearward
to adjust the height (3).
NOTICE
Do not adjust the steering wheel
longer than necessary when the
engine is turned off. This may result in
unnecessary battery drain.
Page 184 of 632
Convenient Features
5-42
Heated Steering Wheel
(if equipped)
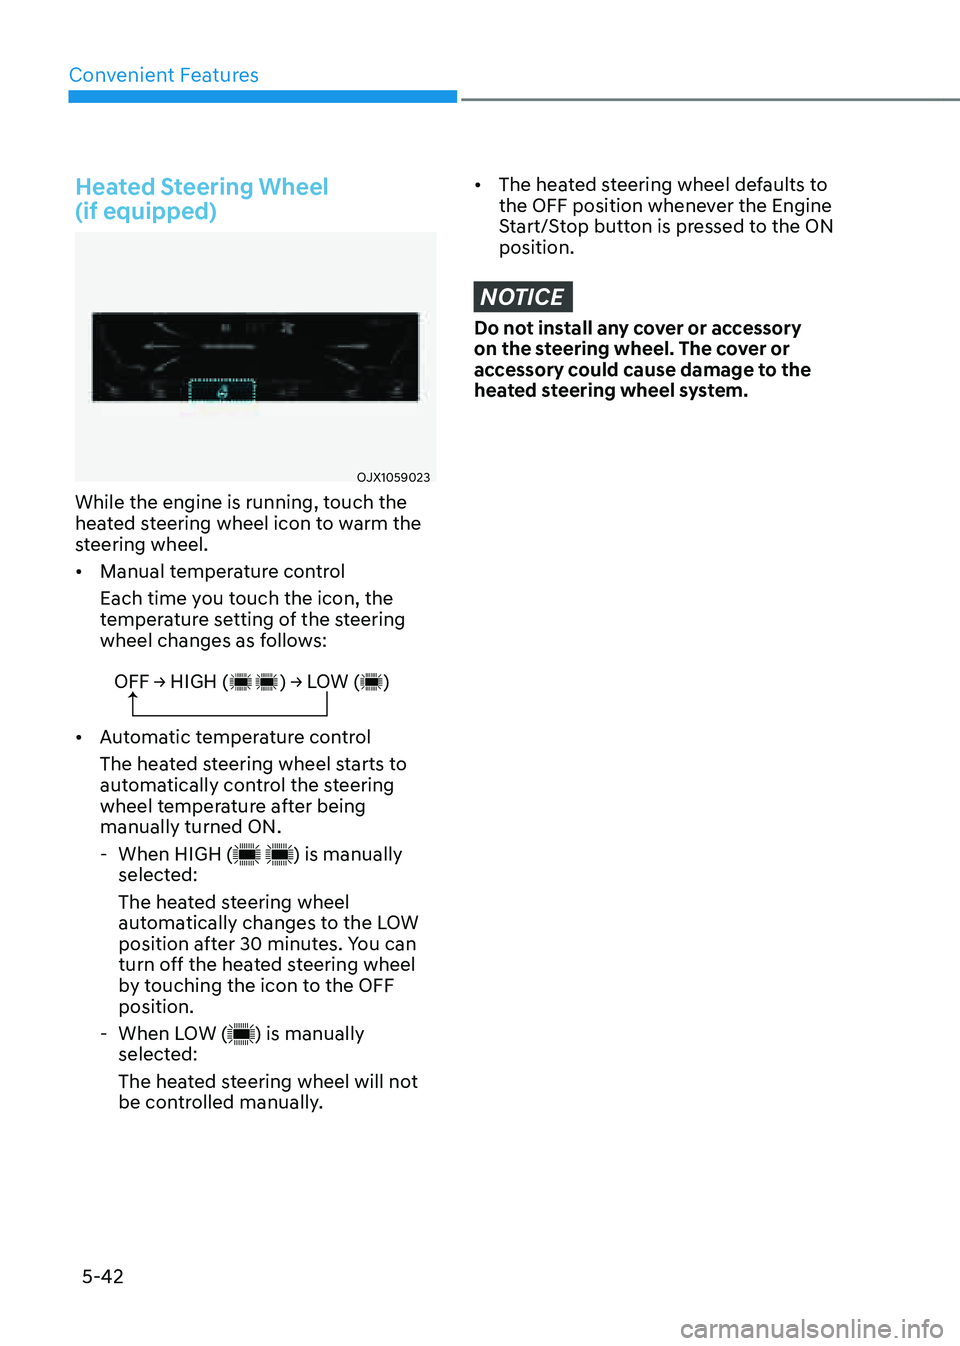
OJX1059023OJX1059023
While the engine is running, touch the
heated steering wheel icon to warm the
steering wheel.
• Manual temperature control
Each time you touch the icon, the
temperature setting of the steering
wheel changes as follows:
OFF → HIGH ( ) → LOW ( )
• Automatic temperature control
The heated steering wheel starts to
automatically control the steering
wheel temperature after being
manually turned ON.
-When HIGH () is manually
selected:
The heated steering wheel
automatically changes to the LOW
position after 30 minutes. You can
turn off the heated steering wheel
by touching the icon to the OFF
position.
- When LOW () is manually
selected:
The heated steering wheel will not
be controlled manually.
• The heated steering wheel defaults to
the OFF position whenever the Engine
Start/Stop button is pressed to the ON
position.
NOTICE
Do not install any cover or accessory
on the steering wheel. The cover or
accessory could cause damage to the
heated steering wheel system.
Page 287 of 632

06
6-15
4. Press and hold the OK button on
the steering wheel for more than 1
second.
5. When the message ‘Vehicle will stay
in (N). Change gear to cancel’ appears
on the cluster LCD display, press
the Engine Start/Stop button while
depressing the brake pedal.
If you wish to cancel, change gear to
P (Park), D (Drive) or R (Reverse), or N
(Neutral) will stay engaged when the
vehicle is Off.
Also, if you open the driver's door, the
gear will automatically shift to P (Park)
and the Engine Start/Stop button will
change to the OFF position.
NOTICE
With the gear in N (Neutral) the Engine
Start/Stop button will be in the ACC
position. Note that the doors cannot
be locked in the ACC position or the
battery may discharge if left in the ACC
position for a long period.
D (Drive)
This is the normal driving position.
The transmission will automatically shift
through an 8-gear sequence, providing
the best fuel economy and power.
For extra power when passing another
vehicle or driving uphill, depress the
accelerator pedal further until you feel
the transmission downshift to a lower
gear.
OJX1069007LOJX1069007L
To shift the gear to D (Drive), rotate the
shift dial clockwise while depressing the
brake pedal.
When the vehicle is stopped in the D
(Drive) position, if you open the driver's
door with the seat belt unfastened, the
gear will automatically shift to P (Park).
However, if the vehicle is in motion, the
gear may not automatically shift to P
(Park) to prevent automatic transmission
damage.
NOTICE
Always come to a complete stop before
shifting into D (Drive).
Page 292 of 632
Driving Your Vehicle
6-20
Paddle Shifter (Manual Shift
Mode)
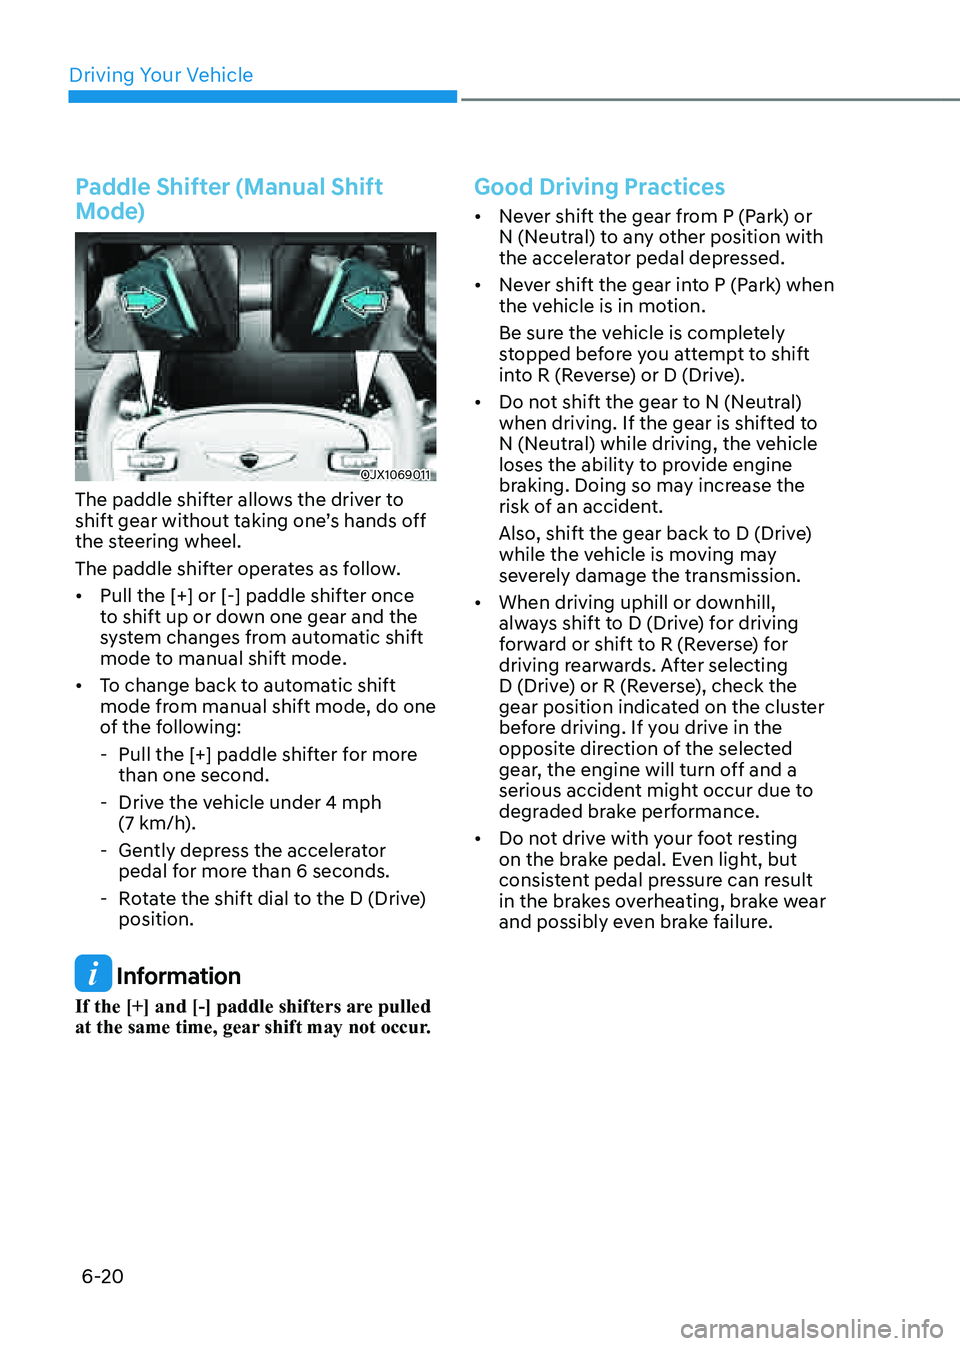
OJX1069011OJX1069011
The paddle shifter allows the driver to
shift gear without taking one’s hands off
the steering wheel.
The paddle shifter operates as follow.
• Pull the [+] or [-] paddle shifter once
to shift up or down one gear and the
system changes from automatic shift
mode to manual shift mode.
• To change back to automatic shift
mode from manual shift mode, do one
of the following:
-Pull the [+] paddle shifter for more
than one second.
-Drive the vehicle under 4 mph (7 km/h).
-Gently depress the accelerator
pedal for more than 6 seconds.
-Rotate the shift dial to the D (Drive)
position.
Information
If the [+] and [-] paddle shifters are pulled
at the same time, gear shift may not occur.
Good Driving Practices
• Never shift the gear from P (Park) or
N (Neutral) to any other position with
the accelerator pedal depressed.
• Never shift the gear into P (Park) when
the vehicle is in motion.
Be sure the vehicle is completely
stopped before you attempt to shift
into R (Reverse) or D (Drive).
• Do not shift the gear to N (Neutral)
when driving. If the gear is shifted to
N (Neutral) while driving, the vehicle
loses the ability to provide engine
braking. Doing so may increase the
risk of an accident.
Also, shift the gear back to D (Drive)
while the vehicle is moving may
severely damage the transmission.
• When driving uphill or downhill,
always shift to D (Drive) for driving
forward or shift to R (Reverse) for
driving rearwards. After selecting
D (Drive) or R (Reverse), check the
gear position indicated on the cluster
before driving. If you drive in the
opposite direction of the selected
gear, the engine will turn off and a
serious accident might occur due to
degraded brake performance.
• Do not drive with your foot resting
on the brake pedal. Even light, but
consistent pedal pressure can result
in the brakes overheating, brake wear
and possibly even brake failure.
Page 293 of 632

06
6-21
• Always apply the parking brake when
leaving the vehicle. Do not depend on
placing the transmission in P (Park) to
keep the vehicle from moving.
• Exercise extreme caution when
driving on a slippery surface. Be
especially careful when braking,
accelerating or shifting gears. On a
slippery surface, an abrupt change
in vehicle speed can cause the drive
wheels to lose traction and may cause
loss of vehicle control resulting in an
accident.
• Optimum vehicle performance and
economy is obtained by smoothly
depressing and releasing the
accelerator.
WARNING
To reduce the risk of SERIOUS INJURY
or DEATH:
• ALWAYS wear your seat belt. In a
collision, an unbelted occupant
is significantly more likely to be
seriously injured or killed than a
properly belted occupant.
• Avoid high speeds when cornering or
turning.
• Do not make quick steering wheel
movements, such as sharp lane
changes or fast, sharp turns.
• The risk of rollover is greatly
increased if you lose control of your
vehicle at highway speeds.
• Loss of control often occurs if two or
more wheels drop off the roadway
and the driver over steers to reenter
the roadway.
• In the event your vehicle leaves
the roadway, do not steer sharply.
Instead, slow down before pulling
back into the travel lanes.
• Genesis Branded Vehicle
recommends you to follow all posted
speed limits.
NOTICE
Kickdown mechanism
Use the kickdown mechanism for
maximum acceleration. Depress the
accelerator pedal beyond the pressure
point. The automatic transmission will
shift to a lower gear depending on the
engine speed.