charging GENESIS GV80 2021 Owner's Manual
[x] Cancel search | Manufacturer: GENESIS, Model Year: 2021, Model line: GV80, Model: GENESIS GV80 2021Pages: 632, PDF Size: 9.37 MB
Page 17 of 632
2-5
02
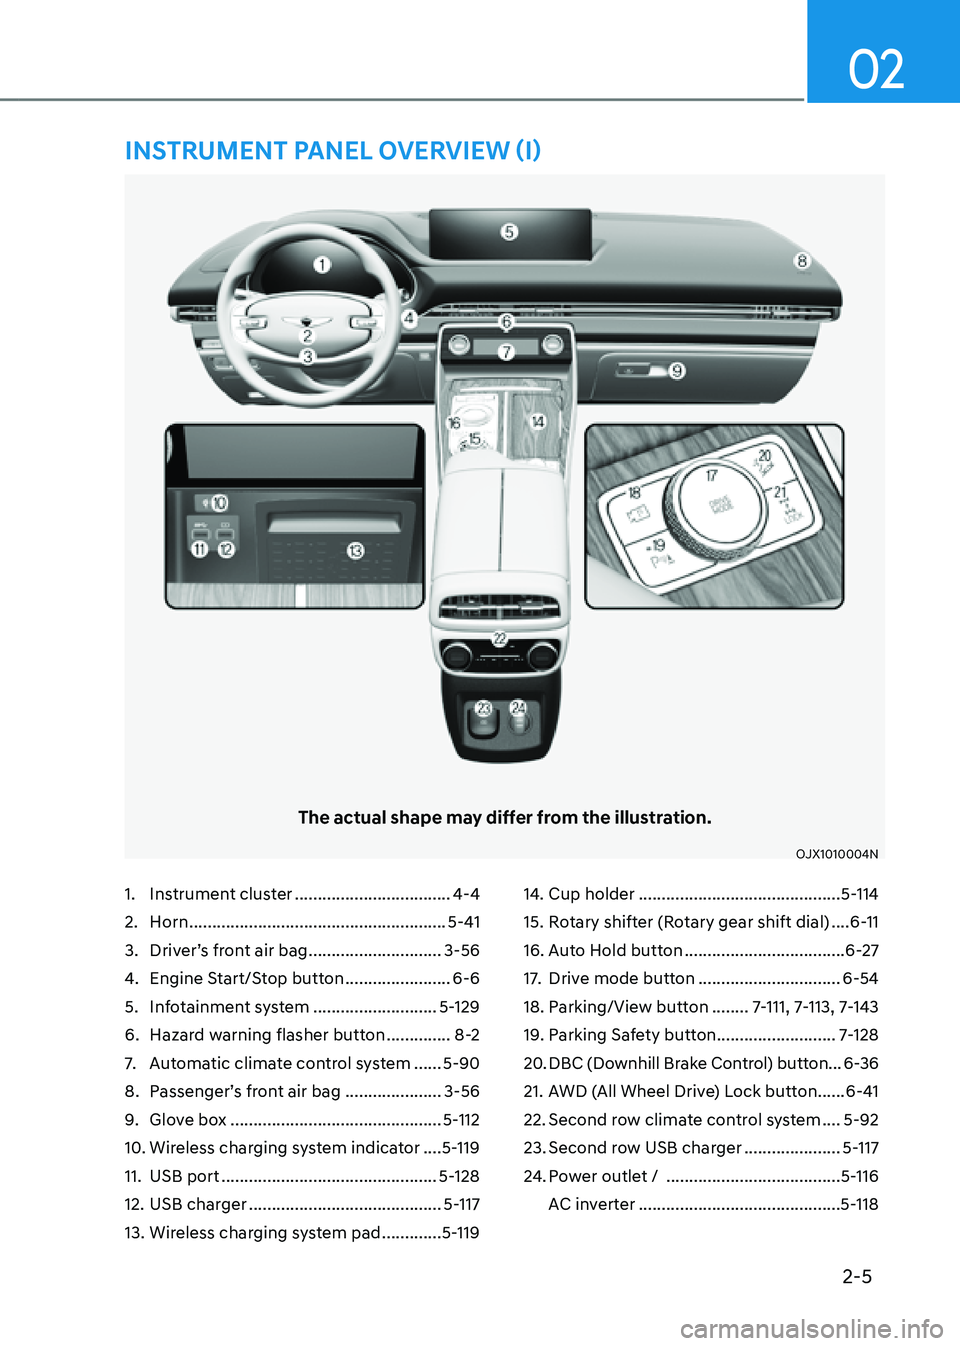
1. Instrument cluster ..................................4-4
2. Horn ........................................................5-41
3. Driver’s front air bag .............................3-56
4. Engine Start/Stop button .......................6-6
5. Infotainment system ...........................5-129
6. Hazard warning flasher button ..............8-2
7. Automatic climate control system ......5-90
8. Passenger’s front air bag .....................3-56
9. Glove box ..............................................5-112
10. Wireless charging system indicator ....5-119
11. USB port ...............................................5-128
12. USB charger ..........................................5-117
13. Wireless charging system pad .............5-119
14. Cup holder ............................................5-114
15. Rotary shifter (Rotary gear shift dial) ....6-11
16. Auto Hold button ...................................6-27
17. Drive mode button ...............................6-54
18. Parking/View button ........7-111, 7-113, 7-143
19. Parking Safety button ..........................7-128
20. DBC (Downhill Brake Control) button ...6-36
21. AWD (All Wheel Drive) Lock button ......6-41
22. Second row climate control system ....5-92
23. Second row USB charger .....................5-117
24. Power outlet / ......................................5-116
AC inverter
............................................5-118
The actual shape may differ from the illustration.
OJX1010004NOJX1010004N
INSTRUMENT PANEL OVERVIEW (I)
Page 94 of 632
03
3-65
Main components of the Occupant
Classification System
• A detection device located within the
front passenger seat cushion.
• Electronic system to determine
whether the passenger air bag
systems should be activated or
deactivated.
• An indicator light located on the
instrument panel which illuminates
the words “PASSENGER AIR BAG OFF”
indicating the front passenger air bag
system is deactivated.
• The instrument panel air bag indicator
light is interconnected with the OCS.
The OCS is designed to help detect
the presence of a properly-seated
front passenger and determine if the
passenger’s front air bag should be
enabled (may inflate) or not.
The purpose is to help reduce the risk
of injury or death from an inflating air
bag to certain front passenger seat
occupants, such as children, by requiring
the air bag to be automatically turned
OFF.
For example, if a child restraint of the
type specified in the regulations is on the
seat, the occupant classification sensor
can detect it and cause the air bag to
turn OFF.
Front passenger seat adult occupants
who are properly seated and wearing the
seat belt properly, should not cause the
passenger air bag to be automatically
turned OFF. For smaller adults it may turn
OFF, however, if the occupant does not
sit in the seat properly (for example, by
not sitting upright, by sitting on the edge
of the seat, or by otherwise being out of
position), this could cause the sensor to
turn the air bag OFF. You will find the “PASSENGER AIR BAG
OFF” indicator on the center fascia
panel. This system detects the conditions
1-4 in the following table and activates or
deactivates the front passenger air bag
based on these conditions.
Always be sure that you and all vehicle
occupants are seated properly and
wearing the seat belt properly for the
most effective protection by the air bag
and the seat belt.
The OCS may not function properly if the
passenger takes actions which can affect
the classification system. These include:• Failing to sit in an upright position.
• Leaning against the door or center
console.
• Sitting towards the sides of the front
of the seat.
• Putting their legs on the dashboard or
resting them on other locations which
reduce the passenger weight on the
front seat.
• Wearing the seat belt improperly.
• Reclining the seatback.
• Wearing thick clothes like ski wear or
hip protection wear.
• Putting an additional thick cushion on
the seat.
• Putting electrical devices (e.g.
notebook, satellite radio) on the seat
with inverter charging.
Page 106 of 632
Instrument Cluster
4
Instrument Cluster ........................................................................\
....................4-4Instrument Cluster Control ........................................................................\
..................4-5
Instrument panel illumination ........................................................................\
...........4-5
Gauges and Meters ........................................................................\
..............................4-5
Speedometer ........................................................................\
.....................................4-5
Tachometer ........................................................................\
.......................................4-6
Engine coolant temperature gauge (for 12.3-inch 3D cluster) ...............................4-6
Fuel gauge
........................................................................\
..........................................4 -7
Outside temperature gauge ........................................................................\
.............4-8
Odometer ........................................................................\
..........................................4-9
Distance to empty ........................................................................\
............................4-9
Fuel economy (for 12.3-inch 3D cluster) ................................................................4-10
Transmission Shift Indicator ........................................................................\
..............4-10
Automatic transmission shift indicator ..................................................................4-10
Warning and Indicator Lights ........................................................................\
.............4-11
Seat belt warning light ........................................................................\
.....................4-11
Air bag warning light ........................................................................\
........................4-11
Parking brake & Brake fluid warning light ...............................................................4-11
Anti-lock Brake System (ABS) warning light ..........................................................4-12
Electronic Brake Force Distribution (EBD) system warning light .........................4-12
Electric Power Steering (EPS) warning light ..........................................................4-13
Charging system warning light ........................................................................\
.......4-13
Engine oil pressure warning light ........................................................................\
...4-14
Engine coolant temperature warning light (for 8-inch cluster) ............................4-14
Low fuel level warning light ........................................................................\
............4-14
Malfunction Indicator Lamp (MIL) ........................................................................\
..4-15
Master warning light ........................................................................\
........................4-15
Electronic Parking Brake (EPB) warning light ........................................................4-16
Low tire pressure warning light ........................................................................\
......4-16
Forward Safety warning light ........................................................................\
...........4-17
Lane Safety indicator light ........................................................................\
...............4-17
All Wheel Drive (AWD) warning light .......................................................................4-17
LED headlight warning light ........................................................................\
............4-18
Icy road warning light ........................................................................\
......................4-18
Electronic Stability Control (ESC) indicator light ...................................................4-19
Electronic Stability Control (ESC) OFF indicator light ...........................................4-19
Immobilizer indicator light ........................................................................\
..............4-19
4. Instrument Cluster
Page 107 of 632
All Wheel Drive (AWD) LOCK indicator light ..........................................................4-20
Downhill Brake Control (DBC) indicator light ........................................................4-20
AUTO STOP indicator light ........................................................................\
...............4-21
Turn signal indicator light ........................................................................\
.................4-21
High beam indicator light ........................................................................\
................4-21
Low beam indicator light ........................................................................\
.................4-21
Light ON indicator light ........................................................................\
...................4-22
High Beam Assist indicator light ........................................................................\
.....4-22
AUTO HOLD indicator light ........................................................................\
.............4-22
LCD Display Messages ........................................................................\
.......................4-22
Vehicle is on ........................................................................\
.....................................4-22
Shift to P ........................................................................\
...........................................4-22
Vehicle is in N. Press START button and shift to P .................................................4-22
Low key battery ........................................................................\
...............................4-22
Press brake pedal to start engine ........................................................................\
..4-23
Key not in vehicle ........................................................................\
............................4-23
Key not detected ........................................................................\
..............................4-23
Press START button again ........................................................................\
..............4-23
Press START button with key ........................................................................\
..........4-23
Check BRAKE SWITCH fuse ........................................................................\
...........4-23
Shift to P or N to start engine ........................................................................\
..........4-23
Battery discharging due to external electrical devices
.........................................4-24
Door, Hood, Liftgate open indicator .......................................................................4-24
Sunroof open indicator ........................................................................\
....................4-24
Low tire pressure ........................................................................\
.............................4-24
Lights ........................................................................\
................................................4-25
Wiper ........................................................................\
................................................4-25
Low washer fluid ........................................................................\
..............................4-26
Low fuel ........................................................................\
............................................4-26
Low engine oil ........................................................................\
..................................4-26
Engine overheated ........................................................................\
...........................4-26
Check haptic steering wheel system .....................................................................4-26
Check headlight ........................................................................\
...............................4-26
Check turn signal ........................................................................\
.............................4-26
Check headlamp LED ........................................................................\
......................4-26
4
Page 118 of 632
04
4-13
WARNING
Electronic Brake Force Distribution
(EBD) system warning light
When both ABS and Parking Brake &
Brake Fluid warning lights are on, the
brake system will not work normally
and you may experience an unexpected
and dangerous situation during sudden
braking.
If this occurs, avoid high speed driving
and abrupt braking.
Have the vehicle inspected by an
authorized retailer of Genesis Branded
products as soon as possible.
NOTICE
Electronic Brake Force Distribution
(EBD) system warning light
When the ABS warning light is on
or both ABS and Parking Brake &
Brake Fluid warning lights are on, the
speedometer, odometer, or tripmeter
may not work. Also, the EPS warning
light may illuminate and the steering
effort may increase or decrease.
If this occurs, have the vehicle
inspected by an authorized retailer of
Genesis Branded products as soon as
possible.
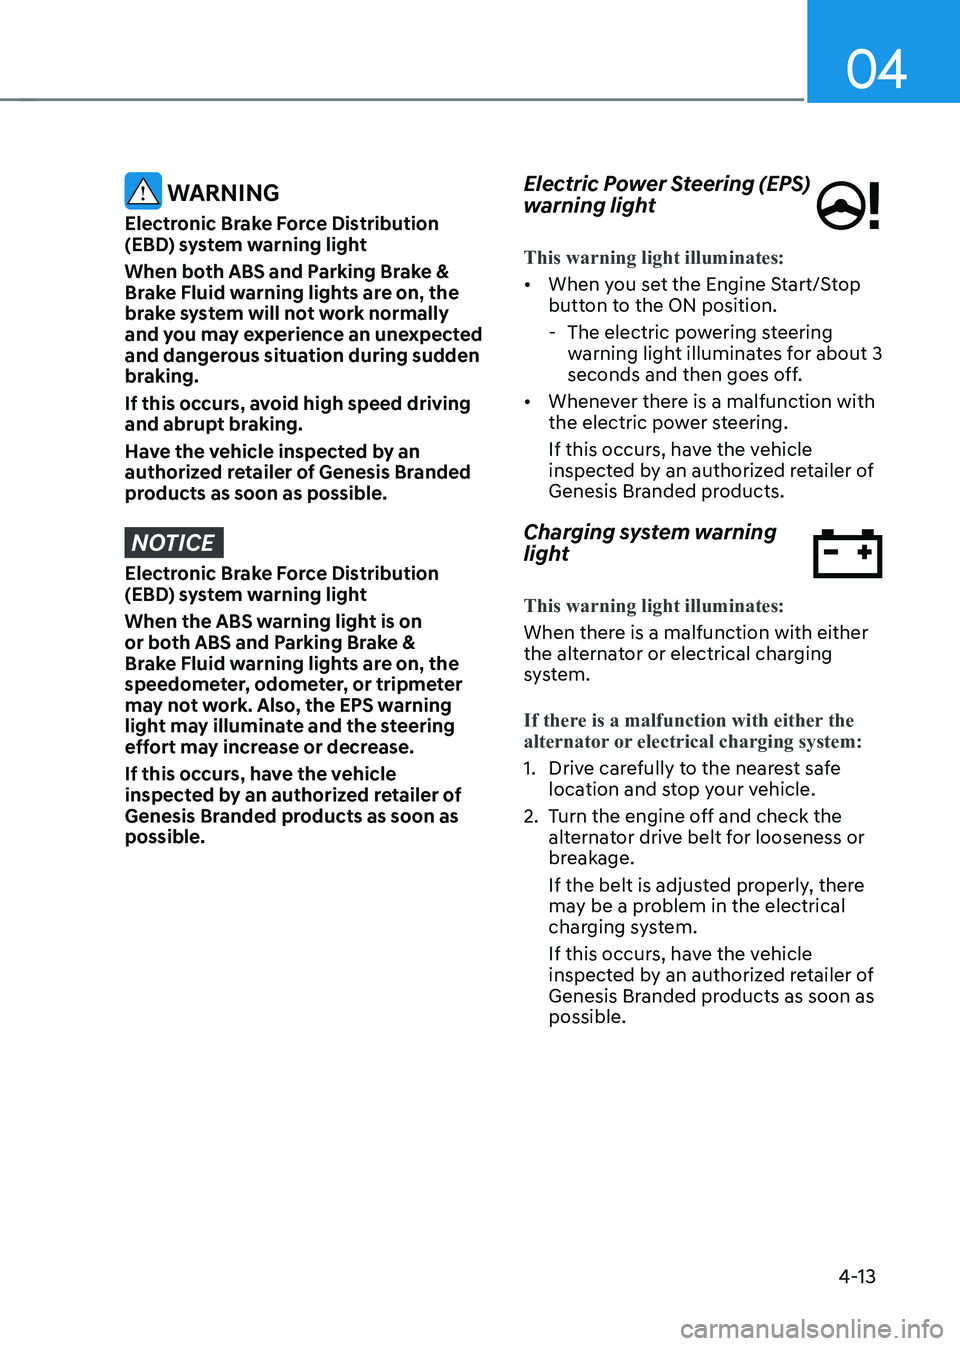
Electric Power Steering (EPS)
warning light
This warning light illuminates:
• When you set the Engine Start/Stop
button to the ON position.
-The electric powering steering
warning light illuminates for about 3
seconds and then goes off.
• Whenever there is a malfunction with
the electric power steering.
If this occurs, have the vehicle
inspected by an authorized retailer of
Genesis Branded products.
Charging system warning
light
This warning light illuminates:
When there is a malfunction with either
the alternator or electrical charging
system.
If there is a malfunction with either the
alternator or electrical charging system:
1. Drive carefully to the nearest safe
location and stop your vehicle.
2. Turn the engine off and check the
alternator drive belt for looseness or
breakage.
If the belt is adjusted properly, there
may be a problem in the electrical
charging system.
If this occurs, have the vehicle
inspected by an authorized retailer of
Genesis Branded products as soon as
possible.
Page 129 of 632
Instrument Cluster
4-24
Battery discharging due to external
electrical devices
This message is displayed if the 12V
battery voltage is weak due to any
non-factory electrical accessories (ex.
dashboard camera) while parking. Be
careful that the battery is not discharged.
If the message appears after removing
the non-factory electrical accessories,
have the vehicle inspected by an
authorized retailer of Genesis Branded
products.
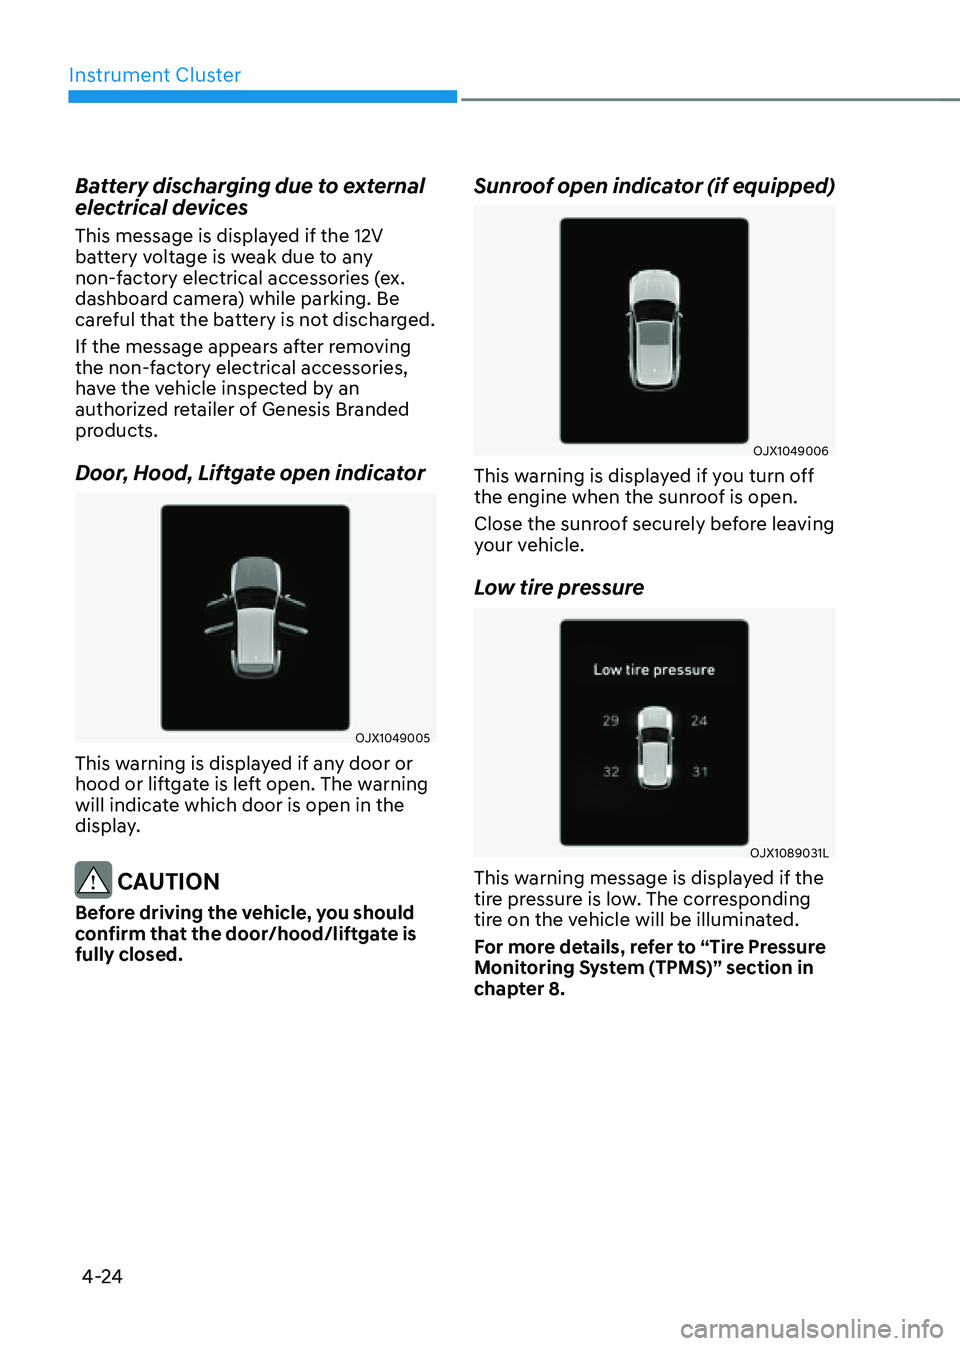
Door, Hood, Liftgate open indicator
OJX1049005OJX1049005
This warning is displayed if any door or
hood or liftgate is left open. The warning
will indicate which door is open in the
display.
CAUTION
Before driving the vehicle, you should
confirm that the door/hood/liftgate is
fully closed.
Sunroof open indicator (if equipped)
OJX1049006OJX1049006
This warning is displayed if you turn off
the engine when the sunroof is open.
Close the sunroof securely before leaving
your vehicle.
Low tire pressure
OJX1089031LOJX1089031L
This warning message is displayed if the
tire pressure is low. The corresponding
tire on the vehicle will be illuminated.
For more details, refer to “Tire Pressure
Monitoring System (TPMS)” section in
chapter 8.
Page 145 of 632
Climate Control Additional Features ............................................................5-109Auto Defogging System ........................................................................\
...................5-109
Auto Dehumidify ........................................................................\
...............................5-110
Recirculating Air When Washer Fluid Is Used ..........................................................5-111
Sunroof Inside Air Recirculation ........................................................................\
........5-111
Storage Compartment ........................................................................\
............5-112Center Console Storage ........................................................................\
....................5-112
Glove Box ........................................................................\
...........................................5-112
Sunglass Holder ........................................................................\
................................5-113
Storage Tray (7-seater) ........................................................................\
......................5-113
Interior Features ........................................................................\
......................5-114Cup Holder ........................................................................\
.........................................5-114
Sunvisor ........................................................................\
.............................................5-115
Rear Mirror ........................................................................\
.........................................5-116
Power Outlet ........................................................................\
......................................5-116
USB Charger ........................................................................\
......................................5-117
AC Inverter ........................................................................\
.........................................5-118
Wireless Smart Phone Charging System .................................................................5-119
Clock ........................................................................\
..................................................5-121
Coat Hook ........................................................................\
..........................................5-121
Floor Mat Anchor(s) ........................................................................\
...........................5-122
Rear Side Window Sunshades ........................................................................\
..........5-123
Cargo Net Holder ........................................................................\
.............................5-124
Cargo Security Screen ........................................................................\
......................5-125
Exterior Features ........................................................................\
....................5-127Roof Side Rails ........................................................................\
...................................5-127
Infotainment System ........................................................................\
.............5-128USB Port ........................................................................\
............................................5-128
Antenna ........................................................................\
.............................................5-128
Steering Wheel Remote Controls ........................................................................\
....5-128
Infotainment System ........................................................................\
........................5-129
Voice Recognition ........................................................................\
............................5-129
Bluetooth® Wireless Technology
........................................................................\
.....5-130
Lexicon Premium Sound System ........................................................................\
....5-130
5. Convenient Features
5
Page 155 of 632
![GENESIS GV80 2021 Owners Manual 05
5-13
OJX1059011LOJX1059011L[A] : In-vehicle authentication pad (Wireless charging pad)
4. After ‘Enabling Digital Key’ is selected,
place the backside of the smart phone
on the in-vehicle au GENESIS GV80 2021 Owners Manual 05
5-13
OJX1059011LOJX1059011L[A] : In-vehicle authentication pad (Wireless charging pad)
4. After ‘Enabling Digital Key’ is selected,
place the backside of the smart phone
on the in-vehicle au](/img/46/35616/w960_35616-154.png)
05
5-13
OJX1059011LOJX1059011L[A] : In-vehicle authentication pad (Wireless charging pad)
4. After ‘Enabling Digital Key’ is selected,
place the backside of the smart phone
on the in-vehicle authentication pad.
ORG3050222N ORG3050222N
5. Select ‘Smartphone Key → Save’
menu on the infotainment system
screen. The saving process will begin
automatically.
6. When the digital key (smart phone) is
saved, a message will appear on the
infotainment system screen.
7. Remove the smart phone from the
pad and complete the saving process
under the guidance of the smart
phone screen.
Information
• Vehicle
When there is a digital key (smart
phone) already saved in the vehicle, the
‘Save’ menu is disabled. If you want to
save a digital key again, refer to “How
to delete Digital Key (Smart phone)”
and follow the deleting procedure first
before saving a digital key.
• Smart phone
The digital key cannot be saved again
while the vehicle’s digital key is saved
in the owner’s smart phone. Save the
digital key after deleting the digital key
from the Digital Key App.
• During the digital key saving process,
the process will cancel when:
-The smart phone is removed from
the in-vehicle authentication pad
(wireless charging pad)
-Changing the infotainment system or
instrument cluster screen
-The vehicle is turned off
-The gear is shifted
-Saving digital key that does not
belong to the vehicle owner
-The smart phone screen is locked or
turned off
-NFC setting of your smart phone is
off (saving process will not begin)
-There is no smart key (saving process
will not begin)
Page 156 of 632
Convenient Features
5-14
How to use the Digital Key (Smart
phone)
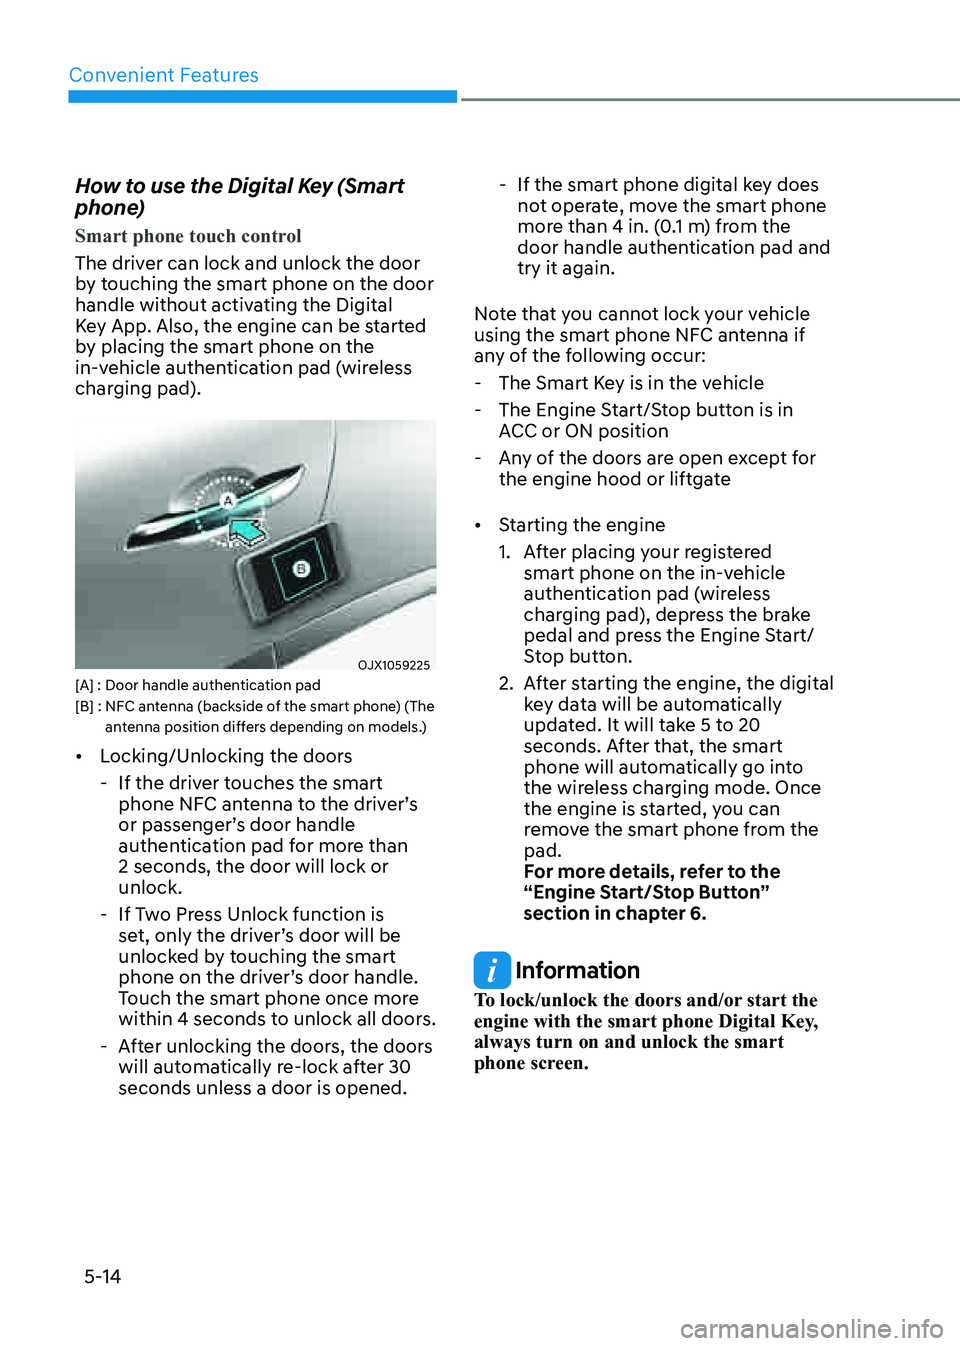
Smart phone touch control
The driver can lock and unlock the door
by touching the smart phone on the door
handle without activating the Digital
Key App. Also, the engine can be started
by placing the smart phone on the
in-vehicle authentication pad (wireless
charging pad).
OJX1059225OJX1059225[A] : Door handle authentication pad[B] : NFC antenna (backside of the smart phone) (The antenna position differs depending on models.)
• Locking/Unlocking the doors
-If the driver touches the smart
phone NFC antenna to the driver’s
or passenger’s door handle
authentication pad for more than
2 seconds, the door will lock or
unlock.
-If Two Press Unlock function is
set, only the driver’s door will be
unlocked by touching the smart
phone on the driver’s door handle.
Touch the smart phone once more
within 4 seconds to unlock all doors.
-After unlocking the doors, the doors
will automatically re-lock after 30
seconds unless a door is opened.
-If the smart phone digital key does
not operate, move the smart phone
more than 4 in. (0.1 m) from the
door handle authentication pad and
try it again.
Note that you cannot lock your vehicle
using the smart phone NFC antenna if
any of the following occur:
- The Smart Key is in the vehicle
-The Engine Start/Stop button is in
ACC or ON position
-Any of the doors are open except for
the engine hood or liftgate
• Starting the engine
1. After placing your registered
smart phone on the in-vehicle
authentication pad (wireless
charging pad), depress the brake
pedal and press the Engine Start/
Stop button.
2. After starting the engine, the digital
key data will be automatically
updated. It will take 5 to 20
seconds. After that, the smart
phone will automatically go into
the wireless charging mode. Once
the engine is started, you can
remove the smart phone from the
pad.
For more details, refer to the
“Engine Start/Stop Button”
section in chapter 6.
Information
To lock/unlock the doors and/or start the
engine with the smart phone Digital Key,
always turn on and unlock the smart
phone screen.
Page 157 of 632
05
5-15
Information
• After the battery has been reconnected
or the battery has been recharged,
it will take time for the digital key
(smart phone) to operate due to remote
security update. When locking or
unlocking the door with the smart
phone NFC antenna, touch and hold
the smart phone on the door handle
until the door(s) is locked or unlocked.
• If the mobile data connection of the
smart phone is weak, remote security
information update may fail. At this
time, use the card key to lock or unlock
the doors, or start the engine.
When you are in a place where the
mobile data connection of your smart
phone is available, place your smart
phone on the in-vehicle authentication
pad (wireless charger pad) and start
your vehicle, or touch the digital key on
the door handle to lock or unlock the
door, the remote security information
will be automatically updated. Even
though the engine is not started, wait
until the remote security information
is updated and the in-vehicle
authentication pad (wireless charging
pad) changes to charging mode.
WARNING
The engine can be started when the
registered smart phone is placed on the
in-vehicle authentication pad (wireless
charging pad). Therefore, do not leave
unsupervised children or people who
are not aware of the system since it can
result in serious injury or death.
In addition, always have the registered
smart phone with you to prevent
vehicle theft when leaving the vehicle.Digital key App remote control
Various control functions such as Door
Lock/Unlock, Remote Start, Panic and
Liftgate Open/Close are available using
the Digital Key App. To use the Digital
Key App functions, the smart phone’s
Bluetooth must be activated, and must
be approximately within 32 ft. (10 m)
from the vehicle.
• Connecting Digital Key App with the
vehicle
1. Open the Genesis Digital Key App
in the smart phone. Select the
vehicle you want to control from
the vehicle list in the App.
2. Approach the vehicle with
the Genesis Digital Key App
opened. The Digital Key App will
automatically connect with the
vehicle.
3. When the connection is complete,
the icons in the Digital Key App will
become active.