door GENESIS GV80 2021 Owner's Manual
[x] Cancel search | Manufacturer: GENESIS, Model Year: 2021, Model line: GV80, Model: GENESIS GV80 2021Pages: 632, PDF Size: 9.37 MB
Page 16 of 632
2-4
Vehicle Information, Consumer Information and Reporting Safety Defects
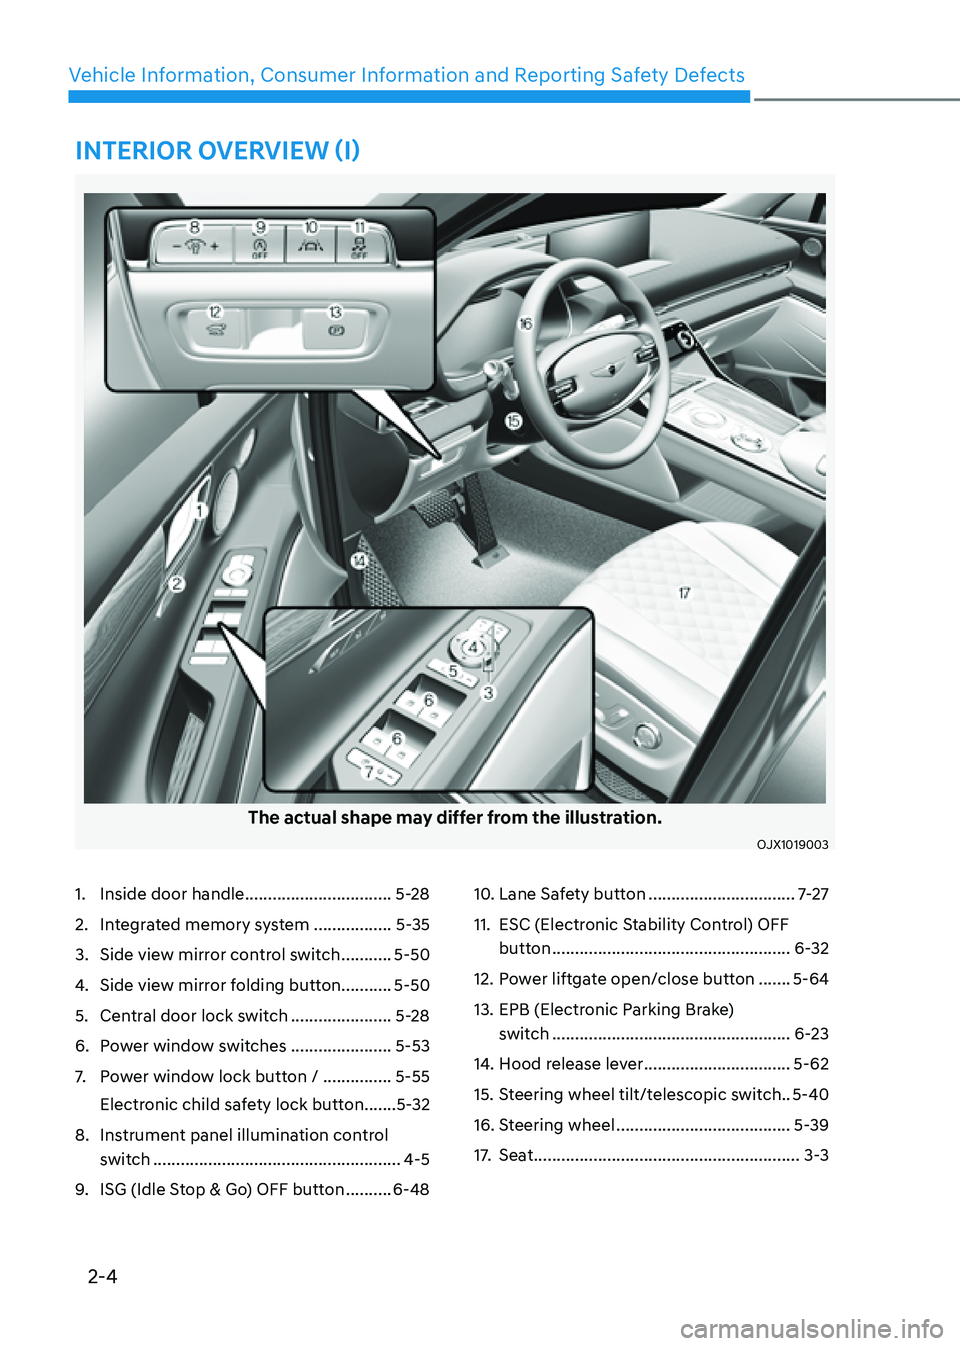
The actual shape may differ from the illustration.
OJX1019003OJX1019003
1. Inside door handle ................................5-28
2. Integrated memory system .................5-35
3. Side view mirror control switch ...........5-50
4. Side view mirror folding button...........5-50
5. Central door lock switch ......................5-28
6. Power window switches ......................5-53
7. Power window lock button / ...............5-55
Electronic child safety lock button
.......5-32
8. Instrument panel illumination control
switch
......................................................4-5
9. ISG (Idle Stop & Go) OFF button ..........6-48
10. Lane Safety button ................................7-27
11. ESC (Electronic Stability Control) OFF
button
....................................................6-32
12. Power liftgate open/close button .......5-64
13. EPB (Electronic Parking Brake)
switch
....................................................6-23
14. Hood release lever ................................5-62
15. Steering wheel tilt/telescopic switch ..5-40
16. Steering wheel ......................................5-39
17. Seat ..........................................................3-3
INTERIOR OVERVIEW (I)
Page 21 of 632
02
2-9
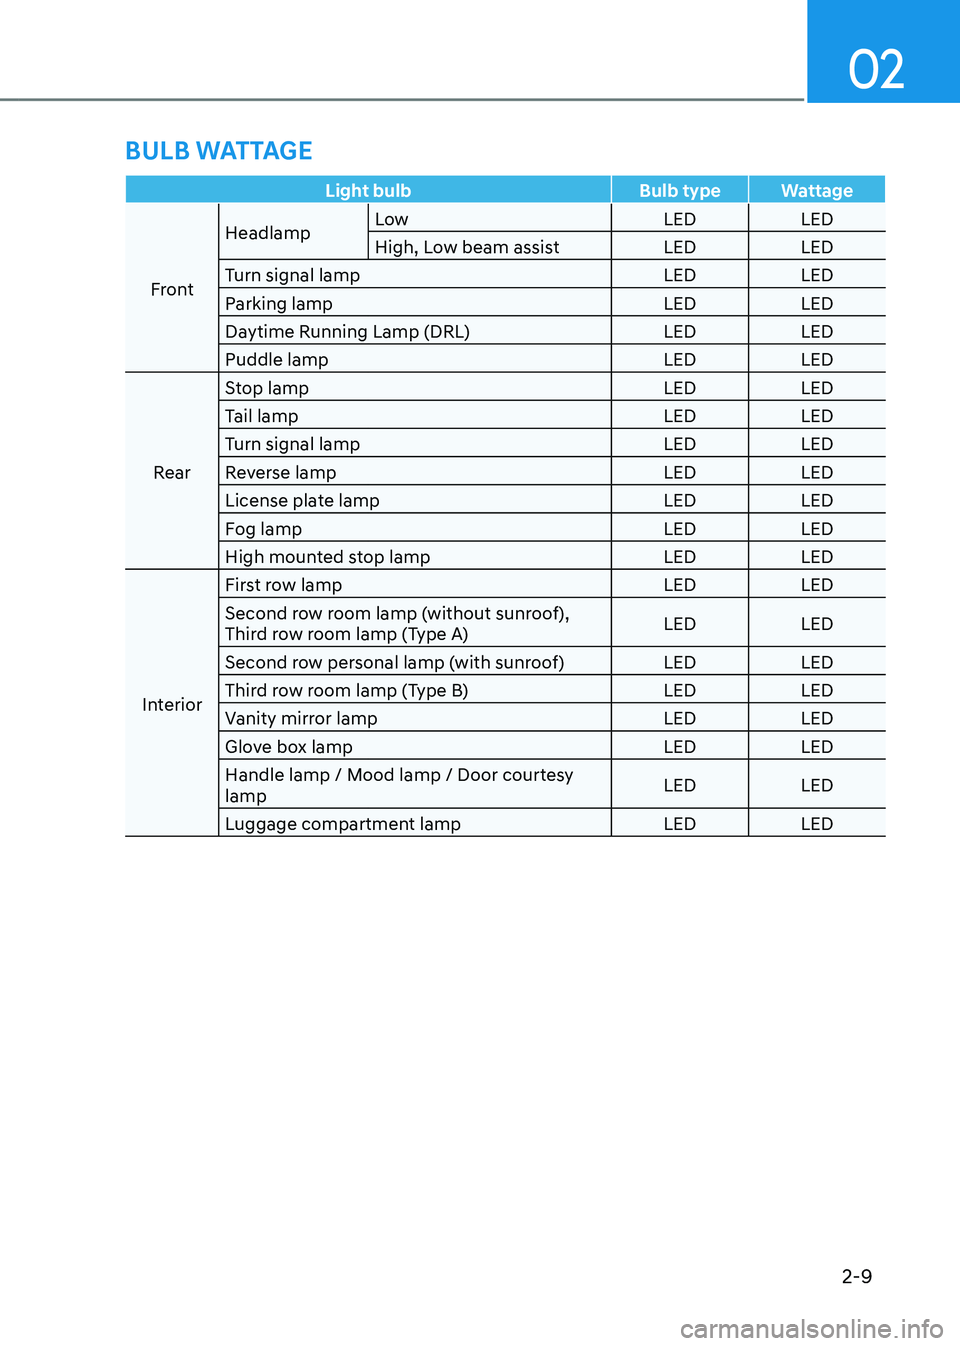
Light bulbBulb typeWattage
Front Headlamp
Low
LEDLED
High, Low beam assist LEDLED
Turn signal lamp LEDLED
Parking lamp LEDLED
Daytime Running Lamp (DRL) LEDLED
Puddle lamp LEDLED
Rear Stop lamp
LEDLED
Tail lamp LEDLED
Turn signal lamp LEDLED
Reverse lamp LEDLED
License plate lamp LEDLED
Fog lamp LEDLED
High mounted stop lamp LEDLED
Interior First row lamp
LEDLED
Second row room lamp (without sunroof),
Third row room lamp (Type A) LED
LED
Second row personal lamp (with sunroof) LEDLED
Third row room lamp (Type B) LEDLED
Vanity mirror lamp LEDLED
Glove box lamp LEDLED
Handle lamp / Mood lamp / Door courtesy
lamp LED
LED
Luggage compartment lamp LEDLED
BULB WATTAGE
Page 44 of 632
03
3-15
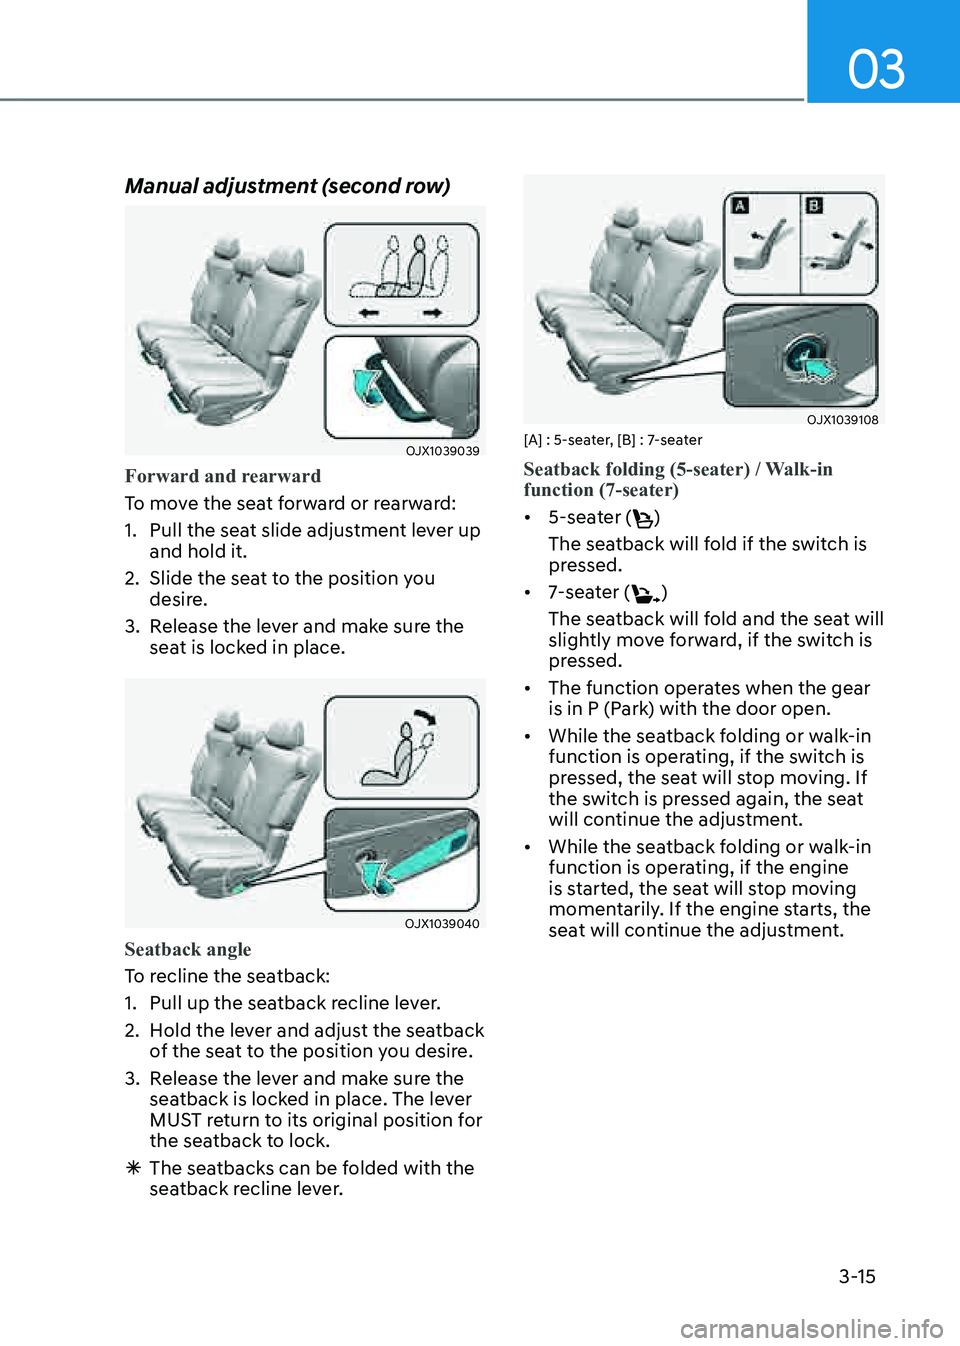
Manual adjustment (second row)
OJX1039039OJX1039039
Forward and rearward
To move the seat forward or rearward:
1. Pull the seat slide adjustment lever up
and hold it.
2. Slide the seat to the position you
desire.
3. Release the lever and make sure the
seat is locked in place.
OJX1039040OJX1039040
Seatback angle
To recline the seatback:
1. Pull up the seatback recline lever.
2. Hold the lever and adjust the seatback
of the seat to the position you desire.
3. Release the lever and make sure the
seatback is locked in place. The lever
MUST return to its original position for
the seatback to lock.
ÃThe seatbacks can be folded with the
seatback recline lever.
OJX1039108OJX1039108[A] : 5-seater, [B] : 7-seater
Seatback folding (5-seater) / Walk-in
function (7-seater)
• 5-seater ()
The seatback will fold if the switch is
pressed.
• 7-seater ()
The seatback will fold and the seat will
slightly move forward, if the switch is
pressed.
• The function operates when the gear
is in P (Park) with the door open.
• While the seatback folding or walk-in
function is operating, if the switch is
pressed, the seat will stop moving. If
the switch is pressed again, the seat
will continue the adjustment.
• While the seatback folding or walk-in
function is operating, if the engine
is started, the seat will stop moving
momentarily. If the engine starts, the
seat will continue the adjustment.
Page 45 of 632
Safety System
3-16
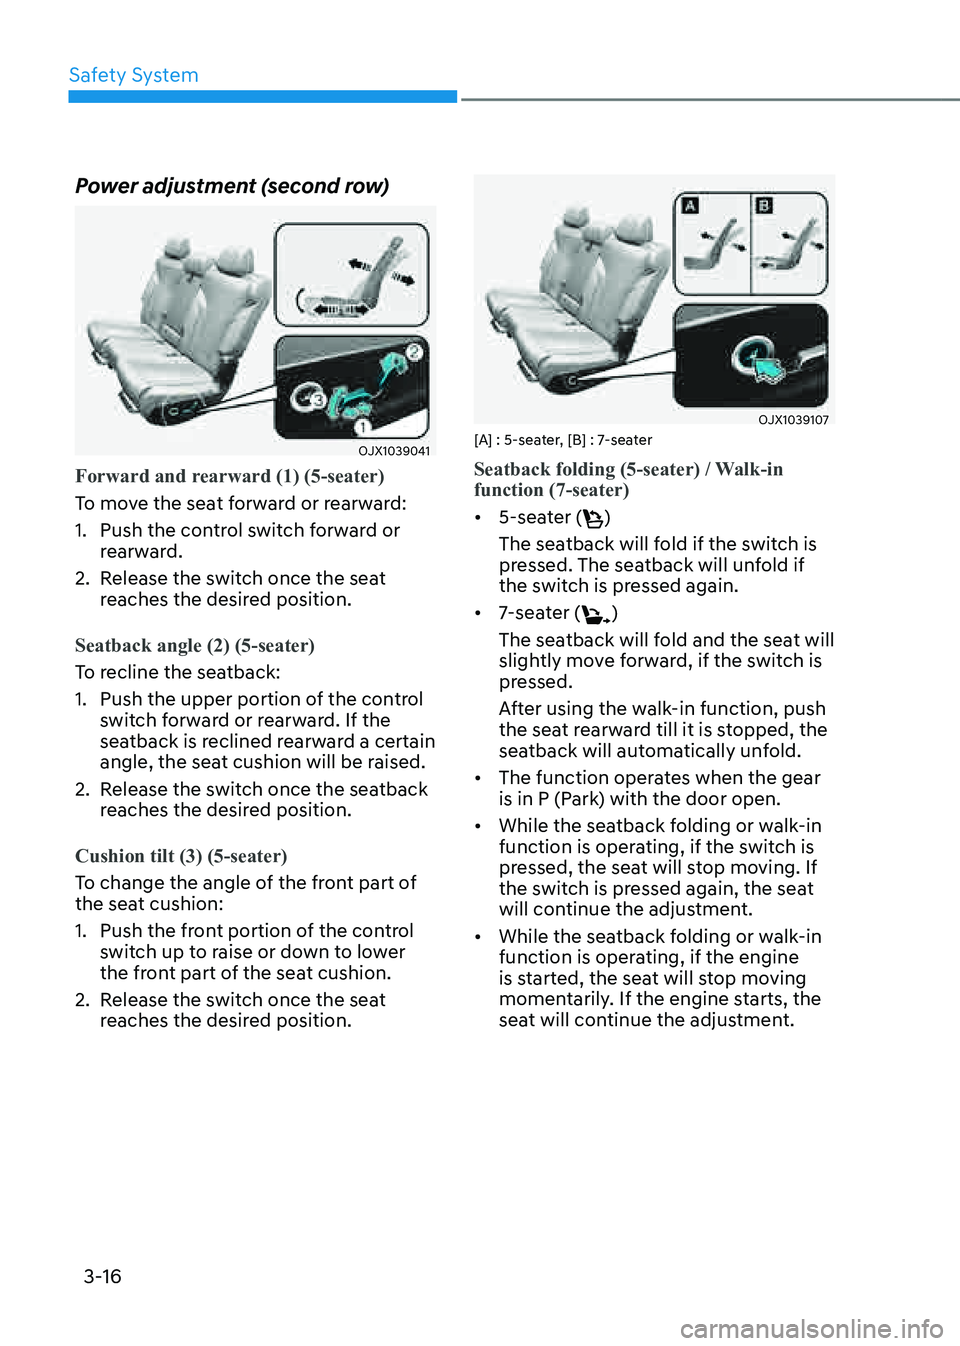
Power adjustment (second row)
OJX1039041OJX1039041
Forward and rearward (1) (5-seater)
To move the seat forward or rearward:
1. Push the control switch forward or
rearward.
2. Release the switch once the seat
reaches the desired position.
Seatback angle (2) (5-seater)
To recline the seatback:
1. Push the upper portion of the control
switch forward or rearward. If the
seatback is reclined rearward a certain
angle, the seat cushion will be raised.
2. Release the switch once the seatback
reaches the desired position.
Cushion tilt (3) (5-seater)
To change the angle of the front part of
the seat cushion:
1. Push the front portion of the control
switch up to raise or down to lower
the front part of the seat cushion.
2. Release the switch once the seat
reaches the desired position.
OJX1039107OJX1039107[A] : 5-seater, [B] : 7-seater
Seatback folding (5-seater) / Walk-in
function (7-seater)
• 5-seater ()
The seatback will fold if the switch is
pressed. The seatback will unfold if
the switch is pressed again.
• 7-seater ()
The seatback will fold and the seat will
slightly move forward, if the switch is
pressed.
After using the walk-in function, push
the seat rearward till it is stopped, the
seatback will automatically unfold.
• The function operates when the gear
is in P (Park) with the door open.
• While the seatback folding or walk-in
function is operating, if the switch is
pressed, the seat will stop moving. If
the switch is pressed again, the seat
will continue the adjustment.
• While the seatback folding or walk-in
function is operating, if the engine
is started, the seat will stop moving
momentarily. If the engine starts, the
seat will continue the adjustment.
Page 47 of 632
Safety System
3-18
Switch typeSeat adjustment
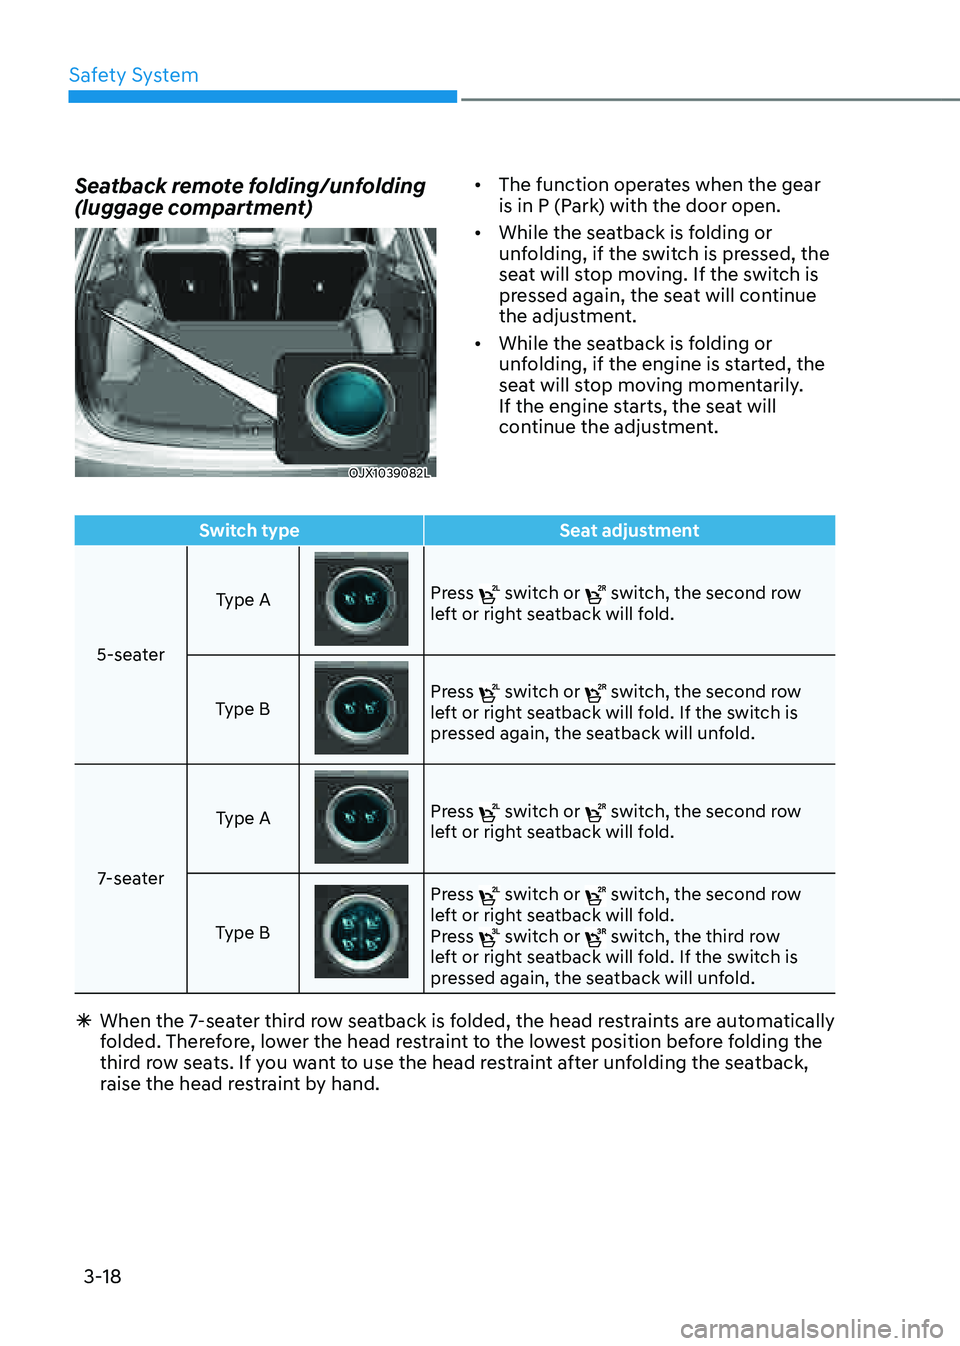
5-seater Type A
Press switch or switch, the second row left or right seatback will fold.
Type B
Press switch or switch, the second row left or right seatback will fold. If the switch is
pressed again, the seatback will unfold.
7-seater Type A
Press switch or switch, the second row left or right seatback will fold.
Type B
Press switch or switch, the second row left or right seatback will fold.
Press switch or switch, the third row left or right seatback will fold. If the switch is
pressed again, the seatback will unfold.
à When the 7-seater third row seatback is folded, the head restraints are automatically
folded. Therefore, lower the head restraint to the lowest position before folding the
third row seats. If you want to use the head restraint after unfolding the seatback,
raise the head restraint by hand.
Seatback remote folding/unfolding
(luggage compartment)
OJX1039082LOJX1039082L
• The function operates when the gear
is in P (Park) with the door open.
• While the seatback is folding or
unfolding, if the switch is pressed, the
seat will stop moving. If the switch is
pressed again, the seat will continue
the adjustment.
• While the seatback is folding or
unfolding, if the engine is started, the
seat will stop moving momentarily.
If the engine starts, the seat will
continue the adjustment.
Page 49 of 632
Safety System
3-20
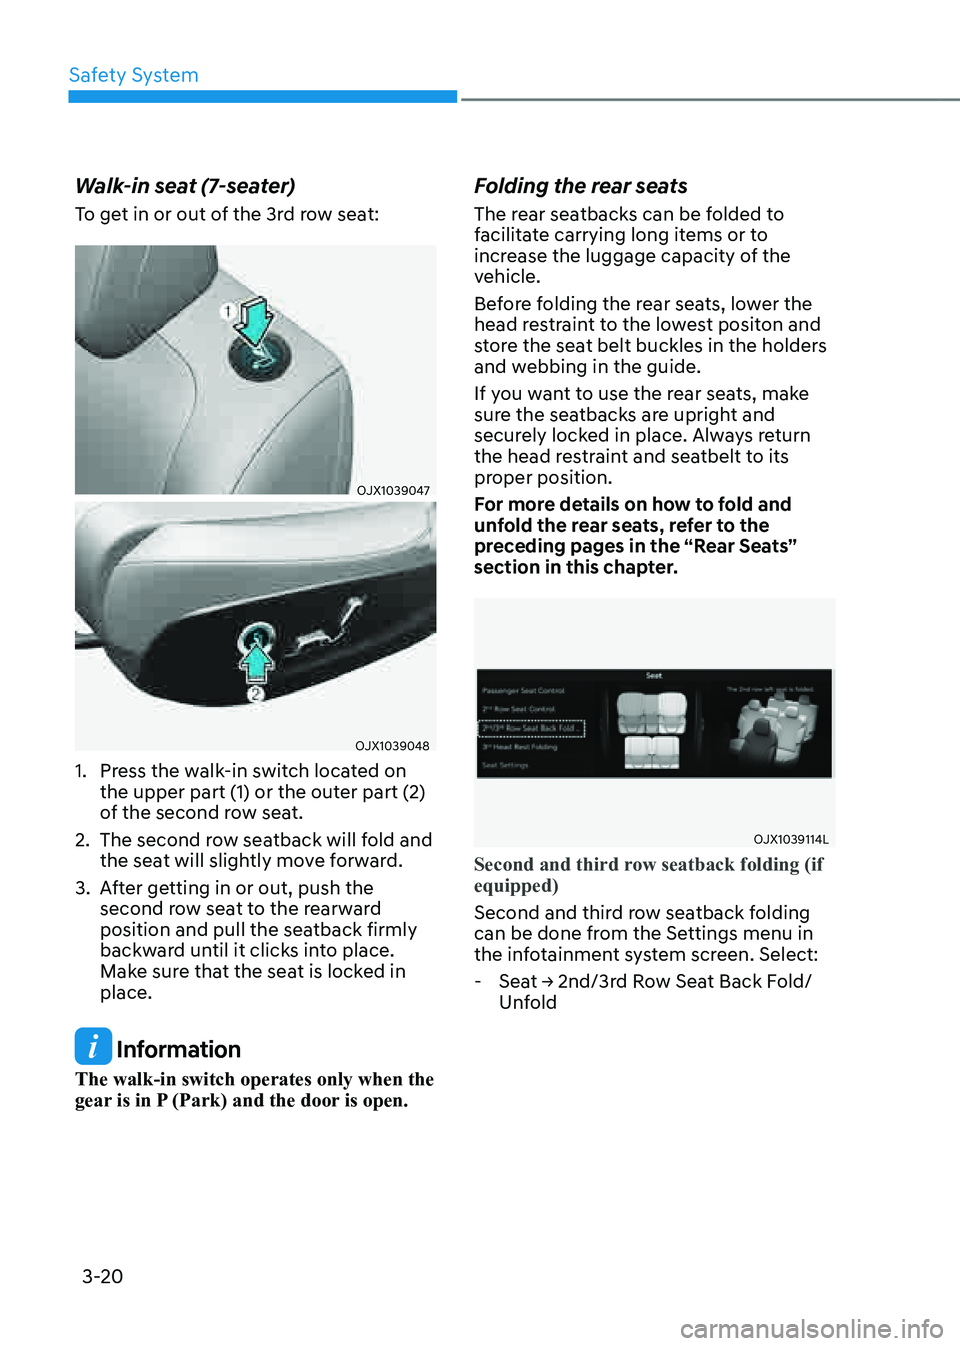
Walk-in seat (7-seater)
To get in or out of the 3rd row seat:
OJX1039047OJX1039047
OJX1039048OJX1039048
1. Press the walk-in switch located on
the upper part (1) or the outer part (2)
of the second row seat.
2. The second row seatback will fold and
the seat will slightly move forward.
3. After getting in or out, push the
second row seat to the rearward
position and pull the seatback firmly
backward until it clicks into place.
Make sure that the seat is locked in
place.
Information
The walk-in switch operates only when the
gear is in P (Park) and the door is open.
Folding the rear seats
The rear seatbacks can be folded to
facilitate carrying long items or to
increase the luggage capacity of the
vehicle.
Before folding the rear seats, lower the
head restraint to the lowest positon and
store the seat belt buckles in the holders
and webbing in the guide.
If you want to use the rear seats, make
sure the seatbacks are upright and
securely locked in place. Always return
the head restraint and seatbelt to its
proper position.
For more details on how to fold and
unfold the rear seats, refer to the
preceding pages in the “Rear Seats”
section in this chapter.
OJX1039114LOJX1039114L
Second and third row seatback folding (if
equipped)
Second and third row seatback folding
can be done from the Settings menu in
the infotainment system screen. Select:
-Seat -> 2nd/3rd Row Seat Back Fold/Unfold
Page 65 of 632

Safety System
3-36
Height adjustment
You can adjust the height of the shoulder
belt anchor to one of the four different
positions for maximum comfort and
safety.
The shoulder portion should be adjusted
so it lies across your chest and midway
over your shoulder nearest the door, not
over your neck.
�
Page 73 of 632

Safety System
3-44
Do not lie down
Sitting in a reclined position when the
vehicle is in motion can be dangerous.
Even when buckled up, the protections
of your restraint system (seat belts
and/or air bags) is greatly reduced by
reclining your seatback.
To reduce the chance of injuries in the
event of an accident and to achieve the
maximum effectiveness of the restraint
system, all passengers should be sitting
up and the front and rear seats should
be in an upright position when the car is
moving.
A seat belt cannot provide proper
protection if the person is lying down in
the rear seat or if the front or rear seats
are in a reclined position.
WARNING
• NEVER ride with a reclined seatback
when the vehicle is moving.
• Riding with a reclined seatback
increases your chance of serious
or fatal injuries in the event of a
collision or sudden stop.
• Driver and passengers should always
sit well back in their seats, properly
belted, and with the seatbacks
upright.
Care of Seat Belts
Seat belt systems should never be
disassembled or modified. In addition,
care should be taken to assure that seat
belts and belt hardware are not damaged
by seat hinges, doors or other abuse.
Periodic inspection
All seat belts should be inspected
periodically for wear or damage of
any kind. Any damaged parts should
be replaced as soon as possible by an
authorized retailer of Genesis Branded
products.
Keep belts clean and dry
Seat belts should be kept clean and
dry. If belts become dirty, they can be
cleaned by using a mild soap solution
and warm water. Bleach, dye, strong
detergents or abrasives should not be
used because they may damage and
weaken the fabric.
When to replace seat belts
The entire seat belt assembly or
assemblies should be replaced if the
vehicle has been involved in an accident.
This should be done even if no damage is
visible. Additional questions concerning
seat belt operation should be directed to
an authorized retailer of Genesis Branded
products.
Page 84 of 632
03
3-55
The vehicles are equipped with an Advanced Supplemental Air Bag System for the
driver’s seat and front passenger’s seats.
The front air bags are designed to supplement the three-point seat belts. For these air
bags to provide protection, the seat belts must be worn at all times when driving.
You can be severely injured or killed in an accident if you are not wearing a seat belt.
Air bags are designed to supplement seat belts, but do not replace them. Also, air bags
are not designed to deploy in every collision. In some accidents, the seat belts are the
only restraint protecting you.
WARNING
AIR BAG SAFETY PRECAUTIONS
ALWAYS use seat belts Child Restraint Systems - every trip, every time, everyone!
Even with air bags, you can be seriously injured or killed in a collision if you are
improperly belted or not wearing your seat belt when the air bag inflates.
NEVER place a child in any Child Restraint System or booster seat in the front
passenger seat, unless the air bag is deactivated. An inflating air bag could forcefully
strike the infant or child causing serious or fatal injuries.
ABC - Always Buckle Children under age 13 in the back seat. It is the safest place
for children of any age to ride. If a child age 13 or older must be seated in the front
seat, he or she must be properly belted and the seat should be moved as far back as
possible.
All occupants should sit upright with the seatback in an upright position, centered
on the seat cushion with their seat belt on, legs comfortably extended and their feet
on the floor until the vehicle is parked and the vehicle is turned off. If an occupant
is out of position during an accident, the rapidly deploying air bag may forcefully
contact the occupant causing serious or fatal injuries.
You and your passengers should never sit or lean unnecessarily close to the air bags
or lean against the door or center console.
Move your seat as far back as possible from front air bags, while still maintaining
control of the vehicle. The U.S. National Highway Traffic Safety Administration
(NHTSA) recommends that drivers allow at least 10 inches (25 cm) between the
center of the steering wheel and the chest.
Page 86 of 632
03
3-57
WARNING
To reduce the risk of serious injury or
death from inflating front air bags, take
the following precautions:
• Seat belts must be worn at all times
to help keep occupants positioned
properly.
• Move your seat as far back as
possible from front air bags, while
still maintaining control of the
vehicle.
• Never lean against the door or center
console.
• Do not allow the front passenger
to place their feet or legs on the
dashboard.
• No objects (such as crash pad
cover, mobile phone holder, cup
holder, perfume or stickers) should
be placed over or near the air bag
modules on the steering wheel,
instrument panel, windshield glass,
and the front passenger’s panel
above the glove box. Such objects
could cause harm if the vehicle is in a
crash severe enough to cause the air
bags to deploy.
• Do not attach any objects on the
front windshield and inside mirror.
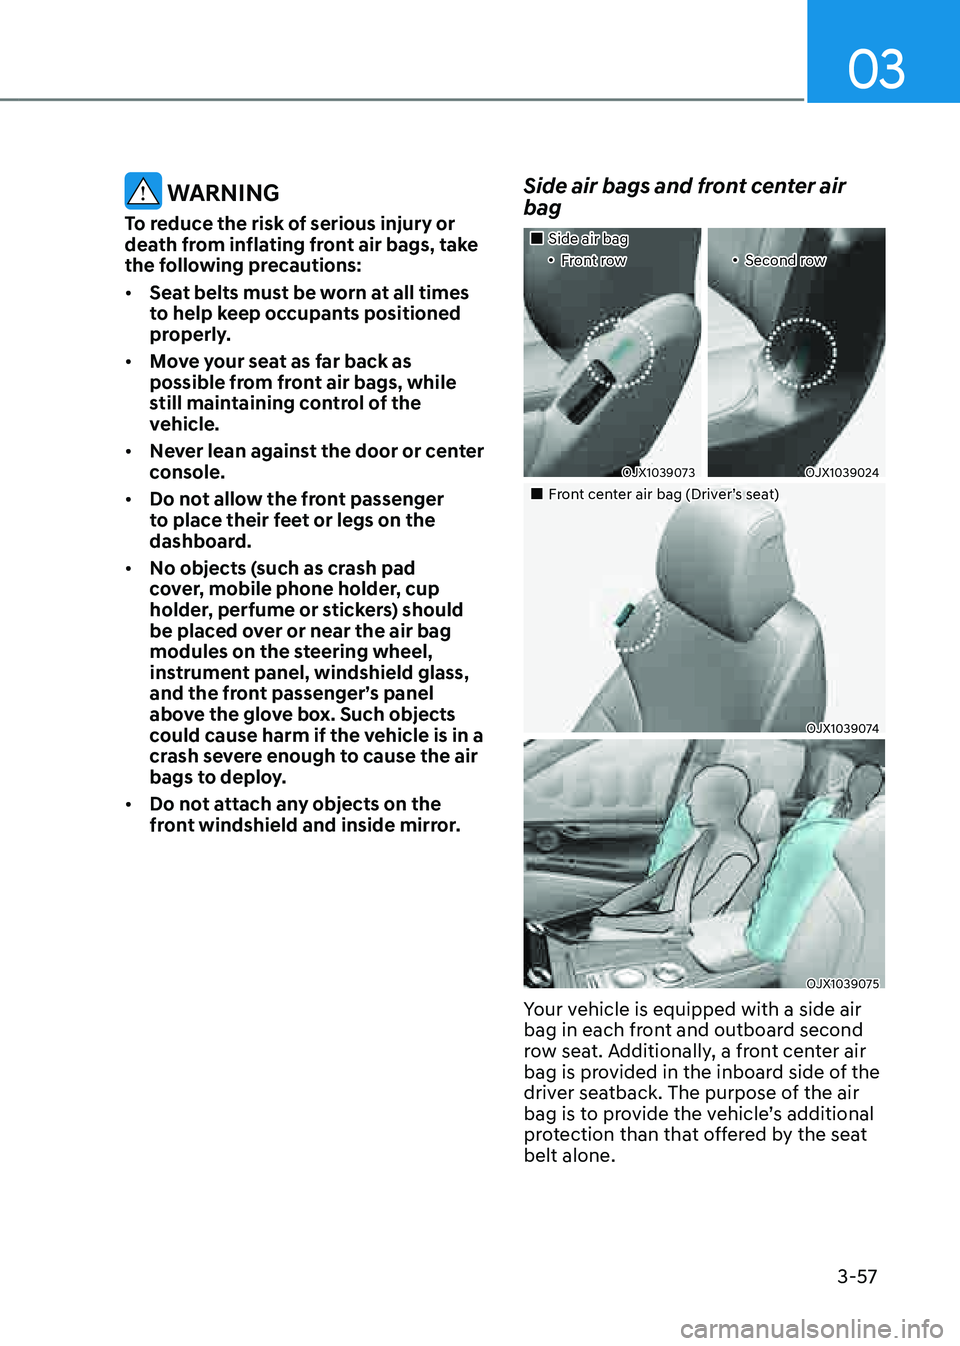
Side air bags and front center air
bag
�