high beam GMC ACADIA 2010 Owner's Manual
[x] Cancel search | Manufacturer: GMC, Model Year: 2010, Model line: ACADIA, Model: GMC ACADIA 2010Pages: 444, PDF Size: 2.58 MB
Page 5 of 444
Introduction v
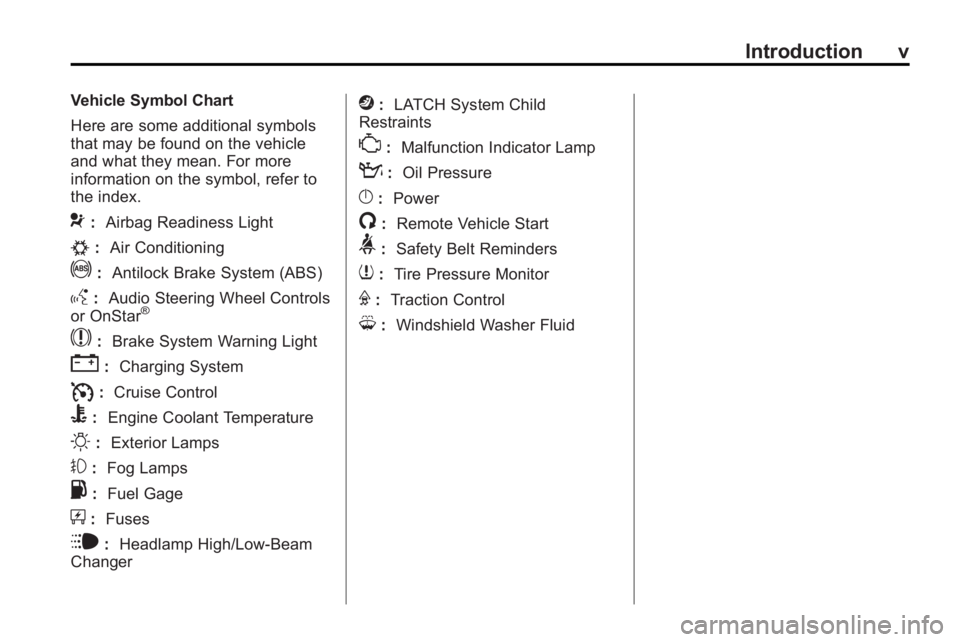
Vehicle Symbol Chart
Here are some additional symbols
that may be found on the vehicle
and what they mean. For more
information on the symbol, refer to
the index.
9:Airbag Readiness Light
#:Air Conditioning
!:Antilock Brake System (ABS)
g:Audio Steering Wheel Controls
or OnStar®
$: Brake System Warning Light
":Charging System
I:Cruise Control
B: Engine Coolant Temperature
O:Exterior Lamps
#:Fog Lamps
.: Fuel Gage
+:Fuses
i: Headlamp High/Low-Beam
Changer
j: LATCH System Child
Restraints
*: Malfunction Indicator Lamp
::Oil Pressure
}:Power
/:Remote Vehicle Start
>:Safety Belt Reminders
7:Tire Pressure Monitor
F:Traction Control
M:Windshield Washer Fluid
Page 119 of 444
Instruments and Controls 5-1
Instruments and
Controls
Controls
Steering Wheel Adjustment . . . 5-2
Steering Wheel Controls . . . . . . 5-3
Horn . . . . . . . . . . . . . . . . . . . . . . . . . . 5-5
Windshield Wiper/Washer . . . . . 5-5
Rear Window Wiper/Washer . . . . . . . . . . . . . . . . . . . . . . 5-6
Compass . . . . . . . . . . . . . . . . . . . . . 5-6
Clock . . . . . . . . . . . . . . . . . . . . . . . . . 5-8
Power Outlets . . . . . . . . . . . . . . . . . 5-8
Warning Lights, Gages, and
Indicators
Warning Lights, Gages, and Indicators . . . . . . . . . . . . . . . . . . 5-10
Instrument Cluster . . . . . . . . . . . 5-11
Speedometer . . . . . . . . . . . . . . . . 5-12 Odometer . . . . . . . . . . . . . . . . . . . . 5-12
Tachometer . . . . . . . . . . . . . . . . . . 5-12
Fuel Gage . . . . . . . . . . . . . . . . . . . 5-12
Engine Coolant
Temperature Gage . . . . . . . . . 5-13
Voltmeter Gage . . . . . . . . . . . . . . 5-13
Safety Belt Reminders . . . . . . . 5-14
Airbag Readiness Light . . . . . . 5-14
Passenger Airbag Status Indicator . . . . . . . . . . . . . . . . . . . . 5-15
Charging System Light . . . . . . 5-16
Malfunction Indicator Lamp . . . . . . . . . . . . . 5-16
Brake System Warning Light . . . . . . . . . . . . . . . . . . . . . . . 5-19
Antilock Brake System (ABS) Warning Light . . . . . . . . . . . . . . 5-19
Tow/Haul Mode Light . . . . . . . . 5-20
StabiliTrak®Indicator Light . . . 5-20
Engine Coolant Temperature Warning Light . . . . . . . . . . . . . . 5-20
Tire Pressure Light . . . . . . . . . . 5-21 Engine Oil Pressure Light . . . . 5-21
Security Light . . . . . . . . . . . . . . . . 5-22
High-Beam on Light . . . . . . . . . 5-22
Fog Lamp Light . . . . . . . . . . . . . . 5-22
Cruise Control Light . . . . . . . . . 5-22
Information Displays
Driver Information Center
(DIC) (With DIC Buttons) . . . 5-23
Driver Information Center (DIC) (Without DIC
Buttons) . . . . . . . . . . . . . . . . . . . . 5-28
Head-Up Display (HUD) . . . . . 5-31
Vehicle Messages
Vehicle Messages . . . . . . . . . . . 5-34
Battery Voltage and Charging Messages . . . . . . . . . . . . . . . . . . 5-35
Brake System Messages . . . . 5-35
Cruise Control Messages . . . . 5-35
Door Ajar Messages . . . . . . . . . 5-35
Engine Cooling System Messages . . . . . . . . . . . . . . . . . . 5-36
Page 140 of 444

5-22 Instruments and Controls
Security Light
This light flashes when the security
system is activated.
For more information, seeAnti-Theft
Alarm System on page 2‑13.
High-Beam on Light
The high-beam on light comes on
when the high-beam headlamps are
in use.
See Headlamp High/Low-Beam
Changer
on page 6‑2for more
information.
Fog Lamp Light
The fog lamp light comes on when
the fog lamps are in use.
The light goes out when the fog
lamps are turned off. See Fog
Lamps
on page 6‑4for more
information.
Cruise Control Light
This light comes on whenever the
cruise control is set.
The light goes out when the cruise
control is turned off. See Cruise
Control
on page 9‑30for more
information.
Page 150 of 444
5-32 Instruments and Controls
The following indicator lights come
on the instrument panel when
activated and also appear on
the HUD:
.Turn Signal Indicators
.High-Beam Indicator Symbol
The HUD temporarily displays
CHECK GAGES and ICE
POSSIBLE when these messages
are on the DIC trip computer.
The HUD also displays the following
messages on vehicles with these
systems, when they are active:
.TRACTION CONTROL ACTIVE
.STABILITRAK ACTIVE
Notice: If you try to use the HUD
image as a parking aid, you may
misjudge the distance and
damage your vehicle. Do not use
the HUD image as a parking aid.
When the HUD is on, the
speedometer reading is continually
displayed. The current radio station
or CD track number will display for a
short period of time after the radio or CD track status changes. This
happens whenever radio information
is changed. The speedometer size
is reduced when radio, CD
information, warnings,
or turn-by-turn navigation
information are displayed on
the HUD.
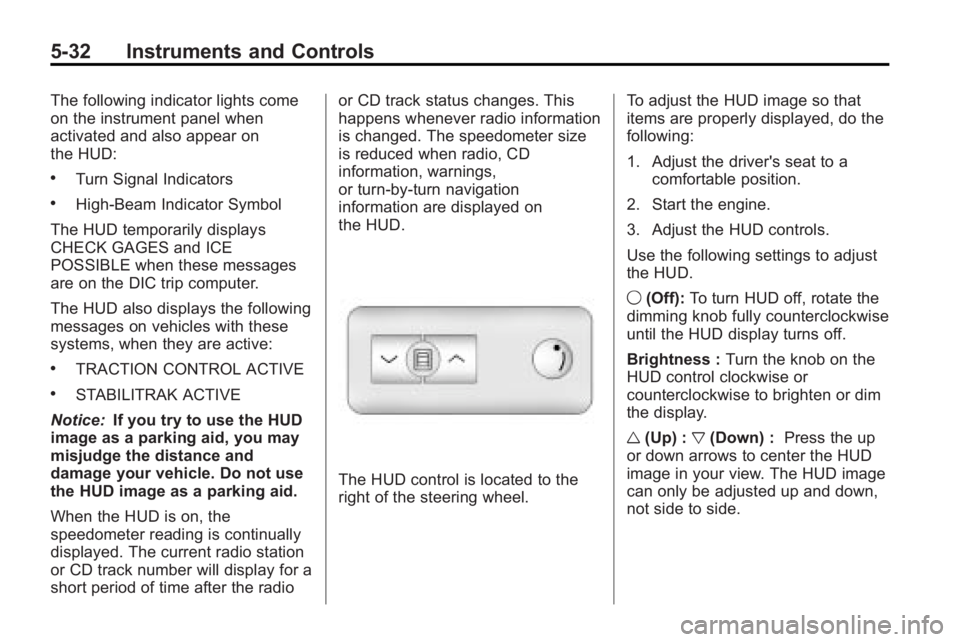
The HUD control is located to the
right of the steering wheel.
To adjust the HUD image so that
items are properly displayed, do the
following:
1. Adjust the driver's seat to a
comfortable position.
2. Start the engine.
3. Adjust the HUD controls.
Use the following settings to adjust
the HUD.
9 (Off): To turn HUD off, rotate the
dimming knob fully counterclockwise
until the HUD display turns off.
Brightness : Turn the knob on the
HUD control clockwise or
counterclockwise to brighten or dim
the display.
w (Up) : x(Down) : Press the up
or down arrows to center the HUD
image in your view. The HUD image
can only be adjusted up and down,
not side to side.
Page 151 of 444
Instruments and Controls 5-33
?(Page) : Press this button to
select the display formats. Release
the page button when the format
number with the desired display is
shown on the HUD.
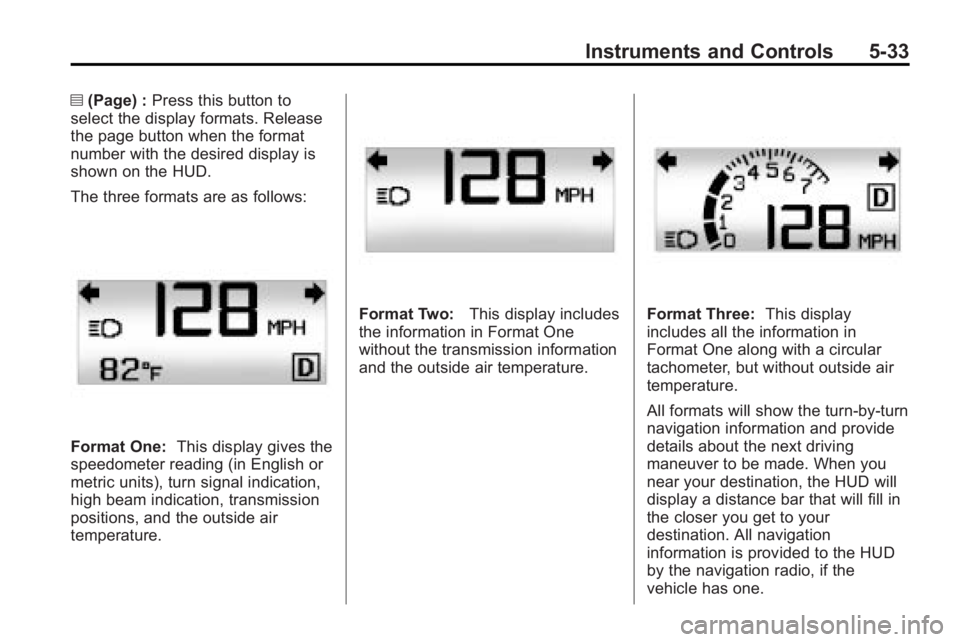
The three formats are as follows:
Format One: This display gives the
speedometer reading (in English or
metric units), turn signal indication,
high beam indication, transmission
positions, and the outside air
temperature.
Format Two: This display includes
the information in Format One
without the transmission information
and the outside air temperature.Format Three: This display
includes all the information in
Format One along with a circular
tachometer, but without outside air
temperature.
All formats will show the turn-by-turn
navigation information and provide
details about the next driving
maneuver to be made. When you
near your destination, the HUD will
display a distance bar that will fill in
the closer you get to your
destination. All navigation
information is provided to the HUD
by the navigation radio, if the
vehicle has one.
Page 175 of 444
Lighting 6-1
Lighting
Exterior Lighting
Exterior Lamp Controls . . . . . . . . 6-1
Headlamp High/Low-BeamChanger . . . . . . . . . . . . . . . . . . . . . 6-2
Flash-to-Pass . . . . . . . . . . . . . . . . . 6-2
Daytime Running Lamps (DRL)/Automatic Headlamp
System . . . . . . . . . . . . . . . . . . . . . . 6-3
Hazard Warning Flashers . . . . . 6-3
Turn and Lane-Change Signals . . . . . . . . . . . . . . . . . . . . . . 6-4
Fog Lamps . . . . . . . . . . . . . . . . . . . . 6-4
Interior Lighting
Instrument Panel Illumination Control . . . . . . . . . . . . . . . . . . . . . . 6-5
Courtesy Lamps . . . . . . . . . . . . . . 6-5
Dome Lamps . . . . . . . . . . . . . . . . . 6-5
Reading Lamps . . . . . . . . . . . . . . . 6-5
Lighting Features
Entry Lighting . . . . . . . . . . . . . . . . . 6-6
Delayed Entry Lighting . . . . . . . . 6-6
Delayed Exit Lighting . . . . . . . . . 6-6
Parade Dimming . . . . . . . . . . . . . . 6-7
Battery Load Management . . . . 6-7
Battery Power Protection . . . . . . 6-8Exterior Lighting
Exterior Lamp Controls
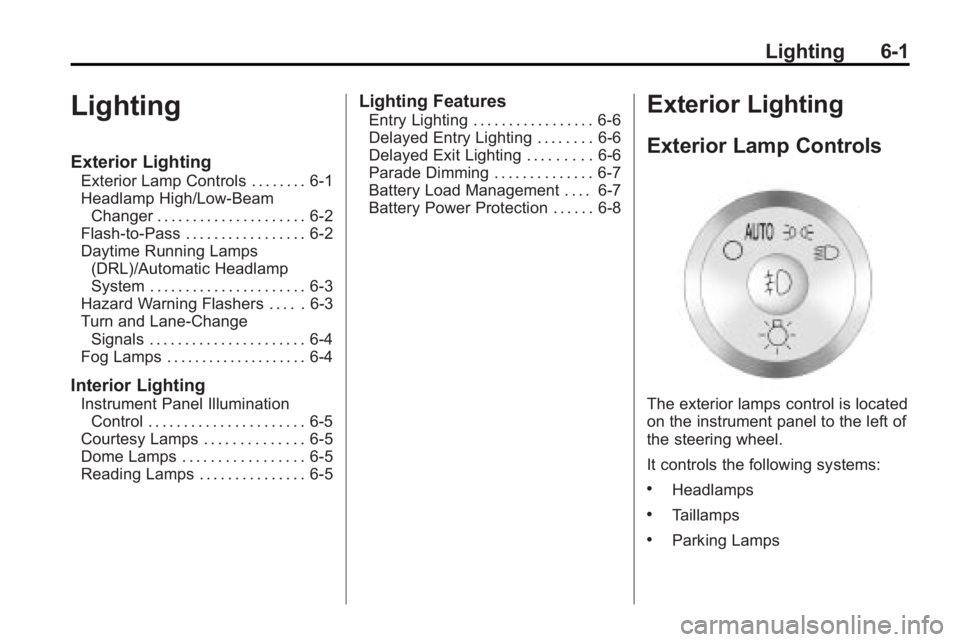
The exterior lamps control is located
on the instrument panel to the left of
the steering wheel.
It controls the following systems:
.Headlamps
.Taillamps
.Parking Lamps
Page 176 of 444
6-2 Lighting
.License Plate Lamps
.Instrument Panel Lights
.Fog Lamps
The exterior lamps control has four
positions:
9(Off): Briefly turn to this position
to turn the automatic light control off
or on again.
AUTO (Automatic): Turns the
headlamps on automatically at
normal brightness, together with the
following:
.Parking Lamps
.Taillamps
.License Plate Lamps
.Instrument Panel Lights
; (Parking Lamps): Turns the
parking lamps on together with the
following:
.Taillamps
.License Plate Lamps
.Instrument Panel Lights 2
(Headlamps): Turns the
headlamps on together with the
following lamps listed below.
A warning chime sounds if the
driver's door is opened when the
ignition switch is off and the
headlamps are on.
.Parking Lamps
.Taillamps
.License Plate Lamps
.Instrument Panel Lights
# (Fog Lamps): Push the fog
lamps control in to turn on the fog
lamps.
See Fog Lamps on page 6‑4.
Headlamp High/
Low-Beam Changer
2 3
Headlamp High/Low Beam
Changer: Push the turn signal/lane
change lever away from you to turn
the high beams on.
Pull the lever towards you to return
to low beams.
This indicator light turns on in the
instrument panel cluster when the
high beam headlamps are on.
Flash-to-Pass
This feature is used to signal to the
vehicle ahead that you want
to pass.
If the headlamps are off or in the
low-beam position, pull the turn
signal lever toward you to
momentarily switch to high-beams.
Release the lever to turn the
high-beam headlamps off.
Page 177 of 444
Lighting 6-3
Daytime Running Lamps
(DRL)/Automatic
Headlamp System
Daytime Running Lamps (DRL) can
make it easier for others to see the
front of your vehicle during the day.
Fully functional daytime running
lamps are required on all vehicles
first sold in Canada.
The DRL system makes either the
low-beam headlamps come on at a
reduced brightness or the DRL
lights, for vehicles with High
Intensity Discharge (HID)
headlamps when the following
conditions are met:
.The ignition is in the ON/RUN
position.
.The exterior lamps control is
in AUTO.
.The engine is running.When the DRL are on, the regular
headlamps, taillamps, sidemarker,
and other lamps will not be on. The
instrument panel and cluster will
also not be lit.
For vehicles with HID headlamps,
if the DRL are on and the left or
right turn signal lamp is turned on,
the left or right DRL will go off.
The headlamps automatically
change from DRL to the regular
headlamps depending on the
darkness of the surroundings. The
other lamps that come on with the
headlamps will also come on.
When it is bright enough outside,
the headlamps will go off and the
DRL will come on.
The regular headlamp system
should be turned on when needed.
Do not cover the light sensor on top
of the instrument panel because it
works with the DRL.
Hazard Warning Flashers
|
Hazard Warning Flasher:
Press this button located on the
instrument panel below the audio
system, to make the front and rear
turn signal lamps flash on and off.
This warns others that you are
having trouble. Press again to turn
the flashers off.
The turn signals do not work while
the hazard warning flashers are on.
Page 178 of 444

6-4 Lighting
Turn and Lane-Change
Signals
An arrow on the instrument panel
cluster flashes in the direction of the
turn or lane change.
Move the lever all the way up or
down to signal a turn.Raise or lower the lever until the
arrow starts to flash to signal a lane
change. Hold it there until the lane
change is completed. If the lever is
briefly pressed and released, the
turn signal flashes three times.
The lever returns to its starting
position whenever it is released.
If after signaling a turn or lane
change the arrow flashes rapidly or
does not come on, a signal bulb
might be burned out.
Have the bulbs replaced. If the bulb
is not burned out, check the fuse.
See
Fuses and Circuit Breakerson
page 10‑31.
Turn Signal On Chime
If either one of the turn signals are
left on and the vehicle has been
driven more than 3/4 mile (1.2 km), a
chime will sound.
Fog Lamps
Use the fog lamps for better vision
in foggy or misty conditions.
The fog lamps button is on the
exterior lamps control to the left of
the steering column.
#(Fog Lamps): Press the exterior
lamps button to turn the fog lamps
on or off. A light comes on in the
instrument panel cluster when the
fog lamps are in use. The ignition
must be on for the fog lamps
to work.
When the headlamps are changed
to high-beam, the fog lamps turn off.
The fog lamps come back on again
when the high-beam headlamps are
turned off.
Some localities have laws that
require the headlamps to be on
along with the fog lamps.
Page 181 of 444
Lighting 6-7
Parade Dimming
This feature automatically prohibits
the dimming of the instrument panel
displays in daylight while the
headlamps are on so that the
displays are still able to be seen.
Battery Load
Management
The vehicle has Electric Power
Management (EPM) that estimates
the battery's temperature and state
of charge. It then adjusts the voltage
for best performance and extended
life of the battery.
When the battery's state of charge
is low, the voltage is raised slightly
to quickly bring the charge back up.
When the state of charge is high,
the voltage is lowered slightly to
prevent overcharging. If the vehicle
has a voltmeter gage or a voltage
display on the Driver Information
Center (DIC), you may see thevoltage move up or down. This is
normal. If there is a problem, an
alert will be displayed.
The battery can be discharged at
idle if the electrical loads are very
high. This is true for all vehicles.
This is because the generator
(alternator) may not be spinning fast
enough at idle to produce all the
power that is needed for very high
electrical loads.
A high electrical load occurs when
several of the following are on, such
as: headlamps, high beams, fog
lamps, rear window defogger,
climate control fan at high speed,
heated seats, engine cooling fans,
trailer loads, and loads plugged into
accessory power outlets.
EPM works to prevent excessive
discharge of the battery. It does this
by balancing the generator's output
and the vehicle's electrical needs.
It can increase engine idle speed to
generate more power, wheneverneeded. It can temporarily reduce
the power demands of some
accessories.
Normally, these actions occur in
steps or levels, without being
noticeable. In rare cases at the
highest levels of corrective action,
this action may be noticeable to the
driver. If so, a Driver Information
Center (DIC) message might be
displayed, such as BATTERY
SAVER ACTIVE, BATTERY
VOLTAGE LOW, or LOW BATTERY.
If one of these messages displays, it
is recommended that the driver
reduce the electrical loads as much
as possible. See
Driver Information
Center (DIC) (With DIC Buttons)
on
page 5‑23or Driver Information
Center (DIC) (Without DIC Buttons)
on page 5‑28.