steering GMC ACADIA 2010 Owner's Manual
[x] Cancel search | Manufacturer: GMC, Model Year: 2010, Model line: ACADIA, Model: GMC ACADIA 2010Pages: 444, PDF Size: 2.58 MB
Page 5 of 444
Introduction v
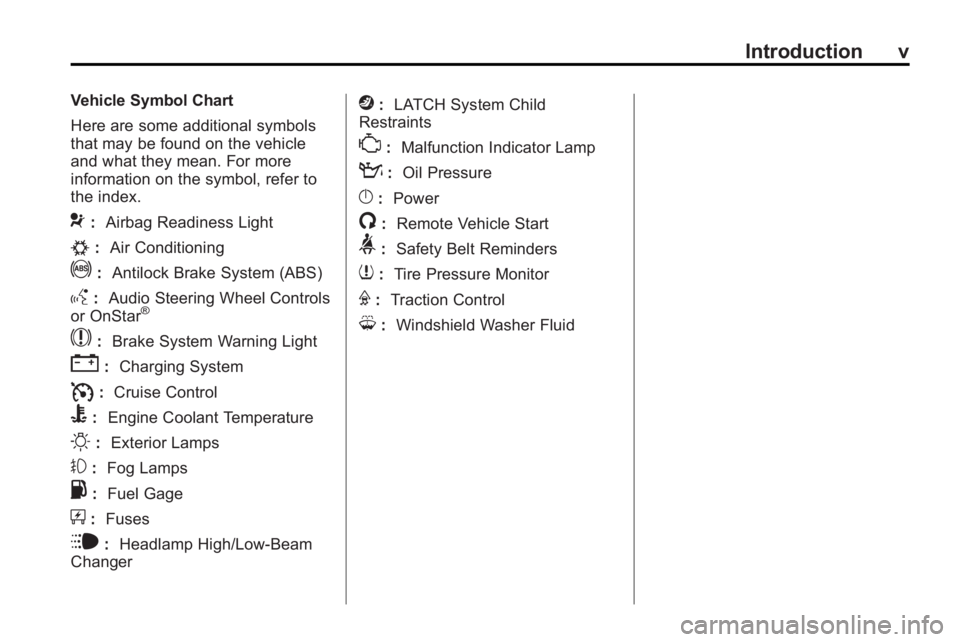
Vehicle Symbol Chart
Here are some additional symbols
that may be found on the vehicle
and what they mean. For more
information on the symbol, refer to
the index.
9:Airbag Readiness Light
#:Air Conditioning
!:Antilock Brake System (ABS)
g:Audio Steering Wheel Controls
or OnStar®
$: Brake System Warning Light
":Charging System
I:Cruise Control
B: Engine Coolant Temperature
O:Exterior Lamps
#:Fog Lamps
.: Fuel Gage
+:Fuses
i: Headlamp High/Low-Beam
Changer
j: LATCH System Child
Restraints
*: Malfunction Indicator Lamp
::Oil Pressure
}:Power
/:Remote Vehicle Start
>:Safety Belt Reminders
7:Tire Pressure Monitor
F:Traction Control
M:Windshield Washer Fluid
Page 7 of 444
In Brief 1-1
In Brief
Instrument Panel
Instrument Panel . . . . . . . . . . . . . . 1-2
Initial Drive Information
Initial Drive Information . . . . . . . . 1-4
Remote Keyless Entry (RKE)System . . . . . . . . . . . . . . . . . . . . . . 1-4
Remote Vehicle Start . . . . . . . . . 1-4
Door Locks . . . . . . . . . . . . . . . . . . . 1-5
Liftgate . . . . . . . . . . . . . . . . . . . . . . . . 1-5
Windows . . . . . . . . . . . . . . . . . . . . . . 1-6
Seat Adjustment . . . . . . . . . . . . . . 1-6
Second Row Seats . . . . . . . . . . . 1-7
Third Row Seats . . . . . . . . . . . . . . 1-7
Heated Seats . . . . . . . . . . . . . . . . . 1-8
Heated and Ventilated Seats . . . . . . . . . . . . . . . . . . . . . . . . 1-8
Head Restraint Adjustment . . . . 1-8
Safety Belt . . . . . . . . . . . . . . . . . . . . 1-8
Sensing System for Passenger Airbag . . . . . . . . . . . . . . . . . . . . . . . 1-9
Mirror Adjustment . . . . . . . . . . . . . 1-9
Steering Wheel Adjustment . . . . . . . . . . . . . . . . . 1-10
Interior Lighting . . . . . . . . . . . . . . 1-10 Exterior Lighting . . . . . . . . . . . . . 1-11
Windshield Wiper/Washer . . . . 1-11
Climate Controls . . . . . . . . . . . . . 1-12
Vehicle Features
Radio(s) . . . . . . . . . . . . . . . . . . . . . 1-14
Satellite Radio . . . . . . . . . . . . . . . 1-15
Portable Audio Devices . . . . . . 1-15
Bluetooth
®. . . . . . . . . . . . . . . . . . . 1-15
Steering Wheel Controls . . . . . 1-16
Navigation System . . . . . . . . . . . 1-16
Cruise Control . . . . . . . . . . . . . . . 1-17
Storage Compartments . . . . . . 1-17
Power Outlets . . . . . . . . . . . . . . . 1-18
Sunroof . . . . . . . . . . . . . . . . . . . . . . 1-18
Performance and Maintenance
StabiliTrak®. . . . . . . . . . . . . . . . . . 1-18
Tire Pressure Monitor . . . . . . . . 1-19
Tire Sealant and Compressor Kit . . . . . . . . . . . . . 1-19
Engine Oil Life System . . . . . . 1-19
Driving for Better Fuel Economy . . . . . . . . . . . . . . . . . . . 1-20
Roadside Assistance Program . . . . . . . . . . . . . . . . . . . . 1-20
OnStar
®. . . . . . . . . . . . . . . . . . . . . 1-21
Page 9 of 444
In Brief 1-3
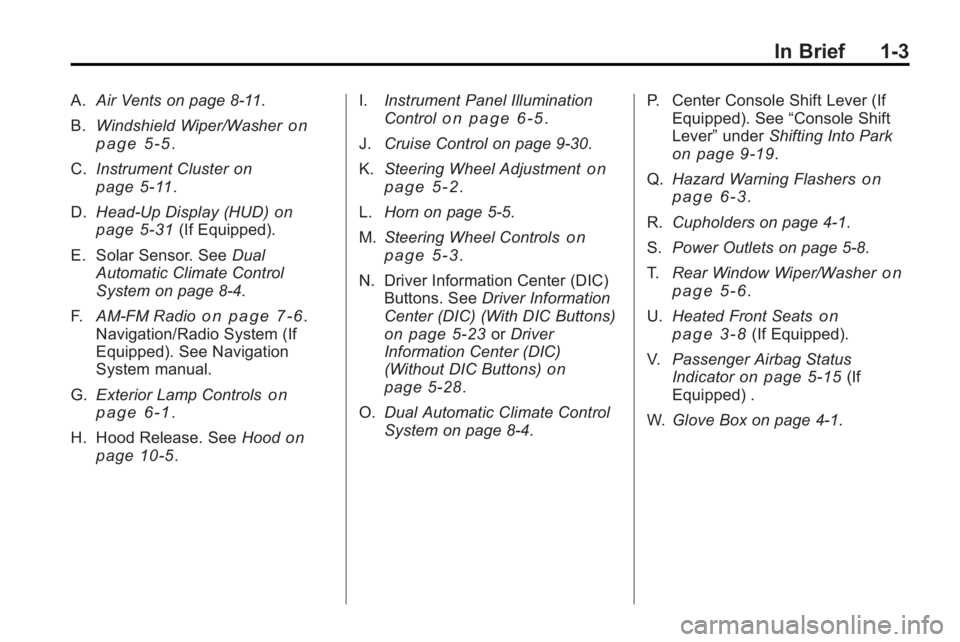
A.Air Vents on page 8‑11.
B. Windshield Wiper/Washer
on
page 5‑5.
C. Instrument Cluster
on
page 5‑11.
D. Head-Up Display (HUD)
on
page 5‑31(If Equipped).
E. Solar Sensor. See Dual
Automatic Climate Control
System on page 8‑4.
F. AM-FM Radio
on page 7‑6.
Navigation/Radio System (If
Equipped). See Navigation
System manual.
G. Exterior Lamp Controls
on
page 6‑1.
H. Hood Release. See Hood
on
page 10‑5. I.
Instrument Panel Illumination
Control
on page 6‑5.
J. Cruise Control on page 9‑30.
K. Steering Wheel Adjustment
on
page 5‑2.
L. Horn on page 5‑5.
M. Steering Wheel Controls
on
page 5‑3.
N. Driver Information Center (DIC) Buttons. See Driver Information
Center (DIC) (With DIC Buttons)
on page 5‑23or Driver
Information Center (DIC)
(Without DIC Buttons)
on
page 5‑28.
O. Dual Automatic Climate Control
System on page 8‑4. P. Center Console Shift Lever (If
Equipped). See “Console Shift
Lever” underShifting Into Park
on page 9‑19.
Q. Hazard Warning Flashers
on
page 6‑3.
R. Cupholders on page 4‑1.
S. Power Outlets on page 5‑8.
T. Rear Window Wiper/Washer
on
page 5‑6.
U. Heated Front Seats
on
page 3‑8(If Equipped).
V. Passenger Airbag Status
Indicator
on page 5‑15(If
Equipped) .
W. Glove Box on page 4‑1.
Page 16 of 444
1-10 In Brief
Interior Mirror
If equipped, a manual inside
rearview mirror can be adjusted so
that the driver can see behind the
vehicle more clearly. Hold the mirror
in the center to move it up or down
and side to side. Use the day/night
adjustment to help prevent glare
from the headlamps behind you.
Move the lever located at the base
of the mirror, to the right for
nighttime use and to the left for
daytime use.
For vehicles with an automatic
dimming rearview mirror, the mirror
will move automatically to reduce
the glare from the headlamps of the
vehicle behind. The dimming feature
comes on and the indicator light
illuminates each time the ignition is
turned to start.
SeeAutomatic Dimming Rearview
Mirror on page 2‑18.
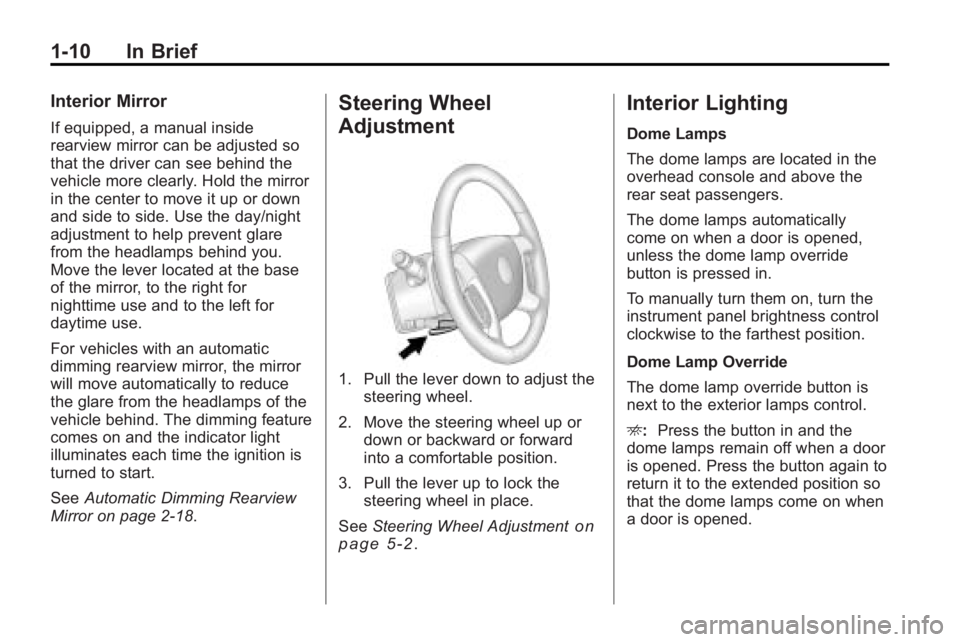
Steering Wheel
Adjustment
1. Pull the lever down to adjust the steering wheel.
2. Move the steering wheel up or down or backward or forward
into a comfortable position.
3. Pull the lever up to lock the steering wheel in place.
See Steering Wheel Adjustment
on
page 5‑2.
Interior Lighting
Dome Lamps
The dome lamps are located in the
overhead console and above the
rear seat passengers.
The dome lamps automatically
come on when a door is opened,
unless the dome lamp override
button is pressed in.
To manually turn them on, turn the
instrument panel brightness control
clockwise to the farthest position.
Dome Lamp Override
The dome lamp override button is
next to the exterior lamps control.
E: Press the button in and the
dome lamps remain off when a door
is opened. Press the button again to
return it to the extended position so
that the dome lamps come on when
a door is opened.
Page 17 of 444
In Brief 1-11
Reading Lamps
Press the button near each lamp to
turn them on or off.
For more information, see:
.Dome Lamps on page 6‑5.
.Instrument Panel Illumination
Control on page 6‑5.
Exterior Lighting
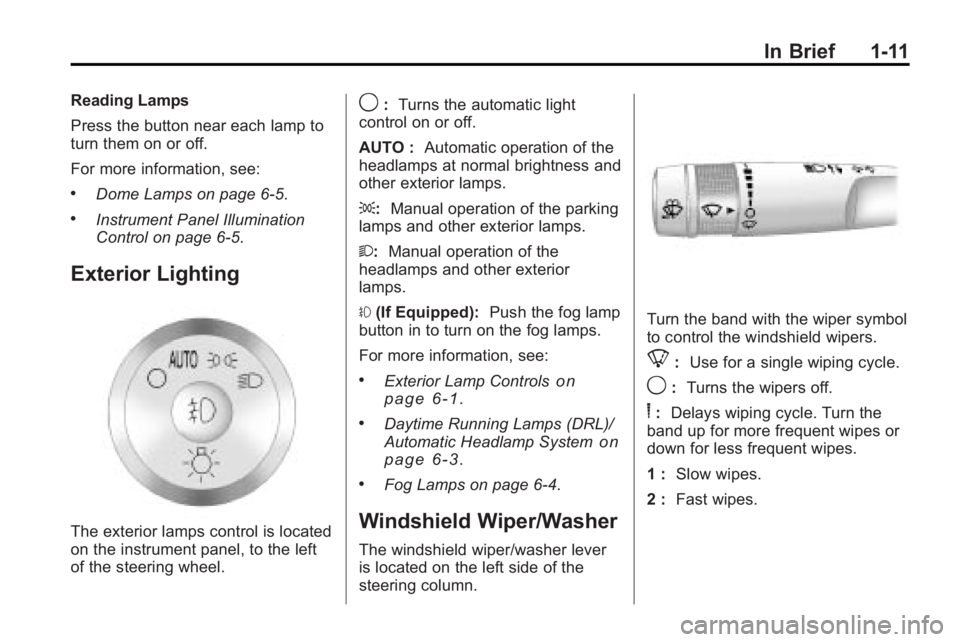
The exterior lamps control is located
on the instrument panel, to the left
of the steering wheel.
9:Turns the automatic light
control on or off.
AUTO : Automatic operation of the
headlamps at normal brightness and
other exterior lamps.
;: Manual operation of the parking
lamps and other exterior lamps.
2: Manual operation of the
headlamps and other exterior
lamps.
# (If Equipped): Push the fog lamp
button in to turn on the fog lamps.
For more information, see:
.Exterior Lamp Controlson
page 6‑1.
.Daytime Running Lamps (DRL)/
Automatic Headlamp Systemon
page 6‑3.
.Fog Lamps on page 6‑4.
Windshield Wiper/Washer
The windshield wiper/washer lever
is located on the left side of the
steering column.
Turn the band with the wiper symbol
to control the windshield wipers.
8: Use for a single wiping cycle.
9:Turns the wipers off.
6:Delays wiping cycle. Turn the
band up for more frequent wipes or
down for less frequent wipes.
1 : Slow wipes.
2 : Fast wipes.
Page 22 of 444
1-16 In Brief
The Bluetooth-enabled cell phone
must be paired with the in-vehicle
Bluetooth system before it can be
used in the vehicle. Not all phones
will support all functions.
SeeBluetooth on page 7‑46.
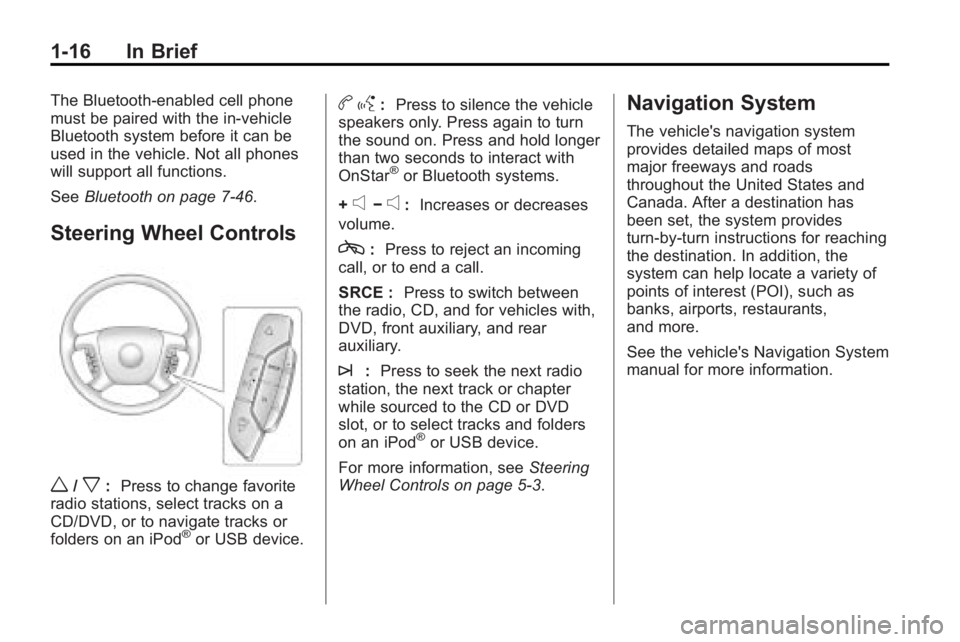
Steering Wheel Controls
w/x:Press to change favorite
radio stations, select tracks on a
CD/DVD, or to navigate tracks or
folders on an iPod
®or USB device.
b g: Press to silence the vehicle
speakers only. Press again to turn
the sound on. Press and hold longer
than two seconds to interact with
OnStar
®or Bluetooth systems.
+
e−e: Increases or decreases
volume.
c: Press to reject an incoming
call, or to end a call.
SRCE : Press to switch between
the radio, CD, and for vehicles with,
DVD, front auxiliary, and rear
auxiliary.
¨: Press to seek the next radio
station, the next track or chapter
while sourced to the CD or DVD
slot, or to select tracks and folders
on an iPod
®or USB device.
For more information, see Steering
Wheel Controls on page 5‑3.
Navigation System
The vehicle's navigation system
provides detailed maps of most
major freeways and roads
throughout the United States and
Canada. After a destination has
been set, the system provides
turn-by-turn instructions for reaching
the destination. In addition, the
system can help locate a variety of
points of interest (POI), such as
banks, airports, restaurants,
and more.
See the vehicle's Navigation System
manual for more information.
Page 28 of 444
1-22 In Brief
service is needed, and technology
that is compatible with the OnStar
service. Not all services are
available everywhere, particularly in
remote or enclosed areas, or at all
times.
The OnStar system can record and
transmit vehicle information. This
information is automatically sent to
an OnStar call center when
Qis
pressed,
]is pressed, or if the
airbags or ACR system deploy. This
information usually includes the
vehicle's GPS location and, in the
event of a crash, additional
information regarding the crash that
the vehicle was involved in (e.g. the
direction from which the vehicle was
hit). When the virtual advisor feature
of OnStar hands-free calling is
used, the vehicle also sends OnStar
the vehicle's GPS location so they
can provide services where it is
located. Location information about the
vehicle is only available if the GPS
satellite signals are unobstructed
and available.
The vehicle must have a working
electrical system, including
adequate battery power, for the
OnStar equipment to operate. There
are other problems OnStar cannot
control that may prevent OnStar
from providing OnStar service at
any particular time or place. Some
examples are damage to important
parts of the vehicle in a crash, hills,
tall buildings, tunnels, weather or
wireless phone network congestion.
OnStar Steering Wheel
Controls
This vehicle may have a Talk/Mute
button that can be used to interact
with OnStar hands-free calling. See
Steering Wheel Controls
on
page 5‑3for more information. On some vehicles, the mute button
can be used to dial numbers into
voice mail systems, or to dial phone
extensions. See the OnStar Owner's
Guide for more information.
Your Responsibility
Increase the volume of the radio if
the OnStar advisor cannot be heard.
If the light next to the OnStar
buttons is red, the system may not
be functioning properly. Press
Q
and request a vehicle diagnostic.
If the light appears clear (no light
is appearing), your OnStar
subscription has expired and all
services have been deactivated.
Press
Qto confirm that the OnStar
equipment is active.
Page 80 of 444
3-30 Seats and Restraints
Airbag System
The vehicle has the following
airbags:
.A frontal airbag for the driver.
.A frontal airbag for the right front
passenger.
.A seat-mounted side impact
airbag for the driver.
.A seat-mounted side impact
airbag for the right front
passenger.
.A roof-rail airbag for the driver,
passenger seated directly
behind the driver, and the third
row outboard passenger
position.
.A roof-rail airbag for the right
front passenger, passenger
seated directly behind the right
front passenger, and the third
row outboard passenger
position.All of the airbags in the vehicle will
have the word AIRBAG embossed
in the trim or on an attached label
near the deployment opening.
For frontal airbags, the word
AIRBAG will appear on the middle
part of the steering wheel for the
driver and on the instrument panel
for the right front passenger.
With seat-mounted side impact
airbags, the word AIRBAG will
appear on the side of the seatback
closest to the door.
With roof-rail airbags, the word
AIRBAG will appear along the
headliner or trim.
Airbags are designed to supplement
the protection provided by safety
belts. Even though today's airbags
are also designed to help reduce
the risk of injury from the force of an
inflating bag, all airbags must inflate
very quickly to do their job.
Here are the most important things
to know about the airbag system:
{WARNING
You can be severely injured or
killed in a crash if you are not
wearing your safety belt
—even if
you have airbags. Airbags are
designed to work with safety
belts, but do not replace them.
Also, airbags are not designed to
deploy in every crash. In some
crashes safety belts are your only
restraint. See When Should an
Airbag Inflate? on page 3‑33.
Wearing your safety belt during a
crash helps reduce your chance
of hitting things inside the vehicle
or being ejected from it. Airbags
are “supplemental restraints” to
the safety belts. Everyone in your
vehicle should wear a safety belt
properly —whether or not there is
an airbag for that person.
Page 82 of 444
3-32 Seats and Restraints
Where Are the Airbags?
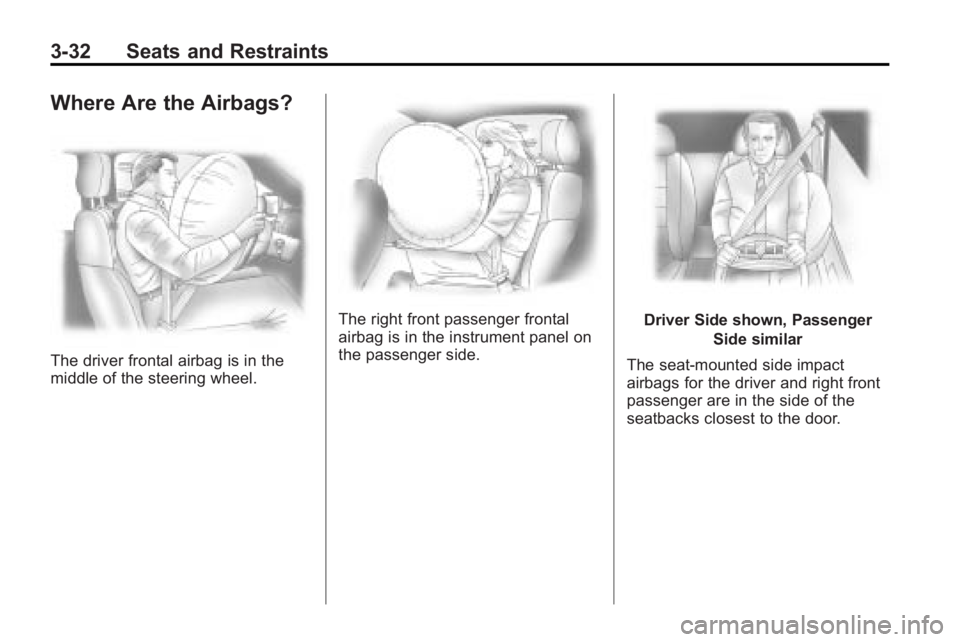
The driver frontal airbag is in the
middle of the steering wheel.
The right front passenger frontal
airbag is in the instrument panel on
the passenger side.Driver Side shown, PassengerSide similar
The seat-mounted side impact
airbags for the driver and right front
passenger are in the side of the
seatbacks closest to the door.
Page 83 of 444
Seats and Restraints 3-33
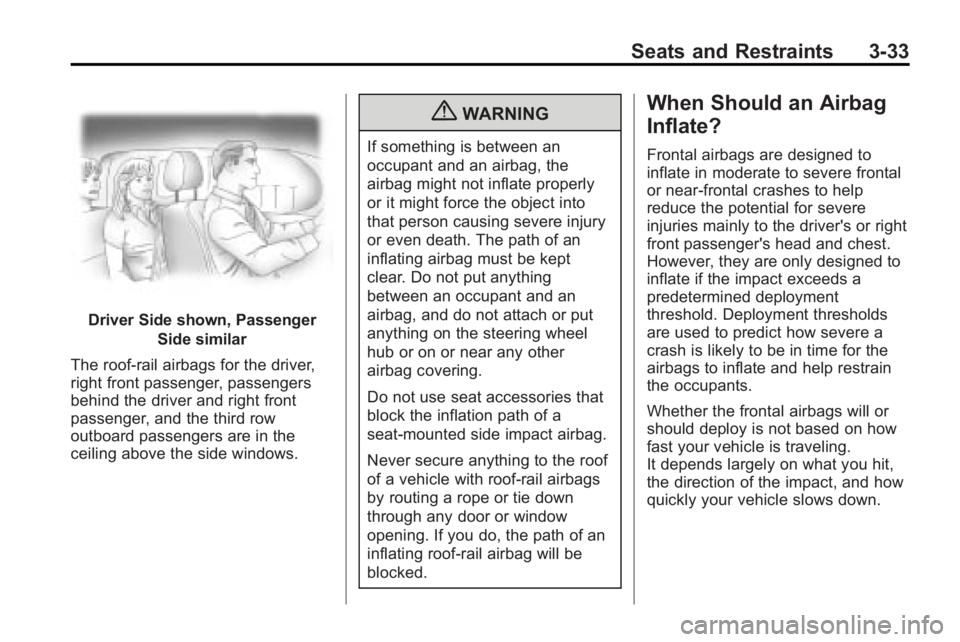
Driver Side shown, PassengerSide similar
The roof-rail airbags for the driver,
right front passenger, passengers
behind the driver and right front
passenger, and the third row
outboard passengers are in the
ceiling above the side windows.
{WARNING
If something is between an
occupant and an airbag, the
airbag might not inflate properly
or it might force the object into
that person causing severe injury
or even death. The path of an
inflating airbag must be kept
clear. Do not put anything
between an occupant and an
airbag, and do not attach or put
anything on the steering wheel
hub or on or near any other
airbag covering.
Do not use seat accessories that
block the inflation path of a
seat-mounted side impact airbag.
Never secure anything to the roof
of a vehicle with roof-rail airbags
by routing a rope or tie down
through any door or window
opening. If you do, the path of an
inflating roof-rail airbag will be
blocked.
When Should an Airbag
Inflate?
Frontal airbags are designed to
inflate in moderate to severe frontal
or near-frontal crashes to help
reduce the potential for severe
injuries mainly to the driver's or right
front passenger's head and chest.
However, they are only designed to
inflate if the impact exceeds a
predetermined deployment
threshold. Deployment thresholds
are used to predict how severe a
crash is likely to be in time for the
airbags to inflate and help restrain
the occupants.
Whether the frontal airbags will or
should deploy is not based on how
fast your vehicle is traveling.
It depends largely on what you hit,
the direction of the impact, and how
quickly your vehicle slows down.